NEXIQ Technologies Brake-Link Wabash National User manual

NEXIQ Brake-Link™
Wabash National®
ABS Application
Operator’s Manual

NEXIQ Brake-Link™ Wabash National® ABS Application
IDSC Holdings LLC retains all ownership rights to Wabash National® Trailer Application and its documentation.
The Wabash National® Trailer Application source code is a confidential trade secret of IDSC Holdings LLC. You
may not decipher or de-compile Wabash National® Trailer Application, develop source code for Wabash National®
Trailer Application, or knowingly allow others to do so. Wabash National® Trailer Application and its documentation
may not be sublicensed or transferred without the prior written consent of IDSC Holdings LLC.
This manual, as w ell as t he so ftware it describes, is furnished und er l icense a nd m ay on ly be us ed or copied i n
accordance with t he t erms of su ch license. Th e c ontent of this m anual i s furnished f or i nformational use on ly, is
subject to change without notice, and should not be construed as a commitment by IDSC Holdings LLC. IDSC
Holdings LLC assumes no responsibility or liability for any errors or inaccuracies that may appear in this book.
Except as permitted by such license, no part of this publication may be reproduced, or transmitted, in any form or by
any means, electronic, mechanical, or otherwise, without the prior written permission of IDSC Holdings LLC.
Wabash National®, MBS-1®P, and MBS-2® are registered trademarks of Wabash Technologies Corp., All Rights
Reserved. www.wasbashnational.com
NEXIQ™ is a trademark of NEXIQ Technologies.
2002−2009 IDSC Holdings LLC. All Rights Reserved.
www.nexiq.com
Part No. 192049WN Revised 01/06/2009

NEXIQ Brake-Link™ Wabash National
®
ABS Application i
Getting Started..................................................... 1
Getting Started .............................................................................. 2
Safety Warnings & Cautions................................................................. 3
Using this Manual.......................................................................... 4
Specialized Text ................................................................................... 4
Manual Icons ........................................................................................ 5
Connecting Components............................................................... 5
Navigating Wabash National® ABS Application ............................ 8
Home Button......................................................................................... 8
Enter Button.......................................................................................... 8
Menu Buttons........................................................................................ 9
Direct Access Buttons......................................................................... 10
COMM Buttons.................................................................................. 10
MODE, AXLE & SIDE Buttons .......................................................... 10
COMPONENT Buttons...................................................................... 11
Other Buttons .................................................................................... 11
Light Emitting Diodes (LEDs).............................................................. 12

ii NEXIQ Brake-Link™ Wabash National
®
ABS Application
Using Wabash National®ABS Application.............. 13
Registering ECU & Selecting Navigation Method ....................... 14
Using the Wabash National® ABS Application............................ 16
ECU Information................................................................................. 16
Faults.................................................................................................. 17
Viewing Current Faults.................................................................... 18
Viewing Stored Faults ..................................................................... 19
Clearing Stored Faults .................................................................... 20
Data List ............................................................................................. 22
Tests................................................................................................... 23
Testing ABS Warning Lamp............................................................ 24
Testing Backup Lamp ..................................................................... 24
Testing Trailer Warning Lamp......................................................... 25
Testing Sensor Sequence............................................................... 26
Wabash National®SID/FMI Table......................... 29
Wabash National® SID/FMI Descriptions .................................... 30
Trailer Warning Faults (Proprietary Fault Codes)........................ 32

NEXIQ Brake-Link™ Wabash National
®
ABS Application 1
1
Getting Started
u
Getting Started, page 2
u
Safety Warnings & Cautions, page 3
u
Using this Manual, page 4
u
Connecting Components, page 5
u
Navigating Wabash National® ABS Application, page 8
Brake-Link™ is a hand-held diagnostic tool primarily designed to troubleshoot heavy-
duty vehicle anti-lock braking systems (ABS). It also provides a variety of utilities and con-
figuration options. As such, the documentation includes a set of task-oriented operator’s
manuals;
this manual
details the Wabash National®ABS Application used to diagnose
MBS-1®P and MBS-2® Trailer brake systems.

2NEXIQBrake-Link™WabashNational
®
ABS Application
Chapter 1• Getting Started
Getting Started
NEXIQ Brake-Link™ is a multi-faceted, hand-held, brake system diagnostic
tool that offers a variety of utilities, diagnostic applications and configuration
options.
Component connection procedures and navigation vary depending on the
utility or application you’re using. Since this manual details the NEXIQ
Brake-Link™
Wabash National® ABS Application, the connection and naviga-
tion sections are specific to the Wabash National® ABS Application.
Refer to the:
Introducing Brake-Link™Operator’s Manual
for:
—a list of safety warnings and cautions
—an overview of the documentation
—a formal introduction to Brake-Link™
—
general
connection instructions
—
general
navigation information
—GENERIC PLC TEST and RP1210A PC LINK option details
—warranty and service information
Figure 1.1
NEXIQ
Brake-Link™

Getting Started
NEXIQ Brake-Link™ Wabash National
®
ABS Application 3
The manufacturer-specific application
Brake-Link™
manual for the con-
troller you’re testing.
Safety Warnings & Cautions
To protect yourself from injury and the test vehicle from damage:
✔Always wear approved eye protection.
✔Always refer to and follow the vehicle manufacturer’s WARNINGS, CAU-
TIONS and service procedures.
✔Exhaust gas contains deadly poison. Always test outdoors
or
use prop-
erly vented exhaust hose.
✔Keep yourself and your test equipment clear of all moving or hot engine
parts.
✔Unless otherwise noted, set the parking brake and place the gear selec-
tor in the NEUTRAL or PARK position. If the vehicle has an automatic
parking brake release, temporarily disconnect the release mechanism.
Also, block the drive wheels before performing a test with the engine
running.
✔Unless otherwise directed, turn the ignition switch OFF before discon-
necting or connecting any electrical components.
✔Read and understand this manual before operating your NEXIQ
Brake-Link™.
✔NEXIQ Technologies recommends having an assistant drive the vehicle
while you use the NEXIQ Brake-Link™ to perform vehicle road testing.
✔Never leave the vehicle unattended while testing.
Certain Electro-Static Discharge (ESD) and/or Electrical Fast Transient
(EFT) events may lock up the NEXIQ Brake-Link™. Disconnect the NEXIQ
Brake-Link™ from the power source and re-connect to regain full
operation.

4NEXIQBrake-Link™WabashNational
®
ABS Application
Chapter 1• Getting Started
Using this Manual
This manual contains comprehensive information to teach you how to use the
Wabash National® ABS Application. It also provides the following features to
support quick reference once you’re familiar with the application.
•A detailed
Table of Contents
to help you find exactly what you’re looking
for quickly and easily
•
All-inclusive discussions
to minimize referencing other sections
•
Comprehensive illustrations
to help you visualize concepts
•
Troubleshooting Tips
to help you solve or avoid common issues
Additionally, each chapter begins with an “at-a-glance” list of the chapter’s con-
tents, along with corresponding page numbers.
Specialized Text
This manual features the following specially formatted text to help you differ-
entiate software elements presented by Brake-Link™.
•Menu items: Whenever the manual instructs you to select from a list of
menu items, it presents the desired choice with the formatting you see
here, e.g., “From the main menu, select WABASH NATIONAL ABS.” If
a task requires multiple menu selections, a “4” appears between each
menu selection, e.g., “Select TESTS 4 ABS WARNING LAMP...”
•Screen titles: Once you select a menu item, Brake-Link™ presents the
selected item’s screen. A screen may display information or present an-
other list of menu items. The screen title appears in bolded type, e.g.,
“From the Tests menu, select ABS WARNING LAMP.”
•Field/Line: The manual presents a field or line of text from the display
with this formatting. For instance, “The ABS WARN LAMP line updates
to reflect the lamp’s current status.”
•
Emphasis
: This format draws your attention to particularly important
information.

Connecting Components
NEXIQ Brake-Link™ Wabash National
®
ABS Application 5
Manual Icons
This manual uses icons to denote specific types of peripheral information.
Connecting Components
Brake-Link™ interfaces with the vehicle’s ECU(s) via:
•the 6-pin or 9-pin Deutsch connector,
typically
located under the dash,
beside the driver’s seat or near the trailer’s brake ECU;
or
•the J560 power line connector on the outside of the tractor or trailer.
The brake controllers
supported by this application
transmit information over
the vehicle’s power lines. If the trailer is connected to the tractor, attach
Brake-Link™ to the tractor’s Deutsch connector; otherwise, attach to the trail-
er’s power line with the J560 PLC Cable Set.
Troubleshooting Tips to help you diagnose or anticipate potential issues.
Caution Tips to help you avoid injury or prevent damage.
?Frequently asked questions, industry definitions and other relevant back-
ground information.

6NEXIQBrake-Link™WabashNational
®
ABS Application
Chapter 1• Getting Started
Figure 1.2 shows how to connect NEXIQ Brake-Link™ components for ABS
diagnostics.
Use the J560 PLC Cable Set in place of the Deutsch adapter if you’re connect-
ing to the trailer’s Power Line.
To connect Brake-Link™ components and power-up:
1Attach the Power/Data Cable DB15 Connector to the data port (labelled
To Vehicle) on the Brake-Link™; tighten the thumbscrews.
Figure 1.2
Connectivity diagram for ABS diagnostics.
Figure 1.3
J560 PLC Cable Set
Power/
Data Cable
6 or 9-pin Deutsch
Note: Where
applicable,
substitute with
J560 PLC Cable
Set (Figure 1.3)
Quick
Disconnect

Connecting Components
NEXIQ Brake-Link™ Wabash National
®
ABS Application 7
2Plug the Data Cable Atari End into the Atari End on the vehicle interface
cable (i.e. Deutsch adapter or J560 PLC Cable Set).
3Attach the vehicle interface cable to the vehicle.
—If you’re using the J560 PLC Cable Set, plug into the power line con-
nector on the outside of the trailer.
—If you’re using the Deutsch Adapter, plug into the Deutsch connector
typically located under the dash on the driver’s side, beside the
driver’s seat.
Note: If the trailer is connected to the tractor, you can attach
Brake-Link™ to the tractor or trailer Deutsch connectors.
4If you’re using the J560 PLC Cable Set, connect the alligator clips to an
external power supply; otherwise, turn the tractor’s key to the “on”
position.

8NEXIQBrake-Link™WabashNational
®
ABS Application
Chapter 1• Getting Started
Navigating Wabash National®ABS Application
Brake-Link™ offers the following navigation options:
•Menu navigation: use arrow buttons to traverse the application menus.
•Buttons navigation: use direct access buttons to access specific
Brake-Link™ options directly.
Note: Both methods utilize and .
This section provides an
overview
of button functionality. The procedure dis-
cussions specify which buttons to push and when.
Home Button
Use the button to return to the Select Application screen.
Note: This button does not function if the screen displays “[ENTER]
TO CONTINUE”.
Enter Button
Use the button to select a menu item, confirm a response, or instruct
Brake-Link™ to proceed to the next step.
SELECT APPLICATION
GENERIC PLC TEST
BENDIX ABS
MERITOR WABCO ABS

Navigating Wabash National®ABS Application
NEXIQ Brake-Link™ Wabash National
®
ABS Application 9
Menu Buttons
If you choose MENU NAVIGATION, use the menu buttons (located below the
tool’s LCD) to navigate through the menu screens.
When the LCD displays a list of information or an options menu,
•press the or keys to scroll through the list or menu;
Note: A dashed line displays after the last data item/option indicat-
ing the end of the list/menu.
•press to select the option marked with a blinking cursor;
•press to exit your selection and return to the previous menu or
screen.
Figure 1.4
Menu buttons
Menu buttons
10 NEXIQ Brake-Link™ Wabash National
®
ABS Application
Chapter 1• Getting Started
Direct Access Buttons
The
direct access buttons
reside on the lower portion of Brake-Link™. Notice
they are grouped by functionality. The section provides a button overview for
each button group.
Note: These buttons operate differently depending on the applica-
tion you’re using. This section provides a cursory explanation of their
functionality within the Wabash National® ABS Application. Refer to
the
Introducing Brake-Link™ Operator’s Manual
for general informa-
tion or the applicable manufacturer-specific Brake-Link™ manual.
COMM Buttons
Wabash National® ABS Application does not utilize these buttons.
MODE, AXLE & SIDE Buttons
Wabash National® ABS Application does not utilize these buttons.
Figure 1.5
Direct Access Buttons
Button
group
tags

Navigating Wabash National®ABS Application
NEXIQ Brake-Link™ Wabash National
®
ABS Application 11
COMPONENT Buttons
Use the COMPONENT buttons to select the component that you wish to test
or monitor. The available buttons are:
Traction & Modulator
Wabash National® ABS Application does not utilize these buttons
Sensor
Use view wheel speeds in the data list (see pg. 22).
ECU
Use to display ECU Information (see pg. 16).
Other Buttons
Use the following buttons to select other Brake-Link™ options:
Current Faults
Use to view all current faults (see pg. 18).
Fault History
Use to view stored faults (see pg. 19).
Reset
Use to clear stored faults (see pg. 20).
VOLT
Use to view voltages in the data list (see pg. 22).

12 NEXIQ Brake-Link™ Wabash National
®
ABS Application
Chapter 1• Getting Started
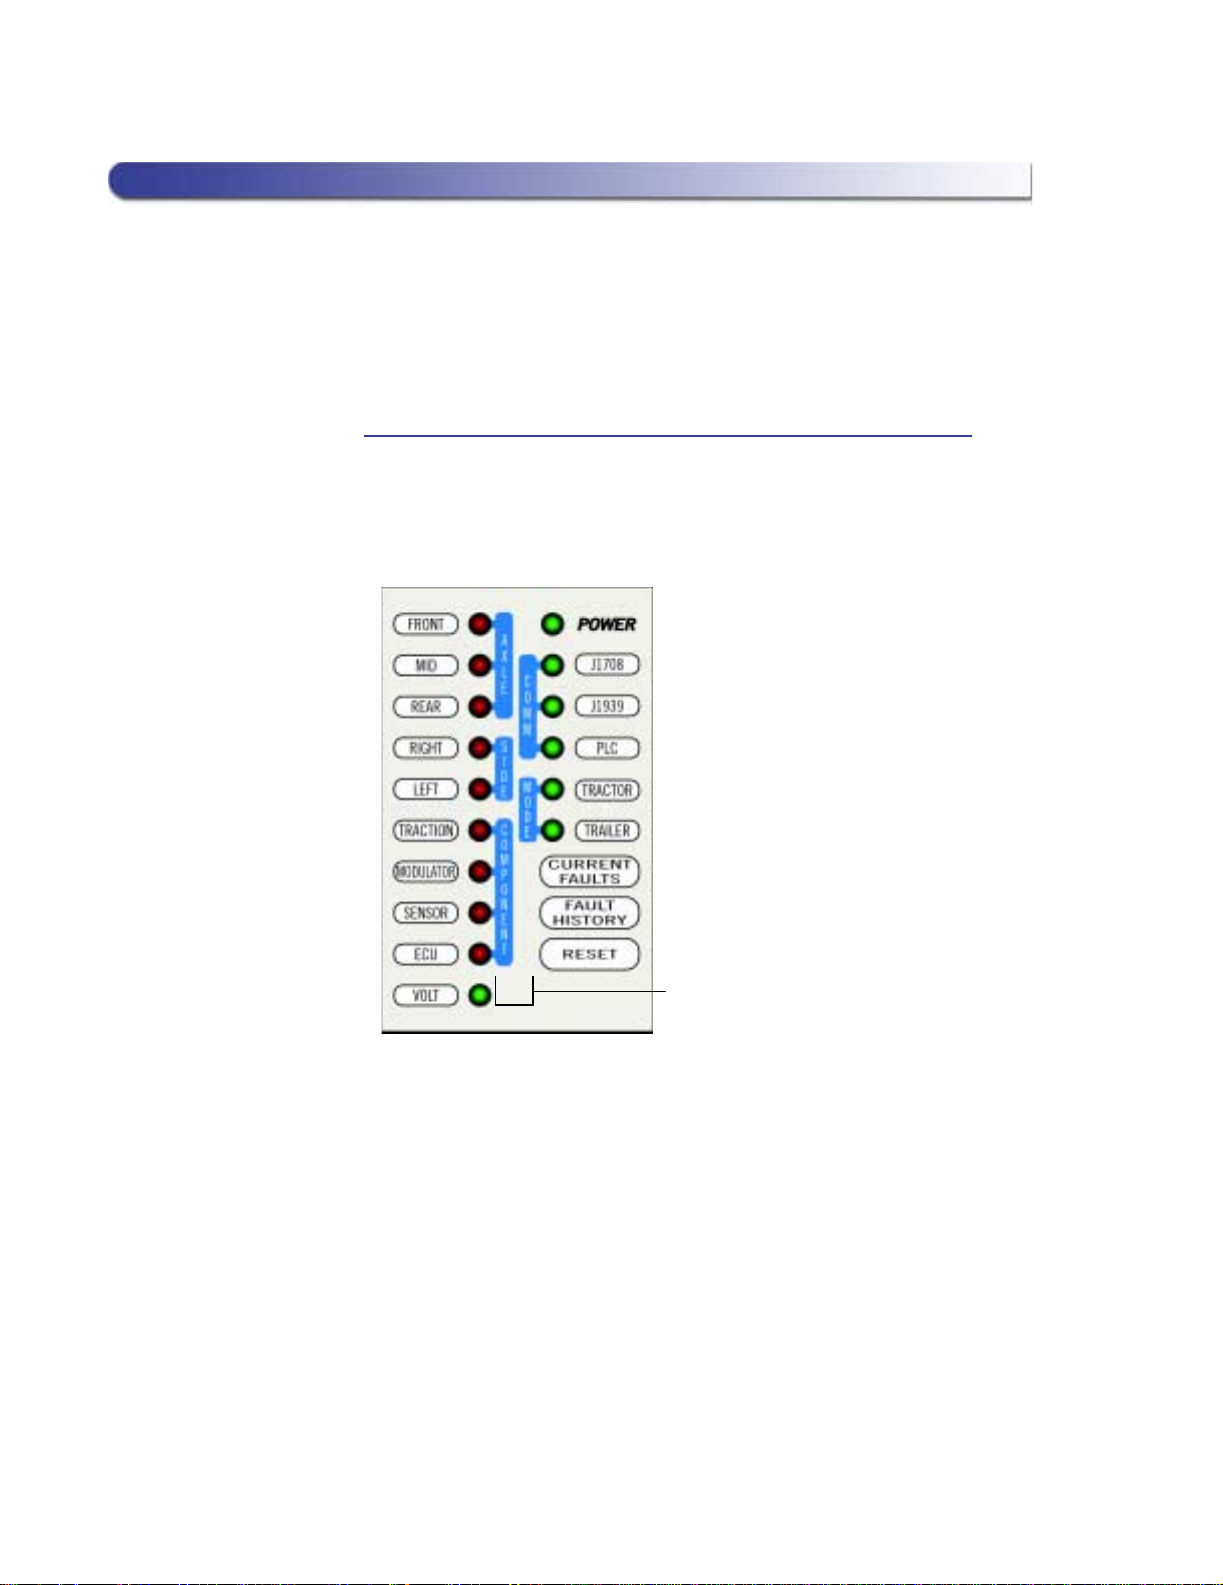
Light Emitting Diodes (LEDs)
The POWER LED lights up to indicate Brake-Link™ is receiving power. The
PLC and TRAILER LEDs light up once Brake-Link™ establishes communica-
tion with the ECU.
Wabash National® ABS Application does not utilize the rest of the LEDs.
Figure 1.6
Light Emitting Diodes

NEXIQ Brake-Link™ Wabash National
®
ABS Application 13
2
Using Wabash
National®ABS
Application
u
Registering ECU & Selecting Navigation Method, page 14
u
Using the Wabash National® ABS Application, page 16
Brake-Link™ features an application for diagnosing Wabash National® Trailer Anti-lock
Brake Systems controlled by MBS-1®P or MBS-2® brake ECMs.
This chapter explains how to use the WABASH NATIONAL ABS Application.

14 NEXIQ Brake-Link™ Wabash National
®
ABS Application
Chapter 2• Using Wabash National®ABS Application
Registering ECU & Selecting Navigation Method
After powering up Brake-Link™ and selecting a diagnostic application,
Brake-Link™ attempts to establish communication with the applicable ECU.
This process is called
registration
. Each procedure in this chapter assumes
you’ve connected Brake-Link™ to the tractor/trailer, selected a navigation
method and registered the ECU.
To register the ECU & select a navigation method:
1Connect Brake-Link™ to the tractor or trailer and power-up (see “Con-
necting Components”, on page 5). Brake-Link™ boots up and presents
the Select Application screen.
Use the and keys to select WABASH NATIONAL ABS;
press .
2Brake-Link™ displays navigation options; use the and
keys to select the desired navigation method and press . See
“Navigating Wabash National® ABS Application”, on page 8.
Note: If you’re going to perform a TEST, select MENU NAVIGA-
TION. All other options support both methods of navigation.
SELECT APPLICATION
BENDIX ABS
MERITOR WABCO ABS
WABASH NATIONAL ABS

Registering ECU & Selecting Navigation Method
NEXIQ Brake-Link™ Wabash National
®
ABS Application 15
3Brake-Link™ auto-detects the Wabash National® Trailer ABS ECU. It
presents the ECU ID and indicates whether there are current and/or
stored faults; press .
Note: MBS-1®P and MBS-2® brake controllers with software ver-
sion 2.5 or older do not support FAULTS and TESTS options. If
you’re testing one of these controllers, Brake-Link™ displays a lim-
ited support message upon ECU registration.
4If you selected:
—menu navigation, the Wabash National® ABS Application main menu
displays next.
—button navigation, the CONTINUE BY PRESSING BUTTONS
prompt displays next.
You’ve successfully registered the ECU and selected a navigation
method. If you need more help, refer to the instruction set that applies
to the task you need to perform.
TRAILER MBS1P
CURRENT FAULTS YES
STORED FAULTS YES
[ENTER] TO CONTINUE
If Brake-Link™displays CAN NOT IDENTIFY ECU, the detected
ECU is not a Wabash National®MBS-1®P or MBS-2®controller.
If it displays ECU NOT RESPONDING, it’s not detecting an ECU;
the ECU may not be working properly.
*TRAILER MBS1P
*LIMITED SUPPORT IN
ECU VER 2.5 OR LESS
[ENTER] TO CONTINUE
ECU INFORMATION
FAULTS
DATA LIST
TESTS

16 NEXIQ Brake-Link™ Wabash National
®
ABS Application
Chapter 2• Using Wabash National®ABS Application
Using the Wabash National®ABS Application
The following table shows the Wabash National® ABS Application main menu
options and indicates the number of items offered by each option, e.g., the
TESTS menu offers 4 tests.
The rest of this section details each Wabash National® ABS Application option.
ECU Information
Use this option to retrieve the following ECU information:
The rest of this section describes retrieving ECU information with each naviga-
tion method.
To view ECU Information:
1Connect Brake-Link™ to the tractor/trailer and power-up; select
WABASH NATIONAL ABS; and select a navigation method. See “Reg-
istering ECU & Selecting Navigation Method”, on page 14.
WABASH NATIONAL ABS Options # of Items
ECU INFORMATION (see pg. 16) 1
FAULTS (see pg. 17) 3
DATA LIST (see pg. 22) 1
TESTS (see pg. 23) 4
•ECU Type •Unit Number
•Configuration •Manufacture Date
•Make •SW Identification (Software ID)
•Serial Number •Hardware Version
•Part Number •VIN (Vehicle Identification Number)
Table of contents
Other NEXIQ Technologies Diagnostic Equipment manuals

NEXIQ Technologies
NEXIQ Technologies USB-Link User guide

NEXIQ Technologies
NEXIQ Technologies Brake-Link User manual

NEXIQ Technologies
NEXIQ Technologies Blue-Link 2 User manual

NEXIQ Technologies
NEXIQ Technologies USB-Link 3 Wireless User guide

NEXIQ Technologies
NEXIQ Technologies Brake-Link User manual


