manuals.online logo
Brands
  1. Home
  2. •
  3. Brands
  4. •
  5. Nidec
  6. •
  7. Measuring Instrument
  8. •
  9. Nidec PT-120 User manual

Nidec PT-120 User manual

Other Nidec Measuring Instrument manuals

Nidec FG-7000TA User manual

Nidec

Nidec FG-7000TA User manual

Nidec Shimpo MT-200 User manual

Nidec

Nidec Shimpo MT-200 User manual

Nidec FG-3000R Series User manual

Nidec

Nidec FG-3000R Series User manual

Nidec TNX Series User manual

Nidec

Nidec TNX Series User manual

Nidec DT-200LR-S12 User manual

Nidec

Nidec DT-200LR-S12 User manual

Nidec ST-1100 User manual

Nidec

Nidec ST-1100 User manual

Nidec MFD-02 User manual

Nidec

Nidec MFD-02 User manual

Nidec FGV-HXY User manual

Nidec

Nidec FGV-HXY User manual

Nidec SHIMPO DT-5TXR User manual

Nidec

Nidec SHIMPO DT-5TXR User manual

Nidec PG-100N Series User manual

Nidec

Nidec PG-100N Series User manual

Nidec Shimpo DT-5TS User manual

Nidec

Nidec Shimpo DT-5TS User manual

Nidec FG-7000L User manual

Nidec

Nidec FG-7000L User manual

Nidec DT-361 User manual

Nidec

Nidec DT-361 User manual

Nidec Kato Engineering KRM2000 User manual

Nidec

Nidec Kato Engineering KRM2000 User manual

Nidec SHIMPO G-7000L-S-2 User manual

Nidec

Nidec SHIMPO G-7000L-S-2 User manual

Nidec TNP-0.5 User manual

Nidec

Nidec TNP-0.5 User manual

Nidec ST-1100 User manual

Nidec

Nidec ST-1100 User manual

Nidec TNP Series User manual

Nidec

Nidec TNP Series User manual

Nidec PG-100B Series User manual

Nidec

Nidec PG-100B Series User manual

Nidec PG-35 User manual

Nidec

Nidec PG-35 User manual

Nidec FG-3000R-S User manual

Nidec

Nidec FG-3000R-S User manual

Nidec DT-105A Installation manual

Nidec

Nidec DT-105A Installation manual

Nidec MF-2 User manual

Nidec

Nidec MF-2 User manual

Nidec MT-100 Installation manual

Nidec

Nidec MT-100 Installation manual

Popular Measuring Instrument manuals by other brands

Powerfix Profi 278296 Operation and safety notes

Powerfix Profi

Powerfix Profi 278296 Operation and safety notes

Test Equipment Depot GVT-427B user manual

Test Equipment Depot

Test Equipment Depot GVT-427B user manual

Fieldpiece ACH Operator's manual

Fieldpiece

Fieldpiece ACH Operator's manual

FLYSURFER VIRON3 user manual

FLYSURFER

FLYSURFER VIRON3 user manual

GMW TG uni 1 operating manual

GMW

GMW TG uni 1 operating manual

Downeaster Wind & Weather Medallion Series instruction manual

Downeaster

Downeaster Wind & Weather Medallion Series instruction manual

Hanna Instruments HI96725C instruction manual

Hanna Instruments

Hanna Instruments HI96725C instruction manual

Nokeval KMR260 quick guide

Nokeval

Nokeval KMR260 quick guide

HOKUYO AUTOMATIC UBG-05LN instruction manual

HOKUYO AUTOMATIC

HOKUYO AUTOMATIC UBG-05LN instruction manual

Fluke 96000 Series Operator's manual

Fluke

Fluke 96000 Series Operator's manual

Test Products International SP565 user manual

Test Products International

Test Products International SP565 user manual

General Sleep Zmachine Insight+ DT-200 Service manual

General Sleep

General Sleep Zmachine Insight+ DT-200 Service manual

Sensa Core Lacto Spark user manual

Sensa Core

Sensa Core Lacto Spark user manual

VOLTCRAFT UTS-1980 operating instructions

VOLTCRAFT

VOLTCRAFT UTS-1980 operating instructions

EBCHQ 94915 Operation manual

EBCHQ

EBCHQ 94915 Operation manual

Balluff BIP LD2-T017-01-EP-S4 Series user guide

Balluff

Balluff BIP LD2-T017-01-EP-S4 Series user guide

Pulsar IMP Lite Series instruction manual

Pulsar

Pulsar IMP Lite Series instruction manual

ETCR 6800 user manual

ETCR

ETCR 6800 user manual

manuals.online logo
manuals.online logoBrands
  • About & Mission
  • Contact us
  • Privacy Policy
  • Terms and Conditions

Copyright 2025 Manuals.Online. All Rights Reserved.

z
The Shimpo Model PT-120 Contact Tachometer is a simple to use,
ergonomic, rugged test instrument for rotational speed applica-
tions. This velocity analyzing and measuring device is ideal for
rotational machine inspection and process speed analysis. The
PT-120 possesses a large backlit LCD screen that provides clear
viewing in any environment. With a simple selection switch users
can obtain readings in either RPM, meters, meters per minute in
metric models or RPM, feet and feet per minute in imperial mod-
els. During testing, the unit automatically saves maximum, min-
imum, last recorded values and up to 96 logged data readings.
The compact, lightweight PT-120 Tachometer comes standard
with 3 AAA batteries, protective carrying case, plus several con-
tact adapters and contact wheel.
PT-120 Contact Tachometer
Operation Manual
Be careful of clothing or appendages getting too
close to moving machinery when taking readings.
Do not leave the device close to water or any other
liquid to avoid damage.
If not using this instrument for extended periods of
time, remove the batteries to prevent potential battery
leakage from causing product damage.
Do not attempt to open housing or do maintenance.
SPECIFICATIONS
Range: PT-122: 0.5-19,999 RPM, 0.05-1999.9 m/min,
0.05-99,999 m; PT-121: 0.5-19,999 RPM, 0.16-6559.6 ft/min, 0.16-
99999 ft
Resolution: 0.1 RPM (0.5-999.9 RPM), 1 RPM (above 1000 RPM);
0.01 m/min (0.05-99.99 m/min), 0.1 m/min (100+ up m/min);
0.02 m (0.05-99,999 m); 0.03 ft/min (0.16-99.99 ft/min), 0.3 ft/min
(100 ft/min and up); 0.04 ft (0.16-99,999 ft)
Display: 5 digit, 0.7” (18 mm) LCD
Accuracy: +/-0.05% + 1 digit
Sampling Time: 0.8 second (over 60 RPM)
Memory: Automatically stores Maximum (UP), Minimum (dn), last
value (LA) and up to 96 readings for review. Maximum speed for
reading storage is every 0.8 seconds.
Dimensions: 6.7 x 2.8 x 1.4 (170 x 70 x 35 mm)
Power: 3 x 1.5V AAA battery
Enclosure: ABS plastic housing
Product Weight: 0.45 lb (0.20 kg)
Package Weight: 1.00 lb (0.45 kg)
Certification: CE
Warranty: 1 Year
Included Accessories: 3 AAA batteries, protective carrying case.
Large & small cone adapter, surface wheel, 3.87” ( 98.3 mm) cir.
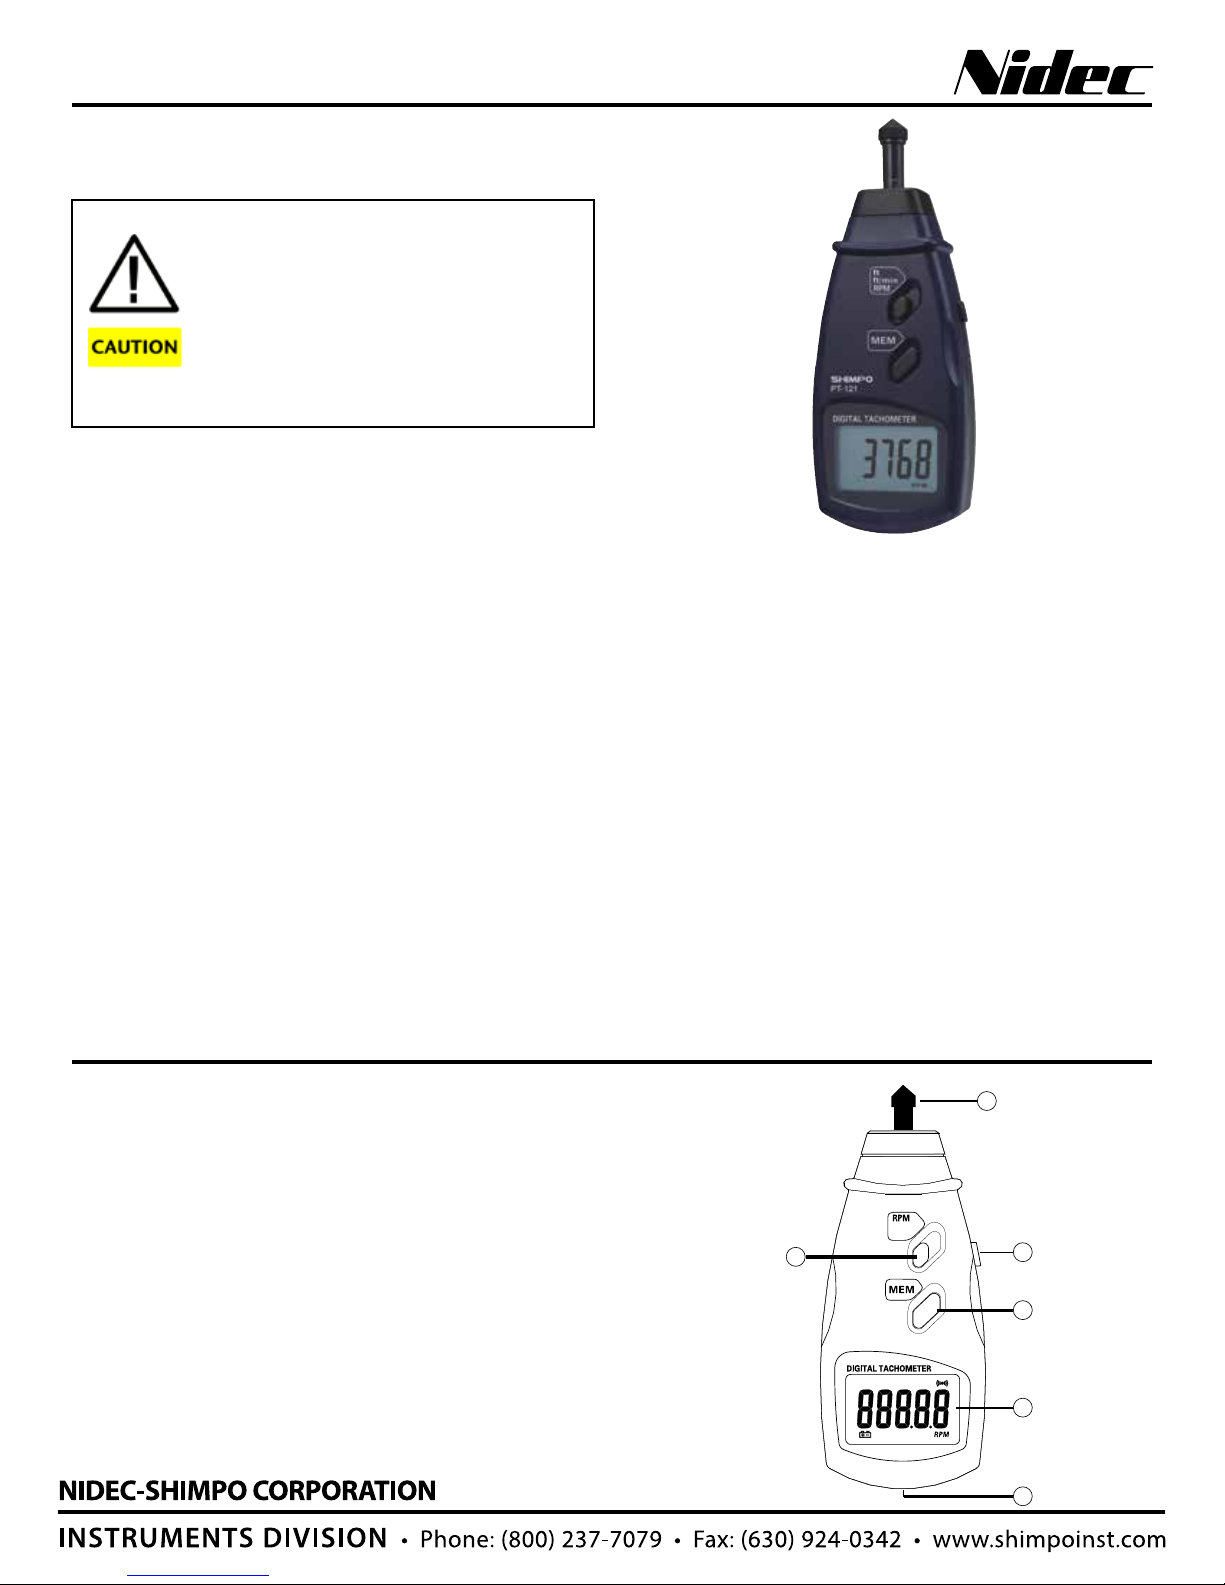
PRODUCT DIAGRAM
1. Measurement Button
2. Function Select Switch
3. Memory Button
4. LCD Display
5. Battery Cover (On Back)
6. Contact Adapter
1
2
3
4
5
6
OPERATION
a. Loosen screw on battery cover and remove cover to install the
3 new AAA batteries.
b. Attach cone or wheel adapter securely to shaft.
Measure RPM, Speed or Length
a. Slide the function switch (2) to select desired unit of measure.
b. Press and hold the measurement button (1); Make physical
contact with equipment.
NOTE: When using wheel, due to wheel’s outer and grooved cir-
cumferences varying, when using the groove for wire, cable and
similar applications, the result is 0.9 of the displayed value.
c. After display data is stable and the desired amount of readings
have been taken, release the measurement button. The maximum
(UP), minimum (dn) and last value (LA) have been recorded over
the test period.
d. Press “MEM” button (3) to cycle the display through the maxi-
mum (UP), minimum (dn), and last (LA) values. The MEM button
must be pressed and released each time to cycle through the
values (Fig. 2).
A fourth press will begin a countdown. After the countdown reach-
es 1, “An” followed by the number of readings automatically re-
corded will be shown. For example, if 64 data points were saved
during measurement, display will show “An 64” (Fig. 3).
Continue to press MEM to cycle through each stored data point
reading. The data point rank followed by the value will be shown
with each subsequent press of the MEM button (Fig. 4).
After displaying all the saved data (maximum 96), the unit will cy-
cle back to Max, Min, and last value.
NOTE: When measuring in feet or meters, these modes do not
have max, min and data recall. Only the last test value is shown.
Clear Stored Data
Press the measurement button (1) to delete all stored data. If you
then press MEM, all statistical values will be zero. Or simply just
start a new test with the measurement button to eliminate the old
data and begin storing new data. (Note: When measured values
vary significantly, the maximum number of data values will be less
than 96.)
NOTES
1. The unit comes with large and small cones plus cylinder adapt-
er.
2. The cylinder and large cone are used for low RPM speeds while
the small cones are used for high RPM speeds
BATTERY REPLACEMENT
1. When the battery voltage is low, the left side of the LCD dis-
plays the battery symbol which indicates that battery replacement
is needed.
2. Loosen screw and open battery cover to remove the batteries
and replace with new batteries.
3. If the tachometer is not going to be in use for extended periods
of time, please remove the batteries to prevent possible battery
leakage which could damage the instrument.
MAINTENANCE
Other than cleaning exterior with cloth, no maintenance can be
performed on product. Do not attempt to take unit apart with the
exception to battery cover. Damage to unit may result.
8
8
8
Fig. 2
Fig. 3
Fig. 4