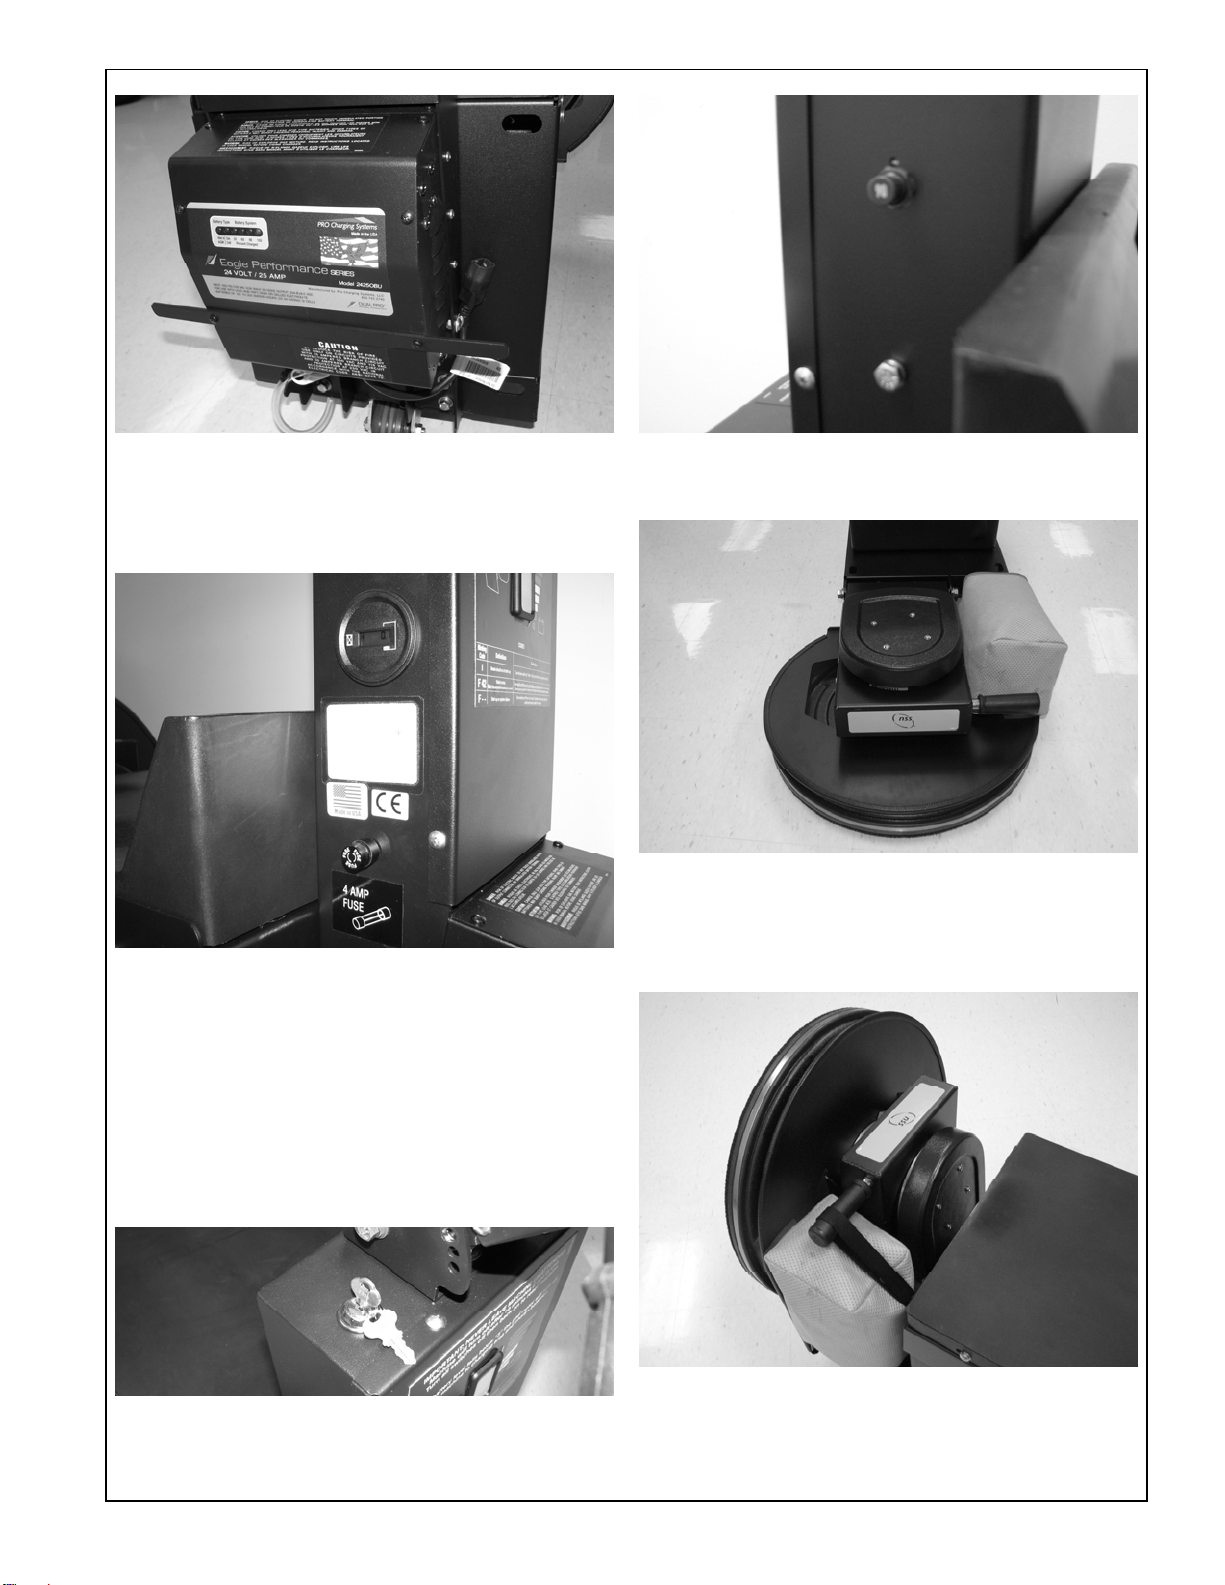
NSS CHARGER 2022 ABLT User manual

OPERATION MANUAL
CHARGER 2022 ABLT
SAVE THESE INSTRUCTIONS
IMPORTANT SAFETY INSTRUCTIONS
WARNING: Failure to observe these instructions can cause
personal injury to machine operator or bystanders.
WARNING: Fire or explosion hazard.
NEVER operate this machine in an
explosive atmosphere (grain dust,
flammable liquids or fumes, etc.).
WARNING: Fire or explosion hazard.
NEVER use flammable liquids
(gas, kerosene, solvents, or thinners)
to clean or burnish floor.
WARNING: This product contains a chemical known to the state of California to cause cancer
and birth defects or other reproductive harm.
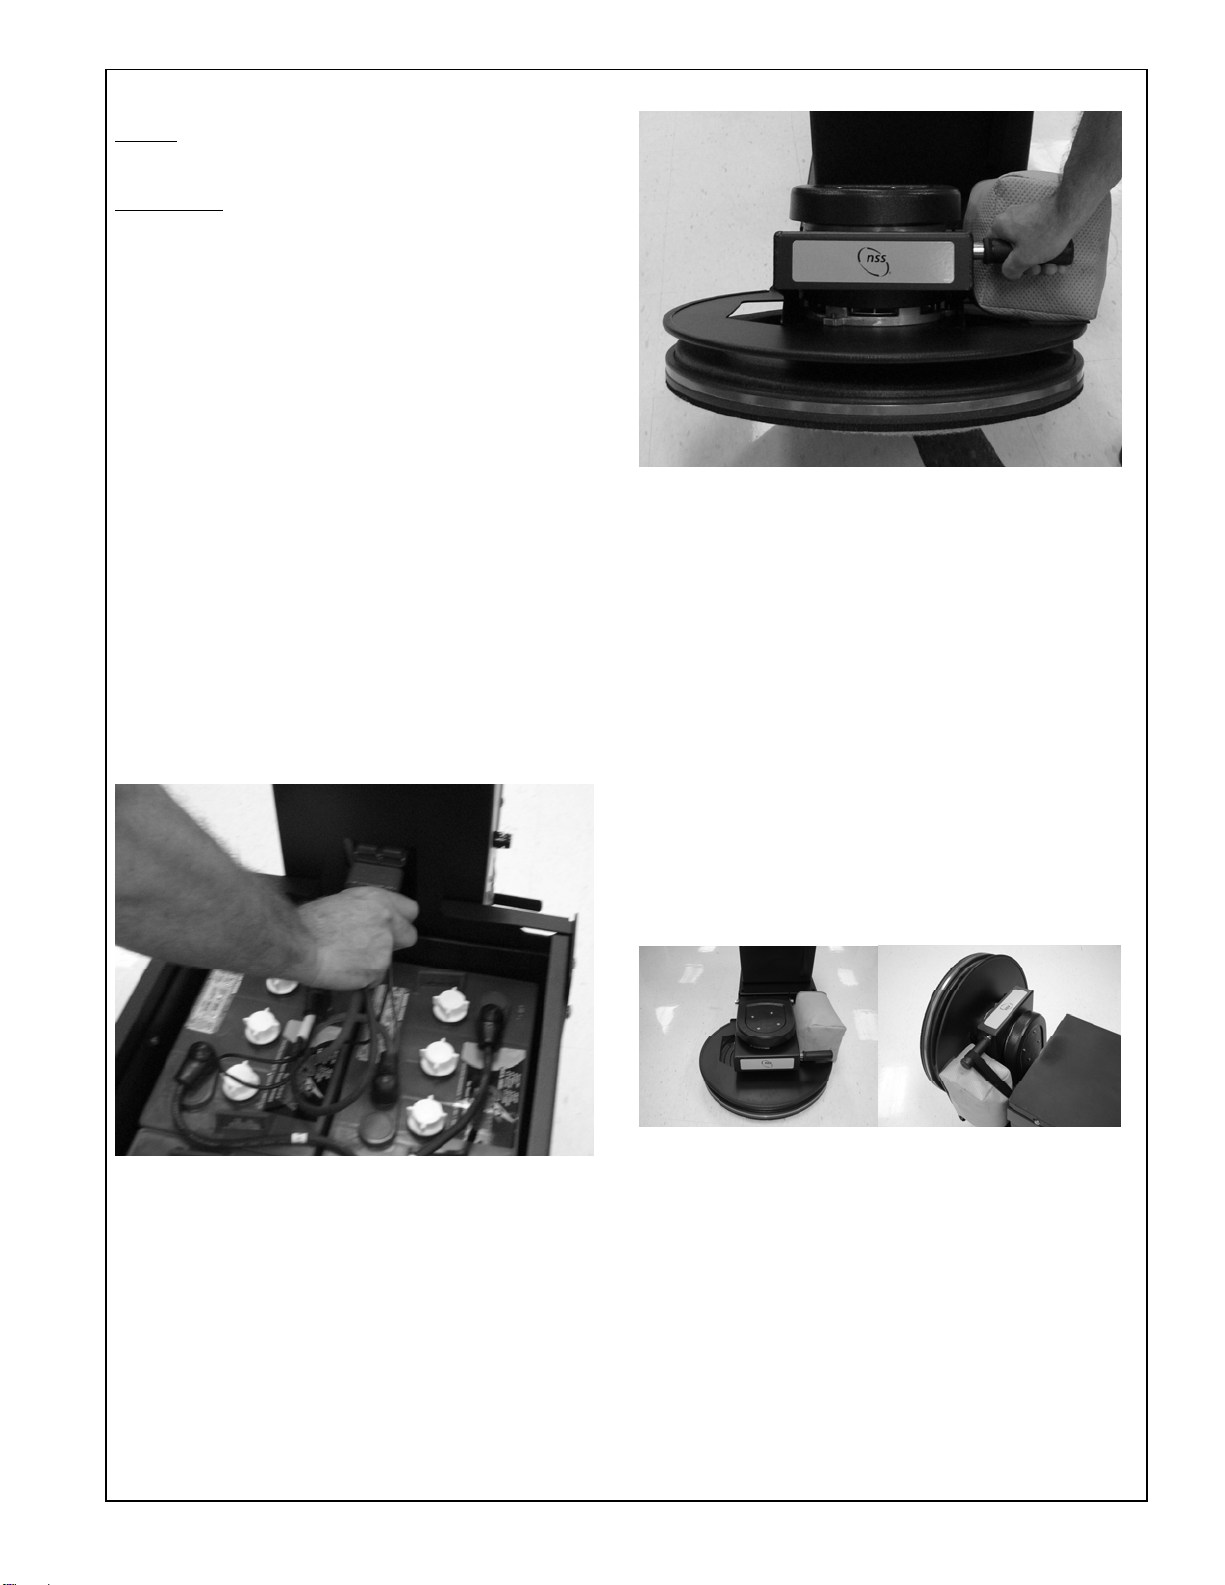
INTENDED USE
NSS Burnishers are intended for commercial use,
buffing and burnishing floors in an indoor environment.
It is not intended for spray burnishing.
NSS Burnishers are Twister Approved.
NSS does not recommend using these machines for
any other purpose.
FOR SAFETY
•ALWAYS read and understand all instructions before
operating or servicing machine.
•ALWAYS use this machine ONLY as described in
this manual.
•NEVER attempt to operate this machine unless you
have been trained in its operation.
•NEVER allow an untrained person to operate this
machine.
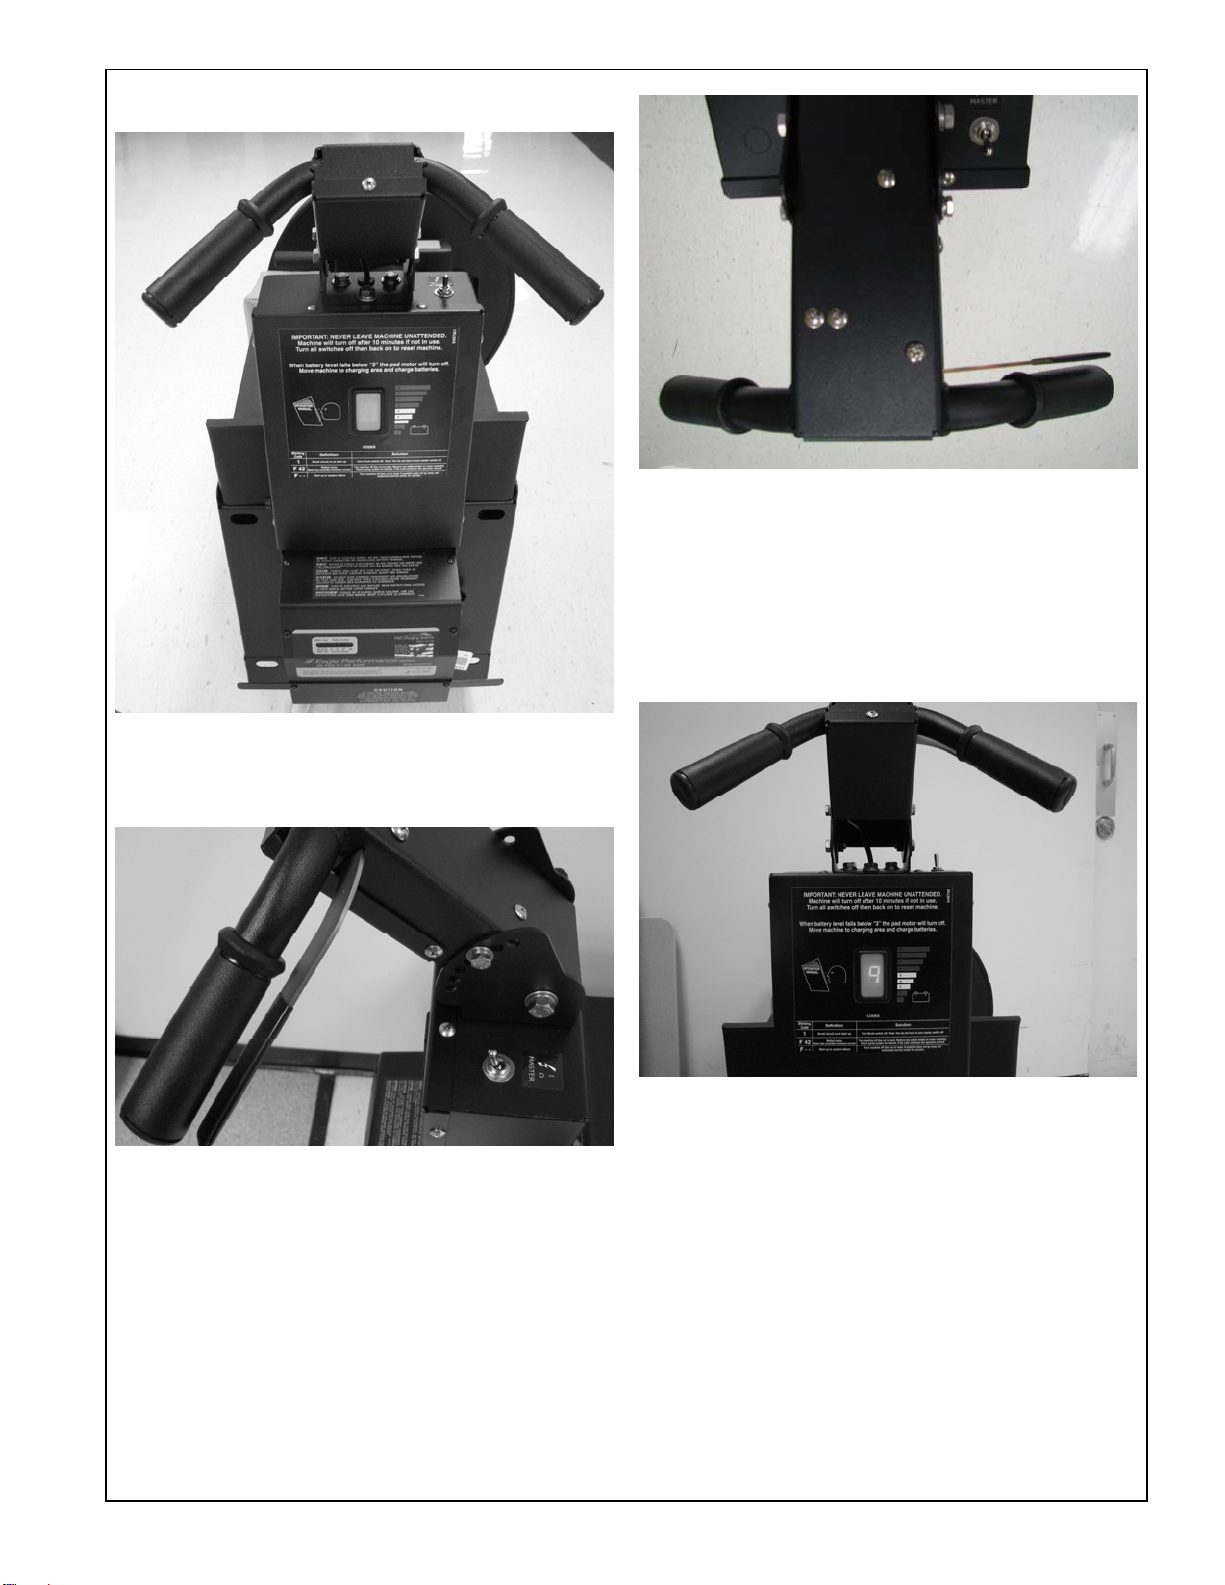
•ALWAYS operate this machine from the rear control
panel, not from the side.
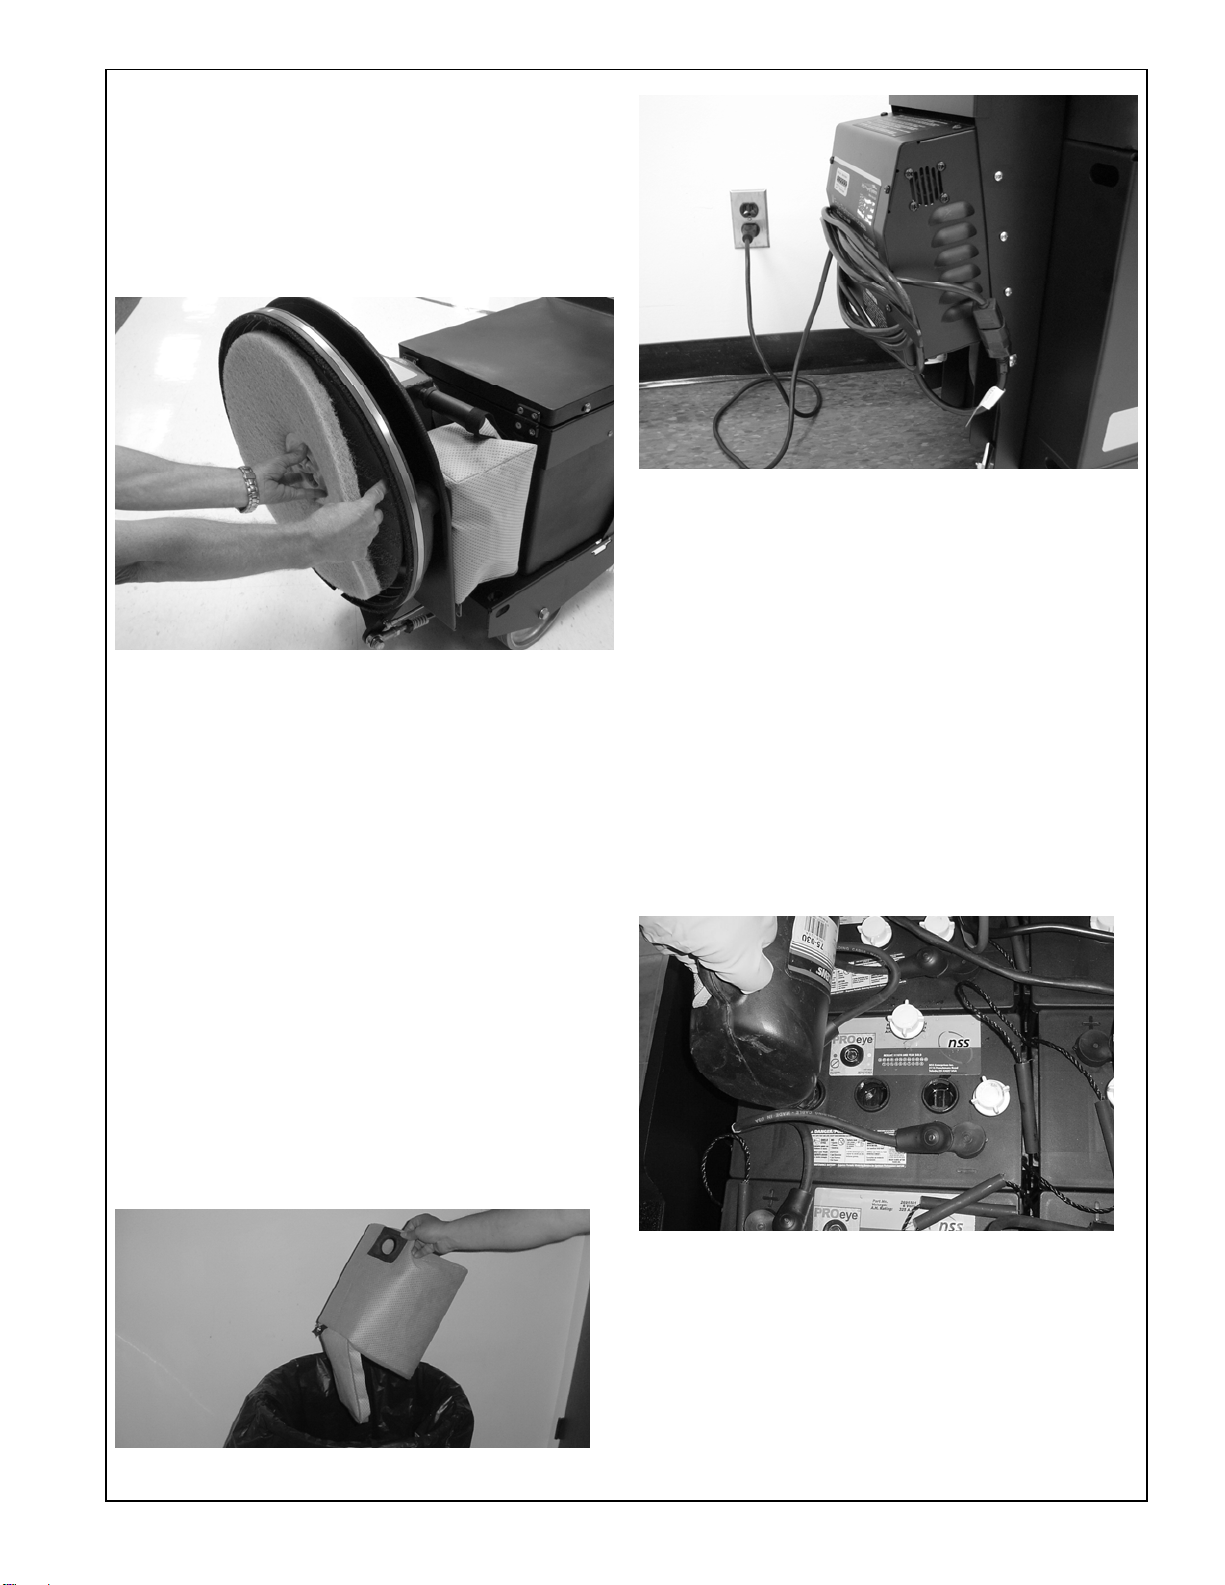
•ALWAYS turn off master switch when attaching or
changing pads.
•NEVER attempt to operate this machine if it is not
working properly or has been damaged in any
manner.
•NEVER disconnect or modify any switches or safety
devices (circuit breaker).
•NEVER drop or insert any object into any machine
opening.
•NEVER operate this machine with any air opening
blocked. Keep all air openings free of dust, lint, hair,
etc.
•NEVER pick up anything that is burning or smoking,
such as cigarettes, matches or hot ashes.
•NEVER allow this machine to be used as a toy. Close
attention is necessary when used by or near children.
•ALWAYS wear clean tennis shoes or “non-slip” shoes.
Leather soled shoes will be extremely slippery.
•ALWAYS keep face, fingers, hair or any other body
part or loose clothing away from any machine opening
or moving part (revolving pad driver).
•ALWAYS be sure that the ramp is secured to the
vehicle before attempting to load / unload.
•ALWAYS use extreme caution when operating the
machine on a ramp or loading / unloading this machine
into or out of a truck / trailer. Use extreme caution if
the ramp is wet, oily, or covered with cleaning
chemicals.
•NEVER stop or turn the machine on a ramp or incline.
•NEVER attempt to climb a grade or operate this
machine on a ramp or incline of more than 20 degrees.
•ALWAYS store this machine indoors in a dry, cool
area.
•NEVER park or store the machine near a dock, on
ramps, near a furnace, boiler, open flame, or other
high heat source.
•NEVER spray this machine with water or any liquids.
•NEVER allow the battery charging plug to get wet or a
short may occur.
•NEVER operate this machine when the battery
charger is plugged in.
•NEVER operate the machine outdoors or allow
machine to freeze.
•NEVER expose the machine to rain, snow, or extreme
temperatures.
•NEVER store any items on the machine.
ALL REPAIR SERVICE MUST BE PERFORMED BY AN NSS AUTHORIZED DISTRIBUTOR /
SERVICE STATION USING ONLY NSS ORIGINAL EQUIPMENT PARTS.
Charger 2022 ABLT 9092026 07-09 Rev C 03-13

IMPORTANT SAFETY INSTRUCTIONS
BATTERY POWERED EQUIPMENT WITH ON BOARD CHARGERS
WARNING: Failure to observe these instructions can cause personal
injury to machine operator or bystanders.
GENERAL
•ALWAYS read and understand all instructions before
installing or charging batteries.
•NEVER attempt to install or charge batteries unless
you have been trained to do so.
•NEVER allow an untrained person to install or charge
batteries.
•ALWAYS remove all jewelry when working on or
near the batteries.
•ALWAYS turn off all switches during installation and
service.
•ALWAYS disconnect the battery leads before
performing any service or repair.
•ALWAYS wear eye protection, rubber gloves and
protective clothing to avoid contact with battery acid.
•NEVER lay anything on top of batteries as arcing
may occur.
•IF CONTACT WITH BATTERY ACID OCCURS,
follow these instructions:
•SKIN – rinse area with water.
•EYES – Flush with water for 15 minutes.
•INTERNAL – Drink water or milk. Follow with Milk
of Magnesia, beaten egg or vegetable oil. Call a
physician immediately.
BATTERY INSTALLATION
•ALWAYS use two people to install, as batteries are
heavy.
•ALWAYS turn off all machine switches.
•ALWAYS position batteries as shown on the
machine installation decal to maintain machine
balance.
•ALWAYS connect batteries as shown on the
machine installation decal to avoid shorting out the
batteries and the electrical system.
BATTERY CHARGING
•ALWAYS read instructions on charger carefully.
•ALWAYS use the NSS supplied charger with proper
voltage rating.
For lead acid batteries only, (does not apply to gel
cell or maintenance free batteries).
•ALWAYS check to ensure the battery water level
covers the battery plates before charging.
•ALWAYS check water level after charging and add
distilled water if necessary to bring level to the bottom
of the fill hole.
•NEVER
overfill batteries as
battery
and machine damage may
result.
•ALWAYS wipe any acid from the top of batteries
using a soap solution.
•ALWAYS reattach caps to batteries. Do not charge
with caps loose or removed.
•ADD only distilled water.
For All Types of Batteries
•ALWAYS study battery manufacturers’ specific
precautions such as recommended rates of charge.
•NEVER charge a frozen battery.
•ALWAYS plug the charger into an earthed socket-
outlet.
•NEVER touch uninsulated portion of output connector
or uninsulated battery terminal.
•ALWAYS disconnect the AC supply before making or
breaking the connections to the battery while
charging.
•NEVER open or disassemble charger.
•NEVER operate charger if the AC supply cord is
damaged or if the charger has received a sharp blow,
been dropped, or otherwise damaged in any way.
Read and understand all
instructions before installing
or charging batteries.
No smoking, open
flames, or sparks while
working with batteries. Contains acid.
Avoid contact Poison. Causes
severe burns. Avoid
contact.
WARNING: Batteries emit hydrogen, which can cause fire or explosion.
NEVER smoke, light a match, or cause a spark during operation or charging.
ALWAYS char
g
e in a well-ventilated area awa
y
from o
p
en flame.
ALL REPAIR SERVICE MUST BE PERFORMED BY AN NSS AUTHORIZED DISTRIBUTOR/
SERVICE STATION USING ONLY NSS ORIGINAL EQUIPMENT PARTS

NOISE AND VIBRATION
MACHINE INSPECTION
•Now that the machine is unpacked remember to
recycle all packing materials.
•Inspect the machine for damage or missing
components. If damage is found, contact the freight
company to file a freight claim.
MACHINE OPERATION
General Information
This machine works best with dry polishing or
burnishing. Use mop on restorers rather than spray buff
systems to restore the shine.
Spray buffing is time consuming and uses more pads
because they become loaded with floor finish, which
can cause overloading of the machine’s control system.
Quick Start
Connecting Battery Pack to Machine
When the machine is shipped with batteries, the
machine will arrive with the battery pack disconnected
from the machine.
•Lift up on the handle on the top cover to expose the
battery pack.
•Connect the cable with the Anderson connector into
the Anderson connector mounted to the machine at
the rear of the battery compartment in front of the
control column.
For machines shipped without batteries
•See Battery Installation in the Maintenance Section
later in this manual.
Lower Brush/Pad to Operating Position
•Move the front of the machine from/to pad changing
position or operating position by grasping the handle
and moving it to the desired position.
•Turn on master switch (and key switch if so
equipped). Wait until you hear a click, the machine is
now on. See Machine Components for more
information.
•Check that the battery meter is reading in the high or
green range. The machine should be put on charge if
not in the high range. See Charging Instructions later
in this manual.
•Push the machine slightly and squeeze the lever in
front of the right handle grip to activate the Pad
Motor.
CAUTION: This Machine must be moving at all times
when the pad is rotating or the floor may be damaged.
Transporting the Machine to Work Site
NSS recommends transporting the machine to the work
site in one of two ways:
•With the front of the machine in the operating position
and the master switch in the off position. This will
reduce the potential of damage to the Flexiwall Shield
and Pad Driver when moving through stock/storage
rooms and double swinging doors.
•With the head in the pad change/storage position with
the strap on. This is the preferred way but not
recommended if when transporting the machine
through double swing doors because the Flexiwall
Shield and Pad Driver could be damaged.
For questions and all information pertaining to this
machine read the rest of this manual. ☺
NOISE
Sound pressure level at Operator
position
68 dB(A)
VIBRATION
Weighted RMS acceleration value
(ISO 5349)
.269 m/s2

MACHINE COMPONENTS
Operator Control Column
The operator control column is located at the rear of the
machine. This column has components that control
various machine functions.
Master Switch and Handle Height Adjustment
•The master switch is located on the top of the control
column to the right of the handle and it turns the
machine on and off.
•If the brush switch lever is activated and the brush
head is down the machine will not turn on. A flashing
fault code will appear on the battery meter. See the
bottom of the decal on control column cover and
correct the problem.
•The control system will automatically turn the
machine off if it sets idle for 10 minutes. Turned off
the master then turn the master switch back on to
restart.
•The operator handle can be adjusted to suit any
operator. See handle adjustment later in this manual
for instructions to set the handle height.
Pad System Control
•The control handle is located at the top of the control
column and has a handle grip on each side. The pad
switch lever is located in front of the right handle grip
and activates the pad switch.
•Push the machine slightly and squeeze the pad
switch lever to turn on the Pad Motor.
•When released the pad switch lever will return to the
off position.
Battery Meter
The battery meter is located in the back of the control
column cover and has two uses. It shows the state of
charge of batteries during operation and flashes fault
codes when there is a problem with the machine.
•The rate of charge is indicated by numbers. The
higher the number the greater the charge in the
battery pack. When the pad motor is activated (turned
on) the numbers on the meter will drop indicating the
battery voltage available during use. If the drop is say
9 to 4, it is indicating that the batteries may need to
be charged, equalized or replaced. See battery
maintenance for equalization instructions.
•When there is a fault with the machine, the Battery
Meter will flash an “F” followed by a number.
•See Trouble Shooting Chart for more information
about fault codes.

Battery Charger
The battery charger is located in the middle of the rear
of the control column.
•This high efficiency battery charger is designed for
onboard operation.
Hour Meter & Fuse Holder
•The hour meter is located on the left side of the
control column and counts the hours the pad motor is
on. The hour meter is used for indicating
maintenance intervals. The hour meter cannot be
reset.
•See maintenance section for maintenance intervals.
•The fuse holder is located under the Hour Meter. It
houses a 2 AMP fuse. The fuse is in the Battery
Charger lockout circuit. The machine will not turn on
without the fuse.
Key Switch
•A Key Switch is Optional and will be located on the
top of the control column to the left of the handle
when installed. The key switch and master switch will
both need to be used to turn the machine on and off.
Circuit Breaker
•There is one master circuit breaker located on the
right side of the control column.
Brush Head
•The Pad Motor, Filter Bag and Flexiwall Shield are
located at the front of the machine.
•The bag connects directly to the Flexiwall shield and
has a snap that retains the rear of the bag.
Retaining Strap
•The retaining strap should be used during storage,
transporting, pad changing and maintenance of
machine.

MAINTENANCE
ALWAYS turn OFF all machine switches
before performing any maintenance or
repairs to any equipment.
Daily Maintenance
Pad Installation / Changing
There is a wide range of pads available for many
different burnishing applications. Consult your local NSS
authorized distributor for application recommendations.
•Lift the front of the machine up to the 90 degree
position to view the pad driver and pad.
•Make sure that the correct pad size is installed. The
Charger 2022 ABLT requires a (7/8" to 1") X 20" pad.
•Remove the center of the pad and place the pad flat
on the floor. Step on the center of the pad to
compress the edges around the center hole. This
allows for easier installation of the pad centering cup.
•With the machine in the pad changing position,
carefully center the pad on the driver.
Caution: Pads must be installed concentric (evenly
aligned) with the outside edge of the pad driver. Failure
to follow these precautions will cause excessive
machine vibration, a reduction in pad life and produce
unsatisfactory burnishing results.
•Place the pad grabber in the center hole of the pad.
•Holding the pad driver and pad, push on the pad
grabber until the spring clip has clicked twice.
Caution: Failure to install the pad grabber tightly may
allow the pad to be thrown from the driver.
Empty the dust collection bag daily.
•Empty the filter bag daily or when it is approximately
one-half (1/2) full.
Charging Batteries
•Recharge the batteries when indicated by the Battery
Meter.
•Never let the batteries sit overnight after the machine
has been run for 1hr or more since last recharge.
•NEVER let the electrolyte level fall below the tops of
the plates. This will damage the batteries
immediately, and void the warrantee.
•Check charger cord for exposed wires and damaged
plugs before using.
•To recharge the batteries plug the charger cord into
the charger and then into an electrical outlet. See the
above picture.
•When the cord is plugged into an outlet the machine
will automatically become disabled or turn off.
•Charge the batteries with the cover open when
possible to reduce heat buildup in the batteries.
•See charging instructions for more details.
Check water level in batteries daily
•ALWAYS wear eye protection, rubber gloves and
protective clothing to avoid contact with battery acid
when working around batteries.
•After charging batteries check the water level of each
battery cell and add distilled water as required to level
specified by battery manufacturer.
•Check and verify that all battery connections are
clean and tight.
•Wipe machine down with a damp cloth.
•NEVER spray this machine with water or any liquids.

Opportunity Charging
Opportunity charging is charging the batteries when an
opportunity presents itself, such as during breaks, and
is done in addition to a full charge cycle.
Opportunity charging is recommended, as this extra
charging time will help raise the operating voltage of the
batteries, and will help ensure maximum runtime and
cycle life.
See Monthly Maintenance and Operating Battery
Charger Instructions for equalizing your batteries
especially if you have been opportunity charging
your machine.
Weekly Maintenance
(Every 25 Hours)
Verify all daily maintenance has been performed.
Inspect the Flexiwall Shield
•Inspect the Flexiwall Shield for dents around the
outside edge and cracks in the plastic.
•Check that the Brush and Retaining Band are
properly installed.
•Remove dirt build up on the brush along the bottom of
the Flexiwall Shield.
•A damaged Flexiwall Shield Assembly will greatly
reduce dust control capabilities of the machine.
Check the Battery Tray Drain Hose
•Check the Battery Tray Drain Hose for liquid level on
a weekly basis.
•Spilled liquids from the battery compartment area are
collected in a tray under the batteries. The tray can be
drained using the hose at the rear of the machine as
shown above.
•IMPORTANT: Drain all liquids into an approved
container and dispose of according to your local or
federal regulations.
Monthly Maintenance
(Every 100 Hours)
Verify that all daily and weekly maintenance has
been performed.
Equalize your batteries (Flooded only).
The batteries should be equalized once every 30 days
for maximum battery runtime and life.
To equalize the batteries:
•Plug in the charger, and fully charge the batteries
(until the green 100% LED is on continuously).
•Unplug the charger from the wall outlet, then plug it
back in.
•The charger will run for 2hrs, holding the batteries at
a constant voltage, and equalizing each cell.
•THIS STEP IS ESPECIALLY IMPORTANT IF YOU
PRACTICE OPPORTUNITY CHARGING
Inspect the machine components
•Inspect the machine components for wear, loose
fasteners, or damage. Pay special attention to all
pivot points and moving parts.
•Call an authorized NSS service center for repairs.
90 Day Maintenance
(Every 300 Hours)
Verify that all daily, weekly and monthly
maintenance has been performed.
Lubrication
•Lubricate the caster with an industrial grade bearing
grease. Failure to lubricate caster will cause the
machine to maneuver with difficulty and premature
failure of the caster will result.

•Lubricate all moving parts as required with a small
amount of grease.
•DO NOT lubricate the Gas Spring shaft, it does not
require lubrication as it is self lubricating.
Every 6 Months
(Every 600 Hours)
Call your Authorized NSS Distributor / Service
Station to have the following services performed.
Verify that all daily, weekly, monthly and quarterly
maintenance has been performed.
Inspect Pad Motor carbon brushes for wear.
•Using compressed air, blow the accumulated carbon
brush dust out of the motor.
•Remove the motor cover and guard to expose the
carbon brushes.
•Replace carbon brush when they measure ½” or less
in length.
•Failure to replace carbon brushes will cause poor
machine performance and possible motor damage.
Check the condition of the batteries.
•A battery may be checked using a Hydrometer to
check the specific gravity (strength) of the acid in
each cell. Variations in readings occur due to the
chemical reaction taking place during use.
•Always check the specific gravity when the battery is
fully charged.
•When the batteries are fully charged, the specific
gravity should be between 1.265 and 1.300.
•Consult your local distributor and replace batteries as
needed.
Battery Removal:
•Turn off all switches. Disconnect battery pack from
the machine.
•Remove the battery cables from the batteries.
CAUTION: Do not short across terminals with a wrench.
•Lift batteries straight up one at a time and out of the
machine.
Battery Installation:
•Turn off all switches.
•ALWAYS wear eye protection, rubber gloves and
protective clothing to avoid contact with battery acid
when installing batteries. See Battery Warnings on
page 2.
•Batteries are heavy – ALWAYS use two people to
install batteries into machine.
•Refer to wiring diagram located on the underside of
the cover. Align batteries in compartment the same
as the old batteries or as shown on diagram.
•Install battery cables the same as they were on the
old batteries or as shown on wiring diagram located
on the underside of the cover.
•NSS recommends replacing the battery cables when
replacing batteries.
•Tighten bolts and hex nuts with a wrench.
•Install terminal boots over terminals to complete
installation.
CAUTION: Do not short across terminals with a wrench.
CAUTION: Loose or improper battery connections will
cause battery or machine damage and possible
personal injury.

Every 12 Months
(Every 1200 Hours)
Call your Authorized NSS distributor / Service
Station to have the following services performed.
Verify that all daily, weekly, monthly and quarterly
maintenance has been performed.
Repeat the maintenance requirements for 6 month
(600 Hours ) at this time.
Gas Spring Service
ALWAYS secure Brush Head in the pad change
position using the strap provided before attempting
any maintenance or repairs to the gas spring or
spring rod guide assembly.
•There is a clip and ball stud at each end. Remove the
spring clip that secures the gas spring to the
machine. Then pull the gas spring off of the ball stud.
•Always be sure the securing clip is reinstalled when
replacing the gas spring.
•Place one end of the gas spring against a hard
surface and push on it. If you can compress it, it must
be replaced. If you cannot compress it, it is most
likely OK.
Pad Pressure Adjustment
The NSS Charger 2022 ABLT is preset at the factory
for medium duty applications. It can be tuned to
your specific application for optimum performance.
ONLY an authorized NSS Service Station should
perform this adjustment.
Tools required for Pad pressure adjustment
1) ¾ open end wrench
2) Clamp on Amp Meter
•It is necessary to use a clamp on AMP Meter when
adjusting the pad pressure.
•There are many different manufactures and models of
AMP Meters to choose from. Two AMP Meters are
shown above. The one on the left is AMPROBE
Model ACDC-610 and the one on the left is
AMPROBE Model ACDC-400.

Checking the Pad Motor Amperage
•First install a new pad on the pad driver. Caution:
Checking the Amps with a used pad will cause the
machine to have high amps when a new pad is
installed.
•Lower the Pad Motor into the operating position and
open the cover over the battery compartment.
•Put the clamp on AMP Meter around the red
(positive) wire coming from the battery pack to the
machine as shown.
•While running the machine read the amp meter. The
amp meter should be reading between 50-70 amps.
Pad Pressure Adjustment
If adjustment is required, follow these instructions.
•It will be easier to access the lock nut and spring
guide rod assembly with the machine in the pad
change position.
•First loosen the lock nut on the spring guide. With the
lock nut loose, the spring guide rod assembly will be
easily turned by grasping the set collar on the spring
guide rod.
•Turn the spring rod guide assembly ½ to 1 turn at a
time. A little adjustment goes a long way.
•Thread the spring guide rod assembly out of the ball
joint to decrease the pad pressure. Thread the spring
guide rod assembly into the ball joint to increase the
pad pressure.
•Every time an adjustment is made check the amps.
This may require a few tries to get it were it should
be.
•After the adjustment is made tighten the lock nut and
redo the amp test. If it has not changed the process is
complete.
Fall back setting ☺
If your machine has come totally out of adjustment or
you need to replace the Spring Rod Guide Assembly
you may need to start from the beginning.
•The factory starting setting for pad pressure is ¾ of
an inch from the set collar to the lock nut.
•From this setting, proceed with the Pad Pressure
Adjusted.
Handle Height Adjustment
•Tools required: 7/16 Wrench and 9/16 Wrench.
•Remove the top bolts on both sides of the Handle
Mount. Do not lose the bolts. Note that there are a set
of holes on a radius for making the adjustment.
•Loosen the bottom bolts but do not remove.
•Set the handle at the desired height. Lining up the
threaded holes in the handle with the holes in the
handle mount.
•Reinstall the top bolts through the holes that line up
with the threaded holes in the handle.

Battery charger
The onboard battery charger supplied with this machine
is capable of charging lead acid batteries from 185 to
350ah capacity. There is no need to change algorithms
or settings based on battery manufacturer, or battery
size.
The charger can also be set to charge flooded (wet)
cell, AGM, or Gel batteries. LED’s on the charger
indicate which type of battery the charger is set to
charge. One setting is for Flooded and AGM batteries,
the other setting is only for GEL batteries.
Depending on the battery charger model, the charger
can operate on 100/115/230 VAC 1ph 50/60 HZ power,
and will automatically detect these input voltages.
Before connecting the battery charger to power, check
the label on the battery charger to verify the proper input
power.
Determining Your Battery Type
CAUTION: DIFFERENT BATTERY TYPES HAVE
DIFFERENT CHARGING REQUIREMENTS. FAILURE
TO PROPERLY IDENTIFY YOUR BATTERY TYPE,
AND SET THE CHARGER ACCORDINGLY WILL
RESULT IN BATTERY DAMAGE, AND VOID THE
WARRANTEE.
Your machine may have been ordered with batteries
installed at the NSS factory. The standard battery type,
normally supplied by NSS, is the Flooded (wet) cell lead
acid battery. Gel and AGM sealed batteries may also
be available at customer request.
Flooded (wet) batteries can be easily identified by the
removable cell caps. Removing the caps allows
inspection of the liquid electrolyte (sulfuric acid) level in
each cell.
AGM (Absorbed Glass Mat) batteries are sealed,
maintenance free batteries. They do not have cell caps
intended for removal. Look for “AGM” printed on the
tops or sides of the batteries.
Gel (gelled electrolyte) batteries are also sealed,
maintenance free batteries. They do not have cell caps
intended for removal. Look for “GEL” printed on the
tops or sides of the batteries.
Battery Charger Indicator LED’s
Your battery charger is equipped with LEDs that
indicate the following:
•Replacement batteries must always be of the
same battery manufacturer, model and amp-
hour rating, as the remaining batteries in the
pack.
•Never mix batteries from different manufacturers in
the same pack.
•Battery Type Setting. Either of these two LEDs will
be illuminated, anytime the charger is plugged
in, to signal which type(s) of batteries the
charger is configured to charge. The two
options available are:
oWet / AGM: When this LED is illuminated,
the charger is configured to charge
either flooded (wet), or AGM batteries.
oGel Cell. When this LED is illuminated,
the charger is configured to charge Gel
batteries ONLY. EXCEPTION: Trojan
AGMs are to be charged with the Gel
setting.
•State of Charge Indicators. Four additional LEDs
provide information about the charge level of
the batteries during charging.
o30%, 60%, 90% and 100%.
•FaultIndications.Duringcharging,thecharger
providesfeedbackaboutthechargeprocess
andanyproblemsdetected.Itwillprovide
feedbackandsignalthetypeofproblemby
flashingLEDsasdescribedbelow:

Changing the Battery Type Setting
The standard setting for the onboard battery charger is
Flooded/AGM. EXCEPTION: If your machine was
ordered from NSS equipped with Gel batteries, then the
charger was configured for Gel batteries at the factory.
Configuring the Charger for Gel batteries:
Remove the top cover.
1.Pull the jumper off the board (position 1), and then
store the jumper for later use at position 2. See
photo below.
2.Reinstall the top cover.
1. The green wire outputs a battery voltage when the
charger is not plugged in to AC to provide an
Interlock function.
2. Securely fasten the black ring terminal from the
charger to the negative terminal ("-", "NEG",
NEGATIVE") of the battery pack.
3. Select Charge Algorithm if battery type is other than
factory default.
Configure the Charger for Flooded/AGM batteries
1.Remove the top cover
2.Pull the jumper from the storage location (position 2),
and install the jumper at position 1.
3.Reinstall the top cover.
Operating the Battery Charger
CAUTION: DIFFERENT BATTERY TYPES HAVE
DIFFERENT CHARGING REQUIREMENTS. FAILURE
TO PROPERLY IDENTIFY YOUR BATTERY TYPE
AND SET THE CHARGER ACCORDINGLY WILL
RESULT IN BATTERY DAMAGE, AND VOID THE
WARRANTEE.
The battery charger is fully automatic. Simply plug the
charger into a suitable wall outlet, and the charger will
charge the batteries. The green 100% LED will be
continuously illuminated when the charge cycle is
complete.
A bubbling, or boiling sound coming from the batteries
during the last few hours of the charge is normal. The
batteries may be warm, but not too hot to touch.
The charger will maintain the proper battery voltage
as long as it is plugged in (maintenance mode).
Equalizing the batteries (Flooded only)
The batteries should be equalized once every 30 days
for maximum battery runtime and life.
To equalize the batteries:
•Plug in the charger, and fully charge the batteries
(until the green 100% LED is on continuously).
•Unplug the charger from the wall outlet, then plug it
back in.
•The charger will run for 2hrs, holding the batteries at
a constant voltage, and equalizing each cell.
Opportunity Charging
Opportunity charging is charging the batteries when an
opportunity presents itself, such as during breaks, and
is done in addition to a full charge cycle.
Opportunity charging is recommended, as this extra
charging time will help raise the operating voltage of the
batteries, and will help ensure maximum runtime and
cycle life.
See Operating Battery Charger Instructions or
Monthly Maintenance for equalizing your batteries
especially if you have been opportunity charging
your machine.
Top cover
screws
Position 1
Remove
jumper for gel
Position 2
Storage Location
For jumper

Battery Do’s and Don’ts:
•You do not have to fully discharge the batteries
before charging. They do not have a “memory”.
•Plug the charger in anytime the machine is not in
use.
•NEVER let the electrolyte level fall below the tops of
the plates (flooded cell batteries). This will damage
your batteries almost immediately, and void the
battery warrantee. They can tell if this happened.
•NEVER refill the batteries with well or tap water
(flooded cell batteries).
•NEVER overfill the batteries (flooded cell batteries).
•NEVER let the batteries sit discharged overnight (or
between shifts).
•ALWAYS check the electrolyte level about every 3 or
4 charge/discharge cycles BEFORE CHARGING.
•ALWAYS refill the batteries with distilled water (if
needed) AFTER CHARGING.
•ALWAYS fully recharge the batteries after use (until
the green LED comes on).
•ALWAYS equalize the batteries (Flooded only)
every 30 days.
•NEVER OVER DISCHARGE!
•NEVER charge GEL batteries with the charger set to
FLOODED/AGM.
•NEVER charge FLOODED/AGM batteries with the
charger set to GEL. EXCEPTION-TROJAN AGM’S
TO BE CHARGED WITH GEL SETTING.
Battery Replacement Notes
•Entire Pack.
oIt is always recommended to replace all batteries in
the pack at the same time.
•One or more batteries out of the pack. This is not
recommended. Replacing just one or two batteries
out of the pack can lead to the following:
•Overcharging the new, or the remaining
original, batteries.
•Undercharging the new or remaining original,
batteries.
•Over discharging either the new or the
remaining original batteries.
oIf you wish to only replace some of the batteries in
the pack, follow these steps for best results:
•Replacement batteries must always be of the
same battery manufacturer, model and amp-
hour rating, as the remaining batteries in the
pack.
•Never mix batteries from different manufacturers in
the same pack.
Fully charge both the new battery, and the
remaining original batteries. (s.g. = 1.265
minimum, use a hydrometer)
Use a replacement battery that is close to the
same age as the remaining original ones.
Do not run the machine as long for about 20
cycles. For example, if you used to get 4 hrs
runtime, only run it for 2.5 hrs, and then charge
the batteries completely.
Opportunity charge whenever possible.
Equalize after 30 days (Flooded only).
The above steps will provide the best
opportunity for the new battery(s) to join the
pack.
**The charger has been tested on batteries from the following manufacturers:
•Trojan flooded cell
•US Battery flooded cell
•Deka flooded cell
Crown gel
•Concord gel
•Discover AGM
Battery Types
NSS Part Number Crown Part
Number Battery Volts System Volts Amp Hour Battery Type
Setting
4491061 1-1470 12 36 210 Flooded/AGM
3390361 1-1435 6 24 & 36 235 Flooded/AGM
2392111 1-1427 12 24 115
SPE CURVE 0
6393651 1-1428 12 24 145
SPE CURVE 0
2392731 1-12145 12 24 100
SPE CURVE 1
6491931 1-1437 6 24 & 36 200 GEL
2691501 1-1450 6 36 350
Flooded/AGM
NOTE: Tro
j
an AGM batteries should be char
g
ed with the GEL settin
g
.

TROUBLE SHOOTING CHART
Problem Cause Solution
Machine will not turn on.
Battery pack is not plugged into machine. Open the battery cover and plug the battery
pack into the machine.
Battery charger is plugged into AC outlet. Unplug the battery charger.
The 4 amp fuse is missing or blown. Replace 4 amp fuse.
Circuit breaker is tripped. Reset circuit breaker.
Brush motor will not run
or stopped running.
Current over load of brush motor has exceeded
set parameters in control system.
Turn off all switches and then turn on the
master switch to reset the control system. If the
problem continues check battery meter for fault
code F42.
Tilt switch failure. Check tilt switch operation. Replace tilt switch if
test failed.
Carbon Brushes worn or not making contact. Have an authorized NSS Service Station check
carbon brushes and replace if necessary.
Machine vibrates.
Pad not centered or torn. Center pad. Change torn and worn pad.
Pad driver damaged and/or out of balance. Check pad driver for damage and replace if
necessary.
Loose or missing components. Tighten or replace as needed.
Run time is less than
when new..
Damaged/defective battery(s).
Check for fault codes on the battery charger
during battery charging. Have an authorized
NSS Service Station check the batteries and
replace as necessary.
Incorrect Battery Type Setting Ensure charger is set to correct battery type.
Batteries not fully charged Charge batteries until the green LED indicates
charge cycle is complete. Equalize batteries
after 30 days (Flooded only).
Battery charger will not
turn on.
Battery charger cord damaged. Check for cord damage and replace if
necessary. DO NOT try to repair it.
Connection not made between battery charger
and battery pack. Check connections at battery pack for corrosion
and loose or broken wires.
The battery charger is damaged. Have an authorized NSS Service Station check
and replace if necessary. DO NOT try to repair
it.
Pad will not stay in the
pad change position. Weak or missing gas spring. Check and replace if necessary.
Pad will turn on in the
pad changing position. Tilt switch failure. See daily maintenance for proper checking
procedure. Replace tilt switch as necessary.

TROUBLE SHOOTING CHART CONTINUED
Problem Cause Solution
Circuit breaker trips.
Spray Buffing. DO NOT spray buff.
Pad pressure to heavy. Check gas springs for failure and replace as
necessary.
Pad pressure out of adjustment.
Readjust pad pressure as required by your burnishing
conditions.
See pad pressure Adjustment for making adjustments
needed.
Front of machine does not
move down to the floor
when turned on.
Pad Pressure setting incorrect. Added pressure
needed.
Readjust pad pressure as required by your burnishing
conditions.
See pad pressure Adjustment for making adjustments
needed.
Spring guides sticking in slides. Check spring guides for proper operation. Replace if
bent. Lubricate if necessary.
Flashing number 1 appears
in battery meter. Brush motor circuit closed when machine is turned on. Turn off pad lever switch. Check tilt switch for proper
operation.
Fault code F12 appears in
battery meter. Internal programmable parameter data is corrupt. Turn machine off and then on. If problem continues
call for service.
Fault code F23 appears in
battery meter. Internal temperature of controller has exceeded the
set parameters. Turn machine off and let control system cool off. If
problem continues call for service.
Fault code F26 appears in
battery meter.
Precharge failure when controller is turned on or the
control system has been wired incorrectly causing an
internal controller failure.
Turn machine off and then on. If problem continues
call for service.
Fault code F29 appears in
battery meter. Wired incorrectly. Internal control system failure. Check wiring. Turn machine off and then on. If
problem continues call for service.
Fault code F32 appears in
battery meter. Wired incorrectly. Internal control system failure. Check wiring. Turn machine off and then on. If
problem continues call for service.
Fault code F42 appears in
battery meter. The brush motor is exceeding the current limit set in
the controller.
Check the pad pressure for proper adjustment. See
Pad Pressure Adjustment section in manual.
Check pad driver and Flexiwall shield for proper
installation and problems. Turn machine off and then
on. Check the gas springs for wear. If problem
continues call for service.
Fault code F4D/F46/F61
appears in battery meter. Caused by wiring short circuit in brush wiring or
shorted brush motor. Check wiring and pad motor for short circuit. Correct
problem if found. If problem continues call for service.
Fault code F58 appears in
battery meter. The deceleration of the pad motor exceeded set
parameters. Turn machine off and then on. If problem continues
call authorized NSS Service Station for service.
Fault code F62 appears in
battery meter. Wired incorrectly. Internal control system failure. Check wiring. Turn machine off and then on. If
problem continues call for service.
Fault code F63 appears in
battery meter. Caused by wiring short circuit in contactor wiring or
contactor coil. Check wiring and contactor for short circuit. Correct
problem if found. If problem continues call for service.

NSS®Enterprises, Inc.
3115 Frenchmens Road, Toledo, Ohio 43607
PHONE (419) 531-2121 FAX (419) 531-3761
NSS ® Enterprises, Inc. European Distribution Centre
Unit II, Pinfold Trading Estate * 55 Nottingham Road
STAPLEFORD, NOTTINGHAM NG9 8AD ENGLAND U.K.
PHONE: (44) 0115 939 1568 * FAX: (44) 0115 949 0615
NSS Asia Limited Shanghai
501 LiYuan Road, Building A7, Suite 7112
Lu Wan District, Shanhai, China 6137125
PHONE: (021) 61371251 FAX: (021) 61371252
Other manuals for CHARGER 2022 ABLT
1
Table of contents
Other NSS Floor Machine manuals

NSS
NSS charger 2000 User manual

NSS
NSS Predator CXC 200 User manual

NSS
NSS WRANGLER 2625 DB User manual

NSS
NSS champ 2929 rb User manual

NSS
NSS champ 2929 rb User manual

NSS
NSS CHARGER 2717 DB User manual

NSS
NSS MANTA 34 RS Manual

NSS
NSS WRANGLER 2730 User manual

NSS
NSS WRANGLER 2625 DB User manual

NSS
NSS PONY 20 SCA User manual

NSS
NSS STALLION 12 SC User manual

NSS
NSS PREDATOR CXH100 User manual

NSS
NSS Predator CXC Operating instructions

NSS
NSS Predator CXH150 User manual

NSS
NSS mustang 1500 User manual

NSS
NSS WRANGLER 1503 AE Operating instructions

NSS
NSS WARHORSE User manual

NSS
NSS WRANGLER 26 User manual

NSS
NSS WRANGLER 2016 AE User manual

NSS
NSS Manta RS 36 Manual