NuWave Bravo XL 20801 User manual

Questions or Concerns?
Toll Free: 1-877-689-2838 • help@nuwavenow.com
(Mon-Fri 7:30am-4:30pm CST)
Owner’s Manual
Model: 20801 / 20802
Rev.02
Bravo
®
XL
Air Fryer and Oven
with Temperature Probe

2| nuwavenow.com
PRODUCT REGISTRATION
Thank you for purchasing the NuWave Bravo XL Oven
and welcome to the NuWave Family!
Congratulations on getting your new Bravo
XL! We are incredibly excited for you and
want to make sure you get the most out of
your new oven and your cooking experi-
ence.
That’s what this manual is all about.
In it, we have provided detailed operating
and care instructions covering every as-
pect of your new oven to make sure it fully
meets your needs.
NuWave prides itself on the relationships
it builds with its customers - a relationship
that only begins with the purchase. So,
if you have any questions, comments, or
concerns, please don’t hesitate to contact
Customer Service. We’ll take good care of
you!
We’re glad you’re with us, and we know
that you will be, too!
The NuWave Team
REGISTER YOUR PURCHASE
1. Visit
nuwavenow.com/QR
2. Scan the QR code using your
mobile device.
3. Fill in the information requested on the
website.
RECORD THIS INFORMATION
Model Number: _________________
Serial Number:__________________
Date of Purchase________________
(Keep receipt)
Store of Purchase _______________
TECHNICAL SPECIFICATIONS
Voltage: 120V, 60Hz
Wattage: 1800 watts
TIP: You can locate the model and serial
numbers, as well as the QR code, on the
label on the back of the unit. Connect with Us!
#nuwavenow
Visit
nuwavenow.com
to see other
great products and accessories.
WELCOME
REGISTER
NOW!
CUSTOMER SERVICE
Phone: 1-877-689-2838
(Mon-Fri 7:30am - 4:30pm CST)
Email:
help@nuwavenow.com

nuwavenow.com | 3
TABLE OF CONTENTS
Safeguards & Information.................................................................................................4-6
Power-Supply Cords............................................................................................................6
Ordering Parts .....................................................................................................................6
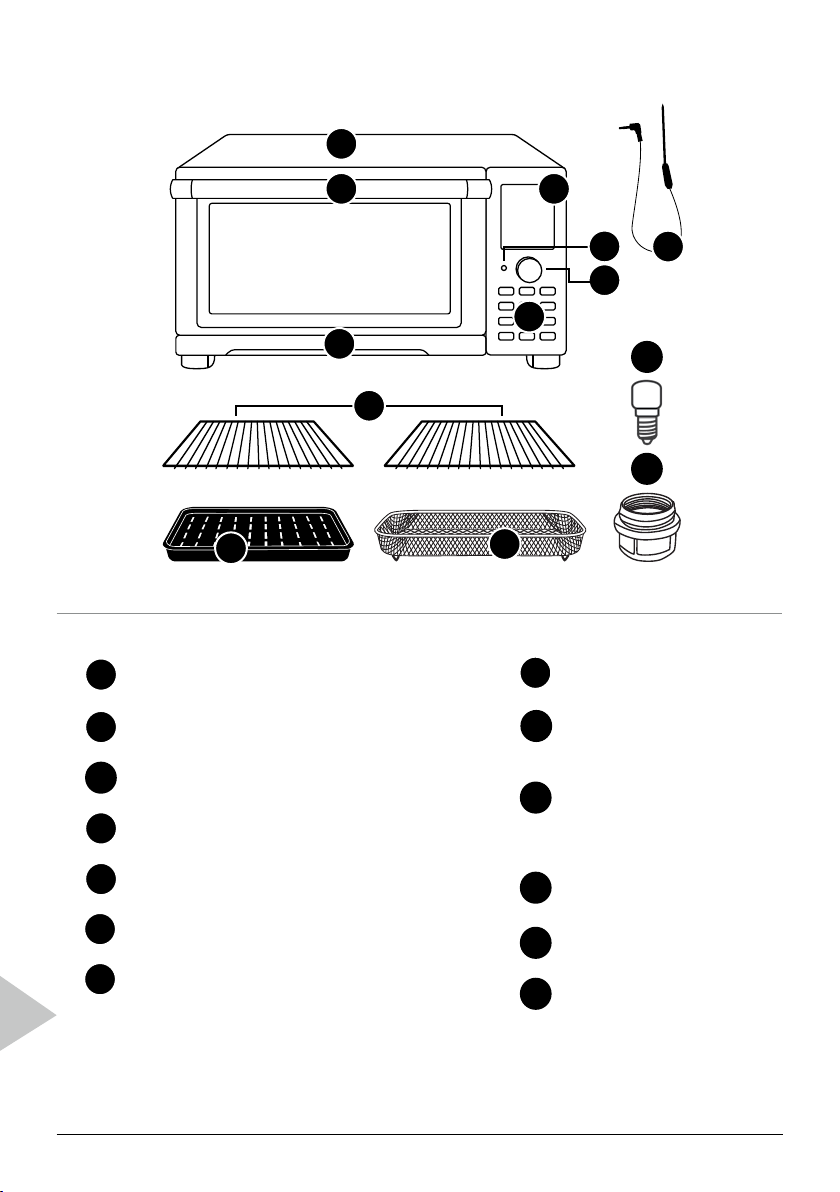
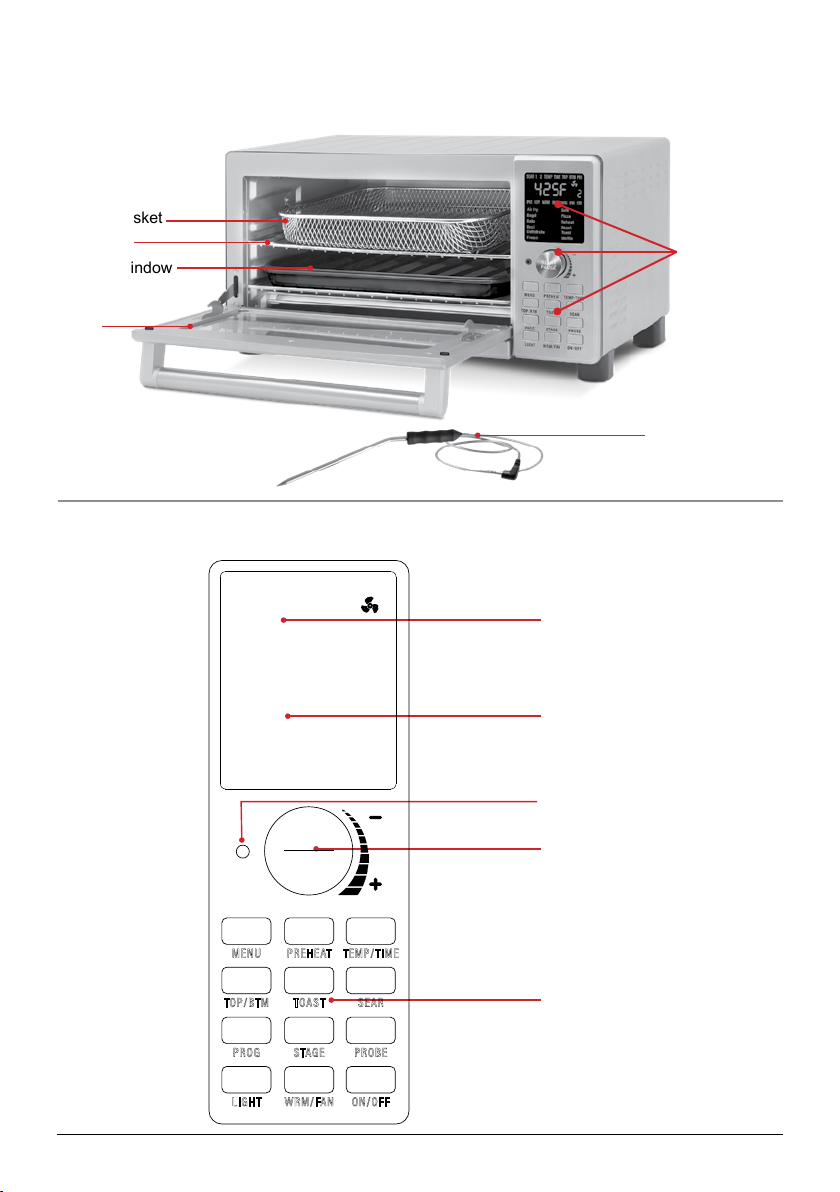
Parts & Accessories..........................................................................................................7
Assembly Guide ................................................................................................................8
Before First Use...................................................................................................................8
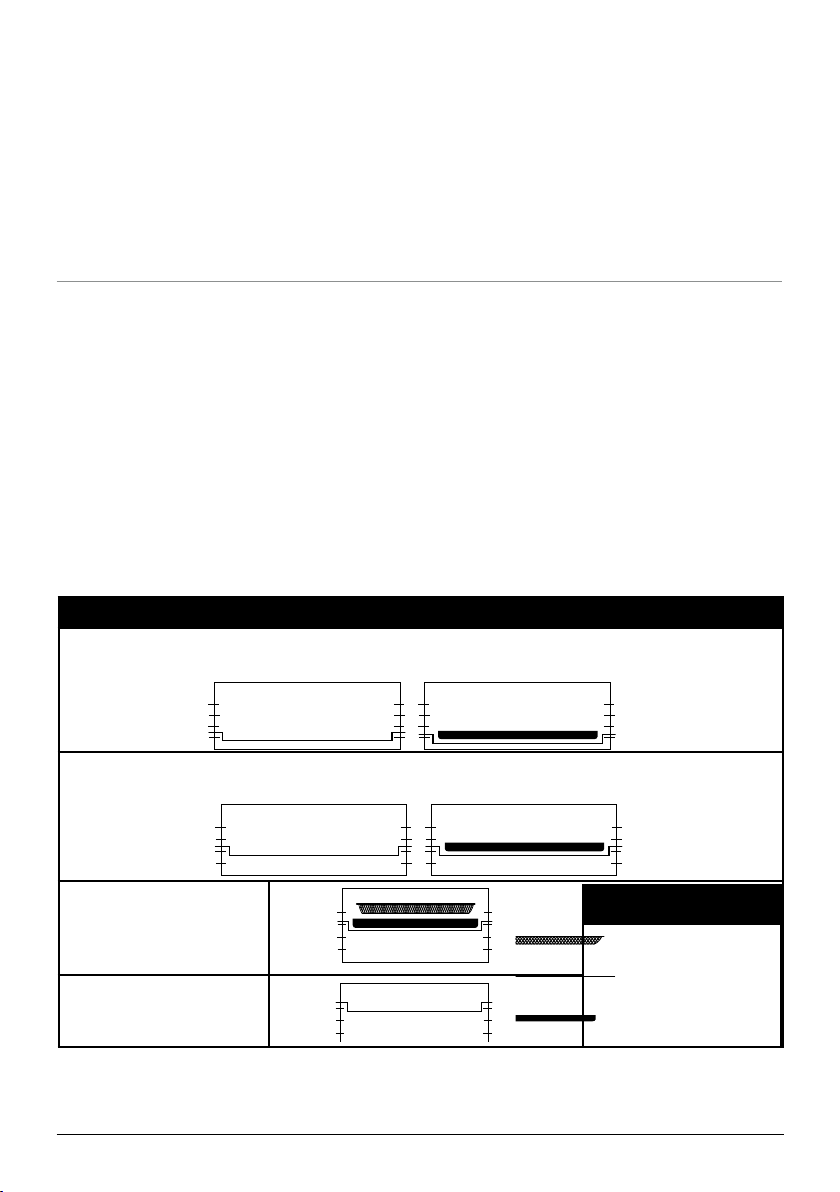
Rack Positions.....................................................................................................................8
Getting Started...................................................................................................................12-17
Key Features .......................................................................................................................12
Control Panel.......................................................................................................................12
Helpful Tips..........................................................................................................................13
Primary Controls..................................................................................................................14
Basic Key Functions............................................................................................................15
Using the Accessories .........................................................................................................16
Selectable Cooking Time.....................................................................................................16
Quick Start...........................................................................................................................17
Adjusting Default Temp & Time ...........................................................................................17
Instructions........................................................................................................................18-26
Time and Temperature.........................................................................................................18
Heat Sources and Fan.........................................................................................................18
Cooking Functions...............................................................................................................19-21
The Menu Function..............................................................................................................22-23
The Preheat Function..........................................................................................................23-24
The Probe Function.............................................................................................................24-25
The Mute Feature................................................................................................................26
The Clock Feature...............................................................................................................26
The Lock Feature ................................................................................................................26
The Wattage Feature...........................................................................................................26
Advanced Functions .........................................................................................................27-29
Stage Cooking.....................................................................................................................27
The Sear Function...............................................................................................................27-28
The Slow Cook Function .....................................................................................................28-29
Care & Maintenance ..........................................................................................................30-32
Before First Use...................................................................................................................30
After Each Use ....................................................................................................................30
Storage................................................................................................................................30
Replacing the Lightbulb.......................................................................................................31
Error Messages ...................................................................................................................31
Troubleshooting...................................................................................................................32
Limited Warranty ...............................................................................................................33-34
Para la versión en español de este manual, visita www.nuwavenow.com

4| nuwavenow.com
SAFEGUARDS & INFORMATION
READ ALL INSTRUCTIONS and WARNINGS The failure to follow any of the import-
ant safeguards, warnings, or instructions for safe use is a misuse of the Bravo XL that
can void your warranty and create the risk of serious injury. When using the Bravo XL,
only use the appliance as intended and for no other use, and always follow basic safety
precautions.
ALWAYS KEEP THIS MANUAL HANDY FOR FUTURE REFERENCE.
1. Read all instructions.
2. Ensure the Bravo XL and all parts are clean and dry before each use.
3. Do not touch hot surfaces. The appliance’s surfaces may be hot during and after use.
Use handles.
4. Discard the protective plastic covering the power plug before use.
5. Do not let the electrical cord touch hot surfaces or hang over any edge.
6. Do not immerse cord, plug, or appliance in water or other liquid.
7. Close supervision is necessary when any appliance is used near children. This ap-
pliance is not intended for use by persons with reduced physical, sensory or mental
capabilities, children, or persons with a lack of experience or knowledge, unless super-
vised or instructed in the use of the appliance by one responsible for their safety.
8. Do not operate if the Bravo XL or cord malfunctions or has been damaged in any way.
Return the unit to the nearest authorized service facility for examination, repair, or
adjustment.
9. Use only on a clean, stable, dry, and level surface.
10. Do not use accessories or attachments not recommended by the
manufacturer.
11. DO NOT USE OUTDOORS. FOR INDOOR USE ONLY.
12. Do not place on or near a hot gas or electric burner, or in a heated oven.
13. Unplug the appliance when not in use and allow the appliance to cool completely
before cleaning or removing/replacing parts.
14. Do not cover or block the intake air vents located in the back and sides of the Bravo
XL, as doing so can prevent proper ventilation. There should be at least 5 inches of
free space behind, to the sides of, and on top of the Bravo XL.
15. Use aluminum foil to wrap foods that produce oil or juice when operating and attach
the Grill/Griddle or use the Drip/Baking Pan to catch drippings and prevent re.
16. To prevent re, do not allow any foil to touch the heating elements.
17. Do not alter or modify any part of the Bravo XL or use attachments
or accessories not recommended by the manufacturer.
18. It is normal for some smoke to escape the Bravo XL when heating for the rst time.
19. If excess smoke is escaping from the air vent during operation, unplug the Bravo
XL immediately and contact NuWave Customer Service at 1-877-689-2838 or email
help@nuwavenow.com
20. During use, steam may be released from the air outlet vents. Keep your hands and

nuwavenow.com | 5
SAFEGUARDS & INFORMATION
ALWAYS KEEP THIS MANUAL HANDY FOR FUTURE REFERENCE.
face away from these vents. Be careful of hot steam escaping when opening the Bravo
XL.
21. Avoid placing your face near the glass door during use.
22. Never touch the insides of the Bravo XL while it is operating.
23. Use extreme caution when moving an appliance containing hot oil or other hot liquids.
24. Never leave the Bravo XL unattended during use.
25. Do not disassemble the Bravo XL.
26. Allow the Bravo XL to cool before putting in or pulling out items or before cleaning.
27. Keep this manual handy for future reference.
28. Always make sure your ngers are clean and dry when pressing the
buttons.
Toaster Oven Warnings (UL Standard 1026, Section 71.7):
1. Oversize foods or metal utensils must not be inserted in a toaster oven as they may
create a re or risk of electric shock.
2. A re may occur if the toaster-oven is covered or touching ammable material, includ-
ing curtains, draperies, walls, and the like, when in operation. Do not store any item
on top of the appliance when in operation.
3. Do not clean with metal scouring pads. Pieces can break off the pad and touch electri-
cal parts creating a risk of electric shock.
4. Extreme caution should be exercised when using containers constructed of materials
other than metal or glass.
5. Do not store any materials, other than the manufacturers recommended accessories,
in this oven when not in use.
6. Do not place any of the following materials in the oven: paper, cardboard, plastic,
cloth, wood, ammable materials, sealed containers, and the like.
7. Do not cover the crumb tray or any part of the oven with metal foil. This will cause
overheating of the oven.
8. Turn off the Bravo XL by pressing the On/Off Button before unplugging the unit from
the wall socket.
Question about your Bravo XL?
Contact our friendly customer service staff from 7:30am to 4:30pm CST, Monday-Friday
at 877-689-2838 or reach us via email anytime at
help@nuwavenow.com

6| nuwavenow.com
SAFEGUARDS & INFORMATION
A short power-supply cord (or detachable power-supply cord) is provided to reduce
the risk of becoming entangled in, or tripping over, a longer cord. Longer detachable pow-
er-supply cords or extension cords are available and may be used if care is
exercised in their use. If a longer detachable power-supply cord or extension cord is used:
1. The marked electrical rating of the extension cord should be at least as great as the
electrical rating of the appliance.
2. The longer cord should be arranged so that it will not drape over any countertop or
tabletop where it could be pulled on or tripped over unintentionally.
3. The Bravo XL should be operated on a separate electrical outlet from other operating
appliances due to wattage limitations.
SAVE THESE INSTRUCTIONS: Read and understand the entire manual before using the
Bravo XL.
Power-Supply Cords
WARNING
To reduce the risk of electric shock, do not perform any servicing other than
that which is contained in these instructions.
To disconnect the Bravo XL, turn it off by pressing the Power button and then
remove the plug from the wall outlet.
NEVER use the Bravo XL with loose, damaged, or missing parts.
While cooking, ALWAYS use oven mitts and allow accessories to cool before
washing.
Over the lifetime of your Bravo XL, you may nd yourself needing a new part
or accessory, and if you do, NuWave has you covered.
Ordering new parts and accessories is quick and easy. Simply take down the
name and number for the part you want, then contact Customer Service. You
can do that by:
• Phone at 877-689-2838 (M‒F, 7:30am‒4:30pm CST), or
• Email at
help@nuwavenow.com
You can even order directly online. Just visit
www.nuwavenow.com
ORDERING PARTS

nuwavenow.com | 7
PARTS & ACCESSORIES
1
2 3
4a 4b
5
6
7
910
8
11
12
Base
Part #: 26815
Handle
Digital Display Menu
Probe Input (Jack)
Temperature Probe
Part #: 26808
Dial
Functions
1
2
3
4a
4b
5
6
Pull-Out Crumb Tray
Part #: 26801
2 Heavy-Duty
Cooking Racks
Part #: 26802
Enamel Baking Pan
and Enamel Broiler
Rack
Part #: 26804
Air Fry Basket
Part #: 26806
Light Bulb
Part#: 26807
Light Bulb Cover
Part#: 26809
7
8
9
10
11
12

8| nuwavenow.com
ASSEMBLY GUIDE
1. Remove and discard any packaging material from the unit.
2. Remove all accessories from their packaging and wash them in warm, soapy water or
in the dishwasher, top rack only, except for the Probe. NEVER submerge the main unit
in water.
While most of the accessories are dishwasher-safe, the Probe is not. Hand washing is,
therefore, highly recommended. Frequent dishwasher cleaning may lead to premature
wear.
Before First Use
1. Place the Bravo on a level, even, and stable heat-resistant surface.
2. Slide the Cooking Rack(s) into Position 1, 2, 3, or 4 of the Bravo.
3. Place Baking Pan with Broiler Rack on Cooking Rack in Position 1.
4. Place the Air Fry Basket on top of Baking Pan. We recommend you use the Air Fry
Basket with the Baking
Pan to optimize cooking results.
5. Place Crumb Tray into position by sliding it into slot at bottom
of Oven. To remove, push down slightly and pull out.
6. Plug the appliance into a standard wall socket. The power plug is located in the rear of
the unit.
Notes:
Do not cover or block the air vents on the Bravo, as doing so can prevent proper ventilation.
Notes:
Use Position 1 for chicken or other large items (with the Baking Pan and Broiler Rack) as
shown above, and with pizza when you want a crispier crust.
Oven Rack and Pan Positions
Position 1:
Air Fry, Bake, Broil, Dehydrate, Frozen, Grill, Pizza, Reheat, Roast, Slow Roast, & Toast
Position 2:
Air Fry, Bake, Broil, Dehydrate, Frozen, Grill, Pizza, Reheat, Roast, Slow Roast, & Toast
Position 3:
Air Fry, Reheat, Bake,
Frozen, Dehydrate,
Toast, Broil, and Roast
Position 4:
Reheat, Frozen, and
Dehydrate
Parts
Air Fry Basket
Cooking Rack
Baking Pan/
Broiler Rack

nuwavenow.com | 9
PRODUCT FEATURES
KEY FEATURES
CONTROL PANEL
Temperature Probe
Door Window
Control Panel
Wire Rack
Air Fry Basket
Door
LED Display
Cooking Function Menu
Probe Jack
START/PAUSE Dial
Unit Function Buttons
400F
2

10 | nuwavenow.com
COOKING FUNCTIONS
12 Preprogrammed Cooking Functions
Air Fry
Automatic Preheat to 450F (232C)
• Default Temp: 350F (177C)
• Default Time: 15 min.
• Heat Source: High Fan (level 3)
• Rack Position: 1, 2, or 3
Pizza
Automatic Preheats to 450F (232C)
• Default Temp: 400F (204C)
• Default Time: 15 min.
• Heat Source: Top/Bottom (30/100
percent)
• Will have a preheat
• Rack Position: 1 or 2. (For crispier
results use position 1.)
• Note: Times & temps will vary on the size
of the pizza.
Bake
Automatic Preheats to 450F (232C)
• Default Temp: 350F (177C)
• Default Time: 25 min.
• Heat Source: Top/Bottom (100/100
percent)
• Will have a preheat
• Rack Position: 1, 2, or 3
Reheat
• Default Temp: 350F (177C)
• Default Time: 10 min.
• Heat Source:
Top/Bottom (100/100 percent)
• Rack Position: Any
Broil
Automatic Preheats to 450F (232C)
• Default Temp: 500F (260C)
• Default Time: 5 min.
• Heat Source: Top (100 percent)
• Rack Position: 2 or 3
Roast
Automatic Preheats to 450F (232C)
• Default Temp: 375F (191C)
• Default Time: 30 min.
• Heat Source: Top/Bottom
(100/100 percent)
• Will have a preheat
• Rack Position: 1
Dehydrate
• Default Temp: 100F (37C)
• Default Time: 2 hours
• Heat Source: Medium Fan (level 2)
• Rack Position: Any
Slow Roast
• Default Temp: 275F (135C)
• Default Time: 1 hour
• Probe: 165F (74C)
• Heat Source: Top/Bottom
(100/100 percent)
• Rack Position: 1, 2, or 3
If Automatic Preheat is turned off the Presets will not preheat automatically.
To convert from Fahrenheit to Celsius press SEAR and TEMP/TIME. Do the same
to switch back.

nuwavenow.com | 11
COOKING FUNCTIONS
Frozen
Automatic Preheats to 450F (232C)
• Default Temp: 375F (191C)
• Default Time: 30 min.
• Heat Source: Top/Bottom (100/100
percent)
• Rack Position: Any
Toast
Automatic Preheats to 450F (232C)
• Default Temp: 425F (218C)
• Default Time: 5 min.
• Heat Source: Top/Bottom (100/100
percent)
• Rack Position: 3
Grill
Automatic Preheats to 450F (232C)
• Default Temp: 425F (218C)
• Default Time: 15 min.
• Heat Source: Top/Bottom (50/100
percent)
• Will have a preheat to 450F (232C)
• Rack Position: 1
Yogurt*
*Refer to page 25 for directions.
Note:
• The unit preheats to the default temperature of the cooking function. To turn off the
automatic preheat, press PREHEAT and preheat will turn off.
• NEVER Allow any food to touch the heating elements directly.
• Default temperatures, times, and rack positions are a guide. Adjustments may need to
be made to reach your desired result.
• Fan speed of High (level 3) is the default setting unless the speed is adjusted.
Dehydrate should be the lowest fan setting (level 1).
Measurement Chart
Teaspoon = t Fahrenheit = °F Minute = min
Tablespoon = T Celsius = °C Second = sec
Cup = c Fluid Ounces = oz Inch = in.
Ounce = oz Liter = L Dozen = doz
Pound = lb(s) Milliliter = ml Hour = hr
Quart = qt Package = pkg. Gram = g
Pint = pt Gallon = gal Kilogram = kg
Helpful Hints
1. To add more time during current cooking cycle, turn START/PAUSE clockwise.
Monitor your food to ensure it doesn't overcook.
2. Some moisture may appear on the Bravo’s door during certain cooking cycles.
3. When air-frying, food can be lightly coated with oil beforehand to boost crispiness and
browning.

12 | nuwavenow.com
Probe Temperatures
TEMPERATURE CHARTS
Meats Oven
Temp. Rare Med
Rare Med Med
Well Well
Chicken, breast
Turkey, breast
Duck, breast
360 165*
Chicken, whole
Turkey, whole
Duck, whole
360 165*
Chicken, thigh
Turkey, thigh
Duck, thigh
360 165*
Steak 1" thick (25mm) 450 125 135 145* 150* 160*
Burgers ½ lb (227g) 450 125 135 145* 155* 160*
Roast Beef (bone-in)
Roast Beef
(boneless)
350 125 135 145* 150* 160*
Roast Lamb
(bone-in)Lamb
(boneless)
350 125 135 145* 150* 160*
Pork (bone-in)
Pork (boneless) 350 145* 150* 160*
Salmon, Tuna,
Halibut, Swordfish 450 145* 150* 160*
Fish Steaks 1" thick
(25mm) 450 145* 150* 160*
Sausage 450/232 160*
Note: Times may vary depending on cooking preference. Consuming raw or
undercooked meats, poultry, or seafood may increase your risk of food borne
illness. *To reduce the risk, cook your food to USDA-safe temperatures.
Cooking Temperature Selectable Cooking Time
50°F–275°F 00:00–99:59
280°F–350°F 00:00–24:00
355°F–400°F 00:00–04:00
405°F–450°F 00:00–01:00
455°F–500°F 00:00–00:30
Selectable Cooking Time

nuwavenow.com | 13
UNIT FUNCTION BUTTONS
ON/OFF
Turns the Bravo®ON and OFF. This also cancels any cooking function.
MENU
Accesses the 12 cooking functions (see pages 10–11). Turn START/PAUSE to select.
PREHEAT
Heats to a desired temperature. By default, the preheat temperature is set to 350F.
TEMP/TIME
Use START/PAUSE turn clockwise to increase, counterclockwise to decrease. Allows you
to adjust temperature and time before and during the cooking process. To convert from
Fahrenheit to Celsius press SEAR and TEMP/TIME. Do the same to switch back.
• Days/Hours: To switch the timer to Days and Hours, press PROG and TEMP/TIME.
To go back to Hours and Minutes, press PROG and TEMP/TIME again.
• TIME format: You can change the format to display minutes and seconds (ex 10:59,
10 minutes and 59 seconds). Press and hold TIME for 1 second, if you press it again
it will go back to the default setting.
• To change the default temperature, press and hold START/PAUSE for 1 second and
then turn the dial to the new default temperature.
• To change the default time, press TIME then press and hold START/PAUSE for 1 second
and then turn the dial to the new default time.
TOP/BTM
Adjusts the power to the top and bottom heating elements. Default is set to 100/100.
TOAST
Select between 10 levels. Default is Level 5, 425F for 5 minutes. Lower the number with
the START/PAUSE dial for lighter toast or raise it for darker toast.
SEAR
Sears your food to preserve juices. Default is 450F for 5 minutes.
PROG
Gives you access to 100 cooking presets and allows you to store 50 of your own.
WRM/FAN
• WRM: Keeps your favorite leftovers warm after cooking. Default temperature 140F
(60C), default time1 hour, up to 3 hours 50F(10C)-200F (93C).
• FAN: Adjust between 0 and 3 fan speeds.
STAGE
Lets you cook at different temps and times throughout the cooking process.
PROBE
Use the included Digital Probe for perfect results every time.
LIGHT
Turns the internal light on and off.
Note: Refer to INSTRUCTIONS for detail explanation for each button and features.

14 | nuwavenow.com
INSTRUCTIONS
With its numerous Cooking Presets and features, the Bravo XL’s suite of unit and cooking
functions offers you all you need to make delicious, healthy meals quickly and easily.
Setting the Clock
1. Press PREHEAT and TEMP/TIME at
the same time.
2. Turn the START/PAUSE to set the
clock. When 12:00 is reached, PM
will be displayed. Unplug the Bravo to
cancel the clock.
Displaying Clock During Cooking:
1. Press PREHEAT and TEMP/TIME at
the same time. The display will show
the current time.
• Time can be adjusted by turning
START/PAUSE.
• The clock time will remain displayed
until START/PAUSE button is
pressed.
WRM/FAN
FAN – Level 3, High (Full) Speed
1. Press and hold WRM/FAN for 1
second. 3 above STG and FAN will be
displayed.
2. Rotate the START/PAUSE dial to adjust
the fan speed.
3. To turn the fan off, turn the START/
PAUSE dial to 0
1. Press ON/OFF once to turn your Bravo
on.
2. Press START/PAUSE to begin cooking
at 350F (177C) for 15 minutes, which
are the default settings.
• 350F (177C) will be displayed and a
countdown will begin.
• To adjust cooking temperature, turn
the START/PAUSE Dial clockwise
to increase, or counterclockwise to
decrease temperature in 5F (1C)
increments. Quickly turn the Dial to
adjust in larger increments.
• Both the cooking temperature and
time can be adjusted during cooking
by pressing TEMP/TIME then
turning the START/PAUSE Dial to
adjust each.
3. Press START/PAUSE once during
cooking to pause.
4. Press START/PAUSE a second time to
resume cooking.
• Remaining cooking time will be
displayed and the countdown will
continue.
/

nuwavenow.com | 15
INSTRUCTIONS
WRM (WARM)
1. Press ON/OFF.
2. Press WRM/FAN. Default is 140F (60C)
for 1 hour (“01:00”).
• Adjust warming temperature/time
by turning START/PAUSE clockwise
to increase, or counterclockwise
to decrease temperature in 5F
(1C) increments. Quickly turn Dial
to adjust in larger increments.
Temperature range is 50F ~ 200F
(10C ~ 93C).
• WRM will be displayed when Warm
function is used.
3. Press START/PAUSE to begin cooking.
Notes:
• The fan is not on during the Warm
function.
• Warm will always be the last cooking
function executed by the Bravo. For
example, the order of cooking functions:
Preheat » Sear 1 » Regular Cooking
Cycle » Sear 2 » Warm » End.
Independent WARM
This feature will keep your food warm for up
3 hours.
1. Press WRM/FAN and TOP/BTM at the
same time to turn Individual WARM
feature.
2. Default time is 1 hr max is 3 hr.
3. 50F - 200F (10C - 93C) is the
temperature range.
140F
TOP/BTM
Default – Top 100%, Bottom 100%. This
refers to the amount of heat coming from
the top and bottom heating elements.
1. Press ON/OFF.
2. Press TOP/BTM, 100 and TOP will be
displayed. Adjust the amount of heat
coming from the top heating element by
turning START/PAUSE. Adjustable in
10% increments.
3. Press TOP/BTM again, 100 and BTM
will be displayed. Adjust the amount of
heat coming from the bottom heating
element by turning START/PAUSE.
Adjustable in 10% increments.
4. After top and bottom heat percentages
have been chosen, press START/
PAUSE.
Note: While using Broil from the MENU,
the BTM power is not adjustable. The
Broil function only uses the TOP heating
element.
Bake, Roast or Broil?
Use Bake when cooking items that rise
(e.g., cakes and cookies). Use Roast
for dense foods that are browned
throughout the cooking process. Use Broil
to quickly brown or crisp a food item.

16 | nuwavenow.com
INSTRUCTIONS
TEMP/TIME
Default – 350F, 15 minutes
1. Press TEMP/TIME once.
• Turn the START/PAUSE dial
clockwise to increase time in
1-minute increments. Quickly turn the
Dial to adjust in larger increments.
• Turn the START/PAUSE dial
counterclockwise to decrease time in
1-minute increments. Quickly turn the
dial to adjust in larger increments.
• Time range is 99 hours, 99 minutes
(“00:00”–“99:99”).
2. Press TEMP/TIME, 350F and TEMP
will be displayed.
• Turn the START/PAUSE dial
clockwise to increase temperature in
5F increments. Quickly turn the dial
to adjust in larger increments.
• Turn the START/PAUSE dial
counterclockwise to decrease
temperature in 5F increments.
Quickly turn the dial to adjust in
larger increments.
3. Press START/PAUSE to begin cooking.
4. When the Bravo is finished cooking
your food, “End” will be displayed and
the unit will beep three times.
Notes:
• Press TEMP/TIME to see current cooking
temperature and remaining cooking time.
• The START/PAUSE dial can be turned in
while pressing TEMP/TIME to adjust your
temperature and time during cooking.
00:15
PREHEAT
1. Press ON/OFF. Adjust cooking
temperature and cooking time.
• Turn START/PAUSE clockwise to
increase temperature in 5F (1C)
increments. Quickly turn the dial to
adjust in larger increments.
• Turn START/PAUSE
counterclockwise to decrease
temperature in 5F (1C) increments.
Quickly turn the dial to adjust in
larger increments.
2. Press START/PAUSE to begin
preheating.
• When the preheat temperature is
reached, the unit will beep and a
10-second countdown will begin.
3. Carefully place food into the Bravo. The
unit will automatically begin cooking
once the countdown is finished.
Notes:
• If using a Preprogrammed cooking
function with a built-in preheat, once
cooking begins, turn the dial to change
the regular cooking time.

nuwavenow.com | 17
INSTRUCTIONS
AUTO PREHEAT
1. Press PROG and PREHEAT at the
same time to turn on/off Auto Preheat.
• Auto Preheat will automatically
preheat the Bravo to the set cooking
temperature.
• After it has reached the set cooking
temperature, Bravo will go into a
10-second countdown just like the
typical PREHEAT function.
• After the countdown ends, the
Bravo will cook at the set cooking
temperature and time.
2. To turn off Auto Preheat press PROG and
PREHEAT at the same time.
DELAY
Default – 1 hour.
1. Press ON/OFF.
2. Press PROG and TOP/BTM.
• Adjust delay time by turning START/
PAUSE clockwise to increase time
in 1-minute increments or by turning
START/PAUSE counterclockwise
to decrease time in 1-minute
increments. Quickly turn the dial to
adjust in larger increments.
• Maximum delay time is 24 hrs.
(“24:00”).
3. Press START/PAUSE to begin delay time
countdown.
• The set delay time will be displayed
with a countdown.
0 1:00
4. Once delay countdown is complete, the
Bravo will begin cooking at set cooking
temperature and time (default is 350F
(177C) for 15 minutes).
Using Delay with Cooking Function
Example 1: Delay cooking 40 minutes, cook
at 360F (182C) for 20 minutes.
1. Press TEMP/TIME. Adjust cooking
temperature to 360F (182C).
2. Press TEMP/TIME a second time.
Adjust cooking time to 20 min.
3. Press PROG and TOP/BTM at the
same time. Adjust Delay time to 40
min.
4. Press START/PAUSE. The Bravo will
delay for 40 minutes, then begin to
cook at 360F (182C) for 20 minutes.
Example 2: Delay cooking 60 minutes (1
hour), cook at 400F (204C) for 10 minutes.
1. Press TEMP/TIME. Adjust cooking
temperature to 400F (204C).
2. Press TEMP/TIME a second time.
Adjust cooking time to 10 min.
3. Press PROG and TOP/BTM at the
same time. Adjust Delay time to 1 hr.
4. Press START/PAUSE. The Bravo will
delay for 1 hr, then begin to cook at
400F (204C) for 10 minutes.
5. When the Bravo is finished, “End” will
be displayed and the unit will beep
three times.
Note: Delay will always be the first function
executed by the Bravo.

18 | nuwavenow.com
INSTRUCTIONS
1
MENU
1. Press ON/OFF.
2. Press MENU. Selected setting will be
flashing.
3. To select from the menu turn START/
PAUSE or press MENU.
4. Once desired menu is chosen, press
START/PAUSE to begin cooking. The
cooking time will be
displayed.
• When the Bravo is finished cooking,
End will be displayed and the unit will
beep three times.
• Turn START/PAUSE to adjust
temperature and time, if necessary.
• You can adjust the temperature and
time for any menu option with a built-
in preheat. (See 12 Preprogrammed
Menu chart.)
Notes:
• Some Menu options require preheating.
This step is preprogrammed into each
Menu option that requires it. Menus with
built-in preheat include “Air Fry”, “Bake”,
“Pizza”, “Frozen”, “Toast”, “Broil”, “Grill”,
and “Roast”.
• Once preheat temperature is reached,
the Bravo will beep, 5 will be displayed,
and a 5-minute countdown will begin.
SEAR: Default — 450F / 5 minutes.
SEAR 1
This is set to default BEFORE the regular
cooking stage.
1. Press ON/OFF.
2. Press SEAR once, 1 will be displayed.
3. Press START/PAUSE. SEAR 1 will be
displayed, colon (:) will flash.
• The unit will cook at 450F for 5 min.
(SEAR 1), cook at 350F for 15 min.
(default), display End, and beep three
times, indicating that your cooking is
complete.
Note:
• Regular cooking stage temperature and
time can be adjusted by turning START/
PAUSE after Step 1.
SEAR 1 2
1. Press ON/OFF.
2. Press SEAR twice. 450F, TEMP, and
SEAR 1 and 2 will be displayed.
3. Press START/PAUSE. SEAR 1 will be
displayed and colon (:) will flash. TIME,
TOP, and BTM will be displayed.
• The unit will cook at 450F for 5 min.
(SEAR 1), cook at 350F for 10 min.
(default), and cook again at 450F
for 5 min. (SEAR 2). SEAR 2 will be
displayed, colon (:) will flash, End will
be displayed, and the unit will beep
three times, indicating your cooking is
complete.
450F

nuwavenow.com | 19
INSTRUCTIONS
2. Press STAGE.
• Press TEMP/TIME. Turn START/
PAUSE to adjust this stage’s cooking
temperature and time.
3. Press STAGE again to program another
stage of cooking.
• Press TEMP/TIME. Turn START/
PAUSE to adjust this stage’s cooking
temperature and time.
4. Press START/PAUSE to begin cooking
the stages programmed.
SEAR 1, SEAR 1 2, DELAY, and WARM
with STAGE COOKING
Example: Delay for 1 hour » adjust to 350F
(Sear 1) for 4 min. » Cook at 325F for 20
min. (Stage 1) » Cook at 300F for 40 min.
(Stage 2) » Cook at 350F for 10 min. (Stage
3) » Cook at 400F for 5 min. (Sear 1 2) »
WARM at 125F for 30 min.
1. Press ON/OFF. Adjust temperature to
325F by turning START/PAUSE, 350F is
the default.
2. Press TEMP/TIME. Adjust time to 20
min. by turning START/PAUSE.
SEAR 2
Sear 2 will always be the stage AFTER the
regular cooking stage.
1. Press ON/OFF.
2. Press SEAR three times, 2 will be
displayed.
• Press START/PAUSE. The unit will
cook at 350F for 15 min. (default),
cook at 450F for 5 min. (SEAR 2),
display End, and beep three times,
indicating your cooking is complete.
Notes:
• Press SEAR four times to clear out Sear
function.
• Maximum time for all Sear functions is 30
min. (“00:30”).
• Maximum temperature for all Sear
functions is 500F.
STAGE
You can program a maximum of 5 stages.
1. Press ON/OFF.
450F
350F
STG
2

20 | nuwavenow.com
INSTRUCTIONS
3. Press PROG and TOP/BTM at the
same time to set delay. Turn START/
PAUSE to adjust time to 1 hour
(“01:00”).
4. Press SEAR once. Turn START/PAUSE
to adjust temperature to 350F. Press
TEMP/TIME. Turn START/PAUSE to
adjust time to 4 min. 1 will be displayed.
5. Press STAGE. Turn START/PAUSE
to adjust temperature to 300F. Press
TEMP/TIME. Turn START/PAUSE to
adjust time to 40 min.
6. Press STAGE again. Turn START/
PAUSE to adjust temperature to 350F.
Press TEMP/TIME. Turn START/PAUSE
to adjust time to 10 min.
7. Press SEAR again. Turn START/
PAUSE to adjust temperature to 400F.
Press TEMP/TIME. Turn START/
PAUSE to adjust time to 5 min., 2 will
flash.
8. Press WARM. Turn START/PAUSE to
adjust warming temperature to 125F.
Press TEMP/TIME. Turn START/
PAUSE to adjust warming time to 30
min.
9. Press START/PAUSE to begin the
cooking process.
Notes:
• During cooking, the Bravo will display
all functions programmed for that
cooking cycle. The function that the
Bravo is currently cooking in will flash.
• The remaining time for that function or
stage will count down and colon (:) will
flash. The remaining functions for that
cycle will remain displayed.
LOCK
Lock is used to stop the function of the
Bravo. While in Lock mode, your Bravo’s
buttons will not respond to any action until
the unit is unlocked.
1. Press ON/OFF. Set cooking
temperature. (See TEMP/TIME.)
2. To lock unit functions, press PROG and
STAGE at the same time. Remaining
cooking time will be displayed.
• NO buttons will function during Lock
except LIGHT and ON/OFF.
3. To unlock your Bravo’s functions, press
PROG and STAGE at the same time
once again. The Bravo will unlock and
LOC be displayed.
• ON/OFF button will work during Lock
function if the Bravo needs to be
turned off.
PROBE
The digital Temperature Probe is used to
show an accurate internal temperature of
food. Default – 165F.
1. Insert end of Temperature Probe into
your food. Place food in oven. Leave
enough of the wire to exit the oven
over the top of the door.
2. Insert the Probe into the Probe Jack.
LOC
This manual suits for next models
1
Table of contents
Other NuWave Kitchen Appliance manuals

NuWave
NuWave Nutri-Pot 13Q Quick guide

NuWave
NuWave Nutri-Pot 10Q User manual

NuWave
NuWave 31201 Technical specifications

NuWave
NuWave Duet User manual

NuWave
NuWave PIC Flex User manual

NuWave
NuWave NuWave Medley XL User manual

NuWave
NuWave Nutri-Pot 6Q Quick guide

NuWave
NuWave 31820 User manual

NuWave
NuWave Nutri-Pot 6Q Quick guide

NuWave
NuWave Olio User manual