Oce Tensioning winder 30 User manual

Tensioning
Winder 30
User’s Guide
For Océ CS9050, CS9060 &
CS9160
Eco Solvent Printers

User’s Guide Tensioning winder 30 for Océ CS9050, CS9060 & CS9160 Eco-Solvent Printer
2 AP-40104 - Revision 1.1 – 12/03/2008
This page is left blank intentionally

User’s Guide Tensioning winder 30 for Océ CS9050, CS9060 & CS9160 Eco-Solvent Printer
3 AP-40104 - Revision 1.1 – 12/03/2008
COPYRIGHT NOTICE
COPYRIGHT ©2008 Océ-Technologies B.V. All rights reserved.
This document may not be reproduced by any means, in whole or in part, without written permission of the
copyright owner.
This document is furnished for the installation of the Tensioning Winder 30 on a OCÉ CS9060 & CS9160
Eco Solvent Printer.
In consideration of the furnishing of the information contained in this document, the party to whom it is given,
assumes its custody and control and agrees to the following:
The information herein contained is given in confidence, and any part thereof shall not be copied or
reproduced without written consent of Océ-Technologies B.V.
This document or the contents herein under no circumstances, shall be used in the manufacture or
reproduction of the article shown and the delivery of this document shall not constitute any right or license to
do so.
March 2008
Published: Océ-Technologies B.V.
St. Urbanusweg 43
Venlo, The Netherlands,
P.O. Box 101, NL 5900 MA Venlo.
WEEE regulations
Environmental information
Disposal of your old product
Your product is designed and manufactured with high quality materials and components, which
can be recycled and reused.
When this crossed-out wheeled bin symbol is attached to a product it means the product is
covered by the European Directive 2002/96/EC
Please inform yourself about the local separate collection system for electrical and electronic
products.
Please act according to your local rules and do not dispose of your old products with your normal
household waste. The correct disposal of your old product will help prevent potential negative
consequences for the environment and human health.

User’s Guide Tensioning winder 30 for Océ CS9050, CS9060 & CS9160 Eco-Solvent Printer
4 AP-40104 - Revision 1.1 – 12/03/2008
This page is left blank intentionally

User’s Guide Tensioning winder 30 for Océ CS9050, CS9060 & CS9160 Eco-Solvent Printer
5 AP-40104 - Revision 1.1 – 12/03/2008
Table of contents
1Safety instructions .....................................................................................................7
2Product overview........................................................................................................9
2.1 Part names and functions......................................................................................9
2.1.1 Front side...........................................................................................................9
2.1.2 Rear side .........................................................................................................10
2.1.2.1 CS9050() ..................................................................................................10
2.1.2.2 CS9060 and CS9160 () ............................................................................10
2.2 In-the-box contents CS9050................................................................................11
2.2.1 Winder kit CS9050...........................................................................................12
2.3 In-the-box contents CS9060 and CS9160...........................................................13
2.3.1 Winder kit CS9060 and CS9160......................................................................14
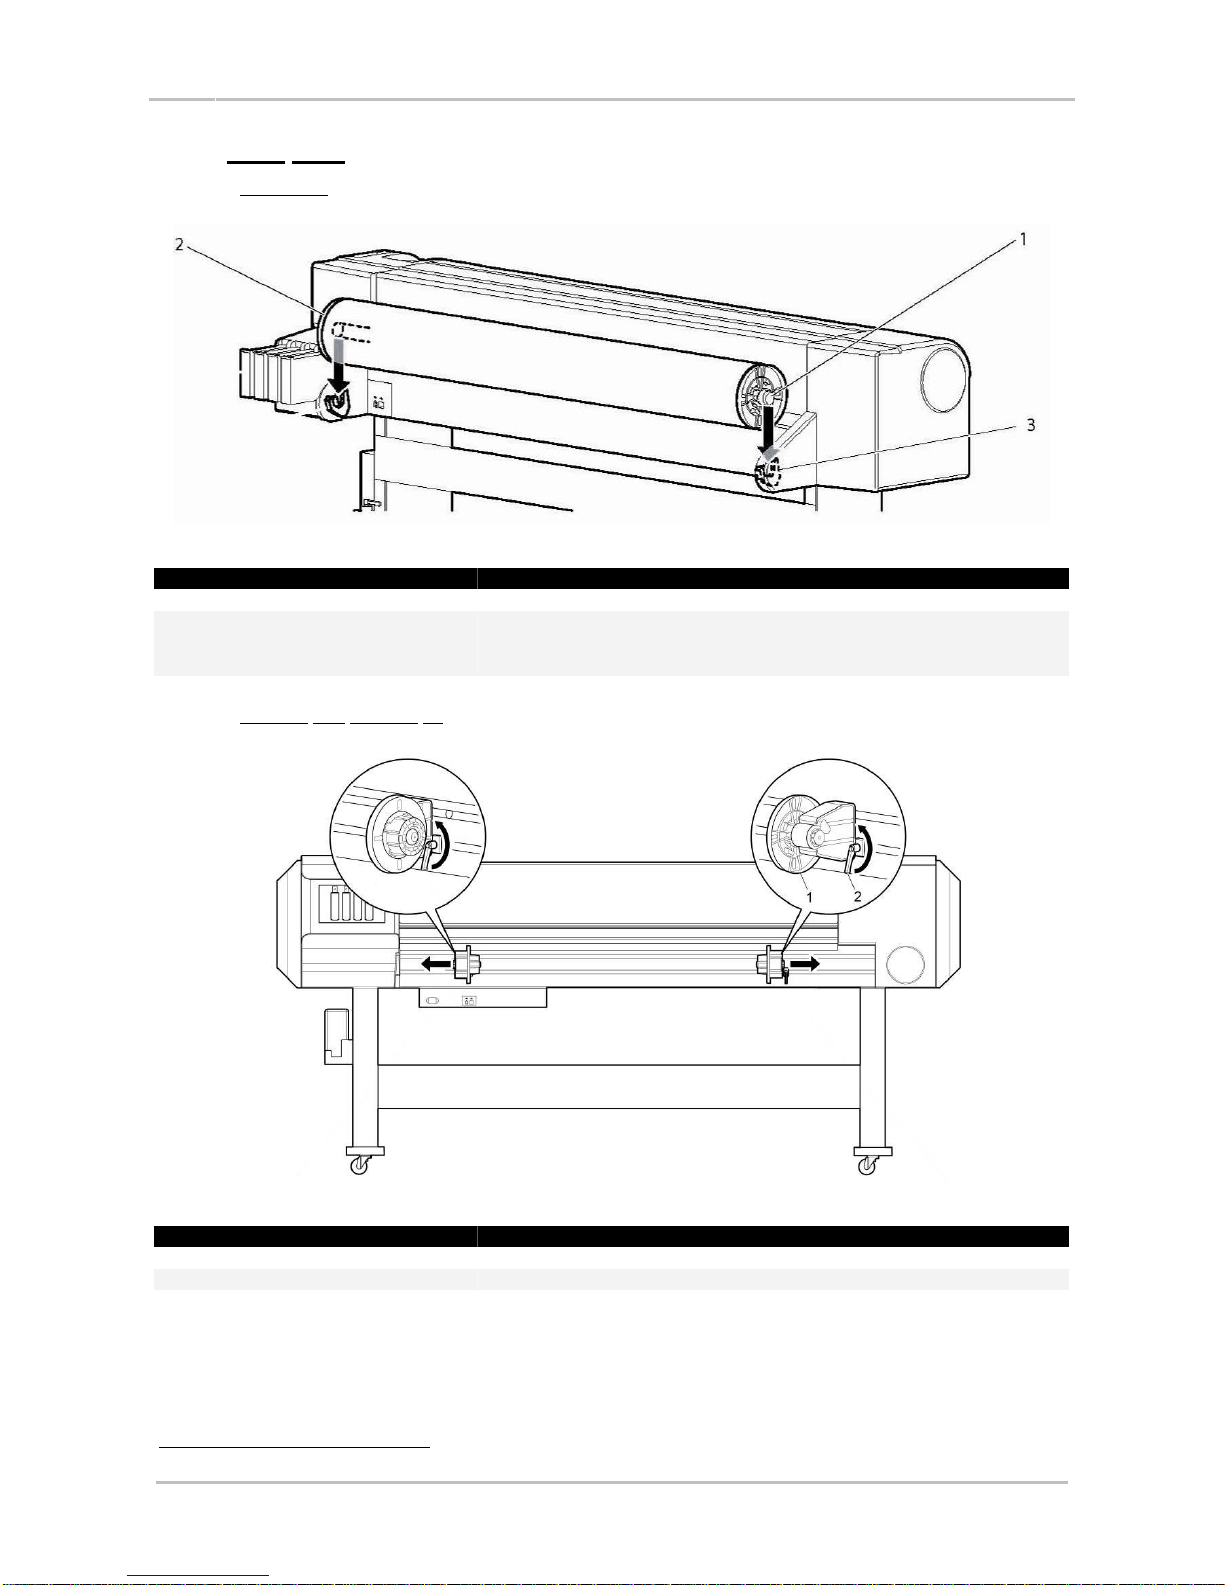
3Installation procedure..............................................................................................15
3.1 Installing the front tensioning system...................................................................15
4Calibration procedure ..............................................................................................21
4.1 Tensioning bar.....................................................................................................21
4.1.1 Calibration........................................................................................................21
4.1.2 Adjustment.......................................................................................................23
4.2 Scroller bar..........................................................................................................24
4.2.1 Calibration........................................................................................................24
4.2.2 Adjustment.......................................................................................................26
5Operating the system...............................................................................................27
5.1 Switching the power ON/OFF..............................................................................27
5.2 Connecting the power cable................................................................................27
5.3 Activate the winding system................................................................................28
5.4 Locking the system..............................................................................................28
5.5 Loading roll media...............................................................................................29

User’s Guide Tensioning winder 30 for Océ CS9050, CS9060 & CS9160 Eco-Solvent Printer
6 AP-40104 - Revision 1.1 – 12/03/2008
This page is left blank intentionally

User’s Guide Tensioning winder 30 for Océ CS9050, CS9060 & CS9160 Eco-Solvent Printer
7 AP-40104 - Revision 1.1 – 12/03/2008
1 SAFETY INSTRUCTIONS
Important
BE SURE TO READ THE TERMS IN THE NEXT CHAPTER THOROUGHLY BEFORE INSTALLING AND
OPERATING THE SYSTEM FOR YOUR OWN SAFETY.
All safety related terms are bundled and categorized in three types.
Safety terms Details
Important Must be followed carefully to avoid death or serious bodily injury
Caution Must be observed to avoid bodily injury (moderate or light) or damage to your equipment
Notes Contains important information and useful tips on the operation of your printer
•Do not stand on or place heavy objects on the unit. Doing so may result in the unit tipping or falling over
and causing injury.
•Do not attempt to plug in electrical plugs with wet hands. Doing so may result in electrical shock.
•Do not use thinner, benzene, alcohol or other active agents. Doing so may result in damage or paint
peeling from the casing.
•Be careful not to spill water inside the winder. Doing so may result in a short-circuit.
•Never open the covers fixed with screws. Doing so may result in electrical shock or a malfunctioning in
the unit.
•When setting roll media, place it on top of a desk or other flat surface. Setting roll media with the scroller
standing up may damage them.

User’s Guide Tensioning winder 30 for Océ CS9050, CS9060 & CS9160 Eco-Solvent Printer
8 AP-40104 - Revision 1.1 – 12/03/2008
This page is intentionally left blank

User’s Guide Tensioning winder 30 for Océ CS9050, CS9060 & CS9160 Eco-Solvent Printer
9 AP-40104 - Revision 1.1 – 12/03/2008
2 PRODUCT OVERVIEW
2.1 PART NAMES AND FUNCTIONS
2.1.1 Front side
No Name Function
1 Operation panel Enable or disable the winding system
2 Power switch To switch ON and OFF the T Winder 30
3 Horizontal adjustment screw Adjust the side position of the scroller
4 Scroller lock lever To lock and unlock the scroller
5 Driving mechanism Winds up the printed media
6 Scroller assembly To install an empty core on which printed media is wound up
7 Tensioning bar Optimizes the tension between print platform and scroller
8 Left bracket Scroller support
9 Scroller height adjustment screw Lower or raise the scroller
10 Scroller height fixing screw Fix the height of the scroller

User’s Guide Tensioning winder 30 for Océ CS9050, CS9060 & CS9160 Eco-Solvent Printer
10 AP-40104 - Revision 1.1 – 12/03/2008
2.1.2 Rear side
2.1.2.1 CS9050(*)
No Name Function
1 Scroller Supports the movable flanges
2 Flange There is one movable and one fixed flange to position the media
correctly
3 Scroller receiver Movable flange
2.1.2.2 CS9060 and CS9160 (*)
No Name Function
1 Scroller support Movable 2-3” compatible core holders.
2 Scroller support lever To lock or unlock the scroller supports.
(*) This system is pre mounted and not included in the kit. But works as one system with the tensioning winder.

User’s Guide Tensioning winder 30 for Océ CS9050, CS9060 & CS9160 Eco-Solvent Printer
11 AP-40104 - Revision 1.1 – 12/03/2008
2.2 IN-THE-BOX CONTENTS CS9050
No Part Description Quantity
1 Front tensioning system 1
aDriving mechanism 1
bLeft bracket 1
cWinder Kit (*) 1
dScroller assembly (2-3” compatible) and core 1
eTensioning bar 1
*Please refer to the next page for the contents of the winder kit

User’s Guide Tensioning winder 30 for Océ CS9050, CS9060 & CS9160 Eco-Solvent Printer
12 AP-40104 - Revision 1.1 – 12/03/2008
2.2.1 Winder kit CS9050
No Part Description Quantity
1 PET adjusting strip 1
2 Hexagon key 3 mm 1
3 Hexagon key 4 mm 1
4 Spacer 6
5 Adjustment plate 1
6 Screw M4x10 10
7 Screw M5x12 3
8 Power cable (EU and UK) 2
9 Motorbox support bracket 1
10 Motorbox closing bracket 1
11 Roller support closing bracket 1

User’s Guide Tensioning winder 30 for Océ CS9050, CS9060 & CS9160 Eco-Solvent Printer
13 AP-40104 - Revision 1.1 – 12/03/2008
2.3 IN-THE-BOX CONTENTS CS9060 AND CS9160
No Part Description Quantity
1 Front tensioning system 1
aDriving mechanism and right bracket 1
bLeft bracket 1
cTensioning bar 1
d Scroller assembly 1
eWinder Kit (*) 1
*Please refer to the next page for the contents of the winder kit

User’s Guide Tensioning winder 30 for Océ CS9050, CS9060 & CS9160 Eco-Solvent Printer
14 AP-40104 - Revision 1.1 – 12/03/2008
2.3.1 Winder kit CS9060 and CS9160
No Part Description Quantity
1 PET adjusting strip 1
2 Hexagon key 3 mm 1
3 Hexagon key 4 mm 1
4 Spacer 6
5 Adjustment plate 1
6 Screw M4x10 6
7 Screw M5x12 2
8 Power cable (EU and UK) 2

User’s Guide Tensioning winder 30 for Océ CS9050, CS9060 & CS9160 Eco-Solvent Printer
15 AP-40104 - Revision 1.1 – 12/03/2008
3 INSTALLATION PROCEDURE
3.1 INSTALLING THE FRONT TENSIONING SYSTEM
Step 1 : Loosen the four screws fixing the right bracket with the driving mechanism.
Step 2 : Mount the right bracket (1) to the right leg (2) of the stand using 2 “M5x12” screws (3).
For CS9060 and CS9160
On the CS9050, the right bracket consists out of 2 parts.
•First slide the closing bracket (1) over the stand (2), make sure that the closing bracket is pushed
properly against the stand.
•If the closing bracket is positioned properly, slide the support bracket onto the closing bracket.
Make sure that the support bracket its flange is properly positioned against the closing bracket and the
stand.
•When it is positioned correctly, fix the support bracket (3) onto the closing bracket using 3 “M5x12” (4)
screws.
For CS9050
12
3
4

User’s Guide Tensioning winder 30 for Océ CS9050, CS9060 & CS9160 Eco-Solvent Printer
16 AP-40104 - Revision 1.1 – 12/03/2008
Step 3 : On the CS9060 and CS9160, install the driving mechanism (1) in the right bracket (2) and tighten
the four screws (3).
On the CS9050, install the driving mechanism (1) onto the support bracket (2) and tighten the
four screws (3)
1
2
3

User’s Guide Tensioning winder 30 for Océ CS9050, CS9060 & CS9160 Eco-Solvent Printer
17 AP-40104 - Revision 1.1 – 12/03/2008
Step 4 : On the CS9060 and CS9160, Mount the left bracket (1) to the left leg (2) of the stand using 4
“M4x10” screws (3).
Notes
Note that there are 8 holes in the left bracket. Be sure to position the bracket correctly.

User’s Guide Tensioning winder 30 for Océ CS9050, CS9060 & CS9160 Eco-Solvent Printer
18 AP-40104 - Revision 1.1 – 12/03/2008
On the CS9050, the left bracket consists out of two parts.
•First attach the closing bracket (1) to the stand (2).
•When fixing the support bracket (3) to the closing bracket, make sure the support bracket is slided
against the feet of the stand.
•Fix the support bracket with 4 screws M4x10 to the closing bracket.
1
2
3
Notes
Note that there are 8 holes in the left bracket. Be sure to position the bracket correctly.

User’s Guide Tensioning winder 30 for Océ CS9050, CS9060 & CS9160 Eco-Solvent Printer
19 AP-40104 - Revision 1.1 – 12/03/2008
Step 5 : Insert the tensioning bar (1) in the positioning pen in the left bracket (2).
Step 6 : Fix the tensioning bar (1) to the drive mechanism (2) using 2 “M4x10” screws (3).

User’s Guide Tensioning winder 30 for Océ CS9050, CS9060 & CS9160 Eco-Solvent Printer
20 AP-40104 - Revision 1.1 – 12/03/2008
Step 7 : Install the scroller bar between the left bracket and driving mechanism.
Step 8 : The installation is completed.
Step 9 : Refer to the next chapter to calibrate the tensioning bar and scroller assembly.
This has to be done to guarantee a smooth and perfect winding flow.
Table of contents
Other Oce Printer Accessories manuals
Popular Printer Accessories manuals by other brands

Fuji Xerox
Fuji Xerox P-880 Technical instructions

Canon
Canon DU7-1101-000 Service manual

Ricoh
Ricoh Aficio AP4510 Replacement guide

Avery Dennison
Avery Dennison ALS 306 user manual

Paxar
Paxar Mobile Printing Station Monarch 9476 Assembly and setup instructions

Konica Minolta
Konica Minolta EK-608 installation manual