Ocular IQ SOLAR User manual

ocularcharging.com.au
sales@ocularcharging.com.au
1300 912 650
OCULAR IQ SOLAR
USER MANUAL
IOCAW13-7S-Solar
IOCAW13-22S-Solar
IOCAW13-7T-Solar
IOCAW13-22T-Solar

Welcome to your Ocular IQ Solar!
Warning: This product shall only be installed,
repaired or serviced by an authorised electrician. All
applicable local, regional and national regulations
for electrical installations must be respected.
Download the Ocular app
1
Or
Click here to
download
Scan Scan
Or
Click here to
download

Ways to charge - IQ Solar
2
Ocular App
After downloading the Ocular App and adding the charger to
it, you can start and stop a charging session via the app, you
can also stop a charging session through your car.
Plug and charge
If the charger is set to plug and charge, you can start a
charging session by simply plugging the charger to your car.
The charging session can be terminated by the car, using the
RFID card if it’s been activated or using the Ocular app.
Scheduling
You can set a schedule to start and stop a charging session. Set
the start and stop times and the days for the schedule to
repeat. Just plug the car in and the car will start charging when
the schedule starts.
Using RFID Card
If the charger is set to using RFID card, you can start a
charging session by first plugging the charger to your car, then
scan the RFID card on the charger to start charging. The
charging session can be terminated by either the car or
swapping the RFID card again.
The Ocular Solar charger can start a charging session in
three ways depending on the settings; using the Ocular
app, plug and charge and using an RFID card.

Please scan QR Code or
CLICK HERE to watch this
video on how to connect
your charger and start
charging!
STEP 1: Set up the app and
charger
3
Please ensure you have downloaded the OCULAR
APP, other apps will not be compatible with your
charger. (see page 1)
Register for an account,
then log in. After log in,
you will see this page.
1.

4
2. Press add station, then
enter your charger's serial
number which can be found
on the silver sticker on the
side of the charger.
The serial number begins
with AW
eg. AW12345678912
3. Select the 'energy tab',
then select 'add gateway'.
Enter M_ followed by the
serial number.
eg. M_AW12345678912

5
4. Now your charger has been successfully added. You can
now see your charger under the 'group' tab and the energy
tab should now show a colourful diagram.

6
STEP 2: start and stop a charging
session
1. Under Energy tab, choose your
desired charging mode: Solar only,
Solar assist or Fast mode by pressing
the drop down and selecting the
desired mode.
You can change the mode on the
energy tab at any point in the
charging session, you do not have to
unplug or restart.
(If you want more information on
these settings, please see FAQ
section at the end of this manual.)
2. Go to the 'Group' tab and select
your charger.
3. Plug your charger into the car,
then start a charging session by
pressing the 'start' button.
This will then change to a 'stop'
button, press this to stop the
charging session or stop charging
through the vehicle.
To delay start, press the delay start
button and choose up to a 3 hour
delay.
Option 1: Using the app

7
If your charger is not providing max charging speed, your
current limit may be set too low.
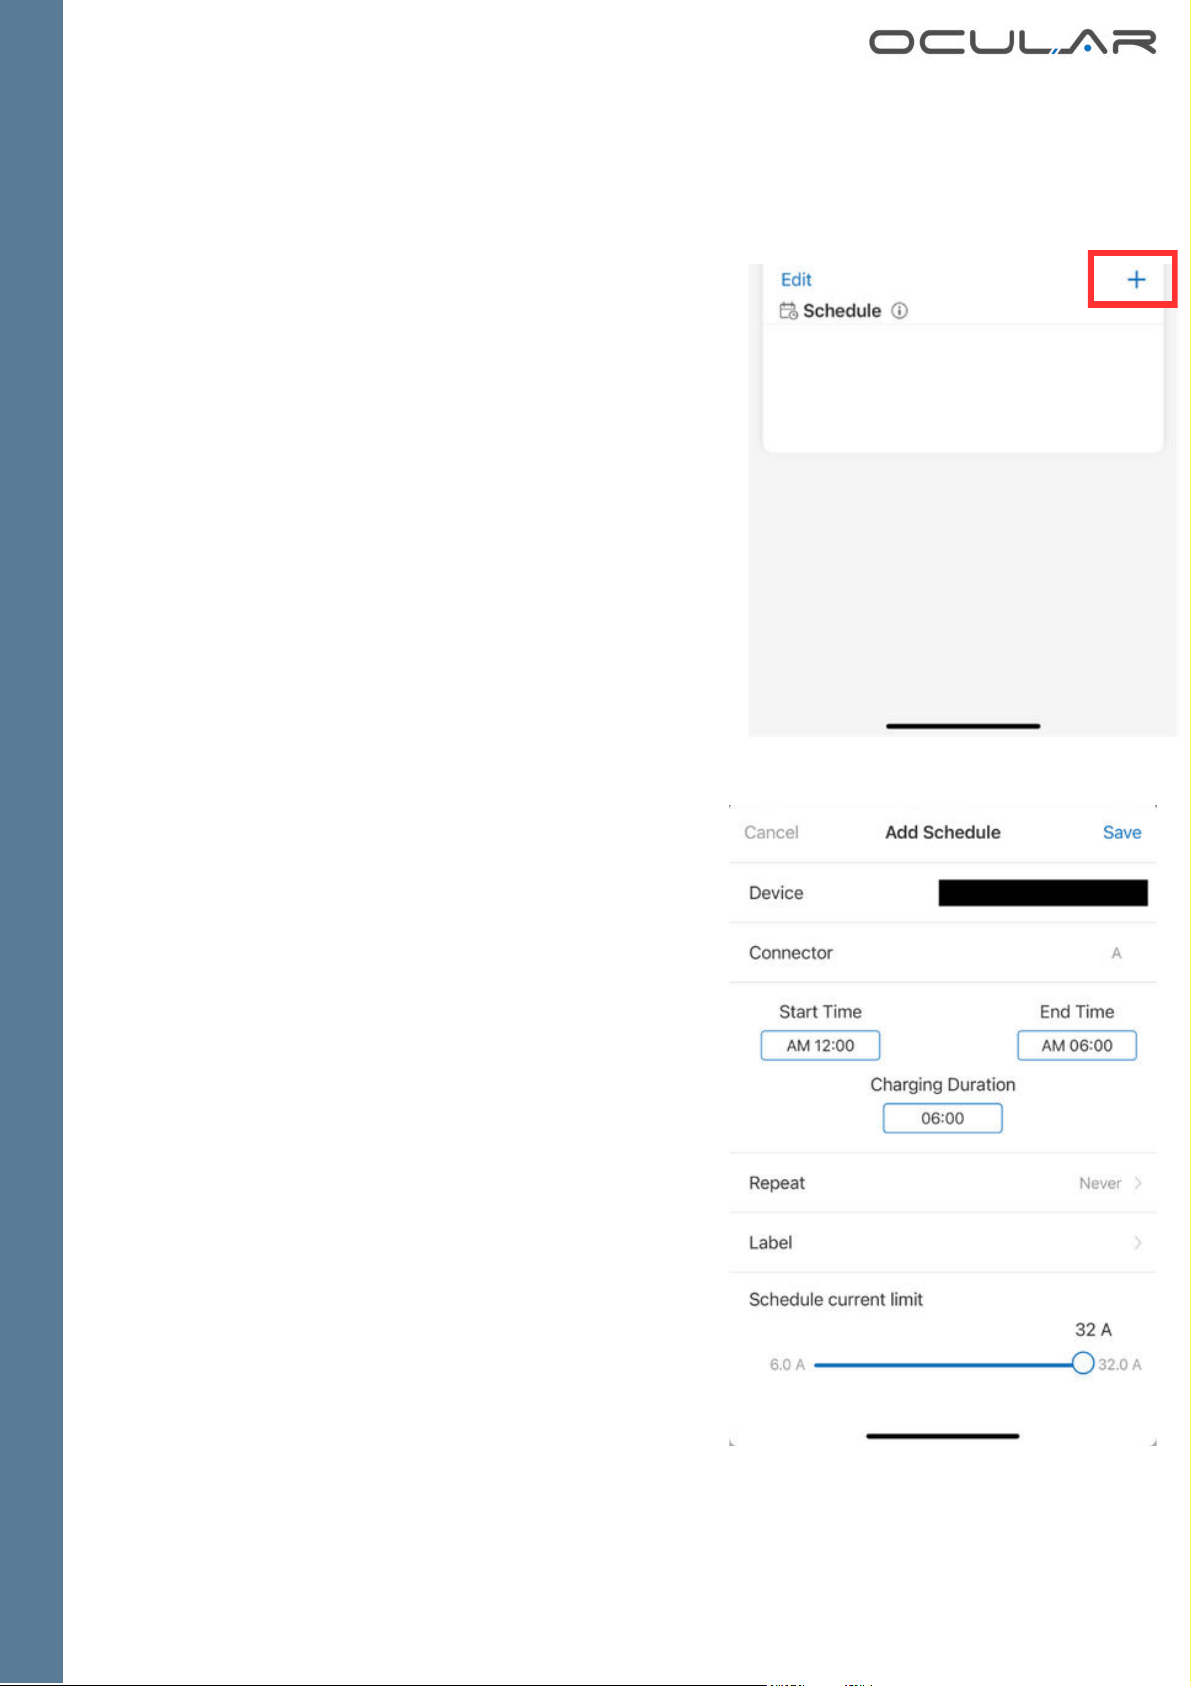
Once the charging session has
begun, change the current limit
by adjusting the slider up to
32A.
Press the 3 dots in the top right
to enter the settings. Ensure the
Max current limit bar is set to
the correct Amps
1.
2.
If there has been a hard limit set by
the electrician, your max current
limit may be less than 32 Amps.
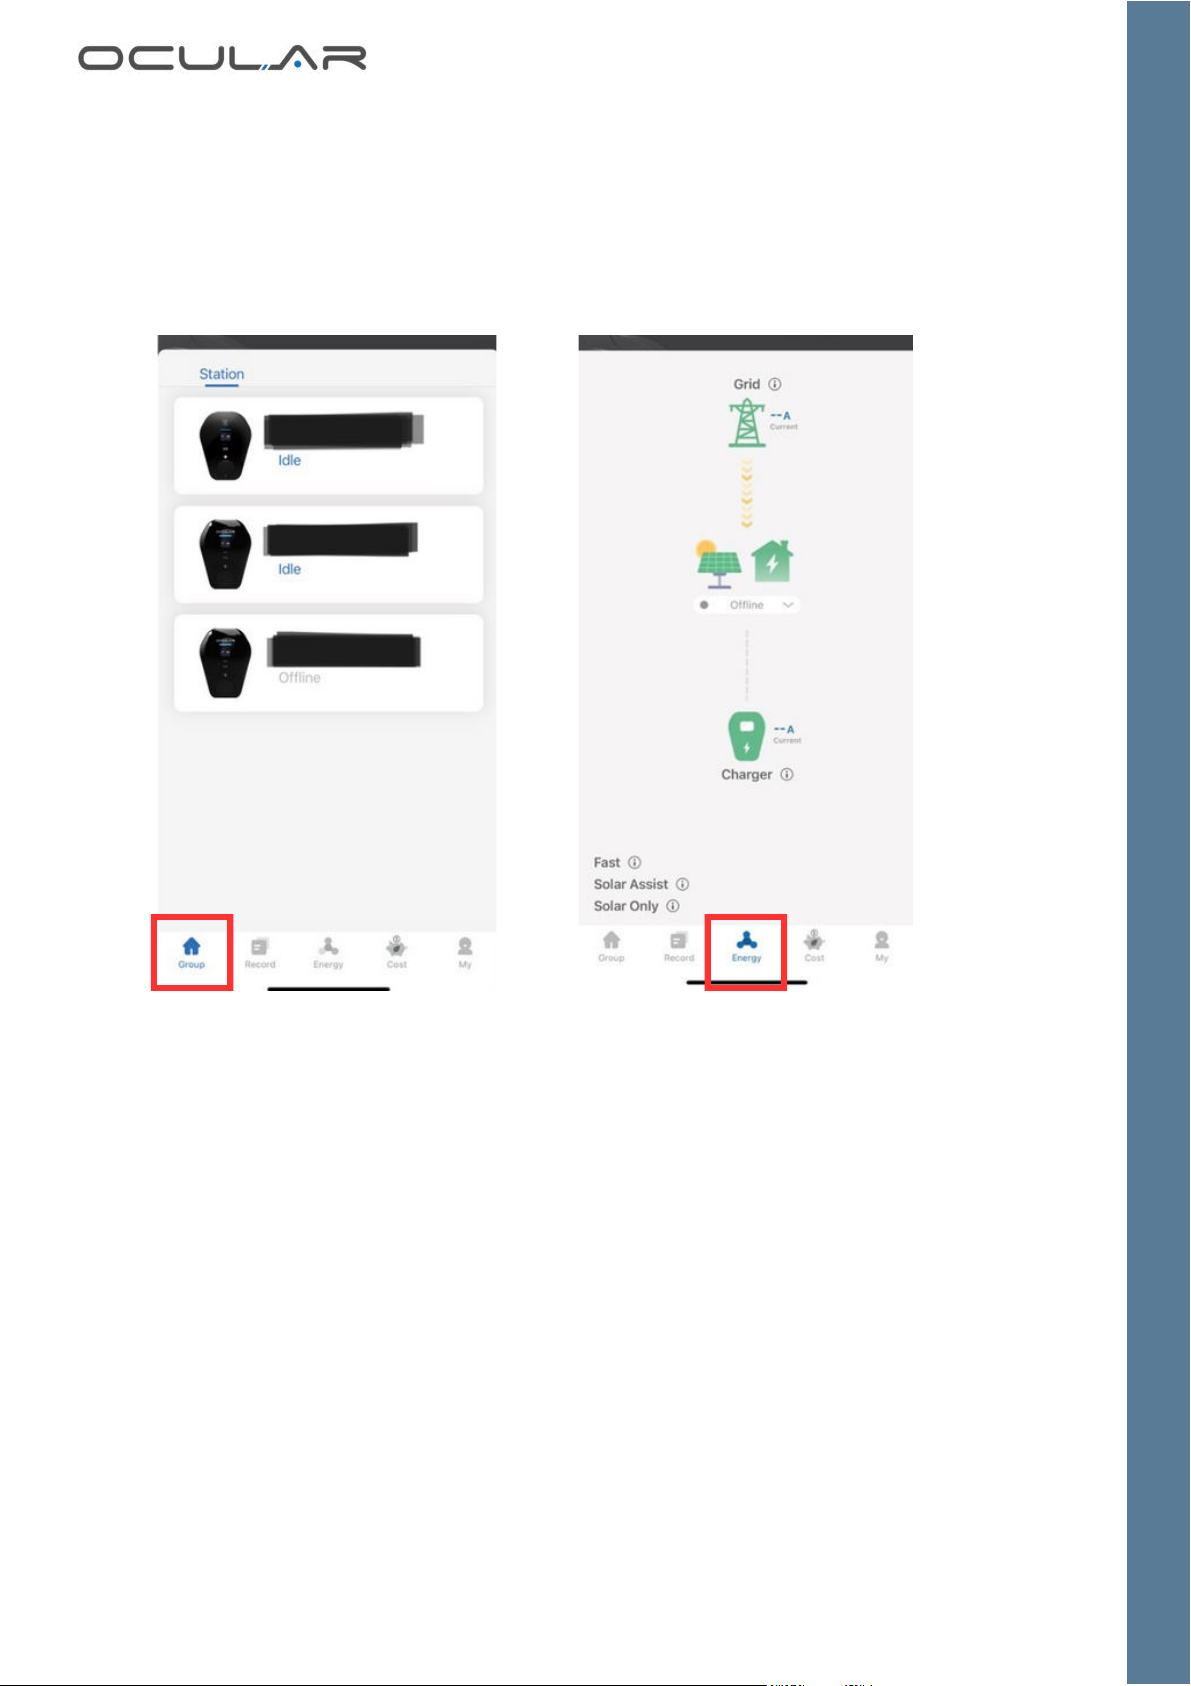
1. Go to the 'Group' tab and select
your charger. Turn on the plug and
charge feature by pressing the
button.
When you plug the car in, you will
start charging on the saved mode
settings and override any scheduled
charging sessions, you do not have
to press 'start'. To stop charging
press 'stop' on the car, or on the
app.
You will charge with the pre-
selected energy mode. You can
change the mode on the energy tab
at any point in the charging session,
you do not have to unplug or
restart.
Option 2: Plug & Charge

8
1. Press the plus button on the top
right of the Schedule tab, and set
the start time and end time.
2. Select repeat to choose which
days to utilise this charging
schedule.
You will charge with the pre-
selected energy mode. You can
change the mode on the energy tab
at any point in the charging session,
you do not have to unplug or restart.
The session will stop at the set time,
or you can stop it earlier through the
app or car.
YOU MUST TURN OFF PLUG AND
CHARGE FOR THIS FEATURE
Option 3: Scheduled charging sessions

9
Option 4: RFID Card
Your charger will come with 2x blank white RFID cards
RFID SYMBOL
Start charging (will act as an override function if you have
scheduling, delay, etc)
Stop charging (no matter which function it has set, or
how you started the charging session, the charging
session will stop once you swipe the RFID card)
When plug & charge, delayed charging and scheduled
charging turned off, the RFID card acts as a form of
authentication/security swipe before you (or anyone else)
can start a charging session
What can you do with this RFID?
Go to 'My' tab
Select My Card
Select Bind New Card
Enter New Card name, and select the
device to read the card
Scan the card across the RFID Symbol.
You should hear a beep and a tick will
appear on the screen if successful
To bind an RFID:
1.
2.
3.
4.
5.

10
On the top is the grid, the
middle is your home and
the bottom you will see
your charger.
In the grid section, you will
see either one number or
three numbers, depending
on whether you have a
single or three-phase
charger.
A positive number means
your home is drawing
power from the grid.
If you see that the number
is negative, then that
means you are producing
excess solar, which is being
exported to the grid.
The number next to your
charger represents the
charging speed.
Guide to the energy tab

11
This mode will charge your EV at a minimum of 6 Amps plus
any excess solar produced. If solar production is low, power
will be drawn from the grid.
This is the preferred solar mode, particularly on cloudy days
or when you have a smaller solar system. This will ensure a
continuous charge plus any excess solar that your home
generates.
Fast Mode
In this mode, the vehicle will be charged at maximum power.
This power can come from a renewable energy source or the
grid. If you have set a current limit on the schedule or by the
electrician during installation that will determine maximum
power.
Solar Assist
Solar Only
This mode charges your EV only when enough excess solar is
produced. Please note a minimum of:
Single Phase - 7 Amps
Three Phase - 20 Amps across all three (3) phases is required
to use this mode to prevent excess starting and stopping of
the charging session which is not recommended.
If the solar production drops below the Single and Three
phase threshold the charging will pause and then restart
after 2-3 minutes of continuous excess solar above the Single
and Three phase threshold.
We recommend this mode when you have a clear excess of
solar power produced. Use Solar Assist when your
production is low or intermittent.
Guide to the energy modes

Go to the 'Records' tab for a complete
overview of your charging history.
You can choose the time frame of
your records: 7 days, 30 days, 90 days
up to 1 year, by pressing the days and
selecting from the drop down menu.
You can export the data by selecting
the share button and receive the
data in your chosen email.
Guide to Charging Records &
Cost Estimates
12
Go to the 'Costs' tab.
Here you can enter your
electricity rate and press
calculate and you will be
able to see the cost of
electricity over the chosen
period of time.
Records
Costs

What's the difference between the 7kW and 22kW?
The 7kW version is best for a single-phase power supply to your home,
whereas the 22kW version works best with three-phase power. If you're not
sure what type of power supply you have in your home, please speak to your
electrician. The unit is available with a universal socket or with a 5m Type 2
cable.
When should I choose a Single or Three-phase IQ Solar?
We recommend matching your charger to the Solar systems output. I.e. if
you have a single-phase solar system choose a single-phase IQ Solar.
Can the 3-phase Ocular IQ Solar be connected to single-phase only?
Yes, it will act like a standard single-phase charger. Just 1 CT input will be
available to use.
Can we charge a single-phase capable EV with a 3-phase Ocular charger?
Yes, absolutely!
Is the Ocular IQ Solar compatible with all EVs?
Yes, every EV in Australia.
When am I exporting electricity?
On the Ocular App, look at the Energy tab. A negative value indicates you are
exporting to the grid (excess solar), while a positive value indicates you are
consuming electricity from the grid. Remember, the Solar Only Mode
requires your home to be exporting excess solar to the grid. See Solar Only
mode below.
Does the Ocular IQ Solar work with any solar system?
Yes. If you have a solar system that is constantly exporting electricity to the
grid, then the Ocular IQ Solar will allow you to use that excess solar efficiently
to recharge your vehicle’s battery. We use a CT to measure the excess solar
being sent to the grid in real time.
IQ SOLAR FAQs
1

Does the Ocular IQ Solar work with any solar system?
Yes. If you have a solar system that is constantly exporting electricity to the
grid, then the Ocular IQ Solar will allow you to use that excess solar
efficiently to recharge your vehicle’s battery. We use a CT to measure the
excess solar being sent to the grid in real time.
2
How many CT clamps are provided?
One CT for single-phase versions and three for three-phase versions. You
must only use the CT clamps provided or an approved CT from the Ocular
team. This is to ensure that the solar and load control readings are accurate
at all times. CTs are supplied in the charger box.
What happens if I have a stationary storage home battery?
For the most part, any excess solar produced by the system will be absorbed
by the battery. The Ocular IQ Solar modes work by using CT clamps to
understand what you are exporting out to the grid. You may find that the
home battery is absorbing most of your excess solar generated first and so
what’s going out to the grid is minimal. Despite this, it’s fine to still install a
charger, but you may find the Solar Assist mode best to draw a small
amount from the grid/battery when no excess solar is being produced. If
there is excess solar available, it can then utilise the available excess solar
that the battery is not taking.

What does each charging mode do?
The Ocular IQ Solar is designed to offer flexibility through three (3) charging
modes: Fast, Solar Assist or Solar Only.
For solar charging our preferred mode is Solar Assist as it always ensures a
baseline load + excess solar.
Fast Mode:
In this mode, the vehicle will be charged at maximum power. This power can
come from a renewable energy source or the grid. If you have set a current limit
on the schedule or by the electrician during installation that will determine
maximum power.
Solar Assist:
This mode will charge your EV at a minimum of 6 Amps plus any excess solar
produced. If solar production is low, power will be drawn from the grid.
This is the preferred solar mode, particularly on cloudy days or when you have a
smaller solar system. This will ensure a continuous charge plus any excess solar
that your home generates.
Solar Only:
This mode charges your EV only when enough excess solar is produced. Please
note a minimum of:
Single Phase - 7 Amps
Three Phase - 20 Amps across all three (3) phases is required to use this mode to
prevent excess starting and stopping of the charging session which is not
recommended.
If the solar production drops below the Single and Three phase threshold the
charging will pause and then restart after 2-3 minutes of continuous excess solar
above the Single and Three phase threshold.
We recommend this mode when you have a clear excess of solar power
produced. Use Solar Assist when your production is low or intermittent.
3

Our experience shows that large variable loads like air conditioning can absorb
most of the solar generation. Use the Energy tab on the Ocular App to understand
the excess available and choose the Solar Assist mode if excess generation is
consistently below the Single and Three phase threshold.
Note that smaller solar systems or cloudy days may result in only a small amount
of electricity going into the vehicle or none at all. Use Solar Assist when your
production is low or intermittent.
Note a very minimal amount of power may be taken from the grid for a short
period of time if solar production drops suddenly. The charging will stop until there
is a clear excess of solar available.
For three-phase three (3) values will be shown on this screen, for single-phase only
one (1) value will be shown on this screen.
Solar Only mode will not work when all three
(3) phases are exporting less than 20 Amps.
This means that there is no clear excess when
summing all three (3) phases.
When summing up all 3 phases, the solar is
only exporting 4 Amps, which is less than the
required 20 Amps before charging.
Solar excess is indicated by a negative (-)
value.
In this case, choose Solar Assist or Fast Mode if
you would like to charge your car.
Solar Only mode will only work when all three
(3) phases are exporting greater than 20 Amps
in total.
In this example, the Solar Only mode will work
at 8 Amps as this is averaged across all three
(3) phases.
(5+5+14)/3 = 8 Amps per phase
4

When Should I choose Fast, Solar Assist or Solar Only
The key here is to know how much your solar is producing and when you
need your car to be fully charged. The charger prioritises the home's use of
excess solar first. Eg. the oven, TV, kettle and air conditioner. A negative
value indicates you are exporting to the grid (excess solar) while a positive
value indicates you are consuming electricity from the grid. Remember the
Solar Only mode requires your home to be exporting excess solar to the grid.
Fast Mode
Switch to Fast Mode on the Energy tab of the App to charge at the fastest
rate. In this mode, the vehicle will be charged at maximum power. This
power can come from a renewable energy source or the grid. This mode
charges your battery quickly when you don’t have time to wait or in the
evening when you have no excess solar.
5

Solar Assist
This is the ideal mode for solar users. Solar Assist mode balances usage of
excess solar but avoids the potential of starting and stopping during a
charging session due to fluctuations in your energy generation. As shown in
the examples, the three-phase charger has only two (2) phases exporting 10
Amps while one (1) phase is only exporting 1 Amp. In Solar Assist, this will still
allow for a charge allowing you to charge at 6 Amps per phase. In Solar Only,
all three (3) phases would need to export more than 7 Amps to work
(displayed -7 on the App).
6

Solar Only - Single Phase
The ideal mode if you have a large solar system that produces a clear excess,
in order to efficiently use your energy that has been generated, minimising
the use of grid energy. The example below shows a clear -21.9 Amps excess
solar which is ideal. Avoid this mode when you have high variability in solar
export such as a very cloudy day, small excess solar (consistently around 0 to
-8 Amps).
Don’t use the Solar Only mode when solar export is low as shown below.
Charging will be paused or possibly start and stop continuously due to low
export. Solar Assist or Fast Mode recommended to have a stable charge.
7
Table of contents
Other Ocular Batteries Charger manuals