Oki OKIPAGE14e User manual

OKIPAGE
14e
Setup Guide
59334301

E-2 |OKIPAGE 14e
Document Title and Part Number
OKIPAGE 14e Setup Guide, 2nd Revision
59334301
Disclaimer
Every effort has been made to ensure that the information in
this document is complete, accurate, and up-to-date. Oki Data
assumes no responsibility for the results of errors beyond its
control. Oki Data also cannot guarantee that changes in
software and equipment made by other manufacturers and
referred to in this document will not affect the applicability
of the information in it. Mention of software products
manufactured by other companies does not necessarily
constitute endorsement by Oki Data.
Copyright Information
Copyright 2001 by Oki Data. All rights reserved.
Written and produced by the Oki Data Training and
Publications Department.
Contact Information
Please address any comments on this publication to:
Web Site
Please visit Oki Data’s multilingual web site at: http://
www.okidata.com
e-MailAddress
MailingAddress
Oki DataAmericas, Inc.
Training & Publications Dept.
2000 Bishops Gate Blvd.
Mt. Laurel, NJ 08054-4620
Trademark Information
OKI and MICROLINE are registered trademarks of Oki Electric
Industry Company, Ltd.
OKIPAGE is atrademarkofOKIAmerica,Inc.
Energy Star is a registered trademark of the United States
Environmental Protection Agency.
TrueType is a registered trademark ofApple Computer
Company.
Hewlett-Packard, HP, and PCL are registered trademarks of
Hewlett-Packard Company.
IBM is a registered trademark of International Business
Machines Corp.
Microsoft, MS-DOS, and Windows are either registered
trademarks or trademarks of Microsoft Corporation in the U. S.
and other countries.
Intellifont is a registered trademark of Compugraphic
Corporation.
Epson is a registered trademark of Seiko Epson Corp.

14e Setup Guide E-3
|
Year 2000 Compliance
All products currently sold by Oki Data areYear 2000
Compliant. Each product contains information technology
that accurately processes date and time data between the
years 1999 and 2000, and carries no issue for the September
9, 1999 (9999) programming concern. These products, when
used in combination with products purchased from other
manufacturers, whose products properly exchange data and
time information, will accurately process the date and time.
All future products are committed to meeting the sameYear
2000 compliance.

E-4 |OKIPAGE 14e
Energy Star
As an ENERGY STAR Partner, Oki Data has determined that this
product meets the ENERGY STAR guidelines for energy
efficiency.

14e Setup Guide E-5
|
Contents
Year 2000 Compliance ...................................................... 3
Energy Star............................................................................. 4
Setting Up Your Printer ...........................................6
Selecting a Location for Your Printer.............................. 6
Visit the Oki Data Web Site............................................... 6
Checking the Contents ...................................................... 7
Remove the Image Drum Protective Paper ................. 8
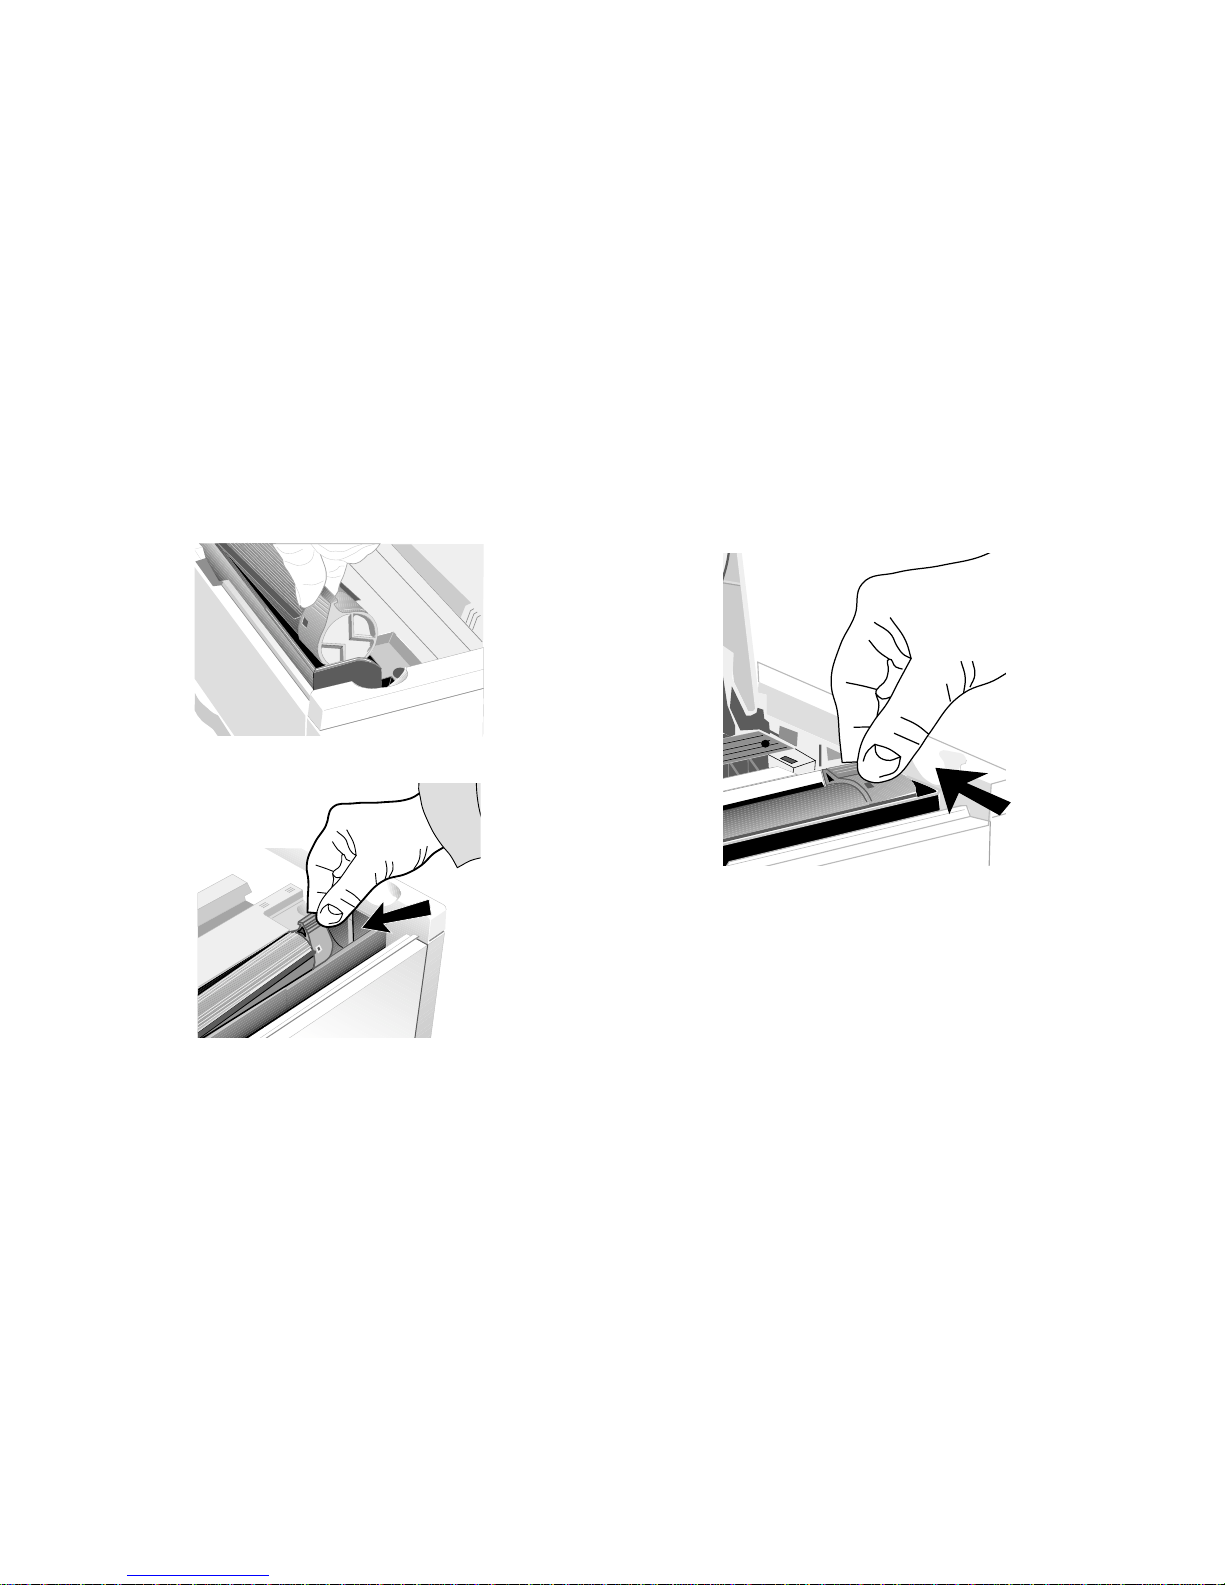
Remove Protective Film ..................................................... 8
Installing Toner .................................................................... 9
Loading Paper ....................................................................11
Using Legal Size Paper................................................11
Paper Exit Paths.................................................................12
Top Paper Exit ...............................................................12
Rear Paper Exit..............................................................12
Choosing Paper .................................................................13
Printing the Demo and Menu Pages...........................13
Interfacing with Your Computer .........................14
Parallel Interface ................................................................14
USB Interface ......................................................................15
Turning on the Printer......................................................15
Printer Software......................................................16
PrinterDrivers .....................................................................16
Status Monitor....................................................................17
Installing Printer Software ...............................................17
Parallel Connection - Windows 2000, 98, Me,
95, NT4.0........................................................................18
USB Connection - Windows 98, Me .......................19
USB Connection - Windows 2000 ......................... 21
Using the Status Monitor ............................................... 22
Using the Printer Menu Setup ...................................... 23
Using Power Save to Minimize Warm-up Time ....... 24
To Disable Power Save ................................................... 24
Uninstall Printer Software............................................... 25
Internet Support .................................................... 26

Overview
E-6 |OKIPAGE 14e
Setting Up Your
Printer
Selecting a Location for Your Printer
•A firm surface such as a table or desktop
•Space to open the cover and pull out the paper tray and
the rear output extender
•Air circulation around the printer to prevent overheating
(minimum of 4 inches)
•A nearby power source
•Room temperature of 50°to 90°F (10°to 32°C)
•Relative Humidity of 20-80%
•No direct sunlight
Visit the Oki Data Web Site
Register your printer and create your own personalized
support center with my.okidata.com. Get support, news and
information, and the latest software upgrades especially
tailored to your printer. To register:
•Visit our website at http://www.okidata.com. Simply click
on ProductRegistration.
You can also register your printer
•By filling out the enclosed registration form and mailing
it or faxing it in.

14e Setup Guide E-7
|
Checking the Contents
Unpack your printer. The shipping box should contain:
1OKIPAGE 14e Printer (with image drum cartridge
installed)
2CD-ROM (includes printer drivers and software)
3Toner Cartridge
4Black plastic light-shield bag (to store image drum if you
need to ship the printer)
5Power Cord
6Warranty and Regulatory Information
7Setup Guide
8User’sGuide
9Warranty Registration Card
If you are missing anything, contact Oki Data.

E-8 |OKIPAGE 14e
Remove the Image Drum Protective
Paper
1Press the cover release button and lift the cover
LETTERLEGALA4OTHERENV
READY
ATTENTION
MANFEED
DATA
2Lift out the image drum cartridge. Do not touch the
drum’s green surface or remove the sponge.
!Only the OKIPAGE Type 8 Image Drum will fit in this
unit (Part# 41331601).
3Without turning the drum cartridge over, remove the
protective paper from the image drum.
4Reinstall the cartridge into the printer.
Remove Protective Film
Lift up the corner and peel the protective plastic film from
the operator panel.
OTHERENV

14e Setup Guide E-9
|
Installing Toner
1Remove the sponge.
2Unwrap the toner cartridge. Shake the cartridge to
distribute the toner.
!Only the OKIPAGE Type 5 Toner Cartridge will fit in
this unit (Part# 52109001)
3Peel tape off the bottom.
4Grasp the lock lever and place the left side of the toner
cartridge under the end tab.

E-10 |OKIPAGE 14e
5Lower the right side into the toner well, aligning the lock
lever slot with the ridge in the drum cartridge.
PUSH
6When the cartridge is in place, push the lock lever forward
until it stops.
7Lower the printer cover and press firmly to close.

14e Setup Guide E-11
|
Loading Paper
1Slide the tray out of the printer.
!The paper gauge (1) indicates how much paper remains
in the tray; you don’t have to slide the tray out to check.
2Adjust the tray guides for the correct paper size.
3Fan a stack of paper and place it in the tray under the tabs.
Do not fill above the “PAPER FULL” mark.
!The tray will hold 250 sheets of 20 lb. paper.
!Recommended paper weight for the tray is 16 to 28 lb
(60 to 105 g/m2).
4Place the tray into the printer then push closed until the
tray locks in place.
Using Legal Size Paper
To load legal size paper, open out the tray extender and
adjust the rear paper guide.

E-12 |OKIPAGE 14e
Paper Exit Paths
Two paper exit options are available. Select the paper path
that is appropriate for the media you are using.
Top Paper Exit
Use the top paper exit for most printing jobs.
•Printed pages exit face down
•Pages are stacked in the order printed
•Exit bin holds 150 sheets of 20-lb. paper
1Pull the front exit extender forward.
2Lift out the support bar.
!Don’t change paper paths while printing - paper jam
may occur.
Rear Paper Exit
The rear paper exit tray provides a straighter paper path. Use
rear exit when printing on heavy paper, envelopes, labels, and
transparencies.
•Printed pages exit face up in reverse order
•Maximum output is 50 sheets of 20-lb. paper
•Use rear exit for printing on heavy paper, envelopes,
labels, transparencies or odd size paper
1Pull out the rear exit extender until it locks in place.
2Lift out the support bar.

14e Setup Guide E-13
|
To return to the top exit, close the rear support bar and push
the rear exit extender firmly back in place; paper will then
exit into the top bin.
!See OperatingYour Printer in the User’s Guide for
information on using special print media.
Choosing Paper
•For best results, use paper that is smooth and of high
quality.
•Store paper in its ream wrapper until you are ready to use
it, and keep it away from moisture or other conditions that
can cause it to wrinkle or curl.
•Avoid printing on both sides of the paper for more than a
few pages, or preprinted documents that have been in a
photocopier.
•Try paper before you buy it in quantity.
!See OperatingYour Printer in the User’s Guide for
information on using recycled print media.
When purchasing paper, use the following specifications for
best results:
Basic Weight
Paper cassette: 16 to 28 lb (60 to 105 g/m2)
Manual feed: 16 to 32 lb (60 to 120.5 g/m2)
Composition
100% chemical wood pulp and/or cotton fiber
Fusing Compatibility
Must not scorch, melt, offset, or release hazardous emissions
when heated to 392°F. (200°C)
Printing the Demo and Menu Pages
With the printer powered up but off line (Ready light is off),
press down on the printer’s operator panel switch (a) for two
seconds. The Ready light will blink and the printer prints the
demo page and the menu page. Note: Press the switch again
to put the printer back on line.
a

Overview
E-14 |OKIPAGE 14e
Interfacing with Your
Computer
Parallel Interface
Your printer has a high-speed, bi-directional parallel IEEE
1284 interface port. Purchase a cable marked IEEE 1284
compliant. To comply with FCC regulations, the cable must
be shielded and UL and CSA approved. Consult your PC
manual for details on cable requirements and interface ports
on your computer.
!OKI DATA has tested and approved the following bi-
directional cable: Part Number 70000803. See Service
and Support in the User’s Guide for purchasing
information.
Connecting the Cable
Make sure the printer and computer are off.
1Insert the printer end of the cable firmly into the proper
connector on the back of the printer. Fasten the cable to
the printer securely.
2Connect the other end of the cable to the proper connector
on your computer. Fasten the cable securely to your
computer.

14e Setup Guide E-15
|
USB Interface
Requires a USB cable. The cable must meet USB Rev 1.1
specification for normal operation, and be UL/CM/CSA
approved.
!OKI DATA has tested and approved the following USB
cable: Part Number 70037901. Cable Length: 10 ft.
(3.048 meters). See Service and Support in the User’s
Guide for purchasing information.
Connecting the Cable
Make sure the printer and computer are off.
1Insert the printer end of the cable firmly into the proper
connector on the back of the printer. Fasten the cable to
the printer securely.
2Connect the other end of the cable to the proper connector
on your computer. Fasten the cable securely to your
computer.
Turning on the Printer
1Make sure the printer is off.
POWER
ON OF
F
POWER
ON OF
FF
F
2Plug the cord into the printer first, then into a grounded
outlet.
3Turn the printer on. It takes about 10 seconds for the
printer to initialize and warm up, and for the Ready light
on the operator panel to turn on, indicating the printer is
ready to receive data.

Overview
E-16 |OKIPAGE 14e
Printer Software
The CD-ROM provided with your printer includes printer
drivers and the on-screen printer status monitor and operator
panel required to use all the OKIPAGE 14e features. Follow
the steps in this guide to install the appropriate printer
software on your computer system.
Printer Drivers
Printer drivers must be installed so your software application
can communicate with your printer and support all of its
features.
The OKIPAGE 14e CD-ROM includes printer drivers for
printing in the following environments:
•Windows Me
•Windows 2000
•Windows 98
•Windows NT 4.0
•Windows 95

14e Setup Guide E-17
|
Status Monitor
The status monitor program allows you to monitor and
configure an OKIPAGE 14e. In addition to displaying
printer status messages, the status monitor provides
remote access to the printer’s operator panel. See page
22 for information on using the Status Monitor.
Installing Printer Software
Determine your computer’s interface connection and
operating system. Then proceed to the page listed for
instructions to install the appropriate printer software.
Parallel Connection
Windows Me, 2000, 98, 95, NT 4.0
see page .....................................................18
USB Connection
Windows 98, Me see page ........................19
Windows 2000, see page...........................21

E-18 |OKIPAGE 14e
Parallel Connection - Windows 2000, 98,
Me, 95, NT4.0
q
Turn on your computer and wait for it to boot up.
q
Turn on your printer.
q
Found New HardwareWizard appears. Click Cancel.
!To fully install all the necessary software, use the
following install procedures with the OKIPAGE 14e CD.
q
Insert the OKIPAGE 14e CD into your CD-ROM drive,
click Start →→
→→
→Run.
q
Browse to your CD-ROM drive and double-click
INSTALL.EXE in the root directory, click OK.
q
Select a language.
q
Click the button beside Printer Software and follow the
on-screen instructions to complete the installation.
!You can click a button on the Menu Installer to:
•View Help Support and Information
•Register your printer online
•Select a different language
q
Click Finish. Exit the Menu Installer.
Openthe StatusMonitor:
q
Click Start →→
→→
→Programs →→
→→
→OKIPAGE 14e →→
→→
→
OKIPAGE14eStatus Monitor.
!See page 22 for information on using the Status
Monitor.

14e Setup Guide E-19
|
USB Connection - Windows 98, Me
q
Turn on your computer and wait for it to boot up.
q
Turn on your printer.
q
Add New HardwareWizard appears. Click Next.
q
Insert the OKIPAGE 14e CD into your CD-ROM drive.
q
Select “Search for the best driver for your device
(Recommended).” Click Next.
q
Select “CD-ROM drive.” Clear other choices. Click Next.
q
The OKI USB Device driver is located. Click Next.
q
The files are copied. Select Finish.
q
The printer is detected and the Add New Hardware Wizard
appears. Click Cancel.
!To fully install all the necessary software, use the
following install procedures with the OKIPAGE 14e
CD.
Install the Printer Driver and Status
Monitor
With the CD in your CD-ROM drive:
q
Click Start →→
→→
→Run.
q
Browse to your CD-ROM drive and double-click
INSTALL.EXE in the root directory. Click OK.
q
The OKI Menu Installer appears. Select a language.
q
Click the button beside Printer Software and follow the
on-screen instructions, selecting the LPT1 port. You can
change your port selection once the installation is
completed.
!You can click a button on the Menu Installer to:
•View Help Support and Information
•Register your printer online
•Select a different language
q
Click Finish. Exit the Menu Installer.
SelecttheUSB printer port:
q
From the Windows Taskbar, click Start →→
→→
→Settings →→
→→
→
Printers. Right-click the OKIPAGE 14e icon, then click
Properties\Details.

E-20 |OKIPAGE 14e
q
Scroll down and select OP1USB1:OKIPAGE 14e in the
“Print to the following port” list. Click Apply. Click OK.
Openthe StatusMonitor:
q
Click Start →→
→→
→Programs →→
→→
→OKIPAGE 14e →→
→→
→
OKIPAGE14eStatus Monitor.
!See page 22 for information on using the Status
Monitor.
Other manuals for OKIPAGE14e
4
This manual suits for next models
1
Table of contents
Other Oki Printer manuals

Oki
Oki ML690 Quick start guide

Oki
Oki OKIPAGE 14ex User manual

Oki
Oki C831n User manual

Oki
Oki MPS6150c Service manual

Oki
Oki B710n User manual

Oki
Oki OKIPAGE 10e User manual

Oki
Oki B6500 Series Installation instructions

Oki
Oki IP-7700-26 User manual

Oki
Oki ML490 Series Quick start guide

Oki
Oki C8800dn User manual