Omron H5CX User manual

4
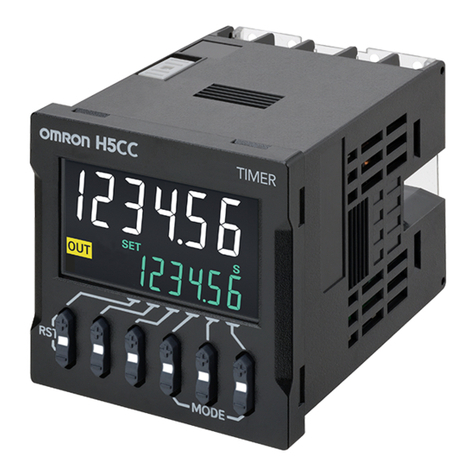
H5CXMultifunction Digital Timer
■Highly visible display with backlit negative trans-
missive LCD.
■Programmable PV color to visually alert when out-
put status changes (screw terminal block models).
■Intuitive setting enabled using DIP switch (H5CX-
A/-A11 models) and ergonomic up/down digit
keys.
■Twin timer in one body to meet a broader range of
cyclic control application requirements as well as
ON/OFF duty adjustable flicker mode.
■PNP/NPN switchable DC-voltage input (H5CX-A/-
A11 models).
■Finger-safe terminals (screw terminal block mod-
els).
■Meet a variety of mounting requirements:
Screw terminal block models, and pin-style termi-
nal models.
■NEMA4/IP66 compliance.
■Six-language instruction manual.
Contents
Ordering Information . . . . . . . . . . . . . . . . . . . . . . . . . . . . . . . . . 5
Specifications . . . . . . . . . . . . . . . . . . . . . . . . . . . . . . . . . . . . . . 6
Nomenclature . . . . . . . . . . . . . . . . . . . . . . . . . . . . . . . . . . . . . . 8
Operation. . . . . . . . . . . . . . . . . . . . . . . . . . . . . . . . . . . . . . . . . . 9
Setting Procedure Guide. . . . . . . . . . . . . . . . . . . . . . . . . . . . . . 10
Operation (Timer Function). . . . . . . . . . . . . . . . . . . . . . . . . . . . 11
Operation (Twin Timer Function). . . . . . . . . . . . . . . . . . . . . . . . 15
Operation in Timer/Twin Timer Selection Mode . . . . . . . . . . . . 19
Timing Charts . . . . . . . . . . . . . . . . . . . . . . . . . . . . . . . . . . . . . . 20
Dimensions . . . . . . . . . . . . . . . . . . . . . . . . . . . . . . . . . . . . . . . . 24
Installation. . . . . . . . . . . . . . . . . . . . . . . . . . . . . . . . . . . . . . . . . 27
Accessories (Order Separately) . . . . . . . . . . . . . . . . . . . . . . . . 29
Precautions . . . . . . . . . . . . . . . . . . . . . . . . . . . . . . . . . . . . . . . . 32
Appendix . . . . . . . . . . . . . . . . . . . . . . . . . . . . . . . . . . . . . . . . . . 35
http://waterheatertimer.org/How-to-wire-off-delay-timer.html
https://waterheatertimer.org/How-to-wire-twin-timer.html

5
H5CXH5CX
Ordering Information
Note: The power supply and input circuits for the H5CX-A11/A11S have basic insulation. Other models are not insulated.
■Model Number Legend:
1. Type classifier
A: Standard type
L: Economy type
2. External connection
None: Screw terminals
8: 8-pin socket
11: 11-pin socket
3. Output type
None: Contact output
S: Transistor output
4. Supply voltage
None: 100 to 240 VAC 50/60 Hz
D: 12 to 24 VDC/24 VAC 50/60 Hz
5. Case color
None: Black
G: Light gray (Munsell 5Y7/1): Produced upon request.
■Accessories (Order Separately)
Note: 1. Supplied with H5CX-A@models (except for H5CX-A11@and H5CX-L8@models).
2. Y92A-48G is a finger-safe terminal cover attached to the P3G-08 or P3GA-11 Socket.
Output type Supply voltage Models
Standard type Economy type
Screw terminals 11-pin socket 8-pin socket
Contact output 100 to 240 VAC H5CX-A H5CX-A11 H5CX-L8
12 to 24 VDC/24 VAC H5CX-AD H5CX-A11D H5CX-L8D
Transistor output 100 to 240 VAC H5CX-AS H5CX-A11S H5CX-L8S
12 to 24 VDC/24 VAC H5CX-ASD H5CX-A11SD H5CX-L8SD
H5CX-@@@@@
1 2 3 4 5
Name Models
Flush Mounting Adapter (See note 1.) Y92F-30
Waterproof Packing (See note 1.) Y92S-29
Track Mounting/
Front Connecting Socket 8-pin P2CF-08
8-pin, finger-safe type P2CF-08-E
11-pin P2CF-11
11-pin, finger-safe type P2CF-11-E
Back Connecting Socket 8-pin P3G-08
8-pin, finger-safe type P3G-08 with Y92A-48G (See note 2.)
11-pin P3GA-11
11-pin, finger-safe type P3GA-11 with Y92A-48G (See note 2.)
Hard Cover Y92A-48
Soft Cover Y92A-48F1
Mounting Track 50 cm (l)
7.3 mm (t) PFP-50N
1 m (l)
7.3 mm (t) PFP-100N
1 m (l)
16 mm (t) PFP-100N2
End Plate PFP-M
Spacer PFP-S

6
H5CXH5CX
Specifications
■Ratings
Item H5CX-A@H5CX-A11@H5CX-L8@
Classification Digital timer
Rated supply voltage 100 to 240 VAC (50/60 Hz), 24 VAC (50/60 Hz)/12 to 24 VDC (permissible ripple: 20% (p-p) max.)
Operating voltage range 85% to 110% rated supply voltage (12 to 24 VDC: 90% to 110%)
Power consumption Approx. 6.2 VA at 264 VAC
Approx. 5.1 VA at 26.4 VAC
Approx. 2.4 W at 12 VDC
Mounting method Flush mounting Flush mounting, surface mounting, DIN track mounting
External connections Screw terminals 11-pin socket 8-pin socket
Terminalscrewtightening
torque 0.5 N · m max. ---
Display 7-segment, negative transmissive LCD;
Present value:
11.5-mm-high characters,
red or green (programmable)
Set value: 6-mm-high characters, green
7-segment, negative transmissive LCD
Present value:
11.5-mm-high characters, red
Set value: 6-mm-high characters, green
Digits 4 digits
Time ranges 9.999 s (0.001-s unit), 99.99 s (0.01-s unit), 999.9 s (0.1-s unit), 9999 s (1-s unit), 99 min 59 s (1-s unit)
999.9 min (0.1-min unit), 9999 min (1-min unit), 99 h 59 min (1-min unit), 999.9 h (0.1-h unit), 9999 h (1-h unit)
Timer mode Elapsed time (Up), remaining time (Down) (selectable)
Input signals Start, gate, reset Start, reset
Input method No-voltage input/voltage input (switchable)
No-voltage Input
ON impedance: 1 k
W
max. (Leakage current: 5 to 20 mA when 0
W
)
ON residual voltage: 3 V max.
OFF impedance: 100 k
W
min.
Voltage Input
High (logic) level: 4.5 to 30 VDC
Low (logic) level: 0 to 2 VDC
(Input resistance: approx. 4.7 k
W
)
No-voltage Input
ON impedance: 1 k
W
max.
(Leakage current: 5 to 20 mA
when 0
W
)
ON residual voltage: 3 V max.
OFF impedance: 100 k
W
min.
Start, reset, gate Minimum input signal width: 1 or 20 ms (selectable, same for all input)
Power reset Minimum power-opening time: 0.5 s (except for A-3, b-1, and F mode)
Reset system Power resets (except for A-3, b-1, and F modes), external and manual reset
Sensor waiting time 260 ms max. (Control output is turned OFF and no input is accepted during sensor waiting time.)
Output modes A, A-1, A-2, A-3, b, b-1, d, E, F, Z, ton or toff
One-shot output time 0.01 to 99.99 s
Control output SPDT contact output: 5 A at 250 VAC, resistive load (cos
f
=1)
Minimum applied load: 10 mA at 5 VDC (failure level: P, reference value)
Transistor output: NPN open collector, 100 mA at 30 VDC max.
residual voltage: 1.5 VDC max. (Approx. 1 V)
Output category according to EN60947-5-1 for Timers with Contact Outputs (AC-15; 250 V 3 A/AC-13; 250 V
5 A/DC-13; 30 V 0.5 A)
Output category according to EN60947-5-2 for Timers with Transistor Outputs (DC-13; 30 V 100 mA)
NEMA B300 Pilot Duty, 1/4 HP 5-A resistive load at 120 VAC, 1/3 HP 5-A resistive load at 240 VAC
Key protection Yes
Memory backup EEPROM (overwrites: 100,000 times min.) that can store data for 10 years min.
Ambient temperature Operating:
-
10 to 55
C (
-
10 to 50
C if timers are mounted side by side) (with no icing or condensation)
Storage:
-
25 to 65
C (with no icing or condensation)
Ambient humidity 25% to 85%
Case color Black (N1.5)
Attachments Waterproof packing,
flush mounting adapter None
7
H5CXH5CX
■Characteristics
Note: 1. The values are based on the set value.
2. The value is applied for a minimum pulse width of 1 ms.
3. To meet UL listing requirements with the H5CX-L8@, an OMRON P2CF-08-@or P3G-08 Socket must be mounted on the Timer.
4. A waterproof packing is necessary to ensure IP66 waterproofing between the H5CX and installation panel.
Item H5CX-A@/-A11@/-L8@
Accuracy of operating
time and setting error (in-
cluding temperature and
voltage influences) (See
note 1.)
Power-ON start:
0.01%
50 ms max. Rated against set value
Signal start:
0.005
30 ms max. Rated against set value
Signal start for transistor output model:
0.005%
3 ms max. (See note 2.)
If the set value is within the sensor waiting time at startup the control output of the H5CX will not turn ON until
the sensor waiting time passes.
Insulation resistance 100 M
W
min. (at 500 VDC) between current-carrying terminal and exposed non-current-carrying metal parts,
and between non-continuous contacts
Dielectric strength 2,000 VAC, 50/60 Hz for 1 min between current-carrying terminals and non-current-carrying metal parts
1,000 VAC, 50/60 Hz for 1 min between non-continuous contacts
Impulse withstand voltage 3 kV (between power terminals) for 100 to 240 VAC, 1 kV for 24 VAC/12 to 24 VDC
4.5 kV (between current-carrying terminal and exposed non-current-carrying metal parts) for 100 to 240 VAC
1.5 kV for 24 VAC/12 to 24 VDC
Noise immunity
1.5 kV (between power terminals) and
600 V (between input terminals), square-wave noise by noise simu-
lator (pulse width: 100 ns/1 ms, 1-ns rise)
Static immunity Destruction: 15 kV
Malfunction: 8 kV
Vibration resistance Destruction: 10 to 55 Hz with 0.75-mm single amplitude each in three directions
Malfunction: 10 to 55 Hz with 0.35-mm single amplitude each in three directions
Shock resistance Destruction: 294 m/s2each in three directions
Malfunction: 98 m/s2each in three directions
Life expectancy Mechanical: 10,000,000 operations min.
Electrical: 100,000 operations min. (5 A at 250 VAC, resistive load)
Approved safety
standards (See note 3.) UL508/Recognition (H5CX-L8@: Listing only with OMRON’s P2CF-08@or P3G-08 socket), CSA C22.2 No.
14, conforms to EN61010-1 (Pollution degree 2/overvoltage category II)
Conforms to VDE0106/P100 (finger protection).
EMC (EMI) EN61326
Emission Enclosure: EN55011 Group 1 class A
Emission AC mains: EN55011 Group 1 class A
(EMS) EN61326
Immunity ESD: EN61000-4-2: 4 kV contact discharge (level 2)
8 kV air discharge (level 3)
Immunity RF-interference: EN61000-4-3: 10 V/m (Amplitude-modulated, 80 MHz to 1 GHz) (level 3);
10 V/m (Pulse-modulated, 900 MHz
5 MHz) (level 3)
Immunity Conducted
Disturbance: EN61000-4-6: 10 V (0.15 to 80 MHz) (according to EN61000-6-2)
Immunity Burst: EN61000-4-4: 2 kV power-line (level 3);
1 kV I/O signal-line (level 4)
Immunity Surge: EN61000-4-5: 1 kV line to lines (power and output lines) (level 3);
2 kV line to ground (power and output lines) (level 3)
Immunity Voltage Dip/Interruption EN61000-4-11: 0.5 cycle, 100% (rated voltage)
Degree of protection Panel surface: IP66 and NEMA Type 4 (indoors) (See note 4.)
Weight H5CX-A@: Approx. 135 g, H5CX-A11@/-L8@:Approx. 105 g

8
H5CXH5CX
■Engineering Data (Reference Values)
Life-test Curve
Reference: A maximum current of 0.15 A can be switched at
125 VDC (cos
f
=1) and a maximum current of 0.1 A
can be switched if L/R is 7 ms. In both cases, a life
of 100,000 operations can be expected. The mini-
mum applicable load is 10 mA at 5 VDC (failure
level: P).
Inrush Current
Nomenclature
0 12345
1,000
500
100
50
10
Switching operations (
10
4
)
250 VDC/30 VDC
cos
f
=1
250 VAC cos
f
=0.4
Load current (A)
30 VDC L/R=7 ms
Voltage Applied voltage Inrushcurrent
(peak value) Time
100 to 240 VAC 264 VAC 5.3 A 0.4 ms
24 VAC/
12 to 24 VDC 26.4 VAC 6.4 A 1.4 ms
26.4 VAC 4.4 A 1.7 ms
ON
(default setting) OFF
Indicator
AReset Indicator (orange)
BKey Protection Indicator (orange)
CControl Output Indicator (orange)
DPresent Value
(red or green (programmable) for
H5CX-A models, red for H5CX-A11
/-L models)
Character height: 11.5 mm
ETime Unit Display
(Color is same as present value.):
(If the time range is 0 min, 0 h, 0.0 h,
or 0 h 0 min, this display flashes to
indicate timing operation.)
FSet Value (green)
Character height: 6 mm
GSet Value 1, 2 Display
Front View
Operation Key
HMode Key
(Changes modes and setting items)
IReset Key
(Resets present value and output)
JUp Keys 1 to 4
KDown Keys 1 to 4
LM
Switches
LKey-protect Switch
MDIP Switch
Front color: Black
Case color: Black
A
B
D
E
F
J
K
C
G
H
I

9
H5CXH5CX
Operation
■Block Diagram
Note: Power circuit is not insulated from the input circuit, except for H5CX-A11/-A11S, which have basic insulation.
■I/O Functions
Inputs Start signal Stops timing in A-2 and A-3 (power ON delay) modes.
Starts timing in other modes.
Reset Resets present value. (In elapsed time mode, the present value returns to 0; in remaining time
mode, the present value returns to the set value.)
Count inputs are not accepted and control output turns OFF while reset input is ON.
Reset indicator is lit while reset input is ON.
Gate Inhibits timer operation.
Outputs Control output (OUT) Outputs take place according to designated operating mode when timer reaches correspond-
ing set value.
Input circuit Internal control
circuit
Power supply
circuit
(Basic
insulation)
Display circuit
Key switch
circuit
(See note.)
Output circuit

10
H5CXH5CX
Setting Procedure Guide
■Settings for Timer Operation
Note: At the time of delivery, the H5CX is set for timer operation.
■Settings for Twin Timer Operation
Note: At the time of delivery, the H5CX is set for timer operation.
1
OFF
ON
2345678
When Using Basic Functions Only
• Time range (0.001 s to 999.9 h,
except 9,999 h and 9,999 min)
• Output mode (A, A-2, E, F)
• Timer mode (UP/DOWN)
• Input signal width (20 ms/1 ms)
The settings can be performed easily with the DIP switch.
➡For details on the setting methods, refer to page 11.
When Using Other Time Ranges
(9,999 h, 9,999 min) and Output
Modes (A-1, A-3, b, b-1, d, and Z)
All the functions can be set with the operation keys.
➡For details on the setting methods, refer to page 12.
When Using More Detailed Setting Items
(Output Time, NPN/PNP Input Mode,
Display Color, Key Protect Level)
Setting for items other than the basic functions can be
performed with the operation keys.
➡For details on the setting methods, refer to page 12.
Basic Functions
Use the following settings for all models except the H5CX-L8@.
Refer to page 12 for the H5CX-L8@.
1
OFF
ON
2345678
When Using Basic Functions Only
• Time range (0.01 s to 99 min 59 s)
• ON/OFF start mode
(flicker OFF start/flicker ON start)
• Timer mode (UP/DOWN)
• Input signal width (20 ms/1 ms)
The settings can be performed easily with the DIP switch.
➡For details on the setting methods, refer to page 15.
When Using Other Time Ranges
(999.9 min, 9,999 min, 99 h 59 min,
999.9 h, 9,999 h, 9.999 s)
All the functions can be set with the operation keys.
➡For details on the setting methods, refer to page 16.
When Using More Detailed Setting Items
(NPN/PNP Input Mode, Display Color, Key
Protect Level)
Setting for items other than the basic functions can be
performed with the operation keys.
➡For details on the setting methods, refer to page 16.
Basic Functions
Use the following settings for all models except the H5CX-L8@.
Refer to page 16 for the H5CX-L8@.

11
H5CX (Timer Function)H5CX (Timer Function)
Operation (Timer Function)
■Settings for Basic Functions
Note: All the pins are factory-set to OFF.
Easy Confirmation of Switch Settings Using Indicators
The ON/OFF status of the DIP switch pins can be
confirmed using the front display. For details, refer to page 19.
Note: 1. Be sure to set pin 1 of the DIP switch to ON. If it is set to OFF, the DIP switch settings will not be enabled.
2. Changes to DIP switch settings are enabled when the power is turned ON. (Perform DIP switch settings while the power is OFF.)
3. There is no DIP switch on the H5CX-L8@. For details on the setting methods, refer to page 12.
4. When using time ranges or output modes that cannot be set with the DIP switch, all of the settings have to be made using the
operation keys. For details on the setting methods, refer to page 12.
1
OFF
ON
2345678
Settings for basic functions can be performed with just the DIP switch.
Be sure to set pin 1 to ON.
Item OFF ON
1 DIP switch set-
tings enable/
disable
Disabled Enabled
2 Time range Refer to the table on the right.
3
4
5 Output mode Refer to the table on the right.
6
7 Timer mode Elapsed time
(UP) Remaining time
(DOWN)
8 Input signal
width 20 ms 1 ms
Pin 2 Pin 3 Pin 4 Time range
ON ON ON 0.001 s to 9.999 s
OFF OFF OFF 0.01 s to 99.99 s
ON OFF OFF 0.1 s to 999.9 s
OFF ON OFF 1 s to 9999 s
ON ON OFF 0min01 sto99 min
59 s
OFF OFF ON 0.1 min to
999.9 min
ON OFF ON 0 h 01 min to
99 h 59 min
OFF ON ON 0.1 h to 999.9 h
Pin 5 Pin 6 Output mode
OFF OFF A mode (signal ON delay
(I): power reset opera-
tion)
ON OFF A-2 mode: (power ON
delay (I): power reset op-
eration)
OFF ON E mode (interval: power
reset operation)
ON ON F mode (accumulative:
power hold operation)
Detailed Settings
After making DIP switch settings for basic functions, detailed settings (see note) can be added using the operation keys.
For details, refer to page 12.
Note: Output time, NPN/PNP input mode, display color, key protect level.

12
H5CX (Timer Function)H5CX (Timer Function)
■Settings for Advanced Functions
ss hs
(1 ms)(20 ms)
(A-1) (A-2) (A-3) (b-1)(b) (d) (E) (F) (Z)(A)
(KP-2) (KP-3) (KP-4) (KP-5)(KP-1)
......
s
Settings that cannot be performed with the DIP switch are performed with the operation keys.
Set the time range using the keys.
Power ON
For details, refer to Time Range List below.
Time range
The characters displayed in reverse video are the default settings.
When performing settings with operation keys only, set pin1 of the
DIP switch to OFF (factory setting). If pin 1 of the DIP switch is set
to ON, the setting items indicated in will not be displayed.
Timer mode
Output mode
Output time
Input signal
width
NPN/PNP
input mode
Display color
Key protect
level Set the key protect level using the keys.
Set the display color using the keys.
Set the NPN/PNP input mode using the keys.
Set the input signal width using the keys.
: Output hold/0.01 to 99.99 s
(If the output time is set to 0.00, is displayed.)
Displayed for modes A, A-1, A-2, A-3, b, and b-1 only.
(NPN input) (PNP input)
Only displayed for H5CX-A@and H5CX-A11@models.
(Red) (Green) Red-green Green-red
Displayed for terminal-block models (H5CX-A@) only.
See note 1. See note 2.
Note: 1. If the mode is switched to the function setting mode during operation,
operation will continue.
2. Changes made to settings in function setting mode are enabled for the
first time when the mode is changed to run mode. Also, when settings
are changed, the timer is reset (time initialized and output turned OFF).
For details on operations in run mode, refer to page 14.
Set the timer mode using the keys.
Set the output mode using the keys.
Set each digit for the output time using the corresponding keys.
Run mode
Function setting mode
3 s min. 3 s min.
(Elapsed
time) (Remaining
time)
0.01 s to 99.99 s
(default setting)
0.1 s to 999.9 s
1 s to 9,999 s
0 min 01 s to 99 min 59 s
0.1 min to 999.9 min
1 min to 9,999 min
0 h 01 min to 99 h 59 min
Display
0.1 h to 999.9 h
Set Value
1 h to 9,999 h
0.001 s to 9.999 s
Time Range List

13
H5CX (Timer Function)H5CX (Timer Function)
■Explanation of Functions
Time Range (timr) (Setting possible using DIP switch.)
Set the range to be timed in the range 0.000 s to 9,999 h. Settings
of type ---- h (9,999 h) and ---- min (9,999 min) cannot, however,
be made with the DIP switch. Use the operation keys if these set-
tings are required.
Timer Mode (timm) (Setting possible using DIP switch.)
Set either the elapsed time (UP) or remaining time (DOWN)
mode.
Output Mode (outm) (Setting possible using DIP switch.)
Set the output mode. The possible settings are A, A-1, A-2, A-3,
b, b-1, d, E, F, and Z. Only output modes A, A-2, E, and F can be
set using the DIP switch. Use the operation keys if a different set-
ting is required. (For details on output mode operation, refer to
Timing Charts on page 20.)
Output Time (otim)
When using one-shot output, set the output time for one-shot out-
put (0.01 to 99.99 s). One-shot output can be used only if the
selected output mode is A, A-1, A-2, b, or b-1. If the output time is
set to 0.00, hold is displayed, and the output is held.
Input Signal Width (iflt) (Setting possible using DIP switch.)
Set the minimum signal input width (20 ms or 1 ms) for signal,
reset, and gate inputs. The same setting is used for all external
inputs (signal, reset, and gate inputs). If contacts are used for the
input signal, set the input signal width to 20 ms. Processing to
eliminate chattering is performed for this setting.
NPN/PNP Input Mode (imod)
Select either NPN input (no-voltage input) or PNP input (voltage
input) as the input format. The same setting is used for all exter-
nal inputs. For details on input connections, refer to Input Connec-
tions on page 28.
Display Color (colr)
Set the color used for the present value.
Key Protect Level (kypt)
Set the key protect level.
When the key-protect switch is set to ON, it is possible to prevent setting errors by prohibiting the use of certain operation keys by specify-
ing the key protect level (KP-1 to KP-5). The key protect indicator is lit while the key-protect switch is set to ON.
Note: Changing mode to timer/twin timer selection mode ( + 1 s min.) or function setting mode ( 3 s min.).
Output OFF Output ON
red Red (fixed)
grn Green (fixed)
r-g Red Green
g-r Green Red
ON
OFF
Note: Factory-set to OFF
Key protect indicator
(See note)
Level Meaning Details
Changing mode
(See note.) Switching display
during operation Reset key Up/down key
KP-1
(default setting) No Yes Yes Yes
KP-2 No Yes No Yes
KP-3 No Yes Yes No
KP-4 No Yes No No
KP-5 No No No No
MODE
1
MODE

14
H5CX (Timer Function)H5CX (Timer Function)
■Operation in Run Mode
Present Value and Set Value
These items are displayed when the power is turned ON. The
present value is displayed in the main display and the set value is
displayed in the sub-display. The values displayed will be deter-
mined by the settings made for the time range and the timer mode
in function setting mode.
Present Value and ON Duty Ratio (Output Mode = Z)
The present value is displayed in the main display and the ON
duty ratio is displayed in the sub-display. “SET1” lights at the
same time.
Set the ON duty ratio used in ON/OFF-duty adjustable flicker
mode (Z) as a percentage.
If a cycle time is set, cyclic control can be performed in ON/OFF-
duty adjustable flicker mode simply by changing the ON duty ratio.
ON time = Cycle time
The output accuracy will vary with the time range, even if the ON
duty ratio setting is the same. Therefore, if fine output time adjust-
ment is required, it is recommended that the time range for the
cycle time is set as small as possible.
Examples:
1. If the cycle time is 20 s, the ON duty ratio is 31%, and the
time range is 1 s to 9999 s, the ON time is given by the fol-
lowing:
20 (s)
= 6.2 (s)
Rounded off to the nearest
integer (because of the time range setting)
ON time = 6 s
2. If the cycle time is 20.00 s, the ON duty ratio is 31%, and
the time range is 0.01 s to 99.99 s, the ON time is given by
the following:
20.00 (s)
= 6.200 (s)
Rounded off to 2 decimal
places (because of the time range setting)
ON time =
6.20 s
Present Value and Cycle Time (Output Mode = Z)
The present value is displayed in the main display and the cycle
time is displayed in the sub-display. “SET2” lights at the same
time.
Set the cycle time used in ON/OFF-duty adjustable flicker mode
(Z).
Present value
Set value
Present value
ON duty ratio
Present value
Cycle time
When Output Mode Z Is Selected
Set each digit for the ON duty ratio using the corresponding keys.
(The keys for the 4th digit cannot be used.)
Set each digit for the cycle time using the corresponding keys.
Set each digit for the set value using the corresponding keys.
When Output Mode Is Not Z
ON duty ratio (%)
100
31(%)
100
31(%)
100
Elapsed cycle time
ON duty set as a percentage
Up/down keys used for analog
adjustment of the ON duty
Cycle time
ON duty (%)
Output control
Close Open
Opening/closing valve Fully closed
Fully open
0%
100%
ON duty

15
H5CX (Twin Timer Function)H5CX (Twin Timer Function)
Operation (Twin Timer Function)
■Switching from Timer to Twin Timer
The H5CX is factory-set for timer operation. To switch to twin timer operation, use the procedure given below. For details, refer to page 35.
■Settings for Basic Functions
Note: All the pins are factory-set to OFF.
Easy Confirmation of Switch Settings Using Indicators
The ON/OFF status of the DIP switch pins can be
confirmed using the front display. For details, refer to page 19.
Note: 1. Be sure to set pin 1 of the DIP switch to ON. If it is set to OFF, the DIP switch settings will not be enabled.
2. Changes to DIP switch settings are enabled when the power is turned ON. (Perform DIP switch settings while the power is OFF.)
3. There is no DIP switch on the H5CX-L8@. For details on the setting methods, refer to page 16.
4. When using time ranges that cannot be set with the DIP switch, all of the settings have to be made using the operation keys. For
details on the setting methods, refer to page 16.
1
+
Power ON
Timer/
twintimer
selection Hold down for
1smin.
Switch from timer operation to twin timer
operation using the keys.
Timer/twin timer selection mode Run mode
1
OFF
ON
2345678
Settings for basic functions can be performed with just the DIP switch.
Be sure to set pin 1 to ON.
Item OFF ON
1 DIP switch set-
tings enable/
disable
Disabled Enabled
2 OFF time range Refer to the table on the right.
3
4 ON time range Refer to the table on the right.
5
6ON/OFFstart
mode Flicker OFF
start Flicker ON start
7 Timer mode UP DOWN
8 Input signal
width 20 ms 1 ms
Pin 2 Pin 3 OFF time range
OFF OFF 0.01 s to 99.99 s
ON OFF 0.1 s to 999.9 s
OFF ON 1 s to 9,999 s
ON ON 0 min 01 s to 99 min 59 s
Pin 4 Pin 5 ON time range
OFF OFF 0.01 s to 99.99 s
ON OFF 0.1 s to 999.9 s
OFF ON 1 s to 9,999 s
ON ON 0 min 01 s to 99 min 59 s
Detailed Settings
After making DIP switch settings for basic functions, detailed settings (see note) can be added using the operation keys.
For details, refer to page 12.
Note: NPN/PNP input mode, display color, key protect level.

16
H5CX (Twin Timer Function)H5CX (Twin Timer Function)
■Settings for Advanced Functions
ss hs
ss hs
(Remaining
time)
(Elapsed
time)
(1 ms)(20 ms)
(KP-1) (KP-2) (KP-3) (KP-4) (KP-5)
......
......
s
s
Settings that cannot be performed with the DIP switch are performed with the operation keys.
0.01 s to 99.99 s (default setting)
0.1 s to 999.9 s
1 s to 9,999 s
0 min 01 s to 99 min 59 s
0.1 min to 999.9 min
1 min to 9,999 min
0 h 01 min to 99 h 59 min
Display
0.1 h to 999.9 h
Set Value
1 h to 9,999 h
0.001 s to 9.999 s
Set the key protect level using the keys.
Set the display color using the keys.
Set the NPN/PNP input mode using the keys.
Set the input signal width using the keys.
Set the twin timer output mode using the keys.
Key protect
level
Display color
NPN/PNP
input mode
Input signal
width
ON/OFF
start mode
Timer mode
Set the timer mode using the keys.
Set the ON time range using the keys.
For details, refer to Time Range List, below.
For details, refer to Time Range List, below
OFF time
range
ON time
range
Set the OFF time range using the keys.
(See note 2.)
(See note 1.)
3smin. 3smin.
Power ON
Run mode
Function setting mode
(Flicker OFF
start) (Flicker ON
start)
(NPN input) (PNP input)
(Red) (Green) (Red-green) (Green-red)
Only displayed for H5CX-A@and H5CX-A11@models.
Displayed for terminal-block models (H5CX-A@) only.
Note: 1. If the mode is switched to the function setting mode during operation, operation will
continue.
2. Changes made tosettings in function setting mode are enabled for the first time when
the mode is changed to run mode. Also, when settings are changed, the timer is reset
(time initialized and output turned OFF).
The characters displayed in reverse video are the initial values.
When performing settings with operation keys only, set pin1 of the
DIP switch to OFF (factory setting). If pin 1 of the DIP switch is set
to ON, the setting items indicated by will not be displayed.
Time Range List
For details on operations in run mode, refer to page 18.

17
H5CX (Twin Timer Function)H5CX (Twin Timer Function)
■Explanation of Functions
OFF Time Range (oftr) (Setting possible using DIP switch.)
Set the time range for the OFF time in the range 0.000 s to 9,999
h. Only settings of type --.-- s (99.99 s), ---.- s (999.9 s), ---- s
(9,999 s), and -- min -- s (99 min 59 s), however, can be made
with the DIP switch. Use the operation keys if another type of set-
ting is required.
ON Time Range (ontr) (Setting possible using DIP switch.)
Set the time range for the ON time in the range 0.001 s to 9,999 h.
Only settings of type --.-- s (99.99 s), ---.- s (999.9 s), ---- s (9,999
s), and -- min -- s (99 min 59 s), however, can be made with the
DIP switch. Use the operation keys if another type of setting is
required.
Timer Mode (timm) (Setting possible using DIP switch.)
Set either UP (incremental) or DOWN (decremental) timer mode.
In UP mode, the elapsed time is displayed, and in DOWN mode,
the remaining time is displayed.
ON/OFF Start Mode (totm) (Setting possible using DIP
switch.)
Set the output mode. Set either flicker OFF start or flicker ON
start. (For details on output mode operation, refer to Timing
Charts on page 20.)
Input Signal Width (iflt) (Setting possible using DIP switch.)
Set the minimum signal input width (20 ms or 1 ms) for signal,
reset, and gate inputs. The same setting is used for all external
inputs (signal, reset, and gate inputs). If contacts are used for the
input signal, set the input signal width to 20 ms. Processing to
eliminate chattering is performed for this setting.
NPN/PNP Input Mode (imod)
Select either NPN input (no-voltage input) or PNP input (voltage
input) as the input format. The same setting is used for all exter-
nal inputs. For details on input connections, refer to Input Connec-
tions on page 28.
Display Color (colr)
Set the color used for the present value.
Key Protect Level (kypt)
Set the key protect level.
When the key-protect switch is set to ON, it is possible to prevent setting errors by prohibiting the use of certain operation keys by specify-
ing the key protect level (KP-1 to KP-5). The key protect indicator is lit while the key-protect switch is set to ON.
Note: Changing mode to timer/twin timer selection mode ( + 1 s min.) or function setting mode ( 3 s min.).
Output OFF Output ON
red Red (fixed)
grn Green (fixed)
r-g Red Green
g-r Green Red
ON
OFF
Note: Factory-set to OFF
Key protect indicator
(See note)
Level Meaning Details
Changing mode
(See note.) Switching display
during operation Reset key Up/down key
KP-1
(default setting) No Yes Yes Yes
KP-2 No Yes No Yes
KP-3 No Yes Yes No
KP-4 No Yes No No
KP-5 No No No No
MODE
1
MODE

18
H5CX (Twin Timer Function)H5CX (Twin Timer Function)
■Operation in Run Mode
Present Value and OFF Set Time
The present value is displayed in the main display and the OFF
set time is displayed in the sub-display. “SET1” lights at the same
time.
Present Value and ON Set Time
The present value is displayed in the main display and the ON set
time is displayed in the sub-display. “SET2” lights at the same
time.
Present value
OFF set time
Present value
ON set time
Set the digits for the OFF set time using the corresponding keys.
Set the digits for the ON set time using the corresponding keys.

19
H5CXH5CX
Operation in Timer/Twin Timer Selection Mode
Select whether the H5CX is used as a timer or a twin timer in timer/twin timer selection mode. The H5CX is also equipped with a DIP
switch monitor function, a convenient function that enables the settings of the DIP switch pins to be confirmed using the front display.
1
1
OFF
ON
2345678
1
+
(Timer) (Twin timer)
To change the mode to timer/twin timer selection mode, hold
down the key for 1 s min. with the key held down.
The key must be pressed before the key.
If the key is pressed first, the mode will not change.
MODE
Confirm the status of DIP switch pins 1 to 8 using
the keys.
Select either timer operation or twin timer operation
using the keys.
1
Power ON
Timer/Twintimer
selection
Run Mode
Note: The H5CX is factory-set for timer operation.
Timer/Twin Timer Selection Mode
DIP switch
monitor
Note: 1. When the mode is changed to timer/twin timer selection mode, the present value is reset and output turns OFF. Timing
operation is not performed in timer/twin timer selection mode.
2. Setting changes made in timer/twin timer selection mode are enabled when the mode is changed to run mode. If settings
are changed, the HC5X is automatically reset (present value initialized, output turned OFF).
Indicates that DIP switch pin 8 is ON.
Indicates that DIP switch pin 7 is OFF.
Indicates that DIP switch pin 6 is ON.
Indicates that DIP switch pin 5 is OFF.
Indicates that DIP switch pin 4 is ON.
Indicates that DIP switch pin 3 is OFF.
Indicates that DIP switch pin 2 is ON.
Indicates that DIP switch pin 1 is ON.
Note: 1. This display is not supported with H5CX-L8@.
2. This display is only possible when DIP switch pin 1
(DIP switch settings enable/disable) is set to ON (enable).
Example
1 s min.
1
1
MODE

20
H5CXH5CX
Timing Charts
■Timer Operation
The gate input is not included in the H5CX-L8@models.
Output mode A: Signal ON delay 1 (Timer resets when power comes ON.)
Output mode A-1: Signal ON delay 2 (Timer resets when power comes ON.)
Output mode A-2: Power ON delay 1 (Timer resets when power comes ON.)
Output mode A-3: Power ON delay 2 (Timer does not reset when power comes ON.)
Either one-shot output or sustained output can be selected.
One-shot output
Sustained output
t
Power
Start signal
Gate
Reset
Control output
Set value
Timing
diagram
UP
DOWN
0
0
Set value
Timing starts when the start signal goes ON.
While the start signal is ON, the timer starts when the
power comes ON or when the reset input goes OFF.
The control output is controlled using a sustained or
one-shot time period.
Basic Operation
Power
**
Start signal
input Timing
Output
* Output is instantaneous when setting is 0.
** Start signal input is disabled during timing.
Power
Start signal
Gate
Reset
Control output
Set value
Timing
diagram
UP
DOWN
0
0
Set value
Timing starts when the start signal goes ON, and is
reset when the start signal goes OFF.
While the start signal is ON, the timer starts when the
power comes ON or when the reset input goes OFF.
The control output is controlled using a sustained or
one-shot time period.
*Output is instantaneous when setting is 0.
Basic Operation
Power
Start signal
input Timing
Output
Power
Start signal
Gate
Reset
Control output
Set value
Timing
diagram UP
DOWN
0
0
Set value
Timing starts when the reset input goes OFF.
The start signal disables the timing function (i.e., same
function as the gate input).
The control output is controlled using a sustained or
one-shot time period.
*Output is instantaneous when setting is 0.
Basic Operation
Power Timing
Output
Power
Start signal
Gate
Reset
Control output
Set value
Timing
diagram
UP
DOWN
0
0
Set value
t
Timing starts when the reset input goes OFF.
The start signal disables the timing function (i.e.,
same function as the gate input).
The control output is controlled using a sustained or
one-shot time period.
*Output is instantaneous when setting is 0.
Basic Operation
Power Timing
Output Sustained

21
H5CXH5CX
.
Output mode b: Repeat cycle 1 (Timer resets when power comes ON.)
Output mode b-1: Repeat cycle 2 (Timer does not reset when power comes ON.)
Power
Start signal
Gate
Reset
Control output
Set value
Timing
diagram UP
DOWN
0
0
Set value
Sustained
Output
Timing starts when the start signal goes ON.
The status of the control output is reversed when time
is up (OFF at start).
While the start signal is ON, the timer starts when the
power comes ON or when the reset input goes OFF.
* Normal output operation will not be possible if the
set time is too short.
Set the value to at least 100 ms (contact output
type).
** Start signal input is disabled during timing.
Basic Operation
Power
**
Start signal
input Timing
Output
TimingTimingTiming
Power
Start signal
Gate
Reset
Control output
Set value
Timing
diagram
UP
DOWN
0
0
Set value
One-shot
Output
Timing starts when the start signal goes ON.
The control output is turned ON when time is up.
While the start signal is ON, the timer starts when the
power comes ON or when the reset input goes OFF.
* Normal output operation will not be possible if the
set time is too short.
Set the value to at least 100 ms (contact output
type).
** Start signal input is disabled during timing.
Basic Operation
Power
**
Start signal
input
Output
TimingTimingTimingTiming
Power
Start signal
Gate
Reset
Control output
Set value
Timing
diagram UP
DOWN
0
0
Set value
Sustained
Output
Timing starts when the start signal goes ON.
The status of the control output is reversed when time
is up (OFF at start).
While the start signal is ON, the timer starts when the
power comes ON or when the reset input goes OFF.
* Normal output operation will not be possible if the
set time is too short.
Set the value to at least 100 ms (contact output
type).
** Start signal input is disabled during timing.
Sustained
Basic Operation
Power
**
Start signal
input
Output
Timing Timing
Power
Start signal
Gate
Reset
Control output
Set value
Timing
diagram
UP
DOWN
0
0
Set value
One-shot
Output
tt t tt
Timing starts when the start signal goes ON.
The control output comes ON when time is up.
While the start signal is ON, the timer starts when
power comes ON or when the reset input goes OFF.
Sustained
Basic Operation
Power
**
Start signal
input
Output
Timing Timing
* Normal output operation will not be possible if the
set time is too short.
Set the value to at least 100 ms (contact output
type).
** Start si
g
nal input is disabled durin
g
timin
g
.

22
H5CXH5CX
Z Mode
Output quantity can be adjusted by changing the cycle time set in the adjustment level to 1 and by changing the ON duty (%) set value.
The set value shows the ON duty (%) and can be set to a value between 0 and 100 (%). When the cycle time is 0, the output will always be
OFF. When the cycle time is not 0 and when ON duty has been set to 0 (%), the output will always be OFF. When ON duty has been set to
100 (%), the output will always be ON.
Output mode d: Signal OFF delay (Timer resets when power comes ON.)
Output mode E: Interval (Timer resets when power comes ON.)
Output mode F: Cumulative (Timer does not reset when power comes ON.)
Z mode: ON/OFF-duty adjustable flicker
Power
Start signal
Gate
Reset
Control output
Set value
Timing
diagram
UP
DOWN
0
0
Set value
The control output is ON when the start signal is
ON (except when the power is OFF or the reset is
ON).
The timer is reset when the time is up.
* Output functions only during start signal input when
setting is 0.
** Start signal input is enabled during timing.
Basic Operation
Power
**
Start signal
input
Output
Timing
Power
Start signal
Gate
Reset
Control output
Set value
Timing
diagram
UP
DOWN
0
0
Set value
Timing starts when the start signal comes ON.
The control output is reset when time is up.
While the start signal is ON, the timer starts when
power comes ON or when the reset input goes OFF.
* Output is disabled when the setting is 0.
** Start signal input is enabled during timing.
Basic Operation
Power
**
Start signal
input
Output
Timing
Power
Start signal
Gate
Reset
Control output
Set value
Timing
diagram
UP
DOWN
0
0
Set value
Start signal enables timing (timing is stopped when the
start signal is OFF or when the power is OFF).
A sustained control output is used.
*Output is instantaneous when setting is 0.
Sustained
Basic Operation
Power
Start signal
input
Output
Timing Timing
Power
Start signal
Gate
Reset
Control output
ON duty setting
(%) ON time
0
0
DOWN
UP
ON duty setting
(%) ON time
Cycle time
Cycle time
Timing
diagram
Timing starts when the start signal goes ON.
The status of the control output is reversed
when time is up (ON at start).
While the start signal is ON, the timer starts when
power comes ON or when the reset input goes OFF.
Basic Operation
Power
**
Start signal
input
Output
* Normal output operation will not be possible if the
set time is too short.
Set the value to at least 100 ms (contact output
type).
** Start signal input is disabled during timing.
Timing
ON duty (%)
Timing
(cycle time) Timing
(cycle time)
Timing
ON duty (%)

23
H5CXH5CX
■Twin Timer Operation
The gate input is not included in the H5CX-L8@models.
Output mode toff: Flicker OFF start
Output mode ton: Flicker ON start
0
0
Power
Start signal
Gate
Reset
Control output
OFF time
Timing
diagram
UP ON time
Sustained
Output
DOWN
OFF time
ON time
Timing starts when the start signal goes ON.
The status of the control output is reversed when time
is up (OFF at start).
While the start signal is ON, the timer starts when the
power comes ON or when the reset input goes OFF.
* Normal output operation will not be possible if the
ON/OFF set time is too short.
Set the value to at least 100 ms (contact output
type).
** Start signal input is disabled during timing.
Basic Operation
Power
**
Start signal
input Timing
ON
Output
Timing
OFF
Timing
ON
Timing
OFF
0
0
Power
Start signal
Gate
Reset
Control output
OFF time
Timing
diagram
UP ON time
Sustained
Output
DOWN
OFF time
ON time
Timing starts when the start signal goes ON.
The status of the control output is reversed when time
is up (ON at start).
While the start signal is ON, the timer starts when the
power comes ON or when the reset input goes OFF.
* Normal output operation will not be possible if the
ON/OFF set time is too short.
Set the value to at least 100 ms (contact output
type).
** Start si
g
nal input is disabled durin
g
timin
g
.
Basic Operation
Power
**
Start signal
input Timing
OFF
Output
Timing
ON
Timing
OFF
Timing
ON
Other manuals for H5CX
2
This manual suits for next models
12
Table of contents
Other Omron Timer manuals

Omron
Omron H3CR-AP User manual

Omron
Omron H3BG-N8 User manual

Omron
Omron H8CA-S Series User manual

Omron
Omron H8GN - V1.02 User manual

Omron
Omron H5CL User manual

Omron
Omron H2F - User manual

Omron
Omron H5CX User manual

Omron
Omron H5F - User manual

Omron
Omron H5AN Series User manual

Omron
Omron H5CX User manual
Popular Timer manuals by other brands

Skytech
Skytech TM-3 Installation and operation instructions

Skytech
Skytech TM/R-AF1-1 Installation and operating instructions

wattstopper
wattstopper RT-50 installation instructions

Timeguard
Timeguard EL17 Installation and operating instructions

ACU-RITE
ACU-RITE 00531 instruction manual

Intermatic
Intermatic HB52RC supplementary guide