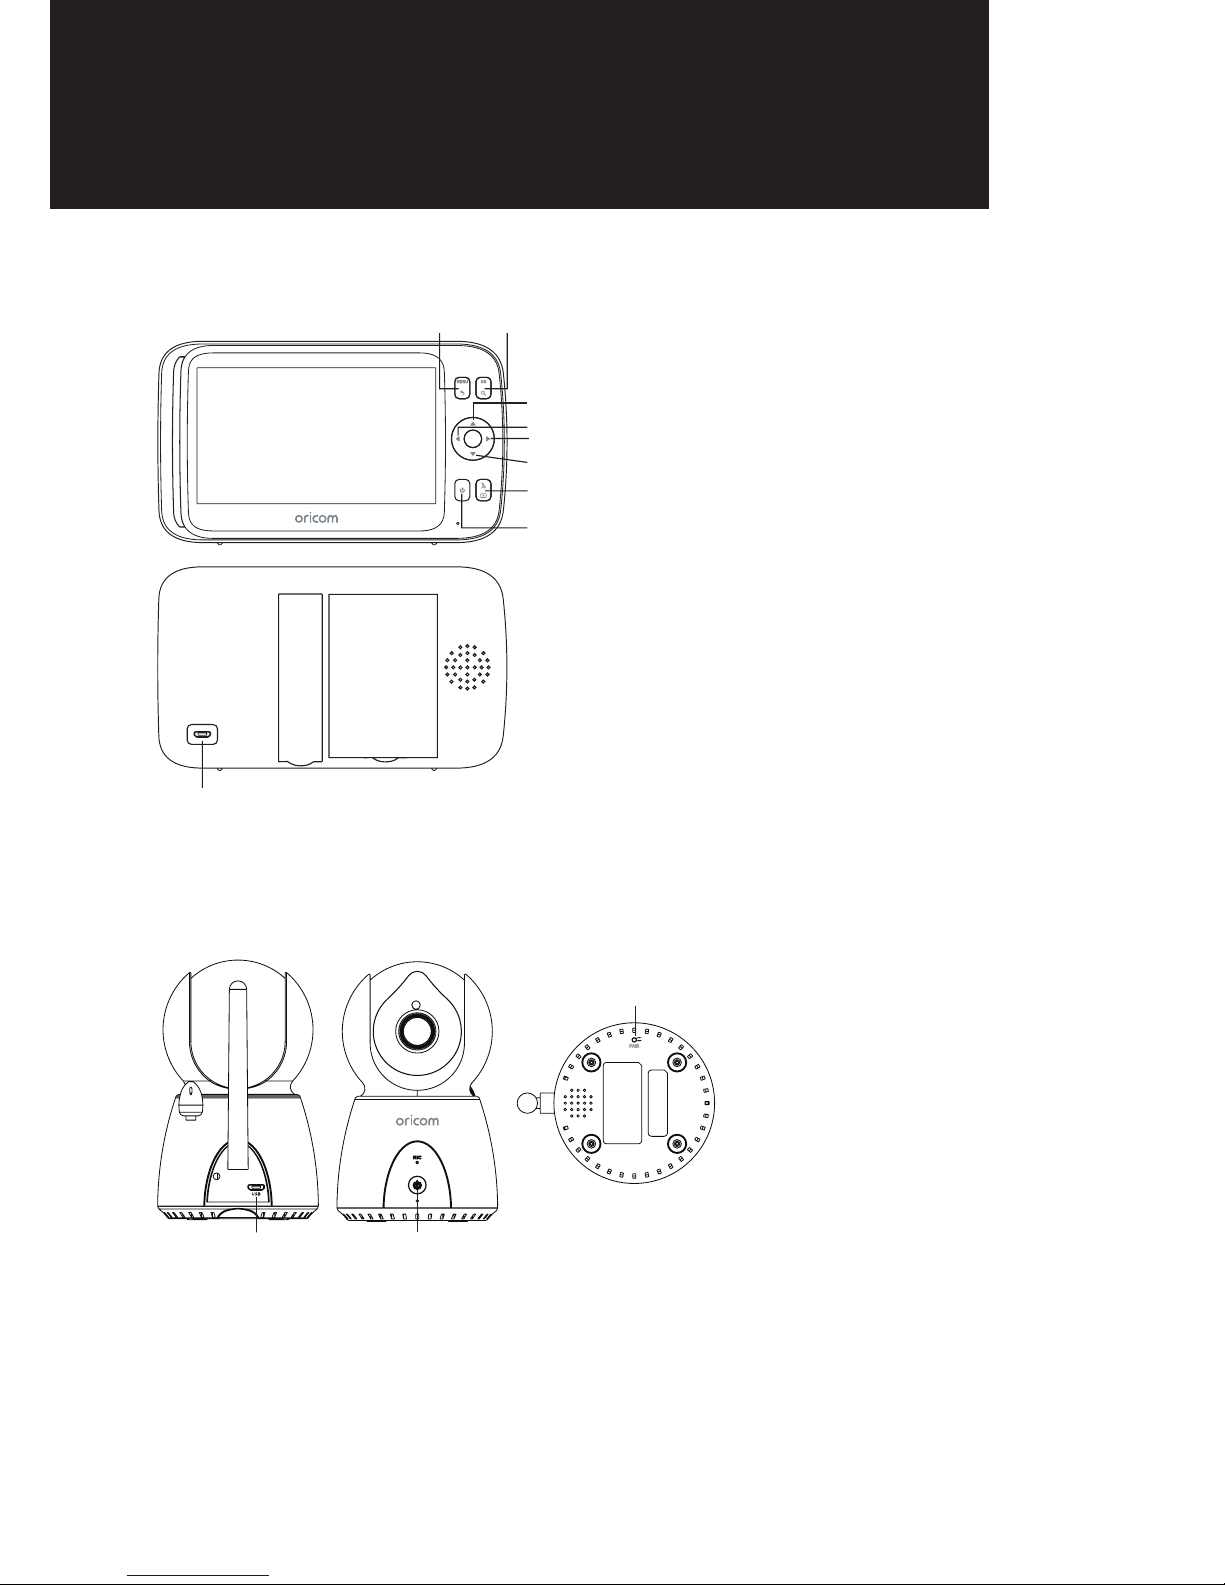
Oricom Secure895 User manual

User Guide
KEEP THIS USER GUIDE FOR FUTURE REFERENCE
Always retain your proof of purchase in case of warranty service.
AUSTRALIA: www.oricom.com.au
NEW ZEALAND: www.oricom.co.nz
Video Baby Monitor
Secure895

Safety InformatIon
taBLe of ContentS
Safety InformatIon 1
oVerVIeW of fUnCtIonaL
ComPonent PoSItIonS 5
SettIng UP yoUr VIdeo BaBy
monItor 6
BaSIC oPeratIon of the keyS 11
menU oPtIonS and fUnCtIonS 12
SettIngS 19
defaULt SettIngS 29
CUStomer SUPPort 30
troUBLeShootIng 31
eXPreSS Warranty 33
Need Help?
If you need assistance setting up or using your Oricom
product now or in the future, call Oricom Support.
Australia 1300 889 785 or 02 4574 8888
www.oricom.com.au
Mon-Fri 8am – 6pm AEST
New Zealand 0800 67 42 66
www.oricom.co.nz
Mon-Fri 10am – 8pm NZST

1Safety InformatIon
taBLe of ContentS
1 Important Safety Information
• ItisveryimportantthatyoureadtheUserGuide
carefully as it contains detailed information you
will need to get the most from your Oricom baby
monitor. If you have any issues setting up or using
your Oricom baby monitor, please call our Customer
Support team.
• YourOricombabymonitorisdesignedtobean
aid and should not be used as a substitute for
responsible and proper adult supervision of a child.
• Thebabymonitorhasbeendesignedtoprovide
some added reassurance in the form of sound and
video transmission for those times when you are not
in the same room as your baby, provided you always
stay within hearing range of the baby monitor during
use.Yourbabymonitorisnotamedicaldevice,nor
a device to prevent cases of Sudden Infant Death
Syndrome (SIDS) or "cot death", and you should not
rely on it for your baby's wellbeing. It is important
that you regularly check on your baby personally.
• Makesurethebabyunit,parentunitandmains
adaptor cables are kept out of reach of your baby
and other young children at all times, at least one
metre away.
• Neverplacethebabyunitorparentunitinsideyour
baby’s cot, bed or playpen.

2Safety InformatIon
Safety InformatIon
• Nevercovertheparentorbabyunitswithclothes,
towels, blankets or any other item. Never use or
place your parent or baby unit in or near moisture or
water (e.g. near bath or pool). Immersing in water
could cause electric shock and even death.
• Theinstallationlocationplaysanimportantrolein
ensuring proper operation. Therefore, maintain a
distance of at least one metre from other electronic
equipment,suchasmicrowaveovensorhi−fi
devices, otherwise they could cause interference.
During continual use, the baby unit power adaptors
may become warm to the touch. This is normal and
should not be a concern.
Risk of suffocation!
Keep all packaging materials and protective foils
out of reach of children.
!
Warning

3
Safety InformatIon
Safety InformatIon
Battery safety
• Batteriesrepresentahazardtohealthandthe
environment!
• Theycontaintoxic,ecologicallyhazardousheavy
metals.Donotdisposeofbatteriesinareasthey
mayexplode.Disposeofbatteriesaccordingtolocal
regulations, never in your household rubbish.
• Donotdismantle,cut,open,crush,bend,puncture,
or shred cells or batteries. If a battery leaks, do
not let the battery liquid touch skin or eyes. If this
happens,immediatelyushtheaffectedareaswith
water, and seek medical assistance.
• Donotmodify,remanufacture,attempttoinsert
foreign objects into the battery, or immerse or
exposeittowaterorotherliquids.Batteriesmay
explodeifdamaged.
• Useonlythebatterysuppliedwiththeproduct.
Improper use, or use of unapproved batteries, may
presentariskofre,explosion,orotherhazard,and
may invalidate any approval or warranty.
• Ifyoubelievethebatteryisdamaged,remove
product from the charger and stop using the
product. Contact Oricom for assistance. Never use
a damaged battery.

4
oVerVIeW of fUnCtIonaL
ComPonent PoSItIonS
Safety InformatIon
Disposal
Always dispose of your products at the end of their
life in accordance with your local waste disposal
requirements.
Packaging materials including cardboard and paper
packaging, should be recycled in accordance with
your local council waste regulations.

5
oVerVIeW of fUnCtIonaL
ComPonent PoSItIonS
Safety InformatIon
Parent Unit
ཱ
ི
ཱི
ཱི
ི
ུ
ཱུ
ྲྀ
1MENUANDBACK
2OK AND ZOOM
3UP / DOWN, VOLUME + / -
4LEFT/RIGHTBUTTONS
5TALK AND VIDEO
6ON/OFFBUTTON
7CHARGING PORT
Camera Unit
ཱ
ི
1CHARGING PORT
2ON/OFFBUTTON
3PAIRBUTTON

6
SettIng UP yoUr VIdeo
BaBy monItor
SettIng UP yoUr VIdeo
BaBy monItor
Check pack contents
SC895
1Babyunit(camera)
1 AC adaptor for the baby unit
1 Parent unit
1 Li-ion Polymer rechargeable battery pack for the
parent unit
1 AC adaptor for the parent unit
1 User guide
If any items are missing, contact Oricom customer
support.
1. Setting up your Video Baby Monitor
Power adaptor markings
Please ensure you connect the correct power adaptor
to parent and baby units. Each power adaptor is
marked with a drawing showing the parent unit or
camera unit as follows:
BabyUnitPower
Adaptor Marking
Parent Unit Power
Adaptor Marking

7
SettIng UP yoUr VIdeo
BaBy monItor
SettIng UP yoUr VIdeo
BaBy monItor
1.1. Connecting the power adaptor to the baby unit
• Connectthesmallplugofthepoweradaptortothe
rearoftheBabyUnit.Theotherendwillpluginto
the power socket.
• Onlyusethesuppliedadaptor(5VDC/1.5A).
Do not place the AC Adaptor cable in a high
"wear and tear" location. Never use a frayed or
compromised cord.
!
Warning
Strangulation Hazard: Children have been
STRANGLED with cords. Keep this cord out of the
reach of children (more than 1 metre away).

8
1.2 Aligning the baby unit
To get the best performance, place your baby unit
between one and two metres away from your baby.
Point the baby unit towards the baby or object you
want to monitor. Check that the baby or object is
suitably displayed on the parent unit screen.
1.3. Connecting the power adaptor to the Parent Unit.
• Connectthesmallplugoftheadaptortotherear
of the Parent Unit. The other end will plug into the
power socket.
• Onlyusethesuppliedadaptor(5VDC/1.5A).
• RecommendedchargingtimeoftheParentUnitis
atleast16hoursbeforerstuse.
• PressandholdthePOWERbutton on the parent
unit to turn it ON.
SettIng UP yoUr VIdeo
BaBy monItor
SettIng UP yoUr VIdeo
BaBy monItor

9
Desk stand
In-use time and battery charging
Depending on the usage, the parent unit will work for
up to 8 hours on a fully charged battery with power
save turned ON.
When the battery charge becomes low on the parent
unit, the battery icon will turn red. At this point, you
need to charge the parent unit.
When charging, the battery status indicator on the
parent unit screen will change to the charging icon
<>.
To speed up the charging process, turn the parent unit
off when charging if it is not being used.
Youcancontinuetouseyourparentunittomonitor
your baby even when the battery is low, provided the
power adaptor is plugged in to recharge the battery.
SettIng UP yoUr VIdeo
BaBy monItor
SettIng UP yoUr VIdeo
BaBy monItor

10
NOTE:
• Theparentunitcanbekeptonchargeevenifitis
fully charged.
• Whentheparentunitisbeingusedwhilston
charge,thechargingtimewillbeextended.
• WerecommendthatyouTURNOFFtheparent
unit when it is not in-use, to conserve battery
power.
Battery Life
The rechargeable battery pack (supplied) can be
charged and discharged hundreds of times, however
it will eventually wear out and lose its ability to hold a
full charge. When the in-use time becomes noticeably
shorter than normal, it is time to purchase a new
battery pack.
How to purchase spare parts
Youcanpurchasebatterypacks(Partnumber:
2B0103)andextracameraunitsfromOricom
www.oricom.com.au
SettIng UP yoUr VIdeo
BaBy monItor
BaSIC oPerat Ion
of the keyS

11
2. Basic operation of the keys
PARENT UNIT
ON/OFF button
Press and hold to switch the
Parent Unit ON/OFF
Press to turn the video screen
ON/OFF
UP/DOWN buttons
Press to tilt the camera upward
or downward
Press to adjust volume level
(can also be used to pan
camera up or down - Must
pressright/leftbuttonrstto
activate camera pan function)
LEFT/RIGHT buttons Press to pan the camera left or
right
OK button Presstoconrmaselection
Backbutton Press to return to previous
setting
MENU button Presstoaccessorexitthe
menu
VIDEO button Press to revert to video screen
TALK button Press and hold to talk to your
baby
Digital Zoom button Press to digitally zoom
BABY UNIT
ON/OFF button Press and hold to switch the
BabyUnitON/OFF
PAIR button Press and hold to pair with the
Parent Unit
SettIng UP yoUr VIdeo
BaBy monItor
BaSIC oPerat Ion
of the keyS

12
3. MENU options and functions
Camera
Press MENU button.
1)SelectCameraicon.Press“OK’’buttontoconrm.
2) Press add camera (SC895 supports up to 4
cameras).PressOKbuttontoconrm.
3) Press the “Pair’’ button on the camera unit to pair
within 30 seconds.
menU oPtIonS
and fUnCtIonS
menU oPtIonS
and fUnCtIonS

13
menU oPtIonS
and fUnCtIonS
menU oPtIonS
and fUnCtIonS

14
View
Press MENU button:
1) Select the view icon for multiple camera options.
Press“OK’’buttontoconrm.
2) Choose camera 1/camera 2/camera 3/camera 4 or
choose to scan between the connected cameras.
menU oPtIonS
and fUnCtIonS
menU oPtIonS
and fUnCtIonS

15
Lullabies
Press MENU button:
1)SelecttheLullabiesicon.Press“OK’’buttontoconrm.
2) Choose the lullaby to play from lullabies list. It will
automatically single cycle once you chose a lullaby.
Note: If chose ALL, it will automatically repeat all
lullabies list.
menU oPtIonS
and fUnCtIonS
menU oPtIonS
and fUnCtIonS

16
Feeding Timer
Press MENU button
1) Select Feeding Timer icon. Press “OK’’ button to
conrm.
2) Choose your preferred feeding reminder time, once
selected a countdown will appear when monitor is
in viewing mode. When the predefined time has
elapsed, monitor will alarm for 5 seconds.
menU oPtIonS
and fUnCtIonS
menU oPtIonS
and fUnCtIonS

17
menU oPtIonS
and fUnCtIonS
menU oPtIonS
and fUnCtIonS

18
SettIngS
Auto Tracking
Press MENU button
1) Select Auto Tracking icon.
2) Press “ON/OFF’’ to enable/disable this function.
3) With Auto tracking turned on, the camera will
automatically follow the movement of an object or
person in its sight.
menU oPtIonS
and fUnCtIonS
Table of contents
Other Oricom Baby Monitor manuals

Oricom
Oricom Secure 310 User manual

Oricom
Oricom SC520 User manual

Oricom
Oricom Secure875 User manual

Oricom
Oricom 200 User manual

Oricom
Oricom 870 User manual

Oricom
Oricom Secure715 User manual

Oricom
Oricom Secure 610 User manual

Oricom
Oricom 200 User manual

Oricom
Oricom secure 910 User manual

Oricom
Oricom OBHGPLUS User manual

Oricom
Oricom CU875 User manual

Oricom
Oricom Secure 100 User manual

Oricom
Oricom OBH36T User manual

Oricom
Oricom Secure 720 User manual

Oricom
Oricom OBH500 User manual

Oricom
Oricom Secure 700 User manual

Oricom
Oricom Secure 110 User manual

Oricom
Oricom babysense 2 User manual

Oricom
Oricom OBH500-2 User manual

Oricom
Oricom Secure745 User manual