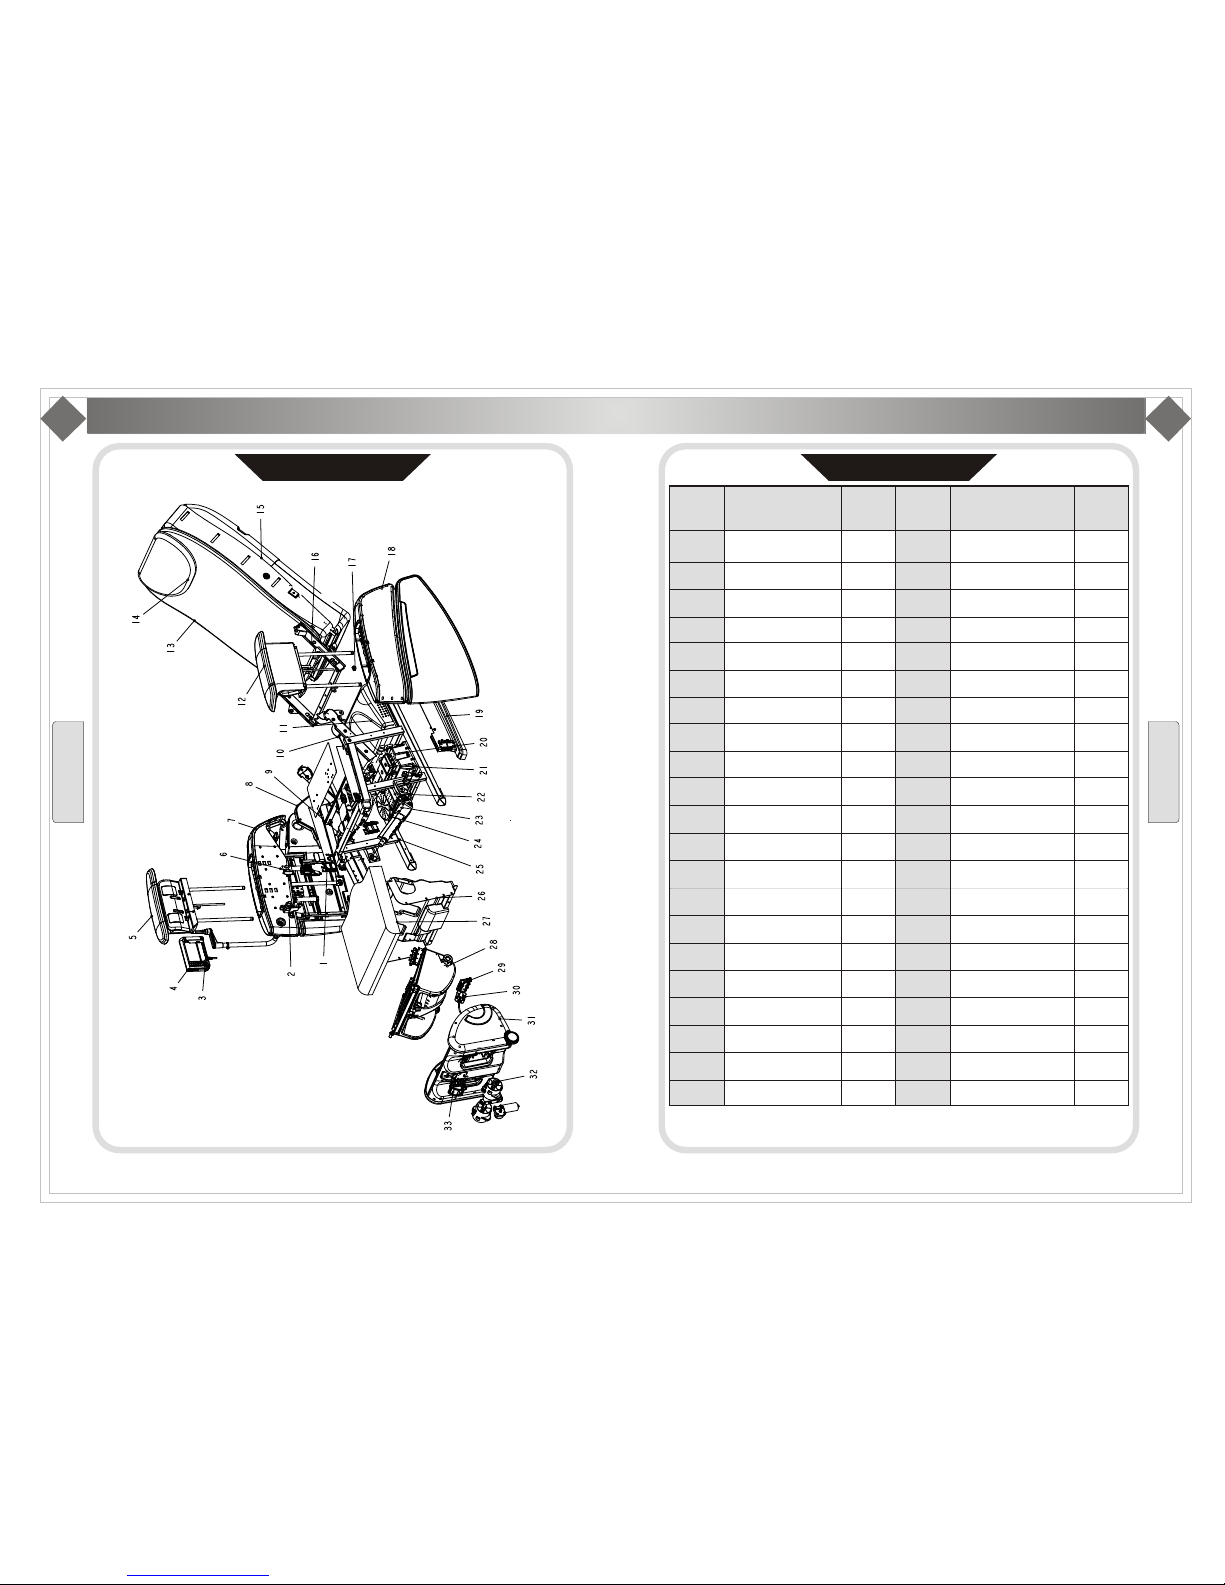
manuals.online logo
Brands
  1. Home
  2. •
  3. Brands
  4. •
  5. Osaki
  6. •
  7. Massager
  8. •
  9. Osaki 3D Pro Intelligent User manual

Osaki 3D Pro Intelligent User manual

Please read “Safety Instructions”carefully before using the chair.
Users ManualUsers Manual
Osaki 3D Pro IntelligentOsaki
1.The Osaki 3D Pro Intelligent massage chair is uniquely designed with patented hidden
arm massagers that give the chair a more traditional design and feel, lending itself to an
Function Introduction
2.Please read the manual carefully before using in order to operate the massage chair correctly.
3.The manual should be well kept. The manual can be referred to for repairs and diagnostics.
Also by reversing the steps to assembl e, you can take apart the chair much mor e easily
Keep this manual for future references .
contents
External structure parts
Internal structure parts
The adjustment before massage
Operation instruction and function illustration
Manual control
Clean and maintenance
Preparation
Safety instructions
Massage operation
Malfunction analysis
After massage
Schematics of mechanical parts
Mechanical parts lists
Maintenance
Others
Technical data
Installation
Installation
1414
2222
2323
11
55
66
1212
1818
2020
2121
77
88
99
9.For your relaxing pleasure, the Osaki Pro Intelligent is integrated with a USB port that
allows you to play your music by plugging headphones into the controller.
array different furniture styles.
2.To activate the arm massage, simply press the button along the sides of the chair. Once
they have fully popped up, gently slide your forearms into the cuffs and enjoy the massage.
3.Once you are done with the arm massage, gently press down form the top and it will lock
into place.
4.The patented leg massager folds away giving the chair softer lines and an elegant appearance.
5.The foot massager uses an air pressure technology, massaging throughout the calves
and feet, complimented by rolling massage wheels along the bottoms of the sole of the feet.
6. The intelligent computer body scan will provide a precise massage and adjust to each
person's body type, recognizing the user's height, spinal curve, and posture.
7.3D Massage technology measures not only your back on a horizontal and vertical axis
but also an in & out plain which provides a more consistent pressure from the neck to
the lower back.
8.The remote is equipped with a voice prompt, making it easier to use. The screen is a
Hi-Resolution VFD display that shows what functions are currently being used.
Osa ki 3D Pro Intelligent
1.Thank you for choosing the Osaki OS 3D Pro Intelligent massage chair.
and properly.
Osa ki 3D Pro Intelligent
1 2
Warning
The power cord should not be used if broken or if the prongs are
not in proper condition.
Plug the chair into only properly rated voltage outlets.
If the cord in anyway seems compromised (pressed, twisted or
reconditioned) do not use.
Please read the instructions very carefully to ensure the assembly of the chair
is done correctly. Please refer to the manual on operating the chair.
Please read the Safety Instructions and warnings prior to operating the chair.
This sign indicates “forbidden behavior”
This sign indicates “must follow
instruction to operate”
This sign indicates self disassembly
is forbidden”
This sign indicates “correct operation
of cable”
Warning  This sign indicates “warning of causing possible death, hurt to body”.
Caution   This sign indicates “caution of causing possible hurt, damage to things”
▲
Symbol meaning
The following should be kept for any further references.
Osteoporosis patient;
People with heart disease including embedded pacemaker or
other medical electronic device inside the body;
For pregnant women or people not healthy, please consult
doctor before use;
Children are not permitted to use this device unless consulted
by a doctor.
If you have been drinking do not use this device.
To avoid any serious injury be sure there are no children, pets or
objects surround the chair when operating.
If you feel any discomfort while using the massage chair, immediately
stop using the massage chair and call your doctor.
Do not massage belly or knees,be careful when massage neck.
Children or pets are not allowed to play on the chair especially
during massage. Standing or sitting on the back or armrest is not
allowed either.
If you have any physical or mental conditions, please consult with
doctor before using the massage chair.
We recommend that the plug be inserted into a surge protector to
avoid from electrical shorts. This will help protect the chair during
storms and outages.
Please be sure the plug is tightly inserted into the outlet.
Please inspect the power cord for and open cuts or exposed wires.
If damage is found do not use the plug and contact the manufacturer.
Do not fold the back cushion of the chair storage. It may cause
damage to the chair and physical injury.
If the chair works dysfunctional, or is broken, splashed with water or
falls into water, please have it repaired by professional repairman or
send the chair to assigned service agent.Self-modification, disassembly
or maintenance is forbidden.
If power cord or plug is damaged, please don't replace it yourself, please
contact us or appointed dealer for replacement.
To avoid electric shock or body hurt, please don't open or disassemble
any part of the chair, there is not any attached part of the chair for
maintenance by customers.
Check leather or cloth material on the back and other areas is broken
or not. If broken, even though it is small, please stop using the chair,
unplug the power and have it repaired
Disassembly
and
maintenance
Safety instructions Safety instructions
1
Preparation
Preparation
People who are
not suitable to
use the chair
Fire and electric
shock
Accident/injury
3 4
Position the chair 40cm from the wall to allow for
sufficient space to recline up and down.
Please operate the chair in a flat or level place
Please be sure the plug is firmly plugged
into the outlet.
Be sure the power cable is in new
condition. If the cable seems reconditioned
do not use and contact the manufacturer.
Don't press with hands or step on the massage heads with
feet.
Don't put hands between the working massage heads.
Don't put hands or feet in the gap of mechanical parts.
Don't drop or embed anything into the slot of massage chair.
Don't stand or sit or put anything on the backrest, armrest or
leg-rest.
Don't stand on the chair during operation.
Don't move the chair during operation.
Don't pull out the plug or turn off the power during operation.
Don't put your hands or head between leg-rest or beneath.
Don't use the massage chair while wearing hair ornaments.
Don't put hard things in pocket when take buttocks and huckle
massage.
Don't sit or press on the backrest when the chair is in reclining
position.
Don't massage on exposed skin or with thin clothes.
It may cause skin ache.
Caution
▲Gas pipe: probably cause explosion or fire.
Phone wire and lightning rod: probably cause electric shock
and fire when thundering.
Water pipe: earth wire is useless where there are plastics
Do not place or store the chair in humid areas that exposed
to liquids.
The remote control and electric components must stay dry
at all time to avoid serious damage.
Keep the chair away from stove or other heating products.
Don't put the chair directly under the sun or other high
temperature places.
To use electric blanket or other heating products on
the chair is forbiden.
Earth wire is not allowed
to be in these places
Unplug the power when any damage on the power.
Caution
To avoid sudden falling.
The maximum suggested operating time is 20mins.
5mins for each position beginning with the slight- step
massage.Along continuous massage in the same
position may cause uncomfortable feeling.
Before sitting on the chair to avoid injury please
inspect everything to confirm that the massage heads
are in the correct position.
Too long time massage is bad for
your body.
To avoid electric shock in any
leakage or breakdown.
To avoid fade, discolor on upholstery
or hardened, deteriorated on PU.
Unplug the power before cleaning the chair.
Unplug the power after using the chair.
Don't use the chair outdoor.
Keep the chair away from heat, wet, sharp things and
corrosive, inflammable, explosive environment.
Make sure the plug completely insert into the socket.
To reduce short circuits and any
fire hazard.
To avoid the accident when turn on
the power.
Turn off all controls before removing plug from outlet.
Checking whether any damage on wire, make sure no
water or rubbish on wire.
Please turn off the power switch and unplug the power after
massage.
Please make sure that the power switch is at the “OFF”
position before inserting the plug into the socket.
Unplug the power immediately when electricity goes off.
When plugging in the power cord into the outlet be sure no
metal from the prongs are exposed and that it is complete
inserted to avoid shortage or shock.
Plug into only recommended power voltages.
Grounding instruction
Replace fuse
※The chair is equipped with a cord having an grounding conductor.The plug must be
plugged into an appropriate socket that is properly installed
and matched with the plug.
※When the fuse is burned out, please turn off the switch
and unplug the power. Opening the lid covered the fuse
which is located in the switch box. Using a same size
fuse to replace the old one, then cover the lid. Or you
can find an electrician to replace the fuse.
Hold the plug to unplug the power but not try to pull the wire
to unplug the power.
Safety instructions Safety instructions
Preparation
Preparation
To make sure the back lying.
To avoid accidental injury.
To avoid accidents or injury
To avoid leakage or
electric shock.
To avoid electric shock.
To avoid electric shock
or fire harzard.
To avoid accidents
To avoid damage or accidents
when power on again.
5 6
Seat side airbag
External structure
External structure parts Internal structure parts
Preparation
Preparation
Internal structure
Armrest airbag
Legrest airbag
Power switch
Power case
Manual control plug
Remote control
Footrest airbag
Sole rollers
Earphone
USB port
Fuse holder
Massage Head
Power plug
Seat cushion
Footrest handle
Right hidden armrest
VFD control
Control bracket
Right armrest
Pillow
Backrest
Back cushion
Left hidden armrest
Back wheel
Left armrest
Button
Footrest and legrest
81
1
1
1
1
1
14
1
1
1
1
11
12
13
14
15
16
17
19
18
20
21
23
122
2
3
4
7
6
1
3
2
1
1
2
Foot cover component (right)
Left hidden armrest
Back cushion sewing product
Pillow sewing products
Backrest assembly
Rotating frame assembly
Rubber wheel
Left armrest assembly
Foot cover assembly(left)
Power case assembly
Gas tank
Small pump
Circle transformer assembly
Footrest actuator
Two-link Electromagnetic valve
Power switch
Control assembly
Remote control
Elevating control assembly
Right armrest assembly
5Right hidden armrest
9Backrest actuator
10
Power case assembly
1
1
1
Back wheel assembly 2
24
13 14
按摩操作按摩操作
按摩操作按摩操作
7 8
2
2
1
Seat frame assembly
Seat frame front plate
Seat cushion
Leg rest
3-link electromagnetic valve
2
Foot lock assembly
Footrest assembly
Sole roller assembly
Sole handle assembly
25
26
27
28
29
30
31
32
33
1
1
1
1
1
1
1
1
Schematics of mechanical parts Mechanical parts lists
No. Q'ty
(PCS)
Name
Mechanical parts lists
Schematics of mechanical parts
Preparation
Preparation
No. Q'ty
(PCS)
Name
9 10
Step1 Take out the chair
Take out these pads from packing box, chair body, cushion, pillow, left/right armrests,
remote control holder, cables, etc. It needs 2 people to take the chair body out. Hold
the metal frame (Point out in below picture) and take the main body out from
box slowly.
Refer to pictures ( )
Step2 Set the main body
Raise the back to 120 degree until you hear a “click” sound.
Main body
▲
Step4 Connect seat air pipe
Connect the air pipes in seat and those insert frame as per color (black to black, gray with
gray, brown with brown). Then stick the snap fastener together.
Step3 Install manual control holder and insert manual control
Using three screws (M5*15) to fix the manual control to right upper arm, then insert the
manual control into the bracket and fix the manual control cables to the buckle at the end of arm.
Align control holder and marking line.
control
VFD control
Seat cushion Manual control holder
Cable
Back cushion
Pillow
Hold here to take out
Don't take this out
when you take out
the chair
Installation
Installation
Installation Installation
Installation(1) Installation(2)
Control holder
Seat cushion
Tawny air pipe Black air pipe
11 12
b
a
1
2
3
4
c
d
Installation
Installation
Installation(4)
Step 6. After installation
After installation, please follow the steps below:
Insert the plug of remote control and power into
the power box in bottom (as picture)
Is for remote control
Is for power plug
a
b
Insert the other end of power plug into the outlet.
Turn on the power switch
Power switch means on
Press keys on remote control to choose massage
program to enjoy the massage.
( “O/I” , “I” .)
c Playing music,insert u disc with Mp3 in.
d Using earphone,insert plug in.
1
2
3
4
Step 5 Sorting out the zipper and snap fastener
Connect the back cushion, pillow with back.
Kind suggestion
Sitting on the chair, try to keep the bottom of
pillow and ear in the same line, then connect
it with back in this position. It will make body
detection more accurate and provide better
massage.
Connect back
and back cushion
with zipper
Connect pillow
and back with
snap fastener
Pillow
Back cushion
Back
5
Please make sure that the power switch is at
the “OFF” position before inserting the plug
into the socket.
The adjustment before massage
Caution
Environment
Check environment
Don’t use the chair in wet places liks near
swimming pool , bath room to avoid lea-
kage or electric shock.
Don’t use under sunlight or near stove
or other heating place to avoid upho-
lstery deteriorated.
Please use chair in flat place to avoid
chair falling or noise or other unexpected
trouble.
Check places in front
Check the areas when back and leg extending,
make sure no people, pets or other things
around.
Check power cable, plug
Space size for using the chair
At least 40cm from wall.
(1) Clean the dust on plug on time.
(using dry cloth).
(2) No damage, re-do, bend, stretch, tie or
press with heavy thing(especially can’t
be pressed by the chair) on power cable.
Check
At least 50cm in front of the leg.
Check surroundings
When the backrest or legrest reclines or
extends, please pay attention to:
(1) Check any person or things in every
direction.
(2) Check the space size.
sa ra
Mas ge ope tion
Two persons hold the two armrest, lift
and move the chair to destination.
▲▲
13 14
The adjustment before massage
How to move massage chair
Adjustment before massage
Caution
Don’t move chair when it’s working in case of
accidents or damage
Bind the cables and put themin the seat to avoid
damage when moving.
If you plump the chair, it may damage the inner
parts of the chair may get damaged.
Don’t use the castor if the floor is wooden or
other easy damaged material. It will need 2
or more persons to lift the chair.
Don’t shake the leg, or it may cause damage
on the chair.
Make sure the power is off and the plug
doesn't touch the floor(It’s better to
let the chair in standing
status to avoid theback
crashing the floor)
Normal ly
Before adjustment
Please make sure the ma-
ssage head in right position
before sitting on the chair
(to avoid massage roller
hitting your head)
Shoulder testing
In shoulder testing, if the shoulder can't
be detected by the massage head, it
would be taken as the highest.
Right position: Your back
cling to the chair back, the
head clings to the pillow.
During testing, the massage
rollers first go downwards
till the bottom of the back
to do the pressing, and
then fully extend forward,
go up and position the
shoulder automatically.
Avoid the wrong testing of shoulder position,
otherwise you won't get good massage.
as ge o r t onM s a pe a i
Kind suggestion
When you feel the
intensity isn’t strong
enough,take off the
pillow or cushion.
Because the chair is heavy, it may ruin
your floor in long time setting.
Please put a blanket or
other soft things to
protect your floor.
Please hold the footrest to move the
chair as shown in the picture in case
any scratches on the leatherette
How to move
Manual operation
program
811121314 15 16
Music controller
Auto massage program
Back/Leg reclining
疲劳恢复
酸痛缓 和
舒畅心 情
体 验
强度语音
疲劳恢 复
酸痛缓 和
舒畅心 情
体 验
1
2
3
4
5
6
9
7
10
811121314 15 16
19 22 25 31 34 39 40
28
1
2
3
4
5
6
9
7
10
18 21 24
20 23
27
17 26
30
29
33
32
37 38
36
35
Manual operation
massage method
On/Off
Emerg ency
off
Fat igue
rec ove ry
Pai n
rel iev in g
Comfo rtable
mood
Demo
Shoulder
Shoulder
Mus ic
syn c Str etc h
Strength
Voic e
On/Off
Emerg ency
off
Fat igue
rec ove ry
Pai n
rel iev in g
Comfo rtable
mood
Demo
Timing
3D+
3D-
Kneading
Shiatsu
Speed
Tapping
Knocking
Width
Position
Upward
Downward
Seat
Foot
Sto p
Arm
Leg
Music sync
Stretc h
Strength
Rolling
Voice
Shoulder
Shoulder
Manual control
Manual control
Aut o Cu sto m
Ret urnin g...B ody det ectin g...
Overall
Shoulder
Back
Waist
Point
Wid th
Speed
Strength
Volume
sa ra
Mas ge ope tion
Aut o Cu sto m
Ret urnin g...B ody det ectin g...
Overall
Shoulder
Back
Waist
Point
Wid th
Speed
Strength
Volume
Infrared signal receiving
B
ackrest
up
Bt
ackres
down
a
Ftigue
r
recove y
P ain
i
reliev ng
Comfortable
mood
s
Legret
up
Legrest
down
15 16
6. The Emergency off button can be used in urgent moments where you need to get out from
the chair quickly or if you are not feeling well.
7. The legrest can be moved up by pressing this button once and to stop it press again.
8. This button will move the legrest down. Press once to lower and again to stop.
9. This button will raise the backrest to the upright position. Hold down to the desired position
and release to stop.
3D+
3D-
3. “Fatigue Recovery” is a complete body preset program that is considered mid aggressive.
4. “Pain Relieving” is a complete body preset program that is considered strong.
5. “Comfortable Mood” is a complete body preset program that is considered smoother and
with less tapping.
2. By pressing the Demo you will experience a sampling of all the massage styles for
8 minutes.
16. The Strength button allows you to control the strength of the air pressure massage
through the air bags.
1. To power on the chair press the highlighted on/off button.
To stop the massage press one more time.
10. This button will lower the backrest to the recline position. Hold down to the desired position
and release to stop.
14. This button will synchronize the pace of the massage to music being played.
15. The Stretch button will activate all the air bag massagers. Press again to stop.
17. This button allows you to select from 10, 20 and 30 minute intervals.
12. This button will raise the massaging rollers massagers up.
13. This button will lower the rolling massagers down.
18. The 3D button will intensify massage and give you a more consistent pressure from top
to bottom of your back.
19. This button will reduce intensity or turn off the 3D function.
21. The Shiatsu button activates the Shiatsu massage style.
22. The speed button allows you to increase the speed of the massage heads by 3 different
stages. Slow, medium and large.
20. In the manual mode this button will activate the Kneading massage.
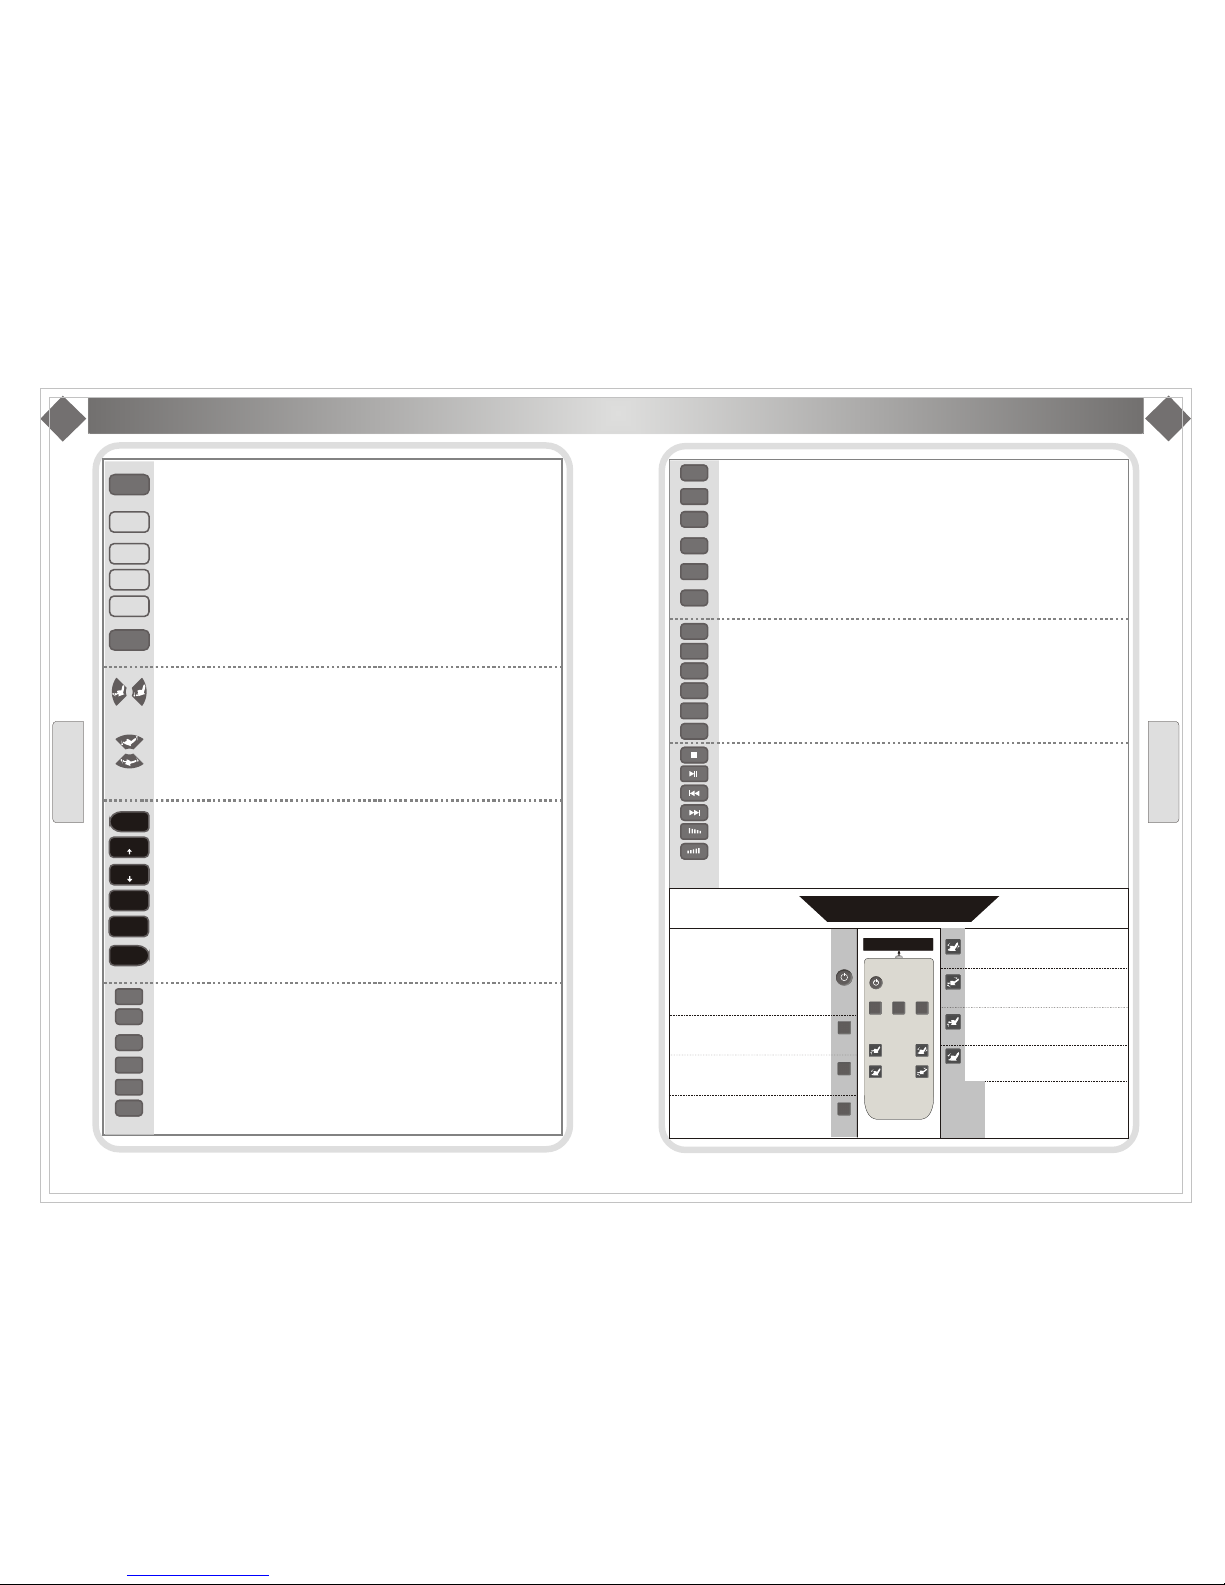
On/O ff
Emergency
off
Fatigue
recover y
Pain
relievi ng
Comfortable
mood
Demo
Stretch
Strength
Shoulder
Shoulder
Timing
Kneading
Shiatsu
Speed
Manual control
as ge o r t onM s a pe a i
Music sync
Voice
26. The position button allows for you to select the massage area for one point, ½ region and
full body.
27. The “upward button moves the massage heads up in the manual mode.
28. The “downward” button moves the massage heads down in the manual mode.
33. In“ON”status, press this key to start or stop leg air massage.
23. Press the “tapping button” to start the tapping massage. Press again to stop.
24. Press “Knocking” to start the knocking massage. Press again to stop.
25. The width button changes the width on the tapping and knocking massage styles.
35. In“ON”status, press it to stop music playing.
36. In“ON”status, press it to start music, press it again to pause.
37. In“ON”status, press it to play previous song.
38. In“ON”status, press it to play next song.
39. In“ON”status, press it to lower the music volume.
32. In“ON”status, press this key to start or stop arm air massage.
29. In“On”status, press this key to start or stop seat air massage.
30. In“On”status, press this key to start or stop feet air massage.
31. In“On”status, press this key to stop mechanical and air massage.
Remote control usage
When power is on, press this key to start
machine, backrest won't recline. Now
you can choose custom or Auto operation.
Press any massage key, it will start body
detecting and reclining, after body
detecting finish, it start automatic
massage. Press again to return.
In“ON”status, press it to choose
fatigue recovery. Press it again to
cancel.
In“ON”status, press it to choose
pain relieving. Press it again to
cancel.
In“ON”status, press it to choose
comfort mood. Press it again to
cancel.
Hold this key, legrest will go down,
release the key, legrest stops, and
remains in this position.
Hold this key, backrest will go up, legrest
goes down, release this key, backrest and
legrest stop, and remain in this position.
Hold this key, backrest will go down,legrest
goes up, release the key, backrest and
legrest stop, and remain in this position.
34. In“ON”status, press this key to start or stop feet sole rolling massage.
The remote control infrared
signal launching aims at the
manual control signal receiv-
ing, it works within 2m.
Tapping
Knocking
Width
Position
Upward
Downward
Seat
Foot
Stop
Arm
Leg
Rolling
Manual control
sa o ra
Mas gepe tion
B ackrest
u p
Backrest
down
Fatigue
recovery
Pain
relieving
Comfortable
mood
Legrest
down
Infrared signal launching
B ackrest
u p
Backrest
down
Fatigue
recovery
Pain
relieving
Comfortable
mood
Legrest
up
Legrest
down
Remind:
40. In “ON” status, press it to increase the music volume.
When music sync is off, volume showed on VFD is the music volume grade, when music
sync is on, the strength for kneading and knocking is changing according to volume
changing. Volume dynamic display according to volume level.
Press this key, Legrest goes up, press
again, legrest stop goes up and keep
this position.
Legrest
up
11. This button will activate a voice tutorial of what is being activated.
17 18
The VFD Display will indicate the time remaining, intensity of air massage, speed,
width, massage strength, the location of the roller heads, air bags massage being
activated and the style of massage being applied.
Massage method
Legre st up and down illustra tion
Air pressure position
4-roller massage
machine position
In automatic mode, it shows
orange, green, blue in turn.
Backrest up and down illustration
Air massage
strength
When returni ng to the upright
When the massage is turned
off the chai r wil l ret urn to its
original position. Pleas e do
not press any but tons while
return to the upri ght posi tion
nor get out of the chai r until
the chai r has come to a stop
and ret urned to the upright
Auto Custom
Returning...Body detecting...
Overall
Shoulder
Back
Waist
Point
Width
Speed
Strength
Volume
Manual control
VFD display illustration
Massag operatione
W
M
N
Kneading
Knocking
Shiatsu
Tappin g
Auto Auto massage
Custom Manual massage
Massage width bar
Massage
Strength bar
Width
Volume
Overall
Shoulder
Back
Waist
Point
To play music in Non-music sync mode,
press 4 times to increase grade. On
the contrary press 4 times to decrease
1 grade.In music sync mode, you can also
increase or lower the volume, though you
see the tone of music inthe display.
1
Operation instruction and function illustration
Step2. Massage
1.To begin your massage select preset massage or
in the manual mode select a massage type.
2.To increase or decrease the massage time presses
the timer button.
3
3
Massage operation
Power on/off
2
On/Off
b
a
1
2
4
Step1. Switch On.
1.Put power cord into chair
2.Plug power cord into the power outlet
3.Located behind the chair beside the power
cord, press the power button to the on position.
4.To begin the massage presses the on button
on the remote control.
1. Before use, remove the pillow and back
pad to make sure there is no damage
or breakage in material on the back or
other part., if there is any damage,
please stop operating and ask for
repairment.
2.Put the plug in proper socket.
Warning!
Attention!
1. Before use, make sure there is no stuff
pinched between armrest , legrest or
seat.
2. Make sure the massage chair is in
return status before sitting on it.
3. When using the massage chair, do
not stand on it.
5
On/Off
On/Off
Position.
Position:
19 20
Arm massage
Armrest with air press
massage, Press armrest
on control start massage.
Legrest extend & retract
Press “Legrest up”
when stopped, pull
handle (as picture),
footrest will extend.
Push footrest back
to legrest, and then
press” legrest down”
Legrest will retract.
And 17CM length is
available.
Armrest up & down
Closed the footrest, make backrest and
legrest restore the normal position by
control. (Follow the voice guide to move
out the footrest) (Or press On/Off key to
make backrest and legrest restore the
normal position.)
5
5
1
2
3
4
6
7
OrOr
Operation instruction and function illustration
Massage operation
Function Illustration
1. Please make sure there is no people, no pets or any stuff within range for backrest and legrest to avoid any unexpected hurt or
property loss.
2. When adjusting the backrest, be careful the gap between the backrest and armrest.
3. When the legrest is moving, please do not stand on or leave from the seat, do not stop the legrest from moving in case of causing
damage to the chair.
4. Please refer to control instruction for more details.
Soft 3D massage
1. Open cover on the control,
press kneading , tapping,
knocking to enjoy corresp
-onding massage, press
intensity to adjust strength.
Press width to adjust
massage among narrow,
medium and wide.
2. Press 3D- or 3D+ to adjust
3D massage machine going
forward angle.
Backrest up
Press UP key on the
control, the backrest
will go up and legrest
will go down simultan-
eously. Release this
key, the backrest and
legrest will be fixed at
locked angle.
Legrest down
Press legrest DOWN
key on the control,
the legrest will go
down slowly.
Release this key,the
legrest will be fixed
at locked angle.
Make sure there is no people or pet or anything
within the range of backrest and legrest.
After restoring, put the controller back to
the controller holder.
Put the back mat and pillow away on the backrest.
Switch off the power.
Unplug the electricity from the socket.
(Attention: hold the right plug position)
Clean the chair if necessary.
Attention!
After using, press ON/OFF to end all the
massage method and wait for restoration.
Make sure to cut the electricity to avoid any
unexpected hurt to children or pets.
After using, turn off the power, unplug the
electricity. Avoid moisture, dirt and aging
of insulation in case of causing damage.
After massage
Restoration of massage chair
Massage operation
On/off
Backrest down
Press DOWN key on
the control, the backrest
will go down and legrest
will go up simultaneously.
Release this key, the
backrest and legrest
will be fixed at locked
angle.
Press legrest up
key on the control,
the legrest goes up
slowly. Press again,
stop goes up and
keep the position.
Legrest up
Rolling massage
The sole part adopt rolling
massage, which can bring
guasha massage and
several different mixing
massage, to ensure you
feel unprecedented
pleasure.
Press inside button (as
picture) few second,
armrest up.
Tips:If not in use for long time,
when pressing the switch ,and
the armrest doesn’t go up.
Please lift the upper cover of
armrest by hand,then the armrest
can go up automatically.
Tips:
21 22
Synthetic leather
●
Clean with tidy, soft and dry cloth slightly.
(Chemical or medical
cleaning products are
forbidden)
1
Dip soft cloth into 3-5% neutral detergent
solution, squeeze it then clean the stain on
the surface gently.
Wash cloth, squeeze it and wipe with
detergent.
●
2
General cleaning
If leather is dirty
Clean it softly with dry cloth.
allow to dry (air blower is prohibited)
●
3
●
1
Dip cloth into weak neutral
detergent, squeeze it and clean
the material surface.
(Diluent, gas, alcohol
are prohibited)
Brush the dirty parts with weak
neutral detergent. (avoid excessive
brushing)
Excessive cleaning may cause
damage to cloth material.
Wipe with water-dipped but
squeezed cloth.
Allow to dry.
●
2
●
3
●
4
●
4
●
1
Dip cloth into neutral detergent,
squeeze it and clean.
Wipe with water-dipped but
squeezed cloth.
Allow to dry.
●
2
●
3
●
1
Wipe with soft cloth after squeezing.
Allow to dry.
●
2
About cleaning
Clean and Maintenance
Clean the controller
Plastic parts
Cloth mate ri al
Maintenance
Before cleaning, unplug the electricity,
don't touch plug with wet hands.
Make sure hands are dry when plugging
to the socket.
If failed to follow the mentioned instruction,
user may get electric shock or burned.
Propellant, diluent or
alcohol are prohibited.
●
1
●
2
●
3
●
2
●
1
remote control
●
1
●
3
Malfunction analysis
malfunction analysis
Ohe
t rs
Note: If the troubles are not caused by above reasons, please turn off the power switch and
cut off the power, then contact the manufacturer or service agent to repair your chair.
Trouble Possible reason Troubleshooting
The massage chair can't
work after powe r is on.
Massage function suddenly
stops while working.
Check if the control is on or not.
Setting time is up.
Open control switch
Not choose massage function Choose massage function
Normal sound, no need to pay
attention to it.
Normal, no need to pay attention to it.
Turn off the power to have the
massager rest for over half an
hour before next turn working.
connect the electricity power again
Check whether the plug and socket
in poor contact.
It is sound of air pump, motor and
mechanical parts.
Inner parts fretted away due to long
time work. It’s normal
Sound suddenly becomes
much louder while working.
Remove the obstacles; turn off
the power to have the massager
rest for over half an hour before
next turn working.
Check if there are any obstacles; the
chair overloads; for the sake of safety,
sometimes the massage machine may
automatically stop working.
Neither the backrest nor the
legrest can be lay down.
Please ask manufacturer or appointed
or authorized maintenance man for
checking and replacement.
Excessi ve operation; setting time is up.
The chair can't return to its
original position.
Massage rollers work on shifts.
Different height of the left
roller and right roller.
Make sure plug and socket are connected.
Controller gives out heat
Stop using it,if it gives too much
heat. Turn to assigned repai r
divison for help.
Caused by long time using
There is beep sound inside
the massager while working.
Check if it is due to long time working.
Please ask appointed or authorized
maintenance man for checking and
repairing.
Electric wire or plug
give out heat
Turn off the power to have the
massager rest for over half an
hour before next round working.
Wire or plug has damaged.
Please ask manufacturer or appointed
or authorized maintenance man for
checking and replacement.
The fuse burned out.
Replace fuse of same specification.
Something wrong with inner circuit
Please ask appointed or authorized
maintenance man for checking and
repairing.
Suddenly power-down
Turn off the power to have the
massager rest for over half an
hour before next turn working.
Stop using,and ask appointed
maintenance man for help.
It may work overload
other abnormal case
23
48*33*33.5IN
Technical data
Technical data
Ⅰ
210W
AC120V,60Hz
Name
Model
Input voltage
Safety design Class
Power
NW/GW
Packing size
212/238LBS
Others
OSAKI
OS-3D Pro Intelligent

Other manuals for 3D Pro Intelligent

1

Other Osaki Massager manuals

Osaki TP-8500 User manual

Osaki

Osaki TP-8500 User manual

Osaki TW-Chiro User manual

Osaki

Osaki TW-Chiro User manual

Osaki OS-3000 User manual

Osaki

Osaki OS-3000 User manual

Osaki OS-Aster User manual

Osaki

Osaki OS-Aster User manual

Osaki HS-3601 User manual

Osaki

Osaki HS-3601 User manual

Osaki OS 3D PRO DREAMER User manual

Osaki

Osaki OS 3D PRO DREAMER User manual

Osaki EC-806R User manual

Osaki

Osaki EC-806R User manual

Osaki OS Pro Marquis User manual

Osaki

Osaki OS Pro Marquis User manual

Osaki 4000XT User manual

Osaki

Osaki 4000XT User manual

Osaki OS-Escape 4D User manual

Osaki

Osaki OS-Escape 4D User manual

Osaki OS4000 User manual

Osaki

Osaki OS4000 User manual

Osaki OS4000 User manual

Osaki

Osaki OS4000 User manual

Osaki OS-Hiro LT User manual

Osaki

Osaki OS-Hiro LT User manual

Osaki OS6000 User manual

Osaki

Osaki OS6000 User manual

Osaki Touch Heart OS-7075R User manual

Osaki

Osaki Touch Heart OS-7075R User manual

Osaki Otamic LE OS-3D User manual

Osaki

Osaki Otamic LE OS-3D User manual

Osaki OS-2000 User manual

Osaki

Osaki OS-2000 User manual

Osaki OS-Pro Soho User manual

Osaki

Osaki OS-Pro Soho User manual

Osaki OS-Pro 4D DuoMax User manual

Osaki

Osaki OS-Pro 4D DuoMax User manual

Osaki Pro Maestro User manual

Osaki

Osaki Pro Maestro User manual

Osaki First Class LE User manual

Osaki

Osaki First Class LE User manual

Osaki OS4000T User manual

Osaki

Osaki OS4000T User manual

Osaki Vista User manual

Osaki

Osaki Vista User manual

Osaki OS:PRO-EKON User manual

Osaki

Osaki OS:PRO-EKON User manual

Popular Massager manuals by other brands

Carbest 94348 instruction manual

Carbest

Carbest 94348 instruction manual

Snailax SL-489 Use & care manual

Snailax

Snailax SL-489 Use & care manual

iLiving ILG-936 user manual

iLiving

iLiving ILG-936 user manual

Human Touch AcuTouch 6.1 Use & care manual

Human Touch

Human Touch AcuTouch 6.1 Use & care manual

Ogawa mobileseat XE DUO user manual

Ogawa

Ogawa mobileseat XE DUO user manual

HoMedics MassageComfort BK-125 Instruction manual and  warranty information

HoMedics

HoMedics MassageComfort BK-125 Instruction manual and warranty information

Invacare Matrx Contour Visco NG user manual

Invacare

Invacare Matrx Contour Visco NG user manual

GESS SYMPHONIE manual

GESS

GESS SYMPHONIE manual

HoMedics SP-35H-EU instruction manual

HoMedics

HoMedics SP-35H-EU instruction manual

Fujiiryoki Cyber-Relax AS-888 user manual

Fujiiryoki

Fujiiryoki Cyber-Relax AS-888 user manual

Back Doctor ultimate chiro Assembly guide

Back Doctor

Back Doctor ultimate chiro Assembly guide

Casada Quattromed III manual

Casada

Casada Quattromed III manual

Insportline D24 user manual

Insportline

Insportline D24 user manual

Panasonic EP-MA70 manual

Panasonic

Panasonic EP-MA70 manual

Beurer MG 215 Instructions for use

Beurer

Beurer MG 215 Instructions for use

Costway Giantex JL10002 user manual

Costway

Costway Giantex JL10002 user manual

Beurer MG 70 instruction manual

Beurer

Beurer MG 70 instruction manual

Comfier CF-4909S user manual

Comfier

Comfier CF-4909S user manual

manuals.online logo
manuals.online logoBrands
  • About & Mission
  • Contact us
  • Privacy Policy
  • Terms and Conditions

Copyright 2025 Manuals.Online. All Rights Reserved.