Osaki OS-Pro 4D DuoMax User manual

SAVE THESE INSTRUCTIONS
Operation Instructions
MASSAGE CHAIR
OS-Pro 4D DuoMax

01
CONTENTS
Before use
Operation Instructions
Massage close
Cleaning and Maintenance
Troubleshooting
Product Specifications
Safety precautions
Installation parts
Place massage chair
Before use
Product structure
Usage method
Maintain
Important
02-04
05-07
08-09
10-11
12-18
19-53
53
54
55
56
Thank you for purchasing this product. Please read this manual instruction carefully
in order to know how to use this product correctly before operation. Please pay more
attention to some important safety warning and keep this manual book properly for
future use.
Note: Our company reserves the right to change and explain the design of the
product. If there is some difference between the product function in market
circulation and the description in the manual, it is a normal update of the product,
and our company will not inform you otherwise. The specific product function and
color shall prevail in kind.

03
Safety Precautions must be observed
Warning Indicates that serious injury or death may result from
improper use.
■Please pay attention to the symbol before each safety item.
Forbidden
■Please read all relevant instructions carefully before use.
■The notes marked here will help you to use the product safely and correctly.
■In order to clearly indicate the extent of harm and damage, precautions are
divided into "Warning" and "Caution" that may be caused by incorrect use.
Both of them are important for safety and must be followed.
Caution
■The device is not intended for use by persons (including children)
with physical disabilities, sensory or neurological impairments or
who lack experience and common sense, unless they are
supervised and instructed in the use of the device by those
responsible for their safety. Children must be supervised to ensure
they do not play with instruments.
■Patients with osteoporosis.
■Patients with heart disease or wearing electronic medical devices
such as a pacemaker.
■People who have a fever.
■Pregnant women or women on their menstrual period.
■Patients who are injured or have a skin disease.
■When unsupervised, any children are under the age of 14 and
those unconscious are not allowed to use this product.
■People who are told by their physicians to have rest or who feel
unwell.
■People whose bodies are wet are forbidden to use this product.
■This product has a hot surface. Persons insensitive to heat must
pay attention when using this product.
■If the supply cord is damaged, to avoid danger, it must be replaced
by a professional from the manufacturer, its maintenance
department or similar department
Indicates that misuse may cause minor injury or property
damage.
Absolute prohibition
The following populations should not use this product
Forbidden
Safety Precautions must be observed
Important safety warnings
■Do not allow children to touch any movable part of this product.
■Use the well-grounded power supply unit suitable for this product.
■Pull out the plug after use or before cleaning to avoid any physical
injury or damage to the product.
■Operate this product as instructed in this manual.
■Do not use any parts or accessories which are not recommended.
■Do not use this product outdoors.
■Please read the Operation Instructions carefully before operation.
■Never use this product for any other purpose not listed herein.
■20 minutes of usage each time is recommended.
■Do not use this product if the cover or leather is broken or
damaged.
■Do not drop anything into this product.
■Never fall asleep while using this product.
■Do not use this product if you are drunk or feel unwell.
■Do not use this product within one hour after a meal.
■Do not use this product with excessive force to avoid any injury.
Storage conditions
Warnings
■Check whether voltage is consistent with the specification of this
product.
■Never insert or pull out the plug with a wet hand.
■Do not let water flow into this product to avoid electric shock or
cause damage to this product.
■Do not pull the power cord when plugging or unplugging it. Rough
handling is forbidden.
■Do not damage the wire or modify the circuit of this product.
■Do not clean live parts of this product with a wet cloth such as a
power switch and plug.
■Be away from this product in case of power failure to avoid any
injury if power is restored suddenly.
■Stop using this product at once while it works abnormal, and
consult your local supplier.
■Stop using this product if you feel unwell, and consult your health
care practitioner .
Safety precautions
Caution
Caution
02
■Storage room temperature: 41°F to 104°F.
■Relative humidity (RH) between 20% and 80%; free of corrosive
gases, and a well-ventilated room.

04 05
Safety Precautions must be observed
■This product should be maintained by the service center designated
by the manufacturer only. No user should disassemble or maintain it
without permission.
■Do not forget to turn off the main power switch after usage.
■Do not use this product if the power socket becomes loose.
■If this product will be left unused for a long period of time, it is
necessary to roll up the power cord of this product and store this
product in a dry and dust-free environment.
■Do not store this product at a high temperature or near open flame.
Avoid prolonged exposure to direct sunshine.
■Please clean this product with dry cloth. Never use thinner, benzene
or alcohol.
■The mechanical components of this product are specially designed
and manufactured, so no special maintenance is needed.
■Do not use a sharp object to stab at this product.
■Do not roll or pull this product on any uneven ground. Instead, it
should be lifted before moving.
■Please use this product intermittently. Do not keep it working
continuously for a long period of time.
Product service and maintenance
Operating environment
■Do not use this product in a very moist environment such as the
bathroom.
■Stop using this product immediately when the ambient temperature
changes sharply.
■Do not use this product in any heavily-dusty or caustic environment.
■Do not use this product in a small space or a place without good
ventilation.
■If the motor sounds during operation of this product, this is the
normal operation sound.
■If the controller cannot work normally, check whether the plug and
the power socket are connected reliably, and whether the power
switch is turned on.
■If the rated working time is over, this product will automatically
activate the power-off button; If this product keeps operating for a
long period of time, the temperature protector will stop this product
automatically. The product can be used again after half an hour.
Solutions to ordinary malfunctions
Caution
Caution
Caution
Installation Parts
Calf Installation Instructions
1、After power-on, lay the backrest frame down with the remote control.
2、Insert the harness connector and the air pipe on the side of the steel frame respectively
into the position corresponding to the armrest (Figure 1).
3、Lift the armrest with inserted air pipe and wire, and hang all hooks to the armrest on
both sides of the steel frame (Figure 2).
Figure 1 Figure 2
Figure 3 Figure 4
4、Put the roller at the rear end of the armrest against the surface of the armrest fixture
(Figure 3) and lower the armrest backward and downward.
Then push the armrest backward, and finally lock it with two M5 screws (Figure 4);

06 07
Installation Parts
Calf mechanism installation instructions
1、Insert the cable and air pipe of the calf mechanism, respectively, into the sockets
at the front of the steel frame assembly (Figure 1).
2、After the connection is completed, open the calf mechanism fixing covers on both
sides of the steel frame assembly (Figure 2).
3、Raise the calf mechanism and put it into the slot and cover the fixing cover and
finally fix it in place with 2 M4 screws (Figure 3).
Installation instructions for touch screen remote control holder
1、Align the holder with the front hole of armrest (right) and lock it with M5 screws
(Figure1);
2、Align the holder trim with the holder and press down along the holder rod to the end.
(Figure 2)
3、After the entire holder is installed, shake the holder gently to check whether it is firmly
installed; holder installation is complete. (Figure 3)
Figure 1 Figure 2
Figure 3
Figure 1 Figure 2
Figure 3
Installation Parts

08 09
45°
12
Zipper
Place massage chair Place massage chair
Installation placement
How to disassemble and use headrest cushion and backrest cushion
Move method
Product lift instruction
CAUTION
Require team work to lift and move
the chair to avoid injury.
1. Please lift the massage chair to
move it on vulnerable ground such as
wooden floor.
2. When moving on a similar wooden
floor, it is recommended to lift it.
Avoid damage to the casters. When
the floor is lifted and moved to the
designated position, be careful to
keep your hands out of the way to
avoid injury, and be careful of your
feet being crushed. Do not let go of
the unit until the unit is completely
flat, the floor may be damaged,
therefore, it is recommended to place
mats, etc. on the floor.
Use the rear casters to move the
massage chair.Move the chair by tilting it
down and backward about 45° as shown
in the diagram.
NOTE: Excessive force to title will cause
the chair to tip over completely and
product damage.
1.Before moving, please shut down the
machine properly to reset the whole
machine, and then cut off the power.
2.Please keep the chair vacant when
moving. (People, pets or clutter will not be
able to stay on the chair.)
3.When moving, do not cross a drop
barrier higher than 2mm or a gap greater
than 5mm.
4.When using casters to move this
product, single continuous movement is
not supported; if the distance exceeds
164ft meters, please make this product
move slowly and evenly.
CAUTION
CAUTION
CAUTION
Using a headrest cushion can reduce the intensity of
kneading massage on the neck and shoulders, and you
can decide whether to use a headrest cushion according
to your needs (recommended to use a headrest
cushion). The backrest cushion and the backrest are
connected by a zipper (1), and the headrest cushion and
the backrest cushion are connected by a zipper (2).
Zipper
4inches
Make sure there is enough
space for the massage chair can
be tilted at least 4inches.
Do not expose the massage chair
directly to high temperature
environment due to sunlight(such
as: in front of heating equipment),
and place it to where can avoid
high temperature and direct
sunlight. It is recommended to lay
a soft cushion for long-term use in
a designated location. When laying
the cushion, the size of the
cushion should be enough to cover
Keep the range where the machine
touches the floor and the range
where your feet touch the floor.

10 11
Before use Before use
Check around
Make sure there are no foreign objects in the
gaps of the machine
Make sure that there are no people, pets and
other objects around the unit.
CAUTION
Before massaging, make sure that
no foreign objects are caught in the
legs, feet, etc.
Under no circumstances allow
hands, feet, and head to penetrate
into the area between the lower leg
mechanism and main body, or the
area between the armrest and the
capsule.
Under no circumstances should
hands, feet, or head sink under the
fabric or leather covering of the
massage area.
CAUTION
Turn on the power
CAUTION
■Please check the power cord and plug for damage before use.
■Please supply power to this product in accordance with the working
power requirements of this product's calibration.
■It is strictly forbidden to use a power supply other than the nominal
power supply of this product.
■It is strictly forbidden to connect various power conversion devices
without authorization to supply power to this product.
Schematic diagram of
power on
Plug in power cord
POWER INPUT
ON /OF F
FUSE: T5AL 250V
Turn on the power
switch ("I" position)
POWER INPUT
ON/O FF
FUSE: T5AL 250V
WARN

Product StructureProduct Structure
Description of Components Schematic view of functional distribution
1
2
3
4
5
6
7
8
9
10
11
12
1.Large head cushion
2.Small head cushion
3.Remote controller
4.Arm air pressure
5.Leg massage unit
6.Shoulder air pressure
7.Ambient lighting on the armrest
8.Armrest Shortcut Keys
9.Health sensor
10.Shoulder mechanism
Back cushion
11.Side panel
12.Under the armrest
Ambient lighting
13
14
13.Shoulder
Airbag massage·
14.Arm
Remote control holder·
Voice control function·
Arm simulator massage·
15.Hand
Airbag massage·
16.Leg
Airbag massage·
17.Sole
Roller massage·
18.Both sides of the head
Audio music playback·
19.Arm
Wireless charger·
USB charging port·
Arm simulator massage·
20.Head and neck to bottom
Dual mechanical core·
Heating massage·
21.Shoulder back waist abdomen、 、 、
Heating function·
22.Leg
Air sac massage·
Kneading function·
Calf movement massage·
15
16
17
18
19
20
21
22
12 13

14 15
Product StructureProduct Structure
Schematic diagram
of use on back and waist
Schematic diagram of use
on shoulder and abdomen
How to use the shawl
·It is provided with a unique shawl assembly, with innovative heating functions on
the shoulder, back, waist and abdomen and heating with graphene. Users can
place the shawl at different massage positions according to massage
requirements. When the shawl assembly is placed at the shoulder position, it will
heat the acupoints such as Bingfeng, Tianzong, Yunmen and Qihu around the
shoulder and clavicle by graphene heating, effectively relieving symptoms such
as scapulohumeral periarthritis and cough, and removing cold and moisture from
shoulder joints.
·When the shawl assembly is placed on the abdomen and back (dual-purpose),
through graphene heating, it plays the role of dispelling cold and relieving pain,
warming channels and removing blood stasis in the back and abdomen,
distributing Qi and blood of the back and abdomen meridian, alleviating the
symptoms such as irregular menstruation and dysmenorrhea for women, relieving
low back pain and kidney discomfort, warming intestines and stomach and
clearing intestinal cold, with a good effect on some people with deficiency of qi and
deficiency of spleen and stomach.
Heating area

16 17
15
1413
11
10
09
06 07 080504030201
16
17
18
19
20
27
28
29
25
26242322
Remote controller keys instruction
Product StructureProduct Structure
21
Main information interface
Gentle
Soothing
Strong
Belt heat
Voice
Calf
Roller
O2-
Core heat
Settings
Angle
Manual
Auto
Home
Upper Air +
Upper Air -
00:30
Speed -
Speed +
4D -
4D +
4D III
PausePower
Manual
Lower Air +
Lower Air -
Full
Shoulder
Foot Code
Area
Gentle
Soothing
Strong
Belt heat
Voice
Calf
Roller
O2-
Core heat
Memory
Health
Customise
Upper Air +
Upper Air -
00:30
Speed -
Speed +
4D -
4D +
4D III
PausePower
Manual
Lower Air +
Lower Air -
Full
Shoulder
Foot Code
Area
12
01.On/off touch key: Enable or disable the massage chair function
02.Pause key: Pause the massage or exit from pause massage
03.Shoulder mechanism heating key: turn the shoulder mechanism heating function
on/off.
04.Mechanical core heating key: Turn the mechanical core heating function on/of
05:O2-Ion key: Turn the O2-Ion function on/of
06.Sole roller key: Enable or disable the sole roller function
07.Calf kneading key: Enable or disable the calf kneading function.
08.Voice control key: Enable or disable the voice control function.
09.Intensity selection key: Select one from different automatic massage intensities.
10.Button on/ff key: Turn on or off the massage chair.
11.Lower body air pressure adjustment key: Adjust the Lower body air pressure.
12.Massage range key: Choose corresponding massage part
13.Foot size selection key: Select the suitable foot size.
14.Shoulder position adjustment key: Regulate shoulder position and confirm
massage criterion.
15.Current status key: Enter to view current massage chair status
16.Automatic function menu key: Enter to select automatic massage program.
17.Remote function menu key: Enter to remotely set the massage function
18.Seat adjustment menu key: Enter the sitting posture adjustment interface to
select sitting posture angle.
19.Setting menu key: Enter the setting menu interface
20.Massage technique selection key: Select the massage technique
21.Upper body air pressure intensity key: Adjust upper body air pressure intensity.
22.Status display bar key: Display the massage program status information.
23.Air massage selection key: Select air position.
24.Time adjustment menu key: Adjust the massage time.
25.Massage speed key: Adjust the massage speed.
26.4D intensity key: Adjust 4D intensity
27.Health detection menu key: Enter the health detection interface
28.Custom menu key: Enter the custom interface.
29.Storage menu key: Enter the storage interface.

18 19
Product Structure Operation Instructions
Armrest shortcut key description
1. Press the remote controller side button on/off key or long press the armrest
on/off key
I. Start massage
3.For automatic angular adjustment, select the automatic program, then the massage
chair will be automatically adjusted to zero-gravity angle, and wait until its adjustment
is completed. To skip a step, press the skip key
Skip to go directly to the next step.
Button On/Off key
Press this key to turn the equipment on
01 02 03 04
05 06 07 08
Select level
Gentle Soothing Strong
Power Pause
Angle adjustment
Area
Power Pause
2. After the system is started, select the massage intensity by clicking on any one of
the Gentle , Comfort or Strong keys on the remote controller to turn
on the massage chair and enter the lying state. If it is not selected within 5 minutes,
the massage chair will turn off automatically.
01.On/off key
·Long press this key for 3 seconds to turn on or off the massage chair. After the
massage is turned on, press the pause/run key briefly.
02.Zero-gravity key
·Press this key to adjust the zero-gravity angle automatically, and zero-gravity at
two levels can be adjusted. Long press the key for 2 seconds to restore the angle
to the initial angle, lower the calf to the lowest and raise the backrest to the
highest position.
03.Automatic mode key
·Automatic massage program switching
04.Voice key
·Long press for 3 seconds to turn voice assistant function on/off. Short press the
key to wake up the voice assistant.
05.4D intensity knob key
·Turn the knob clockwise to enhance the 4D intensity, and turn the knob
counterclockwise to weaken the 4D intensity.
06.Linkage up/down knob key
·Turn the backrest clockwise to rise slowly. The calf frame falls slowly and stops
rotation. The backrest and calf stop simultaneously, and the calf checks foot
length automatically
·Turn the backrest counterclockwise to fall slowly. The calf frame rises slowly and
stops rotation. The backrest and calf stop simultaneously, and the calf checks foot
length automatically.
07.Calf up/down knob key
·Turn the calf clockwise to rise slowly and stop rotation, the calf stops and checks
foot length automatically.
·Turn the calf counterclockwise to fall slowly and stop rotation, the calf stops and
checks foot length automatically
08.Foot stretching knob key
·Turn the foot mechanism clockwise to stretch slowly and stop rotation, and the
foot mechanism stops.
·Turn the foot mechanism clockwise to shorten slowly and stop rotation, and the
foot mechanism stops.
Settings
Angle
Manual
Auto
Home
PausePower
Manual
20 21
Operation InstructionsOperation Instructions
Skip
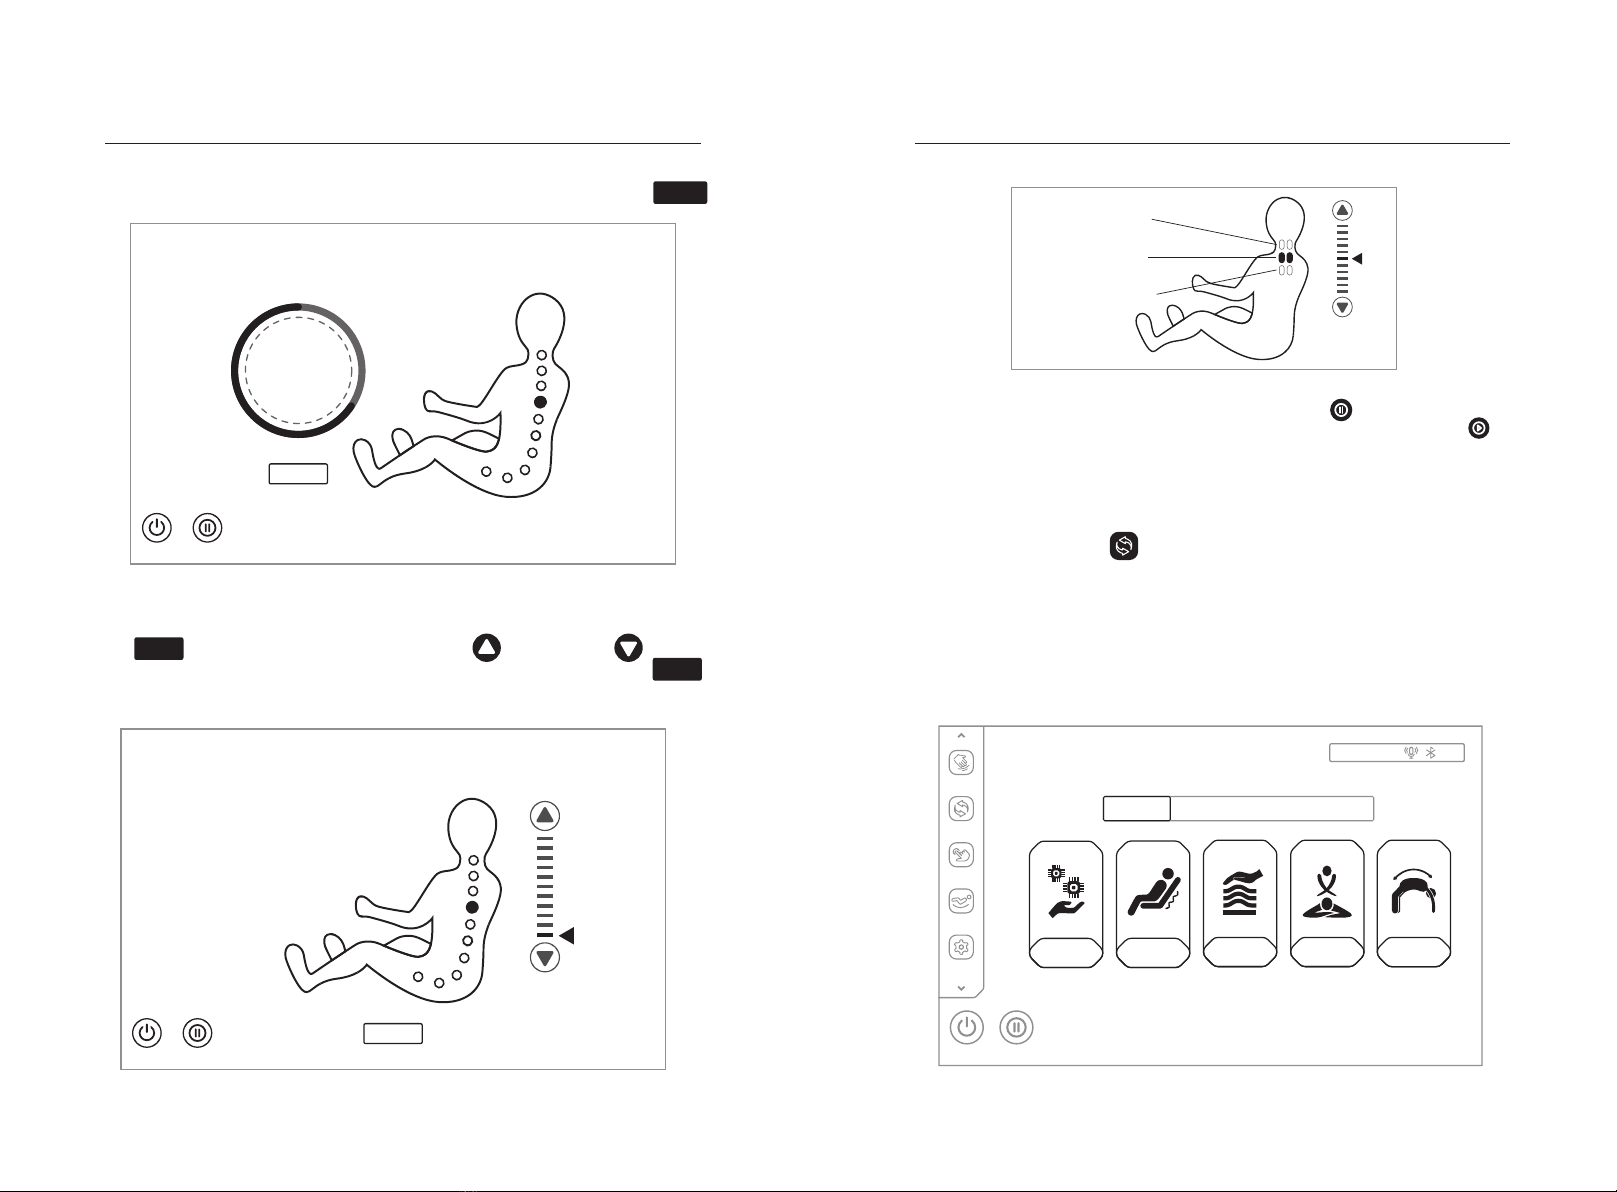
4. Wait until body shape detection is completed, or you can press the skip key
to skip detection and start massage directly.
For fine adjustment of shoulder position, after body shape detection, the remote
controller or a voice prompt will remind the user of fine adjustment of shoulder
position. If the massage roller stops at the shoulder position, directly press the OK
OK
key to start massage. If not, use the Up key and Down key to
adjust the massage roller to the shoulder position, and then press the OK key
to start the massage. If no operation is made within 20s, directly default the current
massage roller position for the shoulder position and start massage.
OK
Checking,
Please wait
Body sensing
Skip
Power Pause
0
OK
Shoulder position adjustment
Power Pause
After the massage chair is turned on, press the pause key to enter the pause
state, then all massage functions will be suspended, and press the pause key
again to resume the previous massage state. Note: In the pause state, all functions
do not work except shutdown.
Automatic program selection
(1)Select the Automatic key in the left menu bar to enter the automatic selection
interface.
(2)In the automatic program selection interface, there are 20 automatic program
options available: Total Relax, Stress Release, Full Airbag, Chinese Massage,
Thai Massage, Meridian Treatment, Neck & Shoulder Care, Waist Care, Waist &
Buttock Shape, Leg & Foot Relieve, President Cosy, Keep Fit, Superior
Enjoyable, Office Regimen, Health Recharge, Energy Boost, Lunch Break, Sweet
Dream, Brain Refresh, Rejuvenate.
(3)Select the desired automatic massage program and click to start massage.
III. Automatic program (please use this function after the chair is turned on)
Position too high
Proper position
Position too low
II. Pause function (please use this function after the equipment is turned on)
Schematic diagram of automatic massage program selection
Total Relax
Stress Release
Full Airbag
Chinese Massage
Thai Massage
Relaxing
and Activating Overall
Relaxation
Exclusive
for Family
AI
Intelligent
Auto Program

22 23
Operation Instructions Operation Instructions
Meridian
Treatment
Neck &
Shoulder Care
Waist Care
Leg & foot Relieve
Massage the shoulders, neck and back and waist by means
of kneading, tapping and Shiatsu techniques to the effect of
meridian treatment.
Massage the neck and shoulders by means of kneading
and stretching techniques mainly, and also the upper back
by medical massage, and then press the Jianjing acupoint
to relieve cervical spondylosis and achieve the effect of
relaxing the muscles of the neck and shoulders.
Massage the waist by kneading, kneading&tapping, tapping,
and then perform 4D massage of the waist
Massage buttocks by kneading and medical massage mainly,
and then through tapping and kneading, deeply massage
buttocks and perineum, to relax the hip muscles and lift the
hip, which is suitable for women massage, and also for men
for maintenance of prostate.
Massage the shoulders and waist by means of kneading,
tapping, kneading and tapping mainly, apply air massage on
the calfs and feet for squeezing massage, allowing more
soothing calf and foot massage.
Total Relax
Stress Release
Full Airbag
Function Description
Chinese Massage
Thai Massage
Massage neck, shoulders and Dazhui acupoint mainly by
kneading to relieve systemic pressure.
Massage scenes(AI Intelligent)
By means of Traditional Chinese medicine massage
technique mainly, apply 4D massage on the back and waist
so as to promote the blood circulation of the back and waist,
soothe the meridians and relieve the blockage of the back
and waist through massage
Mainly with air pressure clamping legs, hands, shoulders and
hips, and then calves, backrest electric push rod with air
pressure to adjust the various different angles to achieve
stretching traction Role, while the movement of 3D massage
hand holding against waist, so that the body is in the Thai
stretching state. Note: Stretching amplitude is divided into
three levels, choose gentle stretching amplitude lowest,
choose soothing when the stretching amplitude moderate,
choose strong when the maximum stretching amplitude.
The upper mechanical core is used to massage the neck,
shoulders and Fengchi acupoint by kneading, and then work
with tapping and Shiatsu to massage the whole body. The
lower mechanical core is used to massage the waist and hip
by kneading and tapping. The two mechanical cores
coordinate to assist to relax the whole body muscle and
alleviate fatigue.
Function Description
Massage scenes(Relaxing and Activating)
Waist &
buttock Shape
Apply air massage on the whole body, with the sole roller and
calf kneading massage. With the calf stretching function, the
mechanical wave operates automatically with hand pressure.

Operation Instructions Operation Instructions
Energy Boost
Lunch Break
Sweet Dream
Brain Refresh
Rejuvenate
Deeply massage the whole body by means of kneading,
tapping and Shiatsu techniques, to wake up the vitality of the
human body and stimulate the energy.
Massage the back and waist by means of kneading and
tapping techniques, and press the Shenyu
acupoint, to improve the quality of lunch break, so that the
user is more energetic in afternoon work.
Massage the shoulders, neck, back and waist by means of
kneading and medical massage techniques, and press the
acupoints of Fengchi and Shenyu, to improve the sleep
quality and help sleep. It is suitable for people suffering from
poor sleep.
Massage the shoulders, neck and back and waist by means
of kneading, 4D kneading and Shiatsu
techniques to achieve a high degree of physical and mental
harmony through deep massage. It is suitable for people who
are mentally retarded and overused. The massage intensity is
gentle.
Massage the back and waist mainly by tapping and
kneading&tapping techniques to promote blood circulation,
eliminate local muscle pain, accelerate lactic acid excretion,
and rekindle human vitality
Function Description
Massage scenes(Exclusive for Family)
President Cosy
Keep Fit
Superior
Enjoyable
Office Regimen
Health Recharge
Massage the shoulders, neck, back and waist by means of
kneading, tapping, kneading and tapping mainly, to relieve
fatigue, promote blood circulation, and release stress by
such deep massage. It is suitable for men, and the
massage intensity is moderate.
Massage the shoulders, neck, waist and hips by means of
kneading and Shiatsu techniques, through the massage on
the whole body, to relax the body and mind, and enjoy the
queen-level treatment. It is suitable for women. Massage
intensity is gentle.
Apply gentle massage on the whole body, with the sole
roller and calf kneading massage. Calf stretching function is
canceled, suitable for the elderly and people suffering stress
on back.
Massage the shoulders, neck and waist by means of
kneading, tapping, kneading and tapping techniques mainly,
to relieve shoulder and neck pain, improve lumbar muscle
soreness and maintain lumbar spine through such deep
massage. It is suitable for office white-collar and sedentary
people.
Deeply massage the whole body by means of kneading,
tapping and Shiatsu techniques, to promote blood circulation
throughout the body and prevent blood clots. It is suitable for
people who live at home for a long time and do not like to go
out, and the massage intensity is moderately gentle.
Function
Massage scenes(Overall Relaxation)
Description
2425

Gentle
Soothing
Strong
Belt heat
Voice
Calf
Roller
O2-
Core heat
Settings
Angle
Manual
Auto
Home
Upper Air +
Upper Air -
00:30
Speed -
Speed +
4D -
4D +
4D III
PausePower
Manual
Lower Air +
Lower Air -
Full
Shoulder
Foot Code
Area
2627
Remote program selection
IV. remote program (please use this function after the equipment is turned on)
Operation Instructions Operation Instructions
Settings
Angle
Manual
Auto
Home
PausePower
Manual
Manual Air
Stop Knead Tap I Tap II
Knead&Tap
Shiatsu I Shiatsu II
Area
Spot Partial Full
Upper Lower
4D intensity Massage Width
Massage Speed
Position
Up
Down
4DⅠ
4DⅡ
4DⅢ
4DⅣ
Function Massage roller adjustment
Speed and strength.
Speed and strength.
Speed, width and strength.
Speed, width and strength.
-Adjustable speed in
five gears
-Adjustable width in
five gears
-Adjustable intensity
in five gears
Remote program - Schematic diagram of technique selection
Function Massage roller adjustment
Press this key to massage without
any technique.
The speed and strength can be adjusted.
The speed, width and strength can be
adjusted.
The speed, width and strength can be
adjusted.
The speed and strength can be adjusted.
The speed, width and strength can be
adjusted.
The speed, width and strength can be
adjusted.
The speed and strength can be adjusted.
-Adjustable speed in
five gears
-Adjustable width in
five gears
-Adjustable intensity
in five gears
Stop
Knead
Tap I
Tap II
Knead&Tap
Shiatsu I
Shiatsu II
Grasp
Knead
Stop
Grasp
Shiatsu II
Shiatsu I
Knead&Tap
Tap II
Tap I
4D I
4D II
4D III
4D IV
Current Status - Schematic diagram of technique selection
Select the remote key in the left menu bar and click to enter the remote menu
to select massage technique, massage area, 4D intensity, massage hand
adjustment, massage width, massage speed, air massage, air intensity and other
massage functions.
1. In the massage technique menu, a total of 11 options are available, including
kneading, Tap I, Tap II, kneading and Tap, Shiatsu I, Shiatsu II, shoulder grasp, 4DI,
4DII, 4DIII and 4DIV. (Note: Click the "leftward arrow and rightward arrow "
button in the remote adjustment menu to scroll left and right to display more
massage techniques).
Note: You can also click the massage technique key in the “Home "interface
to select the corresponding massage technique in the pop-up menu for massage (this
function is a shortcut for switching massage techniques in the current status page of the
remote program - technique adjustment).
Stop

2829
2.The massage area menu has five options: Spot, Partial, Full, Upper and Lower.
Select the corresponding massage area for massage.
Remote program - Schematic diagram of massage area selection
Key Description
Fixed-point massage at fixed-point position.
Small-scope local massage back and forth.
Full back massage back and forth.
Upper back massage back and forth.
Lower back massage back and forth.
Note: You can also click the massage area key in the "Current Status "
interface to select the corresponding massage area in the pop-up menu for massage
(this function is a shortcut for switching massage areas in the current status page of
the remote program - massage area).
Area
Current Status - Schematic diagram of massage area selection
Operation InstructionsOperation Instructions
3.You can adjust 4D intensity in the 4D intensity menu. There are 1~5 gears
available for adjustment with 1 being the weakest and 5 being the strongest. The
stronger the 4D intensity, the higher the massage roller ejection and the greater the
massage strength. Select plus key or minus key to reduce
the 4D intensity.
Remote program - Schematic diagram of 4D intensity
Settings
Angle
Manual
Auto
Home
PausePower
Manual
Manual Air
Stop Knead Tap I Tap II
Knead&Tap
Shiatsu I Shiatsu II
Area
Spot Partial Full
Upper Lower
4D intensity Massage Width
Massage Speed
Position
Up
Down
Gentle
Soothing
Strong
Belt heat
Voice
Calf
Roller
O2-
Core heat
Settings
Angle
Manual
Auto
Home
Upper Air +
Upper Air -
00:30
Speed -
Speed +
4D -
4D +
4D III
PausePower
Manual
Lower Air +
Lower Air -
Full
Shoulder
Foot Code
Area
Spot
Partial
Full
Upper
Lower
Settings
Angle
Manual
Auto
Home
PausePower
Manual
Manual Air
Stop Knead Tap I Tap II
Knead&Tap
Shiatsu I Shiatsu II
Area
Spot Partial Full
Upper Lower
4D intensity Massage Width
Massage Speed
Position
Up
Down

30 31
Press this key to increase 4D intensity which is adjustable from 1 to 5.
Level 0
4D 4D
Press this key to decrease 4D intensity which is adjustable from 1 to 5.
Key Description
Note: You can also select the 4D intensity + key or 4D intensity - key
in the "Home " interface to adjust the 4D intensity. (This function is a shortcut to
the 4D intensity in the current status page of the remote program-4D intensity).
Level 1 Level 2 Level 3 Level 4
4D
4D
Level 0 Level 1 Level 2 Level 3 Level 4 Level 5
Key Description
Current Status - remote program-4D intensity
Press this key to increase 4D intensity which is adjustable from 1 to 5.
Press this key to decrease 4D intensity which is adjustable from 1 to 5.
Level 5
4. For massage hand adjustment, select the Up arrow or the Down arrow
down to upwards or downwards fine-adjust the massage hand position.
Remote program - Schematic diagram of massage hand adjustment
Operation Instructions Operation Instructions
Gentle
Soothing
Strong
Belt heat
Voice
Calf
Roller
O2-
Core heat
Settings
Angle
Manual
Auto
Home
Upper Air +
Upper Air -
00:30
Speed -
Speed +
4D -
4D +
4D III
PausePower
Manual
Lower Air +
Lower Air -
Full
Shoulder
Foot Code
Area
Settings
Angle
Manual
Auto
Home
PausePower
Manual
Manual Air
Stop Knead Tap I Tap II
Knead&Tap
Shiatsu I Shiatsu II
Area
Spot Partial Full
Upper Lower
4D intensity Massage Width
Massage Speed
Position
Up
Down
5. For massage width, as shown in the figure below, select the massage width to
adjust.
Remote program - Schematic diagram of massage width
Settings
Angle
Manual
Auto
Home
PausePower
Manual
Manual Air
Stop Knead Tap I Tap II
Knead&Tap
Shiatsu I Shiatsu II
Area
Spot Partial Full
Upper Lower
4D intensity Massage Width
Massage Speed
Position
Up
Down

32 33
Operation Instructions Operation Instructions
(1)The width can be adjusted only when the user enters the remote mode in
selecting massage technique or massage area.
(2)The massage width is available from 1 to 5 gears, with 1 being the narrowest and
5 being the widest. Please use the following massage techniques: PattingⅠ, Patting
Ⅱ, Finger PressingⅠ, Finger Pressing Ⅱ, 4D Ⅲ and 4D Ⅳ.
Level 0 Level 1 Level 2 Level 3 Level 4 Level 5
Key Description
Press this key to increase massage width which is adjustable from 1 to 5.
Press this key to decrease massage width which is adjustable from 1 to 5.
6. For massage speed, as shown in the figure below, select the massage speed to
adjust.
Remote program - Schematic diagram of massage speed
(1)The speed can be adjusted only when the user enters the remote mode in
selecting massage technique or massage position.
(2)The massage speed is available from 1 to 5 gears, with 1 being the fastest and 5
being the slowest. The speed cannot be adjusted when the massage technique
stops.
Level 0 Level 1 Level 2 Level 3 Level 4 Level 5
Settings
Angle
Manual
Auto
Home
PausePower
Manual
Manual Air
Stop Knead Tap I Tap II
Knead&Tap
Shiatsu I Shiatsu II
Area
Spot Partial Full
Upper Lower
4D intensity Massage Width
Massage Speed
Position
Up
Down
Key Description
Press this key to increase massage speed which is adjustable from 1 to 5.
Press this key to decrease massage speed which is adjustable from 1 to 5.
Note: You can also select the massage speed + key or massage speed -
key in the “Home " interface to adjust the massage speed.
Speed +
Speed -
Current Status - Schematic diagram of massage speed
Level 0 Level 1 Level 2 Level 3 Level 4 Level 5
Key Description
Press this key to increase massage speed which is adjustable from 1 to 5.
Press this key to decrease massage speed which is adjustable from 1 to 5.
Speed +
Speed -
Gentle
Soothing
Strong
Belt heat
Voice
Calf
Roller
O2-
Core heat
Settings
Angle
Manual
Auto
Home
Upper Air +
Upper Air -
00:30
Speed -
Speed +
4D -
4D +
4D III
PausePower
Manual
Lower Air +
Lower Air -
Full
Shoulder
Foot Code
Area

Gentle
Soothing
Strong
Belt heat
Voice
Calf
Roller
O2-
Core heat
Settings
Angle
Manual
Auto
Home
Upper Air +
Upper Air -
00:30
Speed -
Speed +
4D -
4D +
4D III
PausePower
Manual
Lower Air +
Lower Air -
Full
Shoulder
Foot Code
Area
34 35
Operation Instructions Operation Instructions
Remote program-Schematic diagram of air massage
Upper body air pressure Lower body air pressure Whole body air pressure
7.Air pressure massage, enter into the air pressure massage menu to choose the
air pressure mode as shown in the following figure. Air pressure mode include upper
body, lower body, full body air pressure, and off to close the air pressure function.
And in the inner side of the arm with a hand roller massage function, when the
whole body air pressure or upper body air pressure is turned on, the hand roller will
automatically run with the operation of air pressure, which can relieve the stiffness
of the arm muscle.
Key Description
Press this key to enable or disable the whole body air massage function.
Press this key to enable or disable the upper body air massage function.
Press this key to enable or disable the lower body air massage function.
Air pressure display
Manual Air
Upper Air Lower Air
Air intensity
Upper body
Lower body
Full
Settings
Angle
Manual
Auto
Home
PausePower
Manual
Note: You press also air massage key in the “Home " interface, and
select corresponding air mode in the pop-up menu. (This function is a shortcut to
the air massage in the current status interface of the remote function - air massage.)
Full
Lower body
Full
Upper body
Current status - Schematic diagram of air massage
8.For air intensity adjustment, the air function shall be turned on so as to adjust the
air intensity, with a total of five adjustable levels, with 1 being the weakest and 5
being the strongest.
Manual Air
Upper Air Lower Air
Air intensity
Upper body
Lower body
Full
Settings
Angle
Manual
Auto
Home
PausePower
Manual

36 37
Operation Instructions Operation Instructions
Press this key to increase the air intensity which is adjustable from 1 to -5.
Current status - Schematic diagram of air intensity
Key Description
Press this key to decrease the air intensity which is adjustable from 1 to -5.
Level 0 Level 1 Level 2 Level 3 Level 4 Level 5
Level 0 Level 1 Level 2 Level 3 Level 4 Level 5
Note: Can select the upper body air pressure + key or the upper body air
pressure - key in the "Home " interface to adjust the upper body air
pressure intensity; can also select the lower body air pressure + key or the
lower body air pressure - key to adjust the lower body air pressure intensity ,
the air pressure intensity is divided into 5 levels.
Upper Air
Upper Air
Lower Air
Lower Air
Gentle
Soothing
Strong
Belt heat
Voice
Calf
Roller
O2-
Core heat
Settings
Angle
Manual
Auto
Home
Upper Air +
Upper Air -
00:30
Speed -
Speed +
4D -
4D +
4D III
PausePower
Manual
Lower Air +
Lower Air -
Full
Shoulder
Foot Code
Area
Upper Air
Lower Air
Upper Air
Lower Air
Press this key to increase the air intensity which is adjustable from 1 to -5.
Press this key to decrease the air intensity which is adjustable from 1 to -5.
Key Description
V. Seat adjustment
Click the "Angle " button in the menu bar on the left side of the display screen to
enter the angle adjustment interface, which includes leg rest telescoping, footrest
telescoping, leg rest lifting, linkage lifting, backrest lifting, zero gravityⅠ, Ⅱand ot her
massage functions.
Schematic diagram of sitting posture adjustment
1. Zero-gravity adjustment
Key Description
Zero-gravity 1 key: automatically adjust the position of leg unit and
backrest unit to zero-gravity 1 position.
Zero-gravity II key: automatically adjust the position of leg unit and
backrest unit to zero-gravity II position.
Zero I
Zero II
Angle adjustment
Leg shorten
Leg extend
Foot shorten
Foot extend
Leg up Leg down
Whole up
Whole down
Back up
Back down
Zero I Zero II
Settings
Angle
Manual
Auto
Home
PausePower
Manual
Table of contents
Other Osaki Massager manuals

Osaki
Osaki Pro Admiral User manual

Osaki
Osaki OS 4000CS User manual

Osaki
Osaki OS4000T User manual

Osaki
Osaki 4000XT User manual

Osaki
Osaki JP650 3D User manual

Osaki
Osaki Pro Maestro User manual

Osaki
Osaki PLATINUM OP-4D Ultima User manual

Osaki
Osaki OS-Aster User manual

Osaki
Osaki Otamic LE OS-3D User manual

Osaki
Osaki OS:PRO-EKON User manual

Osaki
Osaki HS-3601 User manual

Osaki
Osaki OS-Pro Soho User manual

Osaki
Osaki OS-3D Aspire User manual

Osaki
Osaki Belmont OS-3D User manual

Osaki
Osaki Hamilton LE OS-3D User manual

Osaki
Osaki 3D Pro Intelligent User manual

Osaki
Osaki EC-806R User manual

Osaki
Osaki OS4000 User manual

Osaki
Osaki OS 3D PRO DREAMER User manual

Osaki
Osaki OS-Pro Omni User manual


