OVE ORLANDO User manual

OVE DECORS ● Tel.:1-866-839-2888 ● Fax: 1-866-922-9990●www.ovedecors.com
INSTALLATION AND USER’S GUIDE
GUÍA DE INSTALACIÓN Y DE USO
Dimensions / Dimensiones:
WxDxH / LxPxA
1 524mm x 813mm x 2 124mm
60 x 32 x 83 5/8 in/pu
The warranty will be void if this
item is installed with obvious
visual defects.
La garantía será nula si este
artículo es instalado con defectos
visuales obvios.
Shower / Ducha ORLANDO

2014-02 www.ovedecors.com Orlando
2
TABLE OF CONTENTS
General instructions . . . . . . . . . . .. . . . . . . . . . . . . . . . . . . . . . 2
Important . . . . . . . . . . . . . .. . . . . . . . . . . . . . . . . . . . . . . . . . . .2
Before you begin . . . . . . .. . . . . . . . . . . . . . . . . . . . . . . . . . . . 2
Hardware list . . . . . . . . . . . .. . . . . . . . . . . . . . . . . . . . . . . . . . 3
Required tools . . . . . . . . . . . .. . . . . . . . . . . . . . . . . . . . . . . . . .4
Shower parts . . . . . . . . . . . . . . . . . . . . . . . . . . . . . . . . . . . . . . 5
Plumbing and installing the shower base . . . . . . . . .. . . . . . . . 7
Shower reversibility . . . . . . . . . . . . . . . .. . . . . . . . . . . . . . . . . .8
Installation of the support bar . . . . . . . .. . . . . . . . . . . . . . . . . .9
Installation of the support bar (cont.) . .. . . . . . . . . . . . . . . . . 10
Installing glass panel . . . . . . . . . . . . .. . . . . . . . . . . . . . . . . .11
Installing glass panel (cont.) . . . . . . .. . . . . . . . . . . . . . . . . . . 12
Installing the shower door . . . . . . . . . . . . . . . . . . . . . . . . . .. 13
Installing the handle and seal rubbers .. . . . . . . . . . . . . . . . 14
Adjustments and sealing . . . . .. . . . . . . . . . . . . . . . . . . . . . . 15
Maintenance . . . . . . . . . . . . . . . .. . . . . . . . . . . . . . . . . . . . . . 16
Limited 5 years warranty . . . . . . .. . . . . . . . . . . . . . . . . . . . . .16
►General instructions
Please take a few minutes to review this manual before you
start installation.
If you encounter any installation or performance problems,
don’t hesitate to contact us:
CUSTOMER SERVICE: 1-866-839-2888 #17
WWW.OVEDECORS.COM
►Important
Handle the tempered glass with caution! Improperly handling
the glass can cause it to break suddenly in small pieces
(never in pointed fragments)
You will need at least two people to install this unit properly.
►Before you begin
All plumbing installations should be done by a licensed
professional plumber/installer. Observe all local plumbing and
building codes.
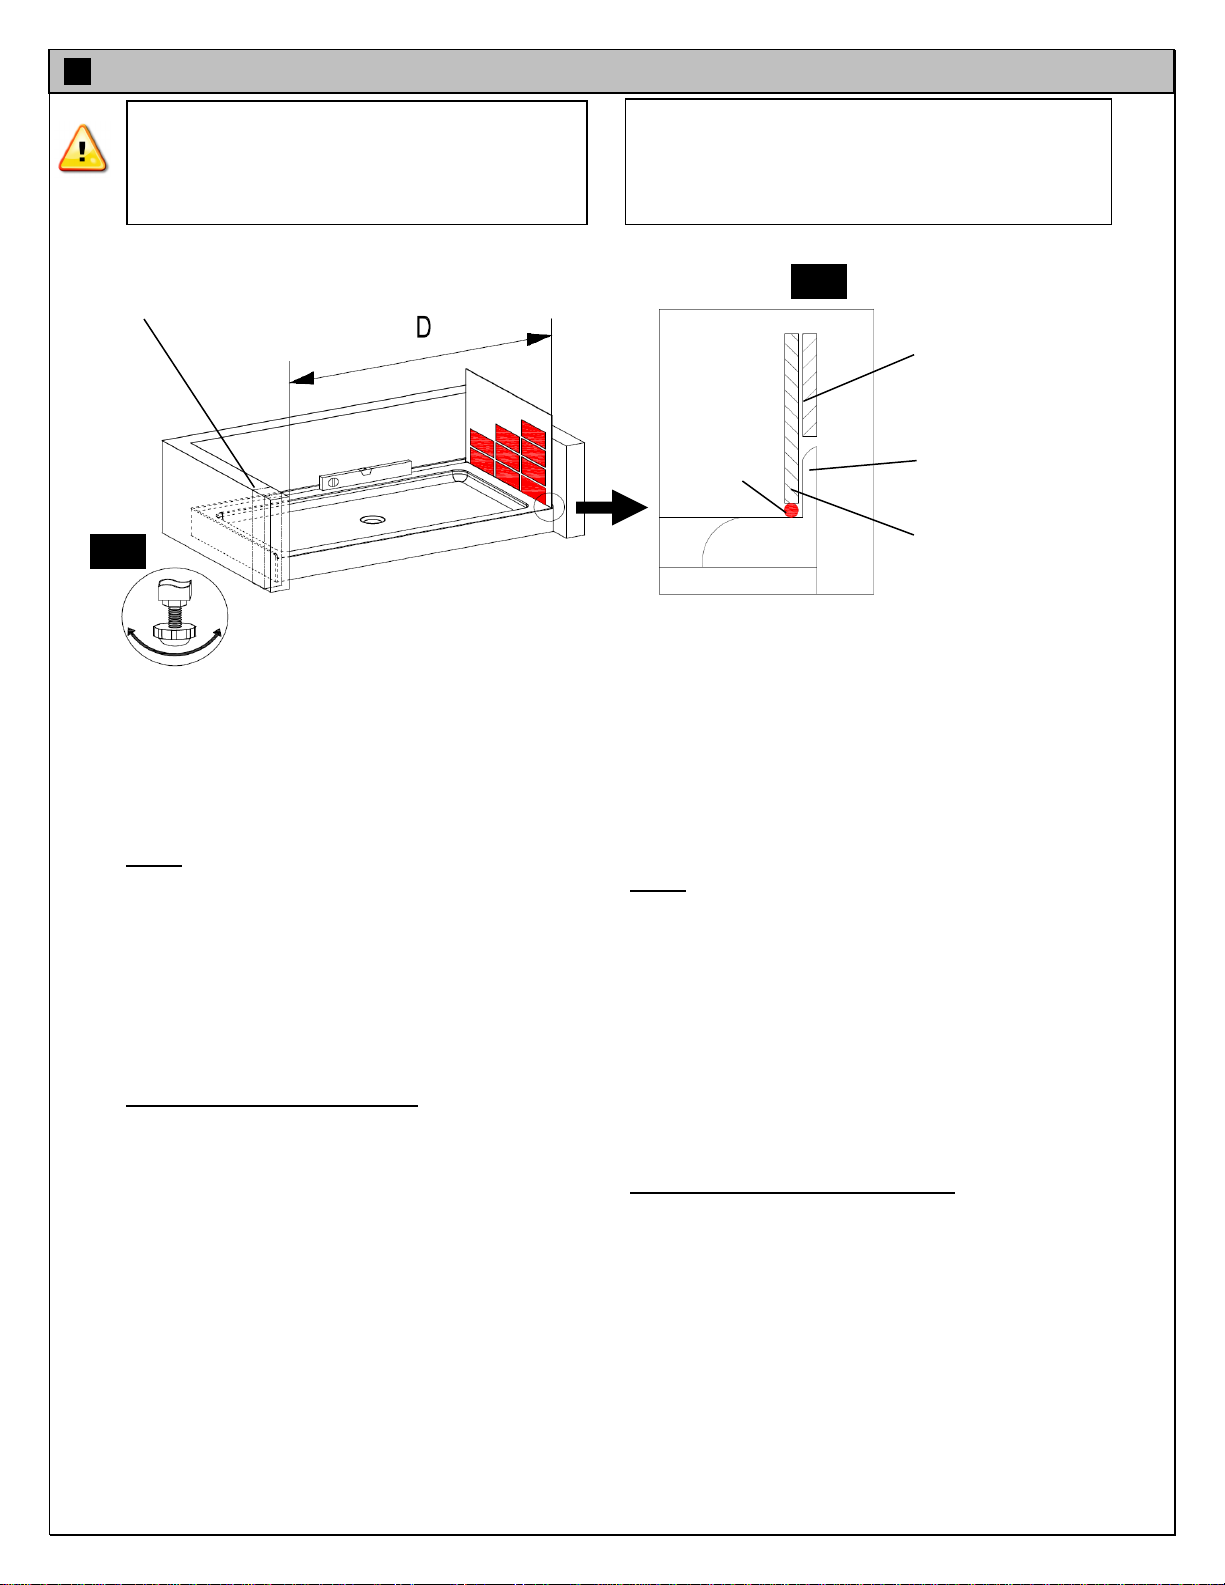
To ensure that the shower operates properly and safely, wall
studs (2” x 4”) must be located at 1” (stud centers) from the
edge of the base. If there are no existing studs, new studs
should be installed and the gyproc repaired. (See drawing,
page 7).
OVE is not responsible for any damage to the unit or personal
property caused by improper installation. If you disregard
instructional warnings, you will void your warranty and possibly
deal with water damage.
Carefully remove product from packaging and keep
packaging until installation is complete.
Inspect all parts for damage; if there is damage to the unit
prior to installation, please contact your distributor.
Install the shower on a floor that is level and able to
accommodate the weight of the unit and an occupant.
Please, consult local building codes and compliance
standards prior to installation and ensure conformity.
TABLA DE CONTENIDOS
Instrucciones generales. . . . . . . . . . . . . . . . . . . . . . . . . . . . . . . . . .2
Importante . . . . . . . . . . . . . . . . . . . . . . . . . . . . . . . . . . . . . . . . . . . . 2
Antes de proceder . . . . . . . . . . . . . . . . . . . . . . . . . . . . . . . . . . . . . . 2
Lista de herrajes . . . . . . . . . . . . . . . . .. . . . . . . . . . . . . . . . . . . . . . . 3
Herramientas requeridas . . . . . . . . . . . . . . . . . . . . . . . . . . . . . . . . . 4
Partes de la duchas . . . . . . . . . . . . . . . . . . . . . . . . . . . . . . . . . . . . . 5
Plomería e instalación de la base de la ducha . . . . . . . . . . . . . . . . .7
Reversibilidad de la ducha. . . . . . . . . . . . . . . . . . . . . . . . . . . . . . . . 8
Instalación de las bisagras . . . . . . . . . . . . . . . . . . . . . . . . . . . . . . . 9
Instalación de las bisagras (cont.) . . . . . . . . . . . . . . . . . . . . . . . . .10
Instalación del panel de vidrio . . . . . . . . . . . . . . . . . . . . . . . . . . . . 11
Instalación del panel de vidrio (cont.) . . . . . . . . . . . . . . . . . . . . . . .12
Instalación de la puerta. . . . . . . . . . . . . . . . . . . . . . . . . . . . . . . . . 13
Instalación de la manija y del sello cauchos. . . . . . . . . . . . . . . . . . 14
Ajuste y estanqueidad. . . . . . . . . . . . . .. . . . . . . . . . . . . . . . . . . . . 15
Mantenimiento. . . . . . . . . . . . . . . . . . . . . . . . . . . . . . . . . . . . . . . . 16
Garantía limitada de 5 años. . . . . . . . . . . . . . . . . . . . . . . . . . . . . . 16
►Instrucciones generales
Tómese unos minutos para revisar este manual antes de
comenzar la instalación.
Si encuentra dificultades de instalación o de funcionamiento, no
dude en comunicarse con nosotros:
SERVICE AL CLIENTE: 1-866-839-2888 #17
WWW.OVEDECORS.COM
►Importante
¡Manipule el vidrio templado con precaución! La manipulación
incorrecta del vidrio puede causar que se rompa bruscamente en
pedazos pequeños (nunca en fragmentos puntiagudos).
La instalación de esta cabina de esta cabina requiere de la
participación de al menos dos personas.
► Antes de comenzar
Todas las instalaciones de plomería deben ser realizadas por un
plomero/instalador profesional. Observe todas las construcciones
de plomería y los códigos locales.
Para que la ducha funcione de manera adecuada y segura, los
montantes de la pared (50,8mm x 101,6mm) deben ser localizados
a 25mm (centro del montante) a partir del borde de la base. Si no
hay montantes existentes, se deberá colocar nuevos montantes y el
gyproc debe ser reparado (ver ilustración, página 7).
OVE no se responsabiliza de ningún daño a la unidad ni a
propiedades personales causados por la instalación inadecuada. Si
usted ignora las advertencias de instalación, perderá la garantía y
podría sufrir daños causados por fuga de agua.
Retire cuidadosamente el empaque del producto y consérvelo
hasta que termine la instalación.
Asegúrese de que ninguna pieza se dañe; en caso de daños
antes de la instalación, comuníquese con el distribuidor.
Instale la ducha sobre un piso nivelado capaz de soportar el peso
de la unidad y un ocupante.
Consulte el Código de construcción y los estándares de
conformidad locales antes de la instalación y asegúrese que haya
conformidad.

2014-02 www.ovedecors.com Orlando
3
Part # /
# de Parte
Description / Descripción
Quantity / Cantidad
Code / Código
1
1 inch screw Philips flat head
Tornillos Philips de cabeza plana de 25mm
6 (4 +2 extra)
99SHW0602-WM
2
1 1/2 inch screw Philips flat head
Tornillos Philips de cabeza plana de 38,1mm
4 (2 +2 extra)
3
Wall plug
Tarugo
4 (2 +2 extra)
4
2.5mm Allen key
Llave Allen de 2,5mm
1
5
4mm Allen key
Llave Allen de 4mm
1
4
2
3
1
Hardware / Lista de herrajes
5

2014-02 www.ovedecors.com Orlando
4
Screwdriver
Destornillador
Drill
Taladro
1/16” & 1/8” Drill bits
Broca de 1,58mm & 3,17mm
Silicone
Silicona
Rubber mallet
Mazo de goma
Tape measure
Cinta métrica Nivel
Level
Nivel
Adjustable tool
Herramienta ajustable
Pencil
Lápiz
Heavy duty cutter
Cortador de alta
resistencia
Plus :
Fabric Drop Cloth (to
protect shower base
while installing)
Paño de la tela (para
proteger la base de
ducha durante la
instalación).
Required Tools / Herramientas requeridas
Safety glasses
Gafas de seguridad

2014-02 www.ovedecors.com Orlando
5
Shower parts / Partes de ducha

2014-02 www.ovedecors.com Orlando
6
Part # / #
de Parte
Description / Descripción
Quantity /
Cantidad
Code / Código
A
Base / Plato
1
10SSB-ORLA60-000WM
B
Fixed glass panel / Panel de vidrio
1
99SG20602-WM
C
Shower door / Puerta de la ducha
1
99SGD0602-WM
D
Vertical shower door support bar / Barra de soporte vertical para
la puerta de la ducha
1
99SGS1005-WM
E
Shower door stopper / Tope para puerta de ducha
2
99SDS0001-WM
F
Brass fitting / Accesorio de latón
2
99SGC1007-WM
G
Support bar / La barra de soporte
2
H
Sliding door guide / Guía para la puerta corredera
1
99SGC1009-WM
I
Support for fixed glass panel / Soporte de la panel de vidrio
1
99SGC1010-WM
J
Vertical seal strip / Pista de goma vertical
2
99SRU0024
K
Vertical seal strip for the shower door / Pista de goma vertical
para puerta de la ducha
1
99SRU0023
L
Door sliding roller / Ruedas para puerta corredera
4
99SWE0003-WM
M
Support bar fixing screws / Tornillos de fijación de la barra de
soporte
2
99SGC1008-WM
N
Shower door handle / Manija de puerta de la ducha
1
99SHA1009-WM
P
Bottom panel rubber strip / Tira de goma para la parte inferior
del panel de vidrio
1
99SRU0033
Q
Metal seal strip / Tira del sello del metal
1
99STR1019-WM
Q1
Decorative clip for the metal seal strip / Clip decorativo para la
tira del sello del metal
2
99SHW1151-WM
Shower parts / Partes de ducha

2014-02 www.ovedecors.com Orlando
7
1A. Ensure that all raw plumbing has been prepared
prior to installation of shower.
1B. Ensure that the base is leveled by adjusting the
leveling screws under the base.
1C. Once in place, the inner surface of the lip of the
base must come flush with the gyproc.
Notes:
The base & lip may be minimally protruding outside
from the gyproc, but allow it to be flush enough to tile
the shower.
Measure the thickness of your tiles on either side
before installing the metal tracks. A thicker tile will
limit your space to install the shower panels.
Make sure to have a distance tile to tile between 58
1/4 in (1479.5mm) Min and 58 1/2 in (1486mm) Max
(see image).
Before continuing the installation:
Ensure proper installation of the drain and test for
leaks prior to installing the remaining pieces of
shower unit.
Verify that the base floor is draining correctly.
Verify all pipe connections to ensure no leakage
occurs.
Allow enough time for the cemented tiles to fully dry
before installing the shower doors.
1A. Asegúrese de que toda la plomería preliminar esté
preparada antes de la instalación de la ducha.
1B. Asegúrese de que la base esté nivelada mediante
el ajuste de los tornillos de nivelación debajo de la base.
1C. Una vez en el sitio, la superficie interna de la
pestaña de la base debe estar a ras con la tabla de
yeso.
Notas:
La base y la pestaña pueden sobresalir mínimamente
con respecto a la tabla de yeso, pero deje que estén
suficientemente a ras para poder colocar baldosas en
la ducha.
Mida el espesor de las baldosas a ambos lados antes
de instalar los rieles metálicos. Una baldosa más
gruesa limitará el espacio para instalar los paneles de
la ducha.
Asegúrese de que haya una distancia de baldosa a
baldosa entre 58 1/4 pulgadas (1 479,5mm) como
mínimo y 58 1/2 pulgadas (1 486mm) como máximo
(Ver imagen).
Antes de continuar con la instalación:
Asegúrese de que haya una instalación correcta del
desagüe y verifique que no haya fugas antes de la
instalación de las piezas faltantes de la unidad de la
ducha.
Verifique que el piso de la base esté drenando
correctamente.
Verifique todas las conexiones de tubería para
asegurarse de que no haya fugas.
Deje el tiempo suficiente para el secado completo del
cemento de las baldosas antes de instalar las puertas
de la ducha.
1B
1C
Needed studs as support for
tracks.
Se necesitan montantes como
soportes para los rieles.
Make sure to have a distance tile to tile (D)
between 58 1/4 in (1479,5mm) Min and 58 1/2
in (1 486mm) Max (see image).
Asegúrese de que haya una distancia de
baldosa a baldosa (D) entre 58 1/4 pulgadas
(1479,5mm) como mínimo y 58 1/2 pulgadas
(1 486mm) como máximo (Ver imagen).
1. Plumbing and installing the shower base / Fontanería e instalación de la base de la ducha
Gyproc is above the lip of the
base.
La tabla de yeso está arriba de
la pestaña de la base.
Tiles in front of the lip of the
base.
Baldosas delante de la
pestaña de la base.
Base lip.
Pestaña de la base.
Silicone
Silicona

2014-02 www.ovedecors.com Orlando
8
This instruction is drawn up for an opening from right
to the left (see illustration A).
For an installation from left to the right (see illustration
B), use the same instructions, but switch around the
panels (C) and (B): mirror effect.
Pay attention on the position of the door handles
holes and the hinges position (mirror effect).
Estas instrucciones está preparadas para una
apertura de derecha a izquierda (Ver ilustración A).
Para una instalación de izquierda a derecha (Ver
ilustración B), utilice las mismas instrucciones, pero
invierta los paneles (C) y (B): efecto espejo.
Preste atención a la posición de la puerta maneja
agujeros y la posición de las bisagras (efecto espejo).
Shower reversibility / Reversibilidad de la ducha
Left to right opening
Apertura de izquierda a derecha
Right to left opening
Derecho a la abertura de la
izquierda
A
B
THIS SHOWER IS REVERSIBLE
ESTE PRODUCTO ES REVERSIBLE
B
C
B
We recommend to install the showerhead on
the fixed panel side to avoid water leaking on
the door opening side.
Se recomienda instalar el cabezal de la ducha
en el lado del panel fijo para evitar fugas de
agua en el lado de apertura de la puerta.

2014-02 www.ovedecors.com Orlando
9
2A. Make sure to have the base and the walls well leveled.
2C. Drill pilot hole in the marked place.
Note: It is recommended that a small diameter bit be used
when first drilling ceramic tiles to avoid breaking them.
Begin with the smaller bit and gradually move to larger drill
bits until the proper sized hole is attained.
2D. Ensure that the final hole is large enough to fit the wall
anchors (5) snugly and then insert the wall anchors using
a rubber mallet (to avoid breaking the tiles) until the
anchors are flush with the tile surface.
2E. Install the brass fitting (F) by using the screws (2)
Repeat the same operations for the other side.
2A. Asegúrese de que la base y las paredes estén bien
niveladas.
2C. Perfore el agujero piloto en el lugar marcado.
Nota: Si esta perforando en baldosas de cerámicas, se
recomienda utilizar una broca de menor diámetro para
evitar que se rompan. Comience con las brocas más
pequeñas y pase gradualmente a brocas más grandes
hasta lograr el agujero del tamaño adecuado.
2D. Asegúrese de que el agujero final sea de un diámetro
que permita la inserción fácil de los anclajes (5) y utilice
un mazo de caucho (para evitar romper las baldosas)
hasta que el anclaje quede a ras con la superficie de la
baldosa.
2E. Instale los accesorios de bronce (F) utilizando los
tornillos (2)
Repita las mismas operaciones para el otro lado.
2. Installation of the support bar / Instalación de las bisagras
2C
2D
2E
B
2B
1925mm (75 13/16”)
2B. Marque claramente el lugar para los agujeros para la
barra de soporte. Coloque a 47mm (1 13/16 pulgada)
horizontalmente y 1925mm (75 13/16 pulgadas )
verticalmente desde el borde de la base (Ver imagen).
2B. Mark clearly the hole location of the support bar Place
at 47mm (1 13/16 inch) horizontally and 1925mm (75
13/16 inch) vertically from the edge of the base (see
image).

2014-02 www.ovedecors.com Orlando
10
2F. Slide the two stoppers (E) on the bar (D), then
mount the two bar supports (G) without tightening.
2G. Install the bar (E) in the shower by mounting the two
supports (G) onto the brass fitting. Don’t tighten the
screw (in order to adjust the bar). Make sure the bar is
properly leveled.
Note: If the bar is not on properly leveled, the door
will not close correctly
2H. Secure the guide (H) on the shower base using the
screw (1) at 15mm (0.6” from the edge of the base and
699mm (27 1/2”) from left side wall (see image).Then
place the glass protection plastic
2I. Secure the glass panel support (I) on the shower
base using the screw (1) at 15mm (0.6”) from the edge
of the base (see image). Then place the glass protection
plastic.
2F. Deslice los dos tapones (E) de la barra (D), a
continuación, montar los dos soportes de la barra (G)
sin apretar.
2G. Instale la barra (E) en la ducha montando los dos
soportes (G) en el accesorio de bronce. No apriete el
tornillo (para poder ajustar la barra). Asegúrese de la
barra quede correctamente nivelada.
Nota: Si la barra no está correctamente nivelada, la
puerta no cerrará correctamente.
2H. Fije la guía (H) en la base de la ducha utilizando el
tornillo (1) a 15mm (0.6” desde el borde de la base y
699mm (27 1/2”) desde la pared del lado izquierdo (Ver
imagen). Luego coloque el plástico de protección del
vidrio.
2I. Fije el soporte del panel de vidrio (I) sobre la base de
la ducha utilizando el tornillo (1) a 15mm (0.6”) desde el
borde de la base (Ver imagen). Luego coloque el
plástico de protección del vidrio.
2. Installation of the support bar (cont.) / Instalación de las bisagras (cont.)
E
D
E
G
G
2F
H
I
2G
2H
2I
Ensure that the support bar is properly
leveled at this step.
Asegúrese de que la barra de soporte se
encuentra correctamente nivelada en este
paso.
Note: The guide (H) slightly exceeds the edge of the
base towards the showering area.
Nota: La guía (H) sobrepasa ligeramente el borde
de la base hacia el área de la ducha.
Helpful hint:
Add a drop of
silicone into the
screw hole before
installing the screw.
Consejo útil:
Agregue una gota
de silicona en el
agujero del tornillo
antes de instalar el
tornillo.

2014-02 www.ovedecors.com Orlando
11
3A Mount the two door rollers (L) onto the door panel
(C) as shown in the illustration.
Note: Make sure the glass protection washers are in
place on either side of the glass panel.
3B. Place the door panel within the showering area to
simplify following installation steps.
Note: Ensure placing the glass panel on a fabric
drop cloth to protect the base.
3A Monte los dos rodillos (L) del la puerta en el panel
de la puerta (C) como se muestra en la ilustración.
Nota: Asegúrese de que las arandelas de protección
del vidrio están en su sitio a ambos lados del panel
de vidrio.
3B. Coloque el panel de la puerta dentro del área de la
ducha para simplificar los siguientes pasos de la
instalación.
Nota: Asegúrese de colocar el panel de vidrio sobre
una tela para proteger las base.
3. Installing glass panel / Instalación del panel de vidrio
3A
C
3B

2014-02 www.ovedecors.com Orlando
12
3C. Place the seal strip (P) at the base of the glass panel
(B) at 1 1/2 in (38mm) from the edge of the panel.
3D. Smoothly slide the glass panel (B) into the guide (H)
and the support (I). Ensure that the plastic gasket is in place
in the guide and the support panel to protect the glass
panels.
3E. Screw the bar (D) into the glass panel (B) using the
screws (M). Ensure that the glass protection washers are in
place to protect the glass panel.
3F. Adjust the position of the glass panel (B) and the
support bar (D), and then tighten the supports bar (G) using
the two screws and an Allen key.
Note: Ensure that the support bar (D) is properly leveled
at this step.
3C. Coloque la tira de estanqueidad (P) en la base del
panel de vidrio (B) a 1 1/2 pulgada (38mm) desde el borde
del panel.
3D. Deslice suavemente el panel de vidrio (B) dentro de la
guía (H) y el soporte (I). Asegúrese de que la
empaquetadura de plástico esté en su sitio dentro de la
guía y en el panel del soporte para proteger los paneles de
vidrio.
3E. Atornille la barra (D) en el panel de vidrio (B) utilizando
los tornillos (M). Asegúrese de que las arandelas de
protección del vidrio estén en su sitio para proteger el panel
de vidrio.
3F. Ajuste la posición del panel de vidrio (B) y la barra de
soporte (D), y luego apriete la barra de soporte (G)
utilizando los dos tornillos y la llave Allen.
Note: Asegúrese de que la barra de soporte (D) esté
correctamente nivelada en este paso.
3. Installing glass panel (cont.) / Instalación del panel de vidrio (cont.)
M
3D
3C
G
3E
3F
P
H
I
B
B

2014-02 www.ovedecors.com Orlando
13
4A. Place the door (C) on the bar (D) while smoothly
inserting it into the guide (H).
4B. Check if the door slides correctly, and adjust if
necessary
4C. Mount the two door rollers (L) under the bar onto the
door panel (C) as shown in the illustration
4A. Coloque la puerta (C) en la barra (D) mientras la
inserte suavemente en la guía (H).
4B. Verifique si la puerta se desliza correctamente, y
ajústela si es necesario.
4C. Monte los dos rodillos (L) de la puerta debajo de la
barra en el panel de la puerta (C) como se muestra en la
ilustración.
4. Installing the shower door / Instalación de la puerta
4A
4A
4C
L
H
H

2014-02 www.ovedecors.com Orlando
14
5A. Mount one vertical seal strip (J) into the fixed glass
panel as shown in the illustration. The gasket lip should
face the interior of the shower. Then mount the second
into the door panel (the gasket lip should face the
exterior of the shower).
5B. Mount the vertical seal strip (K) into the shower door
as shown in the illustration.
5C. Check if the door slides correctly, and adjust if
necessary.
Note: You can change the location of the stoppers
(E) on the bar (D) to adjust the door closing.
5D. Install the handle (N) on the door panel by following
the illustration, and make sure to put the glass
protection washers on either side of the glass.
5A. Monte una tira de estanqueidad vertical (J) en el
panel de vidrio fijo como se muestra en la ilustración. La
pestaña de la empaquetadura debe estar hacia el
interior de la ducha. Luego monte la segunda en el
panel de la puerta (La pestaña de la empaquetadura
debe estar hacia el exterior de la ducha).
5B. Monte la tira de estanqueidad vertical (K) en la
puerta de la ducha como se muestra en la ilustración.
5C. Verifique si la puerta se desliza correctamente, y
ajústela si es necesario.
Nota: Usted puede cambiar la ubicación de los
retenedores (E) en la barra (D) para ajustar el cierre
de la puerta.
5D. Instale la manija (N) en el panel de la puerta
siguiendo la ilustración, y asegúrese de colocar las
arandelas de protección del vidrio a ambos lados del
vidrio.
5. Installing the handle and seal rubbers / Instalación de la manija y del sello cauchos
5A
5C
5B
5C

2014-02 www.ovedecors.com Orlando
15
Ensure that the door closes tight and opens smoothly,
and there is a tight connection between the side glass
panel and the frame as well as the support bar.
Apply a clear silicone water sealant around the outside
perimeter of any fixed components (horizontally
between bottom of fixed side glass panel and base, as
well as vertically between the wall, glass frames, and
any side glass panel).
Mount the metal seal bar (Q1) at the shower entrance
by using a clear silicone.
Allow 24 hours for silicone to dry.
Improper application of silicone sealant may cause your
shower to leak.
Asegúrese de que la puerta cierre firmemente y abra
suavemente y que haya una conexión apretada entre el
panel de vidrio y el riel al igual que con la barra se
soporte.
Aplique silicona transparente resistente al agua
alrededor del perímetro interno y externo de todos los
componentes de la ducha (horizontalmente entre la
parte inferior del panel de vidrio y la base, al igual que
verticalmente (entre la pared, el riel y el panel de
vidrio).
Monte la barra de sellado de metal (Q1) en la entrada
de la ducha utilizando una silicona transparente.
Deje secar la silicona durante 24h.
La aplicación inadecuada de la silicona puede resultar
en fugas durante el uso de la ducha.
Adjustments and sealing / Ajuste y estanqueidad
Hours / Horas

2014-02 www.ovedecors.com Orlando
16
CARE AND MAINTENANCE
For the daily maintenance, use a wet cloth and a soft liquid cleaner.
Never use abrasive cleaners containing some acetone, chlorine or
strong bleach, scrapers, metallic brushes, nor other objects or the
products which can graze or tarnish surfaces.
Use the ratchet to strongly tighten the wheels and stoppers.
Check the wheel screw every 4 - 6 months and re-tighten them if
necessary.
LIMITED 5-YEAR WARRANTY
This warranty extends only to the original owner lend-user for
personal household use only. For commercial uses, additional
limitations may apply.
Distributor warrants your satisfaction with each shower. Should any
shower not meet your satisfaction due to a visual defect, simply
return it to your retailer with the original packaging, PRIOR TO
INSTALLATION, for a replacement.
Distributor warrants shower doors to be free from defects in
workmanship and materials under normal use and service for a
period of five (5) years.
Distributor warrants acrylic surface against blistering or cracking
and chipping resulting from defect in the acrylic surface material
when used under normal conditions and service for a period of five
(5) years from purchase date.
Distributor further warrants the structure of the acrylic shell against
loss of water through fiberglass laminate of the acrylic body as a
result of defect in materials and workmanship for a period of five (5)
years from purchase date.
Distributor warrants, shower hardware (handles, hinges, rubber
support clips, metal support bars and wall tracks) to be free from
defects in workmanship and materials under normal use and
service for a period of one (1) year.
Distributor will, at its election, repair, replace, or make appropriate
adjustment where distributor optional inspection discloses any such
defects occurring in normal usage within the warrantee periods.
Please note distributor is not responsible for installation or removal
costs.
Modification of any shower enclosure components may void the
warranty. This warranty does not cover any claim arising from
abuse, misuse, negligence, accident, improper installation or
operations on the part of the purchaser. This warranty is void if the
distributor product is subject to alterations, or if repairs where done
to the shower unit.
This warranty does not extend to any plumbing or components
installed by dealers, installers or by any party
other than distributor.
Implied warranties, including that of merchantability or fitness for a
particular purpose, are expressly limited in duration to the duration
of this warranty.
Distributor disclaims any liability for special, incidental or
consequential damages.
MANTENIMIENTO
Para mantenimiento diario, utilice un paño húmedo y un
limpiador líquido suave.
Nunca utilice abrasivos olimpiadores que contenga acetona,
cloro o blanqueadores fuertes, espátulas o cepillos de cerdas
metálicas, ni objetos o productos que puedan raspar o deslucir
las superficies.
Use el trinquete para apretar firmemente las ruedas.
Compruebe el tornillo de la rueda cada 4 - 6 meses y apriete
de nuevo si es necesario.
GARANTÍA LIMITADA DE 5 AÑOS
GARANTÍA NO VÁLIDA PARA MÉXICO
Esta garantía se extiende solo al usuario y propietario original solo
para uso doméstico personal. Se pueden aplicar limitaciones
adicionales para usos comerciales.
El distribuidor garantiza su satisfacción en cada ducha. Si alguna
ducha no le satisface debido a un defecto visual, simplemente
devuélvala a la tienda en su empaque original, ANTES DE LA
INSTALACIÓN, para un reemplazo.
El distribuidor garantiza que las puertas para ducha están libres de
defectos en mano de obra y materiales bajo condiciones de uso y
servicio normales por un periodo de cinco (5) años.
El distribuidor garantiza la superficie de acrílico contra la formación
de burbujas o el agrietamiento y el desportillado como resultado de
defectos en el material de la superficie de acrílico al ser utilizado
bajo condiciones y servicio normales por un período de cinco (5)
años a partir de la fecha de compra.
Asimismo, el distribuidor garantiza la estructura de la corteza
acrílica contra pérdida de agua a través del laminado de fibra de
vidrio del cuerpo acrílico como resultado de defectos en materiales
y mano de obra por un período de un (5) año a partir de la fecha de
compra.
El distribuidor garantiza que los aditamentos para ducha (manijas,
bisagras, sujetadores con soporte, barras de soporte de metal y
rieles de pared) están libres de defectos en mano de obra y
materiales bajo condiciones de uso y servicio normales por un
periodo de un (1) año.
El distribuidor reparará, reemplazará o realizará los ajustes
necesarios, según su elección, en caso de que una inspección
opcional realizada por distribuidor muestre que hay dichos defectos
en el uso normal dentro de los periodos de garantía.
Tenga en cuenta que el distribuidor no se hará responsable por los
costos de instalación o retiro.
La modificación de cualquier componente del cerramiento para
ducha puede anular la garantía. Esta garantía no cubre
reclamaciones que surjan del abuso, uso inadecuado, negligencia,
accidente, instalación inadecuada u operación por parte del
comprador. Si el producto del distribuidor está sujeto a alteraciones
o si se reparó la unidad de ducha, esta garantía es anulada.
Esta garantía no se extiende a la plomería o componentes
instalados por concesionarios, instaladores o cualquier otra parte
que no sea el distribuidor.
Las garantías implícitas, incluidas aquellas de comerciabilidad o
idoneidad para un fin particular, están limitadas expresamente en el
tiempo a la duración de esta garantía.
El distribuidor no se hace responsable por daños especiales,
resultantes o accidentales.

2014-02 www.ovedecors.com Orlando
17
Save this manual for future reference
Conserve este manual para futura referencia
HEAD OFFICE / OFICINA PRINCIPAL
2800 Etienne Lenoir, Laval
Quebec H7R 0A3 Canada
Importado Por:
Importadora Primex, S.A. de C.V.
Blvd. Magnocentro No.4, San Fernando La Herradura
Huixquilucan, Estado de México, C.P. 52765
R.F.C. IPR-930907-S70 Tel. (55) 52 46 5500
www.costco.com
Customer service / Service al cliente
Tel.: 1-866-839-2888 #17
Fax: 1-866-922-9990
www.ovedecors.com
KEEP THIS INFORMATION
CONSERVE ESTA INFORMATIÓN
Purchase date / Fecha de compra:
Product Tracking Reference
Numero de referencia
Table of contents
Other OVE Bathroom Fixture manuals
Popular Bathroom Fixture manuals by other brands

PolyJohn
PolyJohn HandStand 2 PSW2-1000 user manual

Dornbracht
Dornbracht 13 800 720-FF installation instructions

Akuaplus
Akuaplus EMMA SPM 0407 user manual

sanindusa
sanindusa SAFIRA Assembly instructions

Chiltern Invadex
Chiltern Invadex Side Entry Mk2 User and installation guide

Riobel
Riobel Pro EV39 installation guide

INDA
INDA Logic 3300 Mounting instructions

Rainware
Rainware Marengo Installation & assembly instructions

Thomasville
Thomasville Bradford THMSVL30FVJ Use and care guide

Kohler
Kohler K-8013 Installation and care guide

Bossini
Bossini L00833 INSTALLATION AND CARE INSTRUCTIONS

agape
agape 750 ACER0750WBSR Assembly instructions