manuals.online logo
Brands
  1. Home
  2. •
  3. Brands
  4. •
  5. PacLights
  6. •
  7. Lighting Equipment
  8. •
  9. PacLights FCPC Series User manual

PacLights FCPC Series User manual

INSTALLATION GUIDE FCPC Series LED Canopy Light
Instructions and specifications are subject to change at any time without notice. Copyright© 2021 PacLights All Rights Reserved Page 1 of 2
Need help? (800) 988 -6386 Email: CS@PacLights.com Website: www.PacLights.com
PL_INST_FCPC_v0
FCPC SURFACE/CEILING MOUNT
IMPORTANT
READ CAREFULLY BEFORE INSTALLING FIXTURE. RETAIN THESE INSTRUCTIONS FOR FUTURE REFERENCE.
PacLights fixtures must be wired in accordance with the National Electrical Code and all applicable local codes. Proper grounding is required for safety.
THIS PRODUCT MUST BE INSTALLED IN ACCORDANCE WITH THE APPLICABLE INSTALLATION CODE BY A PERSON FAMILIAR
WITH THE CONSTRUCTION AND OPERATION OF THE PRODUCT AND THE HAZARDS INVOLVED.
WARNINGS:
• Make certain power is OFF before installing or maintaining fixture. No user serviceable parts inside.
• To prevent wiring damage or abrasion, do not expose wiring to edges of sharp objects.
CAUTION:
• For proper weatherproof function all gaskets must be seated properly and all screws inserted and tightened firmly. Apply weatherproof silicone
sealant around the edge of the Back Box and/or Junction Box. This is especially important with an uneven wall surface. Silicone all plugs and
unused conduit entries.
FIG. 1
FCPC 095/120/150
The FCPC fixture can be mounted directly to a Surface/Ceiling. Install the Safety Lanyard with a Screw near the base of the FCPC (Fig. 1). Drill
the hole pattern into the Surface/Ceiling to be mounted (Fig. 2). Attached the Lanyard to the Surface/Ceiling. Properly attached the wiring.
Fasten the FCPC fixture to the Surface/Ceiling (Fig. 3).
Connect the ACL and the ACN from the FCPC Fixture to the conduit with the AC power Supply Cable. Follow the Wiring Diagram provided.
AC POWER SUPPLY
FCPC DRIVER
HOT [BLACK]
NEUTRAL [WHITE]
GROUND [GREEN]
WIRING DIAGRAM
INPUT
FCPC FIXTURE
SCREW
1
FIG. 2
LANYARD
FIG. 3
CEILING
CAP SCREW
LOCK WASHER
WASHER
NUT
LANYARD
INSTALLATION GUIDE FCPC Series LED Canopy Light
Instructions and specifications are subject to change at any time without notice. Copyright© 2021 PacLights All Rights Reserved Page 2 of 2
Need help? (800) 988 -6386 Email: CS@PacLights.com Website: www.PacLights.com
PL_INST_FCPC_v0
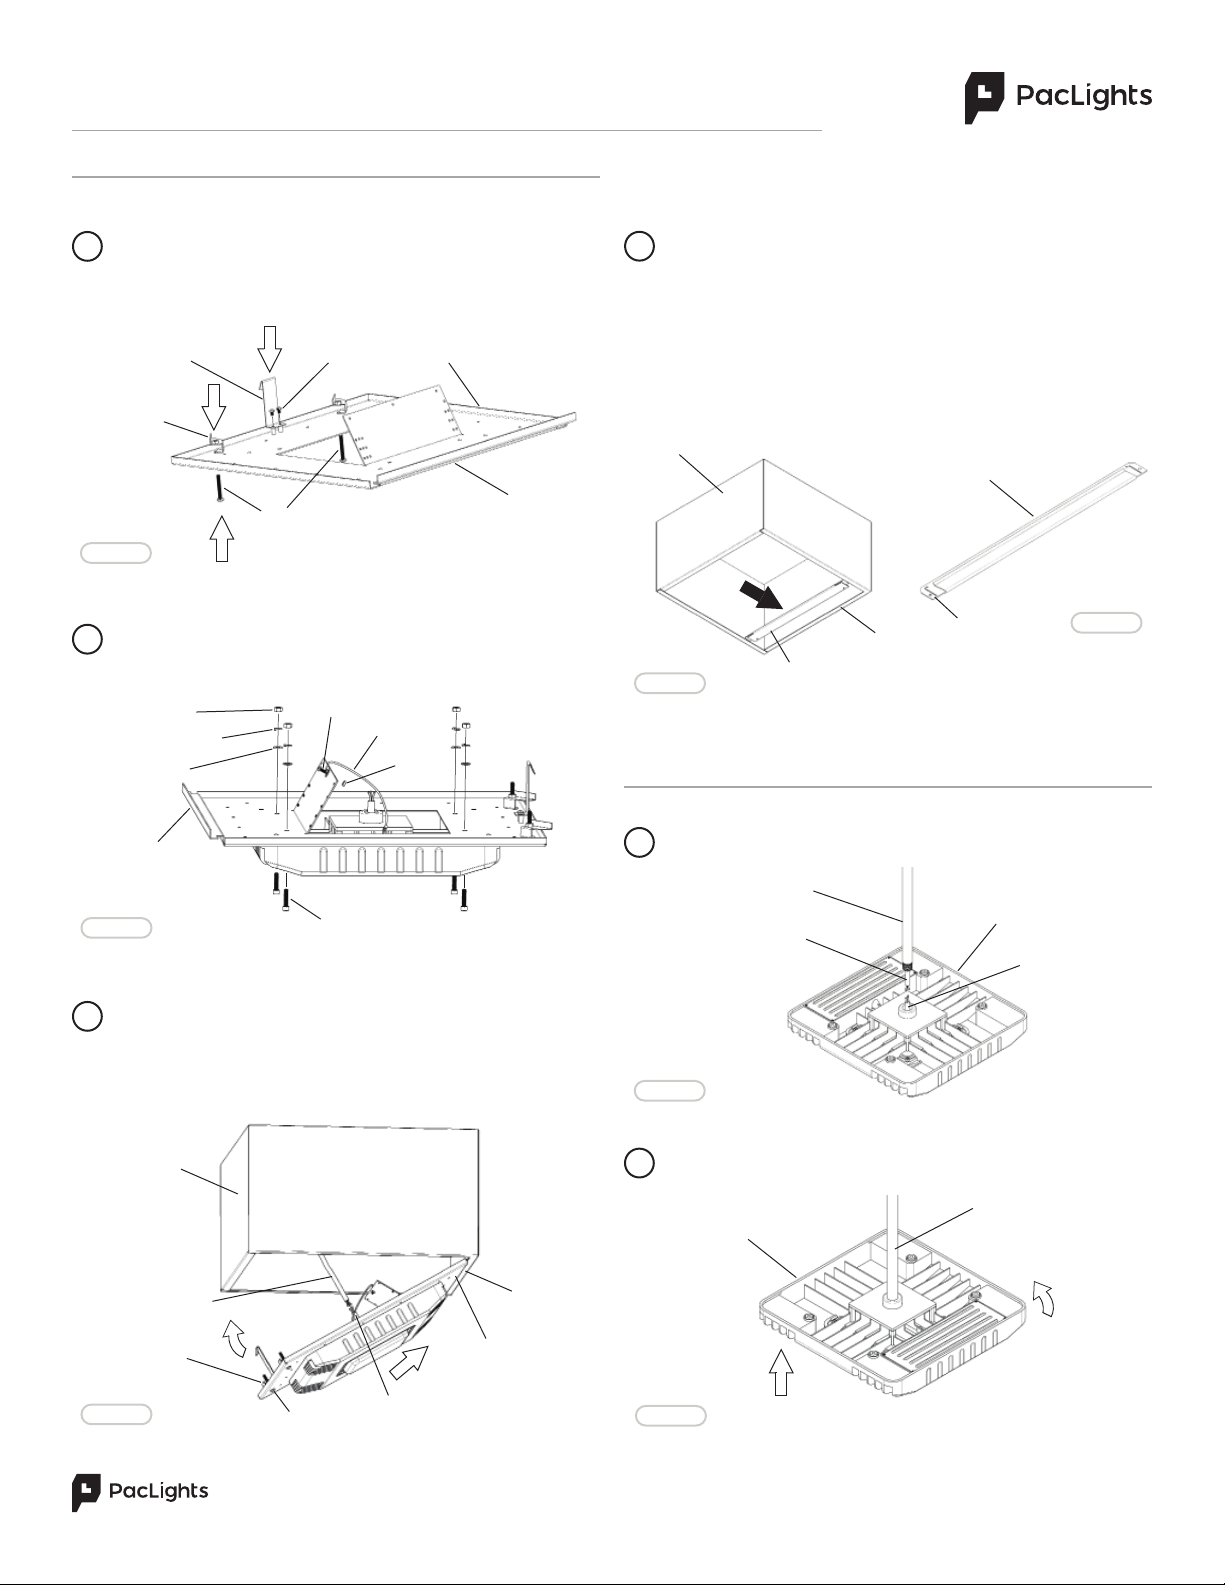
The Retrofit 2’ x 2’ Kit is available for all FCPC fixtures and includes
the Retrofit Plate, Safety Catch, Support Tabs, and fasteners (Fig. 4).
The original housing of the fixture can be used. Power o and detach
all related wiring. Remove the old luminaire, lens, reflector, and ballast
prior to intallation.
FCPC RETROFIT 2’ x 2’ CANOPY KIT
FCPC 3/4” NPT PENDANT MOUNT
The Pendant Mount is available for all FCPC fixtures. Properly
attach the wiring based on the Wiring Diagram (Fig. 9).
WASHER
FIG. 9
1
FIG. 5
FIG. 6
FLANGE
1
LOCK WASHER
Attach the Power Supply Cable wires to the FCPC fixture Cable
wires. Insert FCPC fixture with Retrofit Plate Hinge End onto
Housing Flange and rotate up into place (Fig. 6). Rotate the Support
Tabs to rest on the Housing Flange on the opposite side and tighten
the Support Tab Screws until Support Tabs pull the Retrofit Plate tight
against the Housing.
3
Fasten the FCPC fixture to the Retrofit Plate with Cap Screws,
Washers, Lock Washers, and Nuts (4). Fasten the Safety Lanyard
with a Screw and Nut to the Retrofit Plate and a Screw (Screw to
fixture included with fixture) to the FCPC fixture (Fig. 5).
2
FIG. 4
The FCPC fixture can now be screwed into the 3/4” NPT Conduit
(Fig. 10).
2
CONDUIT
FCPC FIXTURE
FIG. 10
POWER SUPPLY
CABLE FCPC FIXTURE
CABLE
CONDUIT
FCPC FIXTURE
FCPC RETROFIT
PLATE
SAFETY
CATCH
SUPPORT
TAB
NUT
CAP SCREW
LANYARD
SCREW
NUT
SCREW
SCREW
21” SQUARE
CANOPY
HOUSING
POWER SUPPLY
CABLE
FCPC FIXTURE
CABLE
SUPPORT
TAB
For larger Canopy Housings, Flange Adapter Brackets (Two Short
and Two Long) are provided. Install the Brackets onto the Housing
Flanges with a rubber mallet (Fig. 7). If the Canopy Housing is 21
3/4” Square use One Short Flange Bracket and One Long Flange
Bracket to form a right angle at one corner of the Housing. If the
Canopy Housing is 23” Square use Two Short Flange Brackets
opposite to each other and Two Long Flange Brackets opposite to
each other. Note: For the Long Flange Brackets, with pliers, the tab
ends can be snapped o at the slots (Fig. 8).
4
HINGE END
HINGE END
FIG. 7
21 3/4” or 23” SQUARE
CANOPY HOUSING
SMALL FLANGE
BRACKET
FLANGE
SCREW
TAB END
LARGE FLANGE
BRACKET
FIG. 8
HINGE END

This manual suits for next models

3

Other PacLights Lighting Equipment manuals

PacLights FSLN Series User manual

PacLights

PacLights FSLN Series User manual

PacLights FSTA/2 Series User manual

PacLights

PacLights FSTA/2 Series User manual

PacLights FPTA Series User manual

PacLights

PacLights FPTA Series User manual

PacLights FFHL Series User manual

PacLights

PacLights FFHL Series User manual

PacLights FALC Series User manual

PacLights

PacLights FALC Series User manual

PacLights FPTA/2 - 055/075 User manual

PacLights

PacLights FPTA/2 - 055/075 User manual

PacLights FFHS/3 Series User manual

PacLights

PacLights FFHS/3 Series User manual

PacLights FPNN Series User manual

PacLights

PacLights FPNN Series User manual

Popular Lighting Equipment manuals by other brands

MJ LED LIGHTNING MJ-2400-2IN1 user manual

MJ LED LIGHTNING

MJ LED LIGHTNING MJ-2400-2IN1 user manual

Ferplast EXPLORALIGHT Series user manual

Ferplast

Ferplast EXPLORALIGHT Series user manual

Chauvet COLORtube user manual

Chauvet

Chauvet COLORtube user manual

NOMA 252-3415-6 instruction manual

NOMA

NOMA 252-3415-6 instruction manual

Clevertronics Nifty Lifelight Surface Mount Installation & maintenance instructions

Clevertronics

Clevertronics Nifty Lifelight Surface Mount Installation & maintenance instructions

Testrite Visual XSD Series manual

Testrite Visual

Testrite Visual XSD Series manual

Luxibel B Panel240CW user manual

Luxibel

Luxibel B Panel240CW user manual

Fulton Hogan ESTOP Operation & service manual

Fulton Hogan

Fulton Hogan ESTOP Operation & service manual

TIME LED Stellar 769591 Installation and operating instructions

TIME LED

TIME LED Stellar 769591 Installation and operating instructions

Angler RLB18LED instructions

Angler

Angler RLB18LED instructions

FLOS ZEPPELIN 1 F9800009 Assembly

FLOS

FLOS ZEPPELIN 1 F9800009 Assembly

STELLAPRO reflex 800-0381 user manual

STELLAPRO

STELLAPRO reflex 800-0381 user manual

SunSynk ENTREE Installation & operating instructions

SunSynk

SunSynk ENTREE Installation & operating instructions

Tamlite STADIA XL Installation & operating instructions

Tamlite

Tamlite STADIA XL Installation & operating instructions

Ecco EW4009 Installation and operation instruction

Ecco

Ecco EW4009 Installation and operation instruction

Ovation SPACE MINI FRESNEL 50T user manual

Ovation

Ovation SPACE MINI FRESNEL 50T user manual

DORIC Connectorized LED Series user manual

DORIC

DORIC Connectorized LED Series user manual

Beta 1838SW Operation manual and instructions

Beta

Beta 1838SW Operation manual and instructions

manuals.online logo
manuals.online logoBrands
  • About & Mission
  • Contact us
  • Privacy Policy
  • Terms and Conditions

Copyright 2025 Manuals.Online. All Rights Reserved.