manuals.online logo
Brands
  1. Home
  2. •
  3. Brands
  4. •
  5. PacLights
  6. •
  7. Lighting Equipment
  8. •
  9. PacLights FPNN Series User manual

PacLights FPNN Series User manual

INSTALLATION GUIDE FPNN Series LED Flat Panel
Instructions and specifications are subject to change at any time without notice. Copyright© 2022 PacLights All Rights Reserved Page 1 of 3
Need help? (800) 988 -6386 Email: CS@PacLights.com Website: www.PacLights.com
PL_INST_FPNN_v0
A FPNN fixture can be de-commissioned from any Network Zone
manually by ‘long pressing’ for 5 seconds the ‘Reset’ Button that is located
on the Bluetooth Driver inside the FPNN fixture Panel. Lift the fixture
Panel Cover (Fig. 3). The ‘Reset’ Button is located at the end of the
Bluetooth Driver between the Wire Connectors (Fig. 4).
IMPORTANT
READ CAREFULLY BEFORE INSTALLING FIXTURE. RETAIN THESE INSTRUCTIONS FOR FUTURE REFERENCE.
PacLights fixtures must be wired in accordance with the National Electrical Code and all applicable local codes. Proper grounding is required for safety.
THIS PRODUCT MUST BE INSTALLED IN ACCORDANCE WITH THE APPLICABLE INSTALLATION CODE BY A PERSON FAMILIAR
WITH THE CONSTRUCTION AND OPERATION OF THE PRODUCT AND THE HAZARDS INVOLVED.
WARNINGS:
• Make certain power is OFF before installing or maintaining fixture. No user serviceable parts inside.
• To prevent wiring damage or abrasion, do not expose wiring to edges of sharp objects.
CAUTION:
• For proper weatherproof function all gaskets must be seated properly and all screws inserted and tightened firmly. Apply weatherproof silicone
sealant around the edge of the Back Box and/or Junction Box. This is especially important with an uneven wall surface. Silicone all plugs and
unused conduit entries.
FIG. 1 FIG. 2
FPNN - 22D30 FPNN - 24D50 FPNN - 14D30
Connect the ACL and the ACN from the FPNN Fixture to the conduit with the AC power Supply Cable. Follow the Wiring Diagram provided.
AC POWER SUPPLY
FPNN DRIVER
HOT [BLACK]
NEUTRAL [WHITE]
GROUND [GREEN]
WIRING DIAGRAM
INPUT
FPNN FIXTURE
FIG. 3
RESET / DECOMMISSION
PIR/DAYLIGHT SENSOR (OPTIONAL)
All models of FPNN are Bluetooth Network Conrol enabled. Remove
the Sensor Cover (Fig. 1). Install the PIR Sensor to the FPNN fixture by
attaching the Connector to the PIR Sensor and press into place on the
FPNN fixture (Fig. 2).
FIG. 4
SENSOR COVER
CONNECTOR
CONNECTORS
FPNN FIXTURE
‘RESET’
BUTTON
DRIVER
PANEL
COVER FPNN FIXTURE
PIR SENSOR
INSTALLATION GUIDE FPNN Series LED Flat Panel
Instructions and specifications are subject to change at any time without notice. Copyright© 2022 PacLights All Rights Reserved Page 2 of 3
Need help? (800) 988 -6386 Email: CS@PacLights.com Website: www.PacLights.com
PL_INST_FPNN_v0
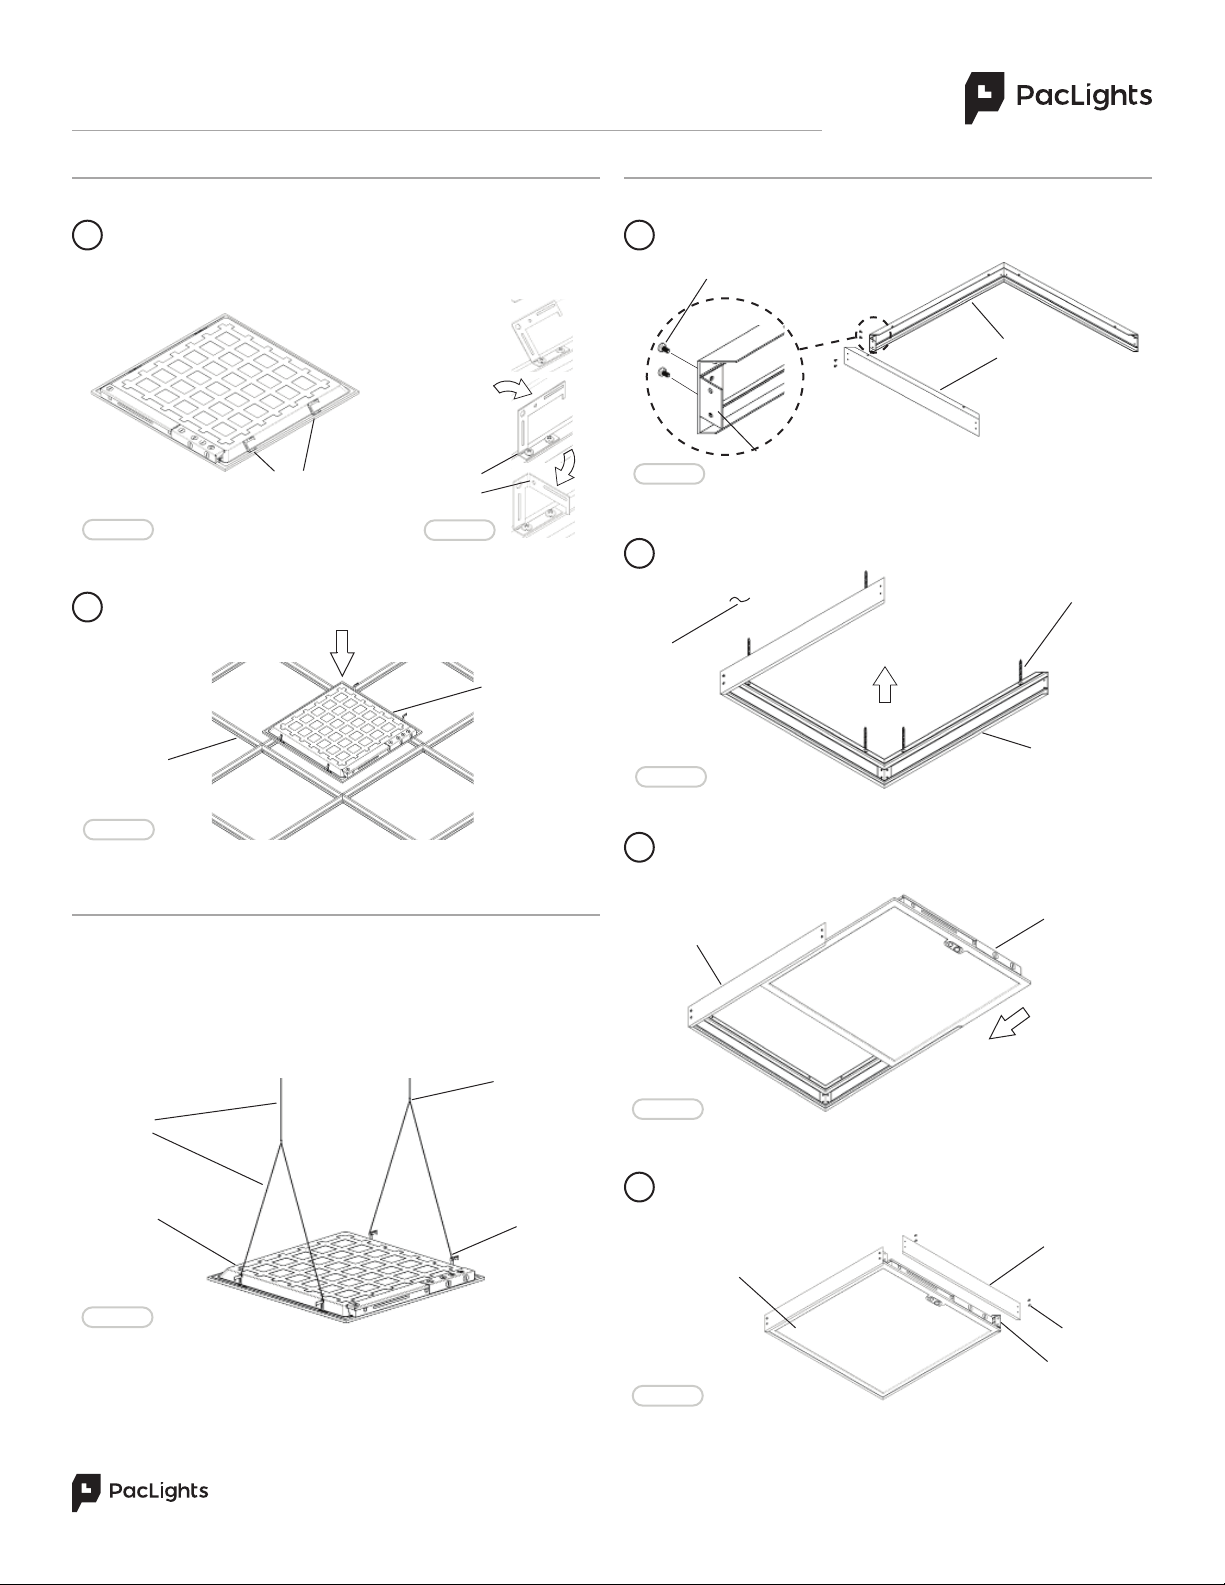
The Mounting Clips (4) are located at the sides of the FPNN fixture
(Fig. 4). Use Pliers to bend the Mounting Clips at the appropriate
bending points. First bend up at the base, then carefully bend out to
90°at the top of the Clip (Fig. 5) (For safety wear work gloves).
1
FPNN MOUNTING ONTO T-GRID
MOUNTING
CLIPS
BEND
POINTS
Insert the FPNN fixture onto the T-Grid (Fig. 6). The Mounting Clips
will set on top of the T-Grid.
2
OPTIONAL FPNN SURFACE MOUNT
FIG. 4
FIG. 6
Secure Safety Cable to Mounting Clip holes as needed to meet local
seismic requirements. Safety Cable and method of attachment to the
building provided by contractor according to local building codes. Use a
Safety Cable (hanger wire) to tie o appropriately (Screws and hanger wires
supplied by others) (Fig. 7).
SAFETY
CABLE
TIE OFF
FIG. 7
FIG. 5
FPNN
FIXTURE
1
FIG. 8
SCREWS
CHANNELS
Fasten the three Channels of the Surface Mount to the Ceiling
surface. Mounting Bolts/Screws not provided (Fig. 9).
2
Slide in the FPNN fixture through the open side of the Surface Mount
(Fig. 10). This is when all the wiring installations should be made as
well. Refer to the wiring diagram.
3
Start o by assembling three of the Channels together. Use Screws to
fasten the Angles to the corners of the Channel frame (Fig. 8).
FIG. 9
FIG. 10
Once the FPNN fixture is properly installed into the Surface Mount,
fasten the last two Angles and side Channel with Screws to completely
enclose the FPNN fixture (Fig. 11).
4
ANGLE
SURFACE
MOUNT
SURFACE
MOUNT
FPNN FIXTURE
FPNN FIXTURE
ANGLE
CHANNEL
FIG. 11
T-GRID
SCREWS
HASP
FPNN
FIXTURE
CEILING
SCREWS
OPTIONAL FPNN SUSPENDED MOUNT
INSTALLATION GUIDE FPNN Series LED Flat Panel
Instructions and specifications are subject to change at any time without notice. Copyright© 2022 PacLights All Rights Reserved Page 3 of 3
Need help? (800) 988 -6386 Email: CS@PacLights.com Website: www.PacLights.com
PL_INST_FPNN_v0
OPTIONAL DRYWALL RECESSED FLANGE
Start o by assembling the Recessed Flanges together by fastening
the Screws to the corners of the Recessed Flanges (Fig. 12).
1
2
SCREWS
RECESSED
FLANGE
Notch out the ceiling drywall surface. Insert the preassembled
Recessed Flange frame flush to the ceiling leaving the Flanged Side
underneath the ceiling. If the drywall ceiling is thin install Cables to
support the frame and the FPNN fixture. Cables are not included
with the Recessed Flange frame (Fig. 13).
FIG. 12
FLANGE SIDE
CABLES
FIG. 13
If the Drywall ceiling is at least 1” thick, then the Recessed Flange
Frame can be fastened from the sides.
See ‘cut-out’ below (Fig. 15).
Mounting screws are not included.
4
FIG. 15
FIG. 14
After the frame is properly installed into the ceiling, one can then
mount the FPNN fixture.
Carefully mount the FPNN fixture onto
the Recessed Flange and adjust any Aircraft Cables if necessary
(Fig 14). Please refer to wiring diagram for wire installation.
3
DRYWALL
SCREW
FPNN FIXTURE
FPNN FIXTURE
RECESSED
FLANGE
RECESSED
FLANGE
RECESSED
FLANGE
CABLES

This manual suits for next models

3

Other PacLights Lighting Equipment manuals

PacLights FSTA/2 Series User manual

PacLights

PacLights FSTA/2 Series User manual

PacLights FFHS/3 Series User manual

PacLights

PacLights FFHS/3 Series User manual

PacLights FALC Series User manual

PacLights

PacLights FALC Series User manual

PacLights FFHL Series User manual

PacLights

PacLights FFHL Series User manual

PacLights FCPC Series User manual

PacLights

PacLights FCPC Series User manual

PacLights FPTA Series User manual

PacLights

PacLights FPTA Series User manual

PacLights FPTA/2 - 055/075 User manual

PacLights

PacLights FPTA/2 - 055/075 User manual

PacLights FSLN Series User manual

PacLights

PacLights FSLN Series User manual

Popular Lighting Equipment manuals by other brands

DeWalt DCL079 instructions

DeWalt

DeWalt DCL079 instructions

Martin MAC 2000 Wash XB user manual

Martin

Martin MAC 2000 Wash XB user manual

GE LED Security Ligh user manual

GE

GE LED Security Ligh user manual

schmersal SLC 220 operating instructions

schmersal

schmersal SLC 220 operating instructions

Polaris UniCover installation instructions

Polaris

Polaris UniCover installation instructions

Lumineux Draycote installation instructions

Lumineux

Lumineux Draycote installation instructions

LIGMAN Mic 3 Installation and service manual

LIGMAN

LIGMAN Mic 3 Installation and service manual

Clas Ohlson WX-C-3VLED44-80WW-1 quick start guide

Clas Ohlson

Clas Ohlson WX-C-3VLED44-80WW-1 quick start guide

Derungs Dmed HX LED 7 Instructions for use

Derungs

Derungs Dmed HX LED 7 Instructions for use

Lightolier AGK specification

Lightolier

Lightolier AGK specification

Vision & Control DL30x60-R633/24V Instructions for use

Vision & Control

Vision & Control DL30x60-R633/24V Instructions for use

Ledj FS300 user manual

Ledj

Ledj FS300 user manual

BREE LIGHTING BR-FL10W-07 quick start guide

BREE LIGHTING

BREE LIGHTING BR-FL10W-07 quick start guide

Arturia Ura Assembly instructions

Arturia

Arturia Ura Assembly instructions

Vision & Control LDLF30x600-B470/UDC Instructions for use

Vision & Control

Vision & Control LDLF30x600-B470/UDC Instructions for use

Pelican 5020 LED instruction manual

Pelican

Pelican 5020 LED instruction manual

GAME OF BRICKS Nano Gauntlet 76223 instruction manual

GAME OF BRICKS

GAME OF BRICKS Nano Gauntlet 76223 instruction manual

Elation EVLED256 Video Wall quick start guide

Elation

Elation EVLED256 Video Wall quick start guide

manuals.online logo
manuals.online logoBrands
  • About & Mission
  • Contact us
  • Privacy Policy
  • Terms and Conditions

Copyright 2025 Manuals.Online. All Rights Reserved.