PAL EVENGLOW User manual

POOL AND SPA LIGHT
INSTALLATION MANUAL
FOR REPLACEMENT

2
CONTENTS
PAGE
2 Guides and Warnings
3 Nicheless Installation
6 Connecting Light
7 Connecting to driver
8 Troubleshooting
8 Terms and Conditions
GUIDES AND WARNINGS
Tools Required:
Phillips Head No. 2 Screw Driver
IMPORTANT INFORMATION:
DO NOT CONNECT THIS 12V LIGHT DIRECT TO A 120V CIRCUIT.
1) Ensure that the electrical system for your pool conforms with all the requirements of the National
Electrical Code (NEC) and all relevant local codes and ordinances.
2) This 12V Underwater Light must be installed in accordance with the National Electrical Code by
a Certified Electrician or a Qualified Pool Technician. NOTE: No Bonding Terminal is required on
the forming shell since the fixture is an all plastic construction and complies with NEC article 680
Requirements.
3) This Underwater light is designed for use with the PCR-4 AND PCR-2D UL Listed Class 2 LED Driver.
The Junction Box and the low voltage transformer is located at least 4 (four) inches (10.16 cm) above
ground level or eight (8) inches(20.3 cm) above maximum water level, whichever is higher. The Junction
Box must be at least 48 inches (1.22 m) from the edge of the pool.
To be certain that the pool or spa electrical system meets all applicable requirements, the electrician
should also consult the local building department.
CANADIAN INSTALLATION
Be sure the electrical system of your pool conforms with the following requirements of the Canadian
Electrical Code (CEC), CSA C22.1 and all local codes and ordinances. A licensed or certified electrician
must install the electrical system to meet or exceed those requirements before the light and (fixture-
housing) is installed. Failure to do so could result in death or serious injury to service technician, pool
users or others due to electrical shock.

POOL & SPA LIGHT
REPLACEMENT INSTALLATION
Replacing existing Large Pool Light
Pre-Installation Guidelines
Risk of Electrical Shock or Electrocution! This underwater light must be installed by a licensed or
certified electrician or a qualified pool professional in accordance with the NEC and all applicable local
codes and ordinances. Improper installation will create an electrical hazard which could result in death
or serious injury to pool users, installers or others due to electrical shock, and may also cause damage
to property. Always disconnect the power to the pool light at the circuit breaker before servicing the
light. Failure to do so could result in death or serious injury to service technician, pool users or others
due to electrical shock.
Please check that the pool and spa meets the requirements of the current NEC and all local codes and
ordinances. A licensed or certified electrician must install the electrical system to meet or exceed those
requirements before the underwater light is installed. Some of the requirements of the NEC which the
pool’s electrical system must meet are as follows:
• The lighting circuit has a Ground Fault Circuit Interrupter (GFCI) for line voltage models and has an
appropriately rated circuit breaker.
• The Junction Box (or for 12V models, the low voltage transformer) is located at least eight (8) inches
(20.3 cm) above ground level and at least 48 inches (1.219 m) from the edge of the pool.
• The light fixture and all metal items within five (5) feet (1.524 m) of the pool are properly electrically
bonded.
• The wet niche is properly electrically bonded and grounded via the No. 8 AWG ground connector
located at the rear of the niche.
• Make sure that the swimming pool’s electrical system meets all applicable requirements, the
electrician should also consult the local building department.
Install conduit to
power supply
15 3/4” (MAX)
3 3/4” (MIN)
7/8” (MAX)
1/2” (MIN)
5 1/2” (STANDARD)
4 3/4” (MIN)
Niche Depth
2 3/4” (MAX)
2” (MIN)
Pool Finish
Concrete Thickness
WATER LINE
Concrete reinforcing bars
Sealant
2” MIN
Concrete
coverage
SOIL
CONCRETE

Pool and Spa Installation Guidelines
The following instructions describe how to remove and install the new PAL Evenglow Pool and Spa
light.
Please check that the pool and spa meets the requirements of the current NEC and all local codes and
ordinances. A licensed or certified electrician must install the electrical system to meet or exceed those
requirements before the underwater light is installed. Failure to do so may cause Electric Shock and
damage to property.
1. WARNING! Switch off main electrical switch or circuit breaker and the switch which operates
the new Evenglow Pool and Spa light.
2. To remove current old light fixture assembly from the pool. Undo the pilot screw at top of
light and remove the light assembly from the niche and place it on top of the pool coping.
3. Cut the cord from back of light assembly.
4. Remove Junction Box cover, disconnect the light fixture wires and pull the cord through the
conduit. Make sure you have connected new light cable when pulling old existing cable through the
conduit.
5. Make sure you Leave at least four (4) feet of cable to coil inside Niche allowing for service
once pool is full of water.
6. Cut the cord at the Junction Box, leaving at least size (6) inches of cord to make
connections.
7. Strip outer cable jacket to expose the four copper conductors (+W, R, G, B) and be careful
not to damage the copper when doing so.
8. Connect the four light wires (+W, R, G, B) to the corresponding light circuit inside the driver.
9. For two wires; connect the Brown wire (+) and Blue wire (-) to either a 12V AC Transformer or
12V DC power supply.
10. Install the PAL Evenglow Large light assembly into the pool niche. Be sure to insert the hook
on the light into the SLOT on the lower part of the niche.
11. Insert mounting screw into top of light and secure to thread in Niche. Do not overtighten
screw.
12. Use only the provided mounting screw with this Evenglow light. This mounting screw
electrically grounds the stainless steel dress ring to the bonded niche. Failure to use the screw provided
could create an electrical hazard which could result in death or serious injury to pool users, installers or
others due to electrical shock.
13. Finally switch on the main switch or circuit breaker to the system, and the switch that operates the
Evenglow underwater light itself. The light should illuminate when power is applied. If not recheck the
installation steps starting with Step 1.
Screw
Hook

5
CONNECTING TO DRIVER
PAL COLOR TOUCH DRIVER
The PAL-EGM/EGL is powered by the PAL PCR-4 Class 2 LED Driver or PCR-2D that is controlled with
the PCT-1 Wireless transmitter.
Refer to PCR-4 or PCR-2D for Detailed Installation Instructions.
PCR-4 Driver
50 watts (PCR-4U-CL)
PCT-1 Transmitter
NOTE:
• Must turn off power before making DIP switch selection.
• When synching PAL lights to other OEM lights, static colors will match but color change mode
timing may vary.
• If the PAL Lights are to be used with Automation, do not use the handheld remote control and
disconnect the Wi-Fi module from the board if so equipped.
• If the Automation does not turn the PAL lights on or off and there is power to the driver, press the
S1 button one time to turn on the PAL Driver.
• Note that the PAL features of infinite color selection and dimmability are not available while in
Cloned mode.
PCR-2D Driver
16 watt version (PCR-2D-16)
35 watt version (PCR-2D-35)
55 watt version (PCR-2D-60)
DIP 1 DIP 2 CLONING DIP SWITCH
SETTING
OFF ON JANDY
OFF OFF PENTAIR
ON OFF HAYWARD
ON ON PAL
1/2” PVC
Conduit
Adaptor
1/2” PVC
Conduit
Refer to PCT-1 information
sheet for full operation details
& features
Cloning Feature

TROUBLESHOOTING
Model: 4 Wire Evenglow Light
ISSUE REASON ACTION
Light not turning on (1) Faulty Globe. Replace Globe.
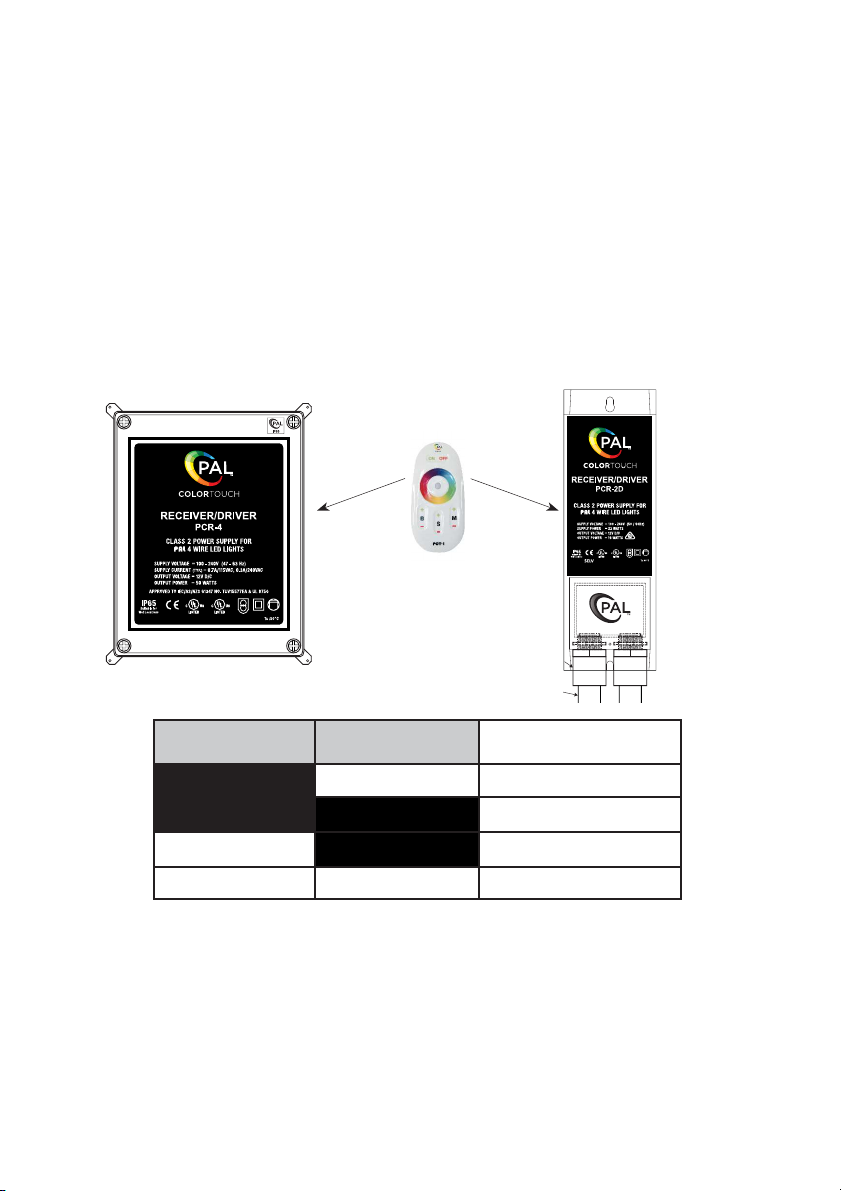
Light not turning on (2) Faulty Driver. Check Driver output under load using a
multimeter. 12volts DC.
Light not turning on (3) Cut Cable. Check the voltage at light using a
multimeter.
Light not turning on (4) Driver not connected
to GPO or switched
on.
Check Driver is connected to power,
check power indicator LED is lit on your
Driver. If still no indicator light, send
back to PAL for repair.
Light not turning on (5) Faulty LED Driver
inside control box.
Push the test button inside control box,
if lights still doesn’t turn on then send
product back to PAL.
Lights out of sync (1) Light incorrectly
wired to control box.
Check color wire sequences connecting
to control box.
Lights out of sync (2) Lights incorrectly
wired to LED lamp.
Check color sequences to LED lamp
terminal block inside the light.
TERMS AND CONDITIONS
PAL PRODUCT WARRANTY DETAILS
The PAL product is guaranteed against defects in materials and/or workmanship, under normal
domestic use for (12) twelve months.
Except as otherwise provided for by law, this guarantee becomes invalid if in the opinion of the
Company the product has been misused, abused, damaged in transit, incorrectly installed, or
connected to an electrical supply not corresponding with the products specification or a non-approved
PAL power supply.
The Company is not responsible for forwarding freight charges or losses in transit.
If any part of the product proves to be defective within the warranty period, the defective part will be
repaired or replaced, free of charge and at the discretion of Bellson Electric.
Bellson Electric shall not be liable for any loss of profits or any consequential, indirect or special loss,
damage or injury of any kind whatsoever arising directly or indirectly from Bellson Electric products.
This limitation does not apply to any liability under the Australian or New Zealand consumer legislation.
PLEASE REGISTER YOUR PRODUCT WARRANTY DETAILS ONLINE AT:
www.bellson.com.au/register.htm
OR You MUST retain some proof of purchase to provide evidence of the DATE of the original purchase.
This manual suits for next models
1
Table of contents
Other PAL Swimming Pool Lighting manuals