manuals.online logo
Brands
  1. Home
  2. •
  3. Brands
  4. •
  5. PaloAlto Networks
  6. •
  7. Network Hardware
  8. •
  9. PaloAlto Networks PA-7500 User manual

PaloAlto Networks PA-7500 User manual

PA-7500
docs.paloaltonetworks.com
1
2Install the Firewall in an Equipment Rack
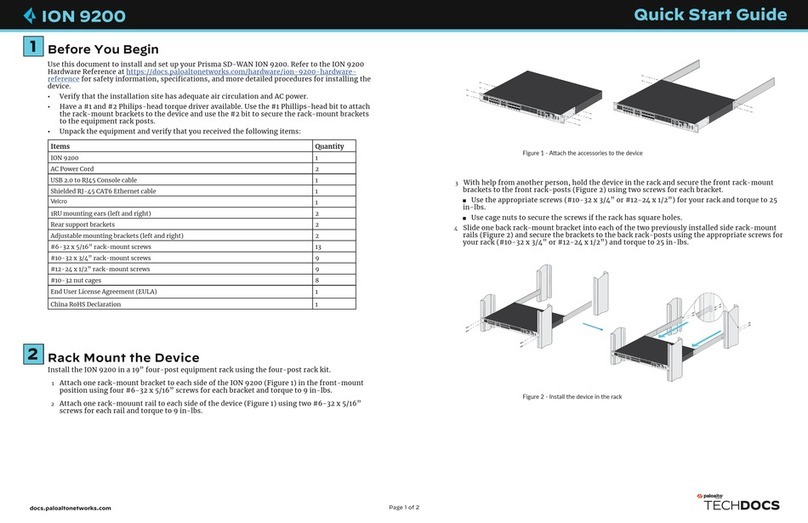
The PA-7500 firewall ships with a rack mount kit for installation in a four-post 19” rack.
1 Refer to Figure 1 to identify the two different mounting bracket types. Slide the adjustable mounting bracket into the “J” shaped lip on
the top edge of the fixed mounting bracket. See Figure 2. Repeat for the second fixed mounting bracket.
Before You Begin
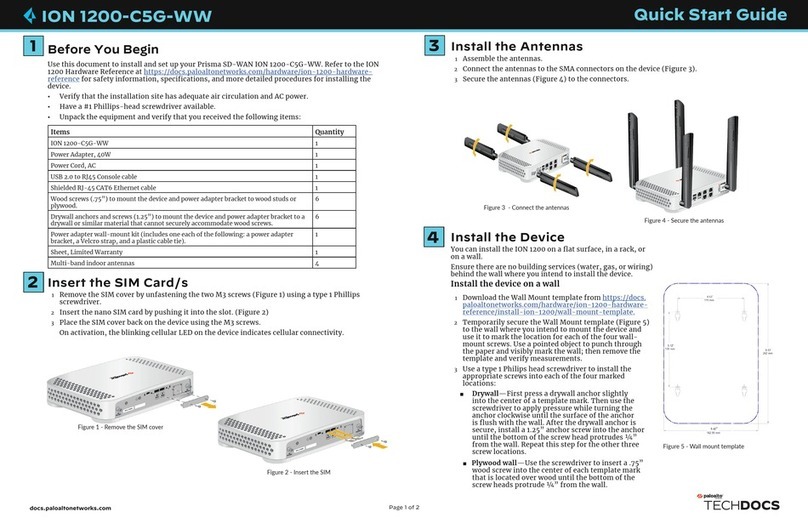
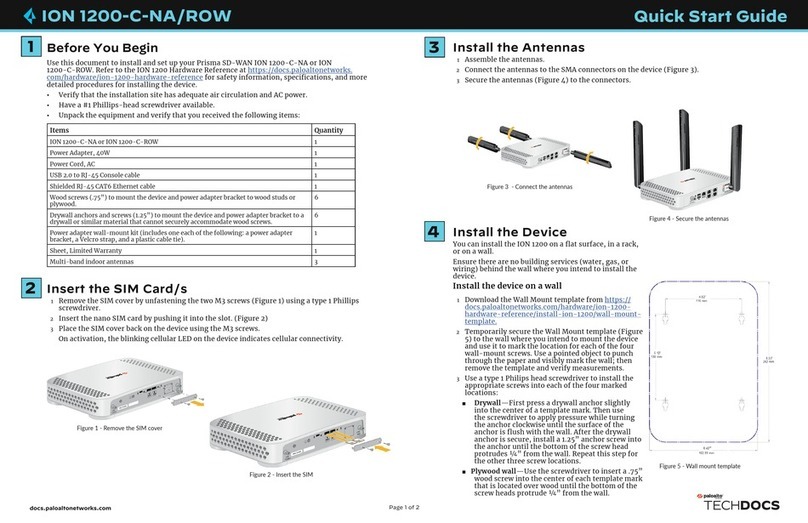
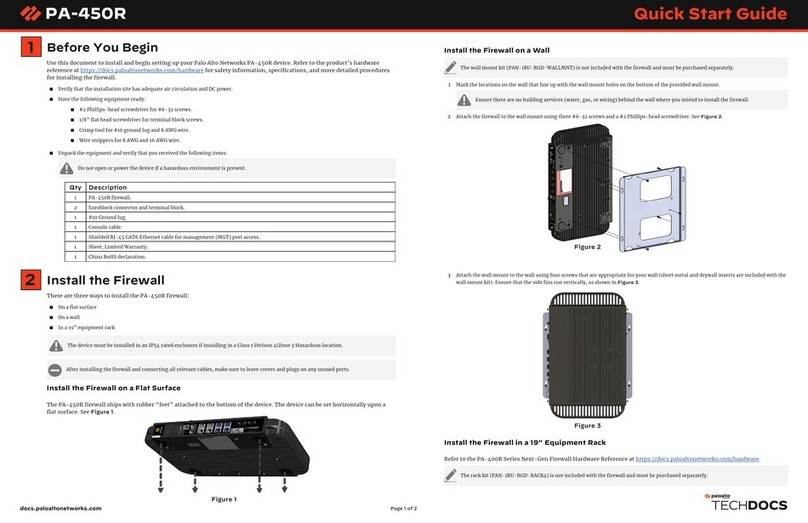
Use this document to install and begin setting up your Palo Alto Networks PA-7500 firewall. Refer to the PA-7500 Series Next-
Gen Firewall Hardware Reference at https://docs.paloaltonetworks.com/hardware for safety information, specifications, and
more detailed procedures for installing the firewall.
◼To ensure safety, two or more people should work together to install the PA-7500 firewall into the rack, preferably using a mechanical
equipment lift.
◼Verify that the installation site has adequate air circulation and AC or DC power.
◼Wear the provided ESD strap when installing components or servicing the PA-7500 firewall.
◼Unpack the equipment and verify that you received the following items:
2 Position the bottom edges of the fixed and adjustable brackets to the bottom of the 14 RU rack space reserved for the PA-7500. Align the
slotted holes of the fixed mounting bracket to the holes on the front side of the equipment frame being used. Similarly, align the slotted
holes in the adjustable mounting bracket to the holes on the rear side of the equipment frame.
3 Adjust the brackets to fit the depth of the equipment frame, then secure the brackets to the equipment frame with mounting screws (not
provided) compatible with your equipment frame. Tighten the screws to their recommended torque value.
4 Use the provided 6-32 x 5/16” flathead screws to secure the adjustable bracket to the fixed bracket as shown in Figure 3. A minimum of six
screws are required for each side.
5 Repeat Steps 1 through 4 for the mid and top mount brackets. See Figure 4.
6 Slide the PA-7500 on the brackets that were previously mounted to the equipment frame until the front mounting flanges of the PA-7500
are flush against the mounting surface of the equipment frame. See Figure 5.
Page 1 of 3
Quick Start Guide
Figure 1 Figure 2
Figure 3
Figure 4
Figure 6
Qty Part
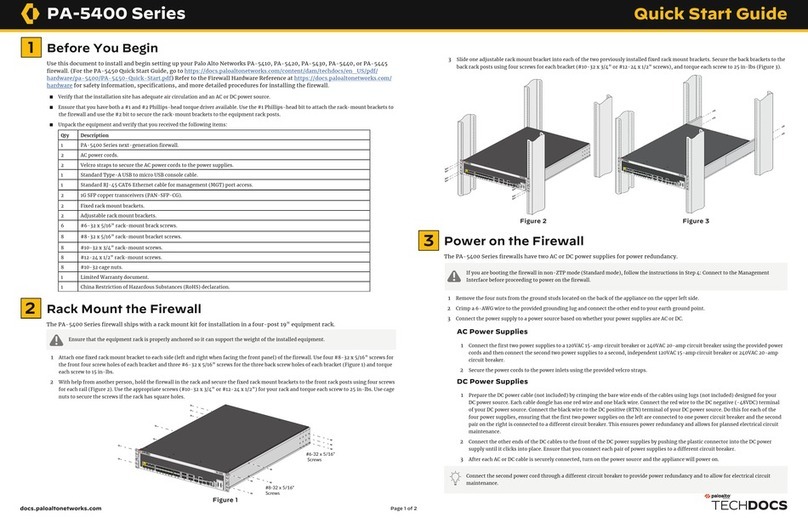
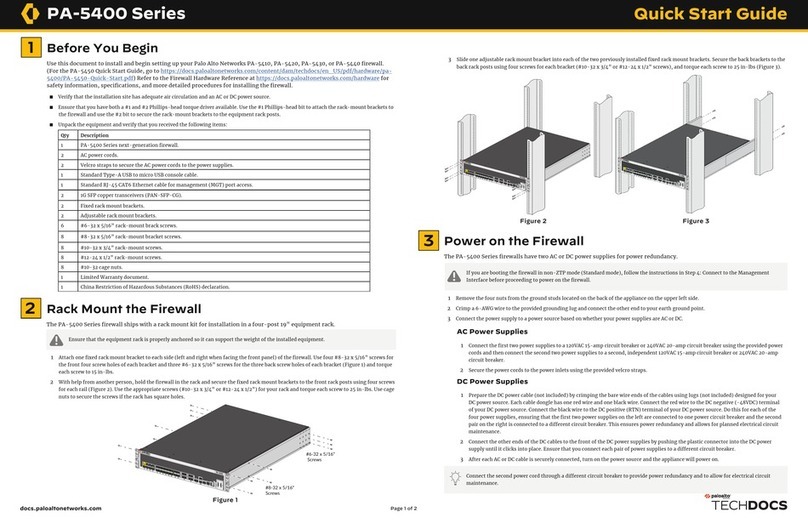
1PA-7500 Next-Generation Firewall.
1ESD wrist strap.
1Standard RJ-45 CAT6 Ethernet cable for management (MGT) port access.
1DB9 to RJ-45 CAT5 Ethernet cable.
4AC or DC power cord.
2Fixed Mounting Bracket (1 Left & 1 Right).
6Adjustable Mounting Bracket (3 Left & 3 Right).
4Fixed Rear Mount.
40 #6-32 x 5/16” Phillips Flathead Screw.
4M4 x 8mmL Screw.
1End User License Agreement (EULA).
1Limited Warranty document.
1China Restriction of Hazardous Substances (RoHS) declaration.
Figure 5

docs.paloaltonetworks.com
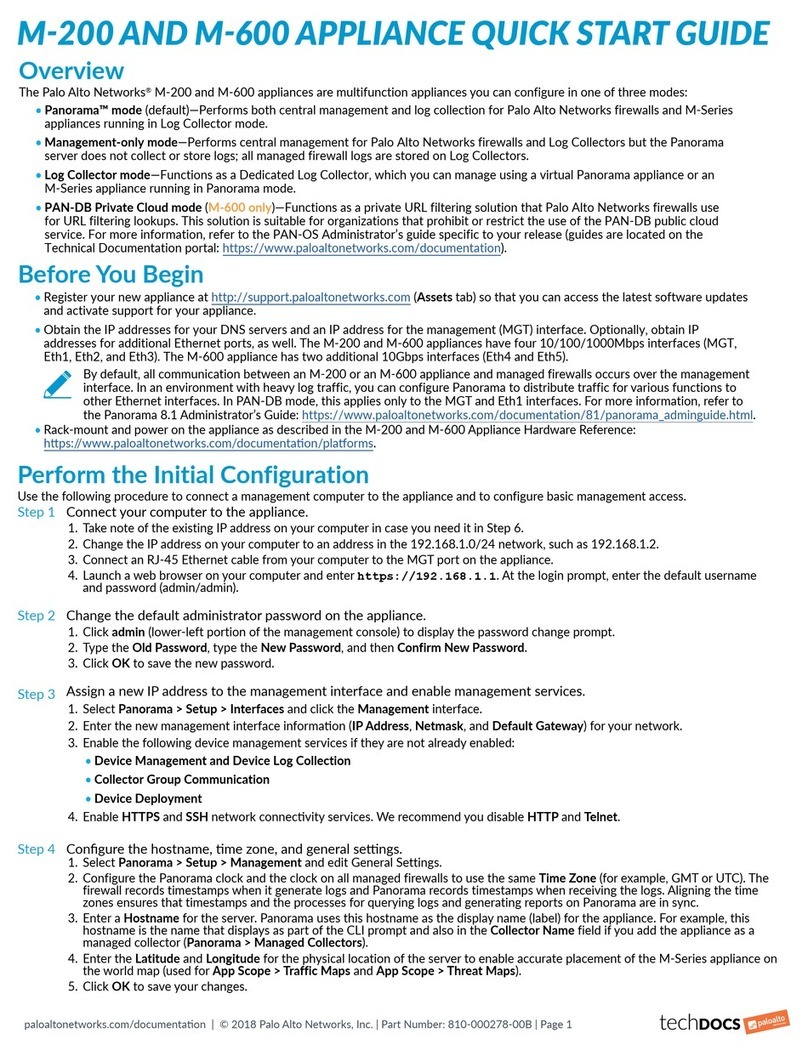
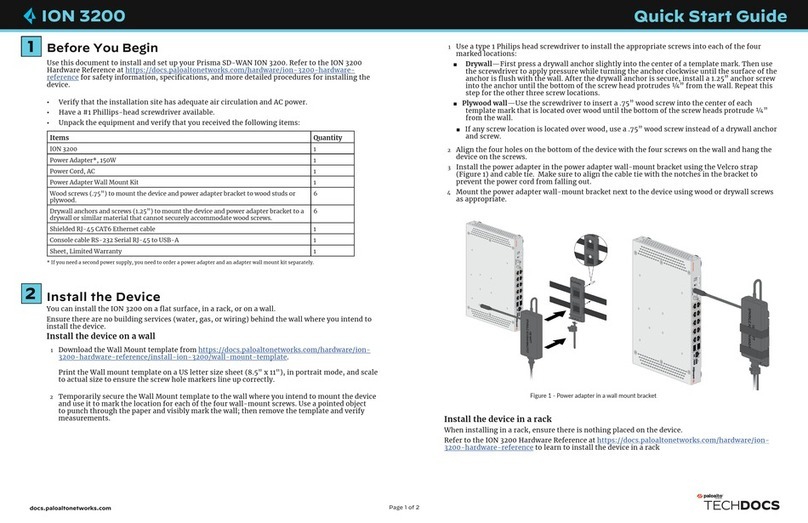
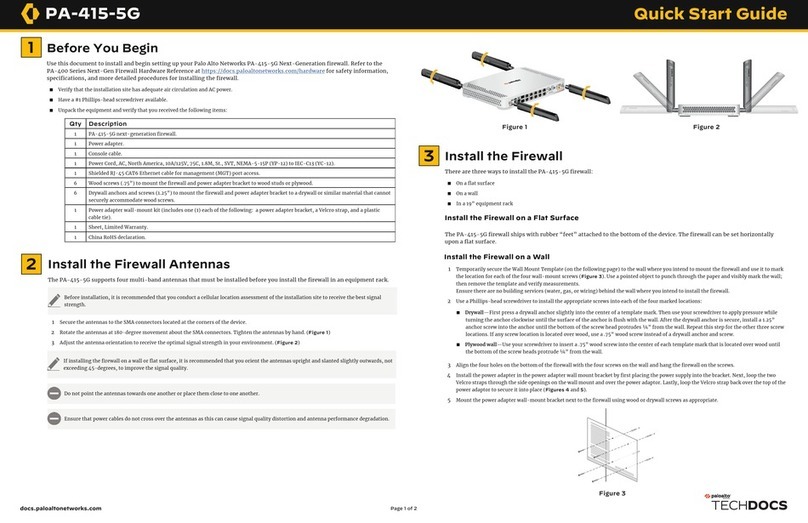
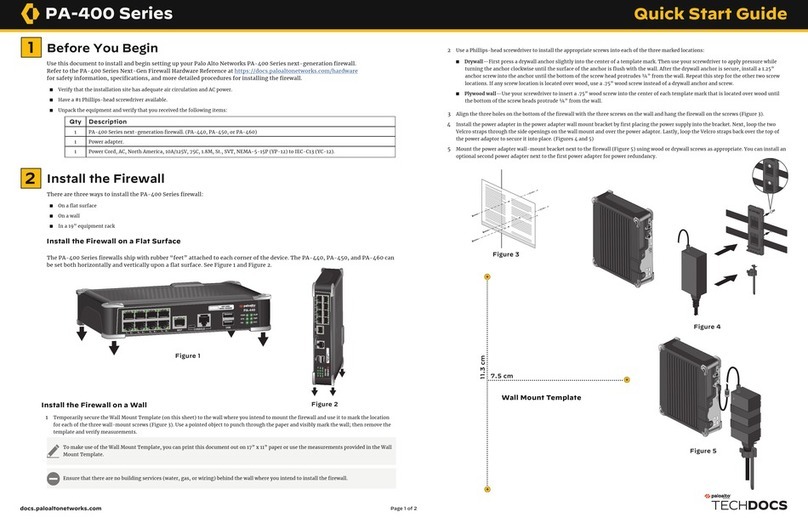
3Install the Interface Cards
The Management Processing Card (MPC), Network Processing Card (NPC), and Data Processing Card (DPC) are installed on the
front panel of the chassis. The process to install each of these interface cards is the same. Up to two Switch Fabric Cards (SFC)
can be installed on the back of the chassis.
Page 2 of 3
1 Attach the provided ESD strap to your wrist and plug the other end in to the ESD port located on the back of the appliance.
2 Remove the card from the antistatic bag. Push the left and right ejector tabs towards each other to allow the ejector levers to rotate into an open
position. See Figure 8. Gently push the card until it reaches the end of the slot. As shown in Figure 9, push on both ejector handles until they
lock the card into place.
Install the front slot cards:
The front slots are numbered from top to bottom. The MPC must be installed in slot 5, while the NPCs and DPCs can be installed in slots 1-4
and 6-9.
Figure 9
Figure 8
7 Secure the PA-7500 to the front of the equipment frame using screws (not provided) compatible with your equipment frame. See Figure 6.
8 Use eight #6-32 x 5/16” screws to secure the rear side of the PA-7500 to the previously mounted brackets. See Figure 7.
Figure 7
3 Install a blank panel into each unused front card slot to help the appliance maintain system air flow.
Install the back slot cards:
1 Attach the provided ESD strap to your wrist and plug the other end in to the ESD port located on the back of the appliance.
2 Remove the card from the antistatic bag. Pull the ejector tabs away from the center and rotate the handles outwards. See Figure 10. Gently
push the interface card into the appropriate slot until the card reaches the end of the slot. As shown in Figure 11, close the ejector handles to
ensure that the card is secure in place.
3 Install a blank panel into each unused back card slot to help the appliance maintain system air flow.
Figure 10 Figure 11
4Connect Power to the Firewall
1 Verify that your power source is powered off.
2 (If connecting the firewall in ZTP mode) Complete Connect in ZTP Mode in Step 5 before proceeding.
3 Attach the provided ESD strap to your wrist and plug the other end in to the ESD port located on the back of the appliance.
4 Remove the four nuts from the ground studs located on the back of the appliance. See Figure 12.
Figure 12

docs.paloaltonetworks.com
5
(Optional) If you are not able to connect to the management web interface, you can check the status of the firewall by connecting
to the console port using the DB-9 to RJ-45 serial cable (provided) and terminal emulation software. The console connection
provides access to firewall boot messages, maintenance mode, and the command line interface (CLI).
Page 3 of 3
Where To Go Next
To learn more about the firewall, refer to the PA-7500 Series Next-Gen Firewall Hardware Reference Guide:
https://docs.paloaltonetworks.com/hardware.
To learn how to configure Palo Alto Networks firewalls, go to the Technical Documentation portal:
https://docs.paloaltonetworks.com.
(Use the Getting Started information in the PAN-OS Administrator’s Guide for initial configuration tasks.)
Start here to Register and Set Up your firewall and access all resources and support tools:
https://go.paloaltonetworks.com/CustomerLaunchPad
Connect in ZTP Mode
1 Unbox the firewall.
2 Connect the ZTP port (Ethernet port 1) on the firewall to the broadband connection.
3 Power on the firewall.
4 Follow the instructions provided by your Panorama administrator to register your ZTP firewall. You will have to enter the serial number
(12-digit number identified as S/N) and claim key (8-digit number). These numbers are on stickers attached to the back of the device.
5 Contact your Panorama administrator if you require further assistance.
Connect to the Management Interface
Connect in Standard Mode
1 Connect the standard RJ-45 Ethernet cable from the RJ-45 port on your computer to the
MGT port on the firewall.
2 Ensure that you have access to a terminal emulator such as PuTTY.
3 Power on the firewall.
4 Access the firewall CLI using your terminal emulator. Watch for the following prompt:
Do you want to exit ZTP mode and configure your firewall in standard mode (yes/no)[no]?
Enter “yes.” The system will then ask you to confirm. Enter “yes” again to boot the firewall in standard mode
5 Stand by as the firewall boots up.
6 Change the IP address on your computer to an address in the 192.168.1.0/24 network, such as 192.168.1.2.
7 From a web browser, go to https://192.168.1.1.
8 When prompted, log in to the web interface using the default username and password (admin/admin).
If you miss the above CLI prompt, you can also change your boot mode using the web interface. Go to the firewall login screen
at any point before or during the startup process. A prompt will ask if you wish to continue booting in ZTP mode or if you
would like to switch to standard mode. Select Standard Mode and the firewall will begin rebooting in standard mode.
◼If installing AC power supplies — Connect the power supply to a 120VAC 15-amp circuit breaker or 240VAC 20-amp
circuit breaker using the provided power cords. Repeat this step for each additional power supply, ensuring that each
pair of power supplies is connected to its own circuit breaker. This ensures power redundancy and allows for planned
electrical circuit maintenance. See Figure 13.
◼If installing DC power supplies — Prepare the DC power cable (not included) by crimping the bare wire ends of the
cables using lugs (not included) designed for your DC power source. Each cable dongle has one red wire and one black
wire. Connect the red wire to the DC negative (-48VDC) terminal of your DC power source. Connect the black wire to the
DC positive (RTN) terminal of your DC power source. Do this for each of the power supplies you are installing, ensuring
that each pair of power supplies is connected to its own power circuit breaker. This ensures power redundancy and
allows for planned electrical circuit maintenance. See Figure 14. Connect the other ends of the DC cables to the front of
the DC power supplies by pushing the plastic connector into the DC power supply until it clicks into place.
Figure 13 Figure 14
5 Crimp a 6-AWG wire to the provided grounding lug and connect the other end to your earth ground point.
6 Connect the two-post lug connector to the two-post ground studs on the appliance using the provided nuts and torque each nut to 50 in-lbs. Be
careful not to strip the nuts and lug studs.
7 Connect the power supplies:
8 Install blanks into any unused power supply slots to help maintain chassis air flow. See Figure 15.
9 Turn on the power source and the firewall will power on.
Figure 15

Other manuals for PA-7500

1

Other PaloAlto Networks Network Hardware manuals

PaloAlto Networks ION 1200-C-5G-WW User manual

PaloAlto Networks

PaloAlto Networks ION 1200-C-5G-WW User manual

PaloAlto Networks ION 9200 Application guide

PaloAlto Networks

PaloAlto Networks ION 9200 Application guide

PaloAlto Networks ION 1000 Application guide

PaloAlto Networks

PaloAlto Networks ION 1000 Application guide

PaloAlto Networks PA-5420 User manual

PaloAlto Networks

PaloAlto Networks PA-5420 User manual

PaloAlto Networks M-200 User manual

PaloAlto Networks

PaloAlto Networks M-200 User manual

PaloAlto Networks PA-400R Series Application guide

PaloAlto Networks

PaloAlto Networks PA-400R Series Application guide

PaloAlto Networks PA-400 Series User manual

PaloAlto Networks

PaloAlto Networks PA-400 Series User manual

PaloAlto Networks PA-455 User manual

PaloAlto Networks

PaloAlto Networks PA-455 User manual

PaloAlto Networks TECHDOCS ION 1200 User manual

PaloAlto Networks

PaloAlto Networks TECHDOCS ION 1200 User manual

PaloAlto Networks PA-5400 Series User manual

PaloAlto Networks

PaloAlto Networks PA-5400 Series User manual

PaloAlto Networks WF-500-B Application guide

PaloAlto Networks

PaloAlto Networks WF-500-B Application guide

PaloAlto Networks M-500 User manual

PaloAlto Networks

PaloAlto Networks M-500 User manual

PaloAlto Networks ION 1200-C-NA/ROW User manual

PaloAlto Networks

PaloAlto Networks ION 1200-C-NA/ROW User manual

PaloAlto Networks ION 3200 Application guide

PaloAlto Networks

PaloAlto Networks ION 3200 Application guide

PaloAlto Networks PA-400 Series User manual

PaloAlto Networks

PaloAlto Networks PA-400 Series User manual

PaloAlto Networks ION 9200 User manual

PaloAlto Networks

PaloAlto Networks ION 9200 User manual

PaloAlto Networks M-200 Application guide

PaloAlto Networks

PaloAlto Networks M-200 Application guide

PaloAlto Networks PA-5400 Series User manual

PaloAlto Networks

PaloAlto Networks PA-5400 Series User manual

PaloAlto Networks PA-7500 Application guide

PaloAlto Networks

PaloAlto Networks PA-7500 Application guide

PaloAlto Networks ION 5200 Application guide

PaloAlto Networks

PaloAlto Networks ION 5200 Application guide

PaloAlto Networks ION 1200-S Application guide

PaloAlto Networks

PaloAlto Networks ION 1200-S Application guide

PaloAlto Networks PA-450R User manual

PaloAlto Networks

PaloAlto Networks PA-450R User manual

PaloAlto Networks PA-400 Series Application guide

PaloAlto Networks

PaloAlto Networks PA-400 Series Application guide

PaloAlto Networks ION 3200 User manual

PaloAlto Networks

PaloAlto Networks ION 3200 User manual

Popular Network Hardware manuals by other brands

ABB iPAQ user manual

ABB

ABB iPAQ user manual

Honeywell Embedded NVR Quick connection guide

Honeywell

Honeywell Embedded NVR Quick connection guide

Dahua DHI-NVR4216-4KS2 quick start guide

Dahua

Dahua DHI-NVR4216-4KS2 quick start guide

Brickcom NR-1000 Series user manual

Brickcom

Brickcom NR-1000 Series user manual

Interlogix TruVision NVR 20 user manual

Interlogix

Interlogix TruVision NVR 20 user manual

netsys NVF-200LS/R user manual

netsys

netsys NVF-200LS/R user manual

Valcom VIP-824A quick start guide

Valcom

Valcom VIP-824A quick start guide

RSA Authentication Manager 8.2 Getting started

RSA

RSA Authentication Manager 8.2 Getting started

evertz 7700 Series manual

evertz

evertz 7700 Series manual

Garland EdgeLens INT10G8LR56 user guide

Garland

Garland EdgeLens INT10G8LR56 user guide

Lantronix XPress DR+ user guide

Lantronix

Lantronix XPress DR+ user guide

Samsung SRN-4000 user manual

Samsung

Samsung SRN-4000 user manual

Eiki LC-X71 owner's manual

Eiki

Eiki LC-X71 owner's manual

Asoni NVR65 Series user manual

Asoni

Asoni NVR65 Series user manual

Precision Digital Corporation PDW30 instruction manual

Precision Digital Corporation

Precision Digital Corporation PDW30 instruction manual

TRENDnet TEG-S4M1FGL supplementary guide

TRENDnet

TRENDnet TEG-S4M1FGL supplementary guide

Matrix Switch Corporation MSC-HD161AAL product manual

Matrix Switch Corporation

Matrix Switch Corporation MSC-HD161AAL product manual

FieldServer Data Aire (DAP) FS-8704-49 Driver manual

FieldServer

FieldServer Data Aire (DAP) FS-8704-49 Driver manual

manuals.online logo
manuals.online logoBrands
  • About & Mission
  • Contact us
  • Privacy Policy
  • Terms and Conditions

Copyright 2025 Manuals.Online. All Rights Reserved.