manuals.online logo
Brands
  1. Home
  2. •
  3. Brands
  4. •
  5. Palram
  6. •
  7. Greenhouse Kit
  8. •
  9. Palram Hybrid' x10'6 Nature User manual

Palram Hybrid' x10'6 Nature User manual

310x185x209cm / 122"x72¾"x82¼"
Assembly Instructions
Nature 6'x10' Hybrid
Instructions de montage
Email: [email protected]om I www.palramapplications.com
IMPORTANT
Please read these instructions carefully before you start to assemble this greenhouse.
Keep these instructions in a safe place for future reference.
a Customer Service
For assistance with assembly or for replacement parts – please log onto our website
or call our service line (number is on the title page).
www.palramapplications.com
Additional information can be found at our website: www.palramapplications.com
a Safety Advice
•It is of utmost importance to assemble all of the parts according to the directions.
Do not skip any step.
•We strongly recommend using work gloves during assembly.
•Always wear shoes and safety goggles when working with extruded aluminium.
•If using a step ladder or power tools ensure that you follow the manufacturer’s safety
advice.
•Do not touch overhead power cables with the aluminium proles.
•Do not attempt to assemble the greenhouse in windy or wet conditions.
•Dispose of all plastic bags safely keep them out of reach of small children.
•Keep children away from the assembly area.
•Do not lean against or push the greenhouse during construction.
•Do not position your greenhouse in an area exposed to excessive wind.
•Do not attempt to assemble this greenhouse if you are tired, have taken drugs or
alcohol or if you are prone to dizzy spell.
•Hot items such as recently used grills, blowtorches etc. must not be stored in the
greenhouse. Ensure there are no hidden pipes or cables in the ground before
inserting the pegs.
•This product is designed to use as greenhouse only.
a Care & Maintenance
When your greenhouse needs to be cleaned, use a mild detergent solution and rinse with
cold clean water. DO NOT use acetone, abrasive cleaners or other special detergents to
clean the clear panels. It is recommended to check periodically that
roof panels caps (plastic part 329 & prole 981) are set in place.
a Tools & Equipment
•Tape measure
•Work gloves
•Lubricant
•Phillips head screwdriver
•Step ladder
•Drill bit
a Before Assembly
This is a multi-part assembly best achieved
by two people. Allow at least half a day for
assembly process.
Selecting a site - the greenhouse must be ,
positioned and xed on a at level surface.
Choose a sunny position away from
overhanging trees.
We are strongly recomend to x your
greenhouse directly to a solid concrete
foundation. When doing that use the pre
drilled holes in the metal base supplied.
Take out all components parts of the
packages. Sort the parts and check against the
contents parts list.
During assembly parts should be laid out close
at hand. Keep all small parts (screws etc.) in a
bowl so they do not get lost.
In purpose to facilitate parts’identication
and assembly process, all-positioned proles
are used in this greenhouse. As a result some
apertures in the proles are not
used during assembly.
a During Assembly
Carry out the assembly steps in the order set
out in the instructions.
Step 1: Make sure the base is square by
measuring the diagonals and level by
using a spirit level.
Step 4: Part A994, A995 are in the back of
the greenhouse. Fixing them determines the
front side of the greenhouse.
Steps 7, 10, 13: The oval hole in the
crossbars A256 should always be assembled
to the base of the greenhouse.
Door assembly (Steps 8, 44 - 50)
Door can be installed as a left hand door
or right hand door to your decision.
Theseinstructions show a right hand door
assembly.
Step 8: determines door direction
door post 987 is where door hinges
will be located.
Steps 44-50: Door assembly should be
done according to this decision.
Steps 31-32: Decide on the window’s
location before assembly. Window can be
installed in one of the indicated options.
Step 51: If a left door is assembled, door
stopper parts should be connected to the
front left handed corner of the base and not
to the corner that is shown in the illustration
Step 52: Firmly connect the greenhouse
to a level nal position immediately after
completion of the assembly.
Screws 411 and nuts 412 are used
thruoghout the assembly process.
lScrews 411 are to be assembled from the
outside and nuts 412 from the inside
of the greenhouse.
lDo not fasten screws and nuts (411 &
412) more than 2-3 turns only. Do not
tighten them until completion of the panels’
assembly, if not specied otherwise.
lHowever, in some steps, temporary
tightening of a few screws may be needed
to prevent a prole from falling till it will
be fully connected in the next steps.
•Large hammer
•Spanner
•T001 - Special tool for Screws 411 and nuts 412
EN
IMPORTANT !
Veuillez lire attentivement ces instructions avant de commencer à monter votre serre.
Conservez ces instructions en lieu sûr pour toute consultation ultérieure.
a Service clientèle
Pour toute assistance concernant le montage de la serre ou ses pièces de rechange –
veuillez consulter notre site Internet ou appeler notre service technique (dont le numéro
de téléphone gure sur la couverture de la brochure).
www.palramapplications.com
Pour en savoir plus, n’hésitez pas à visiter notre site Internet :
www.palramapplications.com
a Consignes de sécurité
•Très important ! Veuillez suivre scrupuleusement les instructions de cette brochure
et réaliser les étapes dans l’ordre énoncé.
• Nous recommandons vivement le port de gants de protection pendant le montage.
• Portez toujours des chaussures de travail et des lunettes de protectrion lorsque vous
travaillez des pièces en aluminium extrudé.
• Lors de l’utilisation d’une échelle ou d’outils électriques, assurez-vous de bien suivre les
consignes de sécurité du fabricant.
• Veillez à ne pas toucher de câbles aériens avec les prolés en aluminium.
• N’essayez pas de monter la serre s’il y a du vent ou s’il fait humide.
• Jetez tous les sacs en plastique en appliquant les règles de sécurité et maintenez-les
hors de portée des jeunes enfants.
• Eloignez les enfants de la zone d’assemblage.
•
Ne vous appuyez pas contre la serre et ne la poussez pas pendant le montage.
•
Ne positionnez pas la serre dans un endroit trop exposé au vent.
•
N’essayez pas de monter la serre si vous êtes fatigué, si vous êtes sous l’eet de drogues,
de médicaments ou d’alcool ou encore si vous êtes sujet aux vertiges.
• Les objets chauds tels qu’un barbecue, un chalumeau ou autre article ayant été
récemment utilisés, ne doivent pas être rangés dans la serre.
• Avant de planter les piquets, assurez-vous qu’aucun tuyau ni câble n’est enterré à
l’endroit sélectionné pour l’installation.
• Ce produit est conçu pour servir de serre exclusivement.
a Entretien & Maintenance
Pour nettoyer votre serre, utilisez une solution détergente douce et à rincez à l’eau claire et
froide. NE PAS utiliser d’acétone ni de produits nettoyants ou autres détergents spéciaux pour
nettoyer les panneaux clairs. Il est recommandé de vérier régulièrement que les couvre-
joints des panneaux du toit sont bien en place (pièces en plastique 329 & prolé 981).
a Avant le montage
EIl s’agit d’un assemblage à pièces multiples
qu’il est préférable de réaliser à deux personnes
et auquel il fait consacrer au moins une demi-
journée.
Sélection du site – la serre doit être montée et
xée sur une surface plane.
Choisissez un emplacement ensoleillé et éloigné
d’éventuels arbres susceptibles de la surplomber.
Nous recommandons vivement de xer la serre
directement à de solides fondations en béton.
Pour ce faire, utilisez les trous déjà percés dans le
châssis métallique fourni.
Sortez toutes les pièces de leurs emballages.
Triez-les et comparez-les avec la liste des pièces
pour vériez que tout y est.
Lors de l’assemblage, les pièces doivent être
disposées à portée de main. Gardez toutes les
petites pièces (vis, etc.) dans un récipient pour
éviter de les perdre.
a Pendant le montage
Procédez au montage étape par étape,
en respectant l’ordre énoncé dans cette
brochure.
Etape 1 :
Assurez-vous que le châssis est bien carré en
mesurant les diagonales, et vériez sa mise à
niveau à l’aide d’un niveau à bulle.
Etape 4 :
les pièces A994, A995 sont à l’arrière de la
serre. Le fait de les xer détermine également
la position de la façade de la serre.
Etapes 7, 10, 13 :
L’ouverture ovale des barres transversales
A256 doit toujours être placé du côté du
châssis de la serre.
Montage de la porte (Etape 8, 44-50) :
La porte peut être installée avec la poignée à
gauche ou à droite à votre convenance. Ces
instructions sont basées sur une installation
avec la poignée à droite.
Etape 8 :
Déterminez l’orientation de la porte
Le montant de porte 987 est celui sur lequel
seront xées les charnières.
Etapes 44-50 :
Le montage de la porte doit être réalisé
selon la décision prise à ce stade.
Etapes 31-32 :
Choisissez l’emplacement de la fenêtre avant
le montage, parmi les options indiquées.
Etape 51 :
Si vous décidez de monter la porte avec la
poignée à gauche, l’arrêt de porte doit alors
être xé au coin avant gauche de la base et
non au coin indiqué sur l’illustration.
Etape 52 :
Immédiatement après avoir terminé
l’assemblage, xez solidement la serre en
position nale, parfaitement horizontale.
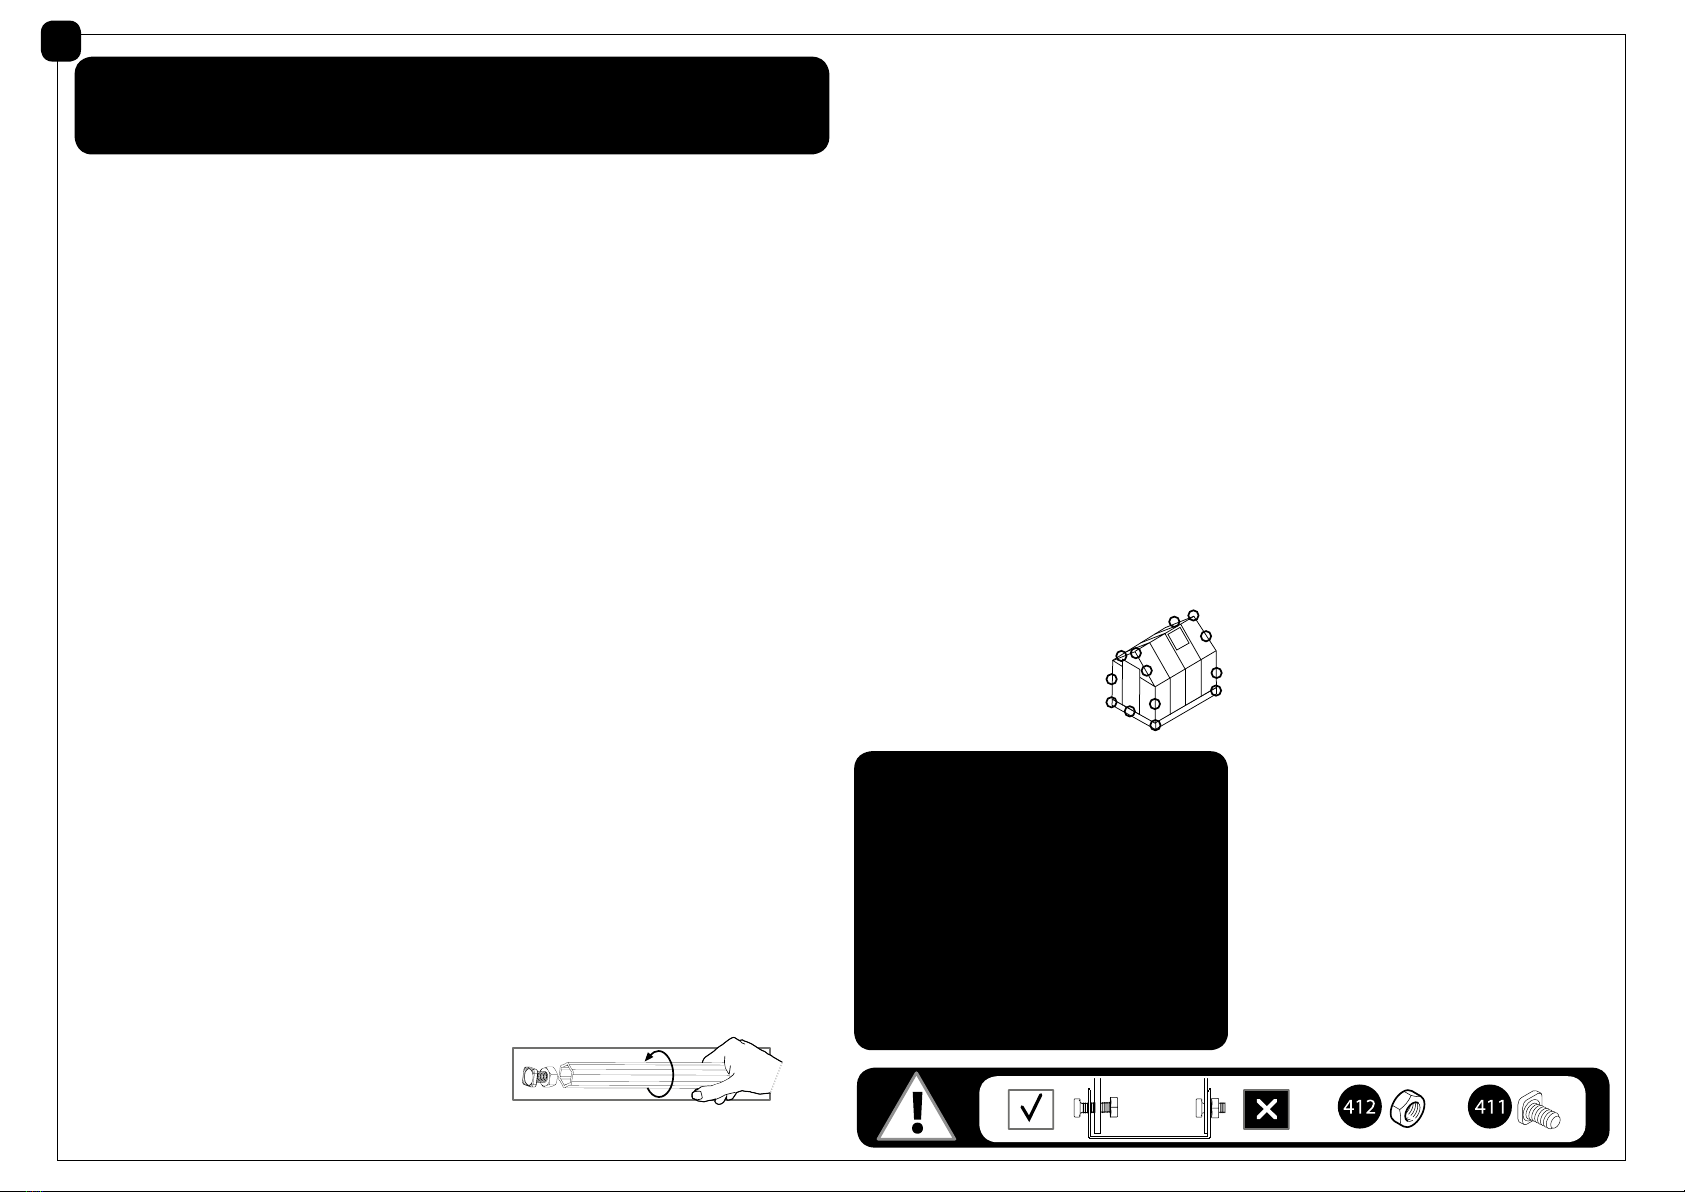
Les vis 411 et écrous 412 servent tout au long
de la procédure.
lLes vis 411 se placent à l’extérieur et les
écrous 412 à l’intérieur de la serre.
lNe serrez les vis et écrous (411 & 412) que de
2 à 3 tours, pas plus. Ne les serrez pas tant que
l’assemblage n’est pas complètement terminé,
sauf indication contraire.
lCependant, la réalisation de certaines
étapes peut nécessiter le serrage provisoire
de quelques vis pour empêcher un prolé de
tomber en attendant qu’il soit entièrement
intégré à l’ensemble de la structure dans les
étapes suivantes.
FR
a Outils & Equipement
•Mètre (ruban)
• Gants de travail
• Lubriant
• Tournevis cruciforme (Philips)
• Escabeau
• Perceuse
• Grand marteau
• Clé à écrous
• T001 – outil spécial pour vis 411 et écrous 412
Pour faciliter l’identication
des pièces et la procédure de
montage, les prolés utilisés
pour la construction de cette
serre sont tous déjà en place.
En conséquence, certaines
ouvertures des prolés restent
inutilisées pendant le montage.
Contents
Item Inc./cm Qty. Item Inc./cm Qty.
962 861/4 / 219 2
963 1141/4 / 290 2
287 70 / 178 1
974 1173/4 / 299 2
994 67 / 170 1
995 67 / 170 1
988 65 / 165 1
987 65 / 165 1
985 64 / 163 2
975 1173/4 / 299 1
Contents
Item Inc./cm Qty. Item Qty. Item Qty.
Inc./cm Item Qty.
Inc./cm
586
2
990
22 / 56
1
981
22 / 56
10
286
24
/ 61
2
984
211/2
/ 55
2
999
22 / 56
5
992
223/4
/ 58
2
989
24
1
/
4
/ 61.5
1
991
24
1
/
4
/ 61.5
1
983
18
1
/
2
/ 47
1
256 503/4 / 129 8
993 46 / 117 16
996 46 / 117 8
986
24
3
/
4
/ 63
1
3017 223/4 / 53 2
3016 64 / 163 1
570
1
550
15
553
1
567
2
559
2
560
2
581
9
Contents
Item Qty. Item Qty. Item Qty. Item Qty. Item Qty.
447 9
M96 4
4008 9
288 3
342 1
spare 1
spare 1
328 31
spare 1
411 10 112
412 112
spare 4
spare 4
T001 1
7009
(1 spare )
3
22
99 1
22 2
465 9
463 2
462 2
464 4
28 1
29 1
329 8
343 2
344L 2
344R 2
318 PVC 20
345 1
413 1
4037 1
425 1
4016 1
422 9
412 1
spare 1
spare 1
spare 1
4043 9
spare 1
01234
b
a
ba =
310
cm/
122

b
a
310
cm/
122

185
cm /
723/4

185
cm /
723/4

1
x2
x4
x2
x4 x4
962
447
447
963
411 412
962
962
962
962
962
ab
x2
T001
963
963
963
963
2
x8
x8x4
996
411
412
996
996
996
996
996
412
411
T001
3
x12
x12
411
412
411412
!
412
411
4
x1
x1
994
995
994
995
aa
a
995
Door
Tür
Porte
Puerta
EN
GR
FR
SP
994 /
5
x1
x2
x2
287
411
412
411
411
412
412
287
411412
!
6
x1 x2
287
287
287
411
411
411
aa
bb
411412
!
b
aa
7
x2
x4
x2
411
412
256
256
256
a
a
411412
!
b
b
256
b
256
a
8
x1
x1
987
988
987
988
aa
987
987
or
988
a
/987
9
84cm
33
x3 x1
x1
345 411 412
345
345
b
b
a
411
411
988
10
x6
x8
x2
x2
411
412
256
286
286
286
411412
!
cc
b
b
aa
411
a
256
286
256
b
c
256 256
11
x8
993
993
a
a
a
a
a
a
aa
a
993
993
12
x4
411
411
993
411412
!
a
a
a
a
993
993
a
13
x4
x8
x4
411
412
256
256
411412
!
a
b
a
a
a
a
256
256
256
256
256
b
b
b
b

Other Palram Greenhouse Kit manuals

Palram Plant Inn Compact - Clear Glazing User manual

Palram

Palram Plant Inn Compact - Clear Glazing User manual

Palram Glory 8'x8' User manual

Palram

Palram Glory 8'x8' User manual

Palram Bella 8'x8'- TwinWall Glazing User manual

Palram

Palram Bella 8'x8'- TwinWall Glazing User manual

Palram Victory Orangery - Garden Chalet User manual

Palram

Palram Victory Orangery - Garden Chalet User manual

Palram CANOPIA MAJORCA Administrator Guide

Palram

Palram CANOPIA MAJORCA Administrator Guide

Palram Harmony Mythos Hybrid 6x4 User manual

Palram

Palram Harmony Mythos Hybrid 6x4 User manual

Palram Victory Orangery User manual

Palram

Palram Victory Orangery User manual

Palram Harmony 6x8 User manual

Palram

Palram Harmony 6x8 User manual

Palram CANOPIA SUNROOM VENT KIT Administrator Guide

Palram

Palram CANOPIA SUNROOM VENT KIT Administrator Guide

Palram Grow&Store - 6'x12' User manual

Palram

Palram Grow&Store - 6'x12' User manual

Palram Mythos 6x12 TwinWall Glazing User manual

Palram

Palram Mythos 6x12 TwinWall Glazing User manual

Palram Eco Grow User manual

Palram

Palram Eco Grow User manual

Palram CANOPIA MARTINIQUE 10x14/3x4.3 Administrator Guide

Palram

Palram CANOPIA MARTINIQUE 10x14/3x4.3 Administrator Guide

Palram Bella Series User manual

Palram

Palram Bella Series User manual

Palram Mythos User manual

Palram

Palram Mythos User manual

Palram Sun Room User manual

Palram

Palram Sun Room User manual

Palram Inter Line 6x4 User manual

Palram

Palram Inter Line 6x4 User manual

Palram Nature 6'x8' Hybrid Glazing User manual

Palram

Palram Nature 6'x8' Hybrid Glazing User manual

Palram Snap&Grow User manual

Palram

Palram Snap&Grow User manual

Palram CANOPIA SANREMO 3x3 Administrator Guide

Palram

Palram CANOPIA SANREMO 3x3 Administrator Guide

Palram Lean To User manual

Palram

Palram Lean To User manual

Palram Canopia SKYLIGHT 6x5 Administrator Guide

Palram

Palram Canopia SKYLIGHT 6x5 Administrator Guide

Palram Balance 8x12 User manual

Palram

Palram Balance 8x12 User manual

Palram Canopia Base Kit Administrator Guide

Palram

Palram Canopia Base Kit Administrator Guide

Popular Greenhouse Kit manuals by other brands

ClearSpan 104903 Assembly instructions

ClearSpan

ClearSpan 104903 Assembly instructions

Redpath Urban Series Instructions & Illustrations

Redpath

Redpath Urban Series Instructions & Illustrations

Robinsons 6' DWARF Lean-To Assembly instructions

Robinsons

Robinsons 6' DWARF Lean-To Assembly instructions

EXPOL ATLAS manual

EXPOL

EXPOL ATLAS manual

Robinsons Rosette Assembly instructions

Robinsons

Robinsons Rosette Assembly instructions

Gazebo penguin W1608-32 Assembly instructions

Gazebo penguin

Gazebo penguin W1608-32 Assembly instructions

Exaco VI23 Assembly instructions

Exaco

Exaco VI23 Assembly instructions

ACD R410 manual

ACD

ACD R410 manual

Outsunny 845-435 manual

Outsunny

Outsunny 845-435 manual

Vitavia VM0048-VS 6200 Assembly instructions

Vitavia

Vitavia VM0048-VS 6200 Assembly instructions

GrowSpan Gothic Premium 108185H manual

GrowSpan

GrowSpan Gothic Premium 108185H manual

Juliana Oase Assembly instruction

Juliana

Juliana Oase Assembly instruction

Mercia Garden Products 04DTSTRDAX0806HGS-V1 manual

Mercia Garden Products

Mercia Garden Products 04DTSTRDAX0806HGS-V1 manual

Juliana Oase Assembly instruction

Juliana

Juliana Oase Assembly instruction

Juliana Diamant 7,5 manual

Juliana

Juliana Diamant 7,5 manual

Bootstrap Farmer DIY High Tunnel Plans Assembly instructions

Bootstrap Farmer

Bootstrap Farmer DIY High Tunnel Plans Assembly instructions

Plantin SRBTSHARK Assembly instructions

Plantin

Plantin SRBTSHARK Assembly instructions

Riverstone Networks Thoreau Series Assembly manual

Riverstone Networks

Riverstone Networks Thoreau Series Assembly manual

manuals.online logo
manuals.online logoBrands
  • About & Mission
  • Contact us
  • Privacy Policy
  • Terms and Conditions

Copyright 2025 Manuals.Online. All Rights Reserved.