manuals.online logo
Brands
  1. Home
  2. •
  3. Brands
  4. •
  5. Palram
  6. •
  7. Greenhouse Kit
  8. •
  9. Palram Americana 12'x12' Hybrid Glazing User manual

Palram Americana 12'x12' Hybrid Glazing User manual

x2
16.02_English_Spanish_74498_RF_V4
Americana 12’x12’ - Hybrid Glazing
Approx. Dim.
365L x 365W x 263H cm / 143.7" L x 143.7"W x 103.5"H
www.palramapplications.com
After Sales Service:
E-Mail: customer.ser[email protected]
Toll Free: (877) 627-8476
Assembly Instructions
Instrucciones de Montaje
Wind Resistant
90km/hr
55ml/hr
Snow Load
15lbs/ft
75kg/m
IMPORTANT
Please read these instructions carefully before you start to assemble this greenhouse.
Keep these instructions in a safe place for future reference.
» Customer Service
For assistance with assembly or for replacement parts – please log onto our website
or call our service line (number is on the title page).
Additional information can be found at our website: www.palramapplications.com
» Safety Advice
•It is of utmost importance to assemble all of the parts according to the directions.
Do not skip any step.
•We strongly recommend using work gloves during assembly.
•Always wear shoes and safety goggles when working with extruded aluminium.
•If using a step ladder or power tools ensure that you follow the manufacturer’s safety advice.
•Do not touch overhead power cables with the aluminium profiles.
•Do not attempt to assemble the greenhouse in windy or wet conditions.
•Dispose of all plastic bags. Keep them out of reach of small children.
•Keep children away from the assembly area.
•Do not lean against or push the greenhouse during construction.
•Do not position your greenhouse in an area exposed to excessive wind.
•Do not attempt to assemble this greenhouse if you are tired, have taken drugs or
alcohol or if you are prone to dizzy spells.
•Hot items such as recently used grills, blowtorches etc. must not be stored in the
greenhouse. Ensure there are no hidden pipes or cables in the ground before
inserting the pegs.
•This product is designed to be used as a greenhouse only.
» Care & Maintenance
When your greenhouse needs to be cleaned, use a mild detergent solution and rinse with cold
clean water. DO NOT use acetone, abrasive cleaners or other special detergents to clean the
clear panels. It is recommended to check periodically that roof panels caps (plastic part 329 &
profile 981) are set in place.
 Tools & Equipment
•Work gloves
•Rubber mallet
•Phillips head screwdriver
•Adjustable Spanner / Wrench
•Leveler
•Tape measure
•Silicone spray / Lubricant
•Ladder
•T001 - Special tool for Screws 411 and nuts 412
•Screws 411 and nuts 412 are used throughout the assembly process.
•Screws 411 are to be assembled from the outside and nuts 412 from the inside of the
greenhouse.
•If not specified otherwise, do not fasten screws and nuts (411 & 412) more than 2-3 turns only.
Do not tighten them until completion of the panels’ assembly. These 2 icons indicate if screws’
tightening is required or not.
•However, in some steps, temporary tightening of a few screws may be needed to prevent a
profile from falling.
Step 52: Decide on the window’s location before assembly.
Window can be installed in one of the indicated options.
Step 85: In case the window is not closed properly,
please release the screws step 76a+b, adjust the profile
and tighten the screw.
Step 100: Make sure the cable is threaded in the hole
(#7329) and does not interfere with the opening the
window.
Step 101: Anchor the greenhouse to the ground by using
part #7331 for hard surface or part #7336 for soft surface.
Step 103: Stretch the cable by using part #7332
Important Recommendations
•Firmly connect the greenhouse to a level position
immediately after completion of the assembly.
•Anchoring the greenhouse can also be done by drilling
the base profiles and fastening it to the ground using
ground screws or spikes (screws and spikes are not
supplied).
•Tighten all screws once assembly is completed.
•Please note: Anchoring this product to the ground is
essential to its stability and rigidity.
It is required to complete this stage in order for your
warranty to be valid.
» Notes During Assembly
•You may use Silicon lubricant spray in order to help you
slide the panels into the profiles.
•Do not spray the Polycarbonate panels.
•Use a rubber mallet if necessary.
During assembly you will encounter the information
icon, please refer to the relevant assembly step for
additional comments and assistance.
» Before Assembly
Selecting a site:
- The greenhouse must be positioned
and fixed on a flat level surface.
- Choose a sunny position away from
overhanging trees.
We strongly recommend this
greenhouse being secured directly to a
solid concrete foundation. When doing
that use the pre drilled holes in the
metal base.
This is a multi-part assembly best
achieved by two people. Allow at least a
half a day for the assembly process.
Take all components & parts out of the
packages. Sort the parts and check
against the contents parts list.
Parts should be laid out close at hand.
Keep all small parts (screws etc.) in a
bowl so they do not get lost.
Please note multi-sided profiles are used
in this greenhouse. As a result some
holes in the profiles are not used during
assembly.
Please review entire instructions before
starting. Carry out the assembly steps in
exact order.
15.04_RF_V4
EN
» Notas durante el montaje
•
Puede utilizar spray lubricante de silicona para
ayudarle a deslizar los paneles en los perles.
•
No aplique spray sobre los paneles de policarbonato.
•
Utilice un mazo de goma si es necesario.
Durante el montaje encontrará el icono de
información, por favor reérase a la etapa de
montaje correspondiente para comentarios
adicionales y asistencia.
Paso 52: Decida sobre la localización de la ventana
antes del montaje. La ventana puede ser instalada en
una de las opciones indicadas.
Paso 85: En caso de que la ventana no se cierra
correctamente, (76a+b) aoje los tornillos, ajustar el
perl y apretar el tornillo.
Paso 100: Asegúrese de que el cable se enrosca en el
agujero (#7329) y no interere con la apertura de la
ventana
Paso 101: Fije el invernadero al suelo mediante el uso
de la pieza #7331 para supercie dura o pieza #7336
para supercies blandas
Paso 103: Estire el cable mediante el uso de pieza
#7332
Recomendaciones importantes
•
Ajuste rmemente el invernadero en una posición
nivelada inmediatamente después de completar su
montaje.
•
También se puede anclar el invernadero
taladrando los perles de la base y asegurándolos
al suelo utilizando tornillos para suelo
(tornillos no incluidos).
•
Apriete todos los tornillos de montaje al completar
•
Por favor, tenga en cuenta: Anclar este producto al
suelo es esencial para su estabilidad y rigidez. Es
necesario completar esta fase para que su garantía
sea válida.
IMPORTANTE
Por favor, lea estas instrucciones cuidadosamente antes de empezar a montar este
invernadero.
Mantenga estas instrucciones en un lugar seguro para referencia futura.
» Servicio de Ayuda al Cliente
Para obtener ayuda con el montaje o para las piezas de recambio - por favor entre a
nuestro sitio web o llame a nuestra línea de servicio (el número está en la página de título).
Información adicional se puede encontrar en nuestro sitio web:
www.palramapplications.com
» Consejo de Seguridad
•Es de suma importancia montar todas las partes de acuerdo con las instrucciones.
No se salte ningún paso.
•Recomendamos rmemente el uso de guantes de trabajo durante el montaje.
•Use siempre zapatos y gafas de seguridad al trabajar con aluminio extruido.
•Al usar una escalera plegable o herramientas eléctricas asegúrese de que sigue las
instrucciones de seguridad de los fabricantes.
•No toque los cables eléctricos aéreos con los perles de aluminio.
•No intente montar el invernadero en días de viento o días con humedad.
•Disponga todas las bolsas plásticas en lugar seguro - guárdelas fuera del alcance de niños.
•Mantenga a los niños fuera del área de montaje.
•No se apoye ni empuje el invernadero durante la construcción.
•No coloque su invernadero en un área expuesta al viento excesivo.
•No intente montar este invernadero si usted está cansado, ha tomado drogas o
alcohol o si usted es propenso a ataques de mareo.
•Artículos calientes recientemente usados tales como parrillas, sopletes etc. no
deben ser almacenados en el invernadero. Asegúrese de que no haya ninguna
tubería o cables ocultos en la tierra antes de insertar las clavijas.
•Este producto es designado a ser usado solamente como invernadero.
» Cuidados & Mantenimiento
Cuando su invernadero necesite limpieza, utilice una solución detergente suave y
enjuague con agua limpia fría. NO UTILICE acetona, limpiadores abrasivos u otros
detergentes especiales para limpiar los paneles. Se recomienda comprobar
periódicamente que los paneles del techo>tapones (parte de plástico 329 y perl 981)
están colocados en el lugar.
» Herramientas & Equipos
•Cinta métrica
•Broca
•Guantes de trabajo
•Martillo grande
•Lubricante
•Llave inglesa
•Escalera plegable
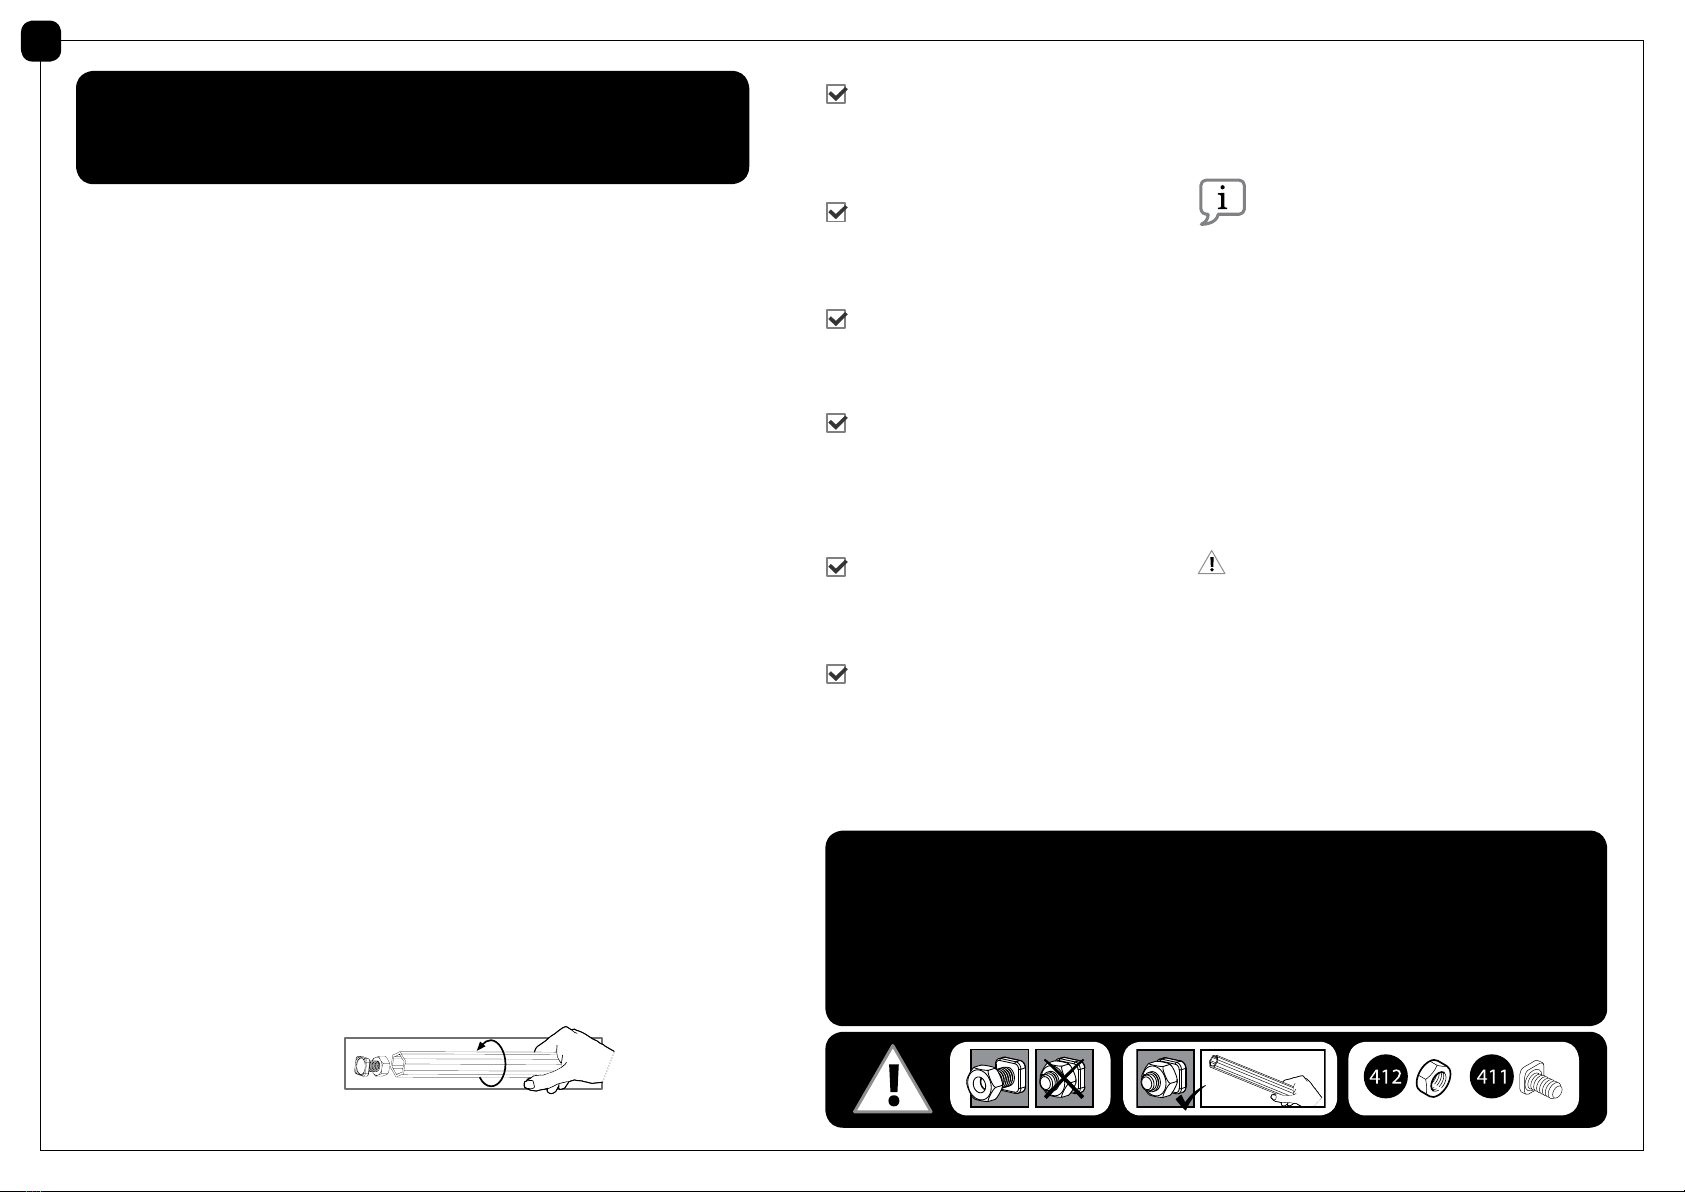
Los tornillos 411 y las tuercas 412 son usados durante todo el proceso de montaje.
•
Los tornillos 411 deben ser montados desde el exterior y las tuercas 412 desde el interior del
invernadero.
•
No apriete los tornillos y tuercas (411 y 412) más de 2-3 vueltas. No los apriete hasta terminar el
montaje de los paneles, a menos que orientado de otra manera.
•
Sin embargo, en algunos pasos, el ajuste temporal de algunos tornillos puede ser
necesario para evitar que un perl caiga hasta que sea conectado completamente en los pasos
siguientes.
•
Sin embargo, en algún paso puede ser necesario apretar de forma temporal algunos tornillos para
evitar que se caiga un perl.
ES
•Destornillador cabeza de tornillo Phillips
•T001 – Herramienta especial para
Tornillos 411 y Tuercas 412
» Antes del Montaje
Seleccionar un lugar:
- El invernadero debe colocarse y jarse
en una supercie plana y nivelada.
- Escoja una ubicación soleada y apartada
de árboles que la cubran.
Recomendamos encarecidamente que
el invernadero se je directamente sobre
cimientos de cemento sólido. Para hacer
esto, utilice los agujeros previamente
taladrados en la base de metal.
Este montaje consta de varias partes
y sería óptimo que lo realizasen dos
personas.
El proceso de montaje llevará alrededor
de medio día.
Extraiga todas las piezas de componentes
de sus embalajes. Ordene las piezas y
compruebe que están todas usando la
lista de contenidos. Las piezas deberían
colocarse cerca y tenerlas a mano.
Ponga las piezas pequeñas (p. ej. tornillos)
en un bol para no perderlas.
Por favor, tenga en cuenta que este
invernadero incluye perles con múltiples
supercies. Como resultado, algunos de
los agujeros de los perles no se utilizan
durante el montaje.
Por favor, revise todas las instrucciones
antes de empezar. Siga los pasos del
montaje en el orden exacto.
15.11_V4
Contents
Item ItemQty. Qty.
996 7265
7266
981
991
989
990
999
7259
992
12 8
2
24
2
2
2
10
4
4
3
1
2
2
2
2
4
7068
983
7264
7261
7262
7260
7267
30
3
993
7263
Contents
Item Qty.
7836
7244
7236
7237
7248
7275
7276
2
8
5
8
10
1
1
Item Qty.
7238
7245
7601
7860
7598
3
1
1
1
2
2
6
7876
7797
Contents
Item Item Item ItemQty. Qty. Qty. Qty.
7011 7251 7239 7329
7330
7242
288
7065
7207
7331
7240
7246
7243
7241
7277
7336
7252
7253
7254
581
7255
7257
7256
7010
7250
32 2 1 8
2
4
8
1
2
4
1
4
2
4
1
4
2
2
2
12
2
2
2
4
6
Contents
Item Qty.
34
(+2)
4008
44
(+6)
8
(+1)
20
(+2)
4043
4
(+1)
4010
4
(+1)
4000
Item Qty.
7066
462
464
465
422
463
7333
7332
7327
2
2
2
6
12
32
(+4)
32
(+4)
6
4
2
2
Item Qty.
8
(+1)
414
M8
8
(+1)
7283
M8
6
(+1)
433
M8
2425
M6
312
(+30)
412
M6
47
(+3)
466
M6
308
(+34)
411
M6
32
(+2)
7284
M6
8
(+1)
7224
M6
Item Qty.
1
1
1
1
1
1
1
(+1)
1
(+1)
7086
7085
7083
7088
423
4036
7827
7795
7826
7445
7442
7441
Contents
Item Item ItemQty. Qty. Qty.
1010 318
3017
7271
T001
7268
7269
7270
329
328
7602
20 44
(+4)
4
1
1
2
4
4
12
(+2)
44
(+2)
4
7793
7223
2
2
7798 2
4
4
(+1)
2
22
7009
99
22
364 cm / 143.3''
366 cm / 144”
b
=
a
b
a
x2
1
7598
7598
7602
7602
7860
7860
7860
7598
2
2
82 74427602
7442
7442
7442
7442
b
a
a
b
7602
7602
2
4043 4
7797
7797
7797 1
4043
4043
7797
3
7876 1 17445
7876 7876
7876
7797 7796
7797
7445
bc
a
c
7745
4
7598
7598
7602
7602
7598
7598
7598 4 2
7602 87442
7442
7442
7442
7442
b
a
7602
7602
5
7601 1
7601
7442
7442
7601
87442
6
7601 2 167442
7601
7601
7442
7442
7601
7
a
aa
a
a
aa
a
a
aa
a
a
aa
a
a
aa
a
a
aa
a
a
a
a
a
a
a
a
a
a
a
a
a
a
a
a
a
a
a
a
a
P328 2
P328
8
411 9 412 9
bc
a
a
a
a
a
a
a
a
a
a
a
c
c
c
b
bc
c
c
c
466
412
412
7284
411
411
7284 10 466 10
9
411 412
88996 4
a
412412
996
996
996
996
996
411 411
10
b
a
aa
b
b
411 412
44
11
993 2
a
a
993
993
a
993
7284
7284 2

Other manuals for Americana 12'x12' Hybrid Glazing

2

Other Palram Greenhouse Kit manuals

Palram Balance 8'x12' Hybrid Glazing User manual

Palram

Palram Balance 8'x12' Hybrid Glazing User manual

Palram Balance User manual

Palram

Palram Balance User manual

Palram 121L x 62W x 148H cm User manual

Palram

Palram 121L x 62W x 148H cm User manual

Palram Balance Series User manual

Palram

Palram Balance Series User manual

Palram Lean To User manual

Palram

Palram Lean To User manual

Palram Bella 8'x8'- TwinWall Glazing User manual

Palram

Palram Bella 8'x8'- TwinWall Glazing User manual

Palram Octave 8x12 User manual

Palram

Palram Octave 8x12 User manual

Palram Victory Orangery - Garden Chalet User manual

Palram

Palram Victory Orangery - Garden Chalet User manual

Palram Canopia Sun Room Series Administrator Guide

Palram

Palram Canopia Sun Room Series Administrator Guide

Palram SNG 8' Series User manual

Palram

Palram SNG 8' Series User manual

Palram CANOPIA MARTINIQUE 10x14/3x4.3 Administrator Guide

Palram

Palram CANOPIA MARTINIQUE 10x14/3x4.3 Administrator Guide

Palram Mythos User manual

Palram

Palram Mythos User manual

Palram Americana 12'x12' Hybrid Glazing User manual

Palram

Palram Americana 12'x12' Hybrid Glazing User manual

Palram Harmony 6'x4' User manual

Palram

Palram Harmony 6'x4' User manual

Palram Harmony User manual

Palram

Palram Harmony User manual

Palram Lean-To Inter User manual

Palram

Palram Lean-To Inter User manual

Palram Nature 6'x8' Hybrid Glazing User manual

Palram

Palram Nature 6'x8' Hybrid Glazing User manual

Palram MiniPro User manual

Palram

Palram MiniPro User manual

Palram Canopia SKYLIGHT 6x5 Administrator Guide

Palram

Palram Canopia SKYLIGHT 6x5 Administrator Guide

Palram Inter Line 6x4 User manual

Palram

Palram Inter Line 6x4 User manual

Palram Octave 8x12 User manual

Palram

Palram Octave 8x12 User manual

Palram Victory Orangery User manual

Palram

Palram Victory Orangery User manual

Palram Mythos 6'x14' User manual

Palram

Palram Mythos 6'x14' User manual

Palram Hybrid 6'x14' User manual

Palram

Palram Hybrid 6'x14' User manual

Popular Greenhouse Kit manuals by other brands

Ditt Drivhus LINA Assembly manual

Ditt Drivhus

Ditt Drivhus LINA Assembly manual

Greenhouse Style Pride of the Pacific Series instructions

Greenhouse Style

Greenhouse Style Pride of the Pacific Series instructions

GARDY SHELTER 7022 Assembly instructions

GARDY SHELTER

GARDY SHELTER 7022 Assembly instructions

Flower House SpringHouse Setup

Flower House

Flower House SpringHouse Setup

Juliana Orangeri 15.2 manual

Juliana

Juliana Orangeri 15.2 manual

Costway HW51811 user manual

Costway

Costway HW51811 user manual

Feelgood PY6 instructions

Feelgood

Feelgood PY6 instructions

ClearSpan R035B00000F Assembly instructions

ClearSpan

ClearSpan R035B00000F Assembly instructions

LAMS CARVI 8,10 Assembly instructions

LAMS

LAMS CARVI 8,10 Assembly instructions

GrowSpan 500 Series manual

GrowSpan

GrowSpan 500 Series manual

Forest garden MGHFP quick start guide

Forest garden

Forest garden MGHFP quick start guide

Mercia Garden Products 04GREEN0406SD-V2 General instructions

Mercia Garden Products

Mercia Garden Products 04GREEN0406SD-V2 General instructions

Vitavia VM9026-P 2500 Assembly instructions

Vitavia

Vitavia VM9026-P 2500 Assembly instructions

Lacewing GH1246 Assembly instructions

Lacewing

Lacewing GH1246 Assembly instructions

Richel J30604 Assembly instructions and user guide

Richel

Richel J30604 Assembly instructions and user guide

solexx Garden Master G-512 Assembly instructions

solexx

solexx Garden Master G-512 Assembly instructions

Vitavia VM9058-PSC 6200 Assembly instructions

Vitavia

Vitavia VM9058-PSC 6200 Assembly instructions

Dancover TITAN Arch 196 manual

Dancover

Dancover TITAN Arch 196 manual

manuals.online logo
manuals.online logoBrands
  • About & Mission
  • Contact us
  • Privacy Policy
  • Terms and Conditions

Copyright 2025 Manuals.Online. All Rights Reserved.