manuals.online logo
Brands
  1. Home
  2. •
  3. Brands
  4. •
  5. Parker
  6. •
  7. Water Filtration System
  8. •
  9. Parker Racor 120R-RAC-01 User manual

Parker Racor 120R-RAC-01 User manual

Contact Information
Parker Hannifin Corporation
Racor Division
P.O. Box 3208
3400 Finch Road
Modesto, CA 95353
phone 800 344 3286
209 521 7860
fax 209 529 3278
racor@parker.com
parker.com/racor
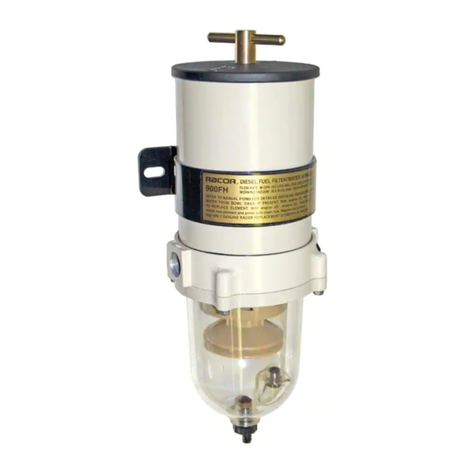
120R-RAC series filter assemblies
were designed specifically for
marine gasoline applications.
These high-performance filters
will help your engine run better
than ever with clean, water-free
fuel. The legendary Aquabloc®
media removes 99% of free water
and sediment down to 10 micron
(nominal). With four port mounting
versatility and simple servicing
procedures, there has never been
a better choice for your marine
application than a Racor fuel filter/
water separator.
Model number 120R-RAC-02
is marine UL Listed and USCG
approved.
Instruction Part Number 10223 Rev C
Marine Gasoline Series
120R-RAC-01 and 120R-RAC-02
Fuel Filter/Water Separators
120R-RAC-01
Specifications 120R-RAC-01 120R-RAC-02
Application:
Inboard
Outboard
No
Yes
Yes
Yes
Maximum Flow Rate 30 GPH (114 LPH) 30 GPH (114 LPH)
Replacement Filter S3240 S3240TUL
Center Threads M18 x 1.5 M18 x 1.5
Port Size 1/4”-18 NPTF 1/4”-18 NPTF
Number of Ports:
Inlets
Outlets
2
2
2
2
Height 6.5 in. (16.5 cm) 6.0 in. (15.2 cm)
Width 3.2 in. (8.1 cm) 3.2 in. (8.1 cm)
Depth 3.2 in. (8.1 cm) 3.2 in. (8.1 cm)
Weight (dry) 1.1 lb (0.5 kg) 1.2 lb (0.6 kg)
Clean Pressure Drop 0.15 PSI (0.01 bar) 0.15 PSI (0.01 bar)
Maximum Allowable Pressure 7 PSI (0.5 bar) 7 PSI (0.5 bar)
Underbowl Clearance 2.0 in. (5.1 cm) 2.0 in. (5.1 cm)
Water Removal Efficiency 99% 99%
Ambient Temperature Range -40°to +255°F (-40°to +124°C)
Maximum Fuel Temperature 190°F (88°C)
120R-RAC-02
Always follow your engine
manufacturer’s guidelines for
priming the fuel system. To prime
the filter:
1. Spin bowl and filter off of
mounting head (together).
2. Fill filter with clean fuel.
3. Apply a coat of motor oil or
clean fuel to filter gasket.
4. Spin bowl and filter (together)
onto mounting head tighten by
hand—do not use tools.
5. Start engine and check for
leaks. Correct as necessary with
engine off.
Draining The Bowl
Water is heavier than fuel and
will settle to bottom of bowl and
appear different in color. In high
humidity environments, check
bowl frequently (daily if a poor fuel
source is suspected).
1. Make sure engine is off and
cool to touch.
2. Close shut-off valve between
fuel tank and filter, if applicable.
3. Open vent plug on mounting
head.
4. Slowly open drain on bottom
of collection bowl and allow
only water to drain out—do not
leave drain open for very long
as it will eventually drain the
entire filter of all water and fuel.
5. When fuel is detected coming
out of drain, close drain quickly
and tighten snugly.
6. Close vent plug and tighten
snugly.
7. Open Shut-off valve if
applicable.
8. Follow Priming instructions.
Danger! Great care must be
exercised to avoid potential fire
hazards during installations. Do
not smoke or permit open flames
or sparks near the fuel system.
Refer to Installation Diagram
on page 4 prior to beginning
installation.
• Any secondary or pressure side
filters located between pump
and engine should be serviced
and left in place.
• Mount unit vertically on suction
side of fuel pump, transfer
pump, or non-removable filters,
whichever comes first.
• Maintain 2” (5.1 cm) vertical
clearance below lter for servicing
bowl and replacing lter.
• Ensure a suitable pipe thread
sealing compound is used on
NPT threads of tting prior
to installation into head. For
mounting exibility, there are
two inlet ports and two outlet
port. Plated steel ttings are
recommended. Plug unused ports
with provided steel NPT plugs—do
not use tapes on NPT threads.
• Use quality fuel hose in
maximum fuel line size
applicable to reduce potential
fuel flow restrictions. Note:
USCG accepted hose
recommended.
• Thread fittings into appropriate
fuel ports and tighten snugly.
Plug unused ports (if any) with
port plugs and tighten snugly.
• Attach fuel lines to filter. Avoid
tight bends, rubbing areas and
heat sources when routing hose.
• Follow Priming Instructions.
Installation Guidelines
Service
Filter Replacement
Filter replacement frequency is
determined by contamination
level in fuels. Fuel flow to engine
becomes restricted as filter
gradually plugs with contaminants,
resulting in noticeable power
loss and/or hard starting. As a
guideline, change filter every 500
hours, every other oil change,
annually, or at first indication of
power loss, whichever occurs first.
Always carry extra replacement
filters as one tankful of excessively
dirty fuel can quickly plug a filter.
1. Clean all debris or dirt away
from head of filter assembly
prior to servicing.
2. Place a container of sufficient
volume below filter assembly
to collect contaminants.
3. Close tank outlet valve if tank
is mounted higher than filter, if
equipped.
4. Open drain (remove plug on
-02 model) to empty filter
assembly of fuel.
5. Spin filter and bowl off
together, then remove bowl
from filter.
6. Dispose of filter properly.
7. Clean bowl O-ring gland and
sealing surface of mounting
head free of dirt, debris, or
gums.
8. Apply motor oil to new filter
seal and bowl O-ring (supplied
with new filter).
9. Place filter seal onto filter and
O-ring into bowl gland.
10. Spin bowl onto new filter
snugly by hand—do not use
tools.
11. Priming fuel system following
your manufacturer’s
procedures, if necessary;
otherwise, see Priming
section.
Priming
OUT
IN
OUT
IN
TOP VIEW
3/8˝ (1.0 cm)
diameter clearance
for fasteners
6.5 in.
(16.5 cm)
1.4 in.
(3.6 cm)
BACK VIEW
Replacement Parts
Part Number Description
1. RK 10214-01 Head Kit
2. 10224 3/8˝-24 UNF Vent Plug
3. RK 10503 Gasket Kit
4. S3240 120R-RAC-01:
10 micron Replacement Filter
(includes #’s 3 and 5)
S3240UL 120R-RAC-02:
10 micron Replacement Filter
(includes #’s 3 and 5)
5. RK 10012 Bowl O-ring Kit
6. RK 10222 Clear Bowl Kit (-01 model)
(includes #’s 5 and 7)
7. RK 30476 Self-venting Drain Kit
8. RK10553 Metal Bowl Kit (-02 model)
(includes #’s 5, 9, and 10)
9. RK 20022 Probe Plug Kit (1/2˝-20 UNF)
10. 01SP-2S Drain Plug Kit (1/8˝ NPTF)
1
2
3
4
5
6
9
7
8
9
May 2013© Parker Hannin Corporation
All products manufactured or distributed by Racor
are subject to the following, and only the following,
LIMITED EXPRESS WARRANTIES, and no others:
For a period of one (1) year from and after the date of
purchase of a new Racor product, Racor warrants and
guarantees only to the original purchaser-user that
such a product shall be free from defects of materials
and workmanship in the manufacturing process. The
warranty period for pumps and motors is specifically
limited to ninety (90) days from date of purchase. A
product claimed to be defective must be returned to
the place of purchase. Racor, at its sole option, shall
replace the defective product with a comparable new
product or repair the defective product. This express
warranty shall be inapplicable to any product not
properly installed and properly used by the purchaser-
user or to any product damaged or impaired by
external forces.
THIS IS THE EXTENT OF WARRANTIES AVAILABLE
ON THIS PRODUCT. RACOR SHALL HAVE NO
LIABILITY WHATSOEVER FOR CONSEQUENTIAL
DAMAGES FLOWING FROM THE USE OF ANY
DEFECTIVE PRODUCT OR BY REASON OF THE
FAILURE OF ANY PRODUCT. RACOR SPECIFICALLY
DISAVOWS ALL OTHER WARRANTIES, EXPRESS
OR IMPLIED INCLUDING, WITHOUT LIMITATION,
ALL WARRANTIES OF FITNESS FOR A PARTICULAR
PURPOSE (EXCEPT FOR THOSE WHICH APPLY
TO PRODUCT OR PART THEREOF THAT IS
USED OR BOUGHT FOR USE PRIMARILY FOR
PERSONAL, FAMILY, OR HOUSEHOLD PURPOSES),
WARRANTIES OF DESCRIPTION, WARRANTIES
OF MERCHANTABILITY, TRADE USAGE OR
WARRANTIES OR TRADE USAGE.
Warning
Failure or improper selection or improper use of the
products and/or systems described herein or related
items can cause death, personal injury and property
damage. This document and other information
from Parker Hannifin Corporation, its subsidiaries
and authorized distributors provide product and/
or system options for further investigation by users
having technical expertise. It is important that you
analyze all aspects of your application and review
the information concerning the product or system
in the current product catalog. Due to the variety
of operating conditions and applications for these
products or systems, the user, through its own analysis
and testing, is solely responsible for making the final
selection of the products and systems and assuring
that all performance, safety and warning requirements
of the applications are met.
The products described herein, including with
limitation, product features, specifications, designs,
availability and pricing, are subject to change by
Parker Hannifin Corporation and its subsidiaries at
any time without notice.
The following statement is required pursuant to
proposition 65, applicable in the State of California:
‘This product may contain a chemical known to the
State of California to cause cancer or reproductive
toxicity’.
Limited Warranties Statement
Fuel tanks above filter
head pressure should not
exceed maximum PSI of filter.
Fuel Tank
(Pressure Side Installation)
Install a shut-off valve when fuel
tank is higher than filter
Fuel tank below filter
lift should not exceed 4 inHg.
Fuel Tank
(Ideal Vacuum
Side Installation)
Fuel Tank
(Vacuum Side Installation)
Install a check valve
(with light or no restriction) when
tank is lower than filter to main
prime.
Optional fuel transfer pump not to exceed
maximum PSI or flow rate of filter.
Not ideal - pumps emulsify water hindering
filter performance.
Fuel transfer pump
(IDEAL vacuum side installation)
Engine
Maintain a service clearance below filter
assembly of at least 2 in. (5.1 cm)
Valve 1 Valve 2
Valve 3
Optional Bypass Installation and Operation
(allows user to service filter without shutting down engine.)
Valves 1 2 3
Unit On-line Open Open Closed
Unit Off-line Closed Closed Open
Installation Diagram

This manual suits for next models

3

Other Parker Water Filtration System manuals

Parker 320R-RAC Series User manual

Parker

Parker 320R-RAC Series User manual

Parker 5MF User manual

Parker

Parker 5MF User manual

Parker BAF010 User manual

Parker

Parker BAF010 User manual

Parker Racor 800D-5REC-D Quick guide

Parker

Parker Racor 800D-5REC-D Quick guide

Parker Racor CCV User manual

Parker

Parker Racor CCV User manual

Parker 660R-RAC Series User manual

Parker

Parker 660R-RAC Series User manual

Parker F2 Series Technical specifications

Parker

Parker F2 Series Technical specifications

Parker Racor RK20025-01 User manual

Parker

Parker Racor RK20025-01 User manual

Parker HX Series User manual

Parker

Parker HX Series User manual

Parker 5MF User manual

Parker

Parker 5MF User manual

Parker MV060 User manual

Parker

Parker MV060 User manual

Parker Zander WS Series User manual

Parker

Parker Zander WS Series User manual

Parker Racor FBO-10 Manual

Parker

Parker Racor FBO-10 Manual

Parker domnick hunter GL Plus Series User manual

Parker

Parker domnick hunter GL Plus Series User manual

Parker Hiross Hyperfilter HFN018 User manual

Parker

Parker Hiross Hyperfilter HFN018 User manual

Parker Finite H-Series Manual

Parker

Parker Finite H-Series Manual

Parker 140R Series User manual

Parker

Parker 140R Series User manual

Parker UC-DF User manual

Parker

Parker UC-DF User manual

Parker EAPF 1 Manual

Parker

Parker EAPF 1 Manual

Parker Racor RK22933 User manual

Parker

Parker Racor RK22933 User manual

Parker F31 Installation and maintenance instructions

Parker

Parker F31 Installation and maintenance instructions

Parker TGA 102-118 User manual

Parker

Parker TGA 102-118 User manual

Parker OIL-X User manual

Parker

Parker OIL-X User manual

Parker Turbine 500MA User manual

Parker

Parker Turbine 500MA User manual

Popular Water Filtration System manuals by other brands

Sullair SCD300 user guide

Sullair

Sullair SCD300 user guide

Hellenbrand H-150 Series owner's manual

Hellenbrand

Hellenbrand H-150 Series owner's manual

Wasserhaus QuaRO Series Installation and user manual

Wasserhaus

Wasserhaus QuaRO Series Installation and user manual

3M 6001 User instructions

3M

3M 6001 User instructions

Nederman NOM 18 instruction manual

Nederman

Nederman NOM 18 instruction manual

Cuckoo CP-XN501HW user guide

Cuckoo

Cuckoo CP-XN501HW user guide

EINHELL BT-VC500 Original operating instructions

EINHELL

EINHELL BT-VC500 Original operating instructions

Antunes UF-216CC owner's manual

Antunes

Antunes UF-216CC owner's manual

ARKA Aquatics Core MF500 Operation instructions

ARKA

ARKA Aquatics Core MF500 Operation instructions

Glasco UV GUV-7 Operation & maintenance manual

Glasco UV

Glasco UV GUV-7 Operation & maintenance manual

puroflux PF-30 Series Operation and maintenance manual

puroflux

puroflux PF-30 Series Operation and maintenance manual

Sub-Zero WS Series quick start guide

Sub-Zero

Sub-Zero WS Series quick start guide

Genesis Monitor 2 manual

Genesis

Genesis Monitor 2 manual

Aquatlantis tecatlantis CLEANSYS PRO operating manual

Aquatlantis

Aquatlantis tecatlantis CLEANSYS PRO operating manual

ELECTROSEA CLEARLINE CL-2000-X2.0 installation manual

ELECTROSEA

ELECTROSEA CLEARLINE CL-2000-X2.0 installation manual

Nephros DSU-H In-Line installation guide

Nephros

Nephros DSU-H In-Line installation guide

Adey MagnaClean Professional2 Installation and servicing

Adey

Adey MagnaClean Professional2 Installation and servicing

Apec Water Essence Series Installation instructions & owner's manual

Apec Water

Apec Water Essence Series Installation instructions & owner's manual

manuals.online logo
manuals.online logoBrands
  • About & Mission
  • Contact us
  • Privacy Policy
  • Terms and Conditions

Copyright 2025 Manuals.Online. All Rights Reserved.