manipulationer. Det är absolut förbjudet att ta bort
eller manipulera med maskinens
säkerhetsanordningar. Om så ändå sker kan
allvarlig skada eller olycka inträffa.
Service, reparation och reservdelar
All form av underhåll och reparation skall utföras
av behörig och kvalicerad serviceverkstad. Koppla
alltid maskinen från eluttaget innan någon form av
underhåll eller service sker. Vid ev. reparation får
endast originaldelar användas.
Förvaring
Om maskinen skall förvaras oanvänd under en
längre tid, koppla bort den från eluttaget, se till att
delar som kan skadas av smuts skyddas ordentligt,
samt smörj delar som kan skadas om de torkar.
Allmänna säkerhetsinstruktioner
Denna bruksanvisning skall anses som en del av
däckbalanseringsmaskinen och ska alltid förvaras
tillsammans med denna. Om maskinen säljs, så
skall bruksanvisningen överlämnas till den nye
ägaren. Förvara alltid bruksanvisningen på en för
operatören lättillgänglig plats och se till att den
bevaras i gott skick.
Läs noga igenom bruksanvisningen innan start av
maskinen och använd den aldrig om tvivel uppstår
beträffande driften av den.
Bruksanvisningen innehåller viktig information som
rör din säkerhet. Följ noga anvisningarna för att
undvika risk för skador på personer och på
utrustningen. Dessutom nns här nyttig
information som kommer att underlätta
användandet och underhållet av maskinen.
Tillverkaren avsäger sig allt ansvar för
personskador eller materiella skador som uppstår
p.g.a. underlåtenhet att följa manualens
säkerhetsinstruktioner, om någon ändring eller
manipulering av maskinen sker eller om icke
original reservdelar används. Dessutom upphävs
garantin på maskinen.
Barn och personer med nedsatt fysisk eller
psykisk förmåga får ej använda produkten utan
tillsyn enligt EN 60335-1/A2:2006.
Säkerhetsinstruktioner
• Håll arbetsområdet rent, torrt och väl upplyst.
Belamrade, fuktiga och mörka arbetsplatser
inbjuder till olyckor och därmed skador.
• Håll barn och åskådare på behörigt avstånd
från maskinen. Barn får absolut INTE använda
maskinen eller vistas inom
arbetsområdet.
• Kontrollera så att inga farliga situationer
uppstår vid arbete med maskinen, att
arbetsområdet runt maskinen är fritt från
föremål som möjligen kan innebära fara, samt
att det inte nns olja (eller annat klibbigt
material) på golvet som kan innebära fara för
användaren.
• Stanna omedelbart maskinen vid ojämn
funktion och kontakta behörig serviceverkstad.
• Endast en behörig person med god utbildning
och kunskap om maskinens funktion får
använda den.
• Använd dammskyddsmask och
skyddsglasögon, samt lämpliga arbetskläder,
skyddsskor och arbetshandskar som passar för
denna typ av arbete.
• Använd lämpliga kläder. Använd inte löst
sittande kläder och bär inga smycken. Använd
hårnät om du har långt hår. Se till att hålla hår,
kläder och handskar borta från rörliga delar.
Löst sittande kläder, smycken och långt hår kan
fastna i rörliga delar.
• Var uppmärksam. Se på det du arbetar med
och använd sunt förnuft vid användning av
maskinen. Använd inte maskinen om du är trött
eller påverkad av droger, alkohol eller
mediciner. Ett ögonblick av bristande
uppmärksamhet kan räcka för att du skall
skadas allvarligt.
• Kontrollera om det nns skadade delar. Innan
maskinen används, kontrollera noggrant att den
fungerar och uträttar det arbete som den är
avsedd att göra. Kontrollera att det inte nns
delar som är skadade eller annat som kan
påverka användningen av maskinen. Byt ut eller
reparera genast skadade eller slitna delar.
• Använd rätt produkt till rätt arbete. Tvinga inte
maskinen. Använd endast maskinen till den typ
av arbete den är avsedd för. Rätt maskin gör
arbetet bättre och säkrare.
• Underhåll. Service och underhåll får endast
utföras av en behörig serviceverkstad.
• Reservdelar och tillbehör. Använd endast
original reservdelar och tillbehör vid service och
reparation av maskinen.
• Förvaring. När maskinen inte används, måste
verktyg och utrustning förvaras i torrt utrymme
för att förhindra rost. Så snart maskinen inte
skall användas under en längre tid, koppla bort
den från eluttaget.
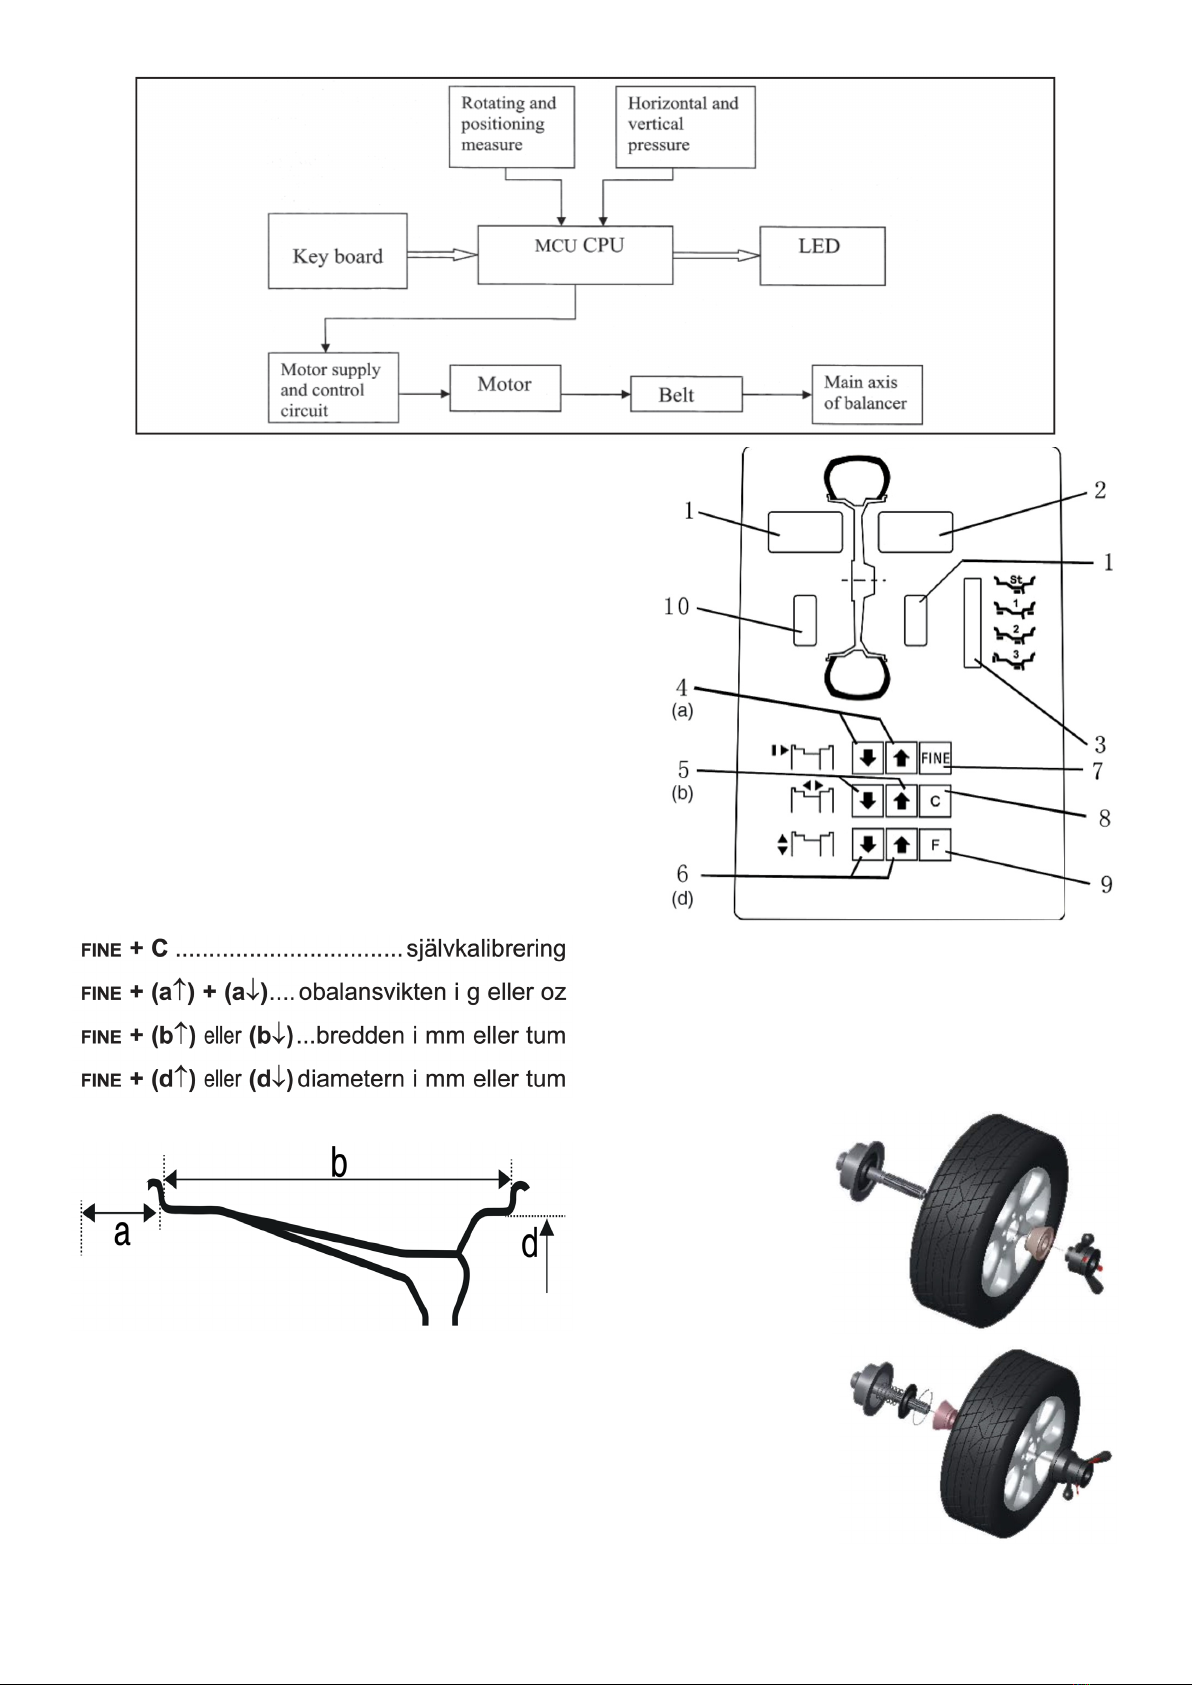
Specifikationer
• Max. hjulvikt 65 kg
• Strömförsörjning 230V/ 50 Hz 50 watt
• Balanseringsexakthet ± 1 g
• Roteringshastighet 80 r.p.m
• Position precision 2,81°
• Fälgdiameter 10”-24” (256 - 610 mm)
• Fälgbredd 1.5”-20” (40 - 508 mm)
• Körningstid < 8 sek
• Ljudnivå under arbete < 70 dB