PELA 70278 User manual

Sheet beading machine, 450mm
Plåtfalsmaskin, 450 mm
Item No:
70278

Kontaktinformation
Verktygsboden Erlux AB
Källbäcksrydsgatan 1
SE-507 42 Borås
Telefon: 033-202650
Mejl: [email protected]
Miljöskydd/Skrotning
Återvinn oönskat material, släng
det inte bland hushållssoporna. Alla
maskiner, tillbehör och förpackningar
skall sorteras och lämnas till en
återvinningscentral och där kasseras
på ett miljövänligt sätt.
Spara denna manual
Du kommer att behöva denna manual för
säkerhetsinformation, montering, handhavande
och lista över maskinens delar. Spara den på en
torr plats för senare bruk.
Läs alla instruktioner innan montering och använ-
dande av falsmaskinen.
Säkerhetsinstruktioner
1. Håll arbetsytan ren: Röriga arbetsytor bjuder in
till olyckor.
2. Ha inga barn i närheten: Barn bör hållas bort
från arbetsområdet. Låt dem inte använda
verktyget.
3. Använd inte apparaten om du är
påverkad av alkohol eller droger: Läs varningse-
tiketter och recept på eventuella
läkemedel du tar för att avgöra om det är
lämpligt för dig att hantera maskinen. Om du är
det minsta osäker skall du inte använda
maskinen.
4. Undvik att vidröra rörliga delar när apparaten
används: Håll undan ngrar och händer från
kugghjul, rullar, prolhjul och alla andra rörliga
delar.
5. Använd ögonskydd: Använd alltid godkända
skyddsglasögon. Köp skyddsglasögon från din
verktygsleverantör.
6. Klä dig säkert: Använd alltid
skyddshandskar och skor med halkskydd när
du arbetar med tunnplåt, material med skarpa
kanter och när du använder falsmaskinen. Bär
inte lösa klädesplagg och smycken. De kan
fastna i de rörliga delarna. Använd även skydd
för håret, keps och/eller hårnät, så att långt hår
inte fastnar i maskinen.
7. Sträck dig inte för långt: Ha alltid en stabil ba-
lans och bra placering för fötterna.
8. Var alltid två personer: Det behövs två personer
för att kunna sköta den här maskinen säkert.
En person behövs för att mata in plåten, medan
den andra person vevar falsmaskinen.
9. Var uppmärksam: Titta på vad du gör.
Använd sunt förnuft. Använd inte verktyget när
du är trött.
10. Max 1,25 mm plåt. Använd inte falsmaskinen
på tjockare plåt än 1,25 mm.
11. Reservdelar och tillbehör. När service utförs
får bara identiska delar användas för utbyte.
Använd bara tillbehör som avsätts för detta
verktyg. Köp skyddsglasögon från din verktygs-
leverantör.
12. Förvaring av maskinen när den inte
används. När maskinen inte används skall den
förvaras på en torr plats för att undvika rost.
För säkerhets skull skal maskinen
förvaras inlåst, utom räckhåll för barn.
Innan du börjar montera ihop maskinen:
Medan du monterar maskinen bör du fästa den i
ett vanligt skruvstäd. Se även till att skruvstädet är
ordentligt fastskruvat.
Del # Beskrivning Antal
1 Falsmaskinens överdel 1
2Handtag 1
3 Prolhjul (6par) 12
Montering
VARNING Plåtfalsmaskinen är tung. Var två
personer när ni lyfter och yttar maskinen.
1. Placera falsmaskinen (#1) i ett skruvstäd som
visas i gur 1. Spänn fast den i städet
ordentligt.
2. Montera på Handtaget (#12) på drivaxeln (#3).
3. Använd en skiftnyckel för att spänna fast
bulten (#11) ordentligt. Se till att bulten (#11)
hamnar mot den platta delen på drivaxeln (#3).

Justering
Falsmaskinen behöver vanligtvis justeras av
användaren. Om maskinen inte är rätt inställd
påverkas kvaliteten av resultatet negativt. Om du
upplever detta problem behöver maskinen justeras.
1. Montera på prolhjulen (#9) och (#10) som
visas i gur 2.
2. Kontrollera prolhjulen (#9) som visas i gur 2,
position 2. När falsmaskinen är korrekt
justerad skall kanterna på prolhjulen röra vid
(eller nästan röra vid) varandra. Om dom inte
gör det gör följande:
3. Lossa de två insexskruvarna med en
insexnyckel som håller fast kugghjulet (#5) och
brickan (#6) till drivaxeln (#3) vid position 3.
4. Flytta drivaxeln (#3) tills prolhjulen (#9) möts
5. Flytta brickan (#6) så att dess kant möter rullen
(#2) och spänn fast insexskruvarna, position 3.
6. Flytta kugghjulet (#5) så att dess sida möter
rullen (#2) och spänn fast insexskruvarna.
Byte av profilhjul
Det följer med era olika modeller av prolhjul
förutom de som följer med på monterade. Följ
nedanstående instruktioner när du byter prolhjul.
Hur du monterar av prolhjulen:
1. Använd en skiftnyckel för att lossa
spännbulten (#15). Se Figur 3, position 1.
2. Använd insexnyckel för att lossa
insexskruvarna (#18) som håller prolhjulen på
plats. Se Figur 3, position 2.
3. Ta bort prolhjulen (#9)
Montera andra profilhjul
1. Välj de prolhjul du vill använda.
2. Trä på dem på axlarna (#3) och (#4) på
samma gång (se gur 4). Se till att
insexskruvarna (#16) är placerade vid den
platta ytan på drivaxeln (#3) och på den andra
axeln (#4)
Justering av axeltrycket
1. Dra åt spännbulten (#15) för hand. Se gur 4.
2. Använd en skiftnyckel för att spänna 1-3 varv,
beroende på vilket resultat man vill ha.
Handhavande
VARNING: Max 1,25mm plåttjocklek
Var alltid två personer när ni använder maskinen.
En person sköter hanteringen av metallen och en
vevar maskinen. Att använda maskinen så att det
blir ett bra resultat kräver att personerna som
hanterar maskinen är samspelta.
1. Markera på materialet där det skall bearbetas.
2. Den ena personen sätter in och styr plåten
mellan hjulen medan den andra vevar maskinen
(se gur 5).
4. Använd en fast nyckel 14 mm för att lossa
ändskruvarna (#14) som håller fast prolhjulen
(#10) för att ta bort brickorna (#13).
5. Använd en insexnyckel för att lossa
insexskruvarna (#16) som håller fast
prolhjulen (#10) på axlarna, vid position 5.
6. Ta av prolhjulen (#10)
3. Montera på ändskruvarna (#14) och
brickorna (#13), position 3. Spänn dem med en
fast nyckel 14mm.
4. Spänn de två insexskruvarna (#16) vid position
4.

Nr: Beskrivning: Antal: Nr: Beskrivning: Antal:
1 Basplatta 1 17 Skydd för handtag 1
2Rullblock 418 Insexskruvar M6x16 8
3 Drivaxel 1 19-1 1/2” Halv-Runt prolhjul (konvex) 1
4Axel 1 19-2 1/2” Halv-Runt prolhjul (konkav) 1
5Kugghjul 220-1 3/8” Halv-Runt prolhjul (konvex) 1
6 Brickor 2 20-2 3/8” Halv-Runt prolhjul (konkav) 1
7Bultar till rulblock M14x30 421-1 1/4” Halv-Runt prolhjul (konvex) 1
8Platt bricka 14mm 421-2 1/4” Halv-Runt prolhjul (konkav) 1
9Prolhjul för kapning 222-1 1/4” Falshjul 1
10-1 Långt prolhjul 1 22-2 1/4” Falshjul 1
10-2 Kort prolhjul 1 23-1 1/8” Falshjul 1
11 Bult M10x20 1 23-2 1/8” Falshjul 1
12 Handtag 1 24-1 1/16” Falshjul 1
13 Bricka 10 mm 2 24-2 1/16” Falshjul 1
14 Ändbultar M10x20 2 25 Fjäderbricka 6mm 8
15 Spännbultar M 10x35 1 26 Insexnyckel 5mm 1
16 Insexbultar M8x10 18 27 Insexnyckel 4mm 1
Läs igenom följande noggrant
Tillverkaren och/eller distributören har med listan över delarna enbart som referensmaterial. Varken
tillverkaren eller distributören lämnar någon garanti på något sätt att köparen är kvalicerad att göra några
reparationer av produkten eller att köparen är kvalicerad att byta delar på produkten. Tillverkaren och
distributören menar uttryckligen att alla reparationer och service skall utföras av kvalicerade fackmän och
inte av köparen. Köparen tar all risk och allt ansvar som uppkommer om köparen själv reparerar eller gör
ingrepp på produkten.


Contact
PELA Tools
Solängsvägen 13
SE-513 70 Borås
Phone: 033-202650
E-mail: [email protected]
Environmental protection /
Scrapping
Recycle any unwanted material,
do not throw it in the household
rubbish. All machines, accessories
and packaging must be sorted and left
at a recycling center and disposed
of in an environmentally friendly
manner.
Save this manual
You will need this manual for safety information,
assembly, operation and list of machine parts. Sto-
re it in a dry place for later use.
READ ALL INSTRUCTIONS BEFORE INSTALLING
AND USING THE BEADING MACHINE.
Safety instructions
1. KEEP THE WORKING SURFACE CLEAN. Messy
work surfaces invite accidents.
2. HAVE NO CHILDREN NEARBY. Children should
be kept away from the work area. Do not allow
them to use the tool.
3. DO NOT USE THE TOOL IF YOU ARE AFFECTED
BY ALCOHOL OR DRUGS. Read the warning
labels and prescriptions for any medicines you
are taking to determine if it is appropriate for
you to handle the machine. If you are unsure,
do not use the machine.
4. AVOID TOUCHING MOVING PARTS WHEN
USING THE TOOL. Keep ngers and hands
away from gears, rollers, prole wheels and all
other moving parts.
5. USE EYE PROTECTION. Always wear approved
goggles. Buy goggles from your tool supplier.
6. DRESS SAFELY: Always wear protective gloves
and shoes with anti-slip protection when
working with sheet metal, materials with sharp
edges and when using the beading machine.
Do not wear loose clothing and jewelry. They
can get caught in the moving parts. Also use
protection for the hair, cap and / or hair net, so
that long hair does not get stuck in the
machine.
7. DO NOT STRETCH. Always have a stable
balance and good placement of the feet.
8. ALWAYS BE TWO PEOPLE. Two people are
needed to operate this machine safely. One
person is needed to feed the plate, while the
other person cranks the beading machine.
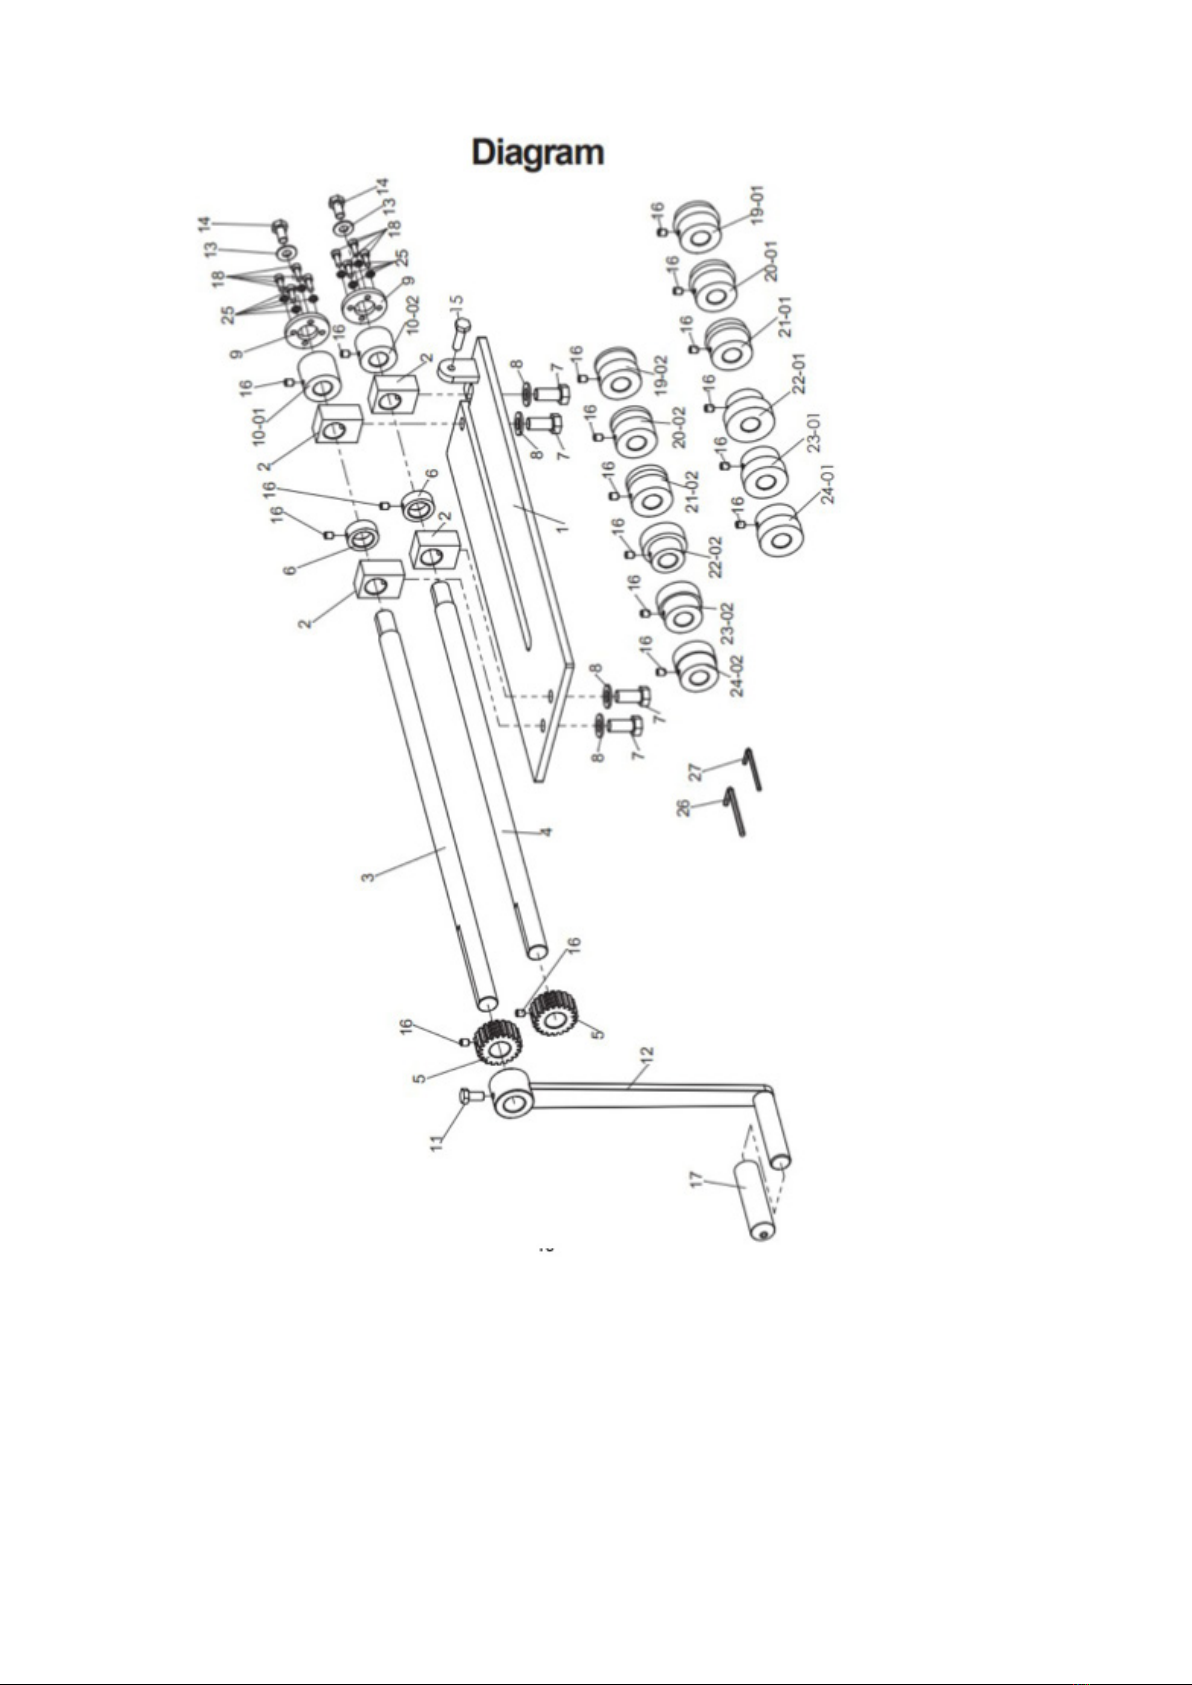
Part # Description Qty
1 Upper part of the beading
machine
1
2Handle 1
3 Prole wheels (6 pairs) 12
9. BE AWARE. See what you do. Use common
sense. Do not use the tool when you are tired.
10. MAX 1.25 mm sheet. Do not use the beading
machine on sheets thicker than 1.25 mm.
11. SPARE PARTS AND ACCESSORIES. When
servicing, only identical parts may be used for
replacement. Use only accessories provided for
this tool. Buy goggles from your tool supplier.
12. STORAGE OF THE MACHINE WHEN IT IS NOT
USED. When not in use, store in a dry place to
avoid rust. For safety reasons, the shell of the
machine must be kept locked, out of the reach
of children.
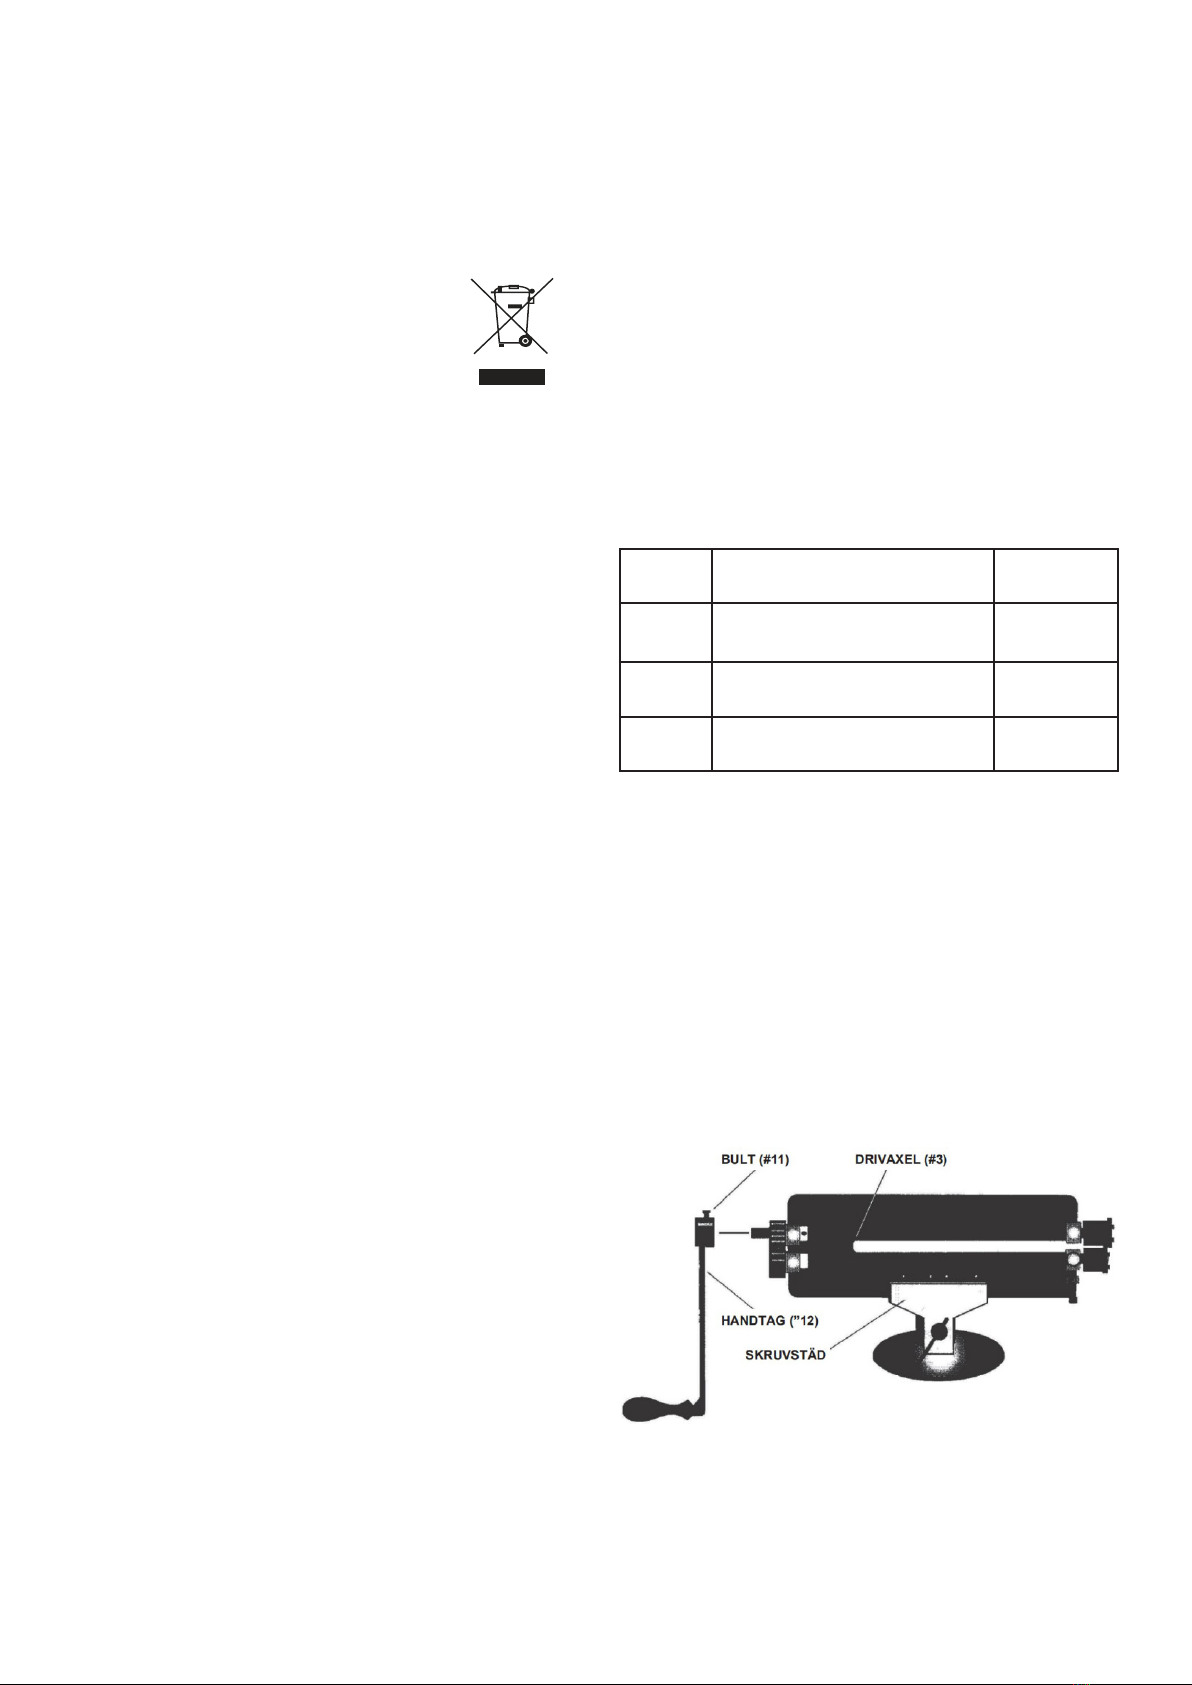
Before you start assembling the machine:
While mounting the machine, attach it to a
standard vise. Also make sure that the vise is
properly screwed on.
Assembly
WARNING: The sheet beading machine is heavy.
Be two people when you lift and move the machine.
1. Place the beading machine (#1) in a vise shown
in Figure 1. Secure it in the vise.
2. Mount the Handle (#12) on the drive shaft (#3).
3. Use a wrench to tighten the bolt (# 11)
securely. Make sure that the bolt (#11) is
against the at part of the drive shaft (#3).

Adjustment
The beading machine usually needs to be adjusted
by the user. If the machine is not set correctly, the
quality of the result is negatively affected. If you
experience this problem, the machine needs to be
adjusted.
1. Mount the prole wheels (#9) and (#10) as
shown in gure 2.
2. Check the prole wheels 9 shown in gure 2,
position 2. When the beading machine is
correctly adjusted, the edges of the prole
wheels should touch (or almost touch) each
other. If they do not, do the following:
3. Loosen the two Allen screws with an Allen key
that secures the gear (# 5) and washer (# 6) to
the drive shaft (#3) at position 3.
4. Move the drive shaft (#3) until the prole
wheels (#9) meet.
5. Move the washer (#6) so that its edge meets
the roller (#2) and tighten the Allen screws,
position 3.
6. Move the gear (#5) so that its side meets the
roller (#2) and tighten the Allen screws.
Replacing profile wheels
It comes with several different models of prole
wheels in addition to those that come mounted.
Follow the instructions below when changing
prole wheels.
How to mount the prole wheels:
1. Use a wrench to loosen the clamping bolt
(#15). See Figure 3, position 1.
2. Use the Allen key to loosen the Allen screws
(#18) that hold the prole wheels in place. See
gure 3, position 2.
Install other profile wheels
1. Select the prole wheels you want to use.
2. Thread them on the shafts (#3) and (#4) at the
same time (see gure 4). Make sure that the
Allen bolts (#16) are located on the at surface
of the drive shaft (#3) and on the other shaft
(#4).
Adjustment of the shaft load
1. Tighten the clamping screw (# 15) by hand. See
Figure 4.
2. Use a wrench to tighten 1-3 turns, depending on
the result you want.
Operation
WARNING: Max 1.25mm plate thickness
Always be two people when using the machine.
One person handles the handling of the metal and
one cranks the machine. Using the machine for a
good result requires that the people who handle the
machine cooperate.
1. Mark on the material where it is to be
processed.
2. One person inserts and guides the plate
between the wheels while the other cranks the
machine (see gure 5).
3. Remove the prole wheels (#9)
4. Use a 14 mm wrench to loosen the end screws
(#14) that secure the prole wheels (#10) to
remove the washers (#13).
5. Use an Allen key to loosen the Allen bolts (#16)
that secure the prole wheels (#10) to the
shafts, at position 5.
6. Remove the prole wheels (#10).
3. Fit the end screws (#14) and washers (#13),
position 3. Tighten them with a 14mm wrench.
4. Tighten the two Allen screws (#16) at position
4.

Part: Description: Qty: Part: Description: Qty:
1 Base plate 1 17 Handle protection 1
2Roll block 418 Allen screw M6x16 8
3 Drive shaft 1 19-1 1/2” Semi-Round prole wheel
(convex)
1
4Shaft 1 19-2 1/2” Semi-Round prole wheel
(concave)
1
5Gear 220-1 3/8”Semi-Round prole wheel
(convex)
1
6 Washer 2 20-2 3/8”Semi-Round prole wheel
(concave)
1
7Bolts for roll block M14x30 421-1 1/4”Semi-Round prole wheel
(convex)
1
8Flat washer 14mm 421-2 1/4”Semi-Round prole wheel
(concave)
1
9Prole wheels for cutting 222-1 1/4”Beading wheel 1
10-1 Long prole wheel 1 22-2 1/4”Beading wheel 1
10-2 Short prole wheel 1 23-1 1/8” Beading wheel 1
11 Bolt M10x20 1 23-2 1/8” Beading wheel 1
12 Handle 1 24-1 1/16” Beading wheel 1
13 Washer 10 mm 2 24-2 1/16” Beading wheel 1
14 End bolts M10x20 2 25 Spring washer 6mm 8
15 Clamping bolts M 10x35 1 26 Allen key 5mm 1
16 Allen bolts M8x10 18 27 Allen key 4mm 1
READ THE FOLLOWING CAREFULLY
The manufacturer and / or distributor has the list of parts only as reference material. Neither the
manufacturer or the distributor makes any warranty in any way that the buyer is qualied to make any
repairs of the product or that the buyer is a qualier. The manufacturer and distributor expressly thinks that
all repairs and service should be carried out by qualied professionals and not by the buyer. The buyer takes
all risk and all responsibility which occurs if the buyer repairs or intervents the product himself.


Verktygsboden Erlux AB Källbäcksrydsgatan 1, SE-507 42 Borås
© Verktygsboden · Borås · Sweden · 0120504-03
Table of contents
Languages:
Other PELA Tools manuals
Popular Tools manuals by other brands

Suncast
Suncast Sidewinder SWA100 owner's manual

Performance Tool
Performance Tool W54197 owner's manual

Einpart
Einpart 3209 instruction manual

Skil
Skil 0580 instructions

Matatakitoyo Torque Tools
Matatakitoyo Torque Tools MT2-4000N Operation manual

Matatakitoyo Torque Tools
Matatakitoyo Torque Tools MIT Operation manual