PELA 532900 User manual

Slangupprullare 10m, 12m & 15m
Hose Reel 10m, 12m & 15m
Item No:
532900,
532901,
532902
Kontaktinformation
Verktygsboden Erlux AB
Källbäcksrydsgatan 1
SE-507 42 Borås
Telefon: 033-202650
Mejl: [email protected]
Miljöskydd/Skrotning
Återvinn oönskat material, släng
det inte bland hushållssoporna. Alla
maskiner, tillbehör och förpackning-
ar skall sorteras och lämnas till en
återvinningscentral och där kasseras
på ett miljövänligt sätt.
Specifikationer
532900
Slang diameter..............................................8×12mm
Inloppsslangens längd...........................................1m
Utloppsslangens längd........................................10m
Max. arbetstryck................................................16bar
532901
Slang diameter.......................................9.5×13.5mm
Inloppsslangens längd...........................................1m
Utloppsslangens längd........................................15m
Max. arbetstryck................................................18bar
532902
Slang diameter................................................9.5mm
Inloppsslangens längd..........................................2m
Utloppsslangens längd........................................20m
Max. arbetstryck................................................17bar
Obs! Läs hela manualen före installation eller
användning.
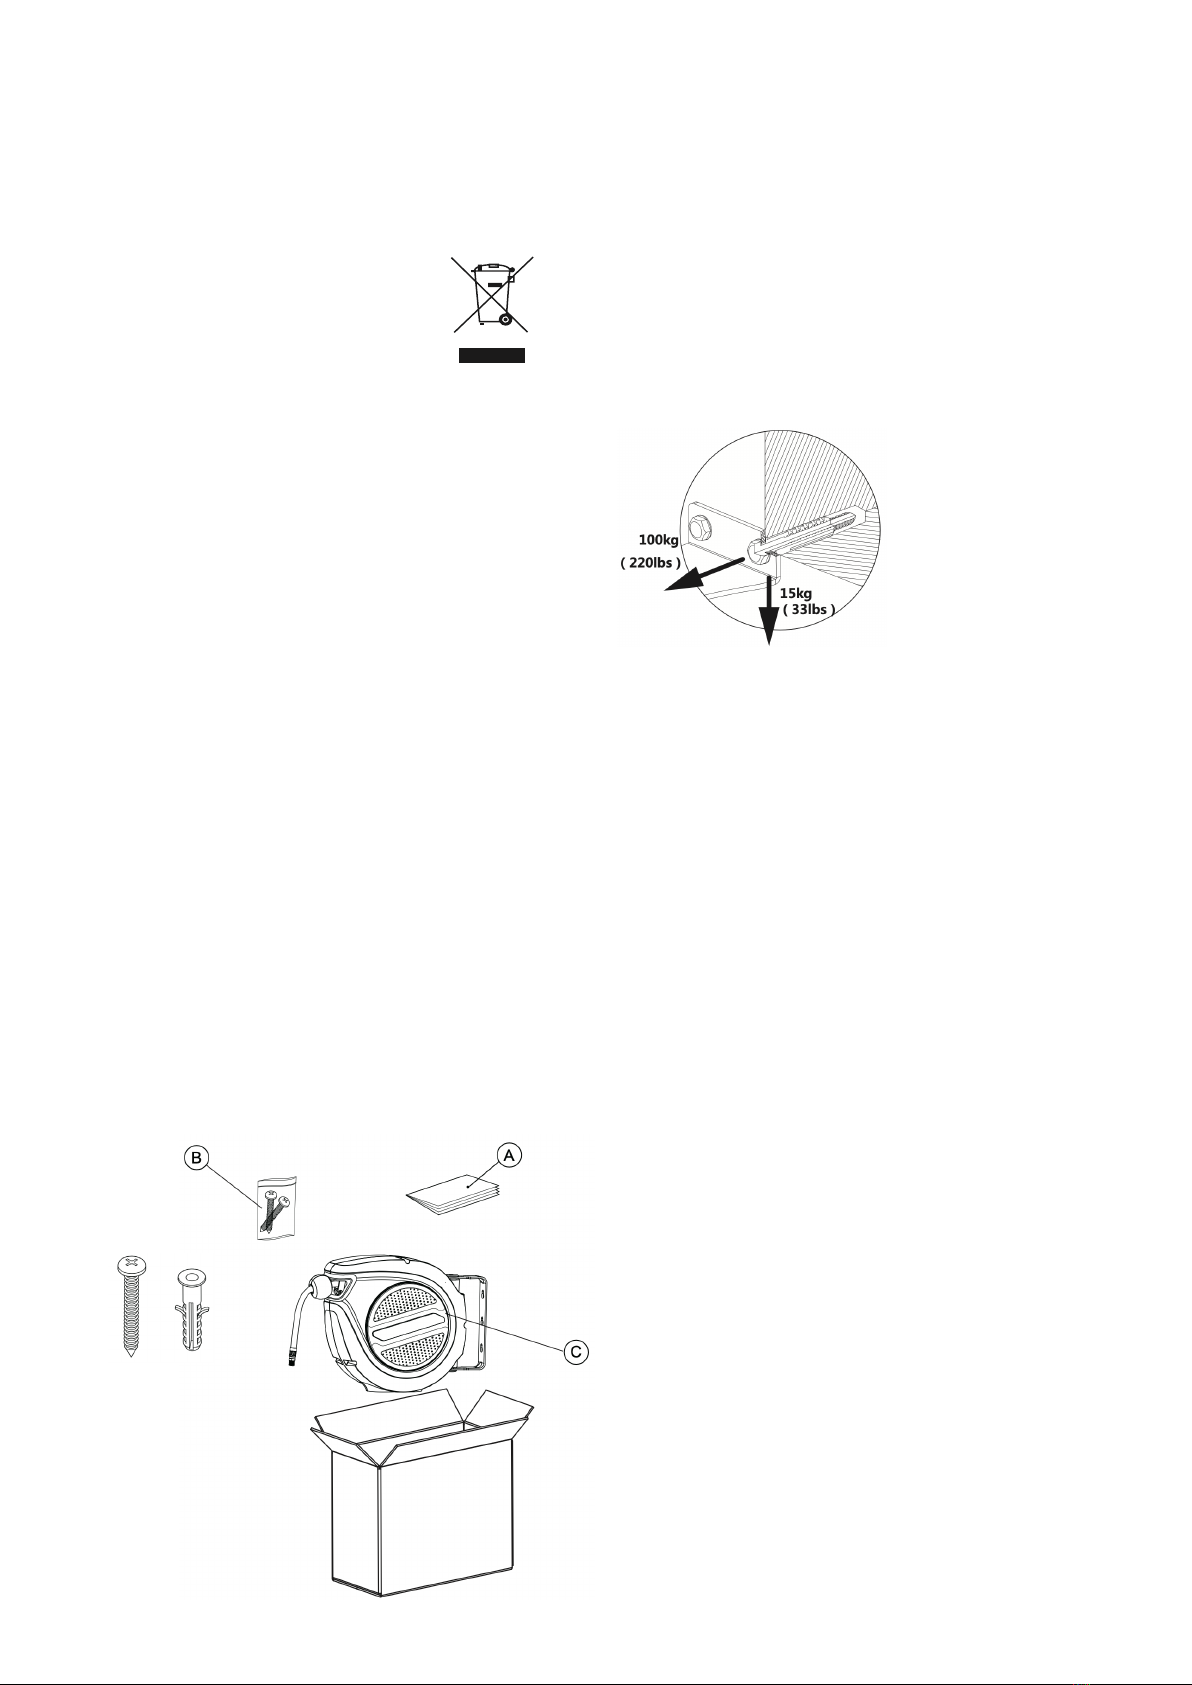
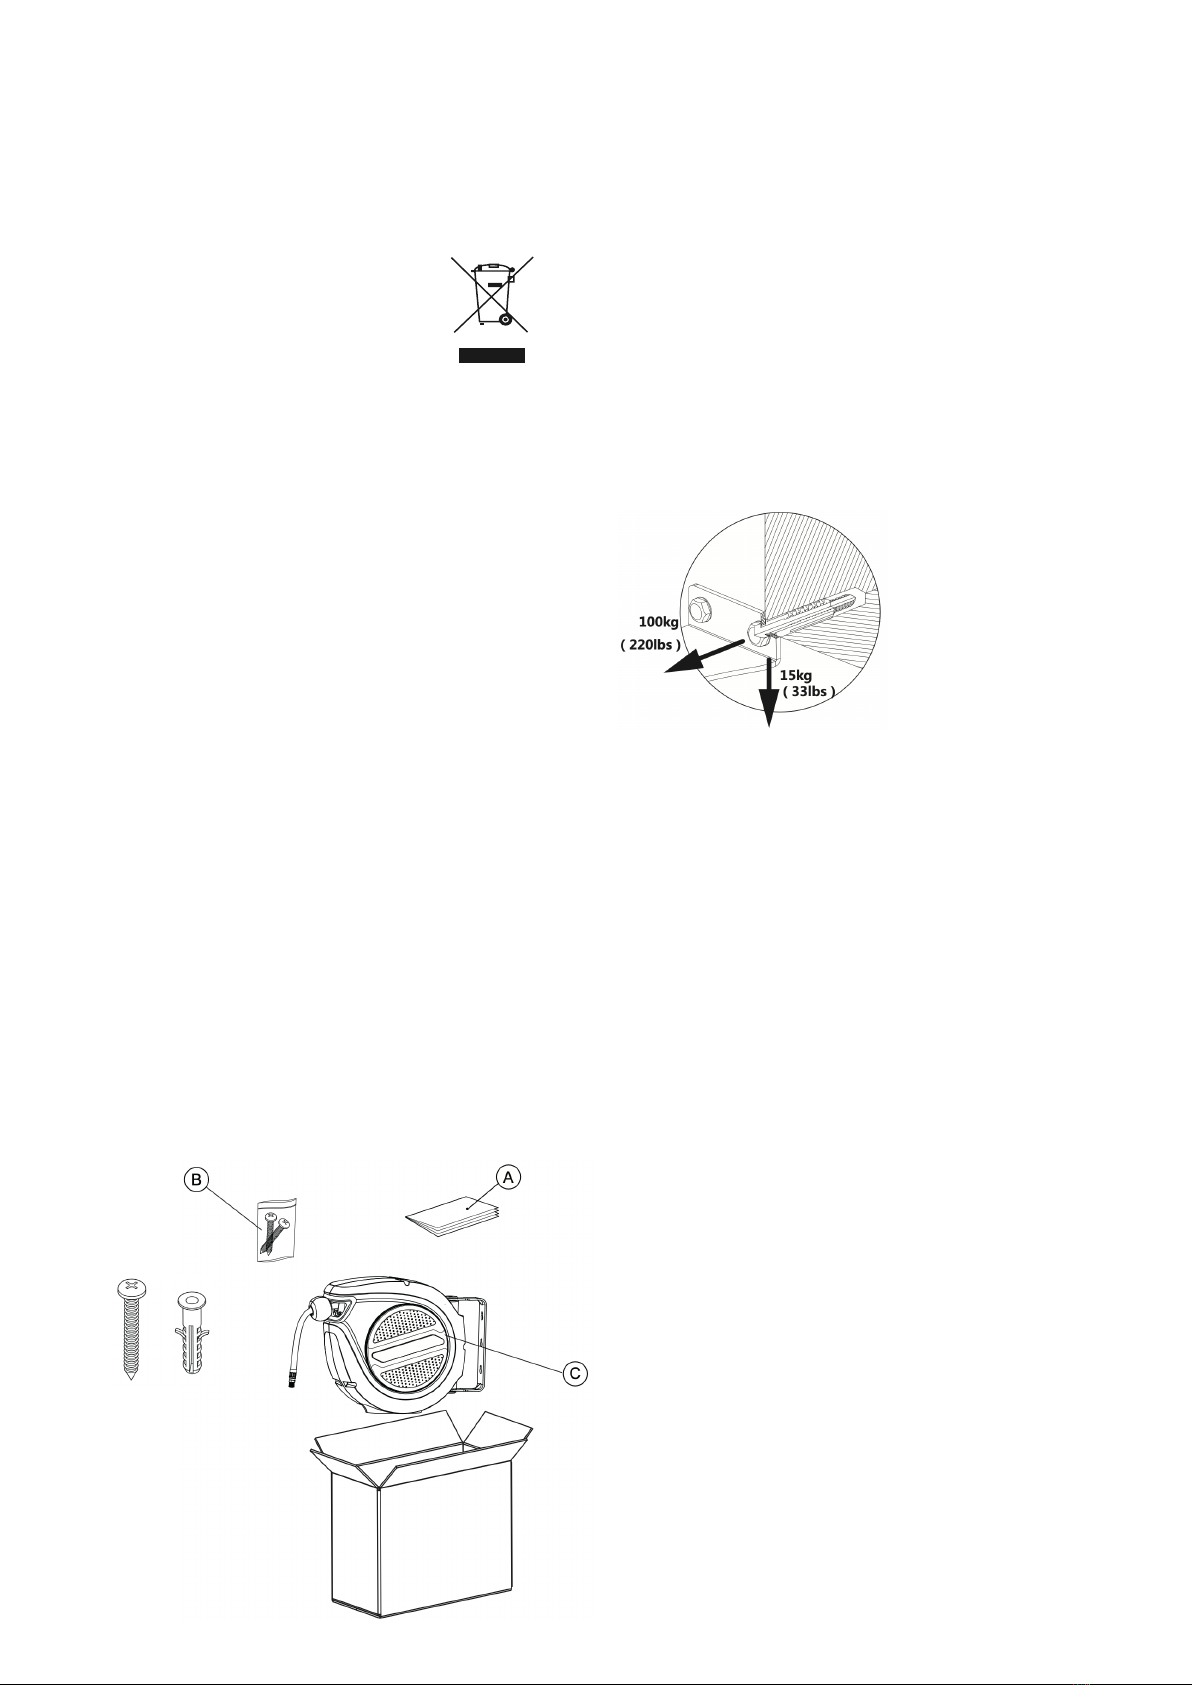
Innehåll
A. Bruksanvisning
B.1 Skruv (x3)
B.2 Plugg (x3)
C. Slangrulle
Välj den bästa platsen för montering
Denna produkt kan monteras på många olika sätt.
Det är viktigt att välja monteringsplats noggrant.
1. Nära din arbetsplats. Se till att slangen kan nå
din arbetsplats.
2. Nära tryckluftsförsörjning. Denna produkt
har en 1 meter lång inloppsslang. Se till att den
kan nå lufttillförseln.
3. Installera inte i direkt solljus.
4. Installera slangupprullaren på en stabil vägg, se
bild. Kontakta en professionell installatör om
du är osäker om väggen är godkänd för
installation.
Montering
Varning: Montera den på en säker plats så att inga
olyckor sker.
Varning: Se till att det inte nns några
spänningsförande elektriska ledningar eller VVS i
väggen på den plats du borrar.
Direkt montering på träregel
Rekommenderade verktyg
• Maskeringstejp
• dubbsökare
• vattenpass
• elektrisk borr
• Ø3 mm (Ø1/8 tum) borr
• Philips skruvmejsel
Steg
1. Använd dubbsökaren för att lokalisera dubben
och markera platsen.
2. Tejpa fast borrmallen på väggen på lämplig höjd
och se till att hålen är centrerade på regeln.
3. Kontrollera hålens mittpunkter med nivån för att
säkerställa att de är lodräta.
4.Borra tre hål med en Φ3 mm murborr, 35 mm
djup på mallens mitt.
5. Skruva in monteringsskruvarna (B.1) i hålen,
lämna ca 5 mm mellan väggen och skruvhuvudet.
6. Häng upp slangvindan på skruvarna.
7. Dra åt skruvarna.
8. Anslut med inloppsslangens ände till
luftkompressorn.

Montera på ihålig vägg och murad vägg
Rekommenderade verktyg
• maskeringstejp
• vattenpass
• elektrisk borr
• Ø10mm borr
• hammare eller klubba
• Philips skruvmejsel
Steg
1. Tejpa fast borrmallen på väggen på lämplig höjd
och se till att hålen är mellan reglarna.
2. Kontrollera hålens mittpunkter med nivån för att
säkerställa att de är lodräta.
3. Borra (3) tre hål med en Ø10 mm murborr på
mallens mitt.
4. Knacka plugg (B.2) i hålen med en hammare
eller klubba.
5. Skruva in monteringsskruvarna (B.1) i
pluggen, lämna ca 5 mm mellan väggen och
skruvhuvudet.
6. Häng upp slangvindan på skruvarna.
7. Dra åt skruvarna.
8. Anslut inloppsslangens ände till kompressorn.
Obs! Släpp trycket när den inte används.
Notera Låt slangen rulla tillbaka i sin takt.
Användning
1. Dra ut slangen till önskad längd. Slangen låses
automatiskt i position.
2. Trycksätt slangvindan och använd ditt luftdrivna
verktyg.
Efter användning
1. Stäng av tillförseln till slangrullen.
2. Släpp trycket i slangvindan genom att snabbt
starta ditt luftdrivna verktyg.
3. Dra lätt i slangen för att frigöra
spärrmekanismen.
4. Gå tillbaka slangen till slangvindan.
5. Om slangen trasslar sig och inte dras tillbaka,
avlägsna alla knutar och låt sedan slangen
sakta dras tillbaka i slangvindan. Se alltid till att
slangen är ren och inte är vriden.
Underhåll
Kontrollera slangupprullaren med jämna mellanrum
för att se att den fungerar som den ska och att det
inte nns några sprickor i slangen.
Montera inte isär behållaren till
slangupprullaren
1. Håll alltid slangen ren.
2. Om slangen blir smutsig, rengör den med en
fuktig trasa medan den dras in.
3. Vrid INTE slangen när den används.
4. Montera slangvindan i ett skyddat område för att
bevara bästa möjliga funktion.
5. Låt INTE slangen komma i kontakt med frätande
kemikalier eller vätskor.
6. Dra alltid in slangen när den inte används.

Contact
PELA Tools
Solängsvägen 13
SE-513 70 Borås
Phone: 033-202650
E-mail: [email protected]
Environmental protection/
Scrapping
Recycle any unwanted material,
do not throw it in the household
rubbish. All machines, accessories
and packaging must be sorted and
left at a recycling center and disposed
of in an environmentally friendly manner.
Specifications
532900
Hose diameter..............................................8×12mm
Inlet hose length.....................................................1m
Outlet hose length...............................................10m
Max. operating pressure...................................16bar
532901
Hose diameter........................................9.5×13.5mm
Inlet hose length.....................................................1m
Outlet hose length...............................................15m
Max. operating pressure...................................18bar
532902
Hose diameter..................................................9.5mm
Inlet hose length.....................................................2m
Outlet hose length...............................................20m
Max. operating pressure...................................17bar
Note! Read the entire manual before installation or
use.
Package contents
A. Instruction Manual
B. Hardware Peack
B.1 Screw(x3
B.2 Plastic anchor (x3)
C. Hose Reel
Choosing the best mounting location
This product can be mounted in many different
ways. It is important to select your mounting
location carefully. Consider mounting to surfaces.
1. Near your worksite. This product includes 10m
outlet hose. Make sure it can reach your work
site.
2. Near your compressed air supply. This product
includes 1m of inlet hose. Make sure it can
reach your air supply.
3. Out of direct sunlight.
4. Strong enough to support the loads shown to
the right (per screw). If unsure, contact a
professional installer.
5. Refer to the installation options below for more
detail.
Installation
Warning: If not properly installed, there is a risk of
falling. Make sure your installation can support the
loads above.
Caution: When using power tools such as an
electric drill, please wear eye protection.
Warning: Ensure thereare no live electrical wires or
plumbing in the wall at the location your are
drilling.
Direct mount to wood stud
Recommended tools
• masking tape
• stud-nder
• bubble level
• electric drill
• Ø3mm(Ø1/8in) drill bit
• Philips head screw driver
Steps
1. Using stud-nder, locate stud and mark the
location.
2. Tape the drilling template on the wall at a
convenient height,making sure the holes are
centered on the stud.
3. Check the hole centers with the level to ensure
they are plumb.
4. Drill three holes with a Φ3mm masonry drill bit,
35mm deep on the template centers.
5. Drive mounting screws (B.1) into the holes,
leaving about 5mm between the wall and screw
head.
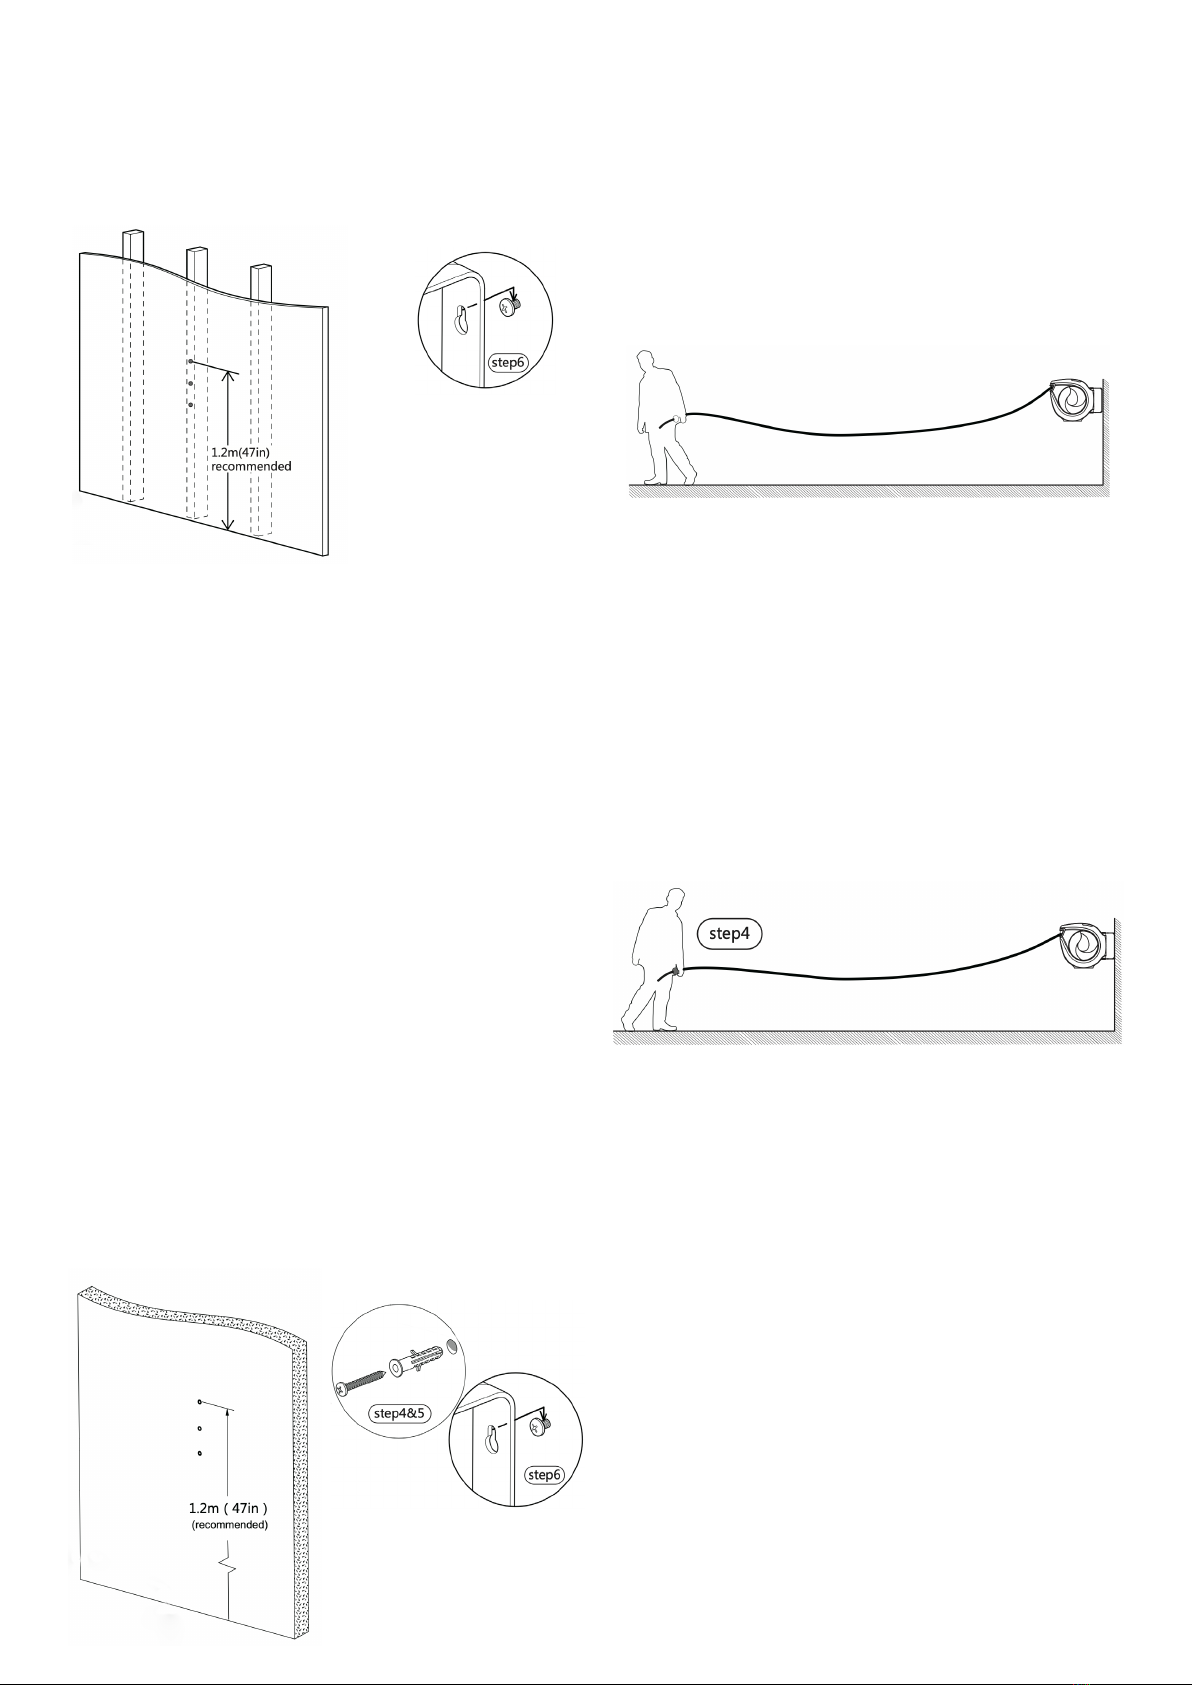
6. Hang the hose reel on the screws.
7. Tighten the screws.
8. Connect with inlet hose end with the air
compressor.
Mount to hollow wall and masonry wall
Recommended tools
• masking tape
• bubble level
• electric drill
• Ø10mm(Ø3/8in)drill bit
• hammer or mallet
• Philips head serew driver
Steps
1. Tape the drilling template on the wall at a
convenient height, making sure the holes are
between studs.
2. Check the hole centers with the level to ensure
they are plumb.
3. Drill (3) three holes with a Ø10mm(Ø3/8in)
masonry drill bit on the template centers.
4. Tap plastic anchors (B.2) into holes with a
hammer or mallet.
5. Drive mounting screws (B.1) into the plastic
anchors, leaving about 5mm (1/4in) between the
wall and screw head.
6. Hang the hose reel on the screws.
7. Tighten the screws.
8. Connect with inlet hose end with the air
compressor.
Note! Release pressure when not in use.
Caution: Do not release the hose allowing the
rewind on its own.
Using the hose reel
1. Pull the hose out to the desired length. The hose
will automatically lock in position.
2. Pressurize hose reel and use your air-powered
tool.
When finished using the hose reel
1. Turn off sir supply to hose reel.
2. Release the pressure in the hose reel, by briey
activating your air-powered tool.
3. Give the hose a short pull to release the ratchet
mechanism.
4. Walk the hose back to the hose reel.
5. If the hose becomes tangled and will not retract
- slowly pull out the hose past the tangled
section and then allow the hose to slowly
retract while guiding the hose back into the
hose reel. Always ensure the hose is clean and
not twisted.
Maintenance
While your product has been made with high
quality materials, degradation can occur over time.
Inspect the hose and housing periodically. If
cracking or blisters are visible, repair before using
again.
Do not dissemble housing.
1. Always keep the hose clean.
2. If the hose becomes dirty, clean it with a damp
cloth while retracting.
3. DO NOT twist the hose while in use.
4. Mount the hose reel in a sheltered area to assist
and protect the performance of the hose and the
reel.
5. DO NOT allow the hose to touch any corrosive
chemicals or uids.
6. Always retract the hose when not in use.


Verktygsboden Erlux AB Källbäcksrydsgatan 1, SE-507 42 Borås
© Verktygsboden · Borås · Sweden · 0120504-03
This manual suits for next models
2
Table of contents
Languages:
Other PELA Tools manuals


