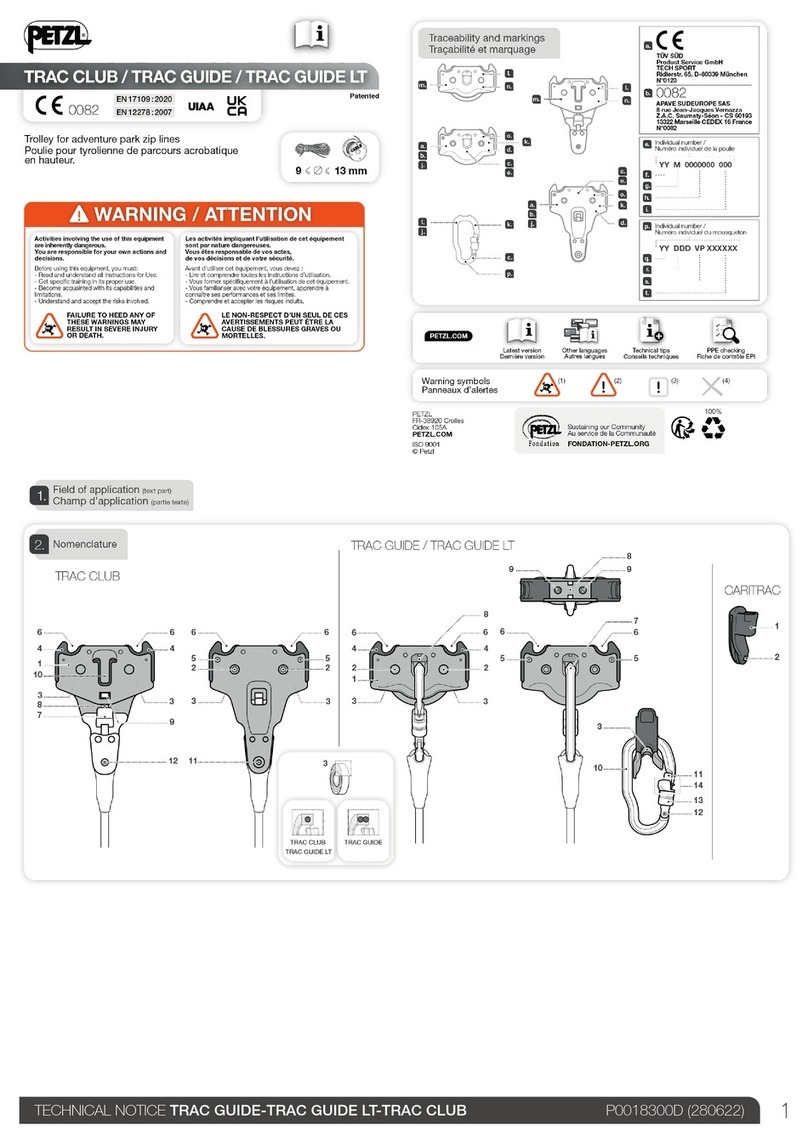
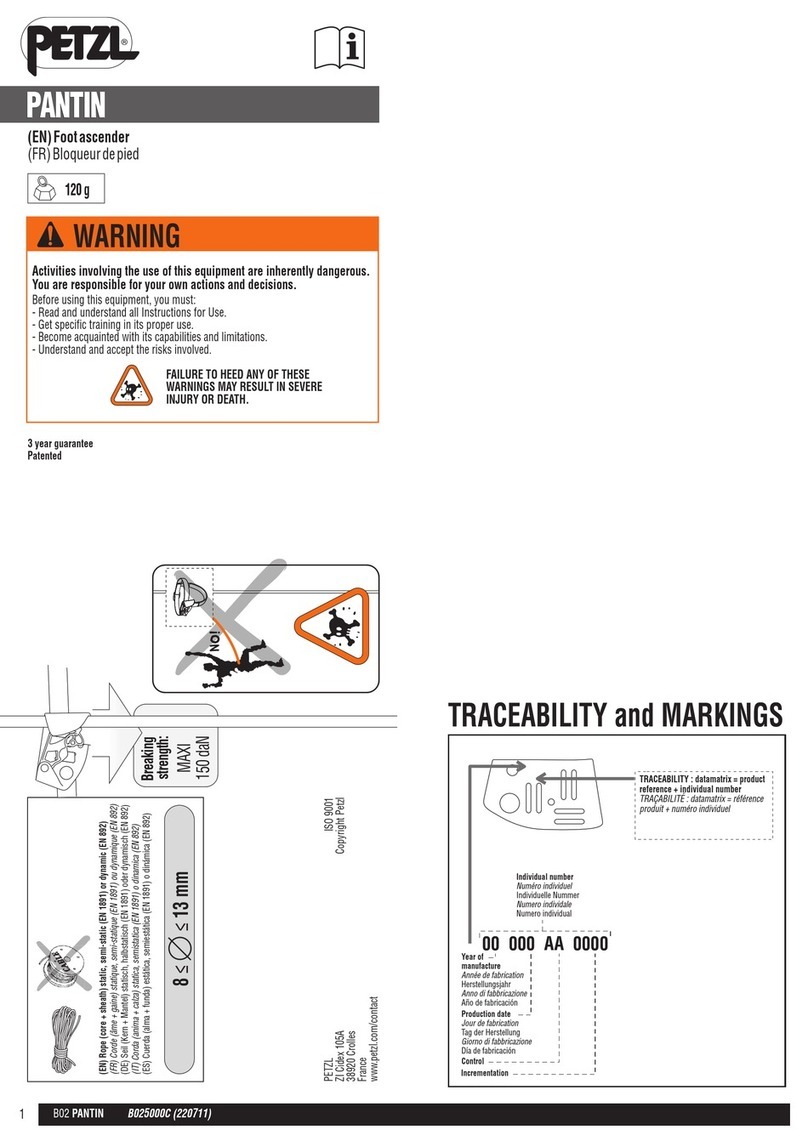
Petzl NEWTON C73 Owner's manual

1Notice Spécifique : NEWTON C73 réf. : C73500-B
Product
information =
specific
information general
information
Activities involving the use of this product are inherently dangerous. You are
responsible for your own actions and decisions.
Before using this product, you must :
- Read and understand the Product Information.
- Become acquainted with the product’s capabilities and limitations.
- Understand and accept the risks involved.
Additionally, you should get qualified instruction in its proper use.
FAILURE TO HEED ANY OF THESE WARNINGS MAY RESULT IN SEVERE INJURY OR DEATH.
WARNING
(GB) IMPORTANT
This notice contains information and
instructions specific to this product
only, for complete product information,
see also the attached Petzl General
Information notice. Both notices must
be read and understood before using
this product.
(FR) IMPORTANT
Cette notice contient uniquement des
informations spécifiques à ce produit.
Pour avoir une information complète,
voir aussi la notice des Informations
générales à tous les produits Petzl.
Les deux notices doivent être lues et
comprises avant d’utiliser ce produit.
(DE) WICHTIG
Diese Gebrauchsanweisung
enthält wichtige Informationen und
Anweisungen, die nur für dieses
Produkt gelten. Weitere Informationen
zu allen Produkten finden Sie der
allgemeinen Petzl-Produktbeschreibung.
Vor der Verwendung dieses Produkts
müssen beide Dokumente gelesen und
inhaltlich verstanden werden.
(IT) IMPORTANTE
Questa nota informativa contiene
informazioni specifiche di questo
prodotto soltanto. Per avere
un’informazione completa, fate
riferimento anche alla nota informativa
generale di tutti i prodotti Petzl.
Entrambe le note informative vanno lette
e comprese prima di utilizzare questo
prodotto.
(ES) IMPORTANTE
Esta ficha técnica contiene únicamente
información específica de este
producto. Para una información
completa, consulte también la ficha de
Información general incluida en todos
los productos Petzl. Las dos fichas
técnicas deben leerse y entenderse
antes de utilizar este producto.
(PT) IMPORTANTE
Esta notícia contém unicamente
informações específicas para este
producto. Para ter uma informação
completa, veja também a notícia das
Informações Gerais para todos os
produtos Petzl. As duas notícias deve
ser lidas e compreendidas antes de
utilizar este produto.
(NL) BELANGRIJK
Deze bijsluiter bevat enkel de specifieke
informatie voor dit product. Voor
een volledige informatie, zie ook de
bijsluiter met de Algemene Inlichtingen
bijgevoegd bij alle Petzl producten.
Beide bijsluiters moeten worden gelezen
en begrepen alvorens dit product te
gebruiken.
(DK) VIGTIGT
Denne brugsanvisning indeholder
specifikke informationer og instruktioner
kun for dette produkt, for at fuldende
produktinformationen, se vedlagte Petzl
overordnende brugsanvisning. Begge
brugsanvisninger bør læses og forstås
før ibrugtagning af dette produkt.
(SE) VIKTIGT
Detta informationsblad innehåller
information och instruktioner som
är specifika för denna produkt. För
komplett produktinformation, se även
den bifogade allmänna informationen
från Petzl. Bägge informationsbladen
måste läsas och all information måste
förstås innan produkten används.
(FI) TÄRKEÄÄ
Tämä ohje käsittää tietoa ja käyttöohjeita
nimenomaan tästä tuotteesta. Lue myös
oheen liitetty, yleinen Petzl informaatio.
Molemmat ohjeet on luettava ja
ymmärrättevä ennen tuotteen käyttöä.
(NO) VIKTIG
Denne bruksanvisningen inneholder kun
informasjon og instruksjoner spesifikt
for dette produktet. For komplett
produktinformasjon, vennligst se den
generelle bruksanvisningen fra Petzl.
Begge bruksanvisningene må leses og
forstås før produktet tas i bruk.
(RU) ВАЖНАЯ
ИНФОРМАЦИЯ
Эти материалы содержат
специальную информацию, которая
имеет отношение только к данной
продукции. Для получения полной
информации обратитесь к заметкам
содержащим Общую Информацию
Petzl (прилагается). Пожалуйста,
прочитайте и осознайте обе части
инструкции перед тем, как начнёте
использовать эту продукцию.
(CZ) DŮLEŽITÉ
Tento návod obsahuje informace, které
jsou určeny pouze pro tento výrobek.
Pro úplnější informace použijte
přiložené Všeobecné informace rmy
Petzl. Před použitím tohoto výrobku
jste povinni se seznámit s obsahem
obou dokumentů.
(PL) UWAGA
Niniejsza instrukcja zawiera wyłącznie
informacje właściwe dla tego produktu
W celu uzyskania kompletnych
informacji należy zapoznać się
instrukcją Informacje ogólne dla
wszystkich produktów Petzl. Należy
przeczytać i zrozumieć obydwie
instrukcje zanim zacznie się używać ten
produkt.
(SI) POMEMBNO
Ta navodila vsebujejo informacije,
ki se nanašajo samo na ta izdelek.
Za popolnejše informacije o izdelku
preberite tudi Splošne informacije
Petzl, ki so priložene. Pred uporabo
izdelka morate prebrati in razumeti obe
navodili.
(HU) FIGYELEM
Ez a használati utasítás kizárólag
a termékre vonatkozó speciális
információkat tartalmazza, és csak
az összes Petzl termékre vonatkozó
Általános információkkal együtt
nyújt elégséges tájékoztatást. A
termék használatbavétele előtt
elengedhetetlen a két ismertető alapos
áttanulmányozása és megértése.
(BG) ВАЖНО
Тази листовка съдържа само
специфичната информация и
указания за употреба на този
продукт. За да получите пълна
информация, вижте също
листовката ”Обща информация”
отнасяща се до всички продукти
на Петцл. Преди да започнете да
употребявате този продукт, трябва
да прочетете и разберете и двете
листовки.
(JP)重要な注意事項
ここで は 、この 製 品 特
有の注意、説明事項の
みを掲載しています。
この製品に関するその他の情
報は、製品に添付されている
一般注意事項を参照ください。
ここに ある 説 明と 製 品 に 添 付 さ
れている一般注意事項を必ず
よく読 み 、理解したうえで製品を
ご使用ください。
3:თဠ
ၦხགྷຫጃၔၦືዜશዽ
ႜพဉຫဧხགྷൢၕዅጀዻ
ધ ၰၒඑ ဋ႖ዽ ႞ዜ ႜพ
௴ ิ ໕ౘ ၩ ႜพ
ᅒધዻཊགྷ ႞ዜၕ ຫဧዻ
ૺ႖གྷ ຫጃၕ ༙
ხዻགྷૺ೦ఁఋ
(CN) 重要声明
这段声明的内容和指示只是对
这特定的产品而言,其它产品
资料请参阅附上之一般Petzl产
品指示。在使用产品前,两方
面的指示均需阅读及充分明白
方可使用。
(TH) ÁÕ¤ÇÒÁËÁÒÂ
¢éͤÇÒÁàµ×͹Íѹ¹ÕéºÃèØàÃ×èͧ¤Óá
¹Ð¹Ó áÅТéÍÁÙžÔàÈɢͧ¼ÅÔµÀѳ
±ì¹Õé ÊÓËÃѺ¢éÍÁÙżÅÔµÀѳ±ì·ÕèÊÁºÙóì,
ãËé´Ù·Õè¤Óá¹Ð¹Ó·ÑèÇ仢ͧ Petzl
·ÕèṺÁÒ ¤Óá¹Ð¹Ó·Ñé§ÊͧÍѹÍѹµéͧ
Íè¹ áÅзӤÇÒÁà¢éÒ㨠¼ÅÔµÀѳ±ì¹Õé.
Specific information

2Notice Spécifique : NEWTON C73 réf. : C73500-B
NEWTON
NEWTON C73
(EN) Fall arrest work harness
(FR) Harnais antichute professionnel
(DE) Auffanggurt für die Arbeit
(IT) Imbracatura anticaduta da lavoro
(ES) Arnés profesional anticaída
®
0197
PRICE
Made in France
3 year guarantee
ISO 9001
PETZL / F 38920 Crolles
www.petzl.com Copyright Petzl
Printed in France
APAVE Lyonnaise BP 3, 69811 Tassin Cedex, France, n0082
0197
NEWTON C73
®
Notified body intervening for the CE standard examination
Organisme notifié intervenant pour l’examen CE de type
Zertifikationsorganismus für CE Typen Überprüfung
Ente riconosciuto che interviene per l’esame CE del tipo
Organismo notificado que interviene en el examen CE de tipo
0197
Body controlling the
manufacturing of this PPE
Organisme contrôlant
la fabrication de cet EPI
Organismus der die Herstellung
dieses PSA kontrolliert
Organismo che controlla
la fabbricazione di questo DPI
Organismo controlador de la
fabricación de este EPI
Control
Contrôle
Kontrolle
Controllo
Control
00 000 A
Production date
Jour de fabrication
Tag der Herstellung
Giorno di fabbricazione
Día de fabricación
Year of
manufacture
Année de fabrication
Herstellungsjahr
Anno di fabbricazione
Año de fabricación
Batch n
N de série
Seriennummer
N di serie
N de serie
690 g
820 g
870 g
AA
1
(S L)
2
(L XXXL)
95 120 cm
37,4 47,2 inch
BB
62 80 cm
24,4 31,5 inch
AA
75 105 cm
27,5 41,3 inch
BB
53 65 cm
20,9 26 inch
0
(XS M)
A
AB
A
60 95 cm
23,6 37,4 inch
BB
45 57 cm
17,7 22,4 inch
A
B
EN361
(EN) Fall-arrest attachment
points EN 361
(FR) Anneaux anti-chute EN 361
(DE) Aufhängeöse EN 361
(IT) Annelli anticaduto EN 361
(ES) Anillos anticaidas EN 361
Nomenclature
of parts Static breaking load
7,5 kN 7,5 kN
15 kN
15 kN
1. How to put on
a. b. c. d. e.
Tightening
Serrage
Spannen
Allacciatura
Apretado
Loosening
Desserrage
Entspannen
Slacciatura
Aflojado
Closing / opening
Fermeture / ouverture
Schließen / Öffnen
Chiusura / apertura
Cierre / abertura
EN 362
2. Fall arrest use
1
A
A
2
4
4
3
EN 361
EN 361
(EN) The anchor point for the
system should preferably be
located above the user’s position
and should meet the requirements
of the EN 795 standard.
(FR) L’ancrage du système doit être
de préférence situé au dessus de la
position de l’utilisateur et répondre
aux éxigences de la norme
EN 795.
(DE) Der Anschlagpunkt des
Systems sollte sich möglichst
oberhalb der Position des Nutzers
befinden. Er muß den
Anforderungen gemäß der Norm
EN 795 entsprechen.
(IT) L’ancoraggio del sistema deve
essere preferibilmente situato al
disopra della posizione
dell’utilizzatore e rispondere alle
direttive della norma EN 795.
(ES) El anclaje del sistema tiene
que estar situado, preferentemente,
por encima de la posición del
usuario. Éste debe responder a las
exigencias de la norma EN 795.

3Notice Spécifique : NEWTON C73 réf. : C73500-B
3. Work positionning use
3B. Accessory PAD C89 :
work positioning belt
3A. Accessory LIFT L54 :
spreader
4. Accessory JAK C73100
EN 358 EN 358
GRILLON

4Notice Spécifique : NEWTON C73 réf. : C73500-B
(GB) ENGLISH
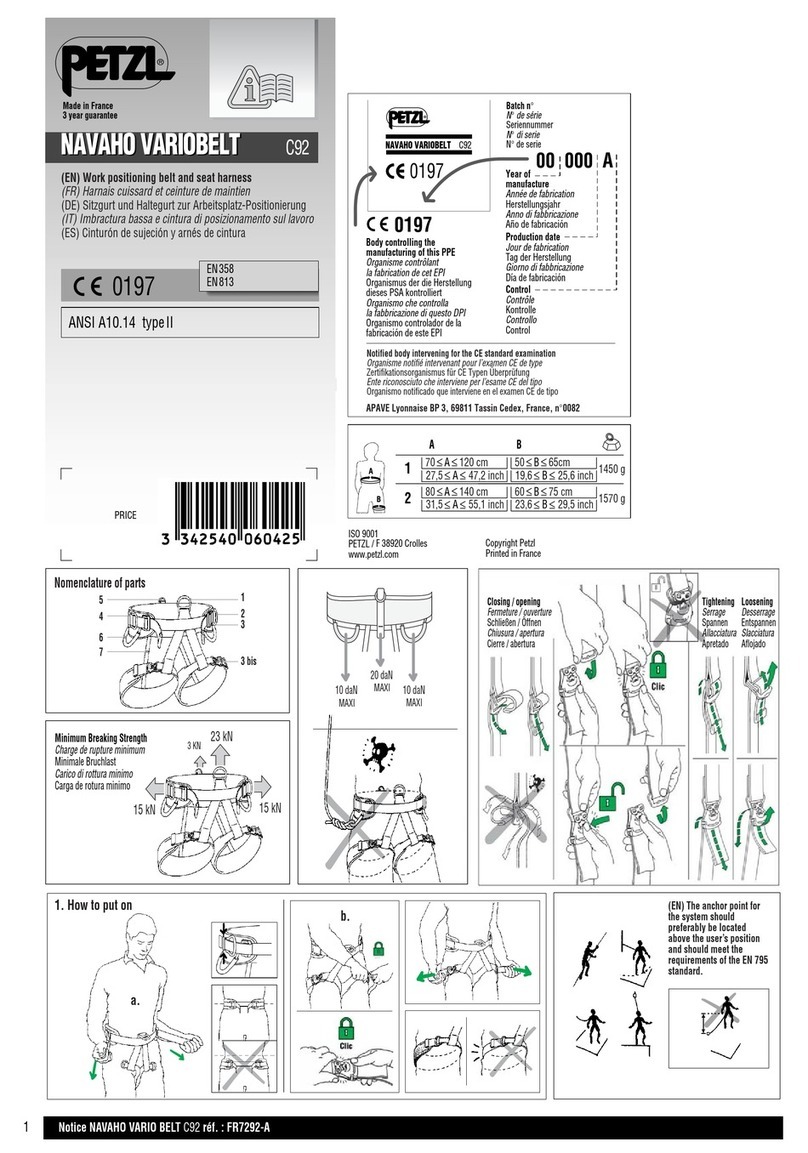
Nomenclature of Parts
(1) Attachment loopsforLIFT L54 spreader, (2) Rearfall arrest
attachment, (3) Sternal fall arrest attachment loops, (4) DoubleBack
adjustment buckle.
Principal materials: polyamide and polyester.
Checking, points to verify
Before each use, check the conditionof the webbing and the safety
stitching. Look forcutsinthe webbing, wearand damage due to use,
to heat, and to contact with chemical products, etc.
Be particularly careful to check forcut threads.
Verify the bucklesare working properly.
Instructions foruse
Diagram 1. Putting on the harness
First adjust the leg loops, thenthe shoulderstraps. Close the harness
by clipping a locking carabinerthrough the sternal attachment loops.
Remark: the usermust test the harness priorto use by moving and
hanging init from all attachment points, Thisisto ensure the harness
isof correct size and fit, and providessufficient comfort forthe
intended use.
Diagram 2. Fall arrest use
A carabinerisvery strong provided it isloaded inthe correct direction
and the gate isclosed. Foryour safety, get into the habit of backing
up your equipment incertainsituations, especially carabiners.
Clearance: distance to fall.
Ensure that the free height under the user is sufficient to avoid
obstacles in the event of a fall.
Diagram 3. Work positioning use
3A. Accessory LIFT L54: Spreader.
3B. Accessory PAD C89 : Work positioning belt. Alwaysuse both belt
attachment rings.
The attachment pointsof the LIFT and PAD must only be used for
attachment to a work positioning system (maximum fall height:
0,5 m) and neverto a fall arrest system.
Diagram 4.
Accessory C73100: vest forNEWTON C73 harness.
(FR) FRANCAIS
Nomenclature
(1) Anneaux de fixationécarteur LIFT L54, (2) Anneaudorsal
antichute, (3) Anneaux sternal antichute, (4) Boucle de réglage
Double-Back.
Matériaux principaux: polyamide et polyester.
Contrôle, points à vérifier
Vérifieravant toute utilisationlessangleset lescouturesde sécurité.
Surveillerlesdommagesdus à l’utilisation, la chaleur, lesproduits
chimiquesetc.
Attentionaux filscoupés.
Vérifierle bonfonctionnement desboucles.
Prescriptions d’utilisation
Schéma 1. Mise en place
Réglerd’abord lescuisses, ensuite lesbretelles. Fermerle harnaisen
reliant lesanneaux «sternal» parun mousquetonà verrouillage.
Remarque: l’utilisateur doit effectuerdesmouvementset un test
de suspensionsur tous lespointsd’attache, pour être sûrque son
matériel est de la bonne taille et duniveaude confort nécessaire pour
l’usage attendu.
Schéma 2. Utilisation antichute
Les mousquetons offrent une bonne résistance s’ils sont sollicités
dans le bon sens et quand ils sont fermés. Pour votre sécurité,
habituez vous dans certaines situations à toujours doubler les
systèmes, en particulier les mousquetons.
Tirant d’air: distance de dégagement. S’assurer que la hauteur libre
sous l’utilisateur est suffisante pour qu’il ne heurte pas d’obstacle en
cas de chute.
Schéma 3. Utilisation maintien au travail
3A. Accessoire LIFT L54: Ecarteur.
3B. Accessoire PAD C89 : Ceinture de maintienautravail. Utiliser
toujours ensemble lesdeux anneaux de la ceinture.
Lesanneaux desproduitsLIFT et PAD doivent être utilisés
uniquement pour l’accrochage à un système de maintienautravail
(hauteur de chute maximum: 0,5 m) et jamaisà un système d’arrêt
de chute.
Schéma 4.
Accessoire C73100: veste pour harnaisNEWTON C73
(DE) DEUTSCH
Benennung derTeile
(1) AnschlagösenfürSpreizbügel LIFT L54, (2) Auffangöse am
Rücken, (3) Auffangöse am Sternum, (4) DoubleBack Einstellschnalle
Hauptbestandteile: Polyamid und Polyester.
Überprüfung, zu kontrollierende Punkte
ÜberprüfenSie vorjederBenutzung die Gurtbänderund die
Sicherheitsnähte. AchtenSie auf Beschädigungendurch Verschleiß,
Hitze, Chemikalienetc. AchtenSie auf zerschnittene Fäden. AchtenSie
darauf, daß die Einstellschnalleneinwandfrei funktionieren.
Gebrauchsanweisung
Darstellung 1. Anlegen des Gurtes
StellenSie zuerst die Beinschlaufen, dann erst die Schulterriemen
ein. SchließenSie denGurt, indem Sie die sternalenÖsenmit
einem Verschlußkarabinerverbinden. Hinweis: DerBenutzermuß
vorGebrauch die Bewegungsfreiheit und denKomfort durch einen
entsprechendenHängetest sicherstellen.
Darstellung 2. Verwendung als Auffanggurt
Karabinerbietengute Festigkeitswerte, wenn sie inderrichtigen
Richtung belastet werdenund wenn sie geschlossensind. Gewöhnen
Sie sich im Interesse IhrereigenenSicherheit an, inbestimmten
Situationenihre Sicherungs- systeme zudoppeln, vorallem die
Karabiner.
Abstand: Zum Auffangen eines Sturzes.
Vergewissern Sie sich, dass unterhalb des Nutzers ausreichend
Sturzraum vorhanden ist.
Darstellung 3. Verwendung zum Positionieren am
Arbeitsplatz
3A. ZubehörLIFT L54: Spreizbügel
3B. ZubehörPAD C89 : Hüftgurt zur Positionierung am Arbeitsplatz.
VerwendenSie stetsbeide seitlichenAnschlagösenzusammen.
Die AnschlagösenderZubehörartikel LIFT und PAD dürfennur mit
einem System zur Positionierung am Arbeitsplatz verbundenwerden
(maximale Sturzhöhe: 0,5 m) und niemalsmit einem System zum
AuffangenvonStürzen.
Darstellung 4.
ZubehörC73100: Weste für Gurt NEWTON C73

5Notice Spécifique : NEWTON C73 réf. : C73500-B
(IT) ITALIANO
Nomenclatura delle parti
(1) Anelli di fissaggio del ponte LIFT L54, (2) Anello dorsale
anticaduta, (3) Anelli sternali anticaduta, (4) Fibbia di regolazione
Double-Back.
Materiali principali: poliammide e poliestere.
Controllo, punti da verificare
Controllare prima di ogni utilizzo le fettucce e le cuciture di sicurezza.
Fare attenzione ai danni dovuti all’utilizzo, al calore, ai prodotti
chimicietc.
Attenzione ai fili tagliati.
Controllare il buonfunzionamento delle fibbie.
Istruzioni d’uso
Schema 1. Sistemazione dell’imbracatura
Regolare innanzitutto i cosciali, quindi le bretelle. Chiudere
l’imbracatura collegando gli anelli sternali tramite un moschettone
conghiera di bloccaggio.
Nota: l’utilizzatore deve compiere dei movimenti ed una prova di
sospensione su tutti i punti d’aggancio, peressere sicuro che sia della
taglia giusta e della comodità necessaria all’utilizzo previsto.
Schema 2. Utilizzo come anticaduta
I moschettoni garantiscono un’ottima resistenza se fatti lavorare
nel verso giusto e quando sono chiusi correttamente. Perla vostra
sicurezza, inalcune situazioni abituatevi a raddoppiare sempre i
sistemi, inparticolare i moschettoni.
Tirante d’aria: distanza di spazio libero. Assicurarsi che l’altezza
libera sotto l’utilizzatore sia sufficiente per non urtare ostacoli in caso
di caduta.
Schema 3. Utilizzo come imbracatura di posizionamento
sul lavoro
3A. Accessorio LIFT L54: Ponte.
3B. Accessorio PAD C89 : Cintura di Posizionamento sul lavoro.
Utilizzare sempre insieme i due anelli della cintura.
Gli anelli dei prodotti LIFT e PAD devono essere utilizzati unicamente
perl’aggancio ad un sistema di posizionamento sul lavoro (altezza di
caduta massima: 0,5 m) e mai ad un sistema anticaduta.
Schema 4.
Accessorio C73100: giubbetto perimbracatura NEWTON C73
(ES) ESPANOL
Nomenclatura
(1) Anillosde fijacióndel separadorLIFT L54, (2) Anillo dorsal
anticaídas, (3) Anillo esternal anticaídas, (4) Hebilla de regulación
Double-Back.
Principalesmateriales: poliamida y poliéster.
Control, puntos a verificar
Compruebe antesde cualquierutilizaciónlascintasy lascosturasde
seguridad. Vigile losdañosdebidosal uso, al calor, a losproductos
químicos, etc… Atencióna loshiloscortados. Verifique el correcto
funcionamiento de lashebillas.
Normas de utilización
Esquema 1. Colocación
Regule primero lasperneras, despuéslostirantes. Cierre el arnés
uniendo losanillosesternalespormedio de un mosquetónde
seguridad. Nota: el usuario debe efectuarmovimientosy una prueba
de suspensiónsobre todoslospuntosde anclaje, para estarseguro
de que su material corresponde a la talla correcta y al nivel de
comodidad necesario para el uso previsto.
Esquema 2. Utilización como anticaídas.
Losmosquetonesofrecenuna buena resistencia si cuando son
solicitados, ensentido correcto, estáncerrados. Para tuseguridad
acostúmbrate, enciertassituaciones, a doblarlossistemas, en
especial losmosquetones.
Altura libre: distancia de seguridad.
Debe asegurarse de que la altura libre por debajo del usuario sea
suficiente para que no se golpee con ningún obstáculo en caso de
caída.
Esquema 3. Utilización como sujeción al trabajo
3A. Accesorio LIFT L54: Separador.
3B. Accesorio PAD C89 : Cinturónde sujeción. Utilice siempre juntos
losdosanillosdel cinturón. Losanillosde losproductosLIFT y PAD
debenserutilizadosúnicamente para engancharlosa un sistema de
sujeción(altura máxima de la caída: 0,5 m) y nunca a un sistema
anticaídas.
Esquema 4.
Accesorio C73100: chaleco para el arnésNEWTON C73.
(PT) PORTUGUES
Nomenclatura
(1) Anéisde fixação afastadorLIFT L54, (2) Anel dorsal anti-queda,
(3) Anéisesternaisanti-queda, (4) Fivela de ajuste Double-Back.
Matériasprincipais: poliamida e poliéster.
Controle, pontos a verificar
Verificarantesde qualquerutilização asfitase ascosturasde
segurança.
Vigiarosdanosdevidosà utilização, ao calor, aosprodutosquímicos,
etc…
Atenção aosfi o scortados.
Verificaro bom funcionamento dasfivelas.
Modo de utilização
Esquema 1. Montagem
Ajustarprimeiro asalças, depoisasperneiras. Fecharo harnês
ligando osanéisesternaisporum mosquetão com segurança.
Nota: o utilizadordeve efectuarmovimentose um teste de suspensão
sobre todosospontosde fixação, para se assegurarde que o seu
equipamento está com o tamanho ideal, e também com o nível de
conforto desejado para a tarefa a realizar.
Esquema 2. Utilisação anti-queda
Poço de ar: zona de queda desimpedida.
Assegure-se que a altura livre sob o utilizador é suficiente para que
ele não embata em nenhum obstáculo em caso de queda.
Esquema 3. Utilisação posicionamento no trabalhol
3A. Acessório LIFT L54: Afastador.
3B. Acessório PAD C89 : Cinto de posicionamento no trabalho. Utilizar
sempre em conjunto osdoisanéisdo cinto.
OsanéisdosprodutosLIFT e PAD devem serutilizado unicamente
para fixação a um sistema de posicionamento no trabalho (altura
de queda máxima: 0,5 m) e nunca a um sistema de travamento de
quedas.
Esquema 4.
Acessório C73100: colete para harnêsNEWTON C73
This manual suits for next models
1
Table of contents
Other Petzl Safety Equipment manuals

Petzl
Petzl PANGA User manual

Petzl
Petzl TIBLOC User manual

Petzl
Petzl PANTIN User manual

Petzl
Petzl DUAL CANYON GUIDE User manual

Petzl
Petzl MGO 60 User manual

Petzl
Petzl RESCUCENDER User manual

Petzl
Petzl GRIGRI User manual

Petzl
Petzl PANTIN User manual

Petzl
Petzl PRO TRAXION User manual

Petzl
Petzl THALES User manual
Popular Safety Equipment manuals by other brands

KidKusion
KidKusion KIDSAFE BANISTER GUARD instructions

PMI
PMI SG51029 Manufacturer's Instructions

CMC
CMC SQUID 300020 manual

Phoenix Contact
Phoenix Contact Axioline AXL F SSDI8/4 1F user manual

Kemo Electronic
Kemo Electronic M148A quick start guide

ABS Safety
ABS Safety ABS-Lock Falz IV installation manual