manuals.online logo
Brands
  1. Home
  2. •
  3. Brands
  4. •
  5. Philips
  6. •
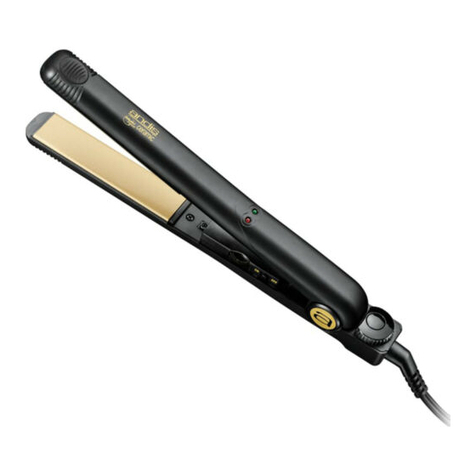
  7. Styling Iron
  8. •
  9. Philips BHS673 User manual

Philips BHS673 User manual

Register your product and get support at
www.philips.com/welcome
BHS673
User manual
• WARNING: Do not use this
appliance near bathtubs,
showers, basins or other
vessels containing water.
• Always unplug the appliance
after use.
• If the mains cord is damaged,
you must have it replaced
by Philips, a service centre
authorised by Philips or similarly
qualied persons in order to
avoid a hazard.
• This appliance can be used
by children aged from 8 years
and above and persons with
reduced physical, sensory or
mental capabilities or lack of
experience and knowledge
if they have been given
supervision or instruction
concerning use of the appliance
in a safe way and understand
the hazards involved. Children
shall not play with the
appliance. Cleaning and user
maintenance shall not be made
by children without supervision.
• Before you connect the
appliance, ensure that the
voltage indicated on the
appliance corresponds to the
local power voltage.
• Do not use the appliance
for any other purpose than
described in this manual.
• Do not use the appliance on
articial hair.
• When the appliance is
connected to the power, never
leave it unattended.
• Never use any accessories or
parts from other manufacturers
or that Philips does not
specically recommend. If
you use such accessories or
parts, your guarantee becomes
invalid.
• Do not wind the mains cord
round the appliance.
• Wait until the appliance has
cooled down before you store it.
• Pay full attention when using
the appliance since it could be
extremely hot. Only hold the
handle as other parts are hot
and avoid contact with the skin.
• Always place the appliance
with the stand on a heat-
resistant, stable at surface.
The hot heating plates should
never touch the surface or other
ammable material.
• Avoid the mains cord from
coming into contact with the hot
parts of the appliance.
• Keep the appliance away from
ammable objects and material
when it is switched on.
• Never cover the appliance
with anything (e.g. a towel or
clothing) when it is hot.
• Only use the appliance on
dry hair. Do not operate the
appliance with wet hands.
• Keep the heating plates clean
and free of dust and styling
products such as mousse,
spray and gel. Never use the
appliance in combination with
styling products.
• The heating plates has coating.
This coating might slowly wear
away over time. However, this
does not aect the performance
of the appliance.
• If the appliance is used on
color-treated hair, the heating
plates may be stained.
• Always return the appliance to
a service centre authorized by
Philips for examination or repair.
Repair by unqualied people
could result in an extremely
hazardous situation for the user.
• Do not insert metal objects
into openings to avoid
electric shock.
• Do not pull on the power cord
after using. Always unplug the
appliance by holding the plug.
Electromagnetic elds (EMF)
This Philips appliance complies with all applicable
standards and regulations regarding exposure to
electromagnetic elds.
Environment
Do not throw away the appliance with the normal
household waste at the end of its life, but hand it in at
an ocial collection point for recycling. By doing this,
you help to preserve the environment.
2 Guarantee and service
If you need information e.g. about replacement of an
attachment or if you have a problem, please visit the Philips
website at www.philips.com/support or contact the Philips
Customer Care Centre in your country (you nd its phone
number in the worldwide guarantee leaet). If there is no
Consumer Care Centre in your country, go to your local
Philips dealer.
3 Introduction
The straightener was designed to protect your fragile ends.
The innovative SplitStop technology is a combination of a
UniTemp sensor and smooth ceramic plates, leading to split
end prevention. This gives advanced protection to your hair
and therefore keeps your hair protected and shinier. We’ve
already turned the sensor on, so you can enjoy maximum
protection right from the start.
Specifications are subject to change without notice
© 2016 Koninklijke Philips N.V.
All rights reserved.
3140 035 42551
English
Congratulations on your purchase, and welcome to Philips!
To fully benet from the support that Philips oers, register
your product at www.philips.com/welcome.
1 Important
Read this user manual carefully before you use the
appliance and keep it for future reference.
• WARNING: Do not use this
appliance near water.
• When the appliance is used in
a bathroom, unplug it after use
since the proximity of water
presents a risk, even when the
appliance is switched o.
3-5CM
c
b
a
h
g
d
e
f
1
2 3
A
3-5CM
10 sec.
B
3-5CM
10 sec.
3-5CM
c
b
a
h
g
d
e
f
1
2 3
A
3-5CM
10 sec.
B
3-5CM
10 sec.
4 Preparation for use
• Wash hair with shampoo and conditioner and blow dry it.
• Use heat protection product and comb your hair with
large-toothed comb.
• Use the straightener only when your hair is dry.
• Frequent users are recommended to use heat protection
products when straightening.
• Ensure that you select a temperature setting that is
suitable for your hair. Please refer to the Hair Type table
below. Always select a lower setting when you use the
straightener for the rst time.
Hair Type Temperature Setting
Thick 200 °C to 230 °C
Normal 170 °C to 190 °C
Fine 130 °C to 160 °C
5 Straighten your hair ( Fig.2 )
1 Connect the plug to a power supply socket.
2 Slide the closing lock ( h) downwards to unlock the
appliance.
3 Press and hold the button ( f ) until the display screen
lights up.
» The default temperature setting 160°C ( d) is
displayed.
4 Press the or button ( e) to select your desired
temperature setting.
» When the appliance is heating up, the temperature
digits will blink. The digits stop blinking when the
heating plates have reached the selected temperature.
» The appliance will heat up in 30 seconds.
5 The ion function ( b) is activated when the appliance is
switched on, which provides additional shine and reduces
frizz.
» You may smell a special odor and hear a sizzling noise.
It is common because they are caused by the ion
generator.
6 Comb your hair and then start by clipping your blow dried
hair into sections not wider than 5cm.
Note: For thicker hair, it is suggested to create more sections.
7 Place one section of hair in between the heating plates
( a) and press the handles rmly together.
8 Slide the straightener down the length of the hair in a
single motion (max. 5 sec) from root to end, without
stopping to prevent overheating.
9 To straighten the rest of your hair, repeat steps 6 to 8 until
you achieve the desired look.
10 To nish your hair styling, mist with a shine spray or
exible hold hair spray.
Tip: Do not brush your hair while setting your hair style.
6 Curl your hair ( Fig.3 )
To create inward/outward curls:
1 Take a hair strand and clip up the rest of hair.
2 Start near the hair roots. Place the strand of hair between
the heating plates ( a).
3 ( Fig.3-A ) Turn the straightener inwards toward your face
and make a 360-degree turn.
( Fig.3-B ) To create outward curls, turn the straightener
away from your face and make a 360-degree turn.
Notes:
• Do not touch the surface above or below the heating
plates as they are hot. If necessary, use cool tip only.
• The beginning section of your hair should be completely
wrapped around the straightener before sliding the hair
down.
4 Your hair strand is fully wrapped around both sides of the
straightener. Make sure the hair tip is sticking out.
5 Pull the straightener downwards along the hair slowly.
Ensure the strand of hair is not slipping o the plates.
Tips:
• You may use the cool tip ( c) to assist in the
360-degree turn.
• Hold the straightener horizontally ( parallel to the oor )
so that the hair won’t fall out.
• You may use the cool tip to x your hair strand in place.
• Gently relax the grip on the handle as you rotate so that
you can easily turn the straightener.
After use:
1 Switch o the appliance and unplug it.
2 Place it on a heat-resistant surface until it cools down.
3 Clean the appliance and heating plates by damp cloth.
4 Close the heating plates ( a) and slide the closing
lock ( h) to lock the appliance.
5 Keep it in a safe and dry place, free of dust. You can also
hang it with the hanging loop ( g).
Note: The appliance has auto shut-o function. It switches
o automatically after 30 minutes without clamping.

Other Philips Styling Iron manuals

Philips HP4642/17 User manual

Philips

Philips HP4642/17 User manual

Philips HP8360/00 User manual

Philips

Philips HP8360/00 User manual

Philips HP4638 User manual

Philips

Philips HP4638 User manual

Philips TRESemme HP4669 User manual

Philips

Philips TRESemme HP4669 User manual

Philips HPS930 User manual

Philips

Philips HPS930 User manual

Philips HP8343 User manual

Philips

Philips HP8343 User manual

Philips SalonStraight Control HP4686 User manual

Philips

Philips SalonStraight Control HP4686 User manual

Philips HP4684 User manual

Philips

Philips HP4684 User manual

Philips Straightener HP8361/00 User manual

Philips

Philips Straightener HP8361/00 User manual

Philips BHS393 User manual

Philips

Philips BHS393 User manual

Philips HP4642/77 User manual

Philips

Philips HP4642/77 User manual

Philips HP4669/05 User manual

Philips

Philips HP4669/05 User manual

Philips HP8342/03 User manual

Philips

Philips HP8342/03 User manual

Philips HP8362 User manual

Philips

Philips HP8362 User manual

Philips HP4696/27 User manual

Philips

Philips HP4696/27 User manual

Philips Salon AirStylist Essential HP4624/00 User manual

Philips

Philips Salon AirStylist Essential HP4624/00 User manual

Philips BHH814 User manual

Philips

Philips BHH814 User manual

Philips SalonStraight Pro XL User manual

Philips

Philips SalonStraight Pro XL User manual

Philips SalonStraight Pro XL HP4667/00 User manual

Philips

Philips SalonStraight Pro XL HP4667/00 User manual

Philips SalonStraight Petite HP8300/00 User manual

Philips

Philips SalonStraight Petite HP8300/00 User manual

Philips HP8343 User manual

Philips

Philips HP8343 User manual

Philips SalonStraight Control HP4686 User manual

Philips

Philips SalonStraight Control HP4686 User manual

Philips HP8300/01 User manual

Philips

Philips HP8300/01 User manual

Philips HP4648/27 ProCeramic Breeze User manual

Philips

Philips HP4648/27 ProCeramic Breeze User manual

Popular Styling Iron manuals by other brands

TZS First AUSTRIA Ida FA-5670-3 instruction manual

TZS First AUSTRIA

TZS First AUSTRIA Ida FA-5670-3 instruction manual

BOMANN CB 878 Instruction manual & guarantee

BOMANN

BOMANN CB 878 Instruction manual & guarantee

TEFAL Beauty Easy liss quick start guide

TEFAL

TEFAL Beauty Easy liss quick start guide

Rowenta IMAGIN CF3010 Instructions for use

Rowenta

Rowenta IMAGIN CF3010 Instructions for use

KRHÜNER 37547 instruction manual

KRHÜNER

KRHÜNER 37547 instruction manual

Unold Premium Traveller Mini Instructions for use

Unold

Unold Premium Traveller Mini Instructions for use

Vitek VT-2313 Manual instruction

Vitek

Vitek VT-2313 Manual instruction

Scarlett TOP Style SC-HS60T52 instruction manual

Scarlett

Scarlett TOP Style SC-HS60T52 instruction manual

Farouk GF8280EU owner's manual

Farouk

Farouk GF8280EU owner's manual

OBH Nordica ARTIST instruction manual

OBH Nordica

OBH Nordica ARTIST instruction manual

THORLABS NanoRotator user guide

THORLABS

THORLABS NanoRotator user guide

Johnson Giro Instructions for use

Johnson

Johnson Giro Instructions for use

Lumme LU-1001 user manual

Lumme

Lumme LU-1001 user manual

Arzum LISA AR 5023 instruction manual

Arzum

Arzum LISA AR 5023 instruction manual

OBH Nordica BJORN AXEN Instructions for use

OBH Nordica

OBH Nordica BJORN AXEN Instructions for use

Clatronic HAS 2753 Instruction manual & guarantee

Clatronic

Clatronic HAS 2753 Instruction manual & guarantee

Remington S-9600 instructions

Remington

Remington S-9600 instructions

izzy SilkCERAMIC HS-79 instruction manual

izzy

izzy SilkCERAMIC HS-79 instruction manual

manuals.online logo
manuals.online logoBrands
  • About & Mission
  • Contact us
  • Privacy Policy
  • Terms and Conditions

Copyright 2025 Manuals.Online. All Rights Reserved.