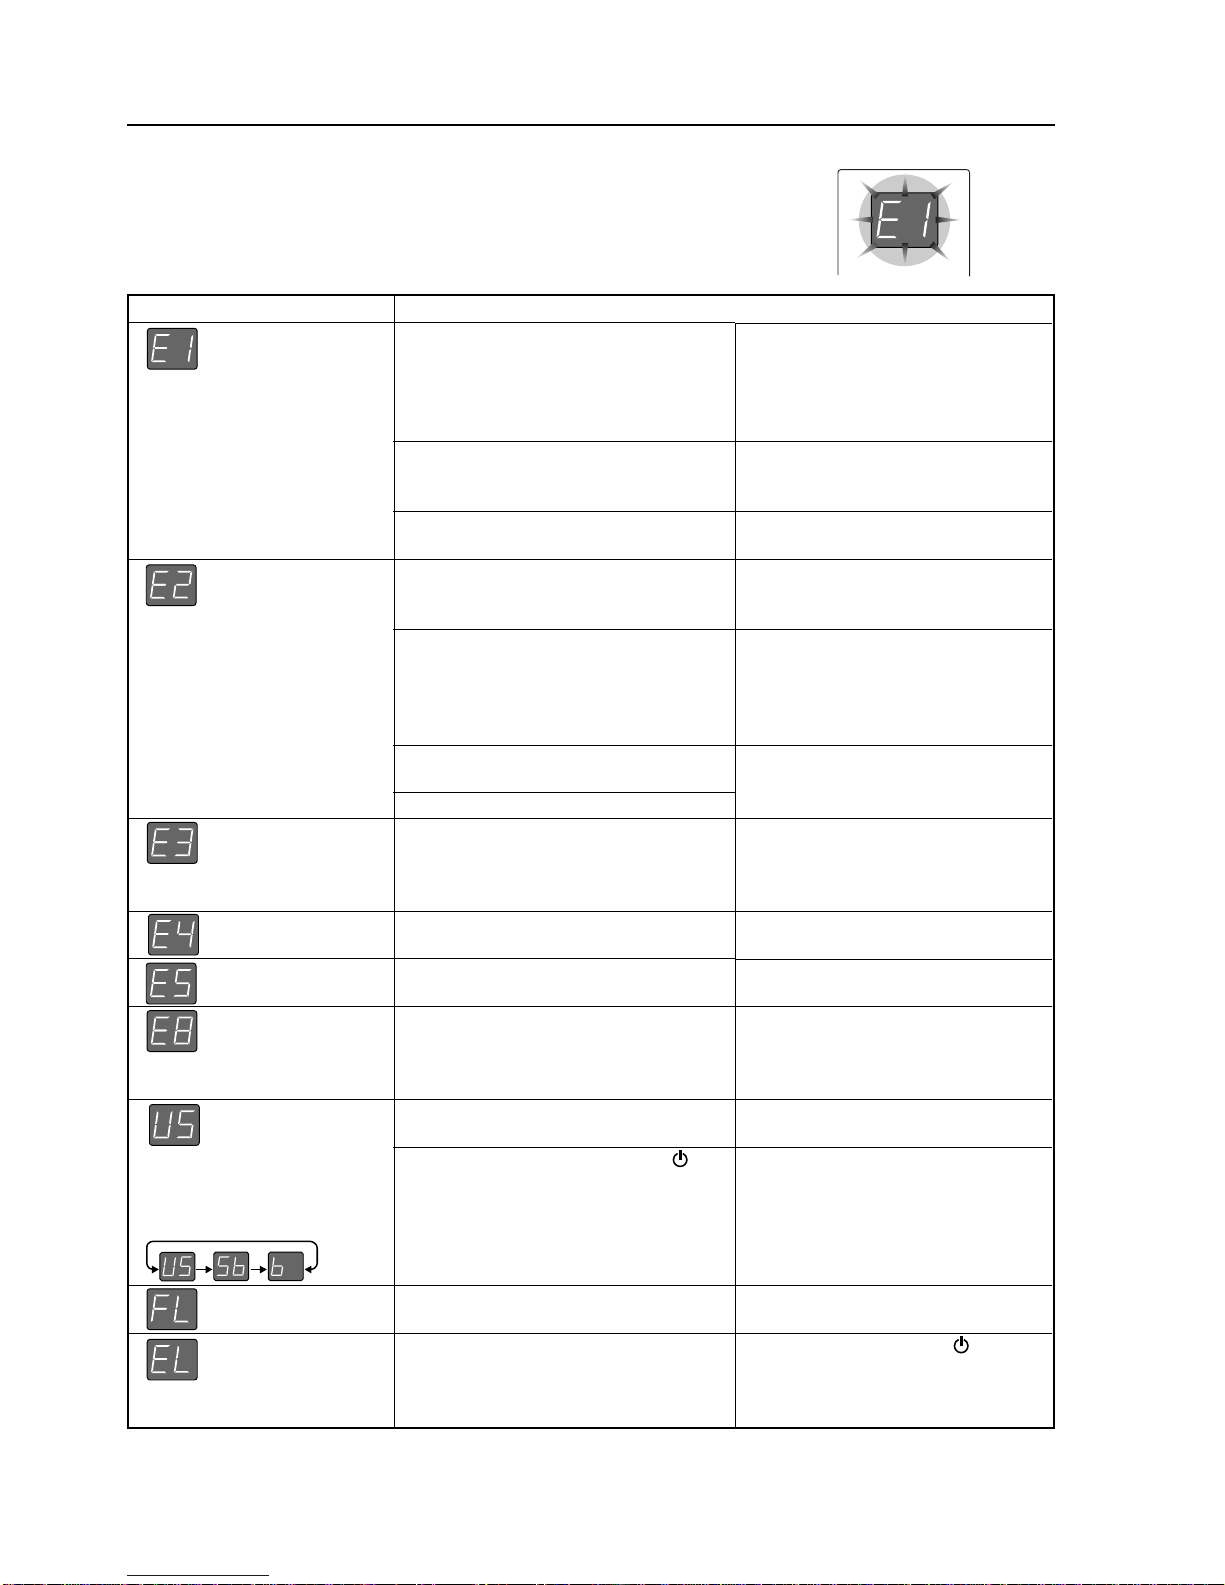
Plus CR-5 User manual

COPY BOARD
CR-5
SERVICE MANUAL

CONTENTS
1. COMPLIANCE OF SAFE REPAIR ............................... 1
1-1. Cautions during Product Movement ..........................1
1-2. Cautions during disassemblying and assembling ...... 1
2. SPECIFICATIONS ........................................................ 2
2-1. Product specifications ................................................ 2
2-2. Names of the Parts .................................................... 3
2-3. Control Panel ............................................................. 5
2-4. Error Display .............................................................. 6
3. SOFTWARE PLUS TOOLBOX .................................... 7
3-1. What is Copyboard Soft PLUS TOOLBOX ................ 7
3-2. Connection to the Computer ......................................8
3-3. Installation of the Software ........................................9
3-4. Menu Screen Names and Functions ......................... 12
3-5. Operating the copyboard from the computer ............. 13
3-6. Hardware Setup ......................................................... 14
3-7. Update the Copyboard’s internal Progrom................. 17
4. TROUBLE SHOOTING................................................. 18
5. DISASSEMBLY AND ASSEMBLY ............................... 19
5-1. Tools Required ........................................................... 19
5-2. Cautions..................................................................... 19
5-3. Disassembly andAssembly Procedures.................... 19
5-4. Disassembly andAssembly ....................................... 20
6. ADJUSTMENT.............................................................. 23
6-1. Calibrtion.................................................................... 23
6-2. Updating the internal program of CR-5 main set ....... 24
6-3. Test mode .................................................................. 25
6-4. Direct Command of CR-5 Main Set
(for Maintenance Service and Installation Traders)
......... 25
6-5. Timing belt adjustment ............................................... 26
7. CABLE AND CABLE CONNECTION .......................... 27
8. PARTS LIST ................................................................. 28
1. Overall configuration ..................................................... 28
2. Frame Section............................................................... 30
3. Accessories Section ...................................................... 32
4. Cartion & Section .......................................................... 34
5. Screws & Washers........................................................ 36
6. CR-5-T .......................................................................... 37
7. CR-5-TN........................................................................ 39
8. PRINTER table ............................................................. 41
9. REVISION HISTORY .................................................... 42

1
1. COMPLIANCE OF SAFE REPAIR
Be sure to read this Service Manual before providing services. In the PLUS Copyboard, full consideration is
taken to ensure the safety for a fire, electric shock, injury, harmful radiation, and substance. Therefore, observe
the notice described in this Service Manual so that the safety is kept when providing services. Moreover, be sure
to observe the notice described in the User’s Manual.
Pay attention to the following during service inspection.
1-1. Cautions during product maintenance
•It is necessary to remove the products when making the service of products put on the stand or wall.At that time,
hold the product by two or more persons to prevent the product from dropping or a person from falling down.
1-2. Cautions during disassembling and assembling
1. Disassemble and assemble products with the products removed from the stand or wall and with the prod-
ucts laid down.
2. Lay down products on a carpet so that the Endless sheet and cover are not damaged during disassembling
and assembling.
3. This equipment contains parts under high voltage. When doing repairs, make sure that power plug is pulled
out to insure safety.
4. Make sure that parts and screws and wiring, etc. are returned to their original positions. Tube, tape and
other insulation materials have been used for safety reasons. The internal wiring has been designed to
avoid direct contact with hot parts or parts under high voltage when using clamps or other tools.
5. The parts used in this device have special safety features such as flame-resistance and anti-voltage proper-
ties. When replacing parts, always use parts supplied from the factory.
6. After finishing operations make sure that all parts and wires have been returned to their original position and
that there has been no deterioration of the area around the location that was worked on.
7. Be sure to use an earth band (wrist band) during repair and inspection.

2
2. SPECIFICATIONS
2-1. Product Specifications
BOARD TYPE (Model name)
Installation method
Form External dimensions
Main unit weight
Panel Size
Effective reading size
Number of pages
Paging
Drive method
BOARD Reading method
Reading illumination
light source
Reading resolution
Reading time
Type
Memory Compatible FAT types
File format
Interface
Control panel Control buttons
Display
Clock
Added functions
PC connection
Power supply AC power adapter
Operating Temperature
conditions Humidity
Recording Printer interface
section
Miscellaneous Ruled lines
Miscellaneous
CR-5
wall mounting
W1143 ✕D63 ✕H688 mm
8.5 kg (Not including pen tray and AC adapter)
H610 ✕W1000 mm
H600 ✕W990 mm
2
Endless in one direction (Horizontal or vertical scroll)
Sheet movement
CIS (Contact Image Sensor)
RGB LED
Main scanning direction (vertical sheet surface) 1.92 dots/mm (50 dpi or equivalent)
Sub scanning direction (horizontal sheet surface) 1.92 dots/mm (50 dpi or equivalent)
Black & white: approx. 10 s
Color: approx. 15 s
USB Flash memory*1
FAT , FAT 32
JPEG or PNG format
USB1.1 or USB2.0*2
ON/Standby, Save, Print, Feed/Stop
7-Segment (Status of PC connection, Error#),
Used for the timestamp and for file dating properties
(Includes backup battery for when there is a loss of power)
Transfer of sheet surface image data via USB (TWAIN supported), settings
Input : AC100–240V/50–60 Hz, Max 1.5 A
Output : DC 24 V, 2.71 A
10–35°C
30–85% (No condensation)
USB1.1 or USB2.0 full-speed mode compliant printers are supported
34mm
Dedicated markers (black, red, blue, and green)
Remarks
*1: USB flash memory is not supplied.
*2: High-speed is not supported.
• Please note that the appearance of the main unit, the supplied printer, specifications, and other items are
subject to change without notice for the purpose of quality improvement.
• This machine contains eParts of the eSOL, Co., Ltd.
• This unit is a PLUS Copyboard product.

3
SPECIFICATION
2-2. Names of the Parts
Front
Adapter holder
DC input connector (On the bottom of the copyboard.)
Connect this with the DC plug end of the AC power adapter.
(Only connect the supplied AC power adapter; nothing else.)
USB port for Personal computer (PC) connection (Type B)
(On the bottom of the copyboard.)
Connect this with a USB port on the computer.
First, install the drivers and software on the supplied CD-ROM.
Pen tray
Upon purchase, mount the
pen tray onto the copyboard.
USB port (Type A)
(On the side of the copyboard.)
Insert the USB memory device here.
If you purchase a separately sold
printer, connect to the printer's USB
pore.
Control panel
Frame cover
Sheet
Use the dedicated markers to draw or write on the sheet.
This is where the AC power
adapter is installed.

4
SPECIFICATION
Rear
Rail groove
When mounting the copyboard on
a wall, insert the edge of the wall
mount fitting here and fasten the
copyboard.
Rail groove
When mounting the copyboard
on a wall, insert the edge of the
fixing bracket here and fasten the
copyboard.
Effective Reading Size
The area that can be copied is the gray area of the
diagram.
• It might not be possible to print or copy when
storing to USB memory or personal computer
any portions that are drawn outside of this range.
Note:
approx. 5 mm
approx. 5 mm
approx. 5 mm
approx. 5 mm
Effective reading size

5
SPECIFICATION
2-3. Control Panel
When pressing a button, please press the center area (i.e., the round and protruding portion).
The button may not work if it is pressed on a corner.
Save button (USB memory
storage)
Moves a one-screen portion of sheet and
reads it, then stores the data on a USB
memory.
Feed/Stop button
Scrolls the sheet one screen portion left,
then stops automatically.
Press during scrolling to stop.
Print button
Moves the sheet one screen portion and
reads it, and prints the image.
*
Only used when a separately sold printer
is connected.
ON/Standby button
Turns the Copyboard’s power on and off
(standby mode).
Display window
The status of the connection between the copyboard and com-
puter, the operating status and error information are indicated by
the 7-segment LEDs.
“ ” is displayed when the Copyboard is connected with a
personal computer. Note that “ ” is displayed when the
Copyboard is not connected with a personal computer.
USB port (Type A)
(On the left side of the
copyboard.)
Saves in commercially-avail-
able USB memory images
that have been read by the
Copyboard.
Can also be used to connect
a separately sold printer.

6
SPECIFICATION
2-4. Error Display
If any of the following flashing indications appear in the display window of
the control panel, please check the matters described below.
Error messages will flash for 5 seconds; however, error displays of “E4”and
“E5” will be lit steadily after the flashing stops.
Error display number
Printer not con-
nected
No printing paper
Printer problem
USB Memory not
recognized
USB Memory
storage problem
Reading problem
System error
Security protection
USB memory not
connected
When the “USb” letter display
is flowing...Warning that dis-
connection of USB memory
has been forgotten
USB Memory is full
An unsupported
printer is connected
•Connect the printer properly and
switch on the printer power.
•Turn the power of the printer off
and then on again, and load the
printer with A4 paper.
•Read the printer instruction
manual.
•
This unit supports the FAT and FAT
32 formats. Perform the formatting
with the personal computer.
•Please see our home page for
information about USB memories
that can be used with the
Copyboard.
( http://www.plus-vision.com )
•Please check the operation with
a personal computer.
•Please perform USB memory
storage again.
•Do not insert or remove the USB
memory during processing.
•
Unplug the power plug from the
power outlet and then plug it in again.
•
Unplug the power plug from the
power outlet and then plug it in again.
•The settings can be changed
using the included software. For
details, contact your nearby PLUS
Vision sales office, dealer or store.
•Plug the USB memory device
into the USB port.
•
A USB memory device is plugged
into the main unit. When the USB
memory device is disconnected, the
power will be switched off and the
unit will enter the standby mode.
•Please delete unnecessary data
using a personal computer.
• Press the ON/Standby button
and switch off the power. When a
record is required, switch on the
power and save to USB memory.
Problem and Solution
• Is the printer cable connected?
•
Is power being supplied to the printer?
•When the printer uses an AC power
adapter, is the cable disconnected
somewhere?
•Has paper been set in the printer?
•Is the printer error indicator flashing
(or lit)?
•Is the USB memory unformatted.
•I
s a USB memory that is not supported
by the Copyboard being used?
•Is the USB memory device plugged
in fully?
•Is the USB memory damaged?
•An error occurred during USB memory
storage.
•There is a lighting fault of the reading
light source, or a read signal error.
•There is a memory or internal fault.
•You have attempted to use a function
disabled by the security settings.
•USB memory device is not plugged
into the main unit.
•Did you press the ON/Standby
button while the USB memory device
was plugged into the main unit?
•There is no available space.
A printer that is not supported by the
Copyboard has been connected.
If the problem persists, please contact your nearby PLUS Vision sales office, dealer, or store.

7
3. SOFTWARE PLUS TOOLBOX
3-1. What is Copyboard Soft PLUS TOOLBOX?
The “PLUS TOOLBOX” software is an application for connecting the copyboard directly to a computer by USB
port to allow transfer of the scanned data to the computer using a TWAIN driver so that the data can be stored on
the computer as image files. It can also be used to manage the copyboard’s operating environment and security
settings from the computer.
Note:
•The security settings apply to the connection between the copyboard’s USB memory and computer. They
can be set to prohibit deleting or unauthorized setting by anyone other than the administrator. In consider-
ation of password management, etc., please note that this security function can only be enabled after con-
tacting PLUS Vision. The security settings can also be made via USB memory.
Operating Environment
Supported OS: Microsoft Windows 2000 Professional (Service Pack 4 or higher) / XP (Home Edition /Pro-
fessional Edition Service Pack 2 or higher) / Vista (32 bit version)
Supported PC: IBM PC/AT fully compatible computers that run the aforementioned OS
CPU: Pentium II or greater
Memory: Windows 2000 (128 MB or greater),
Windows XP (256 MB or greater),
Windows Vista (512 MB or greater)
Connector: USB port (type A), interface compatible with USB 1.1 and USB 2.0 standards.
Available hard
disk space: 40 MB or greater
Display resolution: 800 x 600 pixels or greater
Peripheral devices:CD-ROM drive, standard USB ports
Web browser: Internet Explorer 6.0 or higher
Note:
•All operations are not guaranteed in the aforementioned operating environment.
•Windows 95, 98SE/Me, NT, 2000 Server, Server 2003, and Vista (64 bit version) are not supported.

8
SOFTWARE PLUS TOOLBOX
3-2. Connection to the Computer
The copyboard must be connected with a computer in order to use this software.
Note:
Do not connect this machine to the personal computer before installing the software.
USB
To the PC dedicated
USB port (Type B)
To the personal
computer USB port
(Type A)
Personal Computer
USB cable supplied with the unit
Description of the included CD-ROM’s menu screen (CR-5 setup launcher)
The menu screen is displayed automatically when the included CD-ROM is inserted into the computer’s CD-
ROM drive.
■Install software
When clicked, the installer is launched and the “PLUS
TOOLBOX”, TWAIN driver and USB driver are installed
simultaneously.
■Software manual
When clicked, the PLUS TOOLBOX software’s oper-
ating instructions (in PDF format) open.
■Handling instructions (this manual)
When clicked, the handling instructions (in PDF format) open.
■Acrobat Reader
This is an application for viewing files in PDF format.
If the PDF files cannot be opened, click “Acrobat Reader” on the menu and follow the instructions on the
screen to install.
* View CD-ROM
Click this to view the contents of the CD-ROM using the computer’s Explorer application.
* Copyright and Usage Conditions
Click this to open the copyright, usage conditions and other information.
CR-5setuplauncher
Thankyouforyourpurchasingof
PLUSproduct
TheCD-ROMcontainsfollowing
softwareandanelectronicmanual
*InstallationofSoftware
1)PLUSTOOLBOX
2)CR-5TWAINDriver
3)CR-5USBDriver
*CR-5User'sManual(PDFformat)
*PLUSTOOLBOXSoftwareManual
(PDFformat)
Welcome
InstalationofSoftware
User'sManual
AcrobatReader
SoftwareManual
BrowseCD
Copyright&Usage
?
PLUS

9
SOFTWARE PLUS TOOLBOX
3-3. Installation of the Software
When “Install Software” on the included CD-ROM’s menu is clicked, the “PLUS TOOLBOX”, TWAIN driver and
USB driver are installed.
Check Prior to Installation
1. Check whether your personal computer satisfies the operating environment.
2. Check that your personal computer is not currently connected to this machine via USB.
3. At the time of installation, install withAdministrator rights (i.e., a user having administrator rights) for Windows
2000, or with a Computer Administrator rights (account) for Windows XP/Vista.
4. Close all other applications that are running.
Installation of the PLUS TOOLBOX
1Insert the supplied CD-ROM into the CD-ROM drive
of the personal computer.
The menu screen will be displayed automatically.
If the menu screen is not displayed automatically,
double click
CD-ROM icon and double click “autorun.exe”.
2Click “Installation of PLUS TOOLBOX”.
The installer will start.
3Follow the instructions of the installer and start the
installation.
The PLUS TOOLBOX, the TWAIN driver, the USB
driver, and the Setup Utility will be installed at the same
time.
CR-5setuplauncher
Thankyouforyourpurchasingof
PLUSproduct
TheCD-ROMcontainsfollowing
softwareandanelectronicmanual
*InstallationofSoftware
1)PLUSTOOLBOX
2)CR-5TWAINDriver
3)CR-5USBDriver
*CR-5User'sManual(PDFformat)
*PLUSTOOLBOXSoftwareManual
(PDFformat)
Welcome
InstalationofSoftware
User'sManual
AcrobatReader
SoftwareManual
BrowseCD
Copyright&Usage
?
PLUS
PLUSTOOLBOX-InstallShieldWizard
WelecometotheInstallShieldWizardforPLUS
TOOLBOX
TheInstallShield(R)WizardwillinstallPLUSTOOLBOXonyour
computer,Tocontinue,diskNext.
Cancel
Next
<Back>
WARNING:Thisprogramisprotectedbycopyrightlaw
andinternationaltreaties.

10
SOFTWARE PLUS TOOLBOX
Note:
*The Windows Security dialog box will be displayed
with Windows Vista.
Select “Install this driver software (I)”.
*When using Windows Vista, each time the installer is
started, the User Account Control dialog box is dis-
played.
Select “Continue” and continue with the installation.
4Click “Finish”.
The “Installer Information Dialog Box” will be displayed.
Click “Yes (Y)” and restart the personal computer.
When this software is installed on the personal com-
puter for the first time, continue to make the following
connections and operations.
WindowsSecurity
Wouldyouliketoinstallthisdevicesoftware?
Name:JungoJungo
Publisher:JungoLTD
Always trust software from "Jungo LTD".
You should only install driver software frorm publishers you trust.How can I
decide which device software is safe to install?
Don't Install
Install
PLUSTOOLBOX-InstallShieldWizard
Cancel
Finish
<Back>
InstallShieldWizardCompleted
TheInstallShieldWizardhassuccessfullyinstalled
PLUSTOOLBOX,ClickFinishtoexitthewizard.
PLUSTOOLNOXInstallerInformation
Youmustrestartyoursystemfortheconfiguration
changesmadetoPLUSTOOLBOXtotakeeffect.
ClickYestorestartnoworNoifyouplantorestart
later.
No
Yes
FoundNewHardwareWizard
IfyourhardwarecamewithaninstallationCD
orfloppydisk,insertitnow.
Installthesoftwareautomatically[Recommended]
Installfromalistorspecificlocation[Advanced]
ClickNexttocontinue.
Cancel
Next>
<Back>
Thiswizardhelpsyouinstallsoftwarefor:
CR-5
Whatdoyouwantthewizardtodo?
■Installing the USB Driver
The USB driver is installed on the computer with the installer, but this does not complete association with the
USB port. In order to use PLUS TOOLBOX, install using the procedure described below with the copyboard
connected.
Preparation 1. Press the ON/Standby button of the Copyboard to turn on the power.
2. Use a USB cable to connect the USB port of the personal computer with the PC dedicated
USB port of the Copyboard. (See Page 8)
The New Hardware Search Wizard will be displayed.
Install according to the New Hardware Search Wizard.
1Select “Install Software Automatically (Recom-
mended) (T)” and click “Next (N)” (when using Win-
dows XP).
Start the installation of the USB driver.
Note:
*Installation will be completed automatically with
Windows 2000/Windows Vista.

11
SOFTWARE PLUS TOOLBOX
2Click “Finish”.
This software can now be used.
Uninstallation of the PLUS TOOLBOX
1Selecting [Start] →→
→→
→[Control Panel] will display the Control Panel screen.
Check that your personal computer and the Copyboard are not currently connected by USB.
2Double click “Add or Remove Programs or Applications” (this will differ depending on the OS) to
display the “Add or Remove Programs Properties” screen.
3Select PLUS TOOLBOX from among the list displayed and click [Change / Remove] to display the Add
or Remove wizard screen.
4Selecting the [Remove] radio button of the wizard and clicking [Next] will startthe uninstallation.
Note:
*“Add or Remove Programs” will be displayed for Windows XP/Vista.
*When using Windows Vista, each time the uninstaller is started, the User Account Control dialog box is
displayed.
Select “Continue” and continue with the uninstallation.
FoundNewHardwareWizard
ClickFinishtoclosethewizard..
Cancel
Finish
<Back>
Thewizardhasfinishedinstaliiingthesoftwarfor.
CR-5
CompletingtheFoundNew
HardwareWizard

12
SOFTWARE PLUS TOOLBOX
3-4. Menu Screen Names and Functions
When a computer on which the “PLUS TOOLBOX” dedi-
cated software is installed is connected to the copyboard,
the “PLUS TOOLBOX” main menu appears.
1 Start Scan button
Click this to scan the words or diagrams drawn on the
copyboard onto the computer.
The copyboard’s sheet moves, scanning of one sheet’s
worth of data begins, and the data is transferred to the
computer.
During data transfer, the progress is displayed.
2 Feed/Stop button
Click this to display the sheet surface you want to scan
onto the computer.
The copyboard’s sheet surface scrolls (moves) one
sheet then stops automatically.
Click again while the sheet is scrolling to stop.
3Setup button
Click this to display the settings screen.
The settings screen consists of the “Hardware Setup”,
“Copyboard Firmware Update” and “Security” tabs.
Click a tab to switch to the corresponding screen.
4 (Help)
Click this to display the operating instructions.
5 (Minimize)
Click this to minimize the menu screen, displaying it
as an icon on the task bar.
6 (Close)
Click this to exit the program.
?
Ver.1.0
123
456
Setup
HardwareSetup
Output
ColorMode
TimeDay
2008/01/01
0:00:00
Position FileFormat
Setup
Close
DayStampFormat
YYYY/M/D
DD-MMM-YYYY
DD-MMM-YYYY
Density
Black&White
Color
Standard
Dark
Disable
Disable
Enable
Horizontal
Vertical PNG
JPEG
Enable
A4
Letter
MatchPaperSize
OriginalImage
Print PaperSizeBindingMargin
TimeDayStamp AspectRatio
Default
ReadcurrentDateandTime
CopyboardFirmwareUpdateSecurity
Setup
Close
Openfile
Update
CopyboardFirmwareUpdateSecurity
CopyboardfirmwareVersion
IPLVersion

13
SOFTWARE PLUS TOOLBOX
3-5. Operating the copyboard from the computer
This function allows you to store the words or diagrams drawn on the copyboard’s sheet surface directly onto the
computer.
The image data you have stored (in JPEG or PNG format) can be distributed to the meeting’s participants by e-
mail or used with other software to create documents of your meetings.
1Turn on the copyboard’s power, start up the com-
puter, then make the USB connections.
The “PLUS TOOLBOX” main menu appears on the
computer.
•PLUS TOOLBOX is stationed on the task bar, and
the main menu appears automatically when the
copyboard is connected.
•The main menu can also be displayed by right-click-
ing on the PLUS TOOLBOX icon on the task bar and
selecting “Display”.
2Click the Feed/Stop button to display the sheet sur-
face you want to scan.
When the Feed/Stop button is clicked, the copyboard’s
sheet surface scrolls one sheet then stops automati-
cally.
*This button functions in the same way as the Feed/
Stop button on the main unit.
3Click the scan button to begin transfer.
The transfer progress bar is displayed.
To interrupt scanning, click the [Cancel] button.
The [SaveAs] screen appears once transfer is finished.
4Saving
Choose where the file is to be saved, input the file
name, then click the [Save] button.
To change the file format, click the [▼] button at [File
Type] before clicking the [Save] button, and select
“JPG” or “PNG”.
Note:
When other TWAIN compatible applications are used to capture the picture data, while PLUS TOOLBOX
software is running, following procedure should be taken.
When PLUS TOOLBOX is running or its icon appears on the Windows task
bar, and the picture data is attempted to be captured using other TWAIN com-
patible application software, below error message may pop up. In this case,
right-click the PLUS TOOLBOX icon on the task bar to quit the program and
start capturing procedure using other TWAIN compatible software.
?
Ver.1.0
?
Ver.1.0
?
Ver.1.0
Acquiringimageisinprogress15%Completed.
Close
SaveAs
Savein:
Filename:
Save Preview
Cancel
MyDocuments
MyMusic
MyPictures
MyVideos
saveastype:
CR508030301.JPG
JPGFiles
CR5tw
OK
USBdevicecouldnotbeopened!
Show
Exit

14
SOFTWARE PLUS TOOLBOX
3-6. Hardware Setup
Use this procedure to set the copyboard’s operating environment from the computer. The factory defaults are
shown below.
Setting item
Color Mode
Density
Time Day
Time Day Stamp
Day Stamp Format
Binding Margin
Paper Size
Aspect Ratio
File Format
Position
Description of setting
Color mode for scanning, Color/Black & White
Density for scanning, Standard/Dark
Sets the date and time
Adds the date and time when printing, Enable/Disable
YYY/MMM/DD / DD-MMM-YYYY / MMM-DD-YYYY
Enable/Disable
A4/Letter
Sets the aspect ratio of the printed image
Original Image/Match Paper Size
Sets the format of files stored on the USB memory device
JPEG/PNG
Horizontal/Vertical
Factory default
Color
Standard
Japan Standard Time
Enable
YYY/MMM/DD
Disable
A4
Match Paper Size
JPEG
Horizontal
1Turn on the copyboard’s power, start up the com-
puter, then make the USB connections.
The “PLUS TOOLBOX” main menu appears on the
computer.
2Click the [Setup] button.
The [Hardware Setup] screen appears.
3Click the desired item to select it.
For the radio buttons, when is clicked, it switches
to (only one radio button can be selected within
each item).
●Output setting
Color Mode:This sets the color of the output image.
Color:..................Four colors (red, green
blue and black)
Black & White.....Black only
Density:This sets the density of the output image.
If the output image is too light with the
standard setting, set to “Dark”.
?
Ver.1.0
?
Ver.1.0
Setup
HardwareSetup
Output
ColorMode
TimeDay
2008/01/01
0:00:00
Position FileFormat
Setup
Close
DayStampFormat
YYYY/M/D
DD-MMM-YYYY
DD-MMM-YYYY
Density
Black&White
Color
Standard
Dark
Disable
Disable
Enable
Horizontal
Vertical PNG
JPEG
Enable
A4
Letter
MatchPaperSize
OriginalImage
Print PaperSizeBindingMargin
TimeDayStamp AspectRatio
Default
ReadcurrentDateandTime
CopyboardFirmwareUpdateSecurity

15
●Time Day
This sets the current date and time.
Loading the current time
When “Load the current time” button is clicked, the display switches
to the computer’s current time. This eliminates the need to set the
current time on the copyboard.
Setting the date
1.
Click [ ▼] at the Time Day section to display a calendar.
2. Click [ ] or [ ] on the calendar to choose the calendar for the
current date (year and month).
•When [ ] is clicked while December is displayed, the calen-
dar switches to the next year.
•When [ ] is clicked while January is displayed, the calendar
switches to the previous year.
3. Click today’s date.
•When clicked, the calendar closes and the current day is
changed.
Setting the time
By factory default, the time is set to Japan Standard Time.
PLUS TOOLBOX uses a 24-hour time display. Click to [ ▲] return,
to [ ▼] advance.
1. When the hours (20 in this example) in the time section is clicked, a
gray cursor is displayed over the hours.
2. Click [ ▲] or [ ▼] in the time section to choose the current hour.
3. Now click the minutes (15 in this example) to display a gray cur-
sor over the minutes.
4. Click [ ▲] or [ ▼] to choose the current minutes.
5. Now click the seconds (06 in this example) to display a gray
cursor over the seconds.
6. Click [ ▲] or [ ▼] to choose the current seconds.
Note:
• The clock starts when the [Set] button is clicked.
●Print setting
This setting is enabled when the copyboard is
connected to a separately sold printer.
Binding Margin
When “Enable” is selected, a white margin for
binding is created on the paper when printing.
Paper Size
Select whether to print onA4 or letter size paper.
Time Day Stamp
When “Enable” is selected, the date and time are
printed.
Day Stamp Format
When “Enable” is selected for “Time Day Stamp”,
select the date format.
Below are display examples.
YYY/MMM/DD: 2008/Mar/12
DD-MMM-YYYY: 12-Mar-2008
MMM-DD-YYYY: Mar-12-2008
SOFTWARE PLUS TOOLBOX
▲
▲
▲
▲
01/01/2008
0:00:00
TimeDay
ReadcurrentDateandTime
3/3/2008
TimeDay
March,2008
SunMOnTueWedThuFriSat
Today:3/3/2008
2425262728291
2345678
9101112131415
16171819202122
23242526272829
303112345
01/01/2008
TimeDay
ReadcurrentDateandTime
20:15:06
2008/3/12 20:15:06
2008/3/12 20:15:06
Date and time stamp
Binding Margin Disable
Binding Margin Enable
Binding Margin
When installed
vertically
When installed
horizontally
When installed
vertically
When installed
horizontall
y

16
SOFTWARE PLUS TOOLBOX
Aspect Ratio setting
Select the vertical/horizontal aspect ratio for printing.
When “Original Image” is selected, the image is printed with
the same aspect ratio as on the copyboard’s sheet surface.
When “Match Paper Size” is selected, the image is com-
pressed in the horizontal direction to the same aspect as the
A4 or letter size printing paper (for example, a circle will be-
come an oval).
●Position
Set whether the images are to be recorded horizontally or vertically. The corresponding orientation of the
image when it is opened on the computer and printed is shown below.
●File Format
Select the format of the images stored on the USB memory device, JPEG (“.jpg” extension) or PNG (“.png”
extension). Images scanned when a computer is connected can be selected when storing acquired data.
4Set the selected data.
Check the settings of the items you have changed, and
if they are OK click the [Set] button.
•Click [Cancel] if you do not want to change the set-
tings. The changes are canceled.
•Click [Default] to return all the settings to the factory
defaults.
Position setting Copyboard orientation Orientation of image
on computer Orientation of
printed image
Vertical
Horizontal
Setup
HardwareSetup
Output
ColorMode
TimeDay
2008/01/01
0:00:00
Position FileFormat
Setup
Close
DayStampFormat
YYYY/M/D
DD-MMM-YYYY
DD-MMM-YYYY
Density
Black&White
Color
Standard
Dark
Disable
Disable
Enable
Horizontal
Vertical PNG
JPEG
Enable
A4
Letter
MatchPaperSize
OriginalImage
Print PaperSizeBindingMargin
TimeDayStamp AspectRatio
Default
ReadcurrentDateandTime
CopyboardFirmwareUpdateSecurity

17
SOFTWARE PLUS TOOLBOX
3-7. Update the Copyboard’s Internal Program
Preparations:
1. Download the “Copyboard Firmware Update” program for the CR-5 (“XXXXX.zip”)
2. Unzip the “CR5_XX_X.zip” file and save the program file (“CR5_XX_X.mot”).
3. If the copyboard’s power cord is plugged into an outlet, unplug it.
4. Plug in the copyboard’s power cord while pressing the Save button.
5. Once the display window has switched from “OP” to “UP”, execute the “Copyboard Firmware Update” pro-
gram.
1Displaying the “Copyboard Firmware Update”
screen.
A let you display a machinery “Hardware Setup” screen.
Click the “Copyboard Firmware Update” tab to switch
to the “Copyboard Firmware Update” screen.
2Open the “XXXXX” update file.
1. Click “Open file” to display the screen for opening
the file.
2. Select the CR-5 update file (“CR5_01_00.mot”), then
click the “Open” button.
3Click the “Update” button to start updating.
A status bar is displayed during updating. Please wait.
“ “ is displayed on the display window on the
copyboard’s control panel.
Note:
Do not perform other operations or turn off the
copyboard’s power during updating.
Doing so could damage the copyboard.
Once “ “ is displayed on the copyboard’s display
window, unplug the power cord, then plug it back in
and turn the power on.
Setup
OpenFile
Update
CopyboardFirmwareUpdateSecurity
CopyboardfirmwareVersion
IPLVersion
Open
CR50100
CR50100.mot
CR50100.mot
FirmWare
Lookin:
Open
Cancel
MyRecent
Documents
Desktop
MyDocuments
Mycomputer
MyNetwork
Place
Filename:
Filesoftype:
Setup
Openfile
Update
CopyboardFirmwareUpdateSecurity
CopyboardfirmwareVersion
IPLVersion
CR50100.mot
Close

18
4. TROUBLE SHOOTING
By checking operations, it is possible to carry out judgments on malfunction to a certain extent. Carry out the following checks before
disassembling the equipment.
1.Press the Standby(On) button and turn on the power.
Is the power turned on?
No • The AC Adapter is disconnected from the wall outlet.
• The AC Adapter is defective.
• The power cord of an AC adapter is disconnected.
• The Main Board Assy is defective.
Yes
Does the Error display appear?
Yes The error display (E5) appears. (See section 2-4. Error display)
• The Main Board Assy is defective.
No
2.Feed / Stop button.
Does the sheet operate normally?
No • The connectors of the Motor Harness is disconnected / poor contact.
• The Sheet Panel closely adheres to the back of the Endless Sheet. (Electrification or dew condensation)
• The Sheet Motor Unit is defective.
• The Main Board Assy is defective or is out of fixed position. (Screw loosening)
Yes
3.Press the Print button (when a printer is used).
Does the error display (E1) appear?
Yes Printer failure. (See section 2-4. Error display)
• The printer is defective. (See the Instruction Manual of a printer.)
• The power of a printer is not turned on.
• Printer paper is exhausted or clogged.
• A Printer is not connected to the USB port.
• The Main Board Assy is defective.
No
Is the object written in the board printed normally?
No Half of an image becomes black.
• The CIS Unit is disconnected / poor contact.
• The CIS LED does not light. (The Main Board Assy is defective.)
A black line is put in printing.
• Foreign matter adheres to the CIS Unit.
• Misalignment of CIS Unit: Slight (It is improved by calibration.)
• Misalignment of CIS Unit: Severe (Replace the CIS Unit for improvement.)
• The Main Board Assy is defective.
An image (print) is rubbed.
• Deterioration of CIS Unit.
• The marker (written character) becomes blurred.
• The ink cartridge of a printer is defective. (Ink is exhausted.)
A specific color is not printed or the printed color is improper (when a color printer is used).
• The ink of a printer is exhausted.
• The ink cartridge of a printer is defective.
Yes
4.Press the Save button (when a USB memory is used).
Do the error displays (E2, E3 and E8) appear?
Yes Error display: E2 is displayed. (See section 2-4. Error display)
• An incompatible USB memory is used.
• A USB memory is defective.
• Insertion is defective (during use of USB memory).
Error display: E3 is displayed.
Release the write protect of USB memory and save data again.
• Memory storage error: Repeat save operation again.
• The Main Board Assy is defective.
Error display: E8 is displayed. (See 2-4. Error display.)
• A security function is executed.
No
Is the object written in the board stored normally?
No black line is put in a picture.
• Dust adheres to the CIS Unit.
• Misalignment of CIS Unit: Slight (It is improved by calibration.)
• The CIS Unit is defective: Serious (Replace the CIS Unit for improvement.)
An image is rubbed.
• Deterioration of CIS UNIT.
• The marker (written character) becomes blurred.
Yes
Normal operation
Other manuals for CR-5
2
Table of contents
Other Plus Whiteboard manuals
Popular Whiteboard manuals by other brands

Smart Technologies
Smart Technologies Hawkeye Installation and user guide

EVERWhite
EVERWhite Edison Series quick start guide

Ghent
Ghent 2-Door Rubber instruction manual

IKEA
IKEA MALA 504.565.92 instruction manual

Best-Rite
Best-Rite SPLASH CORK instruction manual

Best-Rite
Best-Rite 74955 Assembly instructions

Magiboards
Magiboards MCR001 Assembly instruction sheet

Smart Technologies
Smart Technologies SMART Board 400 Assembly instructions

Copernicus
Copernicus Premium Royal Inspiration Station Assembly guide

Mooreco
Mooreco Best-Rite Visionary BST-83845-XX Assembly instructions

PolyVision
PolyVision a3 CeramicSteel Serif installation guide

Sigel
Sigel GL 246 Mounting and safety instructions