PSI Polypen Aqua Manual


Page | 2
Manual Version: 2022/01
© PSI (Photon Systems Instruments), spol. s r.o.
www.psi.cz
This document and its parts can be copied or provided to a third party only with the express permission of PSI.
The contents of this manual have been verified to correspond to the specifications of the device. However, deviations cannot be ruled out.
Therefore, a complete correspondence between the manual and the real device cannot be guaranteed. The information in this manual is
regularly checked, and corrections may be made in subsequent versions.
The visualizations shown in this manual are only illustrative.
This manual is an integral part of the purchase and delivery of equipment and its accessories and both Parties must abide by it.

Page | 3
TABLE OF CONTENT
1Information before using PolyPen-Aqua device................................................................................................ 4
2General Description ......................................................................................................................................... 5
2.1 Technical Specification..............................................................................................................................................6
3Device Description ........................................................................................................................................... 7
3.1 List of equipment and customer information............................................................................................................9
3.2 Care and maintenance..............................................................................................................................................9
4Getting started............................................................................................................................................... 10
4.1 Calibration ..............................................................................................................................................................10
4.2 Measurement .........................................................................................................................................................11
5Menu description........................................................................................................................................... 12
6PC communication ......................................................................................................................................... 16
6.1 USB connection.......................................................................................................................................................16
6.2 Driver installation ...................................................................................................................................................16
7SpectraPen software...................................................................................................................................... 19
7.1 Software installation...............................................................................................................................................19
7.2 Software menu .......................................................................................................................................................21
7.3 Data transfer and visualization...............................................................................................................................22
7.4 Online control .........................................................................................................................................................26
7.5 Firmware update ....................................................................................................................................................27
8GPS module ................................................................................................................................................... 28
8.1 GPS/PolyPen-Aqua operation .................................................................................................................................28
9Warranty terms and conditions...................................................................................................................... 30
10 Troubleshooting and Customer Support......................................................................................................... 30
11 Appendix ....................................................................................................................................................... 31
11.1 Programming custom index in PolyPen-Aqua.........................................................................................................31
11.1.1 Function description...............................................................................................................................................32

Page | 4
1INFORMATION BEFORE USING POLYPEN-AQUA DEVICE
Read this manual carefully before operating the device. If you are not sure about something in the manual, contact the manufacturer for
clarification.
By accepting the device, the customer agrees to follow the instructions in this guide.
Always follow corresponding manuals while working with the PolyPen-Aqua device or doing the maintenance.
It is forbidden to interfere with the hardware or software of the PolyPen-Aqua device in any way without previous agreement with the
manufacturer.
The following table presents basic highlight symbols used in this manual:
Symbol
Description
Important information, read carefully.
Complementary and additional information.
Tab. 1 Used symbols.

Page | 5
2GENERAL DESCRIPTION
PolyPen-Aqua PA 210 is a portable, handheld and reasonably priced spectrophotometer intended for measuring spectra in suspensions.
It can be used favorably in a wide range of applications –biotechnology, limnology, ecology, molecular biology, chemistry, forensic
science etc. The device is convenient both for standard laboratory work and for field work, well using its inbuilt GPS unit. The PolyPen-
Aqua measures absorbance and transmittance spectra based on a single beam method; detection range is 380 –790 nm. The device is
equipped with an internal light source - Xenon incandescent lamp.
PolyPen-Aqua can be used as an autonomous instrument. It is powered by an inbuilt Li-Ion rechargeable battery and thus it does not
require a PC or any other bulky accessory for its operation. Measured spectra are instantly displayed in graphs or data sheets on the
device touch screen. Full spectra information is stored in the device memory for later re-analysis in a PC. The important part of the PA
210 package is the control software. It allows user-friendly, online control of the device as well as measured data saving, uploading and
further processing in a PC. Definition of custom calculated parameters based on measured spectra is also possible.
PolyPen-Aqua measures:
Transmittance –whole spectrum; calculated using the following formula
T= I/I0
Where: I0is reference light intensity
I is measured light intensity
Absorbance –whole spectrum; calculated using the following formula
A=log (I0/I)
Where: I0is reference light intensity
I is measured light intensity
Optical density (OD) –at 600 nm, 680 nm, 735 nm and 750 nm; calculated using the following formula
OD=-log(I/I0)
Where: I0is reference light intensity
I is measured light intensity

Page | 6
2.1 TECHNICAL SPECIFICATION
Spectral range
340 nm - 790 nm
Spectral response half width
8 nm
Spectral straylight
-30 dB
Scanning speed
About 100 ms
Dynamic range
High gain: 1:4300
Low gain: 1:13000
Size of aperture
7 mm
Light source
Xenon incandescent lamp
Light source spectral range
340-790 nm
Internal memory capacity
Up to 16 Mbit
Internal data logging
Up to 4,000 measurements
Data transfer
USB cable
PC software
SpectraPen 1.1 (Windows 7 and higher)
Battery type
Li-Ion rechargeable battery
Battery capacity
2600 mAh
Max. charging current
0.5 A
Charging
Via USB port - PC, power bank, USB charger, etc.
Battery life
48 hours typical with full operation
Low battery indicator
Sample holder
4 ml cuvette
Display
Touchscreen 240 x 320 pixel; 65535 colors
Built in GPS module
Ultra-high sensitivity down to -165dBm
High accuracy of <1.5 m in 50% of trials
Size
150 x 75 x 40 mm
Weight
300 g
Operating conditions
Temperature: 0 to +55 °C
Relative humidity: 0 to 95 % (non-condensing)
Storage conditions
Temperature: -10 to +60 °C
Relative humidity: 0 to 95 % (non-condensing)
Warranty
1 year parts and labor

Page | 7
3DEVICE DESCRIPTION
Fig. 1 Device description.

Page | 8
Cuvette slot
The sample is measured in a plastic cuvette inserted into an optical head and covered by a top lid.
Colour touch screen display
PolyPen is operated via a touch screen by using a supplied stylus. The software operation instructions are available on page 19.
No sharp objects should be used when operating the PolyPen-Aqua via touch screen. It is recommended to use
provided stylus when making selections on the touch screen.
USB Connector
USB connector is used for operation of the PolyPen-Aqua device directly from PC via the SpectraPen software and for re-charging the
device batteries. Please note that PolyPen-Aqua device is automatically re-charged when connected to the PC via the USB connector.
Power button
Power button is the main Switch ON/OFF button.

Page | 9
3.1 LIST OF EQUIPMENT AND CUSTOMER INFORMATION
Standard version of the PolyPen-Aqua device package consists:
•PolyPen-Aqua
•Stylus
•Carrying Case
•Textile Strap for Comfortable Wearing
•PolyPen Operating Manual (on a USB flash disc)
•SpectraPen software and driver (on a USB flash disc)
•USB cable
•Other Accessories or Optional Features (according to your specific order)
For data download via USB connection, the USB driver needs to be installed on the PC. It can be found on the
installation disk (USB driver folder).
If any item is missing, please, contact the manufacturer. Also check the carton for any visible external damage. If
any damage is found, notify the carrier and the manufacturer immediately. The carton and all packing materials
should be retained for inspection by the carrier or insurer.
3.2 CARE AND MAINTENANCE
PolyPen-Aqua device
•Never submerge the device in water!
•The device should not come in contact with any organic solvents, strong acids or bases.
•Keep the optical sensor clean and dry. If cleaning is needed, use soft, non-abrasive tissue.
•Do not use sharp objects for touch screen operation.
Li-ion battery
•Avoid fully discharging of the battery.
•Do not keep the battery at full charge for long periods of time. Allow for it to discharge.
•High temperatures shortens battery life.
•If the battery can no longer be charged, please contact PSI for replacement battery and installation instructions.

Page | 10
4GETTING STARTED
To switch ON the PolyPen-Aqua, press the Power button until the device logo shows up. Follow next steps to perform the measurements.
In case the device battery is not charged, connect the PolyPen-Aqua with USB cable via USB port to the PC and charge the battery.
The measurements with the PolyPen-Aqua cannot be made until the calibration is performed. Repeat the
calibration periodically upon certain time period of the device operation.
4.1 CALIBRATION
For calibration of device use plastic cuvette with clear media.
Please follow the instructions below for device calibration:
•Use the standard 4 ml cuvette.
•Clean the cuvette with distilled water and paper tissue.
•As a calibration standard use cultivation medium (BBM, BG11 etc.) or distilled water.
•Put cuvette with medium (minimal volume 2 ml) into the PolyPen-Aqua device and close the cover.
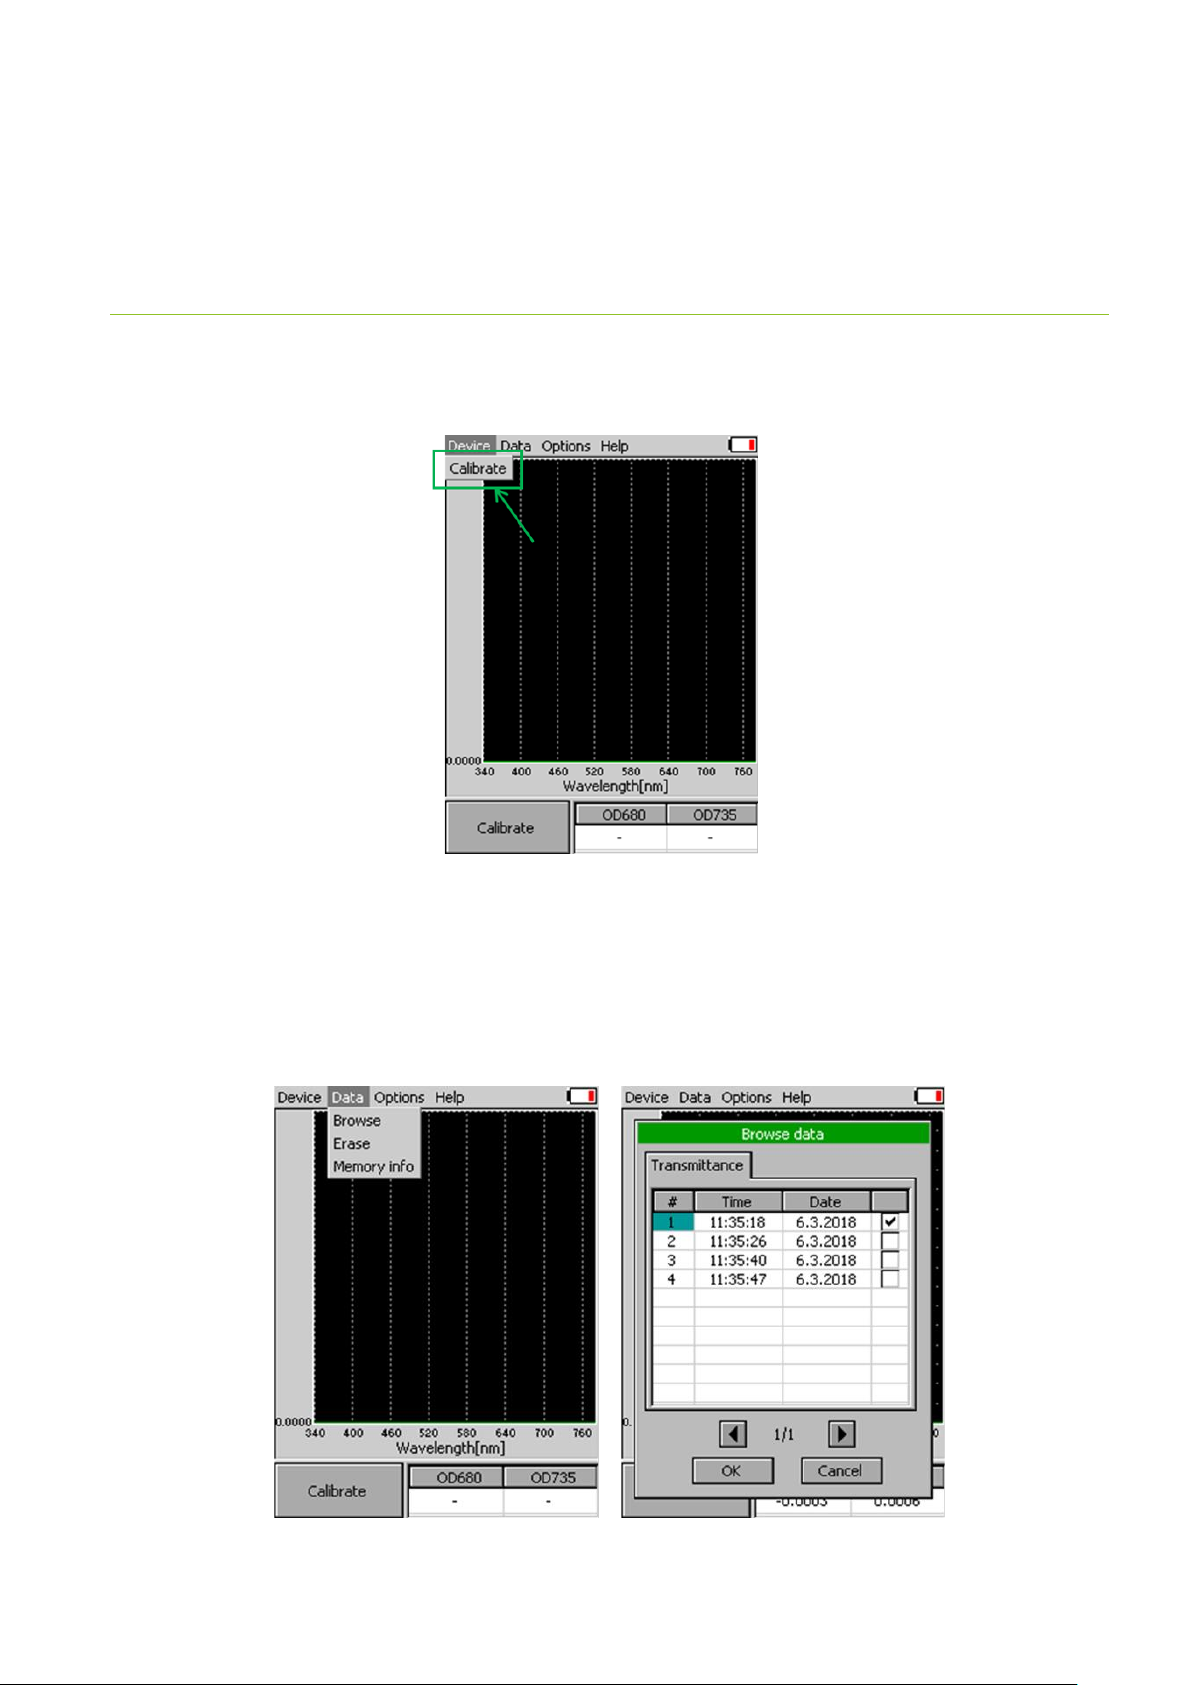
•In the main window go to Calibrate > press OK (Fig. 2) and wait until the calibration step is completed.
•Calibration is automatically stored into the device memory.
•After the calibration step is performed, Main window icon Calibrate will change into Measure (Fig. 3).
•Remember that the calibration is done for the particular cuvette. If you want to use another cuvette, you should make the
calibration with this one.
•Calibration is automatically stored into the device memory and is saved till the device turn OFF.
•The device is now ready to measure other samples.
Fig. 2 Calibration of device.

Page | 11
Please remember or mark the orientation of the cuvette in the device. For repeated measurements it is
recommended to position the cuvette always in the same orientation in the PA 210 cuvette holder.
4.2 MEASUREMENT
Besides the whole spectrum information, the PolyPen-Aqua incorporates pre-defined formulas for calculation of optical density directly
in its software. The measured data are instantly displayed in graphs or data sheets on the device screen display. They are also stored in
the device memory for later re-collection or transfer to a PC.
Please follow these instructions to perform a measurement:
•Fill the cuvette with a sample of algae or cyanobacteria and close the cuvette with
the stopper. Minimal volume of sample is 2 ml.
•Put cuvette with sample to PolyPen-Aqua device.
•Close the cover.
•In the main window select > Measure and wait until the measurement is
completed.
•Value of required parameter appears on the screen after measuring. Measured
data are stored into the device memory and can be downloaded to PC.
•Currently displayed graph represents transmittance data. Displayed graph would
be switched to absorbance data in Options menu (more information in chapter
5).
Indices table displays two selected OD values calculated from actual measured data
(Fig. 4). To define the OD value of interest, go to Options > Settings > Indexes. You can
select two OD indices that are currently displayed. However, all OD indices can be
calculated from stored Transmittance data in the device memory. Other calculated
indices like NDVI, SR, MCARI1, OSAVI, G, MCARI, etc are not displayed, but the entire
list of the indices is available after a data download to PC.
Fig. 3 Measure icon.
Fig. 4 OD values table.
Page | 12
5MENU DESCRIPTION
Device
•Calibrate –calibration can be run any time by pressing Device > Calibrate after inserting cuvette with clear media. (Fig. 5).
Data
•Browse –displays data browse dialog box. The user can browse the list of stored data, select the set of data files and view the light
spectra in Transmittance or Absorbance mode (Options > Settings > > Graph). Color classification of each data file helps user to
discriminate between individual modes. Up to 3 sets of collected data can be displayed at once by checking off the last column in
the data table.
•Erase –erase function is used to delete the internal data memory.
•Memory info –displays info on amount of used internal memory of the PolyPen-Aqua.
Fig. 5 Calibration of the device.
Fig. 6 Menu Data, Browse data.

Page | 13
Options
•Settings –function is used to set various variables for the light measurements and for the device settings.
oIndexes - Select indexes to be calculated and displayed on the main screen (Fig. 7).
Optical density indices –values are calculated as OD = -log(I/I0)- where I0is the irradiance that is transmitted through the
cuvette filled with clear medium. This quantity must be measured as the reference. Iis the irradiance transmitted through
the cuvette with algal or cyanobacterial suspension in which the OD is measured. Log is the decadic logarithm of the I/I0ratio.
Thus, the optical density OD=1 means that the light at the respective wavelength is attenuated by the algae or cyanobacteria
10 times relative to the reference. With OD=2, the attenuation relative to the reference is 100 times.
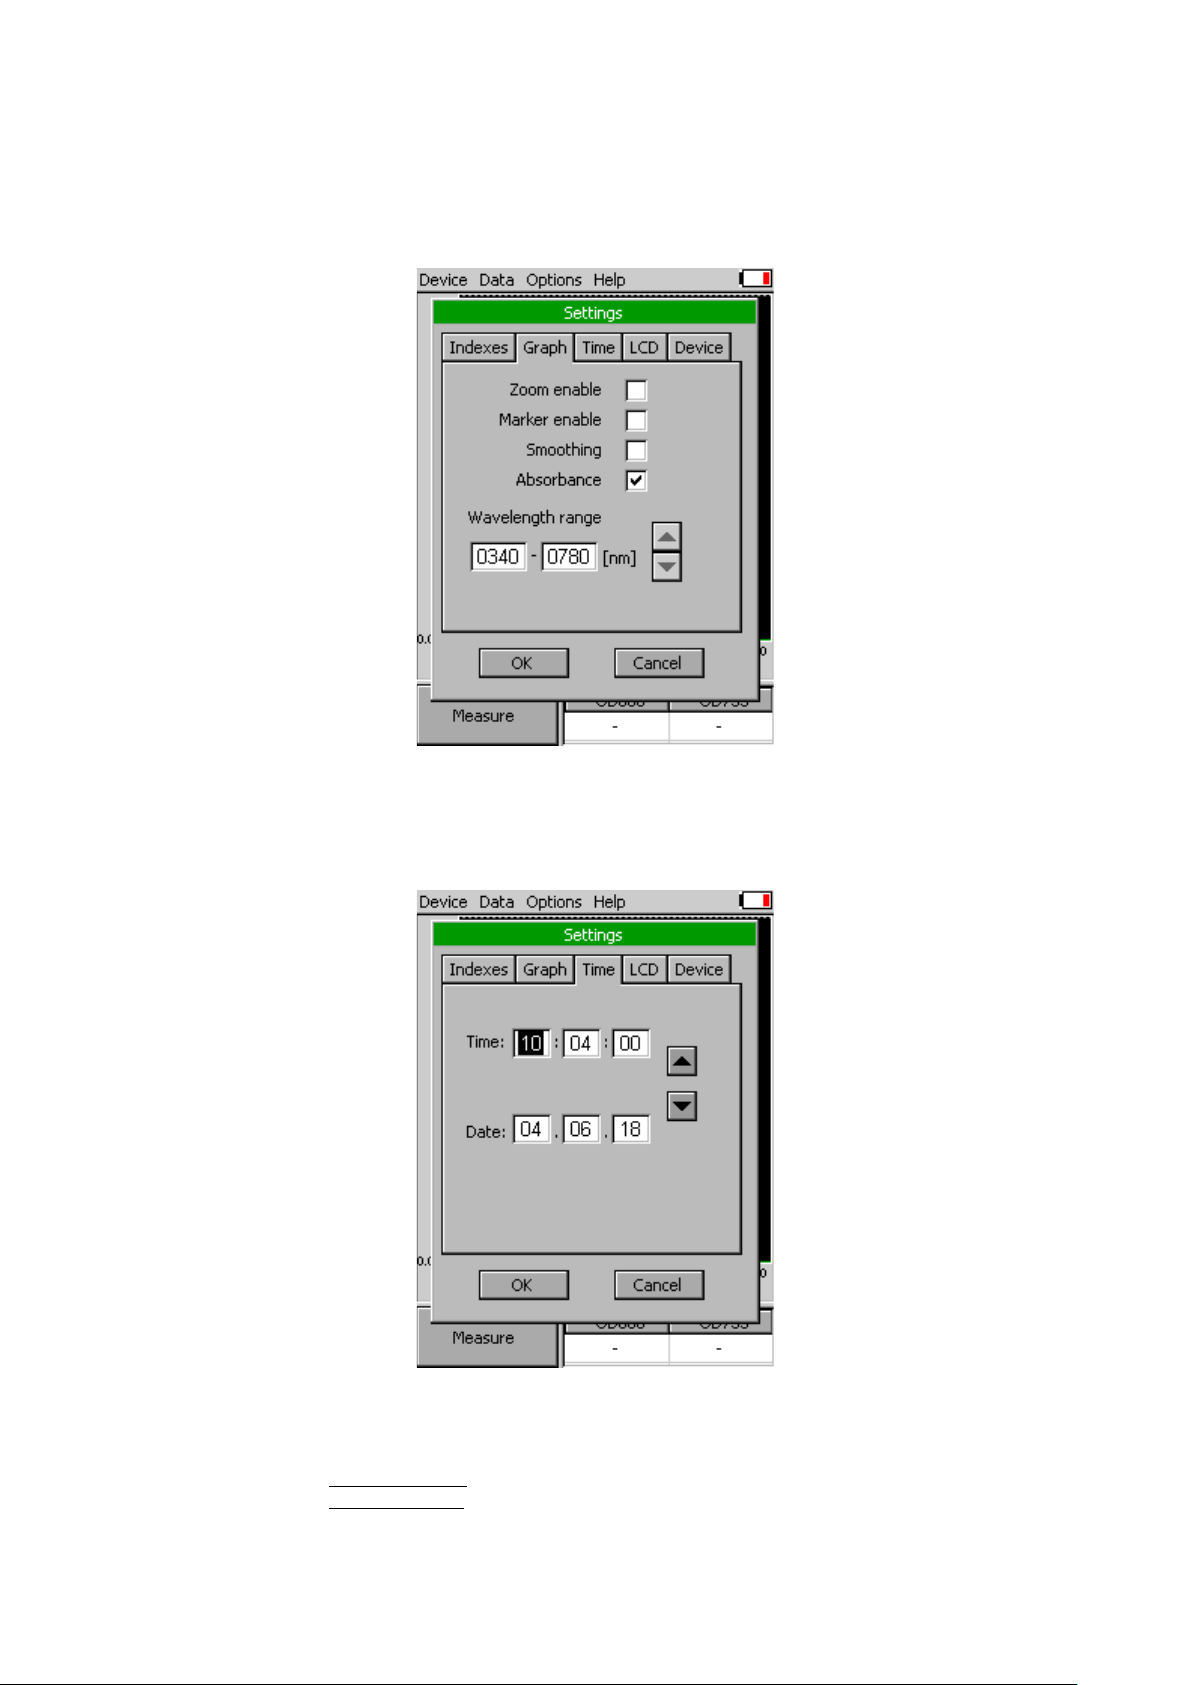
oGraph –displays options for setting the wavelength range and graph features (Fig. 8).
▪Zoom enable –enables the zoom feature. Select an area (in the right-down direction) of the displayed
graph, which you want to zoom in. Reverse these steps if you want to return to the original graph size.
▪Marker enable –enables to display exact numeric value for the point selected in the Scope graph window.
Exact wavelength and light irradiance are displayed for the point, which is selected by touching on the
display. In top right corner of the LCD display the exact value of wavelength in nm is shown for the user
selected position in spectra. In addition, light irradiance for the given nm is shown.
▪Smoothing –enables noise reduction of the graphical display (only on display) by smoothing the noise in
the spectrum at the expense of spectral resolution. Data are not affected (calculated as moving average).
▪Absorbance –switches to absorbance mode of spectrum visualization, the raw spectral data are
calculated according to the formula (A = log(I0/I).
▪Wavelength range –defines the range of wavelengths considered for light scope and light meter
measurements. Desired wavelength range can be adjusted by selecting the wavelength and by using the
arrows up and down.
Fig. 7 Settings - Indexes.
Page | 14
oTime - Set the actual time and date (all data files are stored by time and date signature). To change time, touch on
one of the values and adjust it using the arrows (Fig. 9).
oLCD –is used to adjust LCD display control settings (Fig. 10).
▪Backlight intensity –move slider to adjust backlight intensity.
▪Backlight time-out –move slider to adjust backlight time-out (time of inactivity required before backlight
will dim out to save battery life).
Fig. 8 Settings - Graph.
Fig. 9 Settings - Time.

Page | 15
oDevice
▪Average –Average function is used for adjusting the number of scans for each reading. Averaging of more
scans results in a higher signal-to-noise ratio but increases the time required for each reading that appears
on the screen. Move slider to set the number of measurement to be acquired for averaged values (Fig. 11).
Data are affected.
▪GPS –enables the GPS module. The GPS coordinates cannot be displayed at the device display, but they
are exported together with data and visualized in SpectraPen software.
Help
•About…-information about the device, hardware and software version.
Fig. 10 Settings - LCD.
Fig. 11 Settings - Device.

Page | 16
6PC COMMUNICATION
6.1 USB CONNECTION
PolyPen-Aqua comes with the USB cable that is required for charging of the Li-ion battery and can also be used for data transfer to the
PC after completion of measurements. To connect the USB cable with the PolyPen-Aqua device follow the picture instructions below.
Please note that a lock in system is used to secure the USB cable to the PolyPen-Aqua and extreme caution has to be used when setting
up this connection to avoid damage to the cable pins.
When connecting the USB cable take extra caution to prevent damage to the cable connector pins. Ensure correct
orientation of the cable as shown in the pictures below so the circled portion of the plug and the cable in photo
A and B are perfectly lined up prior to pushing them together. Once this connection is achieved the cable may be
secured in position by turning the metal cover of the cable and locking the cable in position.
To connect PolyPen-Aqua with your computer please follow steps below in Fig. 12:
Fig. 12 How to connect PolyPen-Aqua with PC.
A) connector on the PolyPen device. B) Portion of the USB cable with pins. C –E) Position the cable horizontally and line up the green
circled parts of the cable and the connector, plug in the inlet and screw the securing screw. F) Correct connection of the USB cable and
Pen device.
6.2 DRIVER INSTALLATION
For successful USB connection of the PolyPen-Aqua to the PC computer the USB driver and the SpectraPen software, included on the
USB disk, need to be first installed on the PC. Without the driver installed the PolyPen-Aqua device will not be recognized by the computer
and the connection to the software will be not possible.
•Press Start and Select Control Panels (Fig. 13)

Page | 17
•Navigate through System and security, System to Device manager (Fig. 14)
•Connect the PolyPen to the PC. You should see that PSI USB Device appears in the list. Right click on it and select Update Driver
Software…(Fig. 15)
•Click Browse my computer for driver software and select Driver folder on the PolyPen installation disk. Allow the installation even
if the warning message appears (Fig. 16)
Fig. 13 Control panel.
Fig. 14 System window.
Fig. 15 PSI USB device.

Page | 18
•Installation of the driver is now complete (Fig. 17)
In case this driver installation is not successful the driver may be downloaded directly from PSI websites
www.psi.cz.
Once the device is properly connected to the computer, the indicating icon appears in upper right
corner on the PolyPen display (Fig. 18).
Fig. 16 Choose the driver from the USB disc.
Fig. 17 Complete installation.
Fig. 18 Device connect.

Page | 19
7SPECTRAPEN SOFTWARE
7.1 SOFTWARE INSTALLATION
1. Copy the SpectraPen software provided on the USB flash disk to your
computer and launch the SpectraPen program.
2. To connect and recognize the PolyPen-Aqua device in the SpectraPen
software, proceeds first with the registration of the SpectraPen
software (Fig. 19).
•Select: Help > Register
•Enter: your serial registration number (found in a text file on the
USB flash disk drive included with the device).
•Select: OK
Please note that the serial (registration) number for the PolyPen-Aqua may be found in the file SN.txt, which is
included on the enclosed USB flash disk.
Please Note: it is not possible to download data from the PolyPen device without software registration.
3. Connect the USB cable to the computer. Then switch on the PolyPen by pressing the Power button for a couple of seconds.
4. Ensure the PC and the PolyPen are properly paired (see chapter 6).
5. Connect PolyPen device in SpectraPen software, Device > Connect (Fig. 20)
6. When the device is properly connected the left bottom corner of the SW window will display “PolyPen-Aqua”(Fig. 21). Otherwise
notification “Device: Not Connected” is displayed (Fig. 22).
Fig. 20 SW connection.
Fig. 19 SW registration.

Page | 20
Fig. 22 Connection failed.
Fig. 21 PolyPen-Aqua connect to the SW.
Other manuals for Polypen Aqua
1
Table of contents
Other PSI Measuring Instrument manuals


Popular Measuring Instrument manuals by other brands

elbag Energietechnik
elbag Energietechnik TS-01 user manual

mIoT
mIoT Captis Pulse Lite installation guide

PCE Americas
PCE Americas FL-33458 Operation manual

otometrics
otometrics Madsen Midimate 602 quick guide

Agilent Technologies
Agilent Technologies 85024A User's and service guide

Vortex
Vortex Diamondback HD 2000 user manual


