PSI PlantPen NDVI Manual


Page | 2
Manual Version: 2021/12
© PSI (Photon Systems Instruments), spol. s r.o.
www.psi.cz
This document and its parts can be copied or provided to a third party only with the express permission of PSI.
The contents of this manual have been verified to correspond to the specifications of the device. However, deviations cannot be ruled out.
Therefore, a complete correspondence between the manual and the real device cannot be guaranteed. The information in this manual is
regularly checked, and corrections may be made in subsequent versions.
The visualizations shown in this manual are only illustrative.
This manual is an integral part of the purchase and delivery of equipment and its accessories and both Parties must abide by it.

Page | 3
TABLE OF CONTENT
1Information before using PlantPen device........................................................................................................ 4
2General Description ......................................................................................................................................... 5
2.1 Technical Specification..............................................................................................................................................6
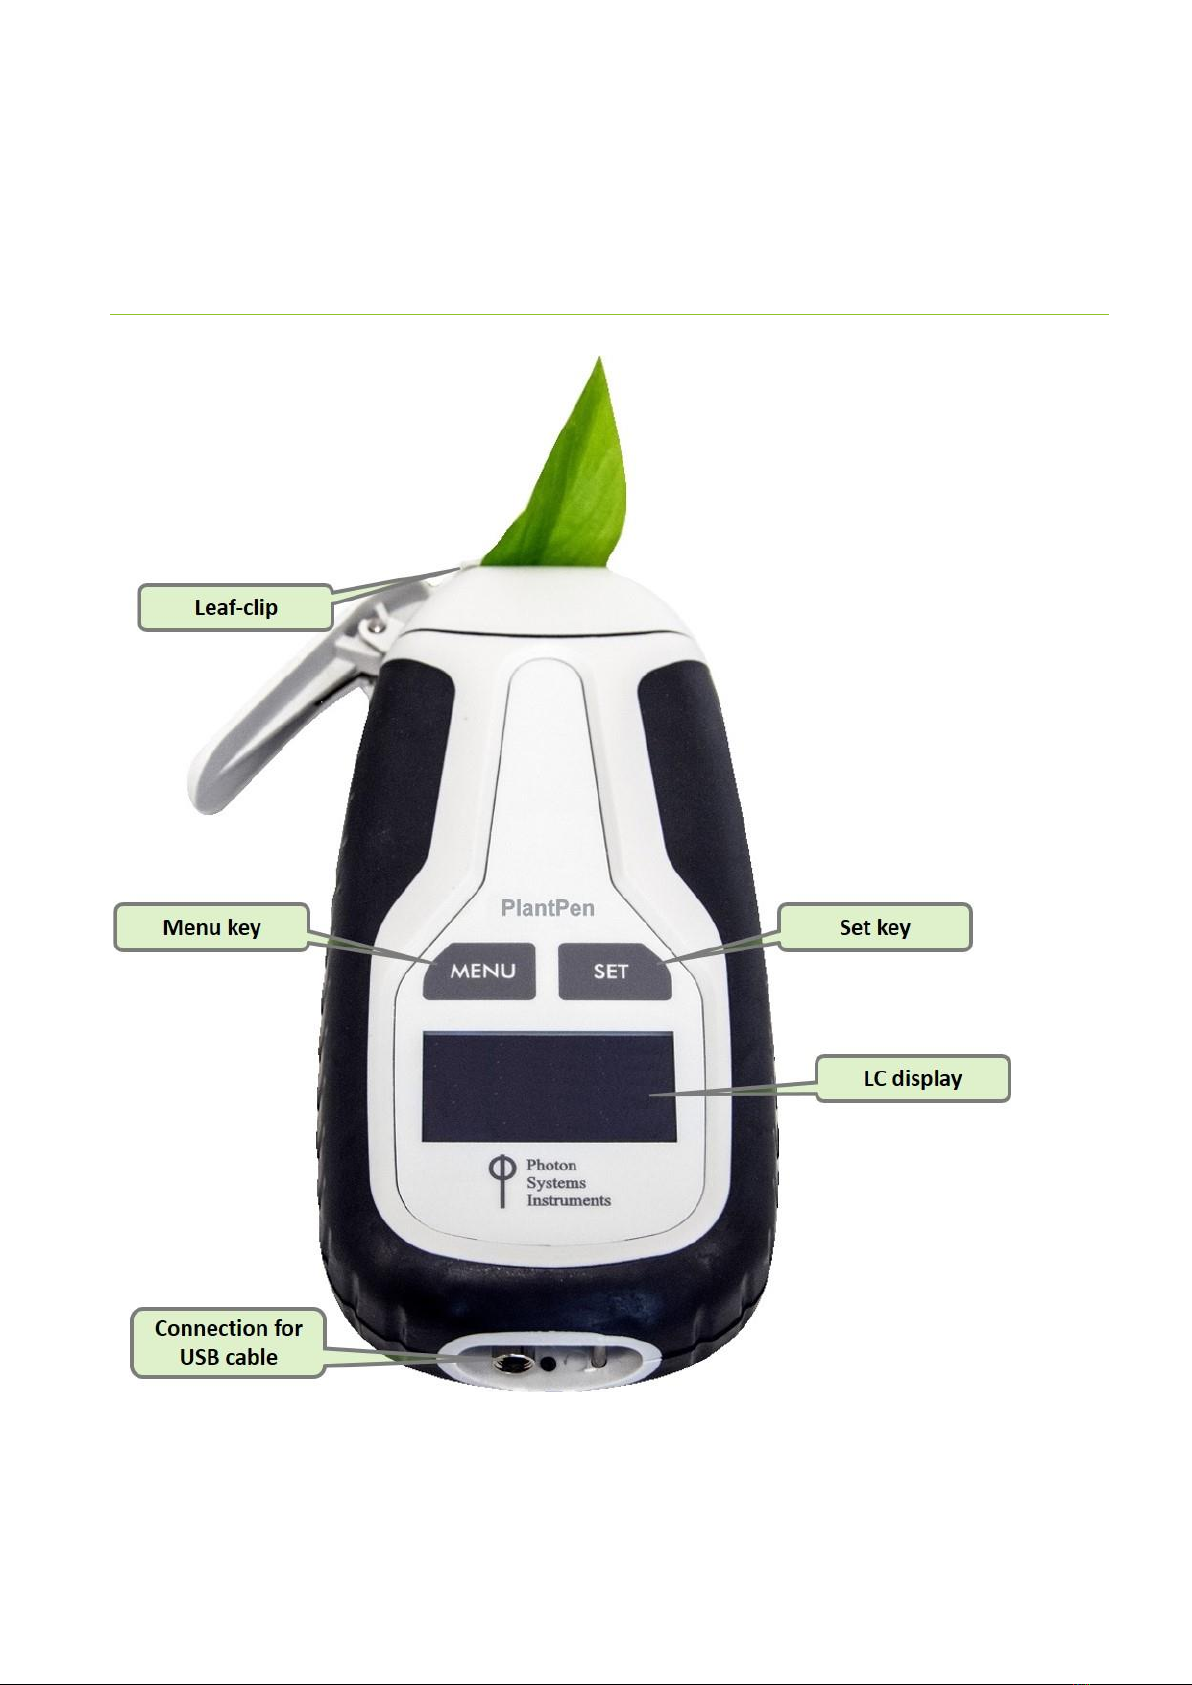
3Device Description ........................................................................................................................................... 8
3.1 List of equipment and customer information............................................................................................................9
3.2 Care and maintenance..............................................................................................................................................9
4Principle of measurement.............................................................................................................................. 10
5Getting started............................................................................................................................................... 11
5.1 Calibration ..............................................................................................................................................................11
5.2 Measurement .........................................................................................................................................................11
6Control menu tree.......................................................................................................................................... 12
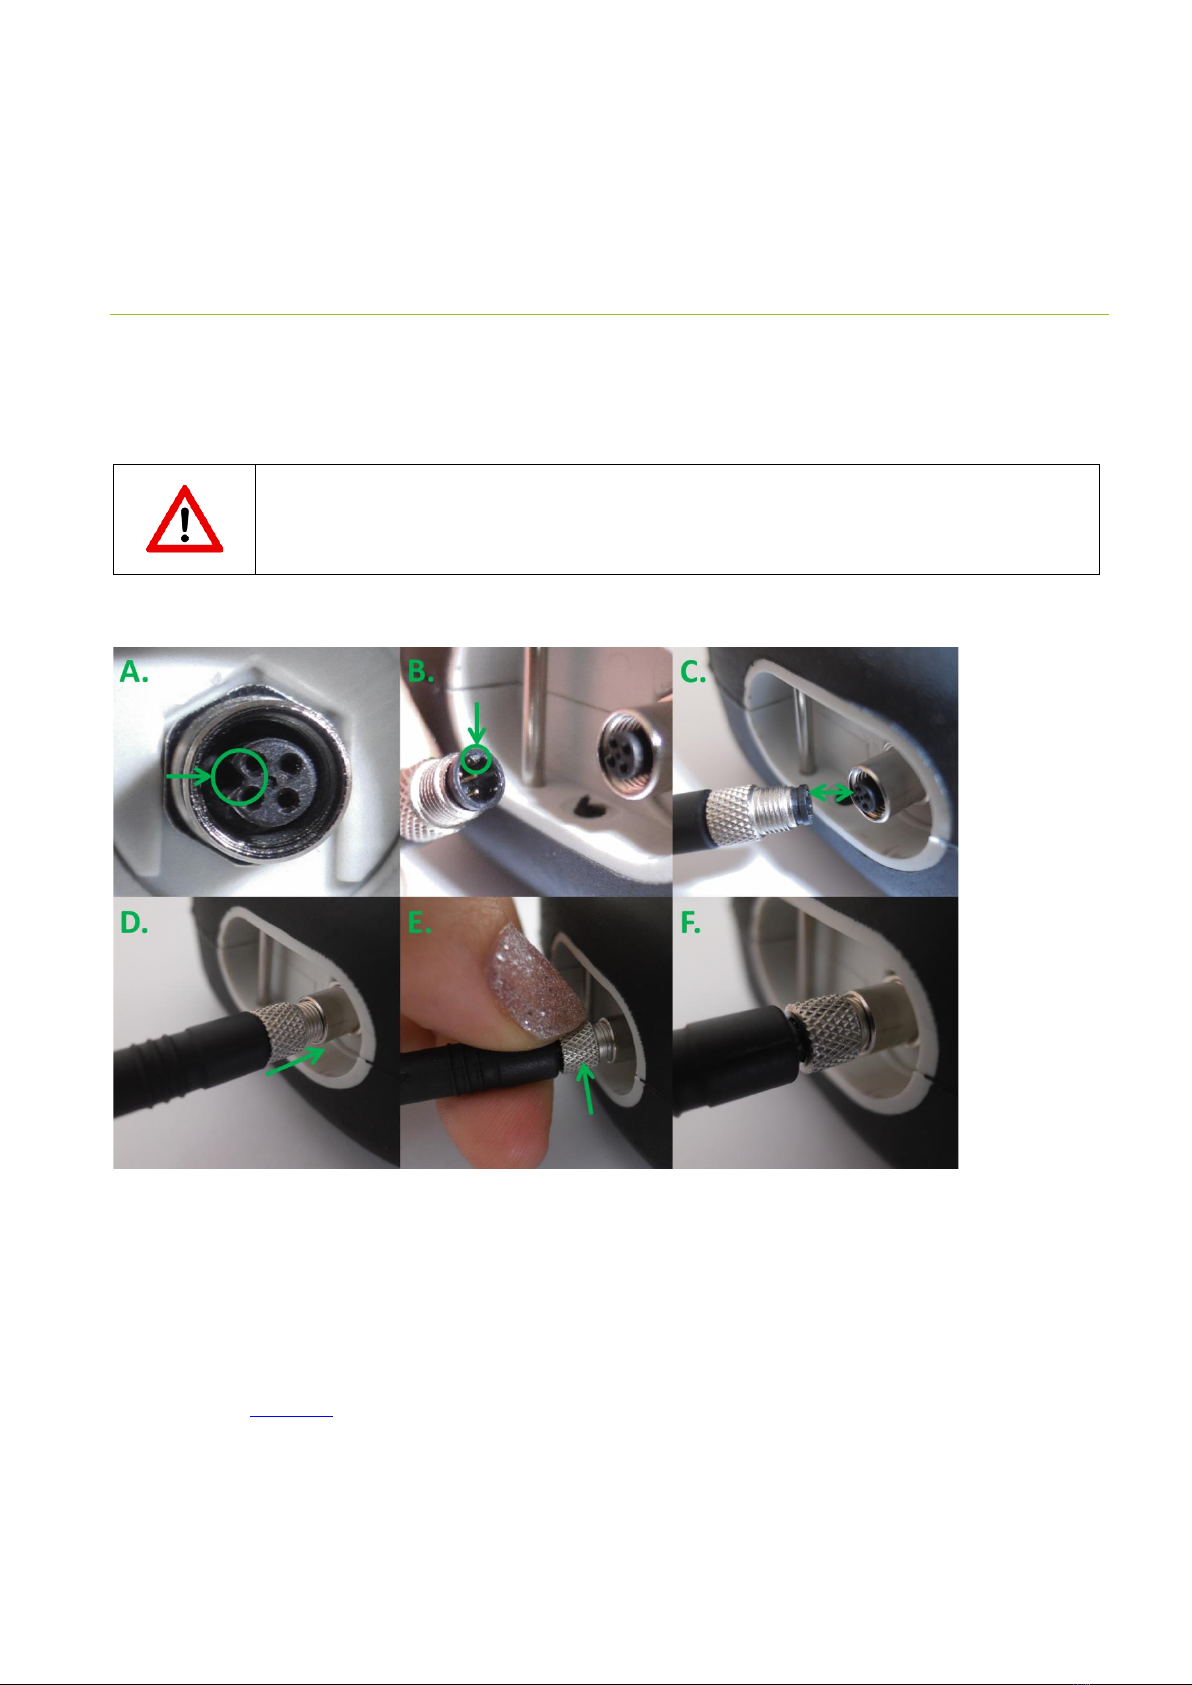
7USB Connection ............................................................................................................................................. 17
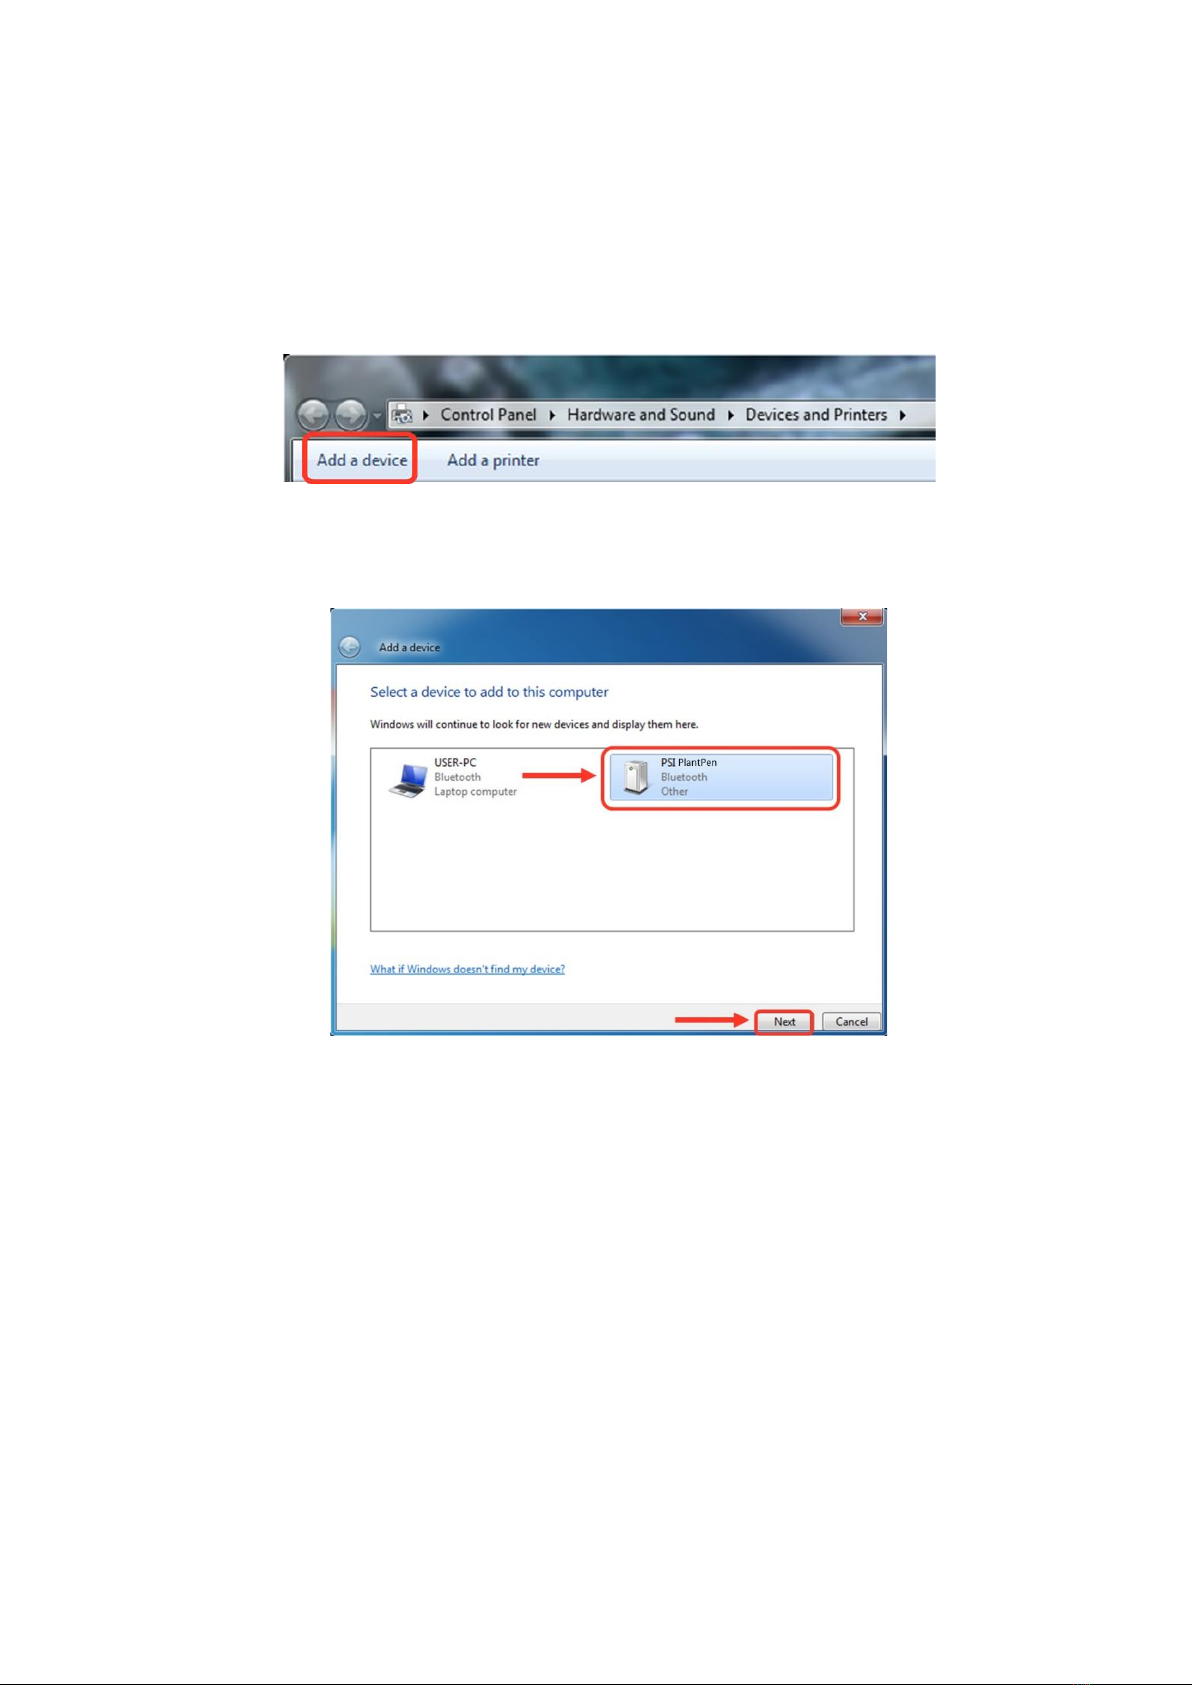
8Bluetooth connection..................................................................................................................................... 18
8.1 Bluetooth pairing....................................................................................................................................................18
9FluorPen software.......................................................................................................................................... 21
9.1 Software installation...............................................................................................................................................21
9.2 Menu and icons explanation...................................................................................................................................22
9.2.1 Main menu .............................................................................................................................................................22
9.2.2 Menu settings.........................................................................................................................................................23
9.2.3 Menu online control ...............................................................................................................................................23
9.3 Data transfer and export ........................................................................................................................................25
9.4 Firmware update ....................................................................................................................................................27
10 GPS module ................................................................................................................................................... 29
10.1 GPS/PlantPen operation .........................................................................................................................................29
10.2 Data download .......................................................................................................................................................30
11 Warranty terms and conditions...................................................................................................................... 31
12 Troubleshooting and Customer Support......................................................................................................... 31

Page | 4
1INFORMATION BEFORE USING PLANTPEN DEVICE
Read this manual carefully before operating the device. If you are not sure about something in the manual, contact the manufacturer for
clarification.
By accepting the device, the customer agrees to follow the instructions in this guide.
Always follow corresponding manuals while working with the PlantPen device or doing the maintenance.
It is forbidden to interfere with the hardware or software of the PlantPen device in any way without previous agreement with the
manufacturer.
The following table presents basic highlight symbols used in this manual:
Symbol
Description
Important information, read carefully.
Complementary and additional information.
Tab. 1 Used symbols.

Page | 5
2GENERAL DESCRIPTION
The PlantPen model PRI 210 measures Photochemical Reflectance Index (PRI) in two narrow wavelength bands centered close to 530
nm and 590 nm. The photochemical reflectance index ((R531 –R570) / (R531 + R570))2 correlates with the epoxidation state of
xanthophyll cycle pigments and photosystem efficiency in many studies under diverse conditions, such as different 1. PRI is sensitive to
changes in carotenoid pigments that are indicative of photosynthetic light use efficiency, the rate of carbon dioxide uptake, or as a reliable
water-stress index. As such, it is used in studies of vegetation productivity and stress.
The PlantPen model NDVI 310 measures Normalized Difference Vegetation Index, which is an important indicator of chlorophyll content
in plants. The pigment in plant leaves, chlorophyll, strongly absorbs visible light (from 0.4 to 0.7 µm) for use in photosynthesis. The cell
structure of the leaves, on the other hand, strongly reflects near-infrared light (from 0.7 to 1.1 µm). The differences in plant reflectance
in the visible and near-infrared wavelengths is used to calculate NDVI index as follows: NDVI=((NIR-VIS)/((NIR+VIS)), where VIS and NIR
stand for the spectral reflectance measurements acquired in the visible (red) and near-infrared regions, respectively. NDVI is directly
related to the photosynthetic capacity and hence energy absorption of plant canopies 2. The NDVI 310 device compares reflected light
at two distinct wavelengths, 635 and 760 nm.
PlantPen can be operated as a stand-alone instrument and thus is ideal for field studies. The reflectance signals are detected at the
wavelengths of the dual light source 530 nm and 590 nm, which are close to the PRI equation values based on Sellers, P. J. (1985)2.
Measured data are sequentially stored in the internal PlantPen memory. Data transfer is via USB or Bluetooth communication.
Comprehensive FluorPen 1.1 software provides data transfer routines and many additional features for data presentation in tables and
graphs.
1 John Gamon, Josep Penuelas, and Christopher Field (1992). A narrow-waveband spectral index that tracks diurnal changes in
photosynthetic efficiency. Remote Sensing of environment, 41, 35-44.
2 Sellers, P. J. (1985) 'Canopy reflectance, photosynthesis, and transpiration', International Journal of Remote Sensing, 6, 1335-1372.

Page | 6
2.1 TECHNICAL SPECIFICATION
Protocols
PlantPen PRI 210
Photochemical Reflectance Index
PRI = (R531 –R570) / (R531 + R570) Reference: Sellers et al. (1985)
PlantPen NDVI 310
Normalized Difference Vegetative Index
NDVI = (R740 –R660) / (R740 + R660)
Reference: Rouse et al. (1974)
LED emitter
PlantPen PRI 210
Dual wavelength light source GREEN = 530 nm, YELLOW = 590 nm
PlantPen NDVI 310
Dual wavelength light source RED = 635 nm, NIR = 760 nm
Detector
PIN photodiode with bandpass filters
From 500 to 600 nm (PRI 210)
From 620 to 750 nm (NDVI 310)
Internal memory capacity
Up to 16 Mb
Internal data logging
Up to 100,000 measurements
Data transfer
USB cable
Bluetooth (transfer up to 3Mbps for distance up to 20m)
PC software
FluorPen 1.1 (Windows 7 and higher)
Battery
Li-Ion rechargeable battery
Capacity 2000 mAh
Max. charging current 0.5 A
Charging via USB port - PC, power bank, USB charger, etc.
70 hours typical with full operation
Low battery indicator
Sample holder
Mechanical leaf-clip
Display
Graphical display
Keypad
Sealed, 2-key tactile response
Turns off after 5 minutes of no use
Built in GPS module
Ultra-high sensitivity down to -165dBm
High accuracy of <1.5 m in 50% of trials
Size
135 x 65 x 33 mm
Weight
188 g
Operating conditions
Temperature: 0 to +55 °C
Relative humidity: 0 to 95 % (non-condensing)
Storage conditions
Temperature: -10 to +60 °C
Relative humidity: 0 to 95 % (non-condensing)
Warranty
1-year parts and labor

Page | 7
Bluetooth module compliance data:
Category
Country
Standard
Radio
USA
FCC Part 15 Subpart B: 2008 Class B
FCC CRF Title 47 Part 15 Subpart C
FCC ID:
T9J-RN42
Europe
ETSI EN 301 489-1 V1.8.1
ETSI EN 301 489-17 V2.1.1
ETSI EN 300 328 V1.7.1
Canada
IC RSS-210 low power comm. device
Certification number:
6514A-RN42
EMC
USA
FCC CFR47 Part 15 subclass B
Europe
EN 55022 Class B radiated
EN61000-4-2 ESD immunity
EN61000-4-3 radiated field
EN61000-4-6 RF immunity
EN61000-4-8 power magnetic immunity

Page | 8
3DEVICE DESCRIPTION
Fig. 1 Device description.

Page | 9
3.1 LIST OF EQUIPMENT AND CUSTOMER INFORMATION
Standard version of the PlantPen device package consists:
•PlantPen PRI 210 or PlantPen NDVI 310
•Carrying Case
•FluorPen software and driver (on a USB flash disc)
•Operation Manual (PDF on a USB flash disc)
•USB Cable
•Self-Adhesive Rubber Pads for Optics Protection
•Other Accessories or Optional Features (according to your specific order)
For data download via USB connection, the USB driver needs to be installed on the PC. It can be found on the
installation disk (USB driver folder).
If any item is missing, please, contact the manufacturer. Also check the carton for any visible external damage. If
any damage is found, notify the carrier and the manufacturer immediately. The carton and all packing materials
should be retained for inspection by the carrier or insurer.
3.2 CARE AND MAINTENANCE
PlantPen
•Never submerge the device in water!
•The device should not come in contact with any organic solvents, strong acids or bases.
•Keep the optical part clean and dry. If cleaning is needed, use soft, non-abrasive tissue.
Li-ion battery
•Avoid fully discharging of the battery.
•Do not keep the battery at full charge for all the time.
•Keeping at high temperatures shortens battery life.

Page | 10
4PRINCIPLE OF MEASUREMENT
PlantPen is a reflectance-based device that provides a convenient method of measuring the relative chlorophyll content of a leaf sample.
The PlantPen model PRI 210 (Fig. 2) measures Photochemical Reflectance Index (PRI) by comparing leaf reflectance in two narrow
wavelength bands centered close to 530 nm and 590 nm. PRI is sensitive to changes in carotenoid pigments that are indicative of changes
in photosynthetic light use efficiency, the rate of CO2 uptake and as a reliable water-stress index. As such, it is used in studies of
vegetation productivity and stress.
The PlantPen model NDVI 310 (Fig. 3) measures Normalized Difference Vegetation Index (NDVI), which is an important indicator of
chlorophyll content in plants. The pigment in plant leaves, chlorophyll, strongly absorbs visible light (from 0.4 to 0.7 µm) for use in
photosynthesis. The cell structure of the leaves, on the other hand, strongly reflects near-infrared light (from 0.7 to 1.1 µm). The
differences in plant reflectance in the visible and near-infrared wavelengths are used to calculate NDVI index. NDVI is directly related to
the photosynthetic capacity and hence energy absorption of plant canopies.
Fig. 2 PlantPen PRI 210.
Fig. 3 PlantPen NDVI 310.

Page | 11
5GETTING STARTED
For more detailed information on steps of PlantPen operation please refer to chapter 6.
The device is powered by built in Li-Ion battery. Ensure that the battery if fully charged by plugging it into a PC via USB cable or the AC
outlet via USB adapter (not included) and the cable.
The PlantPen is controlled using two buttons:
•Use the MENU key to scroll through sequential menu options shown on the digital display. And to turn the device off (hold for 3
sec).
•Use the SET key to turn the device on (hold for 3 sec) and select a menu option based on cursor (>) position.
5.1 CALIBRATION
Calibration assures you that your measurements are accurate within the specification limits that led you to select the instrument in the
first place. It is better to calibrate your device before every set of samples. For Calibration of PlantPen use white reflectance standard.
The calibration of the white reflectance standard is an indispensable part of a correct calculation of PRI or NDVI.
It is necessary to calibrate PlantPen after every switch ON.
Prior measurement perform the calibration as follows:
•For calibration use white reflectance standard (It is part of leaf clip)
•Turn ON device –hold SET button for 1 sec.
•Close the leaf clip (white standard is on bottom part of the leaf clip)
•Go to Calibration (“Insert white sample” appears on display)
•Press SET button to confirm the calibration and wait until the calibration step is completed.
•Calibration is automatically stored into the device memory.
•The device is now ready to measure other samples.
5.2 MEASUREMENT
Please follow these instructions to perform a measurement:
•Insert a leaf sample into the leaf clip. The leaf clip is important for the sample stabilization.
•Go to Measurement
•Press SET to confirm.
•PlantPen measures predefined index (PRI or NDVI).
•Value of the index appears on display after measuring.
•During the measurement all data are stored into the device memory.

Page | 12
6CONTROL MENU TREE
The next few pages of this manual show the structure of the firmware menu on the PlantPen device, and explain in a
schematic way the operation of the PlantPen. The schematic shows the Main Menu, first-level Sub-Menus and second-
level Sub-Menus.
•The blue color represents the Main Menu and its Options.
•The yellow color represents the first-level Sub-Menus and their Options.
•The green color represents the second-level Sub-Menus and their Options.
•Full-line arrows are used to indicate the SET key operations.
•Dashed-line arrows are used to indicate the MENU key operations.

Page | 13

Page | 14

Page | 15

Page | 16

Page | 17
7USB CONNECTION
PlantPen comes with the USB cable that is required for charging of the Li-ion battery and can also be used for data transfer to the PC
after completion of measurements. To connect the USB cable with the PlantPen device follow the picture instructions below. Please
note that a lock in system is used to secure the USB cable to the PlantPen and extreme caution has to be used when setting up this
connection to avoid damage to the cable pins.
When connecting the USB cable take extra caution to prevent damage to the cable connector pins. Ensure correct
orientation of the cable as shown in the pictures below so the circled portion of the plug and the cable in photo
A and B are perfectly lined up prior to pushing them together. Once this connection is achieved the cable may be
secured in position by turning the metal cover of the cable and locking the cable in position.
To connect PlantPen with your computer please follow steps below in Fig. 4:
Fig. 4 How to connect PlantPen with PC.
A) connector on the PlantPen device. B) Portion of the USB cable with pins. C –E) Position the cable horizontally and line up the green
circled parts of the cable and the connector, plug in the inlet and screw the securing screw. F) Correct connection of the USB cable and
Pen device.
Once the cable is securely attached to the PlantPen the other end may be connected to the USB port on a PC. The PlantPen switches ON
automatically after connecting the cable to the PC. For the USB connection to be successful the USB driver and the FluorPen software
need to be installed on the PC. Both may be found on the installation disk (USB driver folder) delivered with the device. Once the USB
driver is installed the Device Manager in Windows will list the USB serial port in the device tree. The USB driver may also be downloaded
from PSI websites www.psi.cz . Once the driver is installed correctly the connection between the PlantPen device and the computer is
initiated by selecting in the software on the computer Setup > Device ID.
For more information about FluorPen software see chapter 9.

Page | 18
8BLUETOOTH CONNECTION
In addition to data transfer via USB the PlantPen may be connected to the software via Bluetooth for data transfer. Before setting up
the Bluetooth connection between the PlantPen and the PC, ensure the following components are in place:
Bluetooth enabled PC
The PC must have Bluetooth wireless technology, either built-in or through a Bluetooth card. Ensure that the PC's Bluetooth setting is in
"discoverable" mode (meaning that it shows up when other devices search for nearby Bluetooth connections). Consult the user guide for
the PC or Bluetooth card to learn how to do this.
Bluetooth configuration software properly set up on the PC
Before you connecting the PlantPen to the PC and downloading data files the Bluetooth software that came with the PC, or the PC's
Bluetooth card needs to be activated. This software varies by manufacturer. Please consult the PC's Bluetooth documentation for more
information.
Bluetooth must be switched on and be visible on both devices
To pair the PlantPen with another Bluetooth device, such as a computer, ensure that Bluetooth is switched on visible on both devices.
8.1 BLUETOOTH PAIRING
1. Enabling Bluetooth on the PlantPen
•Switch ON the PlantPen (press and hold the SET key for 1 s).
•Scroll to the Accessories menu (press the MENU key) and select Accessories by pressing the SET key.
•Select Bluetooth On (press the MENU key, then turn it ON by pressings the SET key.
Keep in mind that the PlantPen turns off automatically after about 8 minutes of no action.
Turning off the PlantPen always turns Bluetooth off.
2. Starting Bluetooth Application on the PC
•The following description of how to set up the Bluetooth
connection between the PC and the device is for Windows 7;
some of the steps may be different with different version of
Windows.
•Select: Start > Devices and Printers (Fig. 5).
•You may also start your Bluetooth application via the Control
Panel: Start > Control Panel > Hardware and Sound > Devices
and Printers.
Fig. 5 Start bluetooth application.

Page | 19
3. Opening the Add Bluetooth Device Application
•Select: “Add a device” to start searching for the new Bluetooth device. Be sure that the PlantPen is in discoverable mode (see
step 1).
Fig. 6 Add a device.
4. Selecting the PlantPen
•Select: PSI PlantPen icon.
•Click: Next (Fig. 7).
5. Starting the Pairing Process
This step is different for old and new version of the PlantPen, that are equipped with disparate Bluetooth module.
Old versions PRI 200 and NDVI 300:
Your Bluetooth Pairing Code is: 0000
•Select: “Enter the device’s pairing code”.
•Enter: 0000 (four digits).
•Select: Next (Fig. 8).
Fig. 7 Select the PlantPen.

Page | 20
Fig. 8 Pairing process.
New versions PRI 210 and NDVI 310:
•Select: Yes (Fig. 9). Please note that the PlantPen
device does not display the verification number. The
verification code is not important for the BT
connection.
•Select: Next.
6. Completing the PlantPen Pairing
•Select: Close (Fig. 10).
The Bluetooth pairing is now complete, and the next step is to open the program FluorPen 1.1 (included on the USB flash disk) For more
information about FluorPen software see chapter 9.
Fig. 9 Verifying of the Bluetooth pairing.
Fig. 10 Finishing.
This manual suits for next models
1
Table of contents
Other PSI Measuring Instrument manuals
Popular Measuring Instrument manuals by other brands

Mecmesin
Mecmesin afg 1000n operating manual

Creative Sensor Technology
Creative Sensor Technology DFM-6300 Series instruction manual

Eastron
Eastron SDM72DM user manual

Masser
Masser EXCALIPER HC user manual

MYPIN
MYPIN LC Series instruction manual

CALEFFI
CALEFFI GE 130 Series Installation and commissioning manual

NDT James Instruments
NDT James Instruments Chlorimeter C-CL-3000 Operator's manual

Liqua-Tech
Liqua-Tech LPM-102 operation & maintenance

Martek Instruments
Martek Instruments Mark 25 instruction manual

SBS
SBS SBS-2500 instruction manual

Endress+Hauser
Endress+Hauser Memosens COS81E operating instructions

Meister
Meister DWM/A-L operating instructions