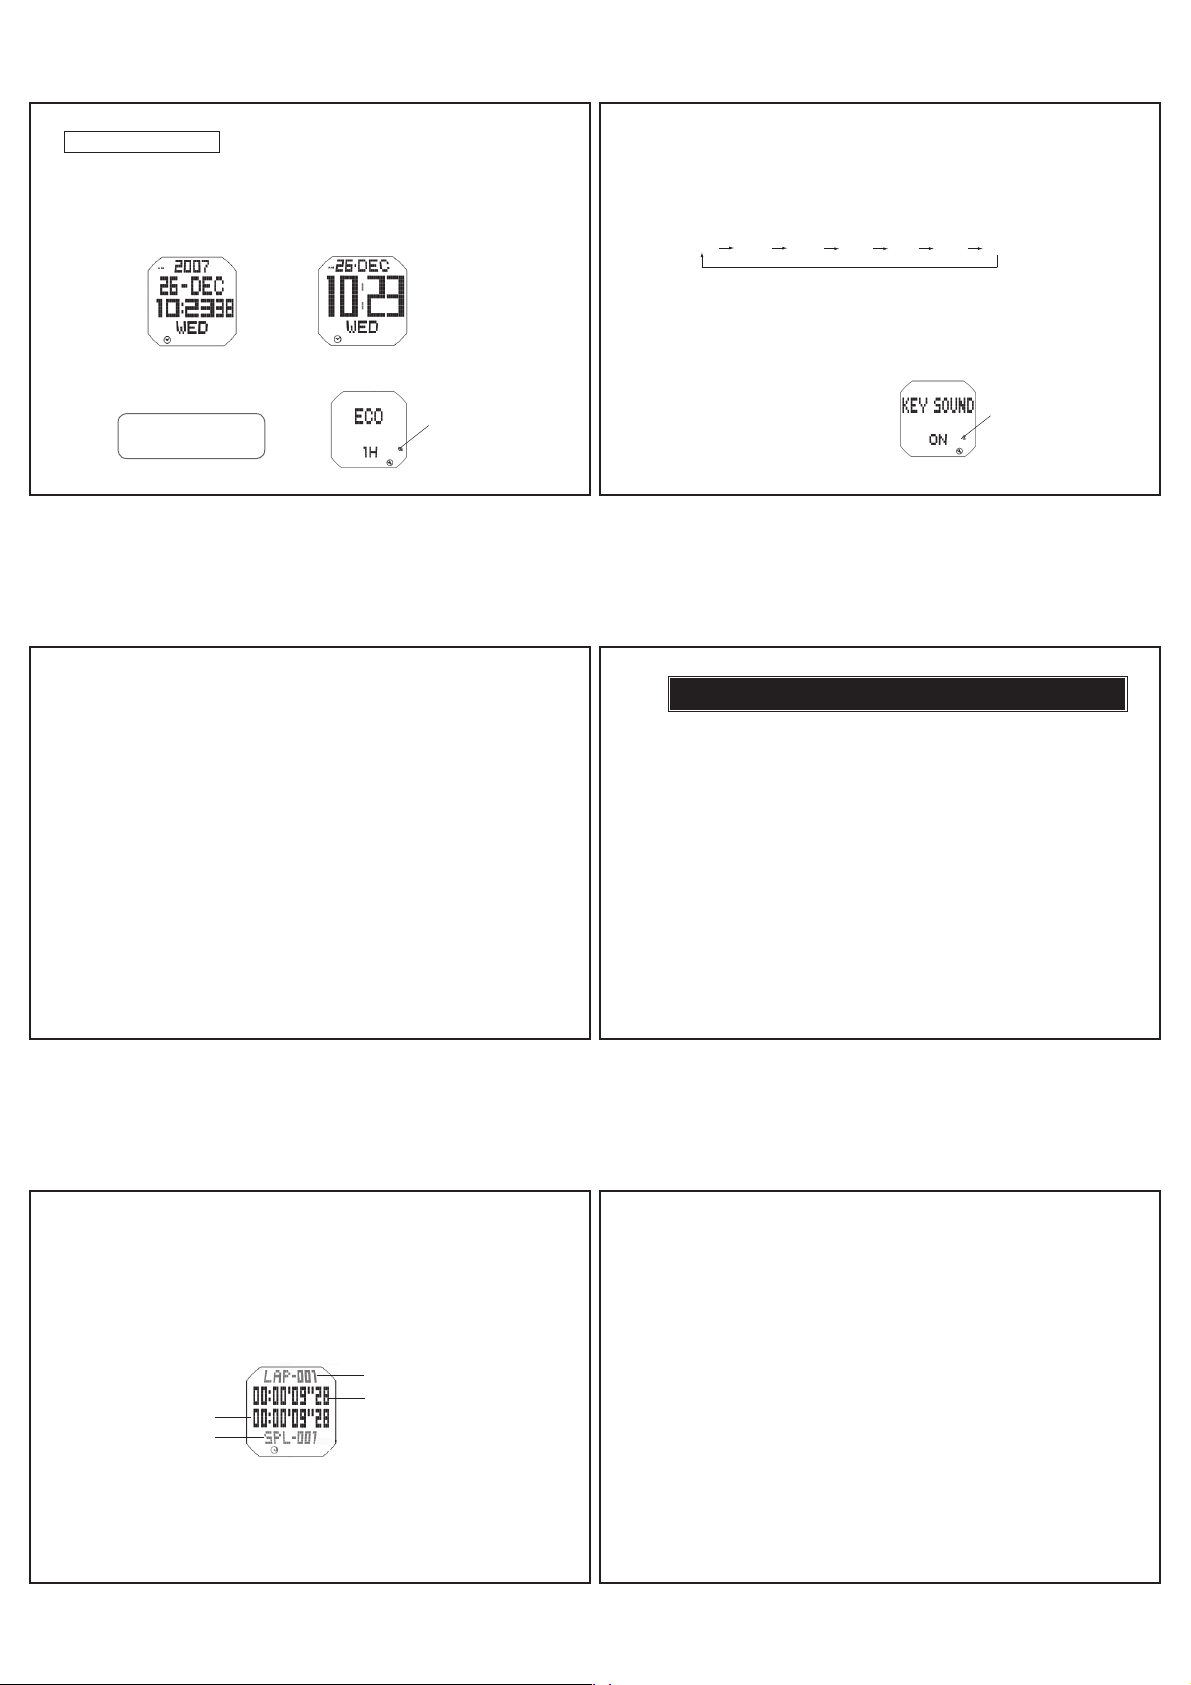
Pulsar W860 User manual

CAL. W860, W861
DIGITAL QUARTZ
ENGLISH
¬Full-panel dot-matrix liquid crystal panel
¬Time/calendar
¬Stopwatch with memory recall function
¬Countdown timer
¬5-channel regular alarm
¬World time
¬30-channel schedule alarm
¬Illuminating light (LED panel)
¬Changeover between normal and enlarged displays
2
English
MODE CHANGE
B
AD
E
C
E
With each press, the mode in the digital display changes in
the following order:
C
SCHEDULE
ALARM
TIME/CALENDAR
(TIME)
STOPWATCH
(CHRONO) TIMER
D
or
WORLD TIME
SETTING
¬Selection of a desired mode can be made by pressing buttons C or D in the
MENU display.
(For Cal. W861)
(For Cal. W860)
C
D
C
DCD
C
D
C
D
C
D
C
D
3
English
¬To return to the MENU display, press button A.
* When button B is pressed, the opening animation display is shown before the se-
lected mode appears.
Select the desired mode.
AB
or
±
ILLUMINATING LIGHT (LED panel)
ETurn on the LED light.
* The display panel is evenly illuminated
for 3 seconds.
E
E
(For Cal. W861)
(For Cal. W860)
4
English
TIME/CALENDAR MODE(TIME)
¬Once the time/calendar of your area is set in the TIME/CALENDAR mode, the
times of the 39 cities covered in the WORLD TIME mode will be set automati-
cally.
Press in MENU display to show TIME/CALENDAR mode.
B
AD
C
Date
Time
Month
Year
Day of the week
AB
or
Mode indicator
5
English
TIME/CALENDAR SETTING
Press for 2 seconds to show TIME/CALENDAR SETTING display.
B
±
Press to select the digits to be adjusted.
Selection of the digits
SecondCity
12-/24-hour indication Year Month
Date
A
±
Set the flashing digits. (Increasing digits)
Set the flashing digits. (Decreasing digits)
C
D
or
±
BReturn to TIME/CALENDAR mode.
MinuteHour
6
English
CHANGEOVER BETWEEN STANDARD TIME AND DAYLIGHT SAVING TIME
If the daylight saving time is effective in the selected city, press to
show the daylight saving time.
C
* With each press of button C, the standard time and daylight saving time of
the city are alternatively shown.
CHANGEOVER BETWEEN HOME TIME AND WORLD TIME
Press for 2 seconds to show WORLD TIME mode.
D
* Press button D again to return to TIME/CALENDAR mode.

7
English
STOPWATCH MODE(CHRONO)
¬The stopwatch measures up to 99 hours, 59 minutes and 59.99 seconds in
1/100 second increments.
Press in MENU display to show STOPWATCH mode.
RESET
D
STOP
C
±±
• • • • • • •
D
±
D
±
START
C
Lap time and split time measurement
LAP/SPLIT 1 LAP/SPLIT 2
Start / Stop /
Restart
C
DMeasure lap &
split time / Reset
Time measured
Lap No.
AB
or
8
English
With each press, stored data are recalled from the oldest to the
newest.
¬The first 100 lap and split times are automatically stored in memory.
¬The stored data can be recalled either during or after the measurement.
MEMORY RECALL FUNCTION
BPress to activate the memory recall function.*
* In memory recall after measurement, the oldest measurement in memory is
displayed. In memory recall during measurement, the newest measurement in
memory is displayed.
±
C
or
DWith each press, stored data are recalled from the newest to the
oldest.
±
BReturn to STOPWATCH mode.
BC
D
Split time
Lap time
9
English
TIMER MODE
¬The timer can be set from 10 seconds up to 99 hours, 59 minutes 59 seconds in one-second increments.
¬The number of times the countdown is repeated can be set from 1 to 99 times.
Press in MENU display to show TIMER mode.
B
D
C
A
Set time
AB
or
Mode indicator
10
English
TIMER SETTING
BPress for 2 seconds to show TIMER SETTING display.
±
±
APress to select the digits to be adjusted (hour / minute / second /
number of times the countdown is repeated).
±
Set the flashing digits. (Increasing digits)
Set the flashing digits. (Decreasing digits)
C
D
or
±
BReturn to TIMER mode.
11
English
TIMER OPERATION
* When the set time is up, a warning sound beeps for 5 seconds. To stop it manu-
ally, press any of the buttons.
CStart / Stop / Restart
DReset
No. of times
the countdown
is repeated
Time measured
12
English
ALARM MODE
¬The alarm can be set to ring daily at five different times per day.
¬The alarms can be engaged and disengaged independently of one another.
Press in MENU display to show ALARM mode.
B
D
C
A
Set alarm time
Alarm channel
Alarm mark
AB
or
“ ON” mark
Mode indicator

13
English
ALARM TIME SETTING
D
±
Press to select the desired alarm channel (AL-1 – AL-5).
B
±
Press for 2 seconds to show ALARM SETTING display.
±
Press to select the digits to be adjusted (hour/minute).
A
±
Set the flashing digits. (Increasing digits)
Set the flashing digits. (Decreasing digits)
C
D
or
±
BReturn to ALARM mode.
*“ON” and the alarm marks appear and the alarm is automatically en-
gaged.
14
English
ALARM ENGAGEMENT/DISENGAGEMENT
¬The alarms can be engaged and disengaged independently of one another.
Press to select the desired alarm
channel (AL-1 – AL-5).
D
±
With each press, the selected alarm
is engaged and disengaged alter-
nately.
C
* At the designated time, the alarm rings for 20
seconds. To stop it manually, press any of the
buttons.
D
C
Alarm mark
“ON”/“OFF” mark
15
English
WORLD TIME MODE
¬The time of 39 cities in different time zones throughout the world can be dis-
played together with their respective country code for overseas telephone call.
Cor Press to select the desired city.
D
* The country code ("CC”) and daylight saving time marks (“DST”) are alternately
displayed in one-second increments.
Press in MENU display to show WORLD TIME mode.
B
D
C
A
Current time of
selected city
City mark
Country code/DST
AB
or
Mode indicator
16
English
If the daylight saving time is effective in the selected city, press for 2
seconds to show the daylight saving time.
B
* Press button B for 2 seconds to return to the standard time.
GMT = Greenwich Mean Time
GMT
± (hours) Country name
0
0
+ 1
+ 1
G M T
L O N
P A R
R O M
Greenwich
London*
Paris*
Rome*
TIME DIFFERENCES AND COUNTRY CODES
(As of April 2007)
City mark City name Country code
United Kingdom
United Kingdom
France
Italy
44
44
33
39
CHANGEOVER BETWEEN STANDARD TIME AND DAYLIGHT SAVING TIME
17
English
GMT
± (hours) Country name
+ 1
+ 2
+ 2
+ 2
+ 3
+ 3
+ 3.5
+ 4
+ 4.5
+ 5
+ 5.5
+ 6
+ 6.5
+ 7
+ 8
+ 8
+ 8
+ 9
B E R
A T H
C A I
J R S
M O W
R U H
T H R
D X B
K B L
K H I
D E L
D A C
R G N
B K K
H K G
B J S
T P E
S E L
Berlin*
Athens*
Cairo
Jerusalem*
Moscow*
Riyadh
Tehran*
Dubai
Kabul
Karachi
Delhi
Dhaka
Yangon
Bangkok
Hong Kong
Beijing
Taipei
Seoul
City mark City name Country code
Germany
Greece
Egypt
Israel
Russia
Saudi Arabia
Iran
United Arab Emirates
Afghanistan
Pakistan
India
Bangladesh
Myanmar
Thailand
China
China
Taiwan
Republic of Korea
49
30
20
972
7
966
98
971
93
92
91
880
95
66
852
86
886
82
18
English
GMT
± (hours) Country name
+9
+ 9.5
+ 10
+ 11
+ 12
- 10
- 9
- 8
- 8
- 7
- 6
- 5
- 5
- 4
- 3
- 3
- 1
T Y O
A D L
S Y D
N O U
W L G
H N L
A N C
Y V R
L A X
D E N
C H I
N Y C
Y M Q
C C S
B U E
R I O
P D L
Tokyo
Adelaide*
Sydney*
Noumea
Wellington*
Honolulu
Anchorage*
Vancouver*
Los Angeles*
Denver*
Chicago*
New York*
Montreal*
Caracas
Buenos Aires
Rio de Janeiro*
Azores Is.*
City mark City name Country code
Japan
Australia
Australia
New Caledonia
New Zealand
U.S.A.
U.S.A.
Canada
U.S.A.
U.S.A.
U.S.A.
U.S.A.
Canada
Venezuela
Argentina
Brazil
Azores Islands
81
61
61
687
64
1
1
1
1
1
1
1
1
58
54
55
351
* The cities marked with “*” use daylight saving time (summer time).

19
English
SCHEDULE ALARM MODE
¬The schedule alarm can be set to ring at 30 different times. Year, month, date,
hour, and minute can be set for each schedule.
¬A message up to 14 characters can also be set. It is displayed at the same time
when the alarm sounds.
¬A personalized message can be input or a message can be selected from
among 10 preset messages.
Press in MENU display to show SCHEDULE ALARM mode.
B
D
C
A
Message
Schedule alarm
channel
AB
or
Schedule alarm
time
(Hour & minute /
Date & month /
Year)
Schedule mark Mode indicator
20
English
SCHEDULE ALARM SETTING
±
B
±
Press for 2 seconds to show SCHEDULE ALARM SETTING dis-
play.
Press to select the item to be edited (flashing).
CD
or
* Hour and minute, date and month, and year can be alternately displayed in one-
second increments.
* The schedule mark is displayed if any schedule alarm has been set for the day.
[When editing TIME:]
APress to show TIME SETTING display when TIME is flashing.
±
CD
or Press to select the desired schedule alarm channel (SAL-01
– SAL-30)
21
English
±
Advance the flashing cursor in order.
Move back the flashing cursor.
C
D
or
[When editing MESSAGE:]
Press to show MESSAGE SETTING display whenMESSAGE is
flashing.
A
BReturn to SCHEDULE ALARM mode.
±
Set the flashing digits. (Increasing digits)
Set the flashing digits. (Decreasing digits)
C
D
or
±
Press to select the digits to be adjusted (minute/hour/date/month/
year).
A
±±
22
English
Press to show the characters to input.
±
Advance the flashing character in order.
Move back the flashing character.
C
D
or
Set the flashing character.
A
BReturn to SCHEDULE ALARM mode.
* Press buttons C and D simultaneously to erase the message when advancing or
moving back the flashing cursor.
* If no message is set,“ NO MESSAGE” is displayed. In such a case, the schedule
alarm is not engaged.
±±±
A
±
23
English
Preset message setting
‘0 MEETING ‘5 LUNCH
‘1 BIRTHDAY ‘6 APPT
‘2 DATE ‘7 FLT
‘3 MOVIE ‘8 GYM
‘4 DINNER ‘9 PARTY
¬For setting a preset message, select the corresponding number to the desired
preset message in the table below. .
24
English
SETTING MODE
¬The setting of the following functions can be adjusted:Opening animation dis-
play, time display, eco mode,LCD contrast, LED color, key sound (confirmation
sound for button operation), alarm sound, schedule alarm sound, and preset
messages
Press in MENU display to show SETTING mode.
AB
or
Select the item to be adjusted.
C
D
±
Selection of items
Time mode
Animation
Schedule sound Alarm sound Key sound
LED color
LCD contrastEco
Message
Adjust the item.
±±
AReturn to MENU display.

25
English
[ECO MODE]
¬The watch display automatically shuts down to reduce electricity consumption
after no button operation is made for a certain period of time (ECO mode). Time
until Eco mode is activated can be set.
OFF 1 hour
3 hours 2 hours
Eco mode mark
[ANIMATION]
¬The opening animation display can be engaged (ON) or disengaged (0FF).
[TIME MODE]
¬The time display can be selected between normal and enlarged displays.
A: Normal display B: Enlarged display
[Ex. : In Time/Calendar mode]
ADJUSTING EACH ITEM
26
English
[LCD CONTRAST]
¬The contrast on the liquid crystal display can be adjusted in 7 steps from level “ -3”
to “+3”. The contrast becomes higher as the digits indicating the contrast level
increase and becomes lower as they decrease.
¬The contrast level has been initially set at “0” at the factory.
¬With each press of button C, the contrast level increases and decreases by one,
respectively.
-3 -2 -1 0 1 2 3
[LED COLOR]
¬The color of the LED panel can be selected between two colors.
A: Amber
B: Blue
[KEY SOUND (Confirmation sound for button operation)]
¬The confirmation sound for button operation can be engaged (ON) or disen-
gaged (0FF).
Key sound mark
27
English
¬When the key sound mark is displayed, the confirmation sound beeps with each
press of the buttons.
[ALARM SOUND]
¬The alarm sounds can be selected between three types of sounds.
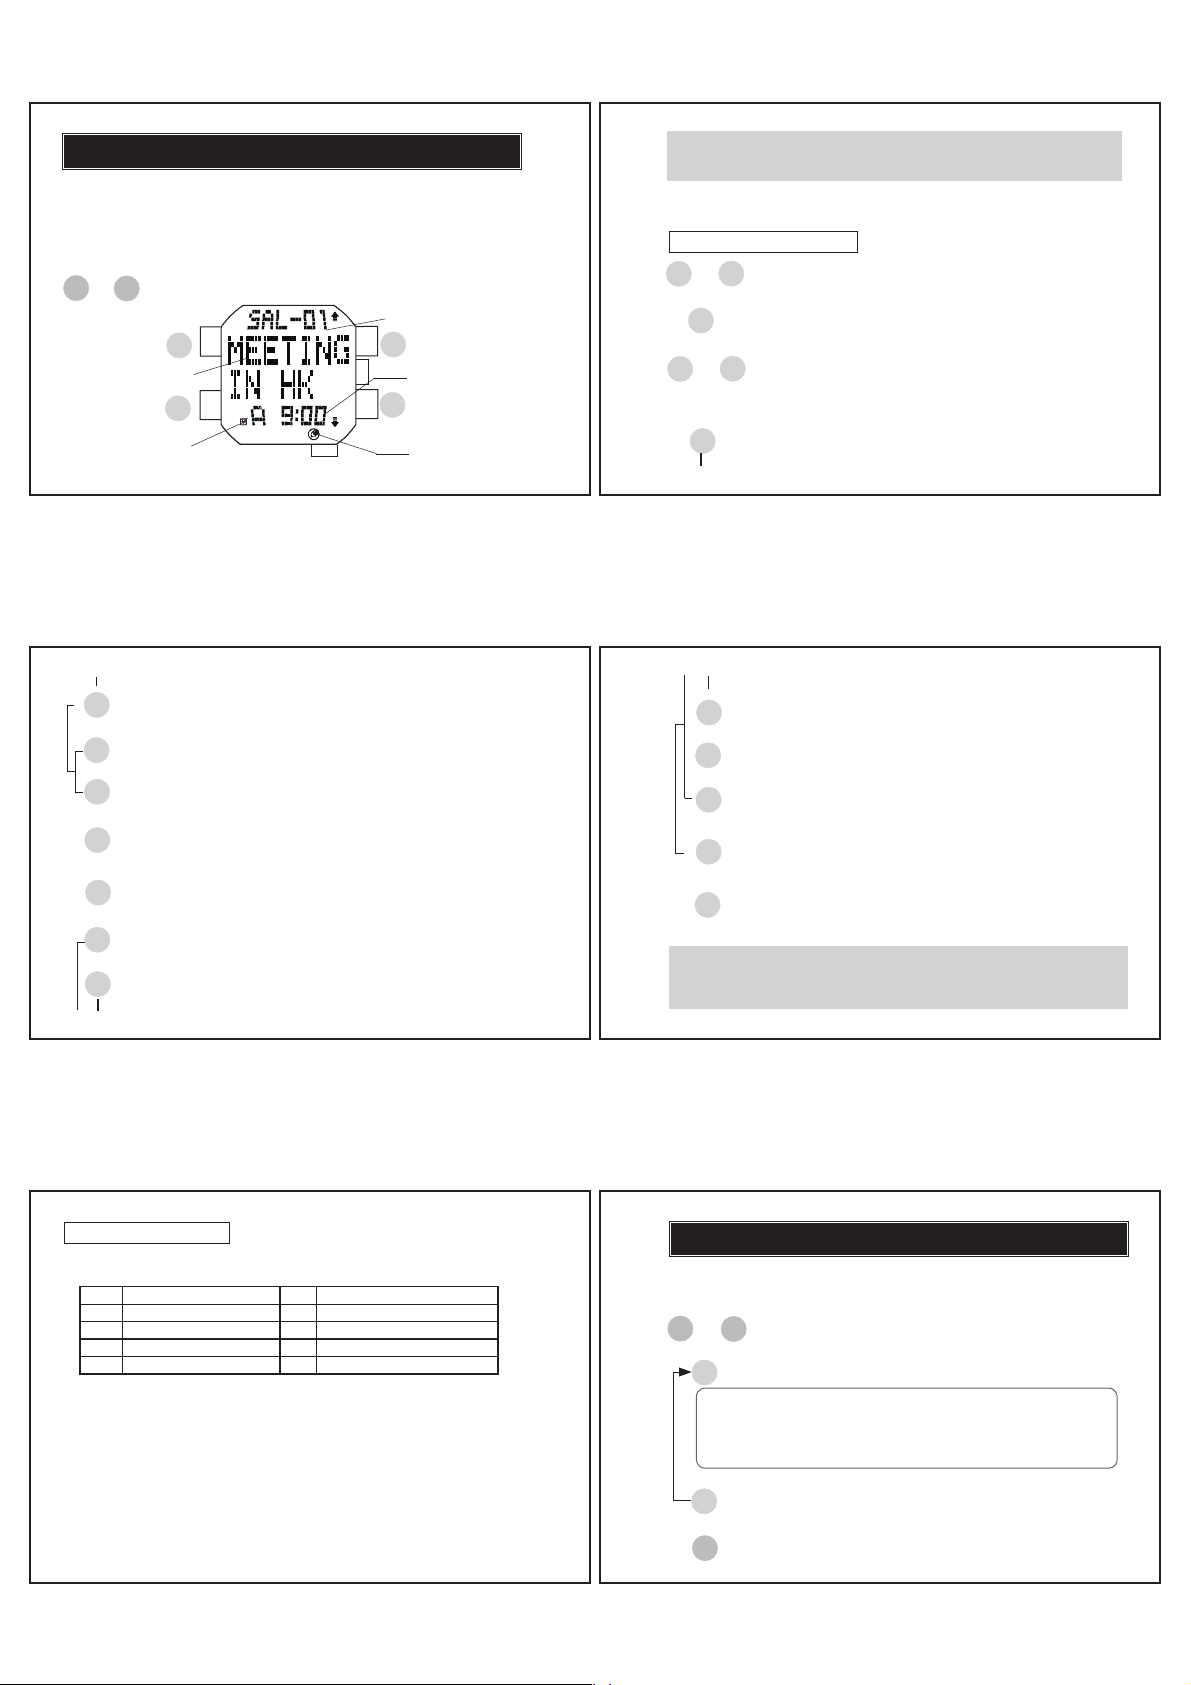
[SCHEDULE ALARM SOUND]
¬The schedule alarm sounds can be selected between three types of sounds.
[ADJUSTMENT OF THE PRESET MESSAGES]
¬The preset messages can be adjusted. After selecting the message to be ed-
ited by pressing button C, press button B for 2 seconds to show the MESSAGE
setting mode, and follow the procedure for editing messages in SCHEDULE
ALARM SETTING display.
28
English
NOTES ON USING THE WATCH
TIME/CALENDAR MODE
[TIME/CALENDAR SETTING]
¬The calendar automatically adjusts for odd and even months including February of
leap years from 2007 to 2099.
¬Once the year, month and date have been set, the day of the week is automatically
set.
¬Setting the seconds:
• With the second digits flashing, press button C or D in accordance with a time
signal. The second digits are reset to“00”.
• When the seconds count any number from“ 30” to“59” and button C or D is
pressed, one minute is added and the seconds are reset to“00”.
¬The flashing digits except the seconds and 12-/24-hour indication move quickly if
button C or D is kept pressed.
¬If the watch is left untouched with the digits flashing, it will automatically return to
the TIME/CALENDAR mode in 2 to 3 minutes.
¬Note on unusual display:
While setting the time/calendar, all the segments of the display will light up if both
buttons C and D are pressed at the same time. This is not a malfunction. Press any
one of the buttons to return to the TIME/CALENDAR mode, and then set the time/
calendar again.
29
English
STOPWATCH MODE
¬After 99 hours, 59 minutes and 59.99 seconds have been measured, the stopwatch
stops. Press button D to reset the stopwatch.
¬Restart and stop of the stopwatch can be repeated by pressing button C.
¬Measurement of the lap time and split time can be repeated by pressing button D.
¬The lap number counts up to“ 999.” After “ 999”, the number is displayed in three
digits such as“000” for 1,000,“001” for 1,001, and so on.
¬The lap time and split time measured remain displayed for 5 seconds together with
the flashing lap and split numbers. Then, the display automatically returns to the
measurement in progress.
Lap time
Split time
Lap no.
¬Even if the digits are reset to “ 00” in the stopwatch measurement, the stored data
is not erased and can be recalled unless a new measurement is started.
¬Even if the STOPWATCH mode is changed to another while the measurement is in
progress, it continues counting. After using the stopwatch function, be sure to stop
the stopwatch to avoid unnecessary battery usage.
[MEMORY RECALL FUNCTION]
Split no.
30
English
TIMER MODE
[TIMER SETTING]
¬The flashing digits move quickly if button C or D remains pressed.
¬If the watch is left untouched with the digits flashing, it will automatically return to
the TIMER mode in 2 to 3 minutes.
[TIMER OPERATION]
¬Restart and stop of the timer can be repeated by pressing button C.
¬If no measurement is made,“ - - - -” mark will be displayed when button B is
pressed to activate the memory recall function.
[ALARM TIME SETTING]
¬The flashing digits move quickly if button C or D remains pressed.
¬If the watch is left untouched with the digits flashing, it will automatically return to
the ALARM mode in 2 to 3 minutes.
¬When the time function is displayed in the 24-hour indication, the alarms are also
displayed in the 24-hour indication.
[ALARM ENGAGEMENT/DISENGAGEMENT]
¬When any one of the alarms is engaged, the alarm mark is displayed.
ALARM MODE
WORLD TIME MODE
¬In the enlarged display, month, date and second are not displayed.
¬The time differences and use of daylight saving time may change in some areas or

31
English
¬At the designated time, the schedule is displayed while the alarm rings for 20 sec-
onds. The schedule mark flashes for 1 hour.
SCHEDULE ALARM MODE
ILLUMINATING LIGHT (LED panel)
¬The LED (light emitting diode) panel loses its luminance as the battery voltage gets
lowered. Also, its luminance level decreases gradually with use.
¬The luminance level of LED may decrease if it is left in low temperature.
countries.
32
English
BATTERY CHANGE
Battery life : Approx. 2 years
Battery : CR2025
¬The battery life may be less than 2 years if the alarm is used more than once a day
and/or the illuminating light more than 3 times a day when eco mode is activated for
12 hours a day.
¬As the battery is inserted at the factory to check the function and performance of
the watch, its actual life once in your possession may be less than the specified
period.
¬When the battery expires, be sure to replace it as soon as possible to prevent any
malfunction.
¬We recommend that you contact an AUTHORIZED PULSAR DEALER for battery
replacement.
¬Battery life indicator
When the battery voltage becomes low, the battery mark starts flashing on the dis-
play. In such a case, have the battery replaced with a new one as soon as possible.
¬Necessary procedure after battery change
After the battery is replaced with a new one or if an abnormal display (broken digits,
etc.) appears, follow the procedure below to reset the IC.
2
Years
33
English
Press and hold buttons A, B, C and D at the same time for 2 to 3 seconds. The
display will become blank. When the buttons are released, time/calendar display will
appear and “2007 1-JAN 12:00'00" MON” will be displayed.
* Before using the watch, set the time/calendar and alarm.
WARNING
¬Do not remove the battery from the watch.
¬If it is necessary to take out the battery, keep it out of the reach of
children. If a child swallows it, consult a doctor immediately.
¬Never short-circuit, tamper with or heat the battery, and never ex-
pose it to fire. The battery may burst, become very hot or catch fire.
CAUTION
¬The battery is not rechargeable. Never attempt to recharge it, as this
may cause battery leakage or damage to the battery.
34
English
TO PRESERVE THE QUALITY OF YOUR WATCH
¬Non-water resistant
• If the watch becomes wet, have it checked by an AUTHORIZED
PULSAR DEALER or SERVICE CENTER.
WATER RESISTANCE
¬Water resistant 5/10/15/20 bar
5 bar WR
10/15/20
bar WR
• Do not operate the buttons when the watch is wet or in water.
If used in sea water, rinse the watch in fresh water and dry it com-
pletely.
• When taking a shower with the water resistant 5 bar watch, or tak-
ing a bath with the water resistant 10, 15 or 20 bar watch, be sure
to observe the following:
* Do not operate the buttons when the watch is wet with soapy
water or shampoo.
* If the watch is left in warm water, a slight time loss or gain may
be caused. This condition, however, will be corrected when the
watch returns to normal temperature.
35
English
* Pressure in bar is a test pressure and should not be considered as correspond-
ing to actual diving depth since swimming movement tends to increase the
pressure at a given depth. Care should also be taken on diving into water.
** We recommend that you wear a PULSAR Diver's Watch for scuba diving.
Operational temperature
range: Between -5° C (+23° F) and 50° C(122°
F)
TEMPERATURES
+50°C
5°C
NS
MAGNETISM
CARE OF CASE AND BRACELET
Your watch will not be
affected by magnetism.
To p r e ve n t p o s s i b l e
r u s t i n g o f t h e c a s e
and br a c e let cau s e d
by dust, moisture and
perspiration, wipe them
periodically with a soft
dry cloth.
+40°C
0°C
D i s p l a y t e m p e r a t u r e
ra nge: Bet ween 0° C (+32° F) and 40° C (+104
° F)
Functi o n a l temper a ture
range of alarm and LED
light: Between 5° C (+41°
F) and 50° C (+122° F)
36
English
Light activities will not
affect your watch, but be
careful not to drop your
watch or hit it against
hard surfaces, a s th is
may cause damage.
Be careful not to expose
th e watch to solvents,
mercury, cosmetic spray,
detergents, adhesives or
paints. Otherwise, the
case, bracelet, etc. may become dis-
colored, deteriorated or damaged.
SHOCKS & VIBRATION
CHEMICALS
It is recommended that
th e watch be che cked
o n c e e v e r y 2 t o 3
years. Have your watch
checked by an AUTHOR-
IZED PULSAR DEALER or SERVICE
CENTER to ensure that the case,
buttons, gasket and crystal seal re-
main intact.
2 - 3
Years
PERIODIC CHECK
I f y o u r wa t c h h a s a
protective film and/or a
sticker on the case back,
be sure to peel them off
before using your watch.
PRECAUTION REGARDING
CASE BACK PROTECTIVE FILM

37
English
The IC (Integrated
C i r c u i t ) u s e d i n
your watch will be
affected by static
electricity which may
disturb the display. Keep the
watch away from close contact
with objects such as TV screens
which emit strong static electric-
ity.
STATIC ELECTRICITY
Other manuals for W860
2
This manual suits for next models
1
Table of contents
Other Pulsar Watch manuals