Pure Water MINI-CLASSIC II User manual

FOR THE RECORD
The model and serial number are found on the back panel.
You should record both the model and serial number from
the back of the machine for future reference.
Model
Date of Purchase
Serial Number
Dealer Name and Phone Number
Pure Water
MINI-CLASSIC II™
Water Distiller
Owners
Manual
4120 NW 44th, Lincoln, NE 68524 USA
Phone: 402-467-9300 • Fax: 402-467-9393
www.mypurewater.com
Form #6567C, © 2001, Pure Water Rev. 2 4/06
MINI-CLASSIC II
U.S. Patent No. D.412.550

CONTENTS
Congratulations from the President of Pure Water ...... 3
Important Safety Information........................................ 3
Use and Care of the Drinking Water Container ............ 4
Electrical Requirements ............................................... 4
How Distillation and Your Distiller Work ....................... 5
Getting Acquainted With Your Mini-Classic II ........... 6-7
Unpacking Your Mini-Classic II..................................... 8
First Time Start-Up .................................................. 8-9
Normal Operation ......................................................... 9
Maintenance & Cleaning ....................................... 10-11
•Maintenance
•Cleaning
•Replacing the Carbon Filter
Troubleshooting.................................................... 12-13
Ordering Parts and Servicing ..................................... 13
Individual Parts List .................................................... 14
Exploded View of Mini-Classic II ................................ 15
For the Record ............................................. back cover
15
Exploded View of Mini-Classic II

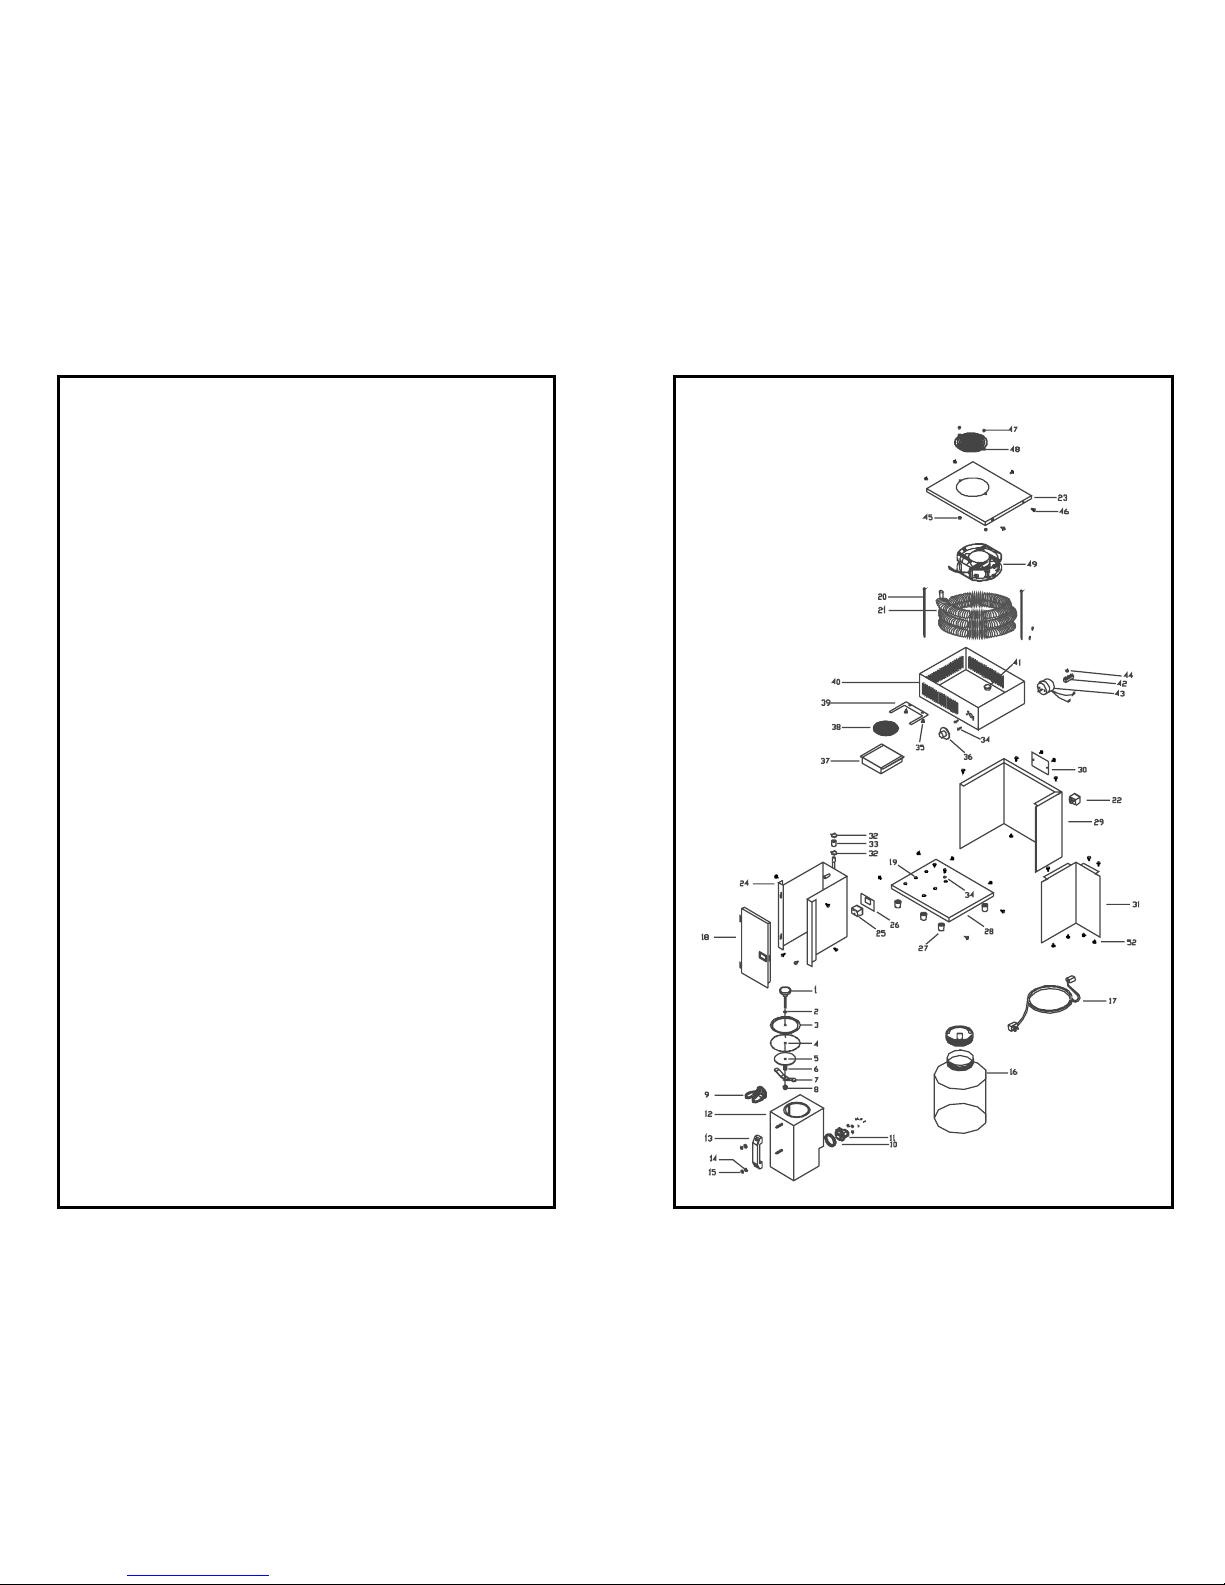
INDIVIDUAL PARTS LIST
Key # Part # Description
100V 120V 240V
1Lid Knob w/ Stud
2Lid O-Ring
3Lid Disc S.S.
469 69 69 Gasket, Boiling Tank Lid
5Washer, Gasket Retainer
6Spring, Tank Lid
7Crossbar, w/ Nut
8Nut, 1/4-20 Nylock
(1-8) 406 406 406 Lid Assembly Kit
99202A 9202AVHeating Element, 750W-Otter Style
716B 716BV Heating Element Kit-Otter Style
10 9205A 9205A 9205A Seal, Silicon with Screws
11 9203A 9203A 9203A Controller, Element-Otter Style
(9-11) 718B 718BV Heating Element/Controller Kit-Otter Style
12 Boiling Tank, Studded
13 9108 9108 9108 Handle, Black Plastic
14 9009 9009 9009 Washer, 1/4”, Stainless Steel
15 Nut, Acorn, 1/4-20
(9-15) 709B 709BV Boiling Tank Assembly Kit
16 745 745 745 1 Gallon Jar w/Pour Lid
17 NA 7276 NA Power Cord, IEC
18 713A 713A 713A DoorAssembly, Rectangle Latch
19 9148 9148 9148 Riser, Pop-In
20 7246 7246 7246 Wire Tie, Black
21 9217 9217 9217 Condensing Coil
(20-21) 712 712 712 Condensing Coil Kit
22 7275 7275 7275 IEC Connector
23 45014D 45014D 45014D Top Cover
24 45504D 45504D 45504D Boiling Tank Liner, Welded
25 9204A 9204A 9204A Element Adapter
26 45024 45024 45024 Clip, Adapter
27 9218 9218 9218 Appliance Feet, 7/8”
28 45503C 45503C 45503C Base, Studded
29 45008D 45008D 45008D Cladding
30 45017B 45017B 45017B Back Cover Plate
31 45009B 45009B 45009B Middle Divider
32 9922 9922 9922 Hose Clamp, Wire
33 9541 9541 9541 Tubing, Silicone
34 9002 9002 9002 Screw, #4-40 x 1/4”
35 9026 9026 9026 Screw, 1/4-20 x 1/4”
36 9343 9343 9343 Timer Knob
37 744 744 744 Filter Cup Kit
38 45518 45518 45518 Carbon Filter, 4-Pack
39 45013A 45013A 45013A Filter Holder, Square
40 45506C-02 45506C-02 45506C-02 Top Cabinet, Studded
41 9220 9220 9220 1” Bushing, Closed
42 9111 9111 9111 Terminal Block, 4-2-3
43 45520 45520 45520 Timer, Assembly
743 743 743 Timer, Assembly Kit
44 9070 9070 9070 Nut, #10-24, Nylock
45 9003 9003 9003 Nut, #8-32, Nylock
46 9029 9029 9029 Screw, #10 Sheet Metal
47 Screw, Fan
48 Guard, Fan
49 9344 9344 Fan, Box
(47-49) 667B Fan and Fan Guard Kit
50 45016 45016 45016 Insulation (Not Shown)
14 3
IMPORTANT SAFETY INFORMATION
•Make sure lid is removed from the glass jug before inserting into
holding area, and before unit is turned on.
•Operate indoors only and allow at least 3 inches of clearance
around unit when in operation.
•Always unplug the power before assembling, repairing or doing
any work on the distiller.
•NEVER immerse the distiller in water or any other liquid.
•NEVER operate the distiller with a damaged cord or allow the
cord to become exposed to hot surfaces.
•NEVER let children play with the distiller.
•Make sure your electrical outlet is properly grounded. If in doubt,
contact a qualified electrician.
•NEVER remove the boiling chamber from the unit until it has
cooled down.
•The physiological effect of the operation of this appliance, benefi-
cial or otherwise has not been investigated by UL.
•Do NOT use with an extension cord.
CONGRATULATIONS
You’ve taken an important step to ensure that you and your family
have fresh, great tasting high-purity drinking water.
The Pure Water Mini-Classic II™distiller is built of the finest materi-
als and constructed with care and attention to detail. If you need
assistance, please contact your local Pure Water Dealer or Distribu-
tor, or call Pure Water Customer Service at 1-800-875-5915. I urge
you to take the time to read and understand the Safety Information
section below.
We are sure you will have many years of use from your Pure Water
Mini-Classic II distiller. If you’re as thrilled with this product as we
expect you will be, why not tell a friend or neighbor?
Thanks for being a member of the Pure Water Family and helping
us to “Improve the Quality of Life Through the Quality of Water!”
Al Meder, President

413
USE AND CARE OF THE DRINKING
WATER CONTAINER
To ensure proper performance and a lifetime of trouble-free
service, please read the following information on general use
and care of the drinking water container:
•Do not use on stove-top burner, under heating elements,
in microwave or conventional ovens.
•Do not store hot liquids nor food in drinking water con-
tainer.
•Dishwasher-safe Lid: Top rack only.
ELECTRICAL REQUIREMENTS
The Pure Water Mini-Classic II must be plugged directly into
a fully grounded outlet.
The Pure Water Mini-Classic II will use approximately 8
amps when operating, so isolate a 10 amp fuse or circuit
breaker for the unit.
This unit operates on 110V, 60 cycles, or as otherwise
specified on the back of the distiller.
ORDERING PARTS & SERVICING
Pure Water recommends that you have your Pure Water
Mini-Classic II serviced by an authorized service center.
Please see your Pure Water Dealer or Distributor.
If you require parts or accessories at any time, please
contact your Pure Water Dealer or Distributor. In the unlikely
event your Pure Water Dealer or Distributor cannot help, you
may contact Pure Water Customer Service at 800-875-5915.
To help you identify parts for your Pure Water Mini-Classic II
please see the parts list included in this manual on page 14.
SYMPTOM: There is steam around the unit...
Possible Cause Check...
...that the unit is not pushed hard against
the wall. Keep a minimum of 1 inch
clearance.
...if there are any items on the unit that
may block the air flow. Remove any
such items.
Possible Cause Check...
...if the fan is not turning and you have
checked that there is power to the unit,
and the timer switch is on, then it may
be a failed fan motor. Replace the fan
motor (stock #667B).
INSUFFICIENT
VENTILATION OF
THE UNIT
FAN MOTOR
SYMPTOM: There is water around the unit...
Possible Cause Check...
...that the carbon filter is in proper
position and water is flowing through it.
...that the drinking water container is
correctly placed to catch the water.
IMPROPER
POSITIONING

SYMPTOM: The distilled water has a taste...
Possible Cause Action...
...change post filter by following directions
for Replacing the Carbon Filter on page
11.
...thoroughly clean the boiling chamber.
Note: Make sure the boiling chamber is
cool.
Possible Cause Check...
...that there is power to your home/office...
...that the power cord is plugged in and is
pushed in completely to back of machine.
...that the power switch is turned on...
...that the boiling chamber is pushed in
completely, and the fan rotates when the
unit is on, but the air is cool, or cold...
Then...
Replace the heating element (stock #9202A).
SYMPTOM: Unit does not produce water...
Possible Cause Check...
...that the power cord is plugged in and is
pushed in completely to back of
machine.
...that the power to your home/office is on.
...that the timer knob (11) is turned on. The
knob must be turned left and the fan
operating.
...that there is water in the boiling chamber.
...that the boiling chamber (1) is completely
pushed in.
12 5
HOW DISTILLATION AND YOUR
MINI-CLASSIC II WORK
Nature has a way to produce pure water from contaminated
sea water (1). When the sun rises in the morning, it starts to
heat the surface of the ocean (2). The heat causes mol-
ecules or pure water to evaporate from the surface of the
ocean (3) and rise to form clouds (4). When the conditions
are right, (5) the clouds cannot hold any moisture and water
falls to earth as rain (6). The rain collects in rivers, lakes and
reservoirs and is available for drinking (7).
NATURE’S DISTILLATION CYCLE...
THE PURE
WATER WAY...
A distiller operates the
same way. Water is placed
into a boiling chamber (1)
where heat is applied
(2). The water boils
and water
molecules (steam) rise (3).
The steam enters the
condenser (4) where cool air
(5) causes the steam to lose
energy and it forms droplets
of pure water (6). This
water is collected and is fresh,
great-tasting, distilled drinking
water (7) - the purest kind.
TROUBLESHOOTING
The Pure Water Mini-Classic II distiller is designed for years
of dependable service. The following guide is presented to
assist you in the event of any problems with your product.
NO
POWER
HEATING
ELEMENT
BURNED OUT
NEW CARBON
FILTER
NEEDED
1
6
3
4
5
7
1
7
6
3
45
2
2

To Clean the Boiling Chamber:
1. Turn the timer knob to the OFF position.
2. If the unit has been operating, allow it to cool for 30
minutes from the end of the distillation cycle.
3. Carefully remove the boiling chamber from the unit.
CAUTION: The boiling chamber will get hot and could
cause a burn if the unit has not been allowed to cool.
4. Remove the boiling chamber lid (4).
5. Drain any residual water inside the boiling chamber (1).
6. Fill the boiling chamber to the water level indicator (2).
7. Add Lumen™Cleaner (stock #6603) to the boiling
chamber. Follow instructions on the label.
Note: DO NOT replace the boiling chamber back into the
unit during the cleaning process DO NOT allow the unit to
operate with the Lumen Cleaner in the boiling chamber.
Replacing the Carbon Filter
Acarbon filter (8) is used to finish or polish the water, and
to improve the taste. The carbon filter should be replaced
approximately every 3 months, or whenever the water
develops a taste. The carbon filter is custom designed for
the Pure Water Mini-Classic II distiller.
To Replace the Carbon Filter:
1. Remove the drinking water container (10) from the unit.
2. Remove the old filter by sliding the filter housing (9)
and filter (8) towards you or removing it from the
opening in the drinking water container.
3. Immerse the new carbon filter (8) in a
separate container filled with distilled
water for one minute.
4. Remove the soaked filter and
place it into the filter housing.
5. Slide the new filter and housing
back into the guide.
611
GETTING ACQUAINTED WITH YOUR
MINI-CLASSIC II
COMPONENT IDENTIFICATION
Boiling Chamber (1). The manually-filled stainless
steel boiling chamber holds approximately one
gallon of water when filled to the proper level.
Water Level Indicator (2). Asmall rod which extends
down inside the boiling chamber. The boiling cham-
ber should be filled to touch the bottom of this
indicator.
CAUTION: DO NOT overfill.
Heating Element (3). The 750-watt heating element
provides the heat to boil the water in the boiling
chamber.

Lid (4). The lid is constructed of heavy-gauge
stainless steel and has a special gasket and handle
which tightens to seal when turned.
Door (5). The stainless steel door improves the
look of the unit and serves an important safety role.
DO NOT open the door until the unit has stopped
distilling for a minimum of 30 minutes.
Condenser (6). Ahollow, finned stainless steel tube
where the steam from the boiling chamber is
collected and cooled by the air from the fan. The
steam is converted into high-purity drinking water.
At the top portion of the condensing coil there are
two small holes. These are gas vents to allow
volatile compounds to escape.
Fan (7). An electrical fan which works automati-
cally to provide a flow of air across the outside of
the condenser.
Filter (8). Before the distilled water flows into the
drinking water container, it passes through a carbon
filter pack to polish the taste of the water.
Filter Housing (9). Astainless steel housing de-
signed to slide into the guides in the distiller and
holds the carbon filter pack.
Drinking Water Container (10). This glass con-
tainer collects the distilled water. It is equipped with
a pour-through lid for ease of use.
Timer Knob (11). The timer knob is located on the
front of the unit. It is a rotary switch. The left posi-
tion is ON, and when rotated counterclockwise, it
automatically starts the timed operation. Arotating
fan indicates the unit is in operation. The upper
right position is OFF.
10 7
MAINTENANCE & CLEANING
With proper care on your part, your Mini-Classic II will pro-
vide you with high-quality water for many trouble-free years.
The following recommendations are for typical water condi-
tions. If you live in an area where the water quality is excep-
tionally poor, you may need to increase the frequency of our
care.
Maintenance
Every Batch:
•Swirl and rinse out the residual water from the
boiling chamber (1).
Monthly, or every 30 gallons:
•Clean the inside of the boiling chamber (1) to re-
move any buildup of solid residues. (See Cleaning
below).
Every 3 months:
•Replace the carbon filter, stock #45518. (See page
11).
•Clean the exterior with Stainless Steel Cleaner &
Polish, stock #6606.
Cleaning
Cleaning the Exterior:
Use Stainless Steel Cleaner & Polish (stock #6606)
and follow instructions.
Cleaning the Boiling Chamber:
Sometimes scale will build up inside the boiling cham-
ber. This needs to be removed periodically to ensure
good heating element life, and high-quality drinking
water.

89
UNPACKING YOUR MINI-CLASSIC II
Your Pure Water Mini-Classic II water purification system is
shipped to you in a durable carton. Carefully remove the
contents from the box.
The Pure Water Mini-Classic II carton contains:
•The Pure Water Mini-Classic II distiller.
•Glass container and lid.
•Filter kit.
•Owners Manual and Warranty Card.
•Power Cord (Not included in 240 Volt machines).
If these are not present, please look for the Quality Assurance
Inspection Slip and note the name of the inspector. Call your
Dealer or Distributor; or, in the event you can’t reach them,
contact Pure Water Customer Service Department at 800-875-
5915 (outside the USA, please call 402-467-9300).
Note: Save the box and packing materials for future use in the
unlikely event your Mini-Classic II should require service work.
FIRST TIME START-UP
Starting the unit for the first time:
1. Open the door (5) and remove the boiling chamber (1)
by pulling on the handle.
2. Remove the lid (4) by turning the black lid knob counter-
clockwise and moving the lid (4) side to side and lift out.
3. Fill the boiling chamber (1) with cold tap water until the
water touches the bottom of the water level indicator (2).
DO NOT overfill.
4. Replace the lid (4) on the boiling chamber (1). Turn the
black lid knob clockwise and tighten firmly, ensuring a
good seal.
5. Push the boiling chamber (1) into the left side of the
distiller until it fits snug and the element prongs plug into
the controller.
6. Close the door.
Note: DO NOT install the post filter at this time. Keep the
first batch of distilled water for soaking the post filter.
First Time Start-Up Continued...
7. Put the drinking water container in place.
8. Plug the power cord into the back of the machine and
then into the electrical source.
9. Turn the timer knob (11) to the left to the ON position.
10. Allow the unit to operate until it automatically shuts off
(approximately 3.5 hours).
11. Keep the first batch of distilled water for soaking the post
filter, but do not drink.
12. Submerge the filter (8) completely in a separate con-
tainer with distilled water for one minute. Remove the
filter (8) and place inside the filter housing (9).
13. Slide the filter housing (9) into the guide above the
drinking water container.
14. Replace the drinking water container (10) to the distiller.
NORMAL OPERATION
1. Ensure that the boiling chamber is cool.
2. Open the door (5) and remove the boiling chamber (1) by
pulling on the handle.
3. Loosen the black knob on the lid (4) and slide the lid from
side to side and lift the lid out.
4. Swirl and empty out any water left in the boiling chamber (1)
from the prior batch.
5. Fill the boiling chamber (1) with tap water until it touches the
bottom of the water level indicator (2).
6. Place the lid (4) on the boiling chamber (1). Tighten the black
lid knob firmly, ensuring a good seal. DO NOT overtighten.
7. Push the boiling chamber (1) into the left side of the distiller
until it fits snug and the element prongs plug into the control-
ler. Close the door.
8. Be sure lid is removed from container. Put the drinking water
container (10) in place.
9. Turn the timer knob (11) left to the ON position. Note: To
activate the unit, the knob must be turned left and the fan
running.
10. Allow the unit to operate until it automatically shuts off. This
will take approximately 3.5 hours and will produce approxi-
mately 3 liters of distilled water.
CAUTION: Never open the door during operation and never
remove the boiling chamber while the unit is operating.
Table of contents
Other Pure Water Distilling Equipment manuals