PWR Bikes Superbolt User manual

ELECTRIC
BALANCE BIKE MANUAL

2
PWR Electric Balance Bike Manual
TABLE OF CONTENTS
ELECTRIC BALANCE BIKE MANUAL
BEFORE RIDING PWR ELECTRIC BALANCE BIKE
PLEASE READ MANUAL CAREFULLY BEFORE OPERATING
Read and understand this entire manual before allowing a child to
use this product!
NOTE: Manual illustrations are for demonstration purposes only.
Illustrations may not reflect exact appearance of actual product.
Specifications are subject to change without notice. Please have
your product Serial Number (S/N) and a copy of your receipt before
contacting PWR for warranty assistance and/or replacement parts.
WARNING: Riding an electric balance bike does present potential
risks, and caution is required. Like any riding product, an electric
balance bike has inherent hazards associated with its use (for
example, falling off or riding it into a hazardous situation). Like any
riding product, electric balance bikes can and are intended to move;
therefore, it is possible to lose control or otherwise get into
dangerous situations. Both children and the adults responsible for
supervising them, must recognize that if such hazards occur, a rider
can be seriously injured or die even when using safety equipment
and other precautions. RIDE BIKE AT YOUR OWN RISK AND USE
COMMON SENSE.
WARNING: PARENTAL AND ADULT RESPONSIBILITY AND
SUPERVISION NECESSARY:
This manual contains important safety information. It is your
responsibility to review this information and make sure that
all riders understand all warnings, cautions, instructions, and
safety topics, and assure that young riders are able to safely
and responsibly use these products. PWR recommends that
you periodically review and reinforce the information in this
manual with younger riders, and that you inspect and maintain
your children’s product to ensure their safety. If you delegate
this task to another adult, it is YOUR RESPONSIBILITY to pass
this owner’s manual and all relevant information to whomever
will take on this role and to ensure without question that the
rider is supervised, controlled, and taught in a safe manner.
WARNING: THESE MODELS ARE NOT FOR CHILDREN
UNDER AGE 8 OR HEAVIER THAN 132 LB (60 KG). No
children should ride any PWR electric balance bike if they
cannot sit on the seat and touch both feet flat on the ground
at the same time. Because products, like electric balance
bikes, can and do present potential hazards plainly
associated with their use, it is well recognized THE NEED
FOR EXERCISE OF PARENTAL RESPONSIBILITY IN
SELECTING RIDING PRODUCTS APPROPRIATE TO THE AGE,
SIZE AND DEVELOPMENTAL PROGRESS OF A CHILD, OR
PARENTAL SUPERVISION IN SITUATIONS IN WHICH
CHILDREN OF VARIOUS AGES MAY HAVE ACCESS TO THE
SAME RIDING PRODUCTS, IS IMPORTANT. PWR recommends
that children under the age of 8 not be permitted to use the
PWR electric balance bike. This recommendation is based
not just on age or weight or height – it reflects consideration
of coordination and skills as well as physical size. The
recommended minimum rider age of 8 years or older for are
only estimates and can be affected by the rider’s size, weight
or skills – not every child 8 years old will be suited to the
PWR electric balance bike. Certainly, any rider unable to fit
comfortably on the PWR electric balance bike should not
attempt to ride it, but a parent’s decision to allow his or her
child to ride these products should be based on the child’s
maturity, skill, and ability to follow directions and rules. PWR
emphasizes that adults are strongly advised not to disregard
PWR recommendations or permit children that under 8 years old to
ride the PWR electric balance bike. These products are intended for
use only by children who are, at a minimum, completely comfortable
and competent while operating these products in conjunction with
parental assistance. Children with any mental or physical conditions
that may make them susceptible to injury, or impair their physical
dexterity or mental capabilities to recognize, understand, and follow
safety instructions and to be able to understand the hazards
inherent in a product’s use should not use or be permitted to use
this product if determined inappropriate for their abilities. Children
or adults with heart conditions, head, back or neck ailments (or prior
surgeries to these areas of the body), or pregnant women should
not operate or provide supervision to these products. Not every
product is appropriate for every age or size of child, and different
age recommendations are found within this category of product
which is intended to reflect the nature of the hazards and the
expected mental or physical ability, or both, of a rider to cope with
the hazards.
NOTE: In order to ensure the product capability, the test is based
on a load of 154lb (70kg) as a test standard. However, the product
load is still recommended not to exceed 132lb (60kg). For more
information, please visit: www.PWRbike.com

3
PWR Electric Balance Bike Manual
TABLE OF CONTENTS
TABLE OF CONTENTS
1. COMPONENTS 4
2. ASSEMBLE YOUR ELECTRIC BALANCE BIKE 5
3. ACCEPTABLE RIDING PRACTICES & CONDITIONS 6
Pre-Ride Inspection and Checklist
Battery
Powering On/Off
Changing Speed Mode
4. BEFORE RIDING 9
The Starting Process
Batery Status
5. TROUBLESHOOTING GUIDE 10
Troubleshooting Problems
Technical Processes
Checking the Battery
Replacing the Fuse
Replacing the Throttle, Monitor, and Power Switch
Replacing the Brake Lever
Replacing the Control Board
Replacing the Motor
6. WARRANTY 14
7. FREQUENTLY ASKED QUESTIONS 15

4
PWR Electric Balance Bike Manual
TABLE OF CONTENTS
1. COMPONENTS
1. THROTTLE GRIP
2. STEM
3. GRIP
4. POWER OFF BRAKE
5. HANDLEBAR
6. HEADSET
7. FORK
8. FRONT WHEEL
9. FRONT AXLE NUTS
10. BATTERY
11. FOOTREST PLATFORM
12. SIDE COVER
13. CHAIN GUARD
14. CHAIN TENSIONER
15. REAR AXLE NUTS
16. DRUM BRAKE
17. REAR WHEEL
18. SEAT CLAMP
19. SEAT POST
20. SADDLE
21. FRAME
Components
CHAIN DRIVE MOTOR
DRIVE SPROCKET ELECTRIC SPEED CONTROL
MONITOR
POWER SWITCH THROTTLE GRIP

5
PWR Electric Balance Bike Manual
TABLE OF CONTENTS
2. ASSEMBLE YOUR ELECTRIC
BALANCE BIKE
You should have the following
parts: Box end wrench, 4mm
Hex key, 5mm Hex key, Foot
rest platform (x1), Screw (x2),
Washer (x2).
Put handlebar on the stem and
adjust the angle.
Remove front cap from
handlebar stem. Secure the stem cap by
threading the screws in an
alternating diagonal pattern.
Ensure that the handlebars are
at the proper angle and tighten
fully.
Assemble Your Electric Balance Bike
Assemble front wheel to the
fork.
Assemble secondary
retention washer on front
wheel axle and hook onto
lower hole of the front fork.
Tighten screw nut using the
box end wrench.
Shown above: secondary
retention washer for front
wheel.
Align the foot rest platform and secure with the washers and
screws using the 4mm Hex key.
Loosen the seat clamp to
adjust seat height. After
adjustment, tighten the seat
clamp using the 5mm Hex key.

6
PWR Electric Balance Bike Manual
TABLE OF CONTENTS
3. ACCEPTABLE RIDING PRACTICES
AND CONDITIONS
WARNING: Always check and obey any local laws or
regulations, which may affect the locations where the electric
balance bike may be used. Keep safely away from cars and
motor vehicle traffic at all times, and only use where allowed
and with caution. Never ride your PWR electric balance bike on
public streets, roads, highways, at night, or when visibility
is limited.
Do not activate the speed control on the hand grip unless
you are on the electric balance bike and in a safe, outdoor
environment suitable for riding. The maximum speed of the bike
is limited by the selected power mode (See Throttle Operation
section below). Avoid excessive speeds that can be associated
with downhill rides. Maintain a grip on the handlebars with both
hands at all times. Do not touch the brake or motor on your
electric balance bike when in use or immediately after riding,
as these parts can become very hot. Ride defensively. Watch
out for potential obstacles that could catch your wheel or force
you to swerve suddenly or lose control. Be careful to avoid
pedestrians, skaters, skateboards, scooters, bikes, children, or
animals who may enter your path, and respect the rights and
property of others. This electric balance bike is intended for use
on flat, dry surfaces, without loose debris, such as sand, leaves,
rocks, or gravel. Wet, slick, bumpy, uneven, or rough surfaces
may impair traction and contribute to possible accidents.
Do not ride your electric balance bike through mud, over ice,
through puddles, in wet or icy weather and never immerse
or wash the electric balance bike with water, as the electrical
and drive components could be damaged by water or create
other possibly unsafe conditions. Never use bike near steps or
swimming pools.
Acceptable Riding Practices
Avoid sharp bumps, drainage grates, and sudden surface
changes. Do not attempt or do stunts or tricks on your electric
balance bike. This electric balance bike is not made to withstand
abuse from misuse such as jumping, curb grinding, or any other
type of stunts. Racing, stunt riding, or other maneuvers also
enhance risk of loss of control or may cause uncontrolled rider
actions or reactions. Never allow more than one person at a time
to ride the electric balance bike. Do not ride at night or when
visibility is limited. Never use headphones, a cell phone or text
when riding. Never risk damaging surfaces, such as carpet or
flooring, by use of an electric balance bike indoors. Never tow
anything or anyone with or allow your electric balance bike to be
towed by any other person or vehicle, motorized or not.
Please ride your electric balance bike in a controlled environment
and do not ride on public streets, open roads and highways.
POWERED & ROTATING PARTS WARNING:
Never operate the electric balance bike without the side panels
and chain guard properly installed. Do not allow hands, feet, hair,
body parts, clothing, or similar articles to come in contact with any
rotating or moving parts, wheels, or drive train components and
chain while the motor is running or while the wheels and tires are
rotating freely.
PROPER RIDING ATTIRE:
Always wear proper protective equipment, such as an approved
and properly fitted safety helmet (with chin strap securely
buckled), eye protection, athletic shoes (lace-up shoes with rubber
soles), elbow pads, and kneepads. Keep shoelaces tied and out
of the way of the wheels, motor, and drive system. Never ride
barefoot or in sandals. Long-sleeved shirt, long pants, and gloves
are recommended. Furthermore, a helmet may be required by
local law or regulation in your area. Your child’s brain is their most
valuable asset, MAKE THEM WEAR AN APPROVED, PROPERLY
FITTED, AND BUCKLED HELMET!
SAFELY APPROACHING OR RE-MOUNTING THE ELECTRIC
BALANCE BIKE:
During adult supervision always teach children to approach the
electric balance bike with caution; before use, while standing
back up if knocked over, or after a spill.
POWERING OFF AND ON
1. Press and hold power switch for 3 seconds to turn off the
electric balance bike
2. Ensure all wheels/tires and drive train components have
stopped rotating or moving.
3. Inspect for any obvious damage.
4. Perform a “Pre-Ride Inspection”
(below)
5. Have rider mount the electric
balance bike, gripping the
handlebars with both hands,
sitting on the saddle with both feet
flat on the ground.
6. Press and hold power
switch for 3 seconds to turn
electric balance bike on.
7. Finally, carefully resume riding your electric balance bike.
LOADING AND UNLOADING
(PUTTING AN ELECTRIC BALANCE
BIKE INTO A VEHICLE)
1. Press and hold power
switch for 3 seconds to turn
off electric balance bike.
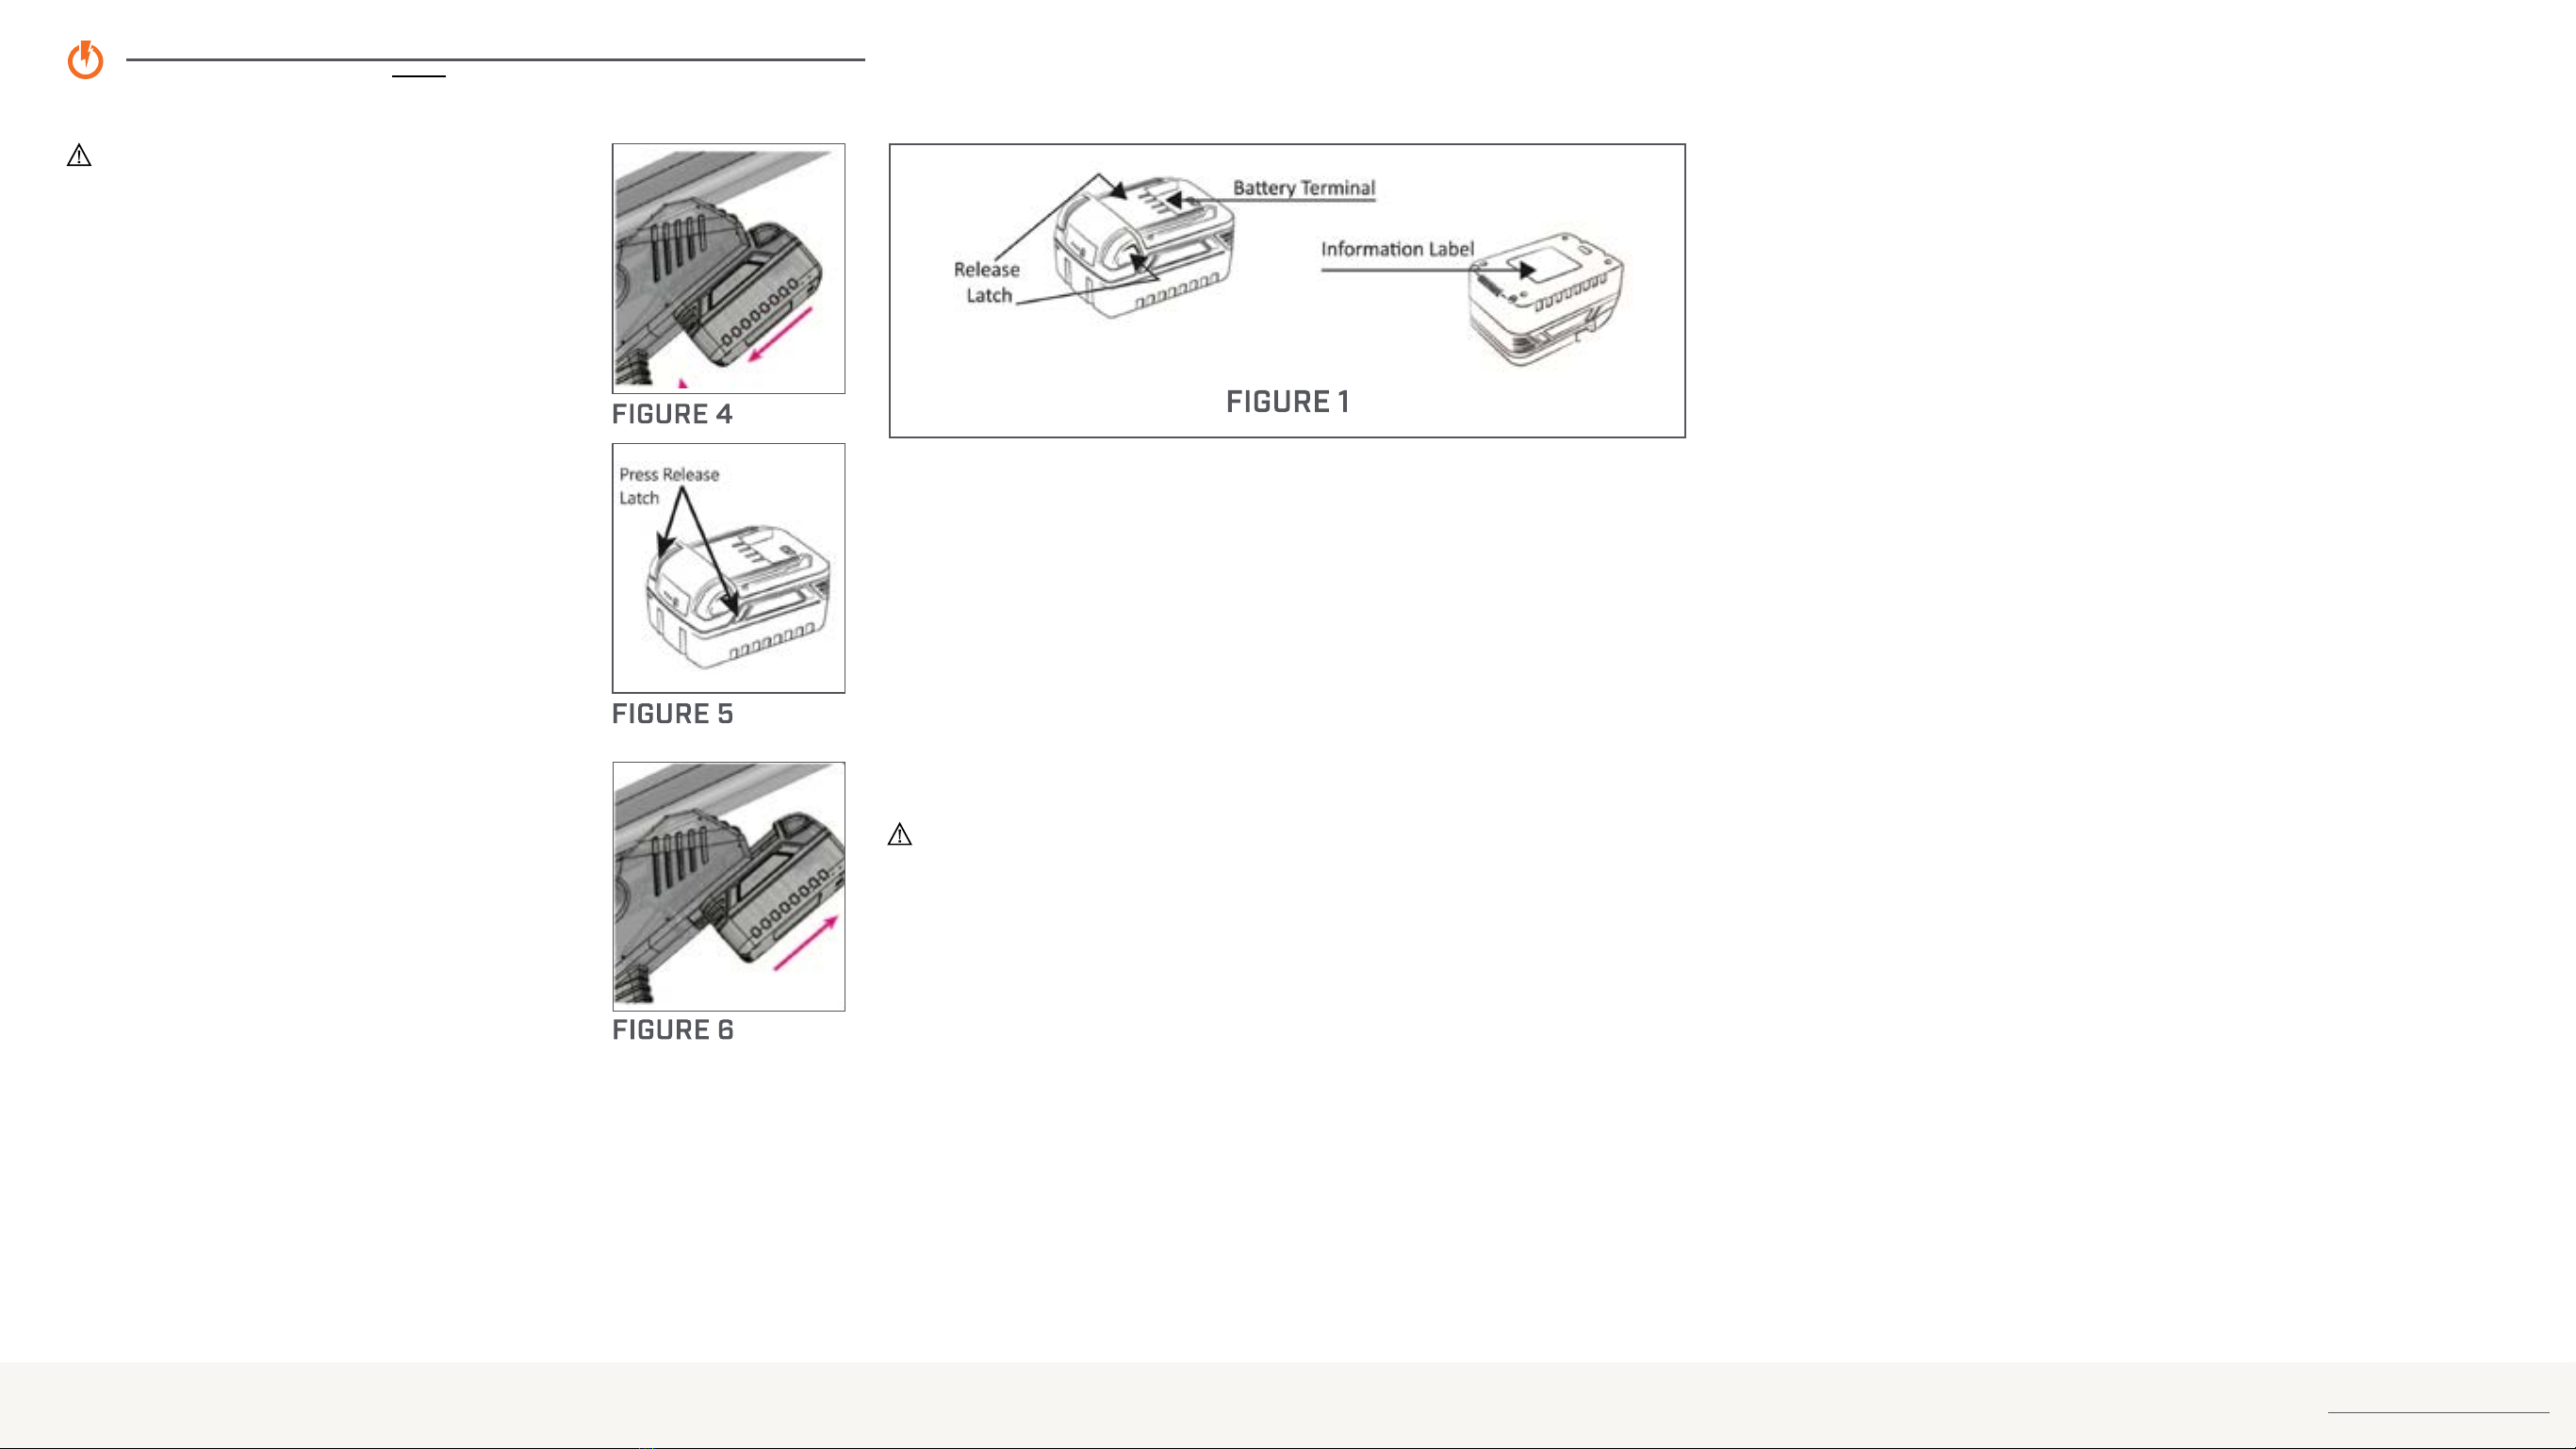
2. Remove battery.
3. Load into vehicle for transport.
4. After unloading, ensure power is
off. The LED light or screen should be dark.
5. Install battery.
6. Perform pre-ride Inspection.

7
PWR Electric Balance Bike Manual
TABLE OF CONTENTS
Acceptable Riding Practices
WARNING: FAILURE TO USE COMMON
SENSE AND HEED THE ABOVE WARNINGS
INCREASES RISK OF SERIOUS INJURY. USE
WITH APPROPRIATE CAUTION AND
SERIOUS ATTENTION TO SAFE OPERATION.
1. PRE-RIDE INSPECTION & CHECKLIST:
Never ride your electric balance bike on
public streets, roads, highways, at night, or
when visibility is limited.
Power off: Ensure power is off (all LED
lights or screen still dark) during the pre-ride
Inspection and remains “OFF” until the rider
is sitting on the saddle, both hands gripping
the handle bars, both feet flat on the ground.
Throttle: Ensure the battery is removed
and the power is off. Check that the throttle
rotates freely. Ensure there are no cracks or
visible damage.
Brake: Check brake for proper function.
When you squeeze lever, brake should
provide positive braking action. Make sure
that brake is not rubbing when lever is
released. Adjust as required prior to use.
Side Panels and Chain Guard: Verify
side panels and chain guard are properly
installed.
Tires: Periodically inspect tires for excess
wear and aging. Regularly check tire pressure
and inflate per the tire manufacturer’s
recommendation on the tire sidewall.
Frame, Fork, Stem, and Handlebars: Check
for cracks and loose hardware. Broken
components are rare; however, it is possible
for a reckless rider to run into a curb or object
and cause damage. Get into the regular habit
of inspecting your electric balance bike every time you ride it!
Hardware/Loose Parts: Check all hardware such as nuts, bolts,
cables, fasteners, etc. to ensure they are secure. There should
not be any unusual rattles or sounds from loose parts or broken
components. If the unit is damaged, do not ride it. Reference
“Warnings” listed in this manual.
Safety Gear: Check that proper protective gear; such as an
approved and properly fitted safety helmet, eye-wear, athletic shoes
(closed toe shoes with rubber soles), elbow pads, kneepads, etc., are
in place prior to riding. Keep shoelaces tied and out of the way of the
wheels, motor and drive system.
WARNING: NEVER RIDE BAREFOOT OR IN SANDALS.
Laws and Regulations: Check and obey any local laws or regulations
prior to riding.
2. BATTERY
Note: The electric balance bike consumes the most power at start-
up, so it is recommended to use your feet to propel forward at the
start instead of using only the throttle. This can increase battery life.
This battery can only be used on your electric balance bike! Do not
use for other applications.
Note: The electric balance bike should be turned OFF and battery
removed when unit is not in use. The electric balance bike will turn
off automatically when not use for one minute to avoid battery
charge loss.
BATTERY INSTALLATION
Note: The electric balance bike should be turned OFF and the
battery removed when unit is not in use. If the power switch is left
on, the battery loses its charge.
1. Locate battery and orient as shown. [Figure 2].
2. Slide battery into slot on the front of the down tube of the
electric balance bike. [Figure 3]
3. There is a point where the battery release latch/button provides
some resistance. Push the battery past this point. You should
hear a click, and this gap should be closed. [Figure 4]
BATTERY REMOVAL
1. Turn the handlebar 45 degrees
2. Press the battery release latch/button and slide battery out of
slot in the direction shown. [Figure 5 & 6]
CHARGING THE BATTERY
Remove battery from electric balance bike and place on charger.
Refer to instructions provided by battery and charger manufacturer.
The electric balance bike should be turned OFF and the battery
removed when unit is not in use. If the power switch is left on, the
battery loses its charge. Do not charge outdoors.
BATTERY DISPOSAL
Your product uses sealed lithium cell batteries which must be
recycled or disposed of in an environmentally safe manner. Do not
dispose of a lithium cell battery in a fire; the battery may explode
or leak. Do not dispose of a lithium cell battery in your regular
household trash. The incineration, land filling, or mixing of sealed
lithium cell batteries with household trash is prohibited by law
in most areas. Return exhausted batteries to a federal or state
approved lithium cell battery recycler or a local seller of batteries.
Many states have laws prohibiting the disposal of lithium cell
batteries in the municipal waste stream. Pleae check with your local
state law.

8
PWR Electric Balance Bike Manual
3. POWERING ON/OFF
POWER ON
Press and hold the power switch for 3 seconds, then you will hear a
beep.
• (1) One beep: Low Speed Mode 5mph (8Km/h) (Default mode)
• (2) Two beeps: Mid Speed Mode 7.5mph (12Km/h)
• (3) Three beeps: High Speed Mode 11mph (17.6Km/h)
POWER OFF
Press and hold the power switch for 3 seconds, then you will hear
one long beep. The monitor or display will go dark.
Note: To avoid battery charge loss, the electric balance bike will turn
off automatically when not in use for over one minute.
4. CHANGING SPEED MODE
(Performed strictly by an adult!)
Your electric balance bike is equipped with 3 different speed
modes(Low, Mid, and High) for different skill levels. We do not advise
showing children how to adjust the modes. Each child should have
the speed set by an adult who will be closely supervising the child.
DO NOT put your child on the high speed mode without working
through the process of learning the low and mid speed modes.
1. Press and hold the brake lever
2. Press the power switch twice in rapid succession (within one
second). You will hear a “beep” tone.
• *One beep: Low speed mode 5mph (8Km/h)
• *Two beep: Mid speed mode 7.5mph (12Km/h)
• *Three beep: High speed mode 11mph (17.6Km/h)
3. To cycle to the next speed press the power switch twice in rapid
succession (within one second).
Acceptable Riding Practices
TABLE OF CONTENTS

9
PWR Electric Balance Bike Manual
TABLE OF CONTENTS
4. BEFORE RIDING YOUR ELECTRIC
BALANCE BIKE
1. THE STARTING PROCESS: SIT, PUSH, COAST, BRAKE,
PRACTICE
(Perform under adult supervision, wearing protective
equipment, in an open and safe area) We recommend that
children start practicing in the unpowered mode before
starting to ride the electric balance bike with power. When the
child can balance the electric balance bike, then install the
battery and start the power ride.
NON-POWERED TRAINING:
(Turn power switch to the “OFF” position and remove battery)
1. Sit on bike with feet on ground. Familiarize rider with
seat, foot platform, brake, handlebars, throttle, and their
functions.
2. Push bike around with feet on ground learning balance and
confidence.
3. Coast and practice controlled turning with feet on platform.
4. Brake to a safe stop using hand brake while maintaining
control.
5. Practice standing and stopping while maintaining control
without falling.
POWERED MODE QUALIFYING CHECKLIST:
Can rider push and coast safely with feet on platform?
Can rider maintain control while standing on platform?
Can rider control bike from start to stop?
Can rider use hand brake to stop on command?
Can rider coast and turn while navigating mild hills and
obstacles?
Has rider demonstrated enough control to move to powered
riding without being a risk to themselves and others?
If so move to Powered Mode training!
Before Riding
POWERED MODE:
LOW SPEED MODE:
1. Install battery.
2. Press and hold power switch for 3 seconds to turn on.
• Ensure you are in the low speed mode to start. If not, see
CHANGE SPEED MODE sections in this manual.
3. Have child carefully push forward and practice slightly twisting
throttle learning to feel the bike beginning to move forward
under power.
4. With feet on ground have child progressively increase throttle
use until moving forward balancing on their own.
5. Have child practice rolling throttle on and off as well as safe
stops with hand brake.
6. As child gains balance and demonstrates throttle and brake
skills, advance to riding with feet on the platform.
7. Coach child to maintain a safe distance from obstacles and
other riders.
MID SPEED MORE:
1. Install battery.
2. Press and hold power switch for 3 seconds to turn on.
• Ensure you are in the mid speed mode. If not, see CHANGE
SPEED MODE sections in this manual.
3. Adult should supervise child as the top speed and acceleration
have both increased in this mode.
4. Coach child to demonstrate ability to roll off throttle and
use brake to slow to a stop and maintain a safe distance for
obstacles and other riders.
5. A majority of users will find this speed to be adequate for
significant skill building and lots of fun!
HIGH SPEED MODE:
1. Install battery.
2. Press and hold power switch for 3 seconds to turn on.
• Ensure you are in high speed mode. If not, see CHANGE
SPEED MODE sections in this manual.
3. Adult should supervise child as the top speed and acceleration
are at their maximum in this mode.
4. Coach child to demonstrate ability to roll off throttle and
use brake to slow to a stop and maintain a safe distance for
obstacles and other riders.
5. This mode is for advanced and older riders only!
2. BATTERY STATUS
WARNING: Please use the exclusive charger that came with your
electric balance bike..
WARNING: Do not charge outdoors.
BATTERY CHARGE
To know the charge of your battery, look at the figure below and read
the indicator lights on the charger. [Figure 7]

10
PWR Electric Balance Bike Manual
TABLE OF CONTENTS
5. TROUBLESHOOTING GUIDE
A fully charged battery must be installed prior to performing any
troubleshooting and must ONLY be performed by an adult. IF YOU
ARE NOT CONFIDENT IN EXECUTING TECHNICAL PROCESSES,
PLEASE CONSULT A BICYCLE MECHANIC. DISCONTINUE
USE WHILE TROUBLESHOOTING AND NORMAL FUNCTION IS
RESTORED!
PROBLEM POSSIBLE CAUSE SOLUTION
Electric balance
bike does not
work
Battery not
installed or fully
seated
Verify a fully charged battery
is installed. Push battery until
release buttons click
Battery not fully
charged
Verify the battery is fully
charged
Did not press
and hold button
for 3 seconds
Press and hold the power
switch for 3 seconds
PRODUCT PARTS: Keep your electric balance bike running for years
with genuine PWR parts. Visit www.PWRbike.com for information
on spare part availability. (Illustrations may not reflect exact
appearance of actual product, specifications subject to change
without notice.)
FUSE REPLACEMENT
1. Remove the left side cover. [Figure 8]
2. Locate the inline fuse holder and remove the cover to access
the fuse. [Figure 9]
3. Remove the damaged fuse and replace with a new one. Replace
the cover on the inline fuse holder and ensure the power cable
is routed neatly. [Figure 10]
4. Reinstall the left side cover and tighten the screws. [Figure 11]
FIGURE 8 FIGURE 9
Troubleshooting Guide
FIGURE 10 FIGURE 11
1. TROUBLESHOOTING PROBLEMS
Follow steps to find resolution. Contact PWR if problems persist or
you need assistance
PROBLEM POSSIBLE CAUSE SOLUTION
Balance
bike will not
power on
Switch not
pressed correctly
1. Review Owner’s Manual.
2. Attempt to start again.
Battery not
installed correctly
1. Remove and reinstall.
2. Check installation is
secure.
Wire connections
loose
1. Check wire connections.
2. Reconnect as needed.
Check battery
function
1. Check battery indicators.
2. Check if battery is charged.
3. Remove and reinstall.
4. Check installation is
secure.
Fuse blown
1. See technical process
“Replacing the Fuse.”
2. If problems persist,
contact PWR.
Note: If no “Beep” after
powering on could indicate
faulty control board, contact
PWR.
PROBLEM POSSIBLE CAUSE SOLUTION
“Beep”
continuous
after
powering on
Check battery
function
1. Check battery indicators.
2. Check if battery is charged.
3. Remove and reinstall.
4. Check installation is secure.
5. If problems persist, contact
PWR.
“Beep”
sound while
in use
Check battery
function
1. Check battery indicators.
2. Check if battery is charged.
3. Remove and reinstall battery.
4. Check installation is secure.
5. If problems persist, contact
PWR.
Stops
operating
during use
Check for
Improper Use
1. Exceeding weight limit
2. Starting on incline without
assistance
3. Obstructions in moving parts
Battery not
installed
correctly
1. Remove and reinstall.
2. Check installation is secure.
Wire
connections
loose
1. Check wire connections.
2. Reconnect as needed.
Check battery
function
1. Check battery indicators.
2. Check if battery is charged.
3. Remove and reinstall.
4. Check installation is secure.
Fuse blown
1. See technical process
“Replacing the Fuse.”
2. If problems persist, contact
PWR.

11
PWR Electric Balance Bike Manual
TABLE OF CONTENTS
PROBLEM POSSIBLE CAUSE SOLUTION
Battery
indicator
errors
Battery not
installed correctly
1. Remove and reinstall.
2. Check installation is
secure.
Check battery
function
1. Check battery indicators.
2. Check if battery is
charged.
3. Remove and reinstall.
4. Check installation is
secure.
5. If problems persist,
contact PWR.
Motor
does not
disengage
while braking
Wire connections
loose
1. Check wire connections.
2. Reconnect as needed.
• IF PROBLEM PERSIST
AFTER CHECKING
ALL CONNECTIONS
DISCONTINUE UE AND
CONTACT PWR!!!
Will not
accelerate
Wire connections
loose
1. Check wire connections.
2. Reconnect as needed.
3. If problems persist,
contact PWR.
Speed
control not
operating
properly
Wire connections
loose
1. Check wire connections.
2. Reconnect as needed.
3. If problems persist,
contact PWR.
Note: Please contact PWR for any assistance you may need! Stay
SAFE and have fun!
Troubleshooting Guide

12
PWR Electric Balance Bike Manual
TABLE OF CONTENTS
Troubleshooting Guide
2. TECHNICAL PROCESSES
CHECKING THE BATTERY
1. Install the battery on
the charger.
2. Confirm the message
displayed. [Figure 12]
REPLACING THE FUSE
1. Remove the battery.
2. Remove the left side
protective cover.
• Remove screws.
[Figure 13]
3. Open fuse cover.
4. Remove fuse and
inspect [Figure 14];
• Replace if needed
with 40amp fuse.
5. Install fuse cover.
6. Install left side
protector.
7. Install battery. Install
the battery on the
charger.
FIGURE 12
FIGURE 13
FIGURE 14
REPLACING THROTTLE, MONITOR, AND POWER SWITCH
1. Remove battery.
2. Remove the left side
protective cover. [Figure
15]
3. Remove the controller
and disconnect the
wire. [Figure 16]
4. Remove Dust Plug.
[Figure 17]
5. Remove and replace;
• Loosen throttle fixing
screw and remove
throttle and wire.
• Replace throttle and
tighten fixing screw.
[Figure 18]
6. Run wire back through
frame tube and out the
lower hole to reconnect.
[Figure 19]
7. Complete reassembly;
• Install controller.
• Install protective
cover.
• Install dust plug.
• Install battery.
FIGURE 16
FIGURE 17
FIGURE 15
FIGURE 18
FIGURE 19
REPLACING BRAKE LEVER
1. Remove battery.
2. Remove the left side
protective cover. [Figure
20]
3. Remove the controller
and disconnect the brake
wire. [Figure 21]
4. Remove the dust plug
and left grip. [Figure 22]
5. Unlock the brake cable
from the lever. [Figure
23]
6. Remove and replace;
• Loosen the fixing
screw of the lever and
remove with the wire.
• Install new lever with
wire and tighten fixing
screw.
7. Attach the brake cable.
[Figure 24]
8. Run the wire back
through the frame and
reconnect. [Figure 25]
9. Complete reassembly;
• Install controller.
• Install protective
cover.
• Install dust plug.
• Install battery
FIGURE 22
FIGURE 23
FIGURE 20
FIGURE 21
FIGURE 24
FIGURE 25

13
PWR Electric Balance Bike Manual
TABLE OF CONTENTS
REPLACING THE MOTOR
1. Remove battery.
2. Remove the left side and left
side protective cover. [Figure
28]
3. Disconnect the motor and
control board wires. [Figure
29]
4. Remove the chain protective
cover.
5. Remove cover screw, right
axle, and chain tensioner
[Figure 30 & Figure 31]
6. Loosen left axle nuts. [Figure
32]
7. Push the rear wheel forward
and remove chain. [Figure
33]
8. Remove and replace;
• Loosen and remove motor
fixing screws, remove
motor.
• Place new motor and install
fixing screws. [Figure 34]
9. Reinstall chain;
• Hang chain on motor
flywheel and wheel cog.
The chain will be loose.
[Figure 35]
• Replace rear protective
cover.
• Pull the rear wheel back
to make the chain tight.
[Figure 36]
• Tighten the chain tensioner
and axle nut. [Figure 37]
• Tighten the left side axle
nut.
10.Complete reassembly;
• Install controller.
• Install protective covers.
• Install battery.
REPLACING THE CONTROL BOARD
1. Remove battery.
2. Remove the left side
protective cover.
[Figure 26]
3. Remove and replace;
• Take out the
control board,
remove cable tie
and disconnect all
wires.
• Insert new
control board and
reconnect. [Figure
27]
4. Complete reassembly;
• Install controller.
• Install protective
cover.
• Install battery.
FIGURE 26
FIGURE 27
FIGURE 29
FIGURE 28
Troubleshooting Guide
REPLACING THE MOTOR (CONT.)
FIGURE 36
FIGURE 34
FIGURE 32
FIGURE 30
FIGURE 37
FIGURE 35
FIGURE 33
FIGURE 31

14
PWR Electric Balance Bike Manual
TABLE OF CONTENTS
PWR WARRANTY
All PWR bikes, e-bikes, and the individual covered components
are protected against all manufacturing defects in material or
workmanship under a Limited Warranty.
The following components are covered for a 2-year period after
receipt of the bike by the original purchasers:
• Bicycle frame
The following components are covered for a 1-year period after
receipt of the bike by the original purchasers:
• Lithium ion battery
• Forks
• Stem
• Handlebar
• Headset
• Freewheel
• Cassette
• Derailleur
• Shifter
• Motor
• Throttle
• Controller
• Wiring harness
• LCD display
• Hardware
The Limited Warranty does not cover:
• Normal wear and tear of any of the covered components
• Consumables or normal wear and tear parts, including without
limitations:
• Tires
• Tubes
• Brake pads
• Cables
• Housing
• Grips
• Chain
• Spokes
• Seat
Warranty
• Any damage or defects to the covered components resulting
from failure to follow instructions in the owner’s manual,
unauthorized modifications, acts of God, improper assembly,
accident, misuse, neglect, abuse, commercial use, installation
of parts and accessories not compatible with the bike,
operator error, water damage, extreme riding, stunt riding, or
improper maintenance.
• The battery is not warrantied from damage resulting from
power surges, charging with an improper charger, improper
maintenance, normal wear or water damage.
SHIPPING DAMAGE
Damage to a covered component during shipping is not covered by
the Limited Warranty, however, PWR Bike will replace such covered
components if you:
1. Notify PWR Bike of a covered component damaged in shipping
within 10 days of your receipt of the e-bike.
2. Provide PWR Bike with a picture of the damaged component.
If there is noticeable damage to the box of your electric balance bike
when it is delivered it is advisable to take pictures before unpacking
in the event you need to file a claim. If damage is noticed during
unpacking please contact PWR Bike support team by email at
info@pwrbike.com or by phone at 1.888.PWR.Bike (1.888.797.2459).
HOW TO FILE A WARRANTY CLAIM
In order to file a warranty claim on a covered component you must:
• Contact the PWR Bike support team by email at info@pwrbike.
com or by phone at 1.888.PWR.Bike (1.888.797.2459). The
support team will work with you to identify the issue with your
bike and offer potential fixes to the issue.
• If the support team determines that a covered component
needs replacement, they will walk you through the process
for returning the defective component and receiving a
replacement.
• After you receive the replacement component the support
team will assist you in determining how to replace or install the
new replacement component
• Replacement covered components covered under this limited
warranty will only be shipped to the address or adresses of the
original purchaser.
LEGAL DISCLAIMER
This warranty is expressly limited to the repair or replacement of
a defective product, at the option of PWR, and is the sole remedy
of the warranty. This limited warranty applies only to the original
purchaser of the PWR product and is not transferable. This warranty
applies only to PWR products purchased through an authorized
dealer or distributor. In no event shall PWR be liable for any loss,
inconvenience or damage, whether direct, incidental, consequential,
or otherwise resulting from breach of any express or implied
warranty or condition of merchantability, fitness for a particular
purpose, or otherwise with respect to our products except as set
forth herein. This warranty gives the consumer specific legal rights,
and those rights and other rights may vary from place to place. This
warranty does not affect your statutory rights. The English version
of the warranty shall prevail.
TO THE EXTENT NOT PROHIBITED BY LAW, THESE WARRANTIES
ARE EXCLUSIVE AND THERE ARE NO OTHER EXPRESS OR
IMPLIED WARRANTIES OR CONDITIONS INCLUDING WARRANTIES
OR CONDITIONS OF MERCHANTABILITY AND FITNESS FOR A
PARTICULAR PURPOSE.

15
PWR Electric Balance Bike Manual
TABLE OF CONTENTS
FAQ
FREQUENTLY ASKED QUESTIONS
Don’t see the answer you’re looking for, shoot us an email at info@
pwrbike.com.
WHO SHOULD I CONTACT IF I HAVE COMMENTS AND
SUGGESTIONS REGARDING PWR PRODUCTS?
If you have any questions or comments on PWR products, please
contact us at info@pwrbike.com.
WHO SHOULD I CONTACT IF MY PWR PRODUCT HAS A DEFECT?
If you think your PWR product is defective, please contact us at
info@pwrbike.com or 1.888.PWR.BIKE (1.888.797.2459)
WHAT IS COVERED BY YOUR LIMITED WARRANTY?
Refer to our Limited Warranty policy in the Owner’s Manual.
?
Table of contents