QNAP TL-R1620Sdc User manual

JBOD Enclosure
TL-R1620Sdc
User Guide
Document Version: 3
14/09/2021

Contents
1. Preface
About This Guide........................................................................................................................................................3
Audience..................................................................................................................................................................... 3
Document Conventions.............................................................................................................................................3
2. Product Overview
About the QNAP JBOD Enclosure.............................................................................................................................4
Hardware Specications............................................................................................................................................4
Package Contents...................................................................................................................................................... 5
Components............................................................................................................................................................... 5
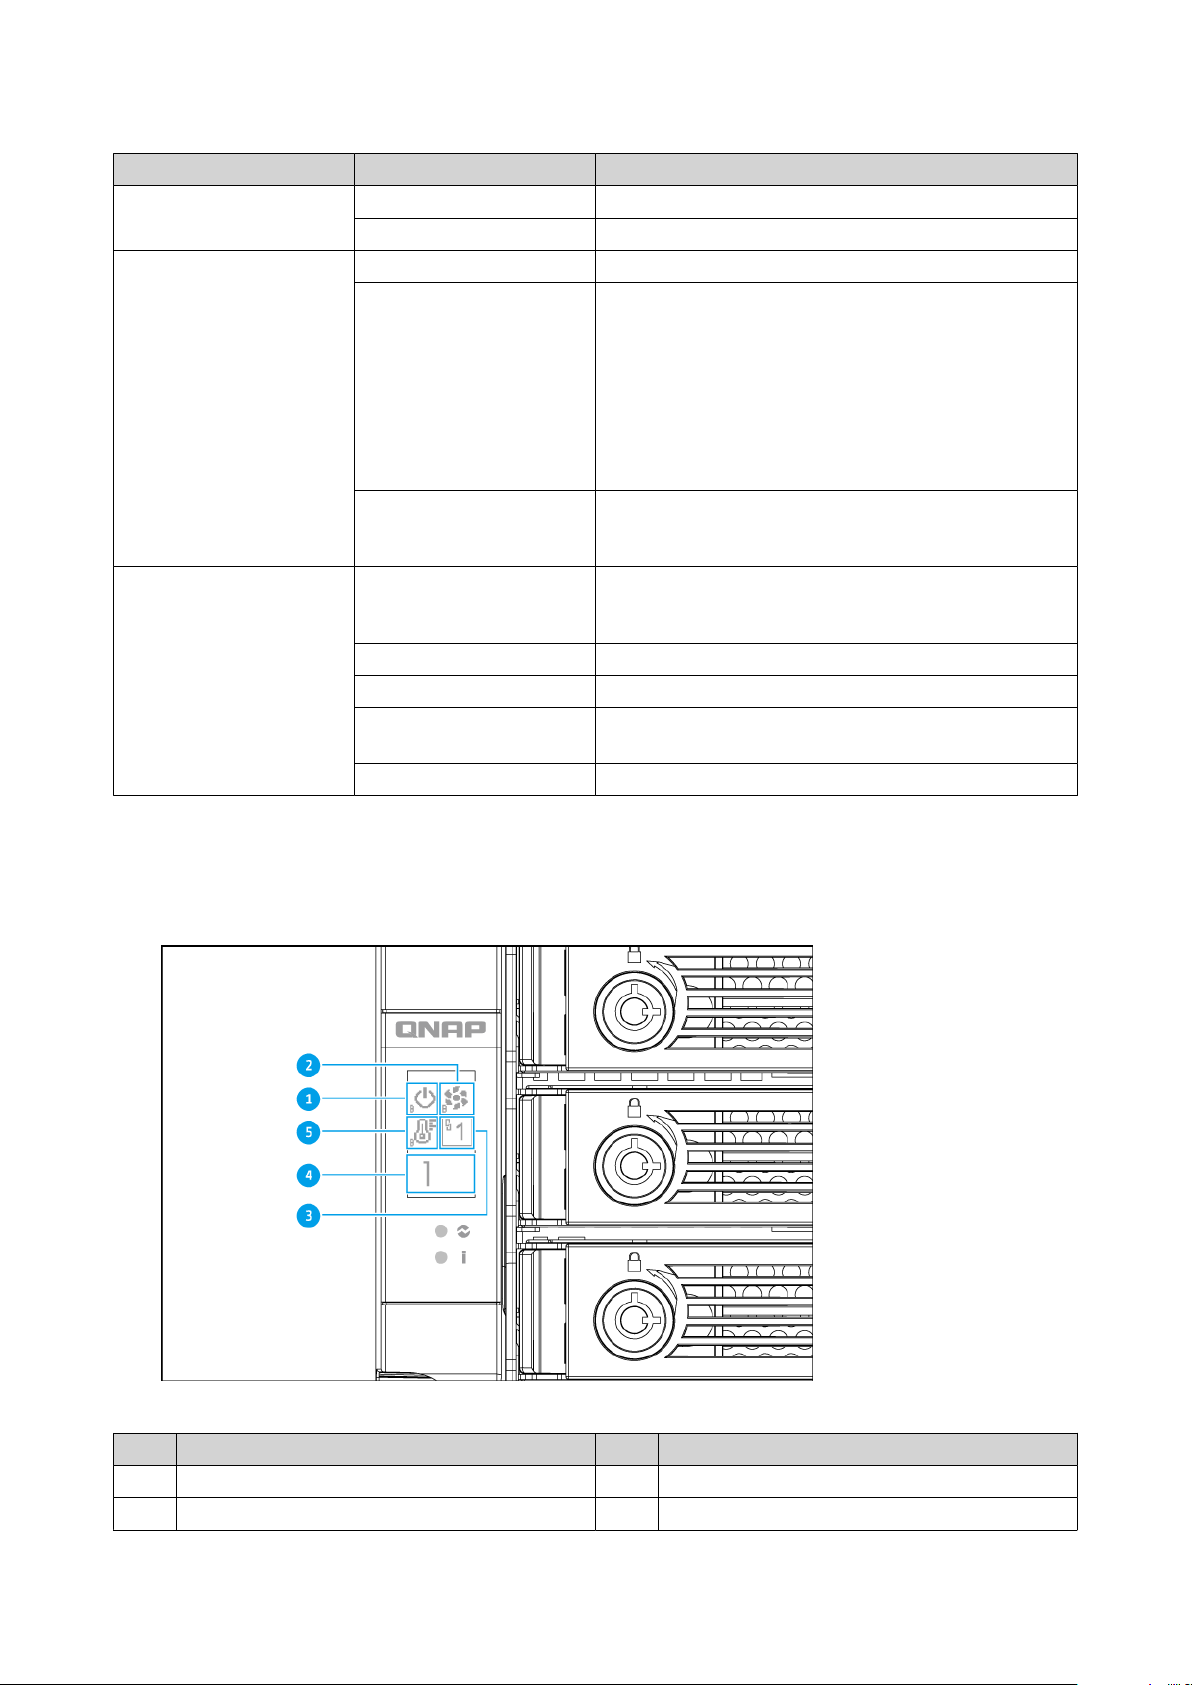
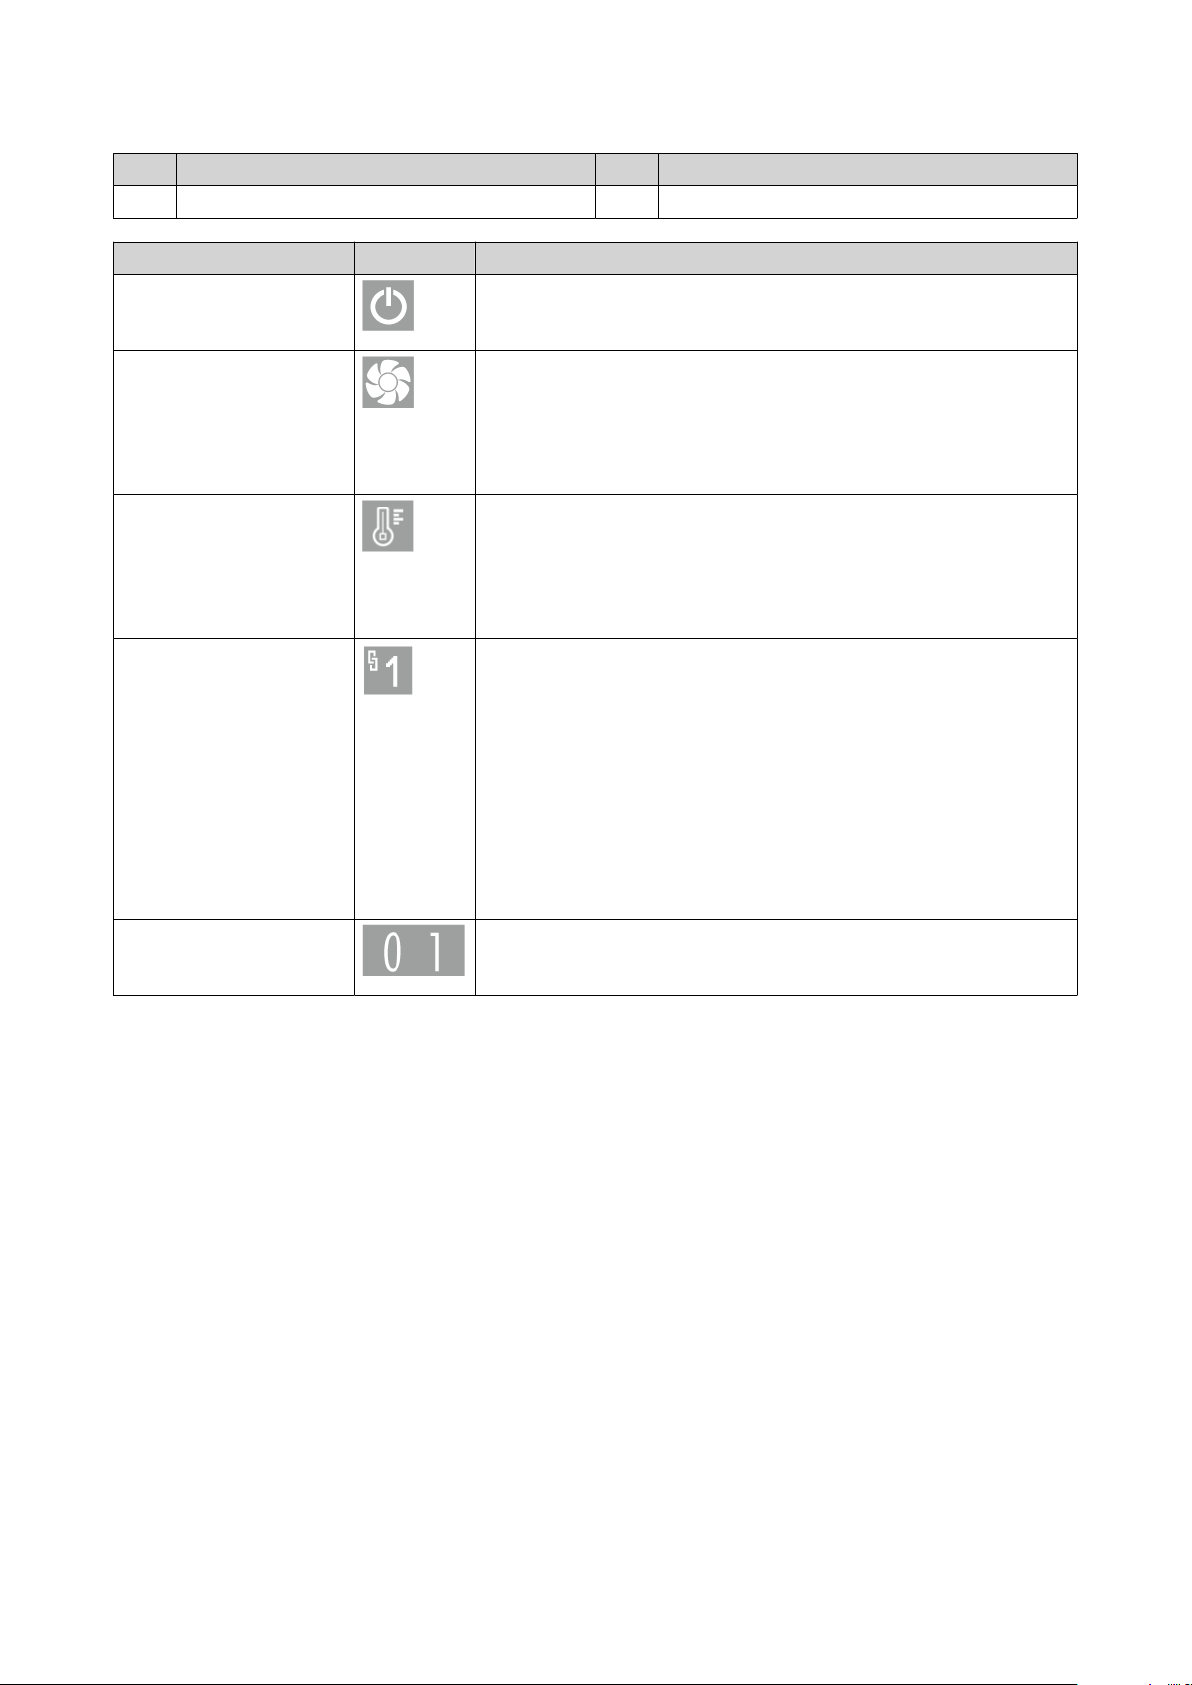
Front Panel.............................................................................................................................................................6
Rear Panel............................................................................................................................................................ 10
Power Supply Units.............................................................................................................................................12
Drive Numbering.................................................................................................................................................13
Audio Alert................................................................................................................................................................13
Safety Information...................................................................................................................................................13
Installation Requirements...................................................................................................................................... 14
Setting Up the JBOD Enclosure.............................................................................................................................. 15
3. Hardware Installation
Removing a Controller............................................................................................................................................ 16
Installing a Controller..............................................................................................................................................17
Drive Installation......................................................................................................................................................18
Installing 3.5-inch Hard Drives on 3.5-inch Trays............................................................................................18
Installing 2.5-inch Hard Drives or Solid-State Drives on 3.5-inch Trays........................................................20
JBOD Connections....................................................................................................................................................22
Connecting the TL-R1620Sdc to the NAS..........................................................................................................22
Connecting the TL-R1620Sdc to a Server......................................................................................................... 24
Hot-Swapping Redundant Power Supply Units....................................................................................................25
Rail Kits......................................................................................................................................................................26
4. Troubleshooting
Forcing Storage Manager or QNAP JBOD Manager to Recognize the JBOD Enclosure.................................. 27
Hot-Swapping Failed Drives....................................................................................................................................27
Support and Other Resources................................................................................................................................28
5. Glossary
QES............................................................................................................................................................................ 29
QNAP JBOD Manager.............................................................................................................................................. 29
Storage Manager..................................................................................................................................................... 29
6. Notices
Limited Warranty..................................................................................................................................................... 30
Disclaimer................................................................................................................................................................. 30
GNU Public License..................................................................................................................................................30
CE Notice...................................................................................................................................................................38
UKCA Notice..............................................................................................................................................................38
FCC Notice.................................................................................................................................................................38
VCCI Notice............................................................................................................................................................... 39
BSMI Notice.............................................................................................................................................................. 39
QNAP JBOD Enclosure - TL-R1620Sdc User Guide
1

1. Preface
About This Guide
This guide provides information about the device and step-by-step instructions on installing the hardware. It
also provides instructions on basic operations and troubleshooting information.
Audience
This document is intended for consumers and storage administrators. This guide assumes that the user has
a basic understanding of storage and backup concepts.
Document Conventions
Symbol Description
Notes provide default conguration settings and other supplementary
information.
Important notes provide information on required conguration settings and
other critical information.
Tips provide recommendations or alternative methods of performing tasks or
conguring settings.
Warnings provide information that, when ignored, may result in potential loss,
injury, or even death.
QNAP JBOD Enclosure - TL-R1620Sdc User Guide
Preface 3

2. Product Overview
This chapter provides basic information about the QNAP device.
About the QNAP JBOD Enclosure
QNAP JBOD enclosures are designed to increase the capacity and utility of your NAS or server, providing a
wide range of storage applications. You can manage installed drives independently or congure them as
software RAID groups using the host device. The TL-R1620Sdc features sixteen 3.5‑inch SAS 12 Gbps drive
bays with three SFF‑8644 ports per controller.
Hardware Specications
Warning
• If your QNAP product has hardware defects, return the product to QNAP or a QNAP-
authorized service center for maintenance or replacement. Any attempt to repair or
perform maintenance procedures on the product by you or an unauthorized third
party invalidates the warranty.
• QNAP is not responsible for any damage or data loss caused by unauthorized
modications and installation of unsupported third-party applications.
• For details, see the QNAP Warranty Terms and Conditions.
Note
Model specications are subject to change without prior notice. To see the latest
specications, go to https://www.qnap.com.
Component TL-R1620Sdc
Storage
Drive bays • 16 x 3.5-inch SAS 12 Gbps
• 16 x 3.5-inch SAS 6 Gbps
Drive compatibility 3.5-inch bays:
• SAS drives
• 3.5-inch SAS hard disk drives
• 2.5-inch SAS hard disk drives
• 2.5-inch SAS solid-state drives
• SATA drives
• 2.5-inch SATA hard disk drives
• 2.5-inch SATA solid-state drives
Note
The 2.5-inch SATA drives require a QDA‑SA2 drive adapter.
Hot-swapping Supported
External I/O Ports & Expansion Slots
QNAP JBOD Enclosure - TL-R1620Sdc User Guide
Product Overview 4

Component TL-R1620Sdc
SFF ports 3 x SFF-8644 per controller
RJ45 1 per controller
Note
This port is only for engineering purposes.
Interface
Buttons • Power: 1 per controller
• OLED panel power: 1 per controller
Dimensions
Form factor 3U Rackmount
Dimensions (H x W x D) 131.3 x 482.2 x 425.3 mm
(5.17 x 18.98 x 16.74 in)
Net weight 12.26 kg (27.03 lb)
Others
Power supply unit 2 x 550W, 100-240V AC, 50/60 Hz
System battery CR2032 lithium battery (3V, 225 mAh)
Sound level 28.8 db(A)
Note
The sound level was tested at a bystander position, which is
within one meter of the device. The test device operated at
low speed with the maximum number of drives installed.
Fans 3 x 80 mm, 12V DC fan
Operating temperature 0˚C to 40˚C (32˚F to 104˚F)
Relative humidity • Non-condensing relative humidity: 5% to 95%
• Wet-bulb temperature: 27˚C (80.6˚F)
Tip
For the list of compatible drive models and expansion cards, go to https://www.qnap.com/
compatibility.
Package Contents
Item Quantity
JBOD enclosure 1
SAS cables 2
Power cords 2
Screws for 3.5-inch drives 64
Screws for 2.5-inch drives 48
Quick Installation Guide (QIG) 1
Components
QNAP JBOD Enclosure - TL-R1620Sdc User Guide
Product Overview 5

Front Panel
No. Component No. Component
1 OLED panel 3 Front panel LEDs
2 Drive LED - -
Front Panel Buttons
Note
Each controller has its own power and OLED buttons.
No. Component No. Component
1 Power button 2 OLED panel power button
QNAP JBOD Enclosure - TL-R1620Sdc User Guide
Product Overview 6

Operation User Action Result
Power on the controller Press the power button The controller powers on.
Tip
• QNAP recommends powering on
the controller from the rear panel.
For details, see Rear Panel and
Storage Controller Power Button.
• System startup takes 10 to 15
minutes, depending on the number
of installed drives and connected
devices. Check the rear panel LEDs
to determine the startup status. For
details, see Rear Panel LEDs.
Power on the OLED
display
Press the OLED button. The OLED display powers on.
Power o the OLED
display
Press the OLED button. The OLED display powers o.
Front Panel and Drive LEDs
The front panel LEDs indicate system status and related information when the device is powered on.
The following LED information applies only when the drive is correctly installed and when the device is
connected to the network.
No. Component No. Component
1 System power LED 3 System status LED
2 Drive LED - -
QNAP JBOD Enclosure - TL-R1620Sdc User Guide
Product Overview 7

LED Status Description
System power Blue The controller is on.
O The controller is o.
System Status Green The device is ready.
Red • The power supply is not functioning.
• The system fan is not functioning.
• The system temperature is too high.
• The disk temperature is too high.
• The power supply unit is unplugged.
O • All drives are in standby mode.
• The device is powered o.
Drive Green • The JBOD enclosure is powered on.
• The drive can be accessed.
Flashes green The drive is being accessed.
Red A drive read/write error occurred.
Flashes red 5 times per
second
The drive is being located in the operating system.
O No drive was detected.
Front Panel OLED Display
The OLED display shows the status of the controllers and main components.
No. Component No. Component
1 Controller power status 4 Enclosure ID
2 Fan status 5 Temperature status
QNAP JBOD Enclosure - TL-R1620Sdc User Guide
Product Overview 8

No. Component No. Component
3 SAS connector status - -
Icon name Icon Description
Controller power status • On: The controller is powered on.
•O: The controller is o.
Controller fan status • On: The fan modules of the controller are operating normally.
• Flashing: The fan modules of the controller are operating
incorrectly or are not installed.
•O: The controller is o.
Controller temperature
status
• On: The temperature of the controller is normal.
• Flashing: The temperature of the controller is too high or too
low.
•O: The controller is o.
Controller SAS connector
status
• On: The SAS connector status displays the linked SAS wide
port numbers.
• Flashing: An error has occurred in any of the physical layers.
Below are a list of the possible errors.
• One of the physical layers is disconnected or linked with a
low speed (6 Gbps or 3 Gbps).
• There are other link errors.
•O: The controller is o.
Controller enclosure ID • The enclosure ID is congured by the host.
• The enclosure ID represents the global controller ID.
QNAP JBOD Enclosure - TL-R1620Sdc User Guide
Product Overview 9

Rear Panel
No. Component No. Component
1 Controller power button 3 SFF-8644 ports
2 RJ45 console port
Note
This port is only for engineering
purposes.
- -
QNAP JBOD Enclosure - TL-R1620Sdc User Guide
Product Overview 10

Rear Panel LEDs
No. Component No. Component
1 Mini-SAS link LED 2 Mini-SAS activity LED
LED Status Description
Mini-SAS Link Connector Green The device is connected to the host.
Orange The device is not connected to the host.
Mini-SAS Activity
Connector
Blue The device is active.
O The device is inactive.
Storage Controller Power Button
Operation User Action Result
Power on Press the button once. • The OLED panel turns on.
• The controller powers on.
Note
Depending on the button on the
controller you press, controller A or B
powers on.
Power o Press and hold for 4
seconds.
• The OLED panel turns o.
• The controller powers o.
Note
Depending on the button on the
controller you press, controller A or B
powers o.
QNAP JBOD Enclosure - TL-R1620Sdc User Guide
Product Overview 11

Operation User Action Result
Force power o Press and hold the
button for 10 seconds.
• The OLED panel turns o.
• The controller powers o.
Note
Depending on the button on the
controller you press, controller A or B
powers o.
Warning
Use this method only when the storage
controller is unresponsive. This action
may result in data loss.
Power Supply Units
No. Component No. Component
1 Power supply unit 1 2 Power supply unit 2
QNAP JBOD Enclosure - TL-R1620Sdc User Guide
Product Overview 12

Drive Numbering
Audio Alert
Duration Frequency Description
Long beep 3 (every 5 minutes) • The system fan is not installed.
• The system fan is not functioning.
• The system temperature is over the threshold.
Note
The default temperature warning
threshold is 55°C. You can set the
threshold to a temperature between
55°C and 69°C using QNAP JBOD
Manager.
1 (every second) The device is being located by QES or QNAP JBOD
Manager.
Short beep 1 • A cable connection between the device and the
host has been established.
• A cable connection between the device and the
host has been removed.
Safety Information
The following instructions help ensure personal safety and environmental safety. Read these instructions
carefully before performing any operations.
General Instructions
• The device should be stored in a secure location with restricted access, controlled through the use of a
tool, lock and key, or any means of security.
QNAP JBOD Enclosure - TL-R1620Sdc User Guide
Product Overview 13

• Only qualied, skilled, and authorized persons with knowledge of all restrictions, safety precautions,
and installation and maintenance procedures should have physical access to the device.
• To avoid potential injury or damage to components, ensure that the drives and other internal system
components have cooled before touching them.
• Observe electrostatic discharge (ESD) procedures to avoid potential injury or damage to components.
Power
• To reduce the risk of re or electric shock, ensure that you only connect the power cord to a properly
grounded electrical outlet.
•
Devices with redundant power supply may have one or more power supply unit (PSU) cords. To avoid
serious injuries, a trained service technician must disconnect all PSU cords from the device before
installing or replacing system components.
System Battery
• To avoid potential battery explosion, causing injury or damage to components, ensure that you replace
the existing battery with a battery of the same type.
• Dispose of used batteries properly according to local regulations or the instructions of the battery
manufacturer.
Moving Parts
•
Moving fan blades: Keep your body parts away from moving fan blades while the device is connected
to a power source.
•
Moving components: Keep your body parts away from other moving components.
Installation Requirements
Category Item
Environment • Room temperature: 0˚C to 40˚C (32˚F to 104˚F)
• Non-condensing relative humidity: 5% to 95%
• Wet-bulb temperature: 27˚C (80.6˚F)
• Flat, anti-static surface without exposure to direct sunlight, liquids,
or chemicals
QNAP JBOD Enclosure - TL-R1620Sdc User Guide
Product Overview 14

Category Item
Hardware and peripherals • NAS or server
• Storage drives
Tip
For the list of compatible drive models, go to https://
www.qnap.com/compatibility.
• One or more SFF-8644 or SFF-8644-to-SFF-8088 connector cables
• Host bus adapter
Tools • Phillips #1 or #2 screwdriver
• Anti-static wrist strap
Setting Up the JBOD Enclosure
Note
Read all safety requirements and information carefully before setting up the JBOD or
installing JBOD enclosure components.
1. Place the JBOD enclosure in an environment that meets the requirements.
For details, see Installation Requirements.
2. Install the JBOD enclosure on a rack.
For details, see Rail Kits.
3. Install the drives.
For details, see the following topics:
•Installing 3.5-inch Hard Drives on 3.5-inch Trays
•Installing 2.5-inch Hard Drives or Solid-State Drives on 3.5-inch Trays
4. Connect the power cord and all applicable cables.
5. Connect the JBOD enclosure to the NAS or server.
For details, see the following topics:
•Connecting the TL-R1620Sdc to the NAS
•Connecting the TL-R1620Sdc to a Server
6. Power on the JBOD enclosure.
QNAP JBOD Enclosure - TL-R1620Sdc User Guide
Product Overview 15

3. Hardware Installation
This section provides information on installing controllers, installing drives, connecting the JBOD enclosure
to a NAS or a server, hot-swapping redundant power supply units, and rail kits.
Removing a Controller
1. Power o the JBOD enclosure.
2. Disconnect the power cord from the electrical outlet.
3. Disconnect all cables and external attachments.
4. Remove the controller.
a. Loosen the screws
b. Pull the handle to pull out the controller.
QNAP JBOD Enclosure - TL-R1620Sdc User Guide
Hardware Installation 16

Installing a Controller
1. Load the controller into the JBOD device.
a. Insert the controller into the chassis.
2. Tighten the screws.
QNAP JBOD Enclosure - TL-R1620Sdc User Guide
Hardware Installation 17

3. Connect all cables and external attachments.
4. Power on the device.
Drive Installation
The TL-R1620Sdc is compatible with 3.5‑inch hard drives, 2.5‑inch hard drives, and 2.5‑inch solid-state drives.
Installing 3.5-inch Hard Drives on 3.5-inch Trays
Warning
• Installing a drive deletes all data on the drive.
• Observe electrostatic discharge (ESD) procedures to avoid damage to components.
•
Moving fan blades: Keep your hands and other body parts away from moving fan
blades.
•
Other moving components: Keep your hands and other body parts away from other
moving components.
1. Power o the JBOD enclosure.
2. Remove the drive tray.
a. Pull the handle to release the tray.
QNAP JBOD Enclosure - TL-R1620Sdc User Guide
Hardware Installation 18

b. Pull the tray out.
3. Install a drive on the tray.
a. Place the drive on the tray so that the holes on the bottom of the drive are aligned with the holes
on the bottom of the tray.
b. Attach the screws.
4. Load the tray into the bay.
a. Insert the tray into the bay.
QNAP JBOD Enclosure - TL-R1620Sdc User Guide
Hardware Installation 19
Table of contents
Other QNAP Enclosure manuals

QNAP
QNAP SilentNAS HS-264 User manual

QNAP
QNAP TL-D400S User manual

QNAP
QNAP TR-004-US User manual

QNAP
QNAP TL-R1200S-RP User manual

QNAP
QNAP TL-R1220Sep-RP User manual

QNAP
QNAP TR-004 User manual

QNAP
QNAP REXP-1200U-RP Instructions for use

QNAP
QNAP TR-002 User manual

QNAP
QNAP TL-D800C User manual

QNAP
QNAP REXP-1220-RP Instructions for use