QNAP SilentNAS HS-264 User manual

HS-264
User Guide
Document Version: 2
29/09/2022

Contents
1. Preface
About This Guide........................................................................................................................................................3
Audience..................................................................................................................................................................... 3
Document Conventions.............................................................................................................................................3
2. Product Overview
About the HS-264....................................................................................................................................................... 4
Hardware Specications............................................................................................................................................4
Package Contents...................................................................................................................................................... 6
Components............................................................................................................................................................... 6
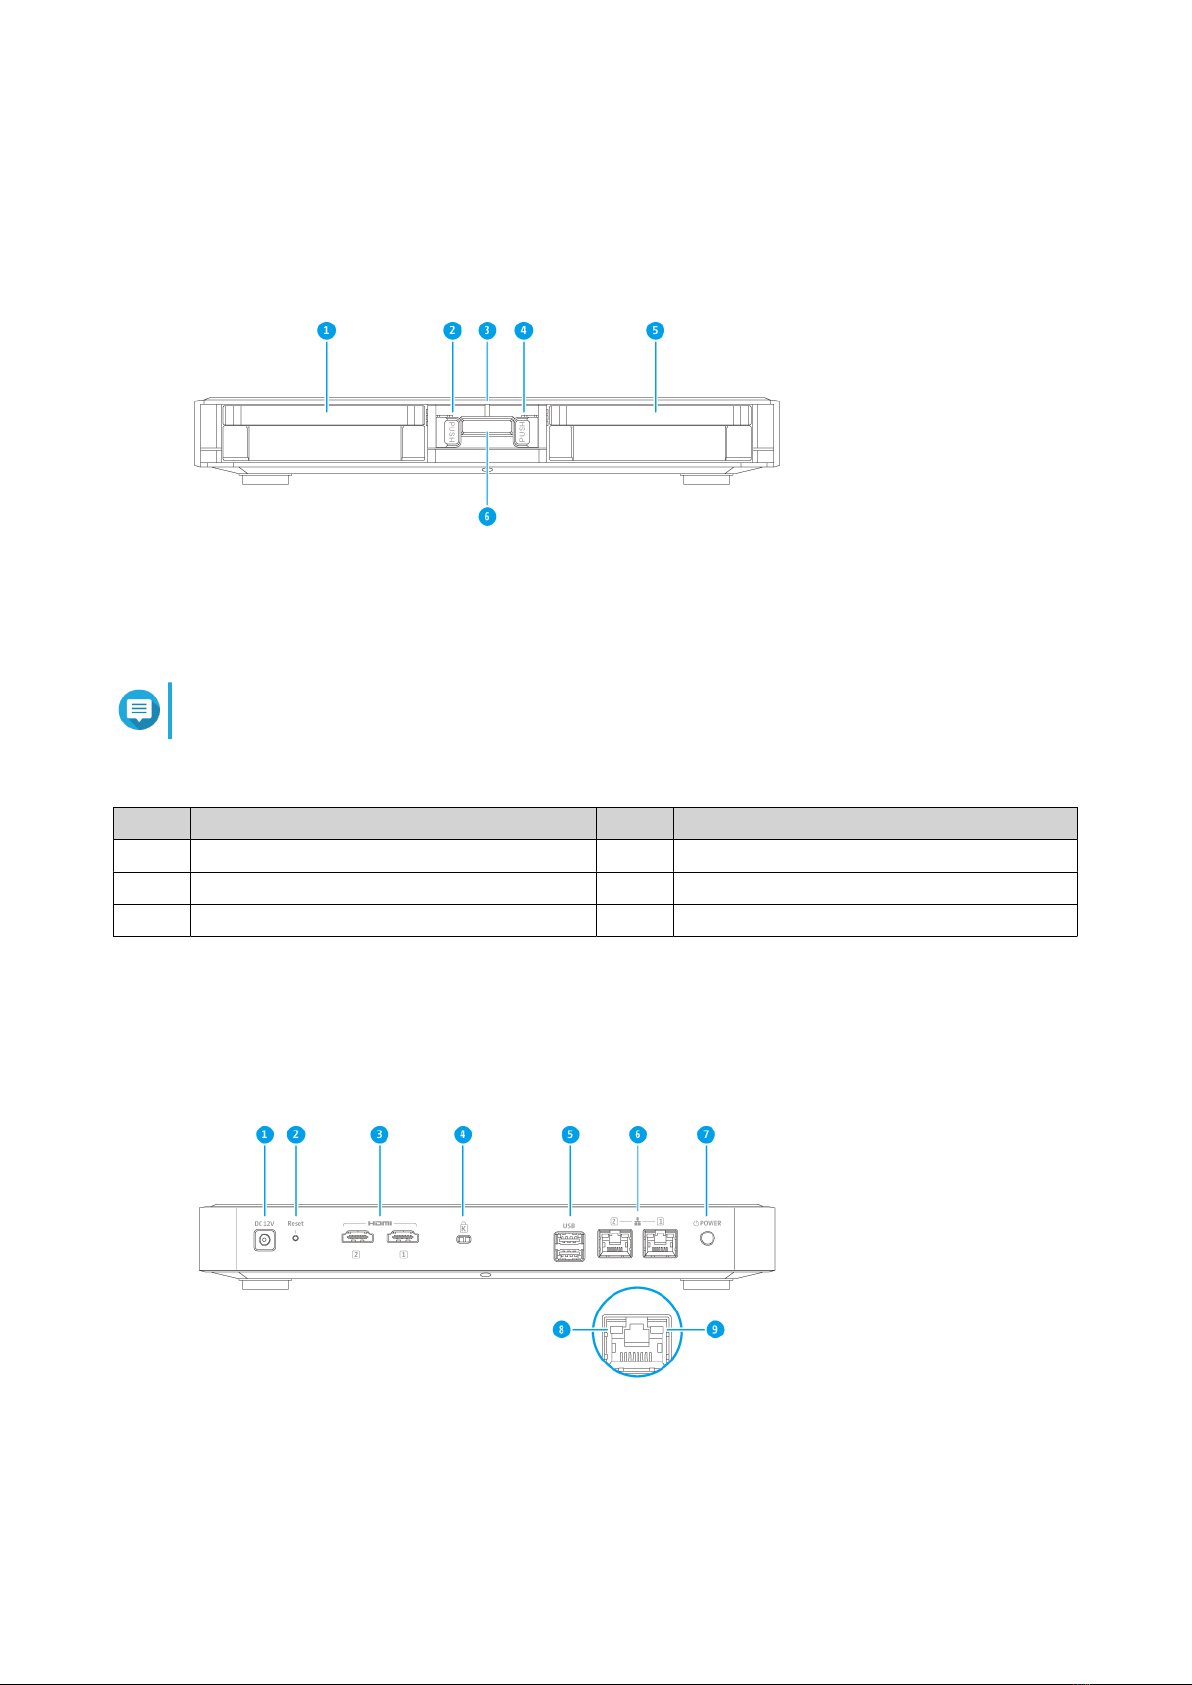
Front Panel.............................................................................................................................................................7
Rear Panel.............................................................................................................................................................. 7
Drive Numbering...................................................................................................................................................8
Safety Information.....................................................................................................................................................8
Installation Requirements........................................................................................................................................ 9
Setting Up the NAS.................................................................................................................................................... 9
3. Installation and Conguration
Hardware Installation..............................................................................................................................................11
Drive Installation.................................................................................................................................................11
Connecting USB Expansion Units......................................................................................................................16
QTS Installation........................................................................................................................................................17
Installing QTS Using Qnder Pro...................................................................................................................... 18
Installing QTS Using the Cloud Key...................................................................................................................20
4. Basic Operations
Power Button........................................................................................................................................................... 24
Reset Button.............................................................................................................................................................24
LEDs...........................................................................................................................................................................25
Audio Alert................................................................................................................................................................26
5. NAS Migration
NAS Migration Requirements.................................................................................................................................27
Status and Setting Changes after NAS Migration................................................................................................27
Migrating a NAS....................................................................................................................................................... 28
Migrating NAS Data Using HBS 3...........................................................................................................................29
Preparing the Destination NAS......................................................................................................................... 29
Creating a One-Way Sync Job.............................................................................................................................30
Importing Local Users or Group Settings to the Destination NAS................................................................31
6. Troubleshooting
Forcing Qnder Pro or myQNAPcloud to Locate the NAS.................................................................................. 33
Hot-swapping Failed Drives....................................................................................................................................33
Recovering Unintentionally Removed Hard Drives............................................................................................. 33
Support and Other Resources................................................................................................................................34
7. Glossary
Cloud Key.................................................................................................................................................................. 35
myQNAPcloud.......................................................................................................................................................... 35
myQNAPcloud Link..................................................................................................................................................35
HS-264 User Guide
1

Qnder Pro............................................................................................................................................................... 35
QNAP ID.................................................................................................................................................................... 35
QTS.............................................................................................................................................................................35
8. Notices
Limited Warranty..................................................................................................................................................... 36
Disclaimer................................................................................................................................................................. 36
Copyright and Trademarks..................................................................................................................................... 36
GNU Public License..................................................................................................................................................37
CE Notice...................................................................................................................................................................44
UKCA Notice..............................................................................................................................................................44
FCC Notice.................................................................................................................................................................44
VCCI Notice............................................................................................................................................................... 45
BSMI Notice.............................................................................................................................................................. 45
SJ/T 11364-2006........................................................................................................................................................46
2

1. Preface
About This Guide
This guide provides information about the device and step-by-step instructions on installing the hardware. It
also provides instructions on basic operations and troubleshooting information.
Audience
This document is intended for consumers and storage administrators. This guide assumes that the user has
a basic understanding of storage and backup concepts.
Document Conventions
Symbol Description
Notes provide default conguration settings and other supplementary
information.
Important notes provide information on required conguration settings and
other critical information.
Tips provide recommendations or alternative methods of performing tasks or
conguring settings.
Warnings provide information that, when ignored, may result in potential loss,
injury, or even death.
HS-264 User Guide
Preface 3

2. Product Overview
This chapter provides basic information about the QNAP device.
About the HS-264
Designed as a multimedia center for digital homes, the HS-264 provides various apps and utilities (such
as QuMagie, Video Station, Music Station, and Plex Media Server) for storing and enjoying all your photos,
videos, and music. High performance and streaming quality are ensured by an Intel® Celeron® N5105
quad-core processor and two 2.5GbE ports, while the dual HDMI (4K @60Hz) output enables you to use the
HS-264 as a Home Theater PC for an amazing entertainment experience.
Hardware Specications
Warning
• If your QNAP product has hardware defects, return the product to QNAP or a QNAP-
authorized service center for maintenance or replacement. Any attempt to repair or
perform maintenance procedures on the product by you or an unauthorized third
party invalidates the warranty.
• QNAP is not responsible for any damage or data loss caused by unauthorized
modications and installation of unsupported third-party applications.
• For details, see the QNAP Warranty Terms and Conditions.
Tip
Model specications are subject to change without prior notice. To see the latest
specications, go to https://www.qnap.com.
Component HS-264
Processor
CPU Intel® Celeron® N5105
Frequency 4-core/4-thread 2.9 GHz burst
Architecture x86 64-bit
Encryption engine AES-NI
Memory
Pre-installed memory 8 GB RAM DDR4 (not expandable)
Flash memory 4 GB (dual-boot OS protection)
Storage
Drive bays 2 x 3.5-inch SATA 6 Gbps
Tip
The drive bays are backward compatible with SATA 3
Gbps drives.
HS-264 User Guide
Product Overview 4

Component HS-264
Drive compatibility • 3.5-inch SATA hard disk drives
• 2.5-inch SATA hard disk drives
• 2.5-inch SATA solid-state drives
Tip
• For the list of compatible drive models, go to
https://www.qnap.com/compatibility.
• To avoid excess vibration and heat generation,
use: 5400 RPM hard drives; low-temperature,
low-noise hard drives; or low-temperature SSDs.
SSD cache acceleration support This device supports SSD cache acceleration for all drives.
Hot-swapping This device supports hot-swapping for all drives.
Network
2.5 Gigabit network interface 2 x 2.5 GbE RJ45
Note
The 2.5 Gigabit Ethernet port supports the following
network connectivity speeds: 2.5 GbE, 1 GbE, 100
Mb, and 10 Mb.
External I/O Ports & Expansion Slots
USB ports 2 x USB 3.2 Gen 2 Type-A
HDMI ports 2 x HDMI
Interface
Buttons • Power
• Reset
IR sensor 1
Note
• The HS-264 supports the QNAP RM-IR004
remote control, which is sold separately. For
purchasing options, see the QNAP Store.
• The RM-IR004 remote control can be used
with certain QTS multimedia or streaming apps
including HybridDesk Station.
• The RM-IR004 provides four colored buttons
with user-dened functions allowing you to
customize the functionality of the remote
control. To congure these buttons, install and
use QButton from the App Center.
Dimensions
Form factor Compact
Dimensions (H x W x D) 41.3 × 302 × 220 mm
(1.62 x 11.89 x 8.66 in)
HS-264 User Guide
Product Overview 5

Component HS-264
Net weight 1.56 kg (3.44 lbs)
Others
Power supply unit External 60W adapter, 100-240V DC
System battery CR2032 lithium battery (3V, 225 mAh)
Warning
To avoid potential battery explosion, causing injury
or damage to components, ensure that you replace
the existing battery with a battery of the same type.
Operating temperature 0˚C to 40˚C (32˚F to 104˚F)
Relative humidity • Non-condensing relative humidity: 5% to 95%
• Wet-bulb temperature: 27˚C (80.6˚F)
Tip
Model specications are subject to change without prior notice. To see the latest
specications, go to https://www.qnap.com.
Package Contents
Item Quantity
HS-264 1
AC power adapter 1
Power cord 1
Ethernet cables 1
Screws for 3.5-inch drives 8
Screws for 2.5-inch drives 6
Quick Installation Guide (QIG) 1
Components
HS-264 User Guide
Product Overview 6

Front Panel
Note
This image shows the HS-264 without the front cover attached.
No. Component No. Component
1 Drive bay 1 4 Drive bay latch
2 Drive bay latch 5 Drive bay 2
3 Status LED 6 IR sensor
Rear Panel
HS-264 User Guide
Product Overview 7

No. Component No. Component
1 Power input 6 2.5 Gigabit Ethernet ports (RJ45)
2 Reset button 7 Power button
3 HDMI ports 8 2.5 Gigabit Ethernet activity LED
4 Kensington security slot 9 2.5 Gigabit Ethernet speed LED
5 USB 3.2 Gen 2 Type-A ports - -
Drive Numbering
Note
This image shows the HS-264 without the front cover attached.
Safety Information
The following instructions help ensure personal safety and environmental safety. Read these instructions
carefully before performing any operation.
General Instructions
• The device should be stored in a secure location with restricted access, controlled through the use of a
tool, lock and key, or any means of security.
• Only qualied, skilled, and authorized persons with knowledge of all restrictions, safety precautions,
and installation and maintenance procedures should have physical access to the device.
• To avoid potential injury or damage to components, ensure that the drives and other internal system
components have cooled before touching them.
• Observe electrostatic discharge (ESD) procedures to avoid potential injury or damage to components.
Power
• To reduce the risk of re or electric shock, ensure that you only connect the power cord to a properly
grounded electrical outlet.
HS-264 User Guide
Product Overview 8

• To avoid serious injuries, a trained service technician must disconnect all PSU cords from the device
before installing or replacing system components.
System Battery
• To avoid potential battery explosion, causing injury or damage to components, ensure that you replace
the existing battery with a battery of the same type.
• Dispose of used batteries properly according to local regulations or the instructions of the battery
manufacturer.
Installation Requirements
Category Item
Environment • Room temperature: 0˚C to 40˚C (32˚F to 104˚F)
• Non-condensing relative humidity: 5% to 95%
• Wet-bulb temperature: 27˚C (80.6˚F)
• Flat, anti-static surface without exposure to direct sunlight, liquids,
or chemicals
• Free from objects that may obstruct NAS ventilation or apply
pressure to the NAS or power cord
Hardware and peripherals • Storage drives
For the list of compatible drive models, go to https://
www.qnap.com/compatibility.
• Network cable
Tools • Phillips #1 or #2 screwdriver
• Anti-static wrist strap
Setting Up the NAS
Important
Read all safety requirements and information carefully before setting up the NAS or
installing NAS components.
1. Place your NAS device in an environment that meets the requirements.
For details, see Installation Requirements.
2. Install the drives.
For details, see Drive Installation.
Tip
For the list of compatible drive models, go to https://www.qnap.com/compatibility.
3. Connect the Expansion Units.
Connecting USB Expansion Units
4. Connect the power cord and all applicable cables.
5. Power on the NAS.
For details, see Power Button.
HS-264 User Guide
Product Overview 9

3. Installation and Conguration
This chapter provides specic hardware and rmware installation and conguration steps.
Hardware Installation
This section provides information on installing drives and USB expansion units.
Drive Installation
The HS-264 is compatible with 3.5-inch and 2.5-inch hard drives, and 2.5-inch solid-state drives.
Installing 3.5-inch Drives on 3.5-inch Trays
Warning
• Installing a drive deletes all data on the drive.
• Observe electrostatic discharge (ESD) procedures to avoid damage to components.
1. Power o the NAS.
2. Remove the front cover.
3. Remove a drive tray by simultaneously pressing the latch and pulling the tray.
HS-264 User Guide
Installation and Conguration 11

4. Install a drive on the tray.
a. Place the drive on the tray so that the holes on the bottom of the drive are aligned with the holes
on the bottom of the tray.
b. Attach the screws.
5. Insert the tray into the bay.
HS-264 User Guide
Installation and Conguration 12

6. Attach the front cover.
7. Power on the NAS.
Installing 2.5-inch Drives on 3.5-inch Trays
Warning
• Installing a drive deletes all data on the drive.
• Observe electrostatic discharge (ESD) procedures to avoid damage to components.
1. Power o the NAS.
2. Remove the front cover.
HS-264 User Guide
Installation and Conguration 13

3. Remove a drive tray by simultaneously pressing the latch and pulling the tray.
4. Install a drive on the tray.
a. Place the drive on the tray so that the holes on the bottom of the drive are aligned with the holes
on the bottom of the tray.
b. Attach the screws.
HS-264 User Guide
Installation and Conguration 14

5. Insert the tray into the bay.
6. Attach the front cover.
HS-264 User Guide
Installation and Conguration 15

7. Power on the NAS.
Connecting USB Expansion Units
The device supports USB expansion units. For details, please see the table below.
You can purchase storage expansion accessories from QNAP or an authorized reseller.
For details, go to https://shop.qnap.com/.
For the list of compatible expansion units and the maximum number of applicable expansion units, go to
https://www.qnap.com/go/compatibility-expansion.
Expansion Unit
Model
Description Required Accessories
TR-002 • Uses a USB 3.2 Gen 2 Type-C interface
• Supports SATA HDD/SDD
USB 3.2 Gen 2 Type-A to Type-C cable
TR-004 • Uses a USB 3.2 Gen 1 Type-C interface
• Supports SATA HDD/SDD
USB 3.2 Gen 2 Type-A to Type-C cable
TR-004U • Uses a USB 3.2 Gen 1 Type-C interface
• Supports SATA HDD/SDD
• USB 3.2 Gen 1 Type-A to Type-C cable
• RAIL-B02
TL-D800C • Uses a USB 3.2 Gen 2 Type-C interface
• Supports SATA HDD/SDD
USB 3.2 Gen 2 Type-A to Type-C cable
TL-R1200C-RP • Uses a USB 3.2 Gen 2 Type-C interface
• Supports SATA HDD/SDD
• USB 3.2 Gen 2 Type-A to Type-C cable
• RAIL-B02
To connect the device to a USB expansion unit, a USB Type-A to USB Type-C cable is required.
1. Verify that the NAS is powered o.
HS-264 User Guide
Installation and Conguration 16

2. Connect the expansion unit to the NAS.
a. Connect the USB cable to the USB Type-C port on the expansion unit.
b. Connect the USB cable to a USB 3.2 Gen 2 Type-A port on the NAS.
Note
This image shows the HS-264 connected to two TR-004U USB expansion units.
3. Power on the expansion units.
4. Power on the NAS.
5. Verify that the expansion units are recognized by the NAS.
a. Log on to QTS as administrator.
b. Go to Main Menu > Storage & Snapshots > Overview > System .
c. Verify that the expansion units are listed.
QTS Installation
The HS-264 uses the QNAP QTS operating system. You can install QTS using any of the following methods.
Method Description Requirements
Qnder Pro
installation
(Recommended)
If the NAS is connected to your local area
network, you can do the following:
• Locate the NAS using Qnder Pro.
• Complete the steps in the Smart Installation
Guide wizard.
For details, see Installing QTS Using Qnder Pro.
• Computer
• Network cable
•Qnder Pro installer
HS-264 User Guide
Installation and Conguration 17

Method Description Requirements
Cloud installation If the NAS is connected to the internet, you can
do the following:
• Scan the QR code on the NAS.
• Log into your myQNAPcloud account.
• Use myQNAPcloud Link to remotely access
your NAS.
• Complete the steps in the Smart Installation
Guide wizard.
For details, see Installing QTS Using the Cloud
Key.
• Computer or mobile device
• Network cable
• myQNAPcloud account
• Cloud Key
Installing QTS Using Qnder Pro
Warning
Installing QTS deletes all data on the drives. Back up your data before proceeding.
Important
To protect your NAS from brute force attacks, create a new system administrator account
during QTS installation to disable the default "admin" account.
1. Power on the NAS.
2. Connect the NAS to your local area network.
3. Run Qnder Pro on a computer that is connected to the same local area network.
Note
To download Qnder Pro, go to https://www.qnap.com/utilities.
4. Click Next.
The QNAP Warranty Service page opens in the default web browser.
5. Click Check warranty.
The QNAP Warranty Service window opens in a new web page.
Important
You can check your device warranty policy or purchase an extended warranty plan at QNAP
Warranty Service.
6. Close the warranty page.
The Smart Installation Guide opens in the default web browser.
7. Click Next.
The Enter the NAS name and administrator’s password screen appears.
8. Specify the following information.
•NAS name: Specify a name with 1 to 14 characters. The name supports letters (A to Z, a to z),
numbers (0 to 9), and hyphens (-), but cannot end with a hyphen.
HS-264 User Guide
Installation and Conguration 18

•Username: Specify an administrator username that contains 1 to 32 characters. The name
supports letters (A to Z, a to z), numbers (0 to 9), and hyphens (-), multi-byte Chinese, Japanese,
Korean, and Russian characters.
The username cannot contain the following special characters: grave accent (`), asterisk (*), equal
sign (=), plus sign (+), square brackets ([ ]), slash (\), vertical bar (|), semicolon (;), colon (:),
apostrophe ('), quotation mark ("), comma (,), less than sign (< ), greater than sign (>), backslash
(/), question mark (?), percent sign (%)
•Password: Specify an administrator password with 1 to 64 characters. The password supports all
ASCII characters.
•Conrm Password: Enter the new administrator password again.
9. Click Next.
The Set the date and time screen appears.
10. Specify the time zone, date, and time using any of the following methods:
Tip
QNAP recommends connecting to an NTP server to ensure that the NAS follows the
Coordinated Universal Time (UTC) standard.
Methods User Actions
Synchronize with computer or device time Select Same as the computer/device time
The NAS time will be the same as your computer or
device used to congure the time.
Enter manually a. Select Input Manually.
b. Specify the date and time.
The NAS date and time will be the same as the
congured time.
Synchronize with an Internet time server
automatically
Click Synchronize with an Internet time server
automatically.
The NAS time will be the same as the NTP server.
11. Click Next.
The Congure the network settings screen appears.
12. Congure the network settings using any of the following methods.
Methods User Actions
Obtain an IP address automatically (DHCP) Select Obtain an IP address automatically (DHCP)
The system automatically detects and congures the
IP address settings.
HS-264 User Guide
Installation and Conguration 19
This manual suits for next models
2
Table of contents
Other QNAP Enclosure manuals

QNAP
QNAP TL-R1200C-RP User manual

QNAP
QNAP TR-002 User manual

QNAP
QNAP TL-D400S User manual

QNAP
QNAP REXP-1220-RP Instructions for use

QNAP
QNAP TR-004 User manual

QNAP
QNAP TL-R1220Sep-RP User manual

QNAP
QNAP REXP-1200U-RP Instructions for use

QNAP
QNAP TR-004U User manual

QNAP
QNAP TL-D800C User manual

QNAP
QNAP TL-R400S User manual
Popular Enclosure manuals by other brands

Icy Box
Icy Box IB-HUB1703-QC3 Quick installation guide

CRU Dataport
CRU Dataport DataPort 5 install guide

CINCH
CINCH ModICE SE Series Assembly instructions

Thermaltake
Thermaltake ARMOR REVO GENE VO800M1W2N user manual

Vivotek
Vivotek AE2000 user manual

Carlon
Carlon CS863 Installation Instructions and Accessory Applications