manuals.online logo
Brands
  1. Home
  2. •
  3. Brands
  4. •
  5. Qsan
  6. •
  7. Storage
  8. •
  9. Qsan XCubeFAS 3126D User manual

Qsan XCubeFAS 3126D User manual

Thank you for purchasingQSAN XF3126D storage system.
XCubeFAS 3126D QuickInstallation Guide
1 BEFORE YOU BEGIN
Package Contents
2 INSTALL SOLID-STATE DRIVES
Release Direction
Carrier Handle
Release Button
Unlock Direction
Unlock
Direction
R
e
l
e
a
s
e
B
u
t
t
o
n
L
o
c
k
A QSAN storage system includes:
3 INSTALL THE OPTIONAL HOST CARDS
Please refer to the QSAN XF3126D hardware manual for detailed instructions.
1. Remove the dummy host card cage by loosening two screws of the dummy host card cage.
2. Align the host card to the slot to be installed and use two screws that lossing from dummy host card cage
to fasten on the controller.
3. Repeat procedures above if there are other host cards need to be installed.
Release Button Lock
1 2
2
Supporting Bracket
(* Remove for
Disk Insertion)
SFF Tray
1
Optional Accessories
You can check the optional accessories on QSAN website :
https://www.qsan.com
Prepare System Information for Installation
- System name
- Admin password
- NTP server address
- Management IP address
- DNS server address
More Information
For additional hardware manual, software manual, or compatibility
matrix which includes HDD, SSD, HBA, and switch requirements,
please refer to the QSAN download center.
1SFF : Small Form Factor / 2.5” disk drive
XF3126D only supports QSAN SD4 SSD.
System Chassis (x1)
AC Power Cords (x2) RS-232 Console Cable (x2) Screws Pack for Disk Drives
Disk Drive Trays Slide Rail Kit (x1)
3U 26-bay
(x26 SFF1) for 3U 26-bay
Unlock the Tray
1. The standard position of the tray is locked to prevent damage
during transport.
2. To unlock the tray: shift the release button lock from left to right.
Open the Carrier Handle of the Tray
1. The procedure of opening the tray carrier handle: shift the
carrier handle release button from up to down; then carrier handle
will automatically pop out.
Install an SSD into the Tray
1. Place the tray onto a stable surface.
2. Remove the supporting bracket. Then align the SSD with the
connector facing away from the carrier handle.
3. Align the four tray screw holes on both sides of the disk tray.
4. Install and tighten all four screws to secure SSD within the tray.
Install the Tray with the SSD into the System Chassis
1. Users must open the carrier handle of the tray before
installing it into the empty bay of the system chassis.
2. Align an SSD with the tray to the empty bay you would like
to install, and push it all the way into the disk drive bay until
the carrier handle can be closed.
3. Lock the release button lock by pushing the lock from right to
left.
4. Refer to the label on the system chassis for the disk numbering.
The disk numbering for system is printed on the chassis.
4INSTALL THE RAIL KIT
The rail kit is an accessory for XCubeFAS series product, Please follow the racking instructions below.
CAUTION:
The populated XCubeFAS system can be very heavy, to avoid any potential injury or harm to installers, or damage to the system, we strongly recommend at least two certified operators
or engineers perform the system installation.
TIP:
Please wait for the controller status LED to turn green on the rear of the chassis before attempting to discover or manage the storage system.
It may take a few minutes to boot the XCubeFAS system.
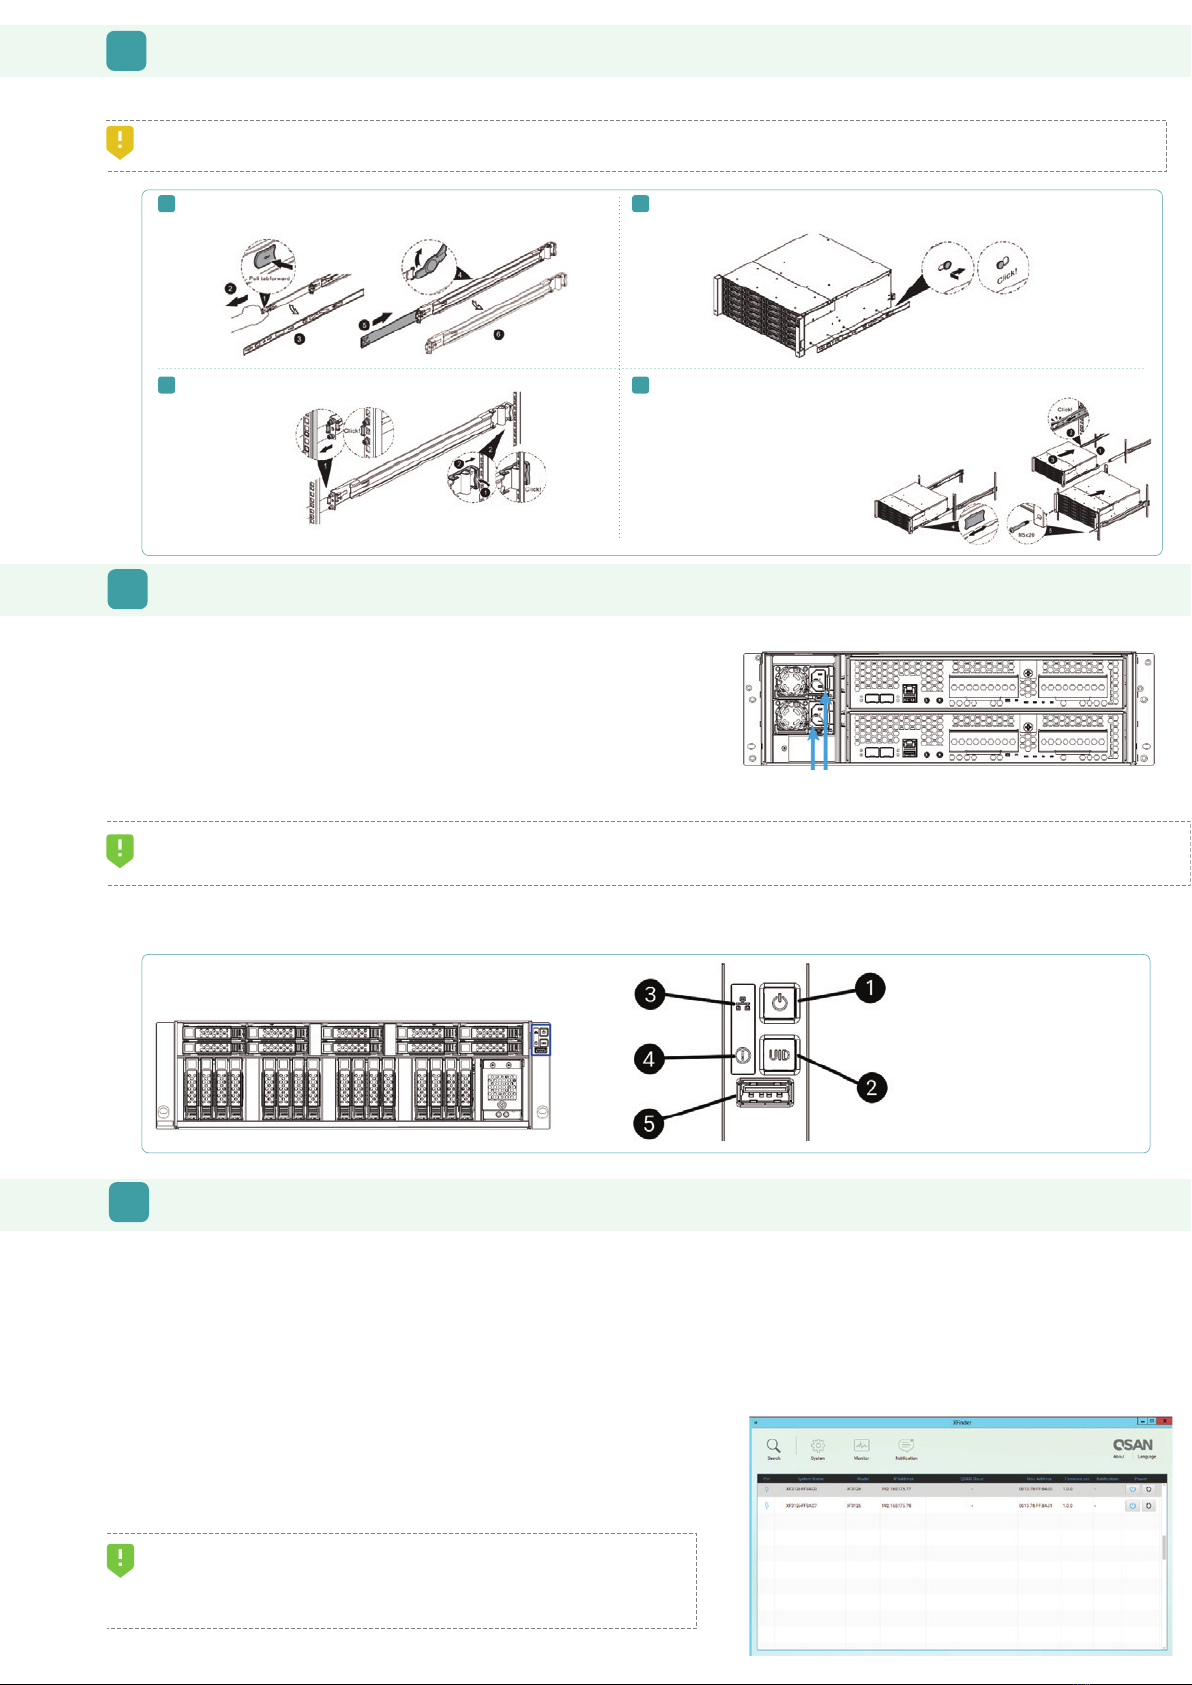
5 POWER ON THE STORAGE SYSTEM
Pull the inner rail out and slide the intermediate member back. Install the inner rail onto the chassis.
Insert the chassis to complete the installation.
Rear Bracket
Front Bracket
Note : Please repeat the installation steps for the other side.
6DISCOVER AND SETUP THE SYSTEM
1 2
4
Install the outer rail /bracket assembly to the frame.
3
Step 1. Pull the middle rail fully extended in locked position.
Step 2. Ensure ball bearing retainer is located at the front of the middle rail.
Step 3. Insert chassis into middle-outer rail.
Step 4. When hit the stop, pull / push release tab to unlock and retract chassis into rack.
Step 5. Use M5 x 20mm screws to fasten the chassis ear.
1. Enclosure Power Button / LED
4. Enclosure Status LED
5. USB Port
2. UID (Unique ldentifier) Button / LED
3. Enclosure Access LED
4
5
TIP:
If the LAN doesn’t have a DHCP server, the management port will be assigned a fix IP address:
169.254.1.234/16. So you can configure the IP address of your management computer to the
same subnet domain of the storage system, e.g.: 169.254.1.1/16. Then open a browser and
enter http://169.254.1.234 to go into the login page.
Power Cord Connectors
Connect the Power Cables
1. Connect power cables from each power supply module to a power source.
2. Make sure to secure the power cables the power supply modules so they can not
be pulled out accidentally.
Power on the System Components
1. Power on any network switches, routers, or other standalone components.
2. Power on any expansion enclosures that might be a part of the system.
3. Power on the XCubeFAS system by pressing the power button on the front of the
system.
4. See the diagram below to determine the meaning of the lights and indicators on
the front of the system.
Discover the System
The default setting for the management IP address is DHCP. We provide the XFinder Java utility to search for QSAN products on the network and aid
quick access to the login page of the XEVO web interface.
XFinder Utility
To download XFinder, please visit: https://www.qsan.com/download_center
QFinder is a Java based program. To execute this program, JRE (Java Runtime Environment) is required. You can visit the following website to
download and install JRE: http://www.java.com/download
After JRE is installed, run the XFinder.jar program. The storage system in your
network will be detected and listed in the table. Select the system you are looking
for. Double clicking the selected entry will automatically bring up the browser and
display the login page.
Storage Management
Initial Setup
The Initial configuration wizard will guide the first time user to initialize and setup the system quickly.
Step 2
- Enter a system name.
- Change the admin’s password.
Step 3
- Select a Time Zone depending on your location.
- Set the local Date and Time. Date and time can be set by manually
or synchronized with a NTP (Network Tim e Protocol) server.
- Click the Next button to proceed.
After all configurations are set up, the system will redirect your page to the new IP address you just set for the management port. Then you have to
login with new admin password.
After initial setup, the next step is to configure the specific storage settings. To deploy your storage, you have to go to the Storage tab first.
Step 1
- Click the “+” icon at the left-top of the Storage tab to pop up a
Create Pool wizard.
Step 4
- Confirm or change the management port IP address and DNS server.
- Click the Apply button to complete the initial configuration.
Step 2
- Click the “+” button to add disks. The system will suggest the default
configurations depend on the amount of disks you have selected.
- Click the Next button to proceed.
Step 3
- Adjust the capacity of the volume to be created and select its block
size.
- Click the Next button to proceed.
Step 4
- Select a host group or leave the option Forbid All Connections and set it
later.
- Click the Next button to proceed.
To access the XEVO web interface, you have to enter a username and
password. The initial defaults for the administrator login are:
- Username: admin - Password: 1234
Step 1
© Copyright 2023 QSAN Technology, Inc. All Rights Reserved. XCubeFAS, XCubeNXT, XCubeNAS, XCubeSAN and XCubeDAS are trademarks of QSAN Technology, Inc. All other trademarks are the
property of their respective owners. Product features, specifications, and appearance are subject to change without notice.
June, 2023
Host Configuration
After creating volumes at the Storage tab, you have to connect the volumes to hosts to complete the storage deployment.
7 GETTING TECHNICAL SUPPORT
Please follow the troubleshooting tips in the XF3126D hardware manual or the XEVO software manual to diagnose and resolve common problems
during initial setup and configuration. If you are still encountering trouble, please contact QSAN technical support for help using one of the options
below.
- Via the Web: https://qsan.com/technical_support
- Via Telephone: +886-2-7720-6355 (Service hours : 09:30 - 18:00, Monday - Friday, UTC+8)
- Via Skype Chat, Skype ID : qsan.support (Service hours : 09:30 - 02:00, Monday - Friday, UTC+8, Summer time : 09:30 - 01:00)
- Via Email: [email protected]
Step 5
- Check the summary of all processes.
- Click the Close button to complete the wizard.
Now you can connect from the server to the storage system.
Step 1
To complete the storage deployment, you have to create a host
group in the Hosts tab.
- Click the “+” icon at the left-top of Hosts tab to pop up a Create
Host Group wizard.
Step 2
- Select iSCSI / IQN or FC / WWN protocol.
- Input one or more host names which comes from your servers and
click the Add to IQN List button to add them into the IQN list.
- Select the IQNs and click the “>” button to move the selected IQNs
to the right side.
- Click the Next button to proceed.
Step 3
- Select the data ports which are allowed to transmit.
- Click the Next button to proceed.
Step 4
- Select the volumes you want to deploy to your servers.
- Click the “>” button to move the selected volumes to the right side.
- Click the Done button to complete the storage deployment.

Other Qsan Storage manuals

Qsan XCubeNAS XN5004R User manual

Qsan

Qsan XCubeNAS XN5004R User manual

Qsan XCubeNAS XN3000T User manual

Qsan

Qsan XCubeNAS XN3000T User manual

Qsan XN5008R User manual

Qsan

Qsan XN5008R User manual

Qsan XCubeFAS Series User manual

Qsan

Qsan XCubeFAS Series User manual

Qsan XEVO User manual

Qsan

Qsan XEVO User manual

Qsan XCubeNAS XN5024R User manual

Qsan

Qsan XCubeNAS XN5024R User manual

Qsan XCubeSAN 3300 User manual

Qsan

Qsan XCubeSAN 3300 User manual

Qsan XCubeNAS XN7012R User manual

Qsan

Qsan XCubeNAS XN7012R User manual

Qsan XCubeNAS Series Quick reference guide

Qsan

Qsan XCubeNAS Series Quick reference guide

Qsan XCubeNAS XN3004T User manual

Qsan

Qsan XCubeNAS XN3004T User manual

Qsan AegisSAN Q500 Series User manual

Qsan

Qsan AegisSAN Q500 Series User manual

Qsan XCUBESAN XS5226S XCUBESAN XS3224D User manual

Qsan

Qsan XCUBESAN XS5226S XCUBESAN XS3224D User manual

Qsan XCubeNAS XN3002T User manual

Qsan

Qsan XCubeNAS XN3002T User manual

Qsan XCubeNAS XN5016R User manual

Qsan

Qsan XCubeNAS XN5016R User manual

Qsan XCubeNAS 8104 User manual

Qsan

Qsan XCubeNAS 8104 User manual

Qsan XCubeNAS XN8012R User manual

Qsan

Qsan XCubeNAS XN8012R User manual

Qsan XCubeNAS XN8024R User manual

Qsan

Qsan XCubeNAS XN8024R User manual

Qsan XCubeSAN XS5224D User manual

Qsan

Qsan XCubeSAN XS5224D User manual

Qsan XCubeNAS XN5008RE User manual

Qsan

Qsan XCubeNAS XN5008RE User manual

Qsan XCubeNAS XN5008T User manual

Qsan

Qsan XCubeNAS XN5008T User manual

Qsan XCubeDAS XD5324D User manual

Qsan

Qsan XCubeDAS XD5324D User manual

Qsan XEVO 2.2 Mounting instructions

Qsan

Qsan XEVO 2.2 Mounting instructions

Qsan XCubeFAS XF2026D User manual

Qsan

Qsan XCubeFAS XF2026D User manual

Qsan XCubeFAS XF3126D User manual

Qsan

Qsan XCubeFAS XF3126D User manual

Popular Storage manuals by other brands

Seagate BlackArmor NAS 110 Specifications

Seagate

Seagate BlackArmor NAS 110 Specifications

Sony HXR-FMU128 Service manual

Sony

Sony HXR-FMU128 Service manual

Sony DMS-8800B Operation manual

Sony

Sony DMS-8800B Operation manual

Hitachi Travelstar C3K80 Quick installation guide

Hitachi

Hitachi Travelstar C3K80 Quick installation guide

Toshiba MK6017MAP Product specification

Toshiba

Toshiba MK6017MAP Product specification

Palmako EL12-1207FSC installation manual

Palmako

Palmako EL12-1207FSC installation manual

Herrnhuter storage box Assembly instruction

Herrnhuter

Herrnhuter storage box Assembly instruction

Seagate ST2000NX0243 product manual

Seagate

Seagate ST2000NX0243 product manual

Samsung HA250JC user manual

Samsung

Samsung HA250JC user manual

Newer Technology Guardian Maximus owner's manual

Newer Technology

Newer Technology Guardian Maximus owner's manual

Western Digital WD Elements WDE1UBK10000 quick guide

Western Digital

Western Digital WD Elements WDE1UBK10000 quick guide

NetApp FAS9500 Install

NetApp

NetApp FAS9500 Install

Memorex traveldrive quick start guide

Memorex

Memorex traveldrive quick start guide

Seagate ST2000LX001 product manual

Seagate

Seagate ST2000LX001 product manual

Vixen Air VXT6300 installation guide

Vixen Air

Vixen Air VXT6300 installation guide

Lenovo IBM Half-high LTO Generation 4 Product guide

Lenovo

Lenovo IBM Half-high LTO Generation 4 Product guide

Quantum Scalar i6000 user guide

Quantum

Quantum Scalar i6000 user guide

Samsung SPINPOINT MP2 HM080HJ Specifications

Samsung

Samsung SPINPOINT MP2 HM080HJ Specifications

manuals.online logo
manuals.online logoBrands
  • About & Mission
  • Contact us
  • Privacy Policy
  • Terms and Conditions

Copyright 2025 Manuals.Online. All Rights Reserved.