manuals.online logo
Brands
  1. Home
  2. •
  3. Brands
  4. •
  5. Qsan
  6. •
  7. Storage
  8. •
  9. Qsan XCubeFAS XF3126D User manual

Qsan XCubeFAS XF3126D User manual

Thank you for purchasingQSAN XCubeFAS storage system.
This QIG will get you up and run quickly.
The QIGs in other languages can be downloaded from the QSAN website: https://qsan.com/en/download_center
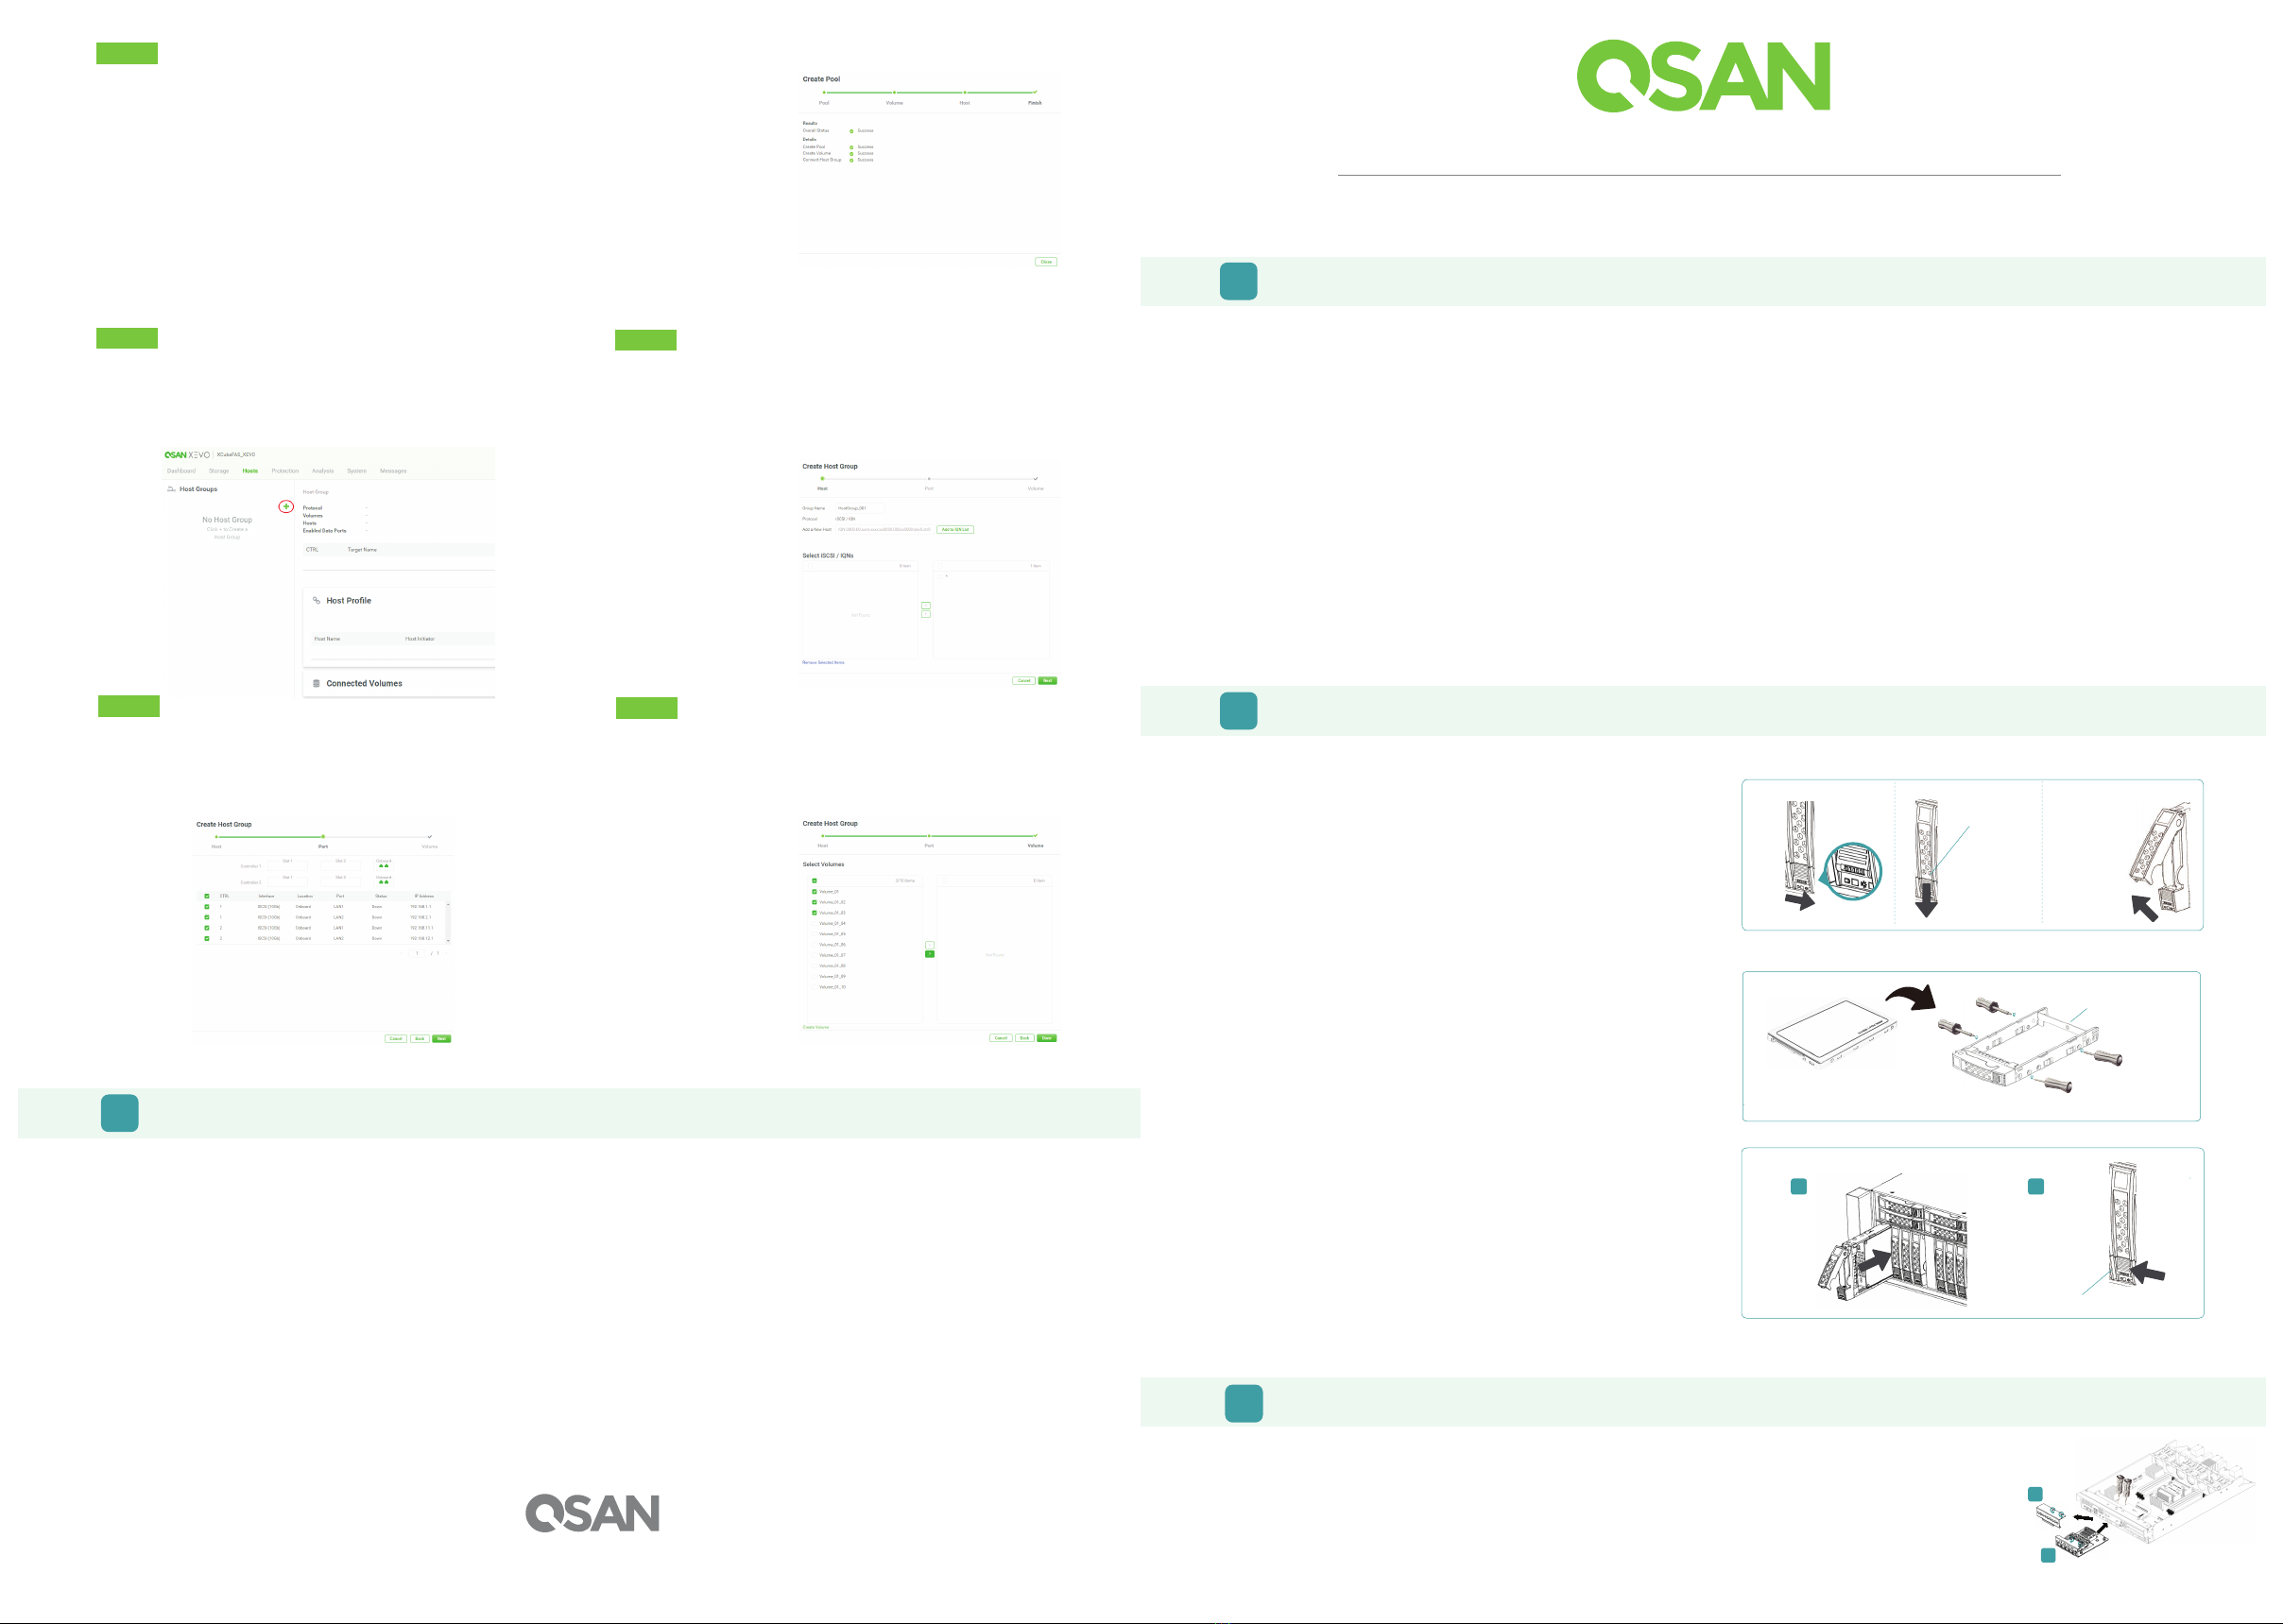
Open the Carrier Handleof a SSD Tray
- The procedure of opening an SSD tray carrier
handle: shift the carrier handle release button from up to
down; then carrier handle will automatically pop out.
Install a SSD into a SSD Tray
1. Place a SSD tray onto a stable surface.
2. Remove the supporting bracket. Then align the SSD
with the connector facing away from the carrier handle.
3. Align the four SSD tray screw holes on both sides of the
disk tray.
4. Install and tighten all four screws to secure SSD within
the tray.
XCubeFAS XF3126D QuickInstallation Guide
1 BEFORE YOU BEGIN
Package ContentsPrepare forInstallation
More Information
Please prepare the following information for installation.
- System name
- Admin password
- NTP server address
- Management IP address at controller 1
- DNS server address
For additional manual, or compatibility matrix which includes HDD, SSD, HBA,
and switch requirements, please refer to the QSAN download center at
https://qsan.com/en/download_center
¹ XF3126D must use 2.5” U.2 dual port NVMe SSD
2 INSTALL SOLID-STATE DRIVES
UnlocktheSSD Tray
- The standard position of the SSD tray is locked to
prevent damage during transport.
- To unlock SSD tray: shift the release button lock
from left to right.
Host Configuration
After creating volumes at the Storage tab, you have to connect the volumes to hosts to complete the storage deployment.
Release Direction
Carrier Handle
Release Button
Unlock Direction
Unlock
Direction
R
e
l
e
a
s
e
B
u
t
t
o
n
L
o
c
k
QSAN XCubeFAS XF3126D model:
- System chassis (x1)
- SSD trays¹(x26)
- Rail kit
- AC power cords (x2)
- RS-232 console cable (x2) for dual controller model
- Screws pack for SSD ( screws x104-120)
- This quick installation guide
Optional accessories:
- 2 port 32Gb Fibre Channel host card SFP28
- 4 port 16Gb/8Gb Fibre Channel host card SFP+
- 2 port 16Gb/8Gb Fibre Channel host card SFP+
- 2 port 25GbE iSCSI host card SFP28
- 4 port 10GbE iSCSI host card SFP+
- 2 port 10GBASE-T iSCSI host card RJ45
- USB LCM module
Install the Tray with the SSD into the System Chassis
-
Users must open the carrier handle of a SSD tray before
installing it into the empty bay of the system chassis.
-
The following is the procedure for installing a SSD
with the tray into the system for SSD trays:
1. Align an SSD with the tray to the empty bay you would like
to install, and push it all the way into the disk drive bay until
the carrier handle can be closed.
2. Lock the release button lock by pushing the lock from right
to left.
- Refer to the label on the system chassis for SSD
The SSD numbering for 3U 26-bay system
will be printed on the chassis.
3 INSTALL THE OPTIONAL HOST CARDS
Please refer to the QSAN XCubeFAS XF3126D Hardware Manual for detailed instructions.
1. Remove the dummy host card cage by loosening two screws of the dummy host card cage.
2. Align the host card to the slot to be installed and use two screws that lossing from dummy host card cage
to fasten on the controller.
3. Repeat procedures above if there are other host adapter cards need to be installed.
* You must install transceiver(s) for the Fibre Channel or 10/25GbE host cards before connecting the cables from
the storage system to the host sides.
Release Button Lock
1 2
7 GETTING TECHNICAL SUPPORT
Please follow the troubleshooting tips in the XCubeFAS XF3126D Hardware Owner’s Manual or the XEVO User’s Manual to diagnose and resolve common
problems during initial setup and configuration. If you are still encountering trouble, please contact QSAN technical support for help using one of the
options below.
- Via the Web: https://qsan.com/en/technical_support
- Via Telephone: +886-2-7720-2118 Extension 136/ 162/ 195/ 154/ 206 (Service hours: 09:30 - 18:00, Monday - Friday, UTC+8)
- Via Skype Chat, Skype ID: qsan.support (Service hours: 09:30 - 02:00, Monday - Friday, UTC+8, Summer time: 09:30 - 01:00)
- Via Email: support@stortrec-usa.com
©2021 QSAN Technology Inc. All rights reserved. No part of this document may be reproduced or repurposed without the express written consent of QSAN. XCubeFAS, XEVO, XFinder, and the QSAN
logo are trademarks of QSAN. All other trademarks are the property of their respective owners. Features, specifications, model numbers, and product appearance is subject to change without notice.
March 2021
Step 5
- Check the summary of all processes.
- Click the Close button to complete the wizard.
Now you can connect from the server to the FAS storage system.
Step 1
To complete the storage deployment, you have to create a host
group in the Hosts tab.
- Click the “+” icon at the left-top of Hosts tab to pop up a Create
Host Group wizard.
Step 2
- Select iSCSI / IQN or FC / WWN protocol.
- Input one or more host names which comes from your servers and click the
Add to IQN List button to add them into the IQN list.
- Select the IQNs and click the “>” button to move the selected IQNs to the
right side.
- Click the Next button to
proceed.
Step 3
- Select the data ports which are allowed to transmit.
- Click the Next button to proceed.
Step 4
- Select the volumes you want to deploy to your servers.
- Click the “>” button to move the selected volumes to the right side.
- Click the Done button to complete the storage deployment.
P/N:55-04031101-01
2
Supporting Bracket
SFF SSD Tray
1
Storage Management
4INSTALL THE OPTIONAL RAIL KIT
The rail kit is an accessory for XCubeFAS series product, Please follow the racking instructions below.
CAUTION:
The populated XCubeFAS system can be very heavy, to avoid any potential injury or harm to installers, or damage to the system, we strongly recommend at least two certified operators
or engineers perform the system installation.
4. See the diagram below to determine the meaning of the lights and indicators on the front of the system.
TIP:
Please wait for the controller status LED to turn green on the rear of the chassis before attempting to discover or manage the storage system.
It may take a few minutes to boot the XCubeFAS system.
5 POWER ON THE STORAGE SYSTEM
Connect the Power Cables
Power on the System Components
1. Power on any network switches, routers, or other standalone components.
2. Power on any expansion enclosures that might be a part of the system.
3. Power on the XCubeFAS system by pressing the power button on the front of the system.
Pull the inner rail out and slide the intermediate member back. Install the inner rail onto the chassis.
Insert the chassis to complete the installation.
Rear Bracket
Front Bracket
Note : Please repeat the installation steps for the other side.
6DISCOVER AND SETUP THE SYSTEM
Discover theSystem
The default setting for the management IP address is DHCP. We provide the XFinder Java utility to search for QSAN products on the network and aid
quick access to the login page of the XEVO web interface.
XFinder Utility
To download XFinder, please visit: https://www.qsan.com/en/download_center
QFinder is a Java based program. To execute this program, JRE (Java Runtime Environment) is required. You can visit the following website to download
and install JRE: http://www.java.com/en/download/
After JRE is installed, run the QFinder.jar program. The FAS storage system in your
network will be detected and listed in the table.
Select the system you are looking for. Double clicking the selected entry will
automatically bring up the browser and display the login page.
1 2
4
Install the outer rail /bracket assembly to the frame.
3
Step 1. Pull the middle rail fully extended in locked position.
Step 2. Ensure ball bearing retainer is locatedat the front of the middle rail.
Step 3.Insert chassis into middle-outer rail.
Step 4.When hit the stop, pull /push release tab to unlockand retract chassis into rack.
Step 5.UseM5x20 screws to fasten the chassis ear.
1. System Power Button / LED
4. System Status LED
5. USB Port
2. UID (Unique ldentifier) Button / LED
3. System Access LED
4
5
Initial Setup
The Initial configuration wizard will guide the first time user to initialize and setup the system quickly.
Step 1
To access the XEVO web interface, you have to enter a username and
password. The initial defaults for the administrator login are:
- Username: admin - Password: 1234
Step 2
- Enter a system name.
- Change the admin’s password.
Step 3
- Select a Time Zone depending on your location.
- Set the local Date and Time. Date and time can be set by manually
or synchronized with a NTP (Network Tim e Protocol) server.
- Click the Next button to proceed.
After all configurations are set up, the system will redirect your page to the new IP address you just set for the management port. Then you have to
login with new admin password.
After initial setup, the next step is to configure the specific storage settings. To deploy your storage, you have to go to the Storage tab first.
Step 1
- Click the “+” icon at the left-top of the Storage tab to pop up a
Create Pool wizard.
Step 4
- Confirm or change the management port IP address and DNS server.
- Click the Apply button to complete the initial configuration.
Step 2
- Click the “+” button to add disks. The system will suggest the default
configurations depend on the amount of disks you have selected.
- Click the Next button to proceed.
Step 3
- Adjust the capacity of the volume to be created and select its block
size.
- Click the Next button to proceed.
Step 4
- Select a host group or leave the option Forbid All Connections and set it
later.
- Click the Next button to proceed.
1. Connect power cables from each power supply module
to a power source.
2. Make sure to secure the power cables the power supply
modules so they can not be pulled out accidentally.
TIP:
If the LAN doesn’t have a DHCP server, the management port will be
assigned a fix IP address: 169.254.1.234/16. So you can configure the IP
address of your management computer to the same subnet domain of the
storage system, e.g.: 169.254.1.1/16. Then open a browser and enter
http://169.254.1.234 to go into the login page.
Power Cord Connectors

Other Qsan Storage manuals

Qsan XCubeDAS Series User manual

Qsan

Qsan XCubeDAS Series User manual

Qsan XCubeFAS 3126D User manual

Qsan

Qsan XCubeFAS 3126D User manual

Qsan XCubeNAS XN5024R User manual

Qsan

Qsan XCubeNAS XN5024R User manual

Qsan XCUBESAN XS5226S XCUBESAN XS3224D User manual

Qsan

Qsan XCUBESAN XS5226S XCUBESAN XS3224D User manual

Qsan XCubeNAS XN8024R User manual

Qsan

Qsan XCubeNAS XN8024R User manual

Qsan XCubeSAN XS5216D User manual

Qsan

Qsan XCubeSAN XS5216D User manual

Qsan XEVO User manual

Qsan

Qsan XEVO User manual

Qsan XCubeSAN 3300 User manual

Qsan

Qsan XCubeSAN 3300 User manual

Qsan XN5008R User manual

Qsan

Qsan XN5008R User manual

Qsan XN5012R User manual

Qsan

Qsan XN5012R User manual

Qsan AegisSAN Q500 Series User manual

Qsan

Qsan AegisSAN Q500 Series User manual

Qsan XCubeSAN XS5224D User manual

Qsan

Qsan XCubeSAN XS5224D User manual

Qsan XCubeNXT XN5012D User manual

Qsan

Qsan XCubeNXT XN5012D User manual

Qsan XCubeNAS XN3002T User manual

Qsan

Qsan XCubeNAS XN3002T User manual

Qsan XCubeFAS XF2026D User manual

Qsan

Qsan XCubeFAS XF2026D User manual

Qsan XCubeDAS XD5324D User manual

Qsan

Qsan XCubeDAS XD5324D User manual

Qsan XCubeNAS XN3000T User manual

Qsan

Qsan XCubeNAS XN3000T User manual

Qsan XCubeSAN XS5224D User manual

Qsan

Qsan XCubeSAN XS5224D User manual

Qsan XCubeNAS XN5008T User manual

Qsan

Qsan XCubeNAS XN5008T User manual

Qsan XCubeNAS XN5008RE User manual

Qsan

Qsan XCubeNAS XN5008RE User manual

Qsan XCubeNAS XN3004T User manual

Qsan

Qsan XCubeNAS XN3004T User manual

Qsan XCubeNAS XN5016R User manual

Qsan

Qsan XCubeNAS XN5016R User manual

Qsan XEVO 2.2 Mounting instructions

Qsan

Qsan XEVO 2.2 Mounting instructions

Qsan XCubeFAS Series User manual

Qsan

Qsan XCubeFAS Series User manual

Popular Storage manuals by other brands

Seagate ST3320620A - Barracuda 320 GB Hard Drive Product overview

Seagate

Seagate ST3320620A - Barracuda 320 GB Hard Drive Product overview

QNAP TBS-453DX user guide

QNAP

QNAP TBS-453DX user guide

Sony MicroVault USM4GL operating instructions

Sony

Sony MicroVault USM4GL operating instructions

Sony MicroVault USM1GL operating instructions

Sony

Sony MicroVault USM1GL operating instructions

Hitachi Deskstar 7K250 Specifications

Hitachi

Hitachi Deskstar 7K250 Specifications

Spectra Logic Spectra 2k AIT install guide

Spectra Logic

Spectra Logic Spectra 2k AIT install guide

QNAP TS-859 Pro Quick installation guide

QNAP

QNAP TS-859 Pro Quick installation guide

Hitachi Ultrastar HUS103030FL3600 install guide

Hitachi

Hitachi Ultrastar HUS103030FL3600 install guide

Seagate ST39173N product manual

Seagate

Seagate ST39173N product manual

Home Decorators Collection BF-21081 Assembly instructions

Home Decorators Collection

Home Decorators Collection BF-21081 Assembly instructions

Western Digital My Passport Pro user manual

Western Digital

Western Digital My Passport Pro user manual

HP 6100 specification

HP

HP 6100 specification

Gasmate Specialist Deluxe II Series manual

Gasmate

Gasmate Specialist Deluxe II Series manual

HP P6080-63001 - Maxtor DiamondMax Plus 40 GB Hard... Getting started

HP

HP P6080-63001 - Maxtor DiamondMax Plus 40 GB Hard... Getting started

CRU DataPort HotDock External Drive Bay quick start guide

CRU

CRU DataPort HotDock External Drive Bay quick start guide

Panasonic RP-SM16GFE1K operating instructions

Panasonic

Panasonic RP-SM16GFE1K operating instructions

Adata Hi-Speed USB 2.0 Flash Disk user manual

Adata

Adata Hi-Speed USB 2.0 Flash Disk user manual

NetApp DS4243 Installation and service guide

NetApp

NetApp DS4243 Installation and service guide

manuals.online logo
manuals.online logoBrands
  • About & Mission
  • Contact us
  • Privacy Policy
  • Terms and Conditions

Copyright 2025 Manuals.Online. All Rights Reserved.