Quicke 160 User manual

12155020 I
2022-10
EN SV DE FR ES PL DA FI NO
Operator’s Manual Flexigrip
160 | 200
Original instructions - Bruksanvisning i original - Original Betriebsanleitung -
Notice originale - Manual original - Instrukcja oryginalna -
Original brugsanvisning - Alkuperäiset ohjeet - Original driftsinstruks
Caution!
Read through the entire instruction manual before you start to use the product.
it contains important information for your safety.

x

203076
1
TABLE OF CONTENTS
1. PREFACE.................................................5
1.1. General information.................................................... 5
2. SAFETY INSTRUCTIONS........................6
2.1. General information.................................................... 6
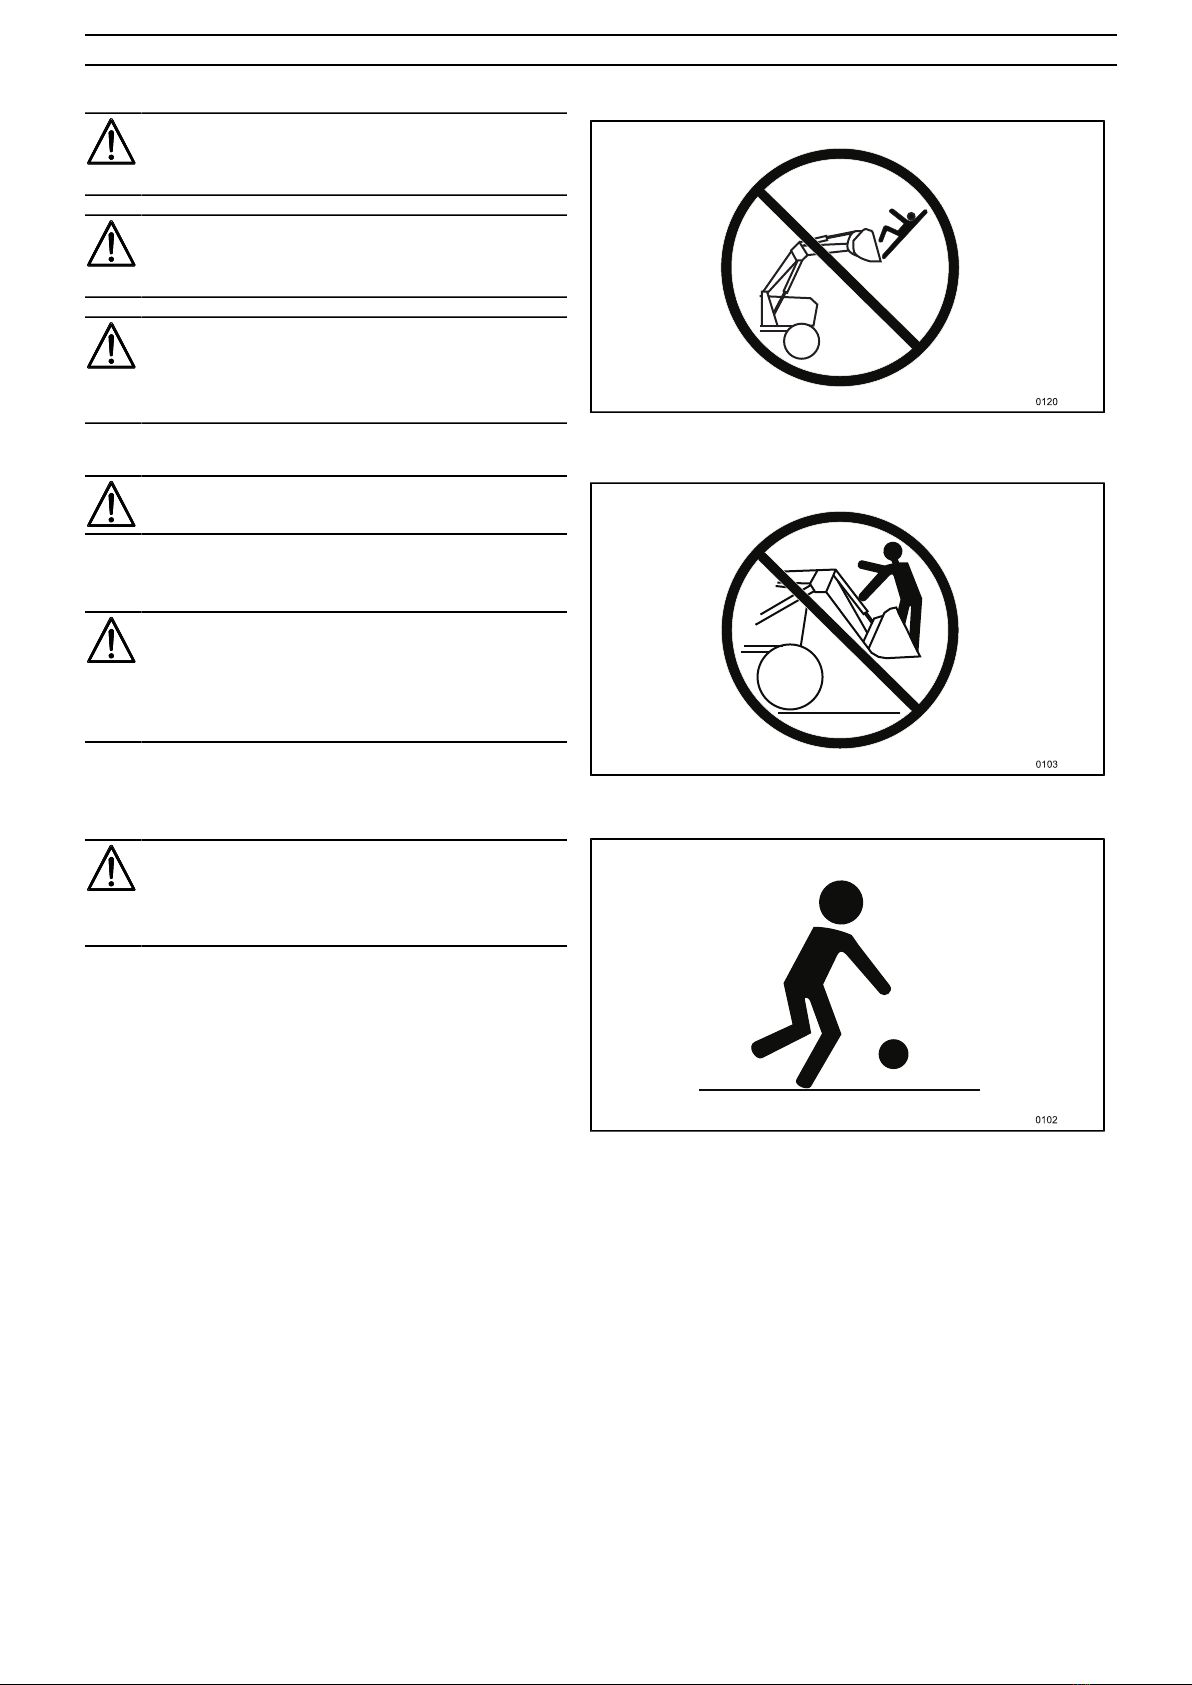
2.1.1. Warning decals........................................................6
2.2. Explanation of warning levels.....................................7
2.2.1. Explanation of symbols..........................................7
2.3. Supervision and users..................................................7
2.3.1. Responsibility......................................................... 7
3. DESCRIPTION....................................... 10
3.1. Definitions................................................................. 10
3.1.1. 3rd service.............................................................10
3.1.2. ErgoDrive / ErgoDrive LCS................................. 10
3.1.3. ElectroDrive CDC / ElectroDrive LCS / EasyDrive
LCS................................................................................. 11
3.1.4. Hose kit.................................................................11
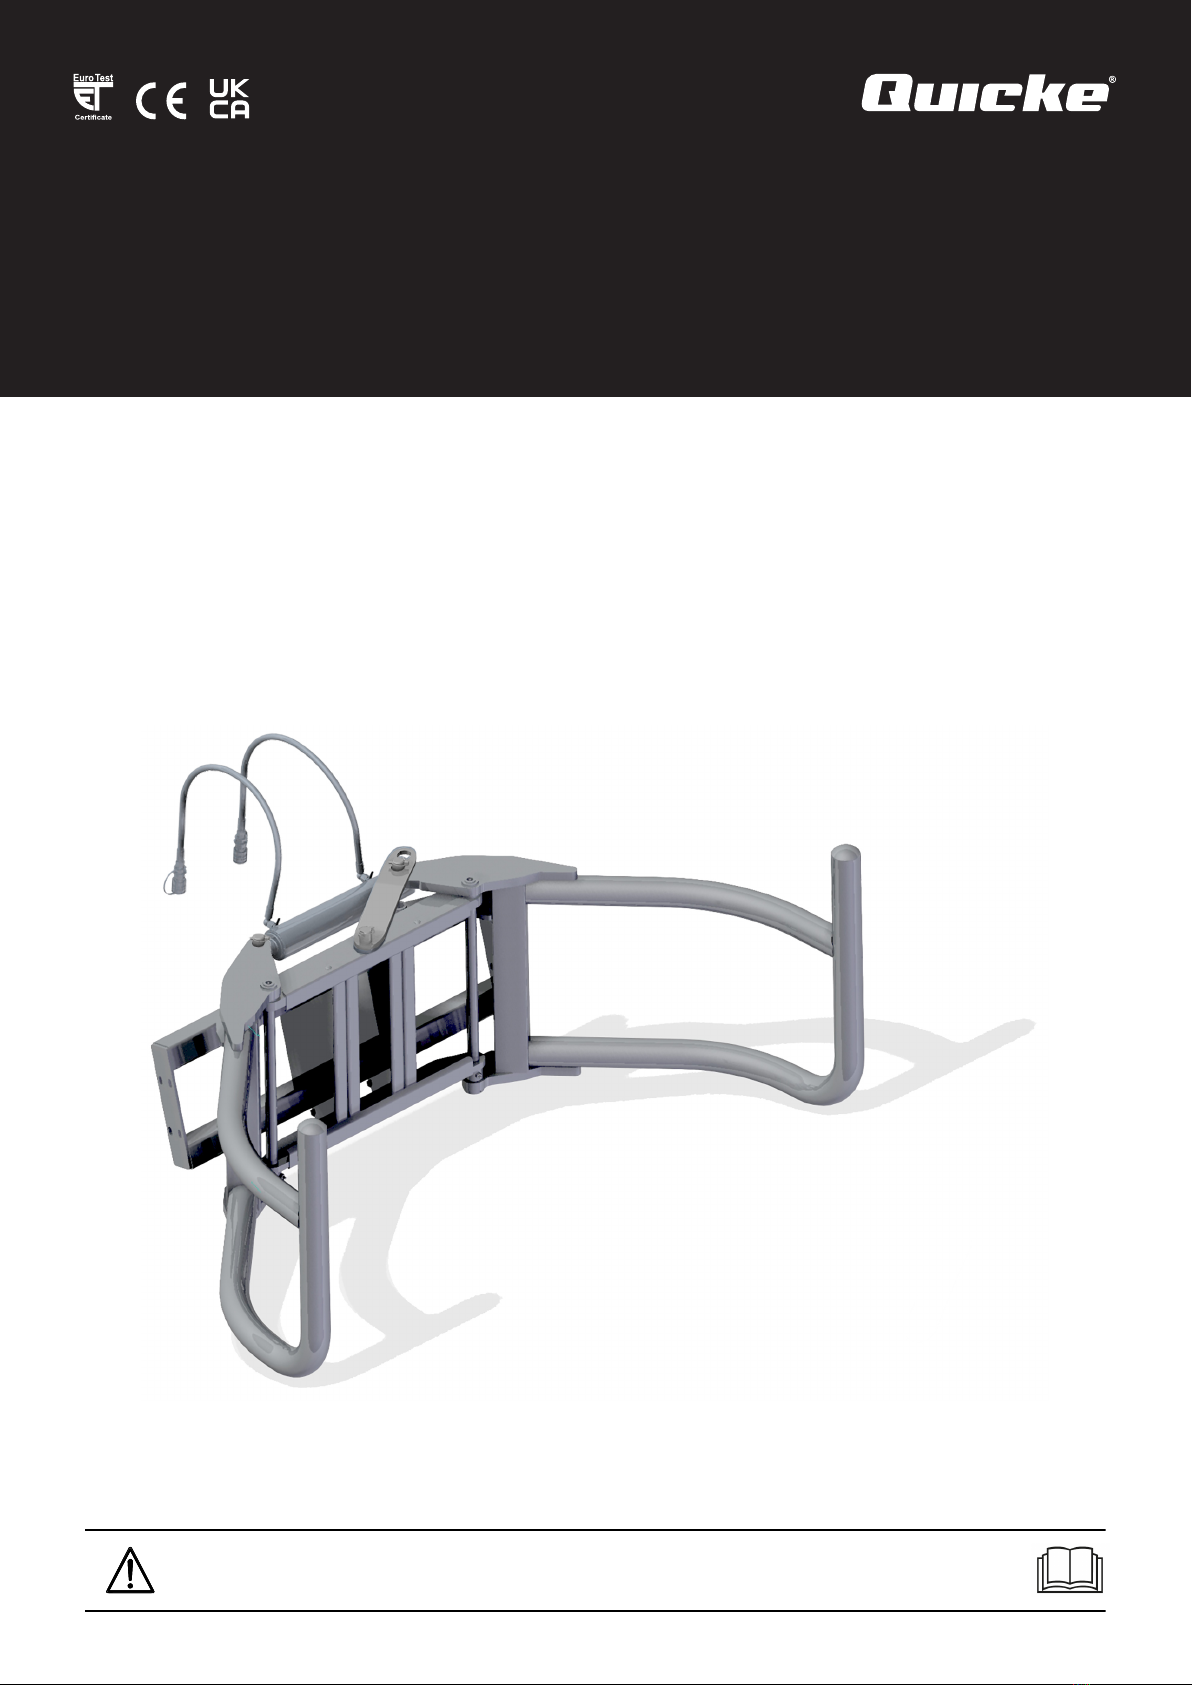
3.2. Tool carrier................................................................ 11
4. DRIVING INSTRUCTIONS.....................12
4.0.1. Designated use......................................................12
4.0.2. Fitting....................................................................12
4.1. Before operating the implement................................14
4.1.1. Dump/Roll back the implement............................15
4.1.2. Open/close the implement - EasyDrive LCS and
ElectroDrive LCS........................................................... 15
4.1.3. Open/close the implement - ErgoDrive LCS/
ErgoDrive........................................................................15
4.1.4. Opening/closing the implement - ElectroDrive
CDC................................................................................ 15
4.1.5. Open/close the implement - Hose kit................... 15
4.1.6. Operating instructions...........................................16
4.1.7. Parking the implement..........................................16
5. LUBRICATION AND
MAINTENANCE......................................... 17
5.1. Lubrication points..................................................... 17
5.2. Storage.......................................................................17
5.3. Hoses and cylinders.................................................. 18
5.3.1. Checking the hydraulic connections.....................18
5.3.2. Repairing the hydraulic cylinders.........................18
6. DATA...................................................... 19
6.1. Table of recommendations........................................ 19
7. WARRANTY CONDITIONS................... 21
EU Declaration of Conformity........................................21
UK DECLARATION OF CONFORMITY ..................22
INNEHÅLLSFÖRTECKNING
8. FÖRORD................................................ 23
8.1. Allmän information................................................... 23
9. SÄKERHETSINSTRUKTIONER............ 24
9.1. Allmän information................................................... 24
9.1.1. Varningsdekaler.....................................................24
9.2. Förklaring av varningsnivåer.................................... 25
9.2.1. Symbolförklaring..................................................25
9.3. Arbetsledning och brukare........................................ 25
9.3.1. Ansvar...................................................................25
10. BESKRIVNING.....................................28
10.1. Definitioner..............................................................28
10.1.1. 3:e funktion.........................................................28
10.1.2. ErgoDrive / ErgoDrive LCS............................... 28
10.1.3. ElectroDrive CDC / ElectroDrive LCS /
EasyDrive LCS...............................................................29
10.1.4. Slangsats............................................................. 29
10.2. Redskapsfästen........................................................ 29
11. KÖRINSTRUKTIONER........................ 30
11.0.1. Avsedd användning.............................................30
11.0.2. Montering............................................................30
11.1. Att göra innan användning av redskapet................. 32
11.1.1. Tömma/bryta upp redskap..................................33
11.1.2. Öppna/stänga redskapet - EasyDrive LCS och
ElectroDrive LCS........................................................... 33
11.1.3. Öppna/stänga redskapet - ErgoDrive LCS/
ErgoDrive........................................................................33
11.1.4. Öppna/stänga redskapet - ElectroDrive
CDC................................................................................ 33
11.1.5. Öppna/stänga redskapet - Slangsats....................33
11.1.6. Körinstruktion..................................................... 34
11.1.7. Vid avställning.................................................... 34
12. SMÖRJNING OCH UNDERHÅLL........35
12.1. Smörjpunkter........................................................... 35
12.2. Förvaring................................................................. 35
12.3. Slangar och cylindrar.............................................. 36
12.3.1. Kontroll av hydraulanslutningar.........................36
12.3.2. Reparation av hydraulcylindrar.......................... 36
13. DATA.................................................... 37
13.1. Rekommendationstabell.......................................... 37
14. GARANTIBESTÄMMELSER............... 38
EG-försäkran om överensstämmelse...............................38
UK DECLARATION OF CONFORMITY ..................39
INHALT
15. VORWORT........................................... 40
15.1. Allgemeine Informationen...................................... 40
16. SICHERHEITSANWEISUNGEN.......... 41
16.1. Allgemeine Informationen...................................... 41
16.1.1. Warnschilder....................................................... 41
16.2. Erklärung der Warnstufen....................................... 42
16.2.1. Symbolerklärung.................................................42
16.3. Arbeitsleitung und Bediener....................................43
16.3.1. Verantwortung.....................................................43
17. BESCHREIBUNG.................................46
17.1. Definitionen.............................................................46
17.1.1. 3. Funktion..........................................................46
17.1.2. ErgoDrive / ErgoDrive LCS............................... 46
17.1.3. ElectroDrive CDC / ElectroDrive LCS /
EasyDrive LCS...............................................................47
17.1.4. Schlauch-satz...................................................... 47
17.2. Gerätehalterungen....................................................47
18. FAHRANWEISUNGEN.........................48

203076
2
18.0.1. Verwendungszweck.............................................48
18.0.2. Montage.............................................................. 48
18.1. Inbetriebnahme des Geräts......................................50
18.1.1. Gerät ankippen / abkippen..................................51
18.1.2. Gerät öffnen/schließen - EasyDrive LCS und
ElectroDrive LCS........................................................... 51
18.1.3. Gerät öffnen/schließen - ErgoDrive LCS/
ErgoDrive........................................................................51
18.1.4. Gerät öffnen/schließen - ElectroDrive CDC.......51
18.1.5. Gerät öffnen/schließen - Schlauchsatz................52
18.1.6. Fahranweisung....................................................52
18.1.7. Abstellung...........................................................52
19. SCHMIERUNG UND WARTUNG.........53
19.1. Schmierpunkte.........................................................53
19.2. Aufbewahrung......................................................... 53
19.3. Schläuche und Zylinder...........................................54
19.3.1. Überprüfung von Hydraulikanschlüssen............ 54
19.3.2. Reparatur von Hydraulikzylindern..................... 54
20. TECHNISCHE DATEN......................... 55
20.1. Tabelle mit Empfehlungen...................................... 55
21. GARANTIEBEDINGUNGEN................ 56
EU-Konformitätserklärung..............................................56
UK DECLARATION OF CONFORMITY ..................57
SOMMAIRE
22. PRÉFACE.............................................58
22.1. Autres informations.................................................58
23. CONSIGNES DE SÉCURITÉ...............59
23.1. Autres informations.................................................59
23.1.1. Autocollants de mise en garde............................59
23.2. Explication des niveaux de mise en garde.............. 60
23.2.1. Explication des symboles................................... 60
23.3. Encadrement et utilisateurs..................................... 60
23.3.1. Responsabilité.....................................................60
24. DESCRIPTION..................................... 64
24.1. Définitions............................................................... 64
24.1.1. 3ème fonction hydraulique.................................64
24.1.2. ErgoDrive / ErgoDrive LCS............................... 64
24.1.3. ElectroDrive CDC / ElectroDrive LCS /
EasyDrive LCS...............................................................65
24.1.4. Jeu de flexibles................................................... 65
24.2. Porte-outil................................................................ 65
25. INSTRUCTIONS DE CONDUITE.........66
25.0.1. Utilisation prévue............................................... 66
25.0.2. Montage.............................................................. 66
25.1. Avant la mise en service de l’outil..........................68
25.1.1. Fonction bennage/cavage....................................69
25.1.2. Pour ouvrir/fermer l'outil - EasyDrive LCS et
ElectroDrive LCS........................................................... 69
25.1.3. Ouvrir/fermer l'outil - ErgoDrive LCS/
ErgoDrive........................................................................69
25.1.4. Pour ouvrir/fermer l'outil - ElectroDrive
CDC................................................................................ 69
25.1.5. Pour ouvrir/fermer l'outil - Jeu de flexibles........ 70
25.1.6. Utilisation............................................................70
25.1.7. Stationnement de l'outil...................................... 70
26. LUBRIFICATION ET ENTRETIEN....... 71
26.1. Points de graissage..................................................71
26.2. Rangement...............................................................71
26.3. Flexibles et vérins................................................... 72
26.3.1. Contrôle des raccords hydrauliques....................72
26.3.2. Réparation des vérins hydrauliques....................72
27. CARACTÉRISTIQUES
TECHNIQUES............................................ 73
27.1. Tableau de recommandations..................................73
28. CONDITIONS DE GARANTIE............. 75
Attestation de conformité UE......................................... 75
UK DECLARATION OF CONFORMITY ..................76
ÍNDICE
29. INTRODUCCIÓN..................................77
29.1. Información general................................................ 77
30. INSTRUCCIONES DE
SEGURIDAD.............................................. 78
30.1. Información general................................................ 78
30.1.1. Pegatinas de advertencia.....................................78
30.2. Explicación de los niveles de advertencia...............79
30.2.1. Explicación de símbolos.....................................79
30.3. Supervisión y usuarios............................................ 79
30.3.1. Responsabilidad..................................................79
31. DESCRIPCIÓN.....................................83
31.1. Definiciones.............................................................83
31.1.1. 3ª función............................................................83
31.1.2. ErgoDrive / ErgoDrive LCS............................... 83
31.1.3. ElectroDrive CDC / ElectroDrive LCS /
EasyDrive LCS...............................................................84
31.1.4. Juego de mangueras............................................84
31.2. Fijaciones de implemento........................................84
32. INSTRUCCIONES DE
OPERACIÓN.............................................. 85
32.0.1. Usos específicos................................................. 85
32.0.2. Montaje............................................................... 85
32.1. Efectuar antes de utilizar el implemento.................87
32.1.1. Vaciado/inclinación hacia arriba del
implemento..................................................................... 88
32.1.2. Abrir/cerrar el implemento - EasyDrive LCS y
ElectroDrive LCS........................................................... 88
32.1.3. Abrir/cerrar el implemento - ErgoDrive LCS/
ErgoDrive........................................................................88
32.1.4. Abrir/cerrar el implemento - ElectroDrive
CDC................................................................................ 88
32.1.5. Abrir/cerrar el implemento - Juego de
mangueras....................................................................... 89
32.1.6. Instrucciones de operación................................. 89
32.1.7. Para desacoplarlo................................................89
33. LUBRICACIÓN Y
MANTENIMIENTO......................................90
33.1. Puntos de lubricación..............................................90
33.2. Almacenamiento......................................................90
33.3. Mangueras y cilindros.............................................91

203076
3
33.3.1. Control de las conexiones hidráulicas................ 91
33.3.2. Reparación de los cilindros hidráulicos..............91
34. DATOS..................................................92
34.1. Tabla de recomendaciones...................................... 92
35. CONDICIONES DE GARANTÍA.......... 93
Declaración de conformidad CE.....................................93
UK DECLARATION OF CONFORMITY ..................94
SPIS TREŚCI
36. WSTĘP................................................. 95
36.1. Informacje ogólne....................................................95
37. INSTRUKCJA
BEZPIECZEŃSTWA...................................96
37.1. Informacje ogólne....................................................96
37.1.1. Naklejki ostrzegawcze........................................96
37.2. Objaśnienie poziomów ostrzeżeń............................97
37.2.1. Objaśnienie symboli........................................... 97
37.3. Dotyczy kierownictwa i użytkowników..................98
37.3.1. Odpowiedzialność...............................................98
38. OPIS................................................... 101
38.1. Definicje................................................................ 101
38.1.1. Funkcja nr 3......................................................101
38.1.2. ErgoDrive / ErgoDrive LCS............................. 101
38.1.3. ElectroDrive CDC / ElectroDrive LCS /
EasyDrive LCS.............................................................102
38.1.4. Zestaw przewodów giętkich.............................102
38.2. Mocowania osprzętu..............................................102
39. INSTRUKCJA UŻYTKOWANIA.........103
39.0.1. Przewidziane zastosowania...............................103
39.0.2. Montaż.............................................................. 103
39.1. Czynności do wykonania przed rozpoczęciem
użytkowania osprzętu.....................................................105
39.1.1. Opróżnianie/podnoszenie osprzętu...................106
39.1.2. Otwieranie/zamykanie osprzętu – EasyDrive LCS
i ElectroDrive LCS.......................................................106
39.1.3. Otwieranie/zamykanie osprzętu - ErgoDrive LCS/
ErgoDrive......................................................................106
39.1.4. Otwieranie/zamykanie osprzętu – ElectroDrive
CDC.............................................................................. 106
39.1.5. Otwieranie/zamykanie osprzętu - Zespół
przewodów giętkich......................................................107
39.1.6. Instrukcja użytkowania.....................................107
39.1.7. Przy odstawianiu...............................................107
40. SMAROWANIE I KONSERWACJA... 108
40.1. Punkty smarowania............................................... 108
40.2. Przechowywanie....................................................108
40.3. Przewody giętkie i siłowniki.................................109
40.3.1. Kontrola połączeń hydraulicznych................... 109
40.3.2. Naprawa siłowników hydraulicznych...............109
41. DANE..................................................110
41.1. Tabela zaleceń....................................................... 110
42. POSTANOWIENIA
GWARANCYJNE..................................... 111
Deklaracja zgodności WE.............................................111
UK DECLARATION OF CONFORMITY ................112
INDHOLDSFORTEGNELSE
43. FORORD............................................ 113
43.1. Generel information.............................................. 113
44. SIKKERHEDSVEJLEDNING............. 114
44.1. Generel information.............................................. 114
44.1.1. Advarselsmærkater........................................... 114
44.2. Forklaring af advarselsniveauer............................ 115
44.2.1. Symbolforklaring.............................................. 115
44.3. Arbejdsledelse og brugere.....................................115
44.3.1. Ansvar...............................................................115
45. BESKRIVELSE...................................118
45.1. Definitioner............................................................118
45.1.1. 3. funktion.........................................................118
45.1.2. ErgoDrive / ErgoDrive LCS............................. 118
45.1.3. ElectroDrive CDC / ElectroDrive LCS /
EasyDrive LCS.............................................................119
45.1.4. Slangesæt.......................................................... 119
45.2. Redskabsbeslag......................................................119
46. ANVENDELSESVEJLEDNING..........120
46.0.1. Korrekt brug..................................................... 120
46.0.2. Montering..........................................................120
46.1. Ting, der skal gøres, inden redskabet anvendes.....122
46.1.1. Tømning/opadvipning af redskab.....................123
46.1.2. Åbne/lukke redskabet - EasyDrive LCS og
ElectroDrive LCS......................................................... 123
46.1.3. Åbne/lukke redskabet - ErgoDrive LCS/
ErgoDrive......................................................................123
46.1.4. Åbne/lukke redskabet - ElectroDrive CDC...... 123
46.1.5. Åbning/lukning af redskabet - slangesæt..........123
46.1.6. Anvendelsesvejledning..................................... 124
46.1.7. Ved afsætning................................................... 124
47. SMØRING OG
VEDLIGEHOLDELSE...............................125
47.1. Smøresteder........................................................... 125
47.2. Opbevaring............................................................ 125
47.3. Slanger og cylindre............................................... 126
47.3.1. Kontrol af hydrauliktilslutninger......................126
47.3.2. Reparation af hydraulikcylindre....................... 126
48. DATA.................................................. 127
48.1. Tabel over anbefalinger.........................................127
49. GARANTIBESTEMMELSER............. 128
EF-overensstemmelseserklæring...................................128
UK DECLARATION OF CONFORMITY ................129
SISÄLLYSLUETTELO
50. JOHDANTO........................................130
50.1. Yleistä....................................................................130
51. TURVALLISUUSOHJEET..................131
51.1. Yleistä....................................................................131
51.1.1. Varoitustarrat.....................................................131
51.2. Varoitustasojen selitys........................................... 132

203076
4
51.2.1. Symbolien selostus........................................... 132
51.3. Työnjohto ja käyttäjät............................................132
51.3.1. Vastuu................................................................132
52. KUVAUS.............................................135
52.1. Määritelmät............................................................135
52.1.1. 3. toiminto.........................................................135
52.1.2. ErgoDrive / ErgoDrive LCS............................. 135
52.1.3. ElectroDrive CDC / ElectroDrive LCS /
EasyDrive LCS.............................................................136
52.1.4. Letkusarja..........................................................136
52.2. Työvälinelevyt....................................................... 136
53. KÄYTTÖOHJEET...............................137
53.0.1. Tarkoitettu käyttö..............................................137
53.0.2. Asennus.............................................................137
53.1. Valmistelut ennen työlaitteen käyttöä....................139
53.1.1. Varusteen tyhjennys/avaus................................140
53.1.2. Avaa/sulje työväline - EasyDrive LCS ja
ElectroDrive LCS......................................................... 140
53.1.3. Avaa/sulje työväline - ErgoDrive LCS/
ErgoDrive......................................................................140
53.1.4. Työvälineen avaaminen/sulkeminen -
ElectroDrive CDC........................................................ 140
53.1.5. Työvälineen avaaminen/sulkeminen -
Letkusarja......................................................................141
53.1.6. Käyttöohje.........................................................141
53.1.7. Irrottaminen.......................................................141
54. VOITELU JA HUOLTO.......................142
54.1. Voitelukohdat.........................................................142
54.2. Säilytys.................................................................. 142
54.3. Letkut ja sylinterit................................................. 143
54.3.1. Hydrauliliitäntöjen tarkastus.............................143
54.3.2. Hydraulisylinterien korjaus.............................. 143
55. TIEDOT...............................................144
55.1. Suositustaulukko....................................................144
56. TAKUUMÄÄRÄYKSET...................... 145
EY-vaatimustenmukaisuusvakuutus..............................145
UK DECLARATION OF CONFORMITY ................146
INNHOLDSFORTEGNELSE
57. FORORD............................................ 147
57.1. Generell informasjon.............................................147
58. SIKKERHETSINSTRUKSJONER......148
58.1. Generell informasjon.............................................148
58.1.1. Varselskilt..........................................................148
58.2. Forklaring av farenivåer........................................149
58.2.1. Symbolforklaring.............................................. 149
58.3. Arbeidsledelse og brukere.....................................149
58.3.1. Ansvar...............................................................149
59. BESKRIVELSE...................................152
59.1. Definisjoner........................................................... 152
59.1.1. 3. funksjon........................................................ 152
59.1.2. ErgoDrive / ErgoDrive LCS............................. 152
59.1.3. ElectroDrive CDC / ElectroDrive LCS /
EasyDrive LCS.............................................................153
59.1.4. Slangesett.......................................................... 153
59.2. Redskapsfester.......................................................153
60. KJØREINSTRUKSJONER.................154
60.0.1. Tiltenkt bruk..................................................... 154
60.0.2. Montering..........................................................154
60.1. Klargjøring av redskap for bruk............................156
60.1.1. Tømme/bryte opp redskap................................157
60.1.2. Åpne/stenge redskapet – EasyDrive LCS og
ElectroDrive LCS......................................................... 157
60.1.3. Åpne/stenge redskapet - ErgoDrive LCS/
ErgoDrive......................................................................157
60.1.4. Åpne/stenge redskapet – ElectroDrive CDC.... 157
60.1.5. Åpne/stenge redskapet – Slangesett..................157
60.1.6. Kjøreinstruksjon................................................158
60.1.7. Ved utkobling....................................................158
61. SMØRING OG VEDLIKEHOLD......... 159
61.1. Smørepunkter.........................................................159
61.2. Oppbevaring.......................................................... 159
61.3. Slanger og sylindere..............................................160
61.3.1. Kontroll av hydraulikktilkoblinger...................160
61.3.2. Reparasjon av hydraulikksylindere...................160
62. DATA.................................................. 161
62.1. Anbefalingstabell...................................................161
63. GARANTIBESTEMMELSER............. 162
EU-deklarasjon om overensstemmelse......................... 162
UK DECLARATION OF CONFORMITY ................163

Preface
5
1. PREFACE
1.1. General information
Warning!
Careless or incorrect use may result in serious
injury or fatality for the driver or others.
Observe the safety instructions.
This instruction manual describes the operation and
maintenance of the implement. The information in the
instruction manual was correct when this manual went to
press. Please visit your dealer if there is anything you do
not understand in the manual.
A user manual is supplied with each implement to show the
operator how to handle and maintain the implement. Read
and use the information so that you can use the implement
in a safe manner, in combination with short stoppages. This
implement has a design that makes it simple to service,
allowing maintenance using regular hand tools.
Read and study the text in the instruction manual
thoroughly before you start to use the implement. If you
are not an experienced driver, study the instruction manual
and ask an experienced driver to explain things to you.
Your dealer can help you by teaching you about operation
and suitable work methods. Keep this instruction manual
readily available, preferably inside the tractor. Get a new
instruction manual if the old one is damaged or gets lost.
Read the instruction manual for the loader too; it contains
important information for your safety.
Caution!
Read through the entire instruction manual
before you start to use the product.
We reserve the right to introduce changes to design and
specification, or improvements at any time, without prior
notice or commitment.
Fill in the information from the implement's type plate and
always state this when contacting your dealer.
Fig.1 Read through the entire user manual before you start to
use the product.
Product information
Product
Type
Ref. No.
Serial No.
Date
Weight
Manufacturer
Reseller
information
Fig.2 Product information
The sign specifies:
Product, type, reference, serial number and weight.
Always provide: Product (A), Type (B) and serial number
(C) for service issues or spare parts needs.
Umeå Sweden
Made in Xxxxxxx
Ålö AB
XXXXXXXXXXXXXXXXXXXXXXXXXXXXXX
XXXXXXX kg
XXXXXXXXXX
XXXXXXXXX
Weight
Type
Serial No. / Year
Product
Ref.No.
Made by
Kit No.
XXXXXXXXX
XXXX
B
C
A
Fig.3 Machine sign.

Safety instructions
6
2. SAFETY INSTRUCTIONS
2.1. General information
Driver safety is one of the most important matters when
a new implement is designed. The designer builds in as
many safety functions as possible. Several accidents occur
every year which could have been avoided by taking a
few seconds of consideration, and through more careful
operation of the implement.
Avoid personal injury. Read the following personal safety
instructions and insist that everybody who works with you,
or for you, also complies with the instructions.
2.1.1. Warning decals
Warning decals are fitted in different locations on the
attachment. Locate, read and find out what the decals mean
before loader and implement are used.
• Do not cover or remove any of the warning decals. If a
warning decal is missing or illegible, replace it with a
new decal. New warning decals are available from your
dealer.
11136514
11136514
1123674 1123673
11137116
Umeå Sweden
Made in Xxxxxxx
Ålö AB
XXXXXXXXXXXXXXXXXXXX
XXXXXXX kg
XXXX-XX-XX
XXXXXXXXXXXXXXXXX
Weight
Certificate
EuroTest
Type
Serial No.
Product
Ref.No.
Date
Made by
XXXXXXXXXX/XXXXXXX
MAX 200 bar
60018712
60018712
Fig.4 Location of warning decals and machine plate.

Safety instructions
7
2.2. Explanation of warning levels
When you see the safety symbol and the signal words on
decals or in the instruction manual, the instructions MUST
be followed since they are related to your own personal
safety.
Fig.5 Locate, read and find out what the decals mean before
the loader and implement are used.
2.2.1. Explanation of symbols
Safety symbol. Information adjacent to this symbol refers to
your personal safety and must be observed.
Danger!
Means an immediately dangerous situation
which, if not avoided, will lead to death or serious
personal injury. (North America only)
Warning!
Means that an accident could occur if the
instruction is not followed. The accident might
lead to serious personal injury or death.
Caution!
Means that an accident could occur if the
instruction is not followed. An accident could
lead to personal injury.
The following texts and instructions do not refer to personal
safety, but are used consistently in the instruction manual,
to provide tips about operation or service of the implement.
Important! Means that an accident could occur if the
instruction is not followed. The accident might lead to
damage to the property or to the process, or personal injury.
Note. Refers to extra information which could facilitate the
understanding or implementation of a certain task.
Fig.6 Safety symbol.
2.3. Supervision and users
2.3.1. Responsibility
Caution!
Always store this instruction manual as well
as the tractor's own instruction manual in the
tractor.
• If there is no instruction manual included with the
tractor then obtain one from the reseller before fitting
and using the loader and the attachment.
• Read through all material carefully and learn how to
use the equipment in a safe and correct manner.

Safety instructions
8
Warning!
Do NOT use the loader or the attachment as a
working platform.
Warning!
Only use the attachment for the intended
application area.
Warning!
Do not grip objects that extend the centre of
gravity to a significant extent. This can lead to
instability.
Fig.7 Do NOT use the loader or the attachment as a working
platform.
Warning!
Do NOT use the loader to lift or transport people.
• Only qualified individuals are permitted to operate the
machine.
Warning!
Always check the machine's surroundings and
ensure that all individuals, especially children
and animals have moved away before starting or
driving the machine.
You may not hear any shouting to attract your attention
from individuals on the outside when you are sitting in the
cab with the door closed.
Danger!
To prevent serious injury or death from crushing:
Keep all individuals and objects clear while any
part of this machine is in motion.
Fig.8 Do NOT use the loader or attachment to lift or transport
people.
Fig.9 Before starting, make sure that no individuals are in the
vicinity of the machine.

Safety instructions
9
Familiarise yourself with the working area and terrain. Pay
attention to vertical clearance and limitations that arise due
to the increased reach.
Fig.10 Familiarise yourself with the working area before
starting. Maintain a safe distance from electrical cables and
other obstructions.
Warning!
Always look at the implement. Objects can fall or
roll backwards onto the driver when the loader is
raised. Only lift loads that are designed for each
specific implement.
Warning!
Always look at the implement. Objects can fall
out during transport. Only transport loads that
are designed for each specific implement.
Fig.11 Always look at the implement. Objects can fall or roll
backwards onto the driver when the loader is raised.
Warning!
Never stand between the front of the tractor and
the loader's cross tubes.
Warning!
Risk of crushing and jamming
The loader may fall downwards.
Lower the loader/implement to the ground prior
to lubrication.
Warning!
When installing the hoses, check that these
are long enough and that they do not get stuck
between the tool carrier, the loader beam or the
links. If necessary, adjust the couplings.
Fig.12 Never stand between the front of the tractor and the
loader's cross tubes.
Warning!
Pressurised oil.
Hydraulic oil at high pressure can be injected
into the body in the event of leakage and cause
serious injury, blindness or fatality. Leakage may
be invisible.
Use approved protective safety glasses and
protect the skin using strong leather gloves for
example. Use cardboard or wood for leakage
detection. If fluid has entered the skin then it
MUST be removed within a couple of hours by a
doctor who can treat this type of injury.
Fig.13 NEVER use fingers or hands for leakage detection.

Description
10
3. DESCRIPTION
3.1. Definitions
Following part is describing different accessories, that can
be used together with the loader.
3.1.1. 3rd service
Optional hydraulic function for operating the implement's
hydraulics.
3.1.2. ErgoDrive / ErgoDrive LCS
The ErgoDrive system is composed of a control valve and
mechanical joystick as well as hydraulic connections and
control cables for specified tractor models.
12V(+)
(-)
Fig.14 ErgoDrive

Description
11
3.1.3. ElectroDrive CDC / ElectroDrive
LCS / EasyDrive LCS
Installation kit as above but with an electrically operated
valve and electronic joystick.
Fig.15 ElectroDrive
3.1.4. Hose kit
Hoses and hydraulic components for connecting the loader
to the tractor's original valve.
Fig.16 Hose kit
3.2. Tool carrier
The implement can be equipped with various types of
implement hook, depending on the loader’s/base machine’s
attachment. There are various attachment systems for
the hooks, e.g. welded or various bolted systems. For
information about which implement hooks are available,
contact Ålö AB. Take care to ensure that the implement
hook is compatible with the loader’s/base machine’s
attachment system. Never improvise or adapt!
Ensure that the implement is locked correctly according
to the loader’s/base machine’s and the implement carrier’s
current instructions prior to use.
385Nm / 283ft/lbs
Fig.17 The implement can be equipped with various types of
implement hook.

Driving instructions
12
4. DRIVING INSTRUCTIONS
4.0.1. Designated use
The attachment is equipped with two grip arms that are
used to carry the material. Transport the material as low as
possible. The main application area is the handling of:
Lower the loader as far as possible when moving. Keep
in mind that the higher you lift the loader, the higher the
centre of gravity, resulting in increased risk of the tractor
overturning.
4.0.2. Fitting
The attachment is supplied partly fitted.
The cylinder is supplied in the accompanying accessories
box. Attachments and hoses between the implement and
operating machine are supplied in separate kits. The
cylinder (1) is fitted with the oil connections backwards.
The pins (2) are locked with screws (3) as shown. The
cylinder bearings are lubricated prior to fitting the pins.
The right or left grip arm movement can be limited using
the strut (1). The strut is fitted between the frame and the
pin. With the strut fitted, the bales can be stacked closer
together. When handling bales of 120cm diameter, two
further holes in the strut should be used (applicable to
Flexigrip 160).
Back Stop
Som en extra säkerhetsåtgärd kan man montera en s.k.
Back Stop. Denna hindrar balar från att rulla bakåt över
traktorföraren. Den finns att beställa som tillbehör.
Fig.18 Fitting the hose kit.
1
1
2
2
2
3
4
3
3
Fig.19 Fitting the cylinder and the restriction brace.
Fig.20 Fitting the BackStop

Driving instructions
13
Hose kit
Connect the hose to the cylinder.
The hose connected to the cylinder's (+) is marked in red.
The hose connected to the cylinder's (-) is marked in blue.
The loader should be equipped with a double-acting oil
return on the implement attachment.
Warning!
When installing the hoses, check that these
are long enough and that they do not get stuck
between the tool carrier, the loader beam or the
links. If necessary, adjust the couplings.
The Attachment set is order separately from your dealer. Fit
the attachment set as shown in supplied instruction.
BLUE(-)
RED(+)
Euro Qfit
Fig.21 Example of fitting the attachment.

Driving instructions
14
4.1. Before operating the implement
Check with caution that:
1. The hose connected to the cylinder's (+) side has red
marking, and the implement moves in accordance with
the open/close description.
2. There is no leakage of hydraulic oil.
3. The implement is correctly fitted and that the pins are
in the locked position. Press the tip of the implement
against the ground (1) to check that the implement is
firmly fixed (2).
1
2
Fig.22 Check that the implement is secured by pressing its front
end against the ground.
4. There is no risk of collision between loader and
attachment (see illustration).
5. Lubricate the implement sufficiently 5. Lubrication and
maintenance.
See also the chapter "Connection and disconnection of the
implement" in the loader operating manual.
Fig.23 Check carefully that there is no risk of collision between
loader and implement.
Warning!
Do NOT stand, walk or work under a lifted
loader. Make sure that you keep individuals,
especially children and animals, away from the
working area.
Fig.24 Do NOT stand, walk or work under a lifted loader.

Driving instructions
15
4.1.1. Dump/Roll back the implement
Right-hand fitting: Move the lever to the left (4) to roll back
the implement.
Move the lever to the right (5) to dump the implement.
Note. With left-hand mounting, the movements will be
reversed. (This does not apply to EasyDrive LCS and
ElectroDrive LCS which only have right-hand mounting.)
5
5
44
0303
Fig.25 Dump/Roll back the implement
4.1.2. Open/close the implement -
EasyDrive LCS and ElectroDrive LCS
To open and close the implement, use the third hydraulic
function which is controlled by switch F2.
When the lever is moved to the right (5) the implement is
opened, and when moved to the left (4) the implement is
closed (right-hand fitting).
Note. When the switch for the third hydraulic service is
released then the control immediately returns to the dump/
roll back function.
0407
F2
5 4 54
Fig.26 Open/close the implement - EasyDrive LCS and
ElectroDrive LCS
4.1.3. Open/close the implement -
ErgoDrive LCS/ErgoDrive
To open and close the implement, use the third hydraulic
function which is controlled with a switch (A) on the front
of the joystick control.
When the lever is moved to the right (5) the implement is
opened, and when moved to the left (4) the implement is
closed (right-hand fitting).
The movements are reversed for left-hand fitting.
Note. When the switch for the third hydraulic service is
released then the control immediately returns to the dump/
roll back function.
A
0304
5 4 54
Fig.27 Open/close the implement - ErgoDrive LCS/ErgoDrive
4.1.4. Opening/closing the implement -
ElectroDrive CDC
To open and close the implement, use the third hydraulic
service which is controlled by switch P2.
When the lever is moved to the right (5) the implement is
opened, and when moved to the left (4) the implement is
closed (right-hand fitting).
The movements are reversed for left-hand fitting.
When the switch for the third hydraulic service is released
then the control immediately returns to the dump/roll back
function.
0305
P2
5 4 54
Fig.28 Opening/closing the implement - ElectroDrive CDC
4.1.5. Open/close the implement - Hose
kit
Hose kit - tractor Joystick, see the instruction manual for
the tractor.

Driving instructions
16
4.1.6. Operating instructions
To avoid damage to the plastic, the upper section of the grip
arm should be placed at the same level as the upper edge
of the bale. Transport the bale horizontally - crowd it to
vertical once at the loading/storage location.
Note. The bale should be turned at the lowest possible
height as. For longer transportation distances, the grip can
reduce, due to inner oil leakage in the loader's control valve,
so that in the worst case scenario, the bale can be dropped.
If this could be an issue, the implement can be equipped
with a load holding valve (extra equipment).
Warning!
For longer transportation distances, the grip can
reduce, due to inner oil leakage in the loader's
control valve, so that in the worst case scenario,
the bale can be dropped.
To prevent "lost bales" caused by inner oil leakage, you can
stop and increase the grip on the bale at regular intervals or
the implement can be fitted with a load holding valve (extra
equipment).
Fig.29 Transport the bale horizontally and at a low height (1) -
crowd it to vertical once at the loading/storage location (2).
4.1.7. Parking the implement
Do not disconnect the cylinder from the implement at any
of the end positions - difficulties may arise due to over-
pressure, when the quick connections are to be connected.
See also the chapter "Connection and disconnection of the
implement" in the loader operating manual.

Lubrication and maintenance
17
5. LUBRICATION AND MAINTENANCE
Warning!
Never stand between the front of the tractor and
the loader's cross tubes.
Fig.30 Never stand between the front of the tractor and the
loader's cross tubes.
5.1. Lubrication points
All bearings are equipped with bushings, which normally
only require lubrication once per month.
Warning!
Risk of crushing and jamming
The loader may fall downwards.
Lower the implement to the ground and close the
attachment before starting to lubricate.
Fig.31 Lubrication points.
5.2. Storage
Apply a thin layer of grease on visible piston rods in order
to protect them.

Lubrication and maintenance
18
5.3. Hoses and cylinders
Read this before checking the hydraulic system for leakage:
Warning!
Pressurised oil.
Hydraulic oil at high pressure can be injected
into the body in the event of leakage and cause
serious injury, blindness or fatality. Leakage may
be invisible.
Use approved protective safety glasses and
protect the skin using strong leather gloves for
example. Use cardboard or wood for leakage
detection. If fluid has entered the skin then it
MUST be removed within a couple of hours by a
doctor who can treat this type of injury.
Check hoses and connections for wear and leakage
at regular intervals. Ensure that hoses have sufficient
clearance and do not scrape against other components.
Replace damaged hoses and tighten all connections.
The cylinders are double-acting. They must always be
maintained in good condition for optimal function. Leaks,
internal or external, affect performance and may be
dangerous.
In order for the implement to function optimally, it requires
a hydraulic system that works at high pressure. Only use
spare parts approved by the manufacturer.
5.3.1. Checking the hydraulic connections
Check that all hoses and adapters are tightened and that
they do not leak.
5.3.2. Repairing the hydraulic cylinders
The removal, repair and fitting of the hydraulic cylinders
require special tools to prevent damage to internal
components. We recommend that a cylinder that needs
repairing be sent to an authorised dealer to be fixed.
Fig.32 NEVER use fingers or hands for leakage detection.
This manual suits for next models
1
Table of contents
Languages:
Other Quicke Farm Equipment manuals
Popular Farm Equipment manuals by other brands

HE-VA
HE-VA Disc-Roller Contour 2.50 m operating instructions

Kverneland
Kverneland IsoMatch Tellus Go manual

Akron
Akron EXG 400 X user manual

Gude
Gude GGF 620 Translation of the original instructions

LeeBoy
LeeBoy L600 Operation, service and parts manual

Titan Attachments
Titan Attachments GJDHD72RAKE Operator's manual