RACOM RipEX 1.5 User manual

User manual
.
RipEX
Radio modem & Router
.
version 1.5
5/9/2013
fw 1.3.x.x
www.racom.eu
RACOMs.r.o. •Mirova1283•59231NoveMestonaMorave•CzechRepublic
Tel.:+420565659511•Fax:+420565659512•E-mail: racom@racom.eu


Table of Contents
Important Notice .................................................................................................................................. 7
Getting started ..................................................................................................................................... 8
1. RipEX – Radio router .................................................................................................................... 10
1.1. Introduction ......................................................................................................................... 10
1.2. Key Features ...................................................................................................................... 10
1.3. Standards ........................................................................................................................... 12
2. RipEX in detail ............................................................................................................................... 13
2.1. Modes of operation ............................................................................................................. 13
2.2. Bridge mode ....................................................................................................................... 13
2.3. Router mode ....................................................................................................................... 18
2.4. Serial SCADA protocols ..................................................................................................... 23
2.5. Combination of IP and serial communication ..................................................................... 24
2.6. Diagnostics & network management .................................................................................. 25
2.7. Firmware update and upgrade ........................................................................................... 26
2.8. Software feature keys ......................................................................................................... 27
3. Network planning ........................................................................................................................... 28
3.1. Data throughput, response time ......................................................................................... 28
3.2. Frequency .......................................................................................................................... 29
3.3. Signal budget ..................................................................................................................... 30
3.4. Multipath propagation, DQ ................................................................................................. 32
3.5. Network layout .................................................................................................................... 34
3.6. Hybrid networks .................................................................................................................. 36
3.7. Assorted practical comments ............................................................................................. 36
3.8. Recommended values ........................................................................................................ 38
4. Product .......................................................................................................................................... 39
4.1. Dimensions ......................................................................................................................... 39
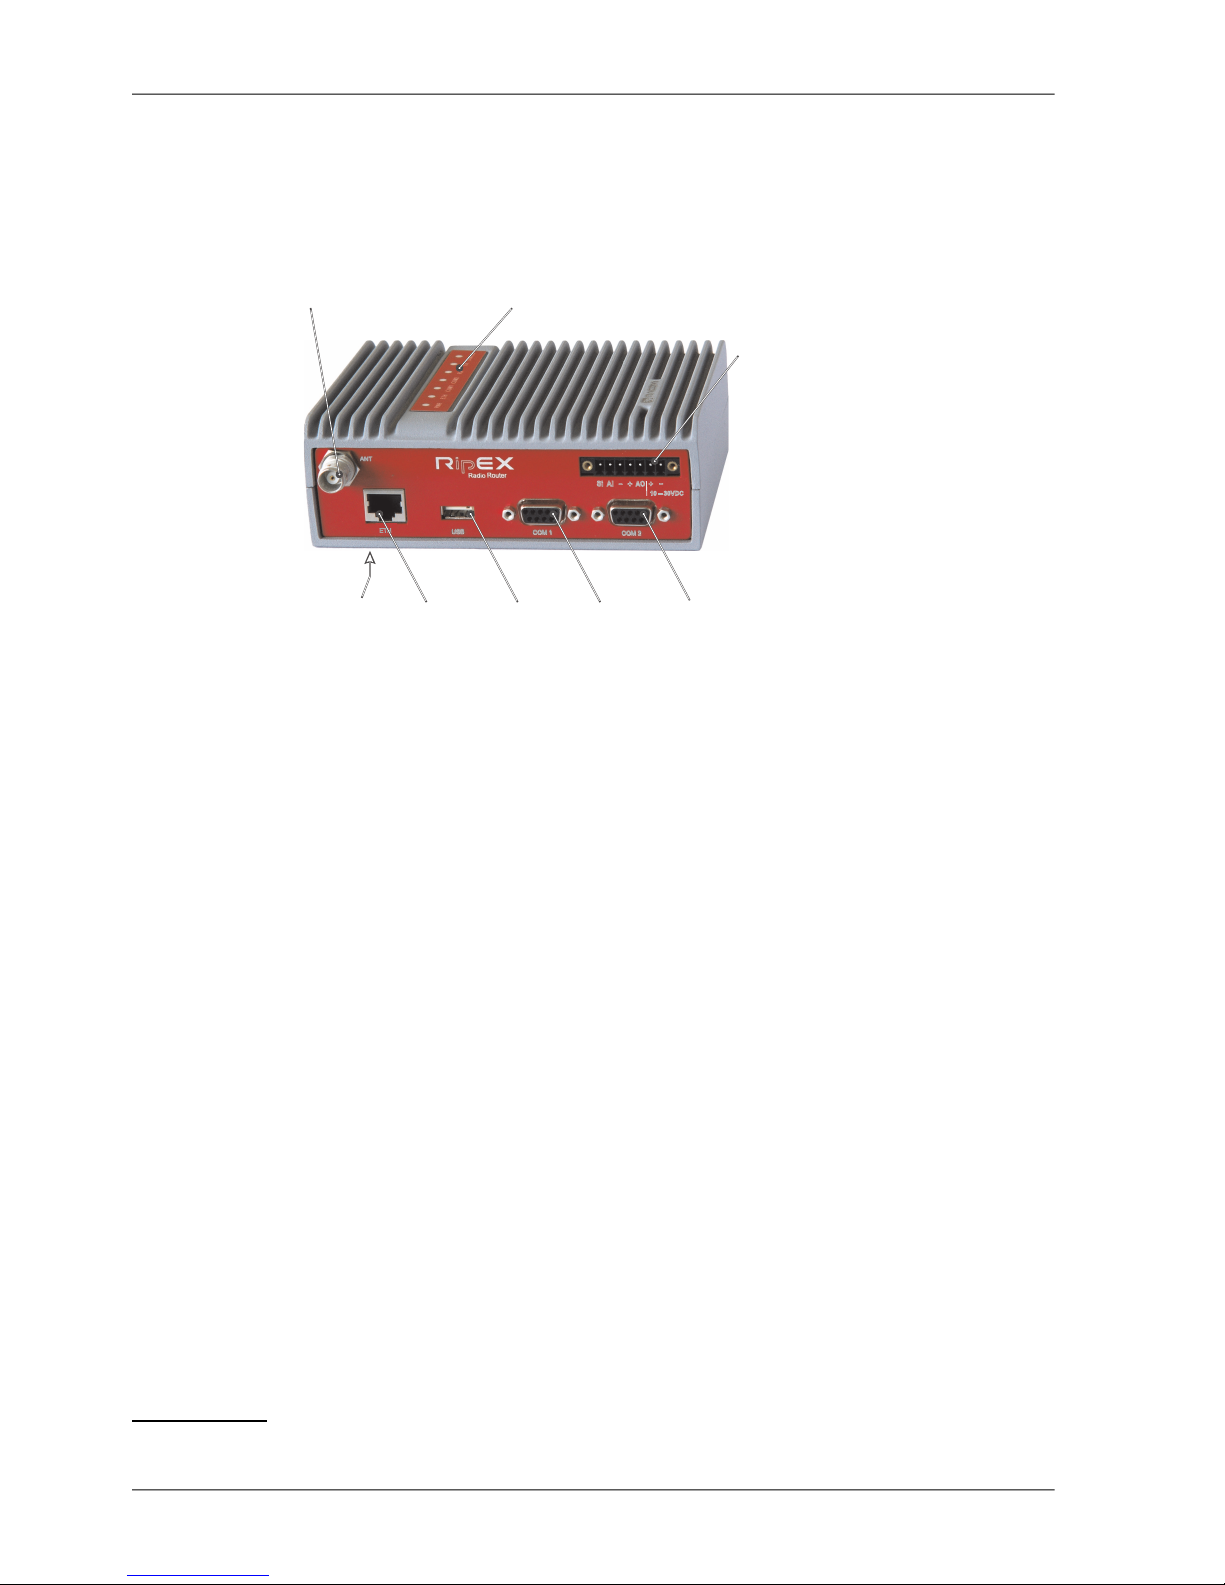
4.2. Connectors ......................................................................................................................... 42
4.3. Indication LEDs .................................................................................................................. 47
4.4. Technical specification ........................................................................................................ 48
4.5. Model offerings ................................................................................................................... 56
4.6. Accessories ........................................................................................................................ 58
5. Bench test ..................................................................................................................................... 66
5.1. Connecting the hardware ................................................................................................... 66
5.2. Powering up your RipEX .................................................................................................... 66
5.3. Connecting RipEX to a programming PC ........................................................................... 66
5.4. Basic setup ......................................................................................................................... 70
5.5. Functional test .................................................................................................................... 70
6. Installation ..................................................................................................................................... 71
6.1. Mounting ............................................................................................................................. 71
6.2. Antenna mounting .............................................................................................................. 74
6.3. Antenna feed line ............................................................................................................... 74
6.4. Grounding ........................................................................................................................... 75
6.5. Connectors ......................................................................................................................... 75
6.6. Power supply ...................................................................................................................... 75
7. Advanced Configuration ................................................................................................................ 76
7.1. Menu header ...................................................................................................................... 76
7.2. Status ................................................................................................................................. 77
7.3. Settings ............................................................................................................................... 78
7.4. Routing ............................................................................................................................. 116
7.5. Diagnostic ......................................................................................................................... 120
7.6. Maintenance ..................................................................................................................... 137
3© RACOM s.r.o. – RipEX Radio modem & Router

8. CLI Configuration ........................................................................................................................ 142
9. Troubleshooting ........................................................................................................................... 143
10. Safety, environment, licensing ................................................................................................... 145
10.1. Frequency ...................................................................................................................... 145
10.2. Safety distance ............................................................................................................... 145
10.3. High temperature ............................................................................................................ 149
10.4. RoHS and WEEE compliance ........................................................................................ 149
10.5. Conditions of Liability for Defects and Instructions for Safe Operation of Equipment .... 149
10.6. Important Notifications .................................................................................................... 150
10.7. Product Conformity ......................................................................................................... 151
10.8. Warranty ......................................................................................................................... 153
A. OID mappings ............................................................................................................................. 154
B. Abbreviations .............................................................................................................................. 155
Index ................................................................................................................................................ 157
C. Revision History .......................................................................................................................... 159
List of Figures
1. RipEX radio router ........................................................................................................................... 8
2.1. Bridge mode example ................................................................................................................ 16
2.2. Addressing ................................................................................................................................. 21
2.3. Optimised addressing ................................................................................................................. 22
2.4. Monitoring ................................................................................................................................... 26
3.1. Application bench test ................................................................................................................ 29
3.2. Signal path ................................................................................................................................. 30
3.3. Multipath propagation ................................................................................................................. 32
3.4. Antenna location ......................................................................................................................... 33
3.5. Main lobe .................................................................................................................................... 34
3.6. Dominant repeater ...................................................................................................................... 35
3.7. Isolated branches ....................................................................................................................... 36
3.8. Antenna mounting ...................................................................................................................... 37
4.1. RipEX dimensions ...................................................................................................................... 39
4.2. RipEX dimensions – bottom ....................................................................................................... 40
4.3. RipEX with DIN rail ..................................................................................................................... 40
4.4. RipEX dimensions with connectors ............................................................................................ 41
4.5. Connectors ................................................................................................................................. 42
4.6. Antenna connector TNC ............................................................................................................. 42
4.7. Separated Rx and TX antennas ................................................................................................. 43
4.8. Supply connector ........................................................................................................................ 44
4.9. Power and Control - cable plug .................................................................................................. 44
4.10. RJ-45F ...................................................................................................................................... 45
4.11. Serial connector ........................................................................................................................ 45
4.12. Serial connector ....................................................................................................................... 46
4.13. Reset button ............................................................................................................................. 46
4.14. GPS Connector SMA ............................................................................................................... 47
4.15. Indication LEDs ........................................................................................................................ 47
4.16. RipEX-HS ................................................................................................................................. 58
4.17. RipeX-HS dimensions .............................................................................................................. 58
4.18. X5 adapter ETH/USB ............................................................................................................... 58
4.19. Demo case ............................................................................................................................... 59
4.20. Fan kit mounting ....................................................................................................................... 60
4.21. Assembly dimensions with fan ................................................................................................. 60
RipEX Radio modem & Router – © RACOM s.r.o.4
RipEX
Radio modem & Router

4.22. L-bracket .................................................................................................................................. 60
4.23. RipEX with L-bracket ................................................................................................................ 61
4.24. Flat bracket ............................................................................................................................... 61
4.25. RipEX with Flat-bracket ............................................................................................................ 61
4.26. Flat-bracket dimensions ........................................................................................................... 62
4.27. 19" Rack shelf .......................................................................................................................... 62
4.28. 19" Rack shelf – dimensions .................................................................................................... 63
4.29. 19" Rack shelf – double ........................................................................................................... 64
4.30. 19" Rack shelf–double – dimensions ....................................................................................... 64
4.31. Dummy load ............................................................................................................................. 65
5.1. Bench test .................................................................................................................................. 66
5.2. Connecting to a PC over ETH and over ETH/USB adapter ....................................................... 67
5.3. PC address setting ..................................................................................................................... 68
5.4. Authentication ............................................................................................................................. 69
5.5. Status Menu ............................................................................................................................... 69
6.1. Flat lengthwise mounting to DIN rail – recommended ............................................................... 71
6.2. Flat widthwise mounting to DIN rail ............................................................................................ 71
6.3. Vertical widthwise mounting to DIN rail ...................................................................................... 72
6.4. Vertical lengthwise mounting to DIN rail ..................................................................................... 72
6.5. Flat mounting using Flat bracket ................................................................................................ 72
6.6. Vertical lengthwise mounting to DIN rail ..................................................................................... 72
6.7. Rack shelf ................................................................................................................................... 73
6.8. Fan kit mounting ......................................................................................................................... 73
6.9. Fan kit using Alarm Output, recommended ................................................................................ 74
6.10. Fan kit, always on ..................................................................................................................... 74
6.11. 10–30 VDC Supplying .............................................................................................................. 75
7.1. Menu Header .............................................................................................................................. 76
7.2. Menu Status ............................................................................................................................... 77
7.3. Menu Settings ............................................................................................................................ 78
7.4. Menu Alarm management .......................................................................................................... 85
7.5. Menu Radio ................................................................................................................................ 89
7.6. Menu Ethernet ............................................................................................................................ 92
7.7. Menu COM ............................................................................................................................... 100
7.8. Menu Protocols COM ............................................................................................................... 102
7.9. Menu Routing ........................................................................................................................... 116
7.10. Menu Neighbours ................................................................................................................... 120
7.11. Menu Statistic ......................................................................................................................... 123
7.12. Menu Graphs .......................................................................................................................... 124
7.13. Menu Ping .............................................................................................................................. 126
7.14. Menu Monitoring ..................................................................................................................... 129
7.15. Monitoring ............................................................................................................................... 134
7.16. Menu SW feature keys ........................................................................................................... 137
7.17. Menu Maintenance Configuration .......................................................................................... 138
7.18. Menu Maintenance Firmware ................................................................................................. 138
7.19. Menu Maintenance Password ................................................................................................ 139
7.20. Menu Maintenance Configuration .......................................................................................... 140
10.1. Declaration of Conformity RipEX ........................................................................................... 152
List of Tables
4.1. Pin assignement ......................................................................................................................... 43
4.2. Ethernet to cable connector connections ................................................................................... 45
5© RACOM s.r.o. – RipEX Radio modem & Router
RipEX
Radio modem & Router

4.3. COM1,2 pin description .............................................................................................................. 45
4.4. USB pin description .................................................................................................................... 46
4.5. Key to LEDs ............................................................................................................................... 47
4.6. Technical parameters ................................................................................................................. 48
4.7. Recommended Cables ............................................................................................................... 51
4.8. CE 25 kHz .................................................................................................................................. 52
4.9. CE 12.5 kHz ............................................................................................................................... 53
4.10. CE 6.25 kHz ............................................................................................................................. 53
4.11. FCC 25 kHz .............................................................................................................................. 54
4.12. FCC 12.5 kHz ........................................................................................................................... 54
4.13. FCC 6.25 kHz ........................................................................................................................... 54
10.1. Minimum Safety Distance 160 MHz ....................................................................................... 145
10.2. Minimum Safety Distance 300–400 MHz ............................................................................... 147
RipEX Radio modem & Router – © RACOM s.r.o.6
RipEX
Radio modem & Router

Important Notice
Copyright
© 2013 RACOM. All rights reserved.
Products offered may contain software proprietary to RACOM s. r. o. (further referred to under the ab-
breviated name RACOM). The offer of supply of these products and services does not include or infer
any transfer of ownership. No part of the documentation or information supplied may be divulged to
any third party without the express written consent of RACOM.
Disclaimer
Although every precaution has been taken in preparing this information, RACOM assumes no liability
for errors and omissions, or any damages resulting from the use of this information. This document or
the equipment may be modified without notice, in the interests of improving the product.
Trademark
All trademarks and product names are the property of their respective owners.
Important Notice
• Due to the nature of wireless communications, transmission and reception of data can never be
guaranteed. Data may be delayed, corrupted (i.e., have errors), or be totally lost. Significant delays
or losses of data are rare when wireless devices such as the RipEX are used in an appropriate
manner within a well‐constructed network. RipEX should not be used in situations where failure to
transmit or receive data could result in damage of any kind to the user or any other party, including
but not limited to personal injury, death, or loss of property. RACOM accepts no liability for damages
of any kind resulting from delays or errors in data transmitted or received using RipEX, or for the
failure of RipEX to transmit or receive such data.
• Under no circumstances is RACOM or any other company or person responsible for incidental,
accidental or related damage arising as a result of the use of this product. RACOM does not provide
the user with any form of guarantee containing assurance of the suitability and applicability for its
application.
• RACOM products are not developed, designed or tested for use in applications which may directly
affect health and/or life functions of humans or animals, nor to be a component of similarly important
systems, and RACOM does not provide any guarantee when company products are used in such
applications.
7© RACOM s.r.o. – RipEX Radio modem & Router
Important Notice

Getting started
RipEX is a widely configurable compact radio modem, more precisely a radio IP router. All you have
to do to put it into operation is to connect it to an antenna and a power supply and configure it using a
PC and a web browser.
Antenna Indicator LEDs' Sleep Input
HW Alarm Input
- GND
+
HW Alarm Output
Supply +10 to +30 V
- GND
Ethernet USB
COM1
RS232
COM2
RS232/485
Default/Reset
-
-++
SI AI
AO
10 – 30VDC
ETH USB
ANT
COM 1
COM 2
Fig. 1: RipEX radio router
RipEX access defaults: IP 192.168.169.169/24, username: admin, password: admin
Set a static IP 192.168.169.x/24 on your PC, power on the RipEX and wait approximately 25 seconds
for the RipEX OS to boot. Connect your PC to RipEXs' ETH interface, start your browser and type ht-
tps://192.168.169.169 in the address line. When accessing RipEX for the first time, you have to accept
the https security certificate issued by Racom.
Before attempting to do any configuration, make sure your RipEX is the only powered-up unit around.
Since all units coming from factory share the same default settings ex factory, you could be accessing
a different unit over the air without being aware of it.
When accessing over the optional “X5” USB/ETH adapter, your PC will get its IP settings from the built-
in DHCP server and you have to type https://10.9.8.7 in your browser. Remaining steps are the same
and you do not need to worry about other RipEX's, you will be connected to the local unit in all cases.
SCADA radio network step-by-step
Building a reliable radio network for a SCADA system may not be that simple, even when you use such
a versatile and easy-to-operate device as the RipEX radio modem. The following step-by-step checklist
can help you to keep this process fast and efficient.
1. Design your network to ensure RF signal levels meet system requirements.
2. Calculate and estimate the network throughput and response times when loaded by your application.
3. Perform a bench-test with 3-5 sets of RipEX's and SCADA equipment (Chapter 5, Bench test).
4. Design the addressing and routing scheme of the network (Chapter 2, RipEX in detail and RipEX
App notes, Address planing1)
5. Preconfigure all RipEX's (Section 5.4, “Basic setup”).
6. Install individual sites
1. Mount RipEX into cabinet (Section 6.1, “Mounting”).
1http://www.racom.eu/eng/products/m/ripex/app/routing.html
RipEX Radio modem & Router – © RACOM s.r.o.8
Getting started

2. Install antenna (Section 6.2, “Antenna mounting”).
3. Install feed line (Section 6.3, “Antenna feed line”).
4. Ensure proper grounding (Section 6.4, “Grounding”).
5. Run cables and plug-in all connectors except from the SCADA equipment (Section 4.2,
“Connectors”)
6. Apply power supply to RipEX
7. Test radio link quality (Section 5.5, “Functional test”).
8. Check routing by the ping tool (the section called “Ping”) to verify accessibility of all IP ad-
dresses with which the unit will communicate.
9. Connect the SCADA equipment
7. Test your application
9© RACOM s.r.o. – RipEX Radio modem & Router
Getting started

1. RipEX – Radio router
1.1. Introduction
RipEX is a best-in-class radio modem, not only in terms of data transfer speed. This Software Defined
Radio with Linux OS has been designed with attention to detail, performance and quality. All relevant
state-of-the-art concepts have been carefully implemented.
RipEX provides 24×7 reliable service for mission-critical applications like SCADA & Telemetry for Util-
ities, SmartGrid power networks or transaction networks connecting lottery terminals, POS or ATM’s.
Any unit can serve as the central master, repeater, remote terminal, or all of these simultaneously, with
a configuration interface easily accessible from a web browser.
Anybody with even basic knowledge of IP networking can set up a RipEX within a matter of minutes
and maintain the network quite easily.
1.2. Key Features
• Exceptional data speeds on the radio channel
- 83 kbps / 25 kHz, 42 kbps / 12.5 kHz, 21 kbps / 6.25 kHz
• 1× ETH, 2× COM, 1× USB, 5× virtual COM
- Simultaneously on radio channel. COM1-RS232, COM2-RS232 or RS485, software configurable.
Virtual COMs over ETH controlled by Terminal servers. USB for independent service access via
USB/ETH adapter and for automatic FW and SW keys upgrade.
• 135–174; 300–360; 368–512; 928–960 MHz
- Licensed radio bands
- Software-selectable channel spacing 25, 12.5 or 6.25 kHz
• 10 watts
- Transmission output control, nine stages from 0.1 to 10 W. Hence linear modulations (the highest
data speed) require a very linear RF power amplifier, max. 2 W is available for them.
• Energy saving
- Sleep mode – 0.1 W, controlled via a digital input.
- Save mode – 2 W, wake up by receiving a packet from the Radio channel
• Extended temperature range
−40 to +70 ºC
• Easy to configure and maintain
- Web interface,
- Wizards,
- On-line help,
- Balloon tips,
- Fastest web access to remote units
• Fast remote access
- Only the effective data are transferred from remote RipEX over the air, html page is downloaded
from the local unit.
RipEX Radio modem & Router – © RACOM s.r.o.10
RipEX – Radio router

• Bridge or Router
- RipEX is a device with native IP support which can be set as a standard bridge or router.
• Modbus, IEC101, DNP3, Siemens 3964(R), Comli, RP570, C24, DF1, Profibus, SLIP, Modbus TCP,
IEC104, DNP3 TCP etc.
- Unique implementation of industrial protocols enables a secure addressed transmission of all
packets in all directions
• Anti-collision protocol on radio channel
- Allows multi polling & report-by-exception concurrently for several independent applications sim-
ultaneously
• Backup routes
- When tested path between two RipEX IP addresses (even behind repeater or LAN) fails, automatic
switch-over to backup gateway behind Radio or Ethernet interfaces
- Unlimited number of prioritized backup gateways
• Optimization – 3× higher throughput
- Optimization method which joins short packets, compresses data, optimises both the traffic to the
link peer and the sharing of the radio channel capacity among the links.
• TCP proxy
- Eliminates a transfer of TCP overhead over Radio channel when TCP overhead run locally between
connected device and RipEX on LAN. I.e. only payload (user) data are transferred further as UDP
(over Radio channel)
- Higher RipEX network bandwidth, no more problems with TCP timeouts
• ARP proxy
- RipEX can simulate any IP address (it may reply to any ARP request)
- This feature is typically used when RTU’s addresses behind different RipEX units are within the
same IP subnet and RTU’s do not provide routing capabilities (neither default GW)
• VLAN & Subnets
- RipEX can simulate any IP address (it may reply to any ARP request)
- Unlimited number of virtual Ethernet interfaces (IP aliases) can be set
• Embedded diagnostic & NMS
- Real time and historical (20 periods, e.g. days) statistics and graphs for the unit and its neighbours.
- SNMP including generation of TRAP alarms when preset thresholds are exceeded
- on-line/off-line (recorded to a file in the RipEX) monitoring of all interfaces
• Security
- 256 AES encryption, the most secure encryption meets FIPS 140 2 requirements
- 2048 (1024, 512) bit SSL certificate (even your own one) for https web configuration
• SW feature keys
Software authorization keys allow you to add advanced features when needed: (Router mode, 83
(CE: 83.33 and 62.50 kbps; Others: 69.44 and 52.08 kbps / 25 kHz), COM2, 10 W, Backup routes
- Free Master-key trial – (all coded features) for 30 days in every RipEX
• Reliability
- 3 years warranty, rugged die cast aluminium case, military or industrial components
- Every single unit tested in a climatic chamber as well as in real traffic
11© RACOM s.r.o. – RipEX Radio modem & Router
RipEX – Radio router

• RipEX - HS
- Redundant hot standby chassis
- Two hot-stand-by standard RipEX units inside
- Automatic switchover capability on detection of failure
- Suitable for Central sites, Repeaters or Important remote sites where no single point of failure is
required
• Internal calendar time
- Can be set manually or synchronized via NTP (Network Time Protocol)
- Any RipEX also runs as a NTP server automatically
- NTP synchronization via Ethernet or over the Radio channel from another RipEX
- Powered from internal long life Lithium Manganese battery, so it is accurate even when RipEX is
powered off
• Flash memory
- All configuration parameters are saved in flash memory
- Configuration and other parameters are safely saved even when RipEX is powered off
1.3. Standards
ETSI EN 300 113-2 V1.5.1Spectrum (art 3.2)
FCC Part 90
ETSI EN 301 489-1 V1.9.2
EMC (art 3.1.b) ETSI EN 301 489-5 V1.3.1
EN 60950-1:2006Electrical Safety (art 3.1.a)
EN 60950–1:2006/A11:2009,
EN 60950–1:2006/A12:2011,
EN 60950–1:2006/A1:2010
IP40IP rating
IEEE 802.3iETH
IEEE 802.3u
IEEE 802.3af
EIA-232-FRS232
EIA RS-485RS485
IEC 60870-5-101IEC101
IEC 60870-5-104IEC104
IEEE 1815-2010DNP3
IEC 61158 Type 3Profibus DP
RFC 1055SLIP
IEEE 802.1QVLAN
RipEX Radio modem & Router – © RACOM s.r.o.12
RipEX – Radio router

2. RipEX in detail
2.1. Modes of operation
Radio modem RipEX is best suited for transmission of a large number of short messages where a
guaranteed delivery time is required, i.e. for mission critical applications.
RipEX has the following basic uses:
• Polling
In poll-response networks a central master unit communicates with a number of remote radiomodems
one at a time. The master unit exchanges data with the currently connected remote radio, and when
finished, it establishes a new connection with the next remote radio according to the polling order.
• Report-by-exception
In report-by-exception networks remote units can be contacted similarly to polling networks. In ad-
dition, any remote unit can spontaneously send data to the master unit (typically an alarm).
• Mesh
In mesh type networks any radio modem in the network can access any other radio modem randomly
and spontaneously. Mesh network can also host polling or report-by-exception applications, even
in several instances.
2.2. Bridge mode
A packet received through any interface is broadcast to the appropriate interfaces of all units within the
network. Packets received on COM are broadcast to both COM1 and COM2 at remote sites, allowing
you to connect 2 RTU's to any radio modem.
Any unit can be configured as a repeater. A repeater relays all packets it receives through the radio
channel. The network implements safety mechanisms which prevent cyclic loops in the radio channel
(e.g. when a repeater receives a packet from another repeater) or duplicate packets delivered to the
user interface (e.g. when RipEX receives a packet directly and then from a repeater).
Beside standard packet termination by an "Idle" period on the serial port (a pause between received
bytes) the bridge mode also offers "streaming". While in streaming mode, transmission on the radio
channel starts immediately, without waiting for the end of the received frame on COM => zero latency.
The bridge mode is suitable for all polling applications.
Note
Limited broadcast 255.255.255.255 and Direct broadcast e.g. 192.168.255.255 as well as
Multicast (224.0.0.0 through 239.255.255.255) on Ethernet are supported and transferred
over the network.
2.2.1. Detailed Description
Bridge mode is suitable for Point-to-Multipoint networks, where Master-Slave applications with polling-
type communication protocol are used. RipEX in bridge mode is as easy to use as a simple transparent
13© RACOM s.r.o. – RipEX Radio modem & Router
RipEX in detail

device, while providing communication reliability and spectrum efficiency by employing a sophisticated
protocol in the radio channel.
In bridge mode, the radio channel protocol do not solve collisions. There is a CRC check of data integrity,
however, i.e. once a message is delivered, it is 100% error free.
All the messages received from user interfaces (ETH&COM's) are immediately transmitted to the radio
channel.
ETH - The whole network of RipEX radiomodems behaves as a standard ethernet network bridge.
Each ETH interface automatically learns which devices (MAC addresses) are located in the local LAN
and which devices are accessible over the radio channel. Consequently, only the ethernet frames ad-
dressed to remote devices are physically transmitted on the radio channel. This arrangement saves
the precious RF spectrum from extra load which would be otherwise generated by local traffic in the
LAN (the LAN to which the respective ETH interface is connected).
One has to be very careful when RipEX in Bridge mode is connected to LAN, because all LAN traffic
is then broadcast to the Radio channel.
COM1,COM2 - All frames received from COM1(2) are broadcast over the radio channel and transmitted
to all COM's (COM1 as well as COM2) on all radio modems within the network, the other COM on the
source RipEX excluding.
There is a special parameter TX delay (Adv. Config., Device), which should be used when all substations
(RTU's) reply to a broadcast query from the master station. In such case massive collisions would ensue
because all substations (RTU's) would reply at nearly the same time. To prevent such collision, TX
delay should be set individually in each slave RipEX. The length of responding frame, the length of
radio protocol overhead, modulation rate have to be taken into account.
2.2.2. Functionality example
In the following, common acronyms from SCADA systems are used:
• FEP - Front End Processor, designates the communication interface equipment in the centre
• RTU - Remote Telemetry Unit, the terminal SCADA equipment at remote sites
The single digits in illustrations are “site names” and do not necessarily correspond with actual addresses
of both the RipEX's and SCADA equipment. Address configuration examples are given in the next
chapter.
Step 1
Polling cycle starts:
FEP sends a request packet for RTU3 through COM1 to
the connected RipEX.
RipEX Radio modem & Router – © RACOM s.r.o.14
RipEX in detail

Step 2
FEP’s RipEX broadcasts this packet on Radio channel.
RipEX3 and RipEX1 receive this packet.
RipEX2 doesn’t receive this packet, because it is not within
radio coverage of FEP’s RipEX.
Step 3
RipEX3 and RipEX1 send the received packet to their
COM1 and COM2.
Packet is addressed to RTU3, so only RTU3 responds.
RipEX1 is set as a repeater, so it retransmits the packet
on Radio channel. Packet is received by all RipEXes.
Step 4
RipEX2 sends repeated packet to its COM1 and COM2.
RTU2 doesn’t react, because the packet is addressed to
RTU3.
RipEX3 and FEP’s RipEX do not send the repeated
packet to their COM ports, because it has already been
sent (RipEX3) or received (FEP’s RipEX) on their COM
(anti-duplication mechanism).
RTU3 sends the reply packet.
Step 5
RipEX3 broadcasts the reply packet from RTU3 on Radio
channel.
Packet is received by RipEX1 and FEP’s RipEX.
Step 6
FEP’s RipEX sends the packet (the reply from RTU3) to
FEP through COM1.
RipEX1 sends this packet to RTU1. RTU1 doesn’t react,
because the packet is addressed to FEP.
RipEX1 repeats the packet on Radio channel.
All RipEXes receive the packet.
15© RACOM s.r.o. – RipEX Radio modem & Router
RipEX in detail

Step 7
RipEX2 sends repeated packet to its COM1 and COM2.
RTU2 doesn’t react, because the packet is addressed to
FEP.
RipEX3 and FEP’s RipEXes do not send the repeated
packet to their COM ports, because it has been handled
already.
FEP processes the reply from RTU3 and polling cycle
continues…
2.2.3. Configuration examples
You can see an example of IP addresses of the SCADA equipment and RipEX's ETH interfaces in the
picture below.
In Bridge mode, the IP address of the ETH interface of RipEX is not relevant for user data communic-
ation. However it is strongly recommended to assign a unique IP address to each RipEXs' ETH interface,
since it allows for easy local as well as remote service access. Moreover, leaving all RipEX's with the
same (= default) IP on the ETH interface may cause serious problems, when more RipEX's are con-
nected to the same LAN, even if by accident (e.g. during maintenance).
192.168.5.51/24
192.168.5.50/24
192.168.5.12/24
192.168.5.2/24
192.168.5.3/24
192.168.5.11/24
192.168.5.1/24
192.168.5.13/24 3
FEP
50
1
2
REPEATER
Fig. 2.1: Bridge mode example
RipEX Radio modem & Router – © RACOM s.r.o.16
RipEX in detail

Repeater
Because using the bridge mode makes the network transparent, the use of repeaters has certain limit-
ations. To keep matters simple we recommend using a single repeater. However, if certain rules are
observed, using multiple repeaters in the same network is possible.
The total number of repeaters in the network is configured for every unit individually under Bridge mode
parameters. This information is contained in every packet sent. All units that receive such packet will
resume transmission only after sufficient time has been allowed for the packet to be repeated. The
packets received from user ports remain buffered and are sent after the appropriate time passes. This
prevents collisions between remote radio modems. There can be no repeater collisions if only one re-
peater is used.
Where two or more repeaters are used, collisions resulting from simultaneous reception of a repeated
packet must be eliminated. Collisions happen because repeaters repeat packets immediately after re-
ception, i.e. if two repeaters receive a packet from the centre, they both relay it at the same time. If
there is a radiomodem which is within the range of both repeaters, it receives both repeated packets
at the same time rendering them unreadable.
Examples:
1. Repeaters connected serially
A packet is transmitted and repeated
in steps 1, 2, 3.
Centre RPT1 RPT2 Remote
1 2 3
In improperly designed networks collisions happen
if a remote radio modem lies in the range of two
X
COLLISION!
1
12
2
WRONG
CEN RPT1 RPT2 REM
repeaters (see the image): the packet sent from
the centre (1) is received by both repeaters. It is
repeated by them both (2) causing a collision at
the remote. In other words – there should not be
more than one repeater where the centre and re-
motes' coverage areas overlap.
Solution 1.
Adjust signal coverage so that RPT2 is out of range
of the centre and RPT1 is out of the range of the
GOOD
Coverage area
123
CEN RPT1 RPT2 REM
remote radio modem. This can be achieved for
example by reducing the output power or using a
unidirectional antenna.
17© RACOM s.r.o. – RipEX Radio modem & Router
RipEX in detail

Solution 2.
Use a single repeater. (Whenever network layout
allows that.)
12
Good
CEN RPT1 REM
2. Parallel repeaters
Improperly designed network:
Centre
Repeater1
Remote1
1
2
1
2
Remote2
Repeater2
X
COLLISION!
GOOD
WRONG
1
2
1
2
CEN
CEN
RPT1
RPT1
REM1
REM1
1
2
1
2
REM2
REM2
RPT2
RPT2
2
- RipEX REM1 is within the range
of two repeaters (RPT1 and RPT2).
The repeaters receive a packet (1)
from the centre (CEN) and repeat
it at the same time (2) causing a
collision at REM1.
Well-designed network:
- A remote is only in the range of a
single repeater (REM1-RPT1,
REM2-RPT2).
There is always only one repeater
where the centre and remote cov-
erage areas overlap.
2.3. Router mode
RipEX works as a standard IP router with two interfaces (radio and ethernet) and two COM port devices.
There is a sophisticated anti-collision protocol on the radio channel, which checks and verifies every
single packet. Being an IP router, each unit can simultaneously work as a store-and-forward repeater
and deliver packets to the connected equipment.
The router mode is suitable for all uses. In contrast to the bridge mode, a packet reception is confirmed
over the radio channel even in very simple polling type applications, and if necessary the packet is re-
transmitted.
Note
Broadcasts (Limited or Direct) and Multicasts on Ethernet are not supported in Router mode.
Only broadcasts in serial SCADA protocols are transferred according their settings.
2.3.1. Detailed Description
Router mode is suitable for multipoint networks, where multi-master applications with any combination
of polling and/or spontaneous data protocols can be used. The proprietary link-layer protocol on the
radio channel is very sophisticated, it can transmit both unicast and broadcast frames, it has collision
RipEX Radio modem & Router – © RACOM s.r.o.18
RipEX in detail

avoidance capability, it uses frame acknowledgement, retransmissions and CRC checks to guarantee
data delivery and integrity even under harsh interference conditions on the radio channel.
RipEX works as a standard IP router with 2 independent interfaces: radio and ETH. Each interface has
its own MAC address, IP address and mask.
IP packets are processed according the routing table rules. You can also set the router’s default gateway
(applies to both interfaces) in the routing table.
The COM ports are treated as standard host devices, messages can be delivered to them as UDP
datagrams to selected port numbers. The destination IP address of a COM port is either the IP of ETH
or the IP of a radio interface. The source IP address of outgoing packets from COM ports is always the
IP of the ETH interface.
2.3.2. Functionality example
In the following example, there are two independent SCADA devices connected to RipEX's two COM
ports. One is designated RTU (Remote Telemetry Unit) and is assumed to be polled from the centre
by the FEP (Front End Processor). The other is labelled PLC (Programmable Logic Controller) and is
assumed to communicate spontaneously with arbitrary chosen peer PLCs.
Step 1
FEP sends a request packet for RTU1 through COM2 to
its connected RipEX.
Simultaneously PLC2 sends a packet for PLC1 to RipEX2
through COM1.
Step 2
FEP’s RipEX transmits an addressed packet for RTU1 on
Radio channel.
RipEX1 receives this packet, checks data integrity and
transmits the acknowledgement.
At the same time packet is sent to RTU1 through COM2.
RipEX3 receives this packet too. It doesn’t react, because
this packet is directed to RipEX1 only.
Step 3
RipEX2 waits till previous transaction on Radio channel is
finished (anti-collision mechanism).
Then RipEX2 transmits on Radio channel the addressed
packet for PLC1.
RipEX1 receives this packet, checks data integrity and
transmits acknowledgement.
At the same time packet is sent to PLC1 through COM1.
Simultaneously the reply packet from RTU1 for FEP is re-
ceived on COM2.
19© RACOM s.r.o. – RipEX Radio modem & Router
RipEX in detail

Step 4
RipEX1 transmitts the reply packet from RTU1 for FEP on
Radio channel.
All RipEXes receive this packet. This packet is addressed
to FEP’s RipEX, so only FEP’s RipEX reacts. It checks
data integrity and transmits the acknowledgement to
RipEX1.
At the same time the packet is sent to FEP through COM2.
Step 5
FEP receives the response from RTU1 and polling cycle
continues…
However any PLC or RTU can spontaneously send a
packet to any destination anytime.
2.3.3. Configuration examples
As it was mentioned above, RipEX radiomodem works as a standard IP router with two independent
interfaces: radio and ETH. Each interface has got its own MAC address, IP address and mask.
The IP router operating principles stipulate that every unit can serve as a repeater.. Everything what
is needed is the proper configuration of routing tables.
Radio IP addresses of the RipEX’s required to communicate over the radio channel must share the
same IP network. We recommend planning your IP network so that every RipEX is connected to a
separate sub-network over the ethernet port. This helps to keep the routing tables clear and simple.
Note
Even if the IP addresses of all RipEXes in a radio channel share a single IP network, they
may not be communicating directly as in a common IP network. Only the RipEXes that are
within the radio range of each other can communicate directly. When communication with
radio IP addresses is required, routing tables must include even the routes that are within
the same network (over repeaters), which is different from common IP networks. The example
configuration below does not show such routing rules for the sake of simplicity (they are not
needed in most cases).
RipEX Radio modem & Router – © RACOM s.r.o.20
RipEX in detail
Table of contents
Other RACOM Radio Modem manuals

RACOM
RACOM RipEX2 User manual

RACOM
RACOM PROFI MR300 User manual

RACOM
RACOM RipEX 1.12.0 User manual

RACOM
RACOM RipEX2 User manual

RACOM
RACOM RipEX 1.12.2 User manual

RACOM
RACOM RipEX 1.6.0 User manual

RACOM
RACOM ECONOMY RE400 User manual

RACOM
RACOM RipEX 1.4 User manual

RACOM
RACOM RAy3 User manual

RACOM
RACOM RipEX User manual