Rad Power Bikes RadRhino User manual

2017

2
Welcome
Thank you for purchasing the RadRhinoTM from Rad Power BikesTM. We take pride in bringing you a quality product that will offer years of enjoyment.
Thanks for riding RAD!
Using This Manual
This manual contains details of the product, its equipment, and information on its operation and maintenance and other helpful tips for owners. Read it
carefully and familiarize yourself with the RadRhino before using it in order to ensure a safe use and prevent tragic accidents. Be sure to retain this manual as
your convenient RadRhino information source.
This manual contains many Warnings and Cautions concerning the safe operation and consequences if safe setup, operation and
maintenance are not performed. All information in this manual should be carefully reviewed and if you have any questions you
should contact Rad Power Bikes immediately. The notes, warnings and cautions contained within the manual and marked by this
triangular Caution Symbol should also be given special care. Users should also pay special attention to information marked in this
manual beginning with NOTICE.
Because it is impossible to anticipate every situation or condition which can occur while riding, this manual makes no representations about the safe use of
bicycles under all conditions. There are risks associated with the use of any bicycle which cannot be predicted or avoided, and which are the sole responsibility
of the rider. You should keep this manual, along with any other documents that were included with your bicycle, for future reference, however all content in
this manual is subject to change or withdrawal without notice. Visit www.radpowerbikes.com to download the latest version. Rad Power Bikes makes every
effort to ensure accuracy of its documentation and assumes no responsibility of liability if any errors or inaccuracies appear within. Assembly and first
adjustment of your Rad Power Bike requires special tools and skills and it is reccomended that this should be done by a trained bicycle mechanic if possible.

3
Table of Contents
Welcome................................................................................................................................................................................................ 2
Using This Manual ................................................................................................................................................................................. 2
Table of Contents .................................................................................................................................................................................. 3
General Info........................................................................................................................................................................................... 4
Assembly Instructions ........................................................................................................................................................................... 5
Battery Charging.................................................................................................................................................................................. 10
Operation ............................................................................................................................................................................................ 14
Maintenance........................................................................................................................................................................................ 20
Troubleshooting .................................................................................................................................................................................. 23
Warnings and Safety............................................................................................................................................................................ 25
Link to Assembly Video and Online Resources.................................................................................................................................... 30
Warranty.............................................................................................................................................................................................. 30

4
General Info
General Components and Overall Dimensions

5
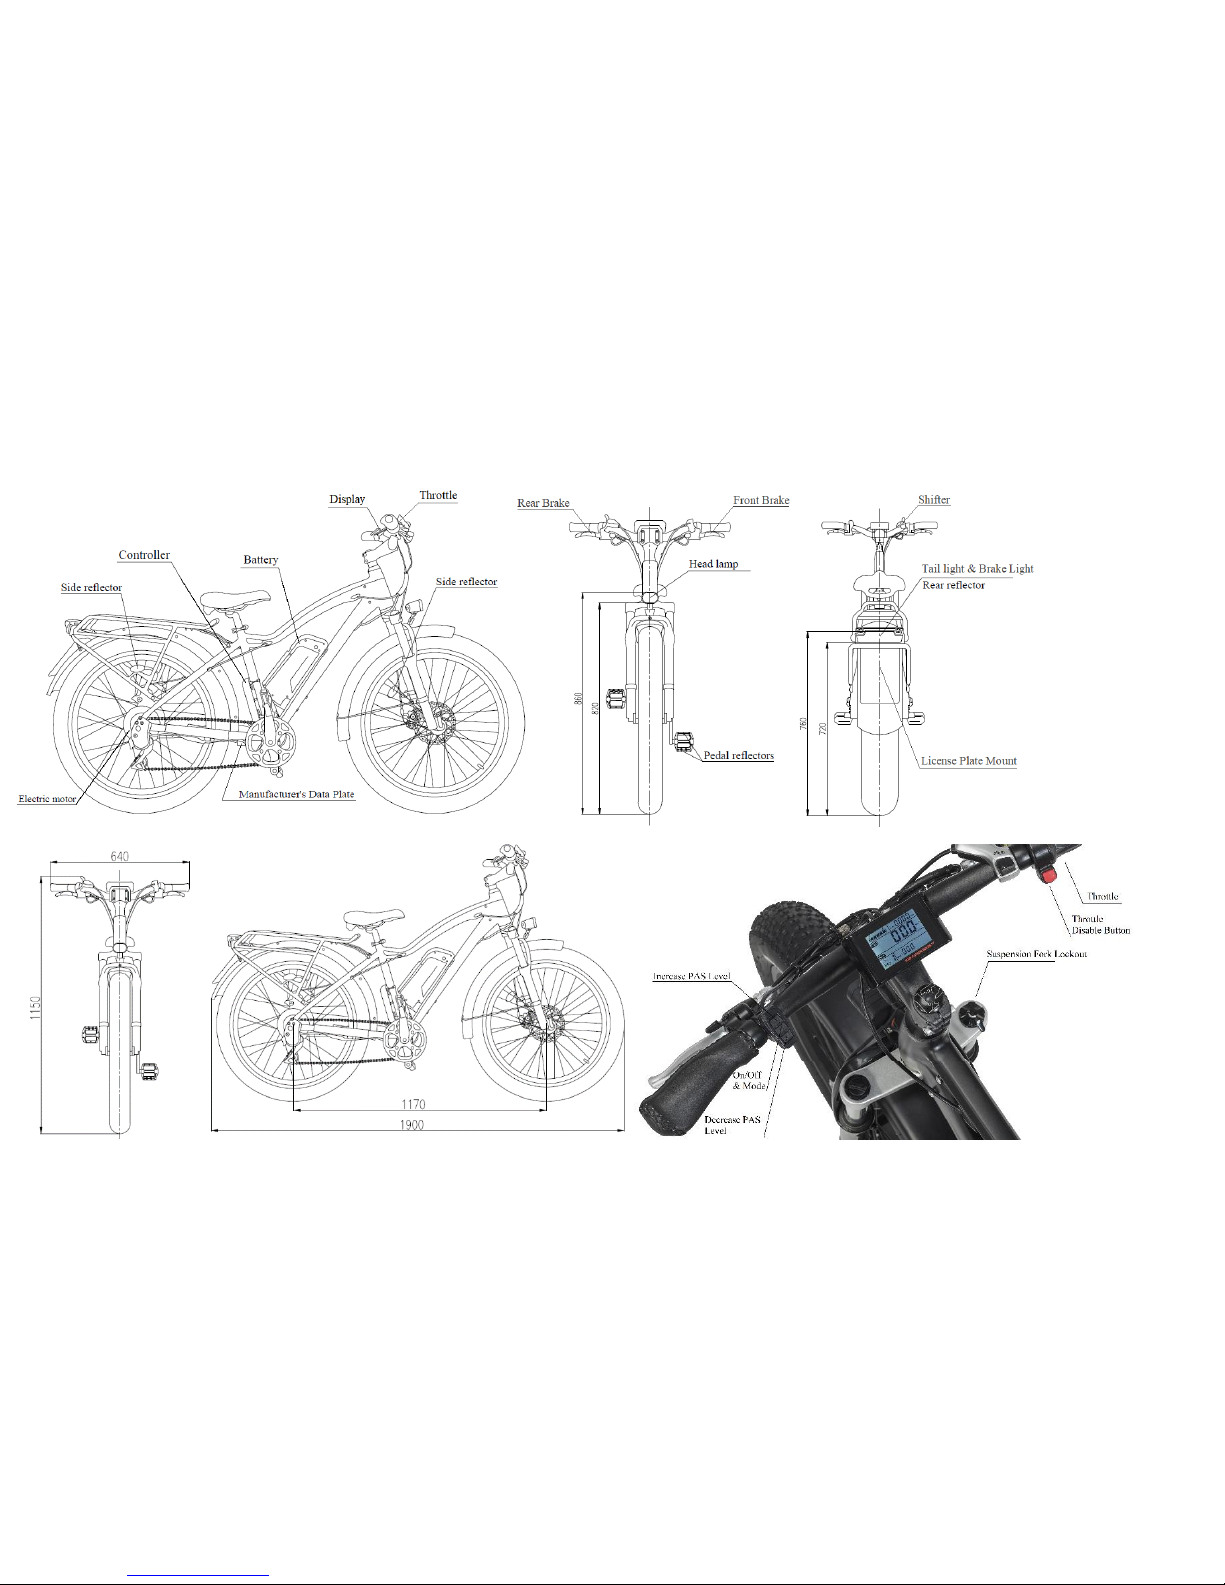
RadRhino Vehicle Category
The RadRhino is a type approved L1e-A powered cycle. Please check relevant legislation in the locations you intend to ride, for a
full understanding of all necessary legal requirements for operating your RadRhino.
Changing Components or Attaching Accessories
The use of non-original components or spare parts can jeopardize the safety of your RadRhino, invalidate your warranty and in
some cases cause your RadRhino to not conform with laws pertaining to your bike.
The replacement of original components or installation of third party accessories or accessories from Rad Power Bikes not
explicitly recommended for your bicycle model, is at your own risk.
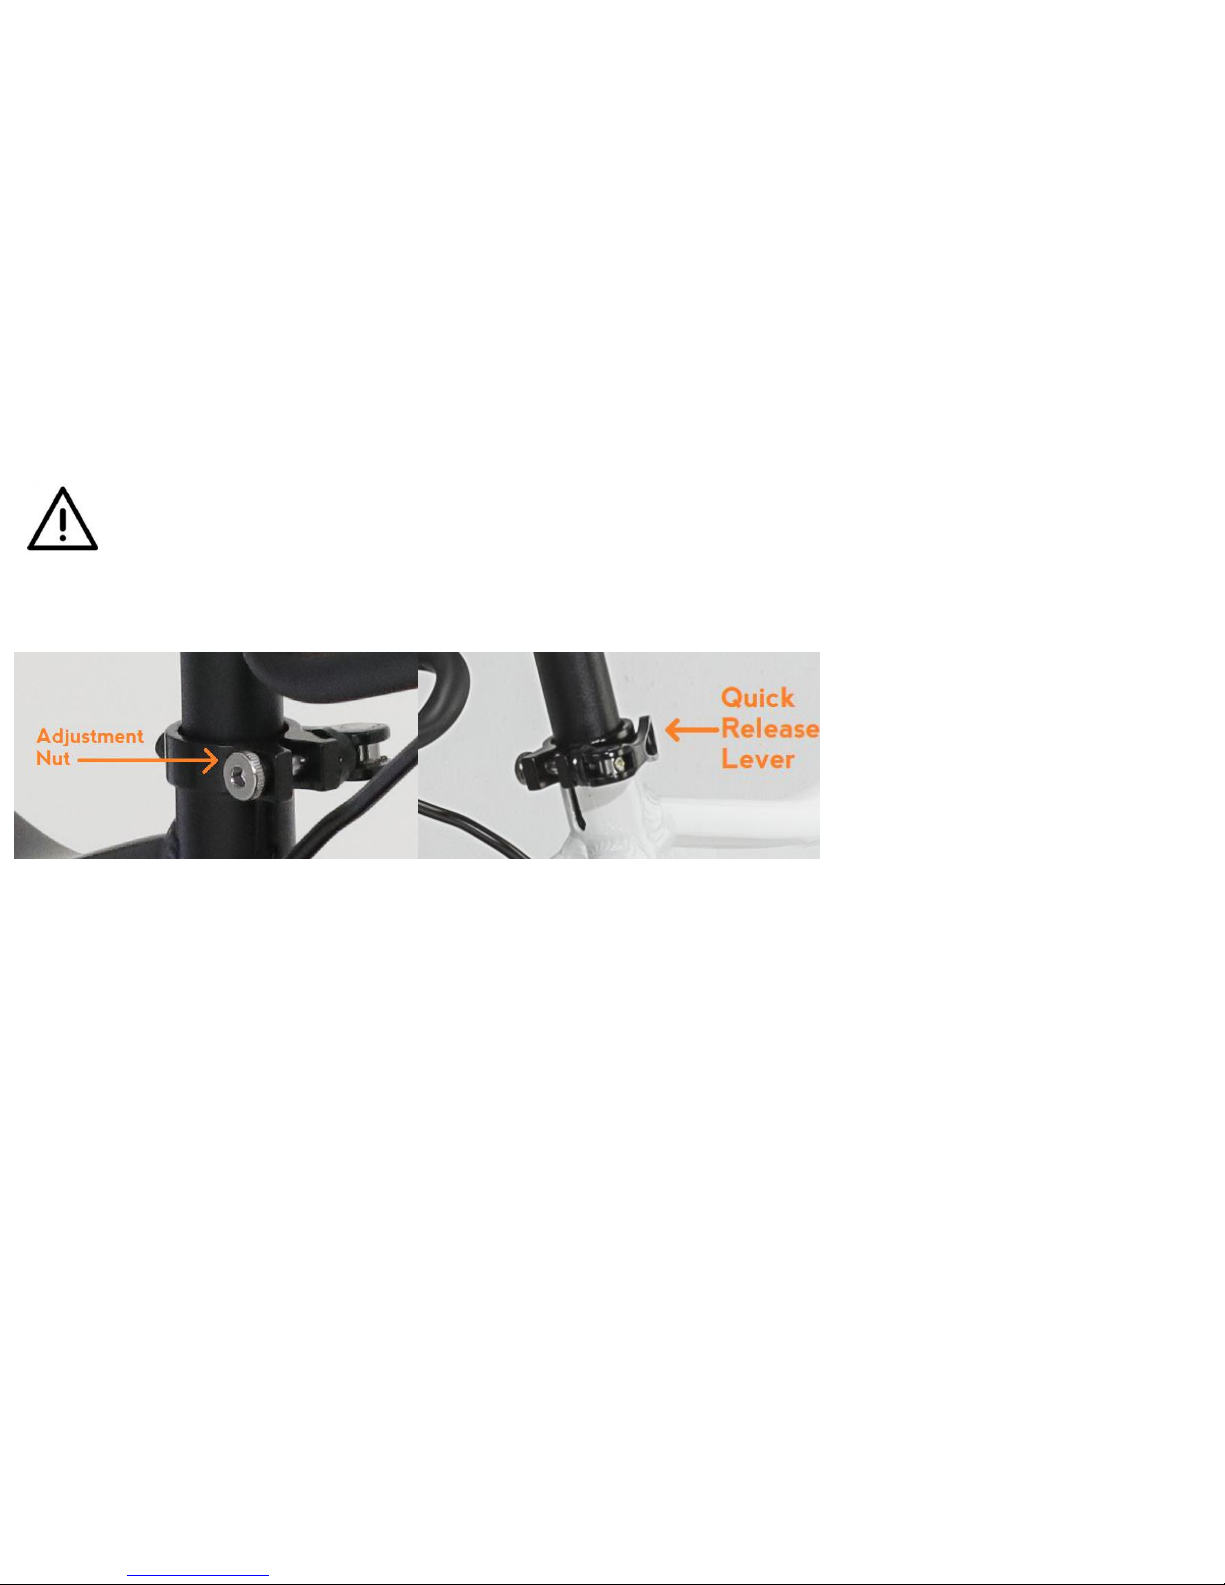
Assembly and Fit
Correct assembly and fit are essential elements of ensuring your bicycling safety, performance and comfort. If you have the
experience, skill and tools to complete these essential steps before your first ride, Rad Power Bikes recommends having a
certified bicycle mechanic check your work. If you do not have the experience, skill and tools to complete assembly and fit, Rad
Power Bikes highly recommends having a certified bicycle mechanic complete these procedures as well as ensure any future
adjustments or tuning.
Assembly Instructions
NOTICE: The following assembly steps are only a general guide to assist in the assembly of your Rad Power Bike and is not a complete or comprehensive
manual of all aspects of assembly, maintenance and repair. We recommend you consult a certified bicycle mechanic to assist in the assembly, repair and
maintenance of your bicycle.
Step 1: Remove bike from carton and carefully set out all contents of the box. Remove packaging material protecting the bicycle
frame and components. Ensure the following pieces are included in the package. If there are any missing parts please contact Rad
Power Bikes for help replacing missing pieces.
1. RadRhino
2. Front wheel and front wheel quick release

6
3. Pedals (Left and Right)
4. Headlight
5. Charger
6. Keys for battery pack
7. Assembly tools and manuals.
8. Front Fender
Step 2: Install handlebar onto stem as shown in the assembly video for the RadRhino at www.radpowerbikes.com

7
Be sure to center the handlebar and ensure hardware is properly secured.
Step 3: Install front wheel. For detailed instructions please view the Quick Release Installation video found at
https://www.radpowerbikes.com/pages/help
Step 4: Install the pedals. Use the pedal marked with an “L” on the left side and the right pedal marked with an “R” on the right
side (side with drivetrain gears). Be careful to not cross thread the pedals. Tighten securely as shown in the assembly video.
Step 5: Inflate tires to desired PSI. Recommended pressure 20 PSI (1.379 Bar). Do not overinflate or underinflate tires.
Step 6: Set desired saddle height. Secure tightly with the quick release lever at the desired height. Ensure saddle post is not
extended beyond the minimum insertion marking near the base of the saddle post.
Step 7: Check that the battery pack is locked to the frame of the RadRhino.

8
Step 8: Install front fender and headlight as shown in the RadRhino assembly video. The headlight angle should be adjusted to
provide a light angle which will illuminate the road ahead and not blind oncoming traffic.
NOTICE: Ensure all hardware is tightened properly and all safety checks in the following sections are performed before first use. Contact Rad Power Bikes if
you have any questions regarding the assembly of your bike. If you are not able to ensure all the assembly steps in the assembly video are performed properly,
or you are unable to view the assembly video please consult a certified local bicycle service provider for assistance in addition to contacting Rad Power Bikes
for help.
Do not extend any components including the stem, rear rack, or saddle post beyond any minimum insertion marking etched into
the components. Ensure that all hardware is properly tightened and secured before moving on to next step otherwise serious
injury or death could occur.
Recommended Torque Values
Adjusting the Saddle Height
1) Open the quick release skewer by swinging open the lever outwards about 180 degrees.
2) You can now move the saddle up and down by sliding the saddlepost. Set the desired saddle height.
Hardware Location
Torque Required (Nm)
Handlebar
18-20
Stem
18-20
Saddle
18-20
Front Wheel (For Bikes With Bolt On Front Wheel)
16-25
Rear Wheel
35-40
Bottom Bracket Parts
35-55
Pedals
35
Disk mounting Bolts
6
Disk Caliber Mount
10
Crank Bolts
40
Rear Derailleur Cable Pinch
6
Front Derailleur Clamp
7
Saddle Post Clamp
7

9
3) After tightening the finger nut on the seat post quick release properly, close the quick release lever by swinging the lever
back 180 degrees until it looks like the image below and the saddle cannot move up, down or to the left or right.
Before using the bike, check that the saddle post quick release skewer is closed and tightened properly. Check that it is correctly
fitted before every ride and after every time the bike is left unsupervised, even for a short time. Otherwise, the saddle post
may come loose and result in loss of control and serious injuries.
For most users, the saddle height should be set by placing the ball of your foot on the pedal when the crank is at it’s lowest point.
Your leg should almost be fully extended.
Adjusting the Saddle Position and Angle
To change the angle and horizontal position of the saddle:
1) Undo the Allen head bolt underneath the saddle on the saddle clamp positioned immediately underneath the saddle,
above the rear wheel.
2) You can now move the saddle backwards or forwards in the guide and adjust the angle of the saddle. A horizontal
position is desirable for most riders. There are white limit markings on the saddle rail, which show the minimum and
maximum horizontal movement allowed for this component, do not exceed these limits.

10
NOTICE: Ensure saddle post and saddle are properly adjusted before riding. Do not raise the saddle post beyond the minimum insertion marking etched into
the saddle post tube. If your saddle post projects from the frame beyond these markings, the saddle post or frame may break, which could cause you to lose
control and fall. Prior to first use, be sure to tighten the saddle clamp properly. A lose saddle clamp or saddle post binding bolt can cause damage to the
bicycle or can cause you to lose control or fall. Periodically check to make sure that the saddle clamp is properly tightened.
Rider Comfort
To obtain maximum comfort, the rider should not overextend his or her arms reach when riding. In order to obtain the most
comfortable riding position and offer the best possible pedaling efficiency, the saddle height should be set correctly in relation to
the rider’s leg length as briefly described above. The correct saddle height should not allow leg strain from over extension, and
the hips should not rock from side to side when pedaling. While sitting on the bicycle with one pedal at its lowest point, place the
ball of your foot on that pedal. The correct saddle height will allow the knee to be slightly bent in this position. A bicycle fitting
professional should be consulted if you have any questions regarding proper bike fit to avoid strain on the rider.
Battery Charging
Charging Procedure
Follow these steps for charging your Rad Power Bike:
1. Turn the battery pack off using the silver illuminated pushbutton switch on the side of the battery. The button should not
be depressed and the battery light should be off.

11
2. Remove the rubber cover on the charging socket on the opposite side of the battery switch.
3. With the battery on or off the bike, place the charger in a flat, secure place, and connect the DC output plug from the
charger (round barrel connector) to the charging port on the side of the battery pack.
4. Then connect the input plug (110/220 volt plug) to the power outlet, charging should initiate and will be indicated by the
LED charge status light on the charger turning red.
5. After charging, indicated by the charging indicator light turning green, unplug the charger from the wall outlet first and
proceed to remove the charger output plug from the bike charging port.
Always charge your battery in temperatures between 10 and 26 degrees Celsius and ensure the battery and charger are not
damaged before initiating charge. If you notice anything unusual while charging please discontinue charging and use of the
bike and contact Rad Power Bikes for help.
Basic Battery Charging Tips
oThe battery should be recharged after each use. There is no memory effect so you can charge the battery after short rides
without damage.
oThe battery can be recharged on or off the bike.
oRemove the battery by turning the key and then pulling the battery forward and up until the battery detaches from the
mating receptacle.
oThe charger will automatically stop charging when the battery pack is full.
oAlways charge in dry locations and indoors away from direct sunlight, dirt or debris.
oDo not cover up the charger when plugged in or charging, it air cools and needs to be left in an open space. Do not charge
with the charger in the inverted position which can inhibit cooling and reduce the chargers life.
oCheck the charger cables, charger and battery for damage before beginning each charge.
oThe light on the charger will turn green when charge is complete and stay red while the battery charges
oCharging normally takes 3-5 hours, however it can take longer when you first receive the bike since the battery pack is
balancing.

12
oCharge in a clear area away from potential to trip on the charging cords, or damage to occur to the bike, battery or
charging equipment while parked.
When the Battery Is Removed
oDo not touch the “+” and “-“terminal contacts on the bottom of the battery when the battery is removed from the bike.
oBe careful not to drop or damage the battery pack when loose from the bike.
oEnsure the battery is turned off whenever it is being removed or off the bike.
When Installing the Battery onto the Bike
oEnsure the battery is turned off before sliding the battery into the frame mount receptacle.
oDo not force the battery onto the receptacle, slowly align and push battery down into the receptacle.
oEnsure the key is in the locked position before riding and check that the battery has been properly secured to the bike
before each use by pulling upwards and testing the security of the pack.
Charging Time
When the input and output terminal are connected properly, and the battery is not fully charged, the red charging indicator light
should illuminate, showing that the battery is charging. The time that the battery takes to fully charge the battery is dependent
on various factors including distance traveled, riding characteristics, terrain, payload, and battery age. The following table
provides an estimate of charge time based on most common distances traveled in regular operation:
Distance Traveled
Charge Time to Fully Recharge
8 km
1 hour
16 km
1.5 hours
24 km
2.5 hours
32 km
3.5 hours
40 km
4.5 hours
48 km
5.5 hours

13
Notice: The battery pack can take longer to charge when fully depleted and when the battery is new. As your battery ages you might also
experience increased charging times but this is only expected after 3-5 years of regular use. If your battery does not seem to be charging
normally, and taking longer to charge than expected, please discontinue charging and contact Rad Power Bikes immediately.
Charger Safety Information
oKeep charger in a safe place away from children.
oFully charge the battery before each use to extend the life of the battery and help to reduce the chance of over-
discharging the battery pack.
oDo not charge the battery with any other chargers than what was originally supplied with your Rad Power Bike or a
charger purchased directly from Rad Power Bikes for use with your specific bike serial number, as approved by Rad Power
Bikes.
oThe charger works on 110/220 V 50/60 Hz standard home AC power outlets, do not open the charger to select voltage
input, the charger automatically detects and accounts for incoming voltage.
oAvoid charger contact with liquids, dirt/debris or metal objects.
oStore the charger in a location where it cannot suffer damage from falls/impact.
oThe charger should only be used indoors in a dry ventilated area.
oIf you notice a strange smell or the charger or battery are overheating, please stop charging immediately and contact Rad
Power Bikes.
oDo not yank or pull on the cables of the charger. When unplugging carefully remove both the AC and DC cables by way of
pulling on the plastic plugs, not pulling on the cables.
Please take special care in charging of your Rad Power Bike in accordance with the above procedures and safety information.
Failure to follow proper charging procedures can result in damage to your Rad Power Bike, charger, personal property and/or
serious injury or death.

14
License Plate Installation
Depending on the location of use, a driving permit/license and insurance/number plate may be required to operate the RadRhino
L1e-A Powered Cycle.
The license/number plate mounting bracket included on all RadRhino’s is sized to accommodate most license/number plates
designed for L1e-A type vehicles.
Please inform yourself regarding all applicable legislation before using your powered cycle and ensure a license/number plate, if
required, is properly secured.
Operation
Start-Up Procedure
After the bike has been properly assembled following the unboxing video and all components are secured correctly, you may now
proceed to start up the vehicle and select the power level following the next steps.
1. Install the key and secure the battery pack to the frame mount, turning in the clockwise direction. Remove the key and
test to see the battery cannot be removed before proceeding.
2. Press the power button on the battery. The blue light should now be visible on the button indicating it is turned on.
3. Hold down the center mode button on the display remote for 2 seconds then release, the display should turn on.
4. Select your desired level of pedal assistance between level 0 through 5 using the up and down arrows on the display
remote. Level 1 corresponds to the lowest level of pedal assistance, and level 5 corresponds to the highest level of pedal
assistance. Level 0 indicates pedal assistance will be inactive.
5. The throttle is used by first ensuring the red button is depressed and then slowly and carefully applying the throttle by
rotating the throttle backwards towards the rider. If the red button on the throttle is not depressed, the throttle will not
be active.
6. The headlight is always on when the battery/LCD display are on. To turn the taillight on, hold down the top and middle
buttons on the display remote located on the left side of the handlebars for 2-3 seconds.

15
7. Once the bike is turned on, please apply the left and right brake levers, one at a time, and ensure each lever engages the
rear brake light contained within the taillight unit.
8. With the proper safety gear and rider knowledge and understanding you may now proceed to operate your Rad Power
Bike. You can begin by pedaling the bike in the appropriate drivetrain gear with or without pedal assistance. You may also
use the throttle to accelerate and maintain your desired speed.
NOTICE: Even if you are an experienced bicycle user, please take the time to read and implement the guidelines described in the owner’s manual
accompanying your RadRhino, and the manuals included with each sub component.
NOTICE: Do not perform any of the steps in the Operation section of this manual until you have read this entire manual since there are important details in the
following sections, especially related to safety.
Users must become accustomed to the bikes power control system before operating. The throttle mechanism allows full
power to be activated from a stop and inexperienced users should take extra care when first applying the throttle. The pedal
assistance feature is also a powerful option and users should fully research and understand how to operate it before first use.
Not taking care to familiarize yourself and practice the operation of the power system on your Rad Power Bikes can lead to
death or serious injury, please head this warning.
Users must follow the instructions and warnings contained in this manual for their safety. Do not attempt to operate your
Rad Power Bike until you have attained adequate knowledge of its control and operation. Damage caused by failing to follow
instructions is not covered under warranty and could result in personal injury to you or others as well as damage to property
and/or your Rad Power Bike. Contact Rad Power Bikes if you have any questions about assembly or operation.

16
Display Features
The image shows the various features and information displayed
on the Display. The display is controlled using the 3 button
remote mounted on the left side of the handlebar.
Driving Range
The range of your Rad Power Bike is the distance the bike will
travel on a single full charge of the onboard battery pack. The
range values in this manual are estimates based on expected
usage characteristics. Some of the factors which effect range
include changes in elevation, speed, payload, and acceleration,
number of starts and stops and ambient air temperatures. Tire
pressure and terrain are also important variables to consider.
We suggest that you select a lower assistance level when you first get your Rad Power Bike to get to know your bike and travel
routes. Once you become familiar with the range requirements of your travel routes, and the capabilities of your Rad Power Bikes
you can then adjust you riding characteristics if you so desire.
The following table provides general estimates and outlines various factors effecting range and their combined estimated effects
on range. This table is meant to help owners understand the factors that can increase of decrease range but Rad Power Bikes
makes no claims to the range that individual users might obtain.
Expected Range
Operating Conditions

17
32 km
oHilly Terrain
oHeavy Payload
oWindy
oHigh Speeds
oLight Pedaling
48 km
oFlat Terrain
oNormal Payload
oNot Windy
oMedium Speeds
oLight Pedaling
64 km
oFlat Terrain
oNormal Payload
oNot Windy
oLow Pedal Assist Level
oModerate to Heavy Pedaling
Battery Capacity Display
The display on the handlebar of your Rad Power Bike features a battery capacity gauge (much like the fuel gauge on an
automobile). It is recommended that users charge the bike as soon as possible once one bar is left on the display. Once the
battery is fully depleted, the last remaining bar will begin to flash, communicating to the user that they should cease operation
immediately.

18
Best Practices for Extending Range and Battery Life
Notice: It is recommended that users pay close attention and ride within the following limitations to ensure the hub motor does not overheat
or become damaged from excessive loading.
oDo not climb hills steeper than 15% in grade.
oPedal to assist the motor when climbing hills and accelerating from a stop.
oAvoid sudden starts and stops.
oWhen climbing hills reduce the power output to 500 watts or less. This can be accomplished by pedaling with the bike
while in pedal assist modes 1 or 2.
oAccelerate slowly.
Parking, Storage and Transport
Please follow these basic parking, storage and transport tips to ensure your bike is well cared for on and off the road.
oWhen pushing the vehicle manually, turn off the power to avoid accidental acceleration from the motor.
oIt is recommended to park indoors.
oSwitch the power off, and any lights to conserve battery. Remove the key from the bike and ensure the battery is locked
to the frame or removed and brought with you for security.
oIn public places, your Rad Power Bike must be parked in accordance with local rules and regulations.
oIf you have to park outdoors in rain, or wet conditions you should only leave your Rad Power Bike outside for a few hours
and proceed to park the bike in a dry location afterwards in order to allow all the systems to dry out. Much like a regular
bike, use in wet conditions mandates a more regular maintenance schedule to ensure your bike does not become rusty,
corroded and to ensure all systems are always working safely.
oDo not park, store, or transport your Rad Power Bike on a rack that is not designed for the size and weight of the bike.
oWide tires, as used on Rad Power Bikes, cannot fit into all bike racks, please select an appropriate rack for the width of
tires used on your bike.

19
oLocking up your bike is recommended to ensure your bike is secure and the chance of theft is reduced. Rad Power Bikes
makes no claims or recommendations on the proper lock hardware or procedures to secure your bike, but we do
recommend you take the appropriate precautions to keep your Rad Power Bike safe from theft.
oWhen storing your bike or carrying your bike on a rack for transport, you can remove the battery pack to reduce the
weight of the bike and make lifting and loading easier.
Carrying Loads
MAXIMUM PAYLOAD FOR RADRHINO
The total maximum weight limit of the RadRhino (125 Kilograms) includes the weight of the rider as well as clothing, riding gear, cargo, etc.
The kickstand is not designed to be used for loading cargo. You MUST hold onto the bike whenever loading cargo. Do not assume the bike is
stable and balanced when using the kickstand, always hold onto the bike when cargo is being loaded or in place.
Total maximum payload: 125 Kilograms
Rear Rack: 18 Kilograms when using the Rad Power Bikes RadRhino rear rack.
Carrying Cargo
Carrying a cargo load involves additional risks which need to be paid close attention to, users should practice riding on a flat and
open area with light cargo before attempting to carry heavier loads. You must become accustomed to the braking, steering, and
operational adjustments required to safely operate the RadRhino with cargo. Braking, acceleration, and balancing are all
significantly affected by the addition of cargo loaded on the RadRhino.
Notice: The following bulleted list provides important tips for the safe operation of the RadRhino when used for carrying cargo.
•Plan your route accordingly as your hill climbing ability, steering and braking are all impacted when cargo is loaded on the
RadRhino. Hills that are normally easy to climb and descend without cargo can become challenging and dangerous once
cargo is loaded.

20
•Cargo should be loaded as low as possible to lower the center of gravity and improve stability, but ensure that cargo does
not interfere with any moving components or the ground.
•Ensure your loads are properly secured and periodically check that nothing loosens.
•Get a feel for the cargo load in a flat and open area before riding on roads.
Do not use the front brake by itself, always apply the rear brake first followed by the front brake and be sure to use both brakes
for all braking operations. Front fork failure or loss of control are plausible when the front brake is operated independently for
slowing at high speed with cargo loads.
The kickstand is not designed to be used for loading cargo. You MUST hold onto the bike whenever loading cargo. Do not
assume the bike is stable and balanced when using the kickstand, always hold onto the bike when cargo is being loaded or in
place.
Maintenance
Bicycle Care
To ensure safe riding conditions you must ensure your bike is properly maintained. You should follow these basic guidelines and
see your certified bicycle mechanic at regular intervals to ensure your bike is safe for use.
1. Properly maintain batteries by keeping them fully charged when not in use.
2. Never immerse the bike or any components in water as the electrical system may be damaged.
3. Periodically check wiring and connectors to ensure there is no damage and the connectors are secure.
4. To clean, wipe the frame with a damp cloth soaked in a mild non-corrosive detergent mixture. Dry with a cloth.
5. Store under shelter; avoid leaving it in the rain or exposed to corrosive materials. If exposed to rain, dry your bicycle
afterwards and apply anti-rust treatment to chain and other unpainted steel surfaces.
6. Riding on the beach or in coastal areas exposes your bicycle to salt which is very corrosive. Wash your bicycle frequently
and wipe or spray all unpainted parts with anti-rust treatment. Damage from corrosion is not covered under warranty so
special care should be given to extend the life of your bike when used in coastal areas or areas with salty air or water.
Table of contents