RADWAG PUE HX5.EX Mounting instructions

PUE HX5.EX
WEIGHING INDICATOR
SOFTWARE MANUAL
ITKP-01-04-12-18-EN

2
DECEMBER 2018

3
CONTENTS
1. INTENDED USE............................................................................................................................................. 6
2. OPERATION PANEL ..................................................................................................................................... 7
3. START-UP ..................................................................................................................................................... 8
4. HOME SCREEN............................................................................................................................................. 8
4.1.Top Bar....................................................................................................................................................9
4.2.Weighing Result Window .........................................................................................................................9
4.3.Workspace...............................................................................................................................................9
4.4.Pictograms...............................................................................................................................................9
5. OPERATING THE MENU............................................................................................................................. 10
5.1.Entering the Menu.................................................................................................................................. 10
5.2.Menu Keys.............................................................................................................................................10
5.3.Entering Numeric and Text Characters and Signs..................................................................................11
5.3.1.Numerical Box.............................................................................................................................11
5.3.2.Text Box......................................................................................................................................13
5.3.3.Diacritical Signs Table.................................................................................................................15
5.3.4.Special Signs Table.....................................................................................................................15
5.4.Return to Weighing ................................................................................................................................ 15
6. PROGRAM................................................................................................................................................... 16
7. LOG IN OPERATION................................................................................................................................... 16
7.1.Log in Procedure....................................................................................................................................17
7.2.Log out Procedure..................................................................................................................................17
7.3.Permission Levels..................................................................................................................................17
8. WEIGHING................................................................................................................................................... 18
8.1.Zeroing...................................................................................................................................................18
8.2.Taring.....................................................................................................................................................18
8.3.Dual Range Devices ..............................................................................................................................19
8.4.Weighing Unit Change...........................................................................................................................19
8.5.Setting MIN, MAX Thresholds................................................................................................................20
8.5.1.Setting MIN, MAX Threshold Using Programmable Button..........................................................20
8.5.2.Setting MIN, MAX Thresholds by Product Selection....................................................................21
8.5.3.Setting MIN, MAX Threshold Using Proximity Sensor ................................................................. 21
8.5.4.Setting MIN, MAX Threshold Using Digital Input .........................................................................21
9. COMMUNICATION ...................................................................................................................................... 22
9.1.RS232....................................................................................................................................................22
9.2.RS485....................................................................................................................................................22
9.3.Ethernet.................................................................................................................................................23
9.4.USB .......................................................................................................................................................23
10. PERIPHERAL DEVICES............................................................................................................................ 24
10.1.IM01.EX Communication Module.........................................................................................................24
10.1.1.Connecting IM01.EX to the Mains.............................................................................................24
10.1.2.Connecting IM01.EX Module and PUE HX5.EX Indicator .........................................................24
10.1.3.Activation of Connection Between the IM01.EX Module and HX5.EX Scale..............................24
10.2.Computer.............................................................................................................................................25
10.2.1.Computer Port...........................................................................................................................25
10.2.2.Address.....................................................................................................................................26
10.2.3.Weighing Printout Template......................................................................................................26
10.2.4.Continuous Transmission..........................................................................................................26
10.2.5.Printout Interval.........................................................................................................................27
10.2.6.PUE HX5.EX and E2R System .................................................................................................27
10.3.Printer..................................................................................................................................................27
10.3.1.Printer Port................................................................................................................................28
10.3.2.Code Page................................................................................................................................28
10.3.3.Prefix, Suffix..............................................................................................................................29
10.3.4.Record of Measurement Data Onto a USB Flash Drive.............................................................30
10.4.Barcode Scanner.................................................................................................................................30
10.4.1.Barcode Scanner Port...............................................................................................................30
10.4.2.Offset........................................................................................................................................31
10.4.3.Length of Code..........................................................................................................................31
10.4.4.Prefix, Suffix..............................................................................................................................31
10.4.5.Field Selection...........................................................................................................................32
10.4.6.Filtering.....................................................................................................................................32

4
10.4.7.Test...........................................................................................................................................32
10.5.Additional Display ................................................................................................................................33
10.5.1.Additional Display Port..............................................................................................................33
10.5.2.Bottom Text Area Template ......................................................................................................33
11. PRINTOUTS .............................................................................................................................................. 34
11.1.Print Mode: Header – GLP Printout - Footer........................................................................................34
11.2.Non-Standard Printouts .......................................................................................................................36
11.3.Adjustment Report...............................................................................................................................37
11.4.Dosing Report......................................................................................................................................37
11.5.Formulation Report..............................................................................................................................38
12. INPUTS / OUTPUTS .................................................................................................................................. 39
12.1.Input Setup ..........................................................................................................................................39
12.2.Output Setup........................................................................................................................................39
13. DISPLAY.................................................................................................................................................... 41
13.1.Workspace........................................................................................................................................... 41
13.1.1.Label.........................................................................................................................................41
13.1.2.Text Box....................................................................................................................................43
13.1.3.Bar Graph ................................................................................................................................. 43
13.2.Keys.....................................................................................................................................................45
13.3.Default Screen Settings .......................................................................................................................47
14. PERMISSION LEVELS.............................................................................................................................. 47
14.1.Anonymous Operator...........................................................................................................................47
14.2.Date and Time.....................................................................................................................................48
14.3.Printouts...............................................................................................................................................48
14.4.Databases Edition................................................................................................................................48
14.5.Select Database Record......................................................................................................................49
15. UNITS ........................................................................................................................................................ 49
15.1.Units Availability...................................................................................................................................49
15.2.Start Unit..............................................................................................................................................50
15.3.Gravitational Acceleration....................................................................................................................50
15.4.Custom Units.......................................................................................................................................50
16. MISCELLANEOUS PARAMETERS........................................................................................................... 51
16.1.Interface Language..............................................................................................................................51
16.2.Display Brightness...............................................................................................................................51
16.3.Date and Time.....................................................................................................................................51
16.4.Backlight Standby Time .......................................................................................................................52
16.5.Automatic Shutdown............................................................................................................................52
16.6.Default Operator Settings.....................................................................................................................52
17. ADJUSTMENT........................................................................................................................................... 53
17.1.External Adjustment.............................................................................................................................53
17.2.User Adjustment ..................................................................................................................................53
17.3.Start Mass Determination.....................................................................................................................54
17.4.Adjustment Report...............................................................................................................................54
18. SCALE DATA ............................................................................................................................................ 54
19. WORKING MODES - GENERAL INFORMATION ..................................................................................... 55
19.1.Running Working Mode........................................................................................................................55
19.2.Working Mode Accessibility .................................................................................................................55
20. WORKING MODES - Local Settings ........................................................................................................ 55
20.1.Readout...............................................................................................................................................56
20.2.Save Mode...........................................................................................................................................57
20.3.Auto Threshold ....................................................................................................................................57
20.4.Result Control......................................................................................................................................57
20.5.Autotare...............................................................................................................................................58
20.6.Labelling Mode ....................................................................................................................................58
20.6.1.Automatic C Label Triggering....................................................................................................59
20.7.Statistics .............................................................................................................................................. 60
21. WORKING MODE – WEIGHING................................................................................................................ 60
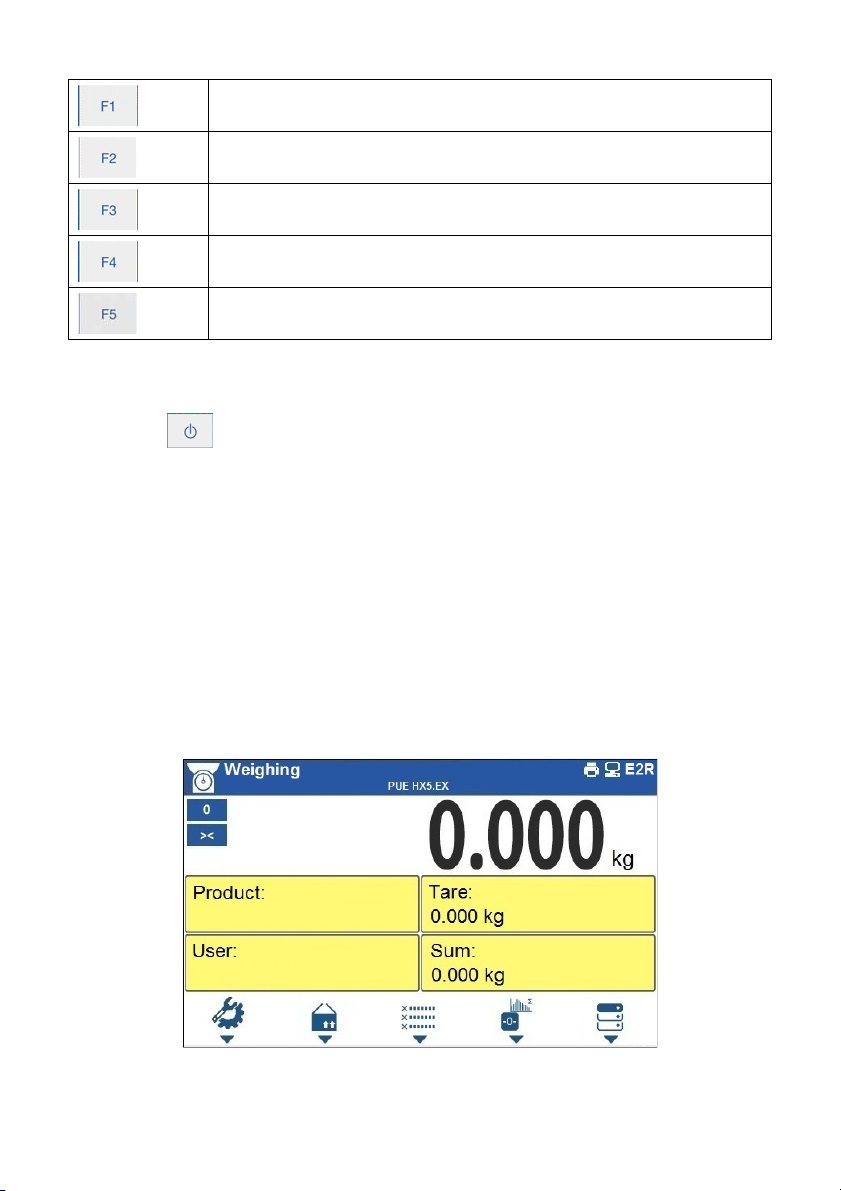
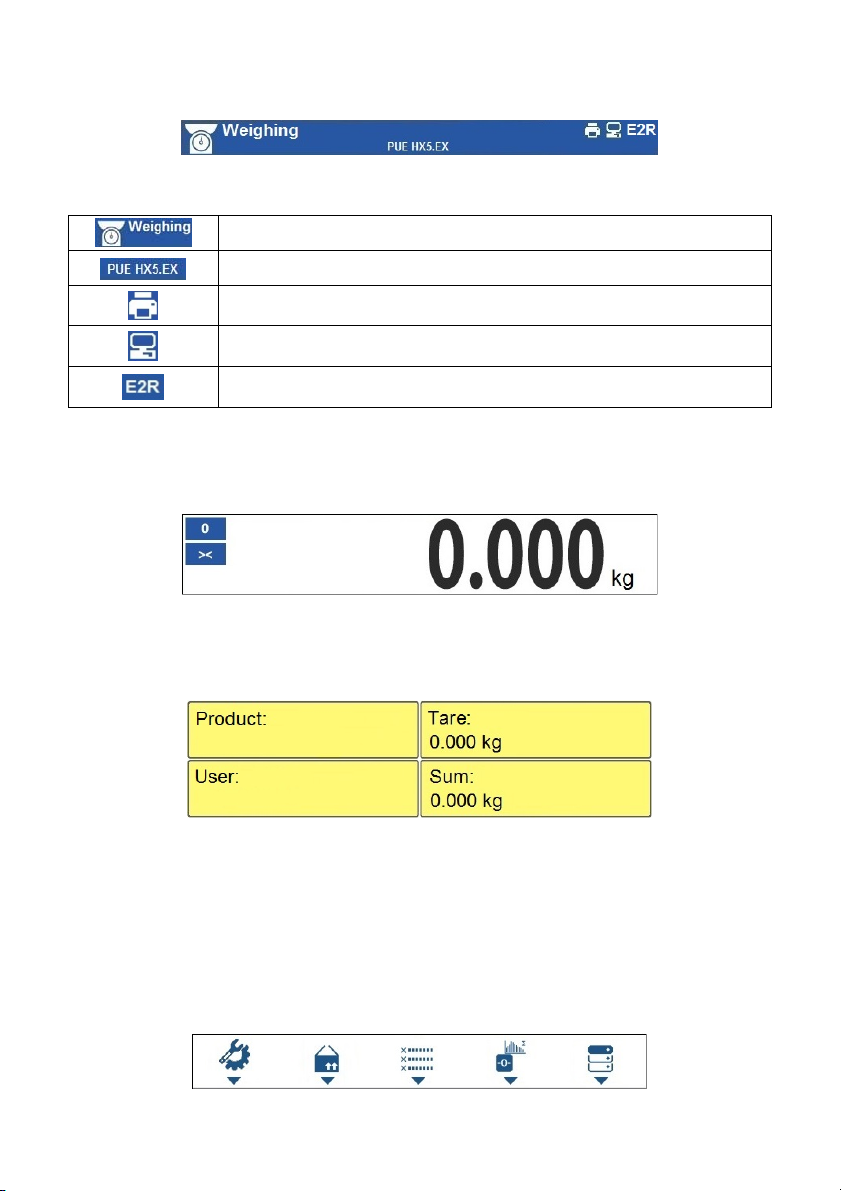
21.1.Home Screen.......................................................................................................................................60
21.2.Local Settings......................................................................................................................................61
22. WORKING MODE – PARTS COUNTING .................................................................................................. 61
22.1.Home Screen.......................................................................................................................................61
22.2.Local Settings......................................................................................................................................61
22.2.1.Function of Automatic Correction of Reference Sample Mass...................................................62
22.2.2.Minimum Reference Sample Mass............................................................................................63

5
22.3.Setting Reference Sample Mass by Entering Mass of a Single Part .................................................... 63
22.4.Setting Reference Sample Mass by Determining Mass of a Single Part .............................................. 63
22.5.Setting Reference Sample Mass by Acquiring Mass of a Single Part from Database...........................64
22.6.Entering Reference Sample Mass to Weighing Device Memory ..........................................................64
23. WORKING MODE - PERCENT WEIGHING............................................................................................... 65
23.1.Home Screen.......................................................................................................................................65
23.2.Local Settings......................................................................................................................................65
23.3.Reference Sample Mass Determined by Weighing..............................................................................66
23.4.Reference Sample Mass Entered to the Weighing Device Memory ..................................................... 66
23.5.Setting Reference Sample Mass by Acquiring Mass of a Single Part from Database...........................66
24. WORKING MODE – DOSING.................................................................................................................... 66
24.1.Home Screen.......................................................................................................................................67
24.2.Local Settings......................................................................................................................................67
24.3.Automatic Dosing Procedure ...............................................................................................................69
24.4.Manual Dosing Procedure....................................................................................................................71
24.5.Dosing Process Report........................................................................................................................73
25. WORKING MODE – FORMULATIONS .....................................................................................................73
25.1.Home Screen.......................................................................................................................................73
25.2.Local Settings......................................................................................................................................74
25.3.New Formulation..................................................................................................................................74
25.4.Formulation Procedure ........................................................................................................................75
25.5.Formulation Report..............................................................................................................................77
26. DATABASES............................................................................................................................................. 78
26.1.Database Export..................................................................................................................................78
26.2.Database Import .................................................................................................................................. 79
26.3.Adding Database Record.....................................................................................................................79
26.4.Deleting Database Record...................................................................................................................80
26.5.Deleting Database Content..................................................................................................................80
26.6.Databases Edition................................................................................................................................80
26.6.1.Operators..................................................................................................................................80
26.6.2.Products....................................................................................................................................80
26.6.3.Formulations .............................................................................................................................81
26.6.4.Packaging.................................................................................................................................82
26.6.5.Customers.................................................................................................................................82
26.6.6.Labels .......................................................................................................................................82
26.6.7.Universal Variables...................................................................................................................83
27. REPORTS.................................................................................................................................................. 83
27.1.Deleting Weighings Report ..................................................................................................................84
27.2.Reports Preview...................................................................................................................................84
27.2.1.Weighings.................................................................................................................................84
27.2.2.Alibi...........................................................................................................................................85
27.2.3.Dosing reports...........................................................................................................................85
27.2.4.Formulations reports ................................................................................................................. 85
28. IMPORT / EXPORT.................................................................................................................................... 86
28.1.Data Export..........................................................................................................................................86
28.2.Data Import..........................................................................................................................................87
29. ERROR MESSAGES ................................................................................................................................. 88
30. ANNEX 01 – Printout Variables ............................................................................................................... 88
30.1.Variables List.......................................................................................................................................88
30.2.Variables Formatting............................................................................................................................90
31. ANNEX 02 – Label Template.................................................................................................................... 93
31.1.Creation of Label Template via the Scale.............................................................................................93
31.2.Sending Label Template to Scale Memory...........................................................................................93
31.3.Assigning a Label with a Template to a Product...................................................................................93
31.4.Assigning a C Label with a Template to a Product...............................................................................94
31.5.Assigning a Label with a Template to a Customer ...............................................................................94
31.6.Printing a Label with a Template..........................................................................................................94
32. ANNEX 03 - ZEBRA Printer Configuration.............................................................................................. 94
33. ANNEX 04 - Barcode Scanner Configuration ......................................................................................... 95

6
1. INTENDED USE
PUE HX5.EX is a versatile weighing indicator designed to make industrial
scales based on load cells. It is constructed in accordance with Directive
2014/34/EU, and can be used in environment filled with explosive gases and
dust, classified as zones: 1, 2, 21, 22. The PUE HX5.EX indicator's functionality
makes it a perfect solution for vast range of various industry applications.
The standard version of the indicator is equipped with the following
communication interfaces enabling integration with devices placed in the
hazardous area: 2 x RS232, RS485, and 4I/4O (optionally). The indicator
is powered using intrinsically safe power supplies: PM01.EX-1 or PM01.EX-2.
It is possible to connect the PUE HX5.EX indicator to IM01.EX communication
module, placed outside the hazardous area. Due to its intrinsically safe
interface, the IM01.EX module can expand the indicator’s interfaces range:
Ethernet, 2 x RS232, USB, RS485 (option), 12I/12O (option), analog outputs
(option), PROFIBUS (option).
PM01.EX-1
AC 100÷240V
50/60Hz
PM01.EX-2
AC 100÷240V
50/60Hz
OR
IM01.EX
Safe area
Hazardous area
PUE HX5.EX

7
2. OPERATION PANEL
Keys:
Press to switch the indicator on / off.
Press to enter the main menu.
Press to log in.
Press to zero the scale.
Press to tare the scale.
Press to change the weighing unit.
Press to cancel the message.
Press to confirm the message.
Press to change the working mode.
Press to confirm the weighing result (PRINT).
Press to confirm the messages (ENTER).
Press to cancel the messages.

8
Programmable key assigned to a pictogram displayed in the bottom screen
area.
Programmable key assigned to a pictogram displayed in the bottom screen
area.
Programmable key assigned to a pictogram displayed in the bottom screen
area.
Programmable key assigned to a pictogram displayed in the bottom screen
area.
Programmable key assigned to a pictogram displayed in the bottom screen
area.
3. START-UP
•Press key, it is to be found on the top of the operation panel.
•Upon completed start-up the home screen is displayed automatically.
•The scale is ready for operation.
4. HOME SCREEN
The home screen features 4 sections:
•top bar,
•weighing result window,
•workspace,
•pictograms.
Home screen view:

9
4.1. Top Bar
The top bar displays the following information:
Working mode name and symbol.
Weighing device name.
Symbol informing that printer is connected.
Symbol informing that communication with a PC computer is on.
Symbol informing that communication with E2R SYSTEM is on.
4.2. Weighing Result Window
Weighing result window provides all weighing related data.
4.3. Workspace
The workspace is to be found underneath the weighing result window.
The workspace comprises 4 programmable widgets. Each working mode
features default home screen widgets set. You can customize the screen.
For detailed information concerning the workspace read section 'Display'.
4.4. Pictograms
The pictograms assigned to operation panel keys are to be found underneath
the workspace.

10
You can define on-screen pictograms individually for each working mode.
For detailed procedure informing you how to define on-screen pictograms read
section 'Display'.
5. OPERATING THE MENU
In order to navigate the program menu use the operation panel.
5.1. Entering the Menu
In order to enter the menu press key. Background colour of the first menu
entry differs from the remaining ones. To navigate the program menu use the
keys that operate as arrow keys.
Menu view
5.2. Menu Keys
Press to enter the main menu.
Press to go to the home screen.
Press to move one menu level up, or to discard entering parameter
modifications.
Press to move one menu level up.
Press to delete a character when editing numeric and text values.

11
Press to change keyboard mode when editing numeric and text values.
Press to select/change working mode.
Press to confirm/accept modifications.
Press to move one menu level up, or to discard entering parameter
modifications.
Press to select higher-level parameters group, or to edit parameter value and
change it by one digit up.
Press to select parameters group that you want to operate. The first parameter
of the selected parameters group is displayed.
Press to select lower-level parameters group, or to edit parameter value and
change it by one digit down.
5.3. Entering Numeric and Text Characters and Signs
Depending on a type of data entered to indicator's memory the software offers
two different edit boxes:
•numerical box (for entering part mass values, tare values, etc.).
•text box (for entering printout template, universal variable value, etc.).
Button functions change depending on the edit box type.
5.3.1. Numerical Box

12
Where:
Digits mode. To change keyboard working mode press key. Keyboard working
mode options: - digits mode, - arrow keys operation, - bottom bar
operation.
Press to clear box content.
Keys:
Press to enter digit 1.
Press to enter digit 2.
Press to enter digit 3.
Press to enter digit 4.
Press to enter digit 5.
Press to enter digit 6.
Press to enter digit 7.
Press to enter digit 8.
Press to enter digit 9.
Press to enter digit 0.
Press to enter „-” (minus) sign.
Press to enter „.” (dot) sign.
Press to delete one character.
Press to exit, the box remains unmodified.

13
Press to confirm the modifications.
Press to change keyboard working mode.
5.3.2. Text Box
Where:
Capital letters mode. To change keyboard working mode press key. Keyboard
working mode options: - upper-case characters mode, - lower-case
characters mode, - digits mode, - arrow keys operation, - bottom
bar operation.
Press to save project to *.lb file on USB flash drive.
Press to read project saved to *.lb file on USB flash drive.
Press to clear box content.
Press to print project using printer connected to the indicator.

14
Press to view list of variables that can be used in the project.
Keys:
Press to enter . , { } : °.
Press to enter a b c.
Press to enter d e f.
Press to enter g h i.
Press to enter j k l.
Press to enter m n o.
Press to enter p q r s. Press to activate „ąëñ” function (diacritical signs table).
Press to enter t u v. Press to activate „!$&” function (special signs table).
Press to enter w x y z. Press to activate „Caps Lock” function.
Press to enter (space) sign.
Press to enter „.”.
Press to enter „ -” (minus) sign.
Press to delete one character.
Press to change keyboard working mode.
Press to go to the next line in the editing box.
Press to exit, the box remains unmodified.
Press to confirm the modifications.

15
5.3.3. Diacritical Signs Table
In order to activate diacritical signs table while editing text box it is necessary
to press and hold key. Diacritical signs characteristic for a particular
interface language are automatically added to the table when the given
language gets selected.
Diacritical signs table: Polish. Diacritical signs table: English, German,
French, Spanish.
Where:
Press to activate „Caps Lock” function.
!$& Press to switch to special signs keyboard.
5.3.4. Special Signs Table
In order to activate special signs table while editing text box it is necessary
to press and hold key.
Where:
Function inactive.
ąëñ Press to switch to diacritical signs keyboard.
5.4. Return to Weighing
Introduced modifications are automatically recorded upon return to the home
screen. To return to the home screen:

16
•press key repeatedly, keep pressing the key until you see the home
screen,
•press key, the home screen is displayed immediately.
6. PROGRAM
Program menu is divided into function groups. Function group is a group
of interrelated parameters.
Function Groups:
•Working modes,
•Databases,
•Reports,
•Communication,
•Peripherals,
•Printouts,
•Inputs / Outputs,
•Display,
•Permissions,
•Units,
•Adjustment,
•Misc,
•Scale data.
7. LOG IN OPERATION
In order to access operator-related parameters and to edit databases, you
need to log in as an operator with <Administrator> permission level.
<Admin> is a default operator set on each brand new
indicator. The default operator is assigned with
<Administrator> permission level. <Admin> account is not
protected by password. Logging of default operator is carried
out automatically upon indicator start-up. In case
of modification of default operator data or upon adding new
operators, it is necessary to log in manually.

17
7.1. Log in Procedure
•Go to the home screen, press key, wait for the operators database
to open.
•Select particular operator, wait for the on-screen keyboard with
a password box to open.
•Enter the password and press key to confirm, the home screen
is displayed.
7.2. Log out Procedure
•Go to the home screen, press key, wait for the operators database
to open.
•Select <Log out> option, the home screen is displayed.
7.3. Permission Levels
There are 4 permission levels: Administrator, Advanced Operator, Operator,
None.
Access to operator-related parameters and program functions
is conditioned by a permission level:
Permission level Available parameters and functions
None
Permission to edit operator-related parameters not granted. Operator
can neither accept the weighing result nor start the following
operations: entering reference sample mass and determining
reference sample quantity in <Parts counting> mode, entering
reference sample mass and determining reference sample in <Percent
weighing> mode, dosing, making formulations.
Operator
Operator can edit <Readout>, <Misc> parameter groups (operation
of <Date and time> parameter and <Restore operator's default
settings> function excluded). Operator can run and carry out all
weighing operations.
Advanced operator Operator can edit all operator-related parameters excluding <Date and
time> parameter. Operator can run and carry out all weighing
operations.
Administrator Operator can edit all operator-related parameters and all databases,
and use all functions. Operator can run and carry out all weighing
operations.

18
8. WEIGHING
Load the weighing pan. Read the result when stability marker is
displayed.
Only stable weighing results can be recorded (stability marker
).
8.1. Zeroing
To zero mass indication press key. Zero indication and the following
pictograms are displayed: and .
Zeroing operation means determining new zero point, recognized by the
weighing device as precise zero. The instrument can be zeroed only when the
indication is stable.
Indication can be zeroed only within ±2% range of maximum
capacity. If the zeroed value is greater than ±2% of the
maximum capacity, then the software displays a respective
error message:
8.2. Taring
To determine net weight value, load the weighing pan with a packaging, wait
for a stable indication and press key. Zero indication and the following
pictograms are displayed: and . The weighing device has been
tared.
Remember not to exceed scale's maximum capacity, i.e. sum of tare weight
value and load weight value must be lower than the maximum capacity value.
Upon unloading the weighing pan, the sum of tared masses with minus sign
is displayed.
You can assign tare value to a particular product stored in the database.
In such case the assigned tare value is automatically acquired upon selection
of the given product.

19
It is impossible to tare zero or negative values. When you tare
zero or negative values the indicator responds with the
following message:
8.3. Dual Range Devices N/A in case of single range scales
Switching from weighing with the accuracy of the I weighing range to weighing
with the accuracy of the II weighing range takes place automatically upon
exceeding Max of the I weighing range.
In case of dual range scales:
•upon switching to weighing with the accuracy of the I weighing range,
pictogram/marker is displayed on the left,
•upon switching to weighing with the accuracy of the II weighing range,
pictogram/marker is displayed on the left.
Switching from weighing with the accuracy of the II weighing range
to weighing with the accuracy of the I weighing range takes place
automatically upon unloading the weighing pan and returning to AUTOZERO –
(pictogram/marker is displayed).
8.4. Weighing Unit Change
You can change the weighing unit, to do it press key.
Options in case when the main unit is [g]:
•g (gram),
•kg (kilogram),
•ct (carat),
•lb (pound)*,
•oz (ounce)*,
•N (newton)*,
•u1 (custom unit 1)*,
•u2 (custom unit 2)*.
*) –unit disabled for verified weighing devices.

20
Options in case when the main unit is [kg]:
•kg (kilogram),
•lb (pound)*,
•N (newton)*,
•u1 (custom unit 1)*,
•u2 (custom unit 2)*.
*) –unit disabled for verified weighing devices.
You can declare start unit and two custom units – for detailed
information read section 15, „UNITS”.
8.5. Setting MIN, MAX Thresholds
MIN, MAX thresholds are used:
•to control mass of the weighed loads (read section 20.4 of this user
manual),
•for graphic visualization informing you how much of the weighing device
capacity is used (read section 13.1.3 of this user manual),
•to control the external automation systems using digital outputs of the
indicator (read section 12.2 of this user manual).
The mass is considered to be correct if it is comprised within MIN and MAX
threshold values. You can set MIN, MAX thresholds as follows:
•using programmable <Set MIN, MAX> button,
•selecting product with set thresholds,
•using a proximity sensor,
•using a digital input.
MAX threshold value has to be greater than MIN threshold
value.
8.5.1. Setting MIN, MAX Threshold Using Programmable Button
•Enter <Display / Buttons functions> submenu.
•Edit a given button.
•Select <Set MIN and MAX> parameter from the list.
•Exit to the home screen.
•Press previously programmed button, <Min> numerical box is opened.
Other manuals for PUE HX5.EX
2
Table of contents
Other RADWAG Accessories manuals

RADWAG
RADWAG PUE 7.1 User manual

RADWAG
RADWAG PUE HY10 User manual

RADWAG
RADWAG PUE C315 User manual

RADWAG
RADWAG PUE H315 User manual

RADWAG
RADWAG PUE C32 User manual

RADWAG
RADWAG PUE C32 User manual

RADWAG
RADWAG HRP 16 User manual

RADWAG
RADWAG PUE C32 User manual

RADWAG
RADWAG PUE C/31 User manual

RADWAG
RADWAG PUE HX7 User manual