manuals.online logo
Brands
  1. Home
  2. •
  3. Brands
  4. •
  5. Real Good Toys
  6. •
  7. Toy
  8. •
  9. Real Good Toys Classic Bungalow User manual

Real Good Toys Classic Bungalow User manual

Congratulations on your choice of a Real Good Toys product. Your kit has been precision made with meticulous
care by our craftspeople using carefully selected materials. This Dollhouse will last for years, even generations,
if heirloom care and attention is given during assembly. Take your time and read the instructions completely.
If you have questions, ask the experts at your local Dollhouse store or at [email protected]
Measure and identify the parts:
The kit is packed in
groupings that protect the parts, and that is how the Parts
List is organized. As you measure and identify the parts,
label them with sticky notes using the names from the
parts list, and check them off the parts list so you know
you have everything. Taking the time now to identify and
organize the parts also makes them familiar so you will
understand what the instructions intend as you read ahead.
• Plan ahead so you know where you are going
• Read ahead so you know how to get there
•
Paint ahead so the parts will be ready when you need them
Instructions for
Real Good Toys’ the Classic Bungalow Kit #B 1925
©12/18
Before you begin - You have already opened the box and
see all the parts organized in boxes and bundles. For the
moment, keep them that way. There are important things
to do before you open your glue bottle.
Choose your color scheme. Look at houses in your
community, models in your local Dollhouse shop or at our
website: realgoodtoys.com; look at plan books from a paint
store or architectural books at your library (a favorite is:
Painted Ladies by Michael Larsen and Elizabeth Pomada).
You will be painting some of the parts right away so get the
paint now. Choose high-quality interior semi-gloss latex
enamel paints for ease of use and durability.
Prepare your space: This dollhouse
will spread out over a large area while
it is being built. You will need a large
at tabletop for the house, several
boxes to keep parts organized until
they are needed, and several trays
lined with waxed paper for hold-
ing small parts like windows and
railings. A snap-lid box will
keep your tools and supplies
handy between building
sessions.
Tools and Supplies:
Tape measure or ruler, Pencil, Sticky notes
(like PostIts®)
White glue
(like Aleene’s Tacky Glue®)
for all construction
Solvent-based Panel Cement
for shingles
Masking tape, Utility knife or coarse le
Fine tooth saw (razor saw
(like X-Acto®)
or a hacksaw)
Painting Supplies, Sandpaper
(especially 320gr)
Waxed paper
PostIts
®
, Aleene’s
®
, and X-Acto
®
are registered trademarks of their manufacturers
and have no afliation with Real Good Toys
Not suitable for children under 13 years of age
California 93120 compliant for formaldehyde phase 2
Options: www.realgoodtoys.com or your miniature dealer
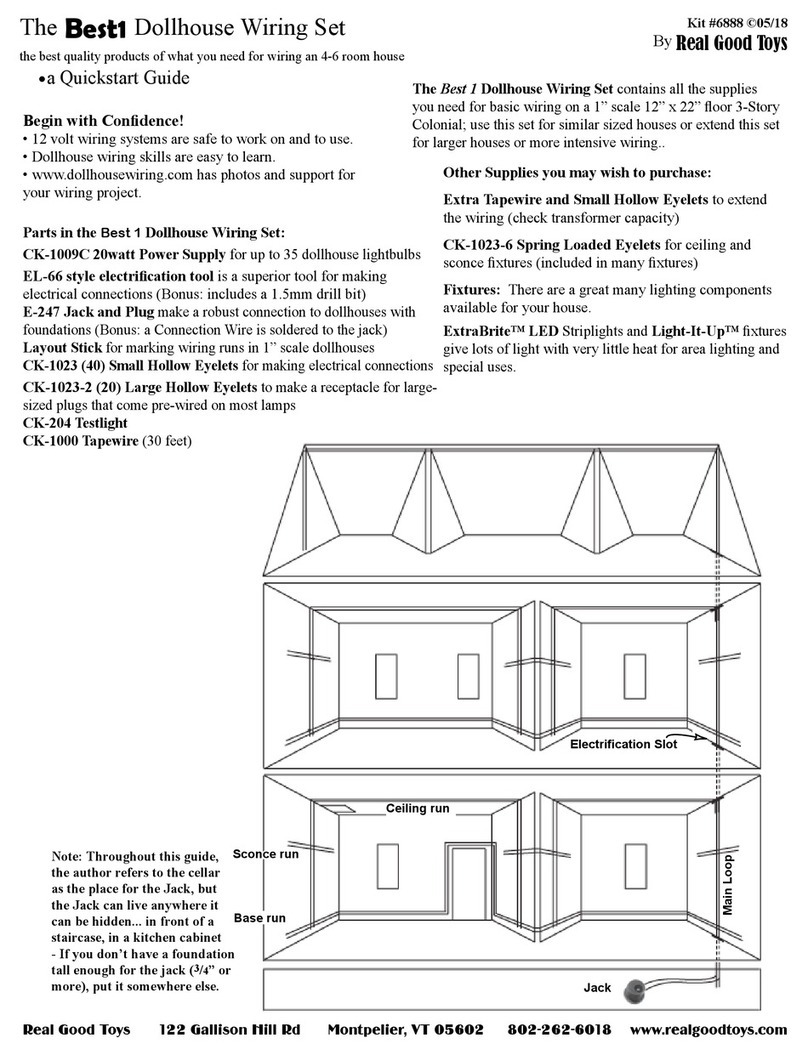
6888: the “Best 1” Dollhouse Electrical Kit
Stucco Grit: Paint additive for foundation texture
Dye-1: Brown shingle dye
Dye-3: Grey shingle dye
SC: Copper ashing
5408-10 Coarse Double-Cut le
1015: 6-panel interior doors for Dividers
J-FK Interior nishing materials: Baseboard
and crown moldings & stairway
banisters and landing rails.
Real Good Toys 122 Gallison Hill Rd Montpelier, VT 05602 802 262-6018 www.realgoodtoys.com
www.realgoodtoys.help has slideshows
See page 4 and
www.realgoodtoys.help
Parts List page 2
Instructions for Kit #B 1925
Identify the parts: Open one bundle at-a-time. Measure each part and nd it on the parts list.
Label the parts and mark the parts list so you know you’ve found everything.
Drawings are not all the same scale
Panels Bundle
(1) J0905 Dormer Roof Left: (1/4) 123/8top x 95/8, angled, bevels
(1) J0906 Dormer Roof Right: (1/4) 123/8top x 95/8, angled, bevels
(2) J0888 Attic Divider: (3/8) 111/4 x 135/8
, angled, door cutout
(1) J0884 Dormer SideWall Left: (3/8 clapboard) 513/16tall x 513/16top, angled
(1) J0885 Dormer SideWall Right: (3/8 clapboard) 513/16tall x 513/16top, angled
(1) J0886 Dormer Front Wall: (3/8 clapboard) 911/16 x 14, peaked, window cutout
(1) J0887 Divider: (3/8) 9 x 135/8, door cutout
(1) J0897 2nd Front Step Block: (3/4) 6 x 11/4
Panels
(4) J0920 Porch Post: (11/4x 11/4) 5
(1) J0880 Front Wall: (3/8 clapboard) 111/8x 303/16, cutouts
(1) E9801 Bottom Stair Block: (6-step) 21/4, bottom bevel
(1) E9802 Top Stair Block: (6-step) 21/4, top bevel
(1) J0893 Mid Floor: (3/8) 2911/16 x 133/4, woodgrain, stair hole
(1) J0894 Base Floor: (1/4) 2911/16 x 133/4, woodgrain
(1) J0902 Porch Roof: (1/4) 343/16 x 87/16, bevel
(1) J0900 Porch Floor: (1/4) 303/16 x 55/8
(1) J0881 Side Wall Left: (3/8 clapboard) 215/8tall x 135/8, angled
(1) J0882 Side Wall Right: (3/8 clapboard) 215/8tall x 135/8, angled
(1) J0901 Front Roof: (1/4) 343/16 x 153/32, dormer cutout
Bundles
(6) J0936 Rafter Material: (3/16 x 11/32) 151/4
(2) J0933 Stripwood (Side): (3/16 x 7/16) 19
(6) J0934 Stripwood (Side): (3/16 x 7/16) 137/32
(6) J0935 Stripwood (Eave): (1/8x 5/16) 151/4
(2) J0895 Foundation, F&B: (1/2) 303/16 x 13/4 grooved
(1) J0898 Porch Beam: (3/4x 11/4) 317/16,
(1) J0937 Porch Beam Cap: (5/8x 7/8) 313/16, shaped
(1) J0899 Attic Ceiling: (3/4x 11/2, triangular) 2911/16
(1) J0903 Rear Roof: (1/4) 343/16 x 2
Attic Divider
Long Foundation (front & back)
Porch Beam
Porch Roof
Front Roof
(The stair hole is closer to the front)
Mid Floor
Base Floor
Rear Roof
Dormer Roofs
Clapboard
Front
Attic Ceiling
Divider
Top Stair Block
Bottom Stair Block
Porch Post
Porch Beam Cap
Side
Stair Stringer
(in the box)
Electrication Slots - make running
tapewire from oor-to-oor easier...
if you do not intend to wire your doll-
house, ignore the Electrication Slots
Box Parts
(1400) T1004 Shingles: (1/16 x 3/4) 11/4
(1) J0907 Cricket Roof, Left: (1/4) 61/2x 7 Triangle, bevels
(1) J0908 Cricket Roof, Right: (1/4) 61/2x 7 Triangle, bevels
(1) J0909 Cricket Triangle: (1/4) 1013/32 x 13/8, triangle.
(2) J0883 Handy Square: (3/8) Triangle ±41/2”
(2) J0921 Chimney Block: (11/2x 11/2) 5, angled
(4) J0889 Foundation, Mid: (3/8) 187/8x 13/4
(2) J0910 Front Step Tread: (1/8) 6 x 17/16
(1) J0896 Base Front Step Block: (1/2) 6 x 21/2
(4) J0890 Porch Triangle: (3/8) 53/16 x 13/4+angled
(1) E9803 Stair Stringer: (1/8) 3/4x 107/8, angled
(2) J0904 Eave: (1/4) 31/8 x 31/8.
(1) R311 Oval Light Door, assembled
(set) Door Interior Trim
(6) J0912 Postbase Side: (1/4) 13/4 x 47/8, Inlet
(2) J0913 Postbase SideEnd: (1/4) 13/4 x 47/8
(4) J0914 Postbase Front: (1/8) 2 x 47/8
(2) J0915 Postbase BackEnd: (1/8) 2 x 47/8, Inlet
(2) J0916 Postbase Back: (1/8) 2 x 27/8
Rail Pack:
(2) J0923 Front Trim: (3/32 x 7/16) 9
(4) J0924 Front Porch Rail: (W) 91/16
(4) J0925 Side Porch Rail: (W) 417/32
(38)E9661 Baluster: (1/8 x 5/16) 21/8
Window Frame Pack
(2) J0955 71/2Window Frame: 713/16
(8) J0950 6 Window Frame: 65/16
(4) J0954 5” Window Frame: 55/16
(8) J0949 4” Window Frame: 45/16
(2) J0956 Middle Frame: 47/16
(2) J0953 Interior Frame: (3/32 x 7/16) 713/16
(1) E3623 Groove-Fill: (1/8 x 3/8) 4
(1) J0922 Porch Edge Nosing: (3/16 x 3/16) 6
Brackets Pack
(18)J0931 Porch Rafter End: (3/16 x 11/32) 15/8 angled
(6) J0932 Dormer Rafter End: (3/16 x 11/32) 13/16 angled
(14)R310 Bracket Base Assembly:
(10)J0928 45oBracket Cap: (7/32 x 7/16 angled) 11/2
(4) J0927 30oBracket Cap: (7/32 x 3/16 angled) 11/2
Caps pack:
(2) J0892 Chimney Cap: (3/8) 11/2x 11/2
(2) J0891 Chimney Cap: (3/8) 13/4x 13/4
(4) J0911 Postbase Cap: (1/4) 21/4 x 21/4
(4) J0918 Post Cap: (1/8) 11/2x 11/2
(6) J0919 Arch: (1/8) 33/8 x 2, shaped.
Window Pane Pack
(1) J0952 Window Pane 5 x 71/2 Printed
(2) J0951 Window Pane 4 x 6 Printed
Postbase
Front
Postbase
Back
Postbase
BackEnd
Post-
base
Side
Postbase
SideEnd
Porch Rafter End
Dormer Rafter End
Handy
Square
Arch
Door Interior Trim
cross-section
Door
Chimney Block
Chimney
Caps
Drawings are not all the same scale
Post
Cap
Dormer Front
(in the Panels Bundle Dormer Side
Mid Foundation
Parts List page 3
Instructions for Kit #B 1925
Front Step Blocks
Front Step Treads
Postbase
Cap
Eave
Porch Triangle
45oBracket Cap
30oBracket Cap
Bracket
Base
Cross-sections
Cross-sections
Cross-sections
Cricket Roofs
Cricket Triangle
Window Frame
Middle Frame
Accessories and Options page 4
Instructions for B1925 Bungalow
Exterior:
Exterior Paint Color:
see www.realgoodtoys.help for suggestions
Accessories:
Gingerbread
Flower Boxes
Foundation Stucco Grit
Octagonal Shingles
Fancy Windows and Doors
Turnposts and Spindles
Interior:
Wiring
Wallpaper
Interior paint color:
Ceilings
Painted walls
Interior trim
Flooring:
Applied wood, tile, or carpet
Banister & Landing Rails
Window and Door trim
Baseboard and Crown
Options for building the Classic Bungalow Dollhouse
See your local dollhouse shop or www.realgoodtoys.com
#6002
E1640 Conservatory
15 x 16 x 16T
E1615 Colonial Addition
13 x 16 x 19T
Split Octagonal Shingles
Shingle Dye
Dye1: Reddish Brown
Dye3: Dark Grey
T10: 12” Turntable
T250: Assembled Turntable
ET250: Wired Turntable
Doors:
#6022#6018 #1015
Exterior Interior
Note: I often enlarge an interior door opening to t the #6022
5025
Louvered
Shutters
Pine: HOW500
Cedar: HOC350
Stucco Mix
T250 Assembled Turntable
Real Good Toys 122 Gallison Hill Rd Montpelier, VT 05602 802 262-6018 www.realgoodtoys.com
6803 Banister
& Landing Set
(use with your kit stairs)
Wallpaper
Trim and Stripwood
Flute24
SW16
RGT8
Spindle
#4017 Pine Stair
and Landing Set
(replaces your kit stairs)
A Doghouse for
your Dollhouse
Real Good Toys’ Best1
Dollhouse Wiring Set
P2000
HH444
DH
Accessories and Options page 5
Instructions for B1925 Bungalow
A Dollhouse for your Dollhouse
6452M: Cherrydale Mini
6448M: Kiwi Mini
SW16
J-FK
Banister/Newel
Turned Landing Rails
Baseboard Molding
Crown Molding
Tapewire or Roundwire powered
“Light-It-Up” LED Lighting
E226
E224
E225
Battery powered LED Lighting
HW2326
HW2301
Tools, Accessories, Supplies, and Miniatures:
visit www.realgoodtoys.com
RGT5
Porch
Post
This kit will accommodate 1” Scale furniture
#6888
Assembly Notes /Getting Started (A) page 6
Instructions for Kit #B 1925
Identify and label all of the parts
Preassemble the Foundation, Rear Roof, Stairs, Postbases
Finish the oors,
Paint everything* one coat (see page 11)
Sand everything until the paint is smooth, transparent,
and some of the wood is showing through
Build the housebody up to the Roof
Second-coat the Walls
Mark, paint, and attach the Roofs
(don’t glue on the Rear Roof yet)
Optional: Start the wiring
Foundation
Install the Dividers
Optional: Finish the wiring
Assemble and nish painting everything else
Finish the Attic - attach the Rear Roof
Finish the outside
Finish the inside
Assembly Tips:
A large, clutter-free, well-lighted work area is helpful
during assembly, but a at work surface is essential.
Read the instructions carefully; look at each of the
illustrations. !With the parts in your hands!, think the
assembly through before you proceed.
Test t each time you are ready to glue a piece in
place...then you’ll know you have it right.
If more tape or a helper is needed, it’s good to know
that before the parts have glue on them.
Don’t be stingy with glue or tape; use generous
amounts. Always wipe off excess glue immediately.
Keep one damp rag and one dry rag handy all the time.
Have weights available for holding things tight as
glue joints dry (stacks of books, gallons of pure Ver-
mont Maple Syrup - anything heavy).
Glue the body of your dollhouse together with
white, water clean-up glue that dries clear. Do not use
instant-bond (super glue), fast-tack, rubber cement,
silicone, or hot melt glues. They are all used in some
wood applications, but they all have some characteris-
tic that makes them un-desirable for the body of your
dollhouse. Carpenter Glue works well, but glue-smear
dries yellow or tan; many of the things you glue onto
the house are pre-painted – extra glue will show.
I use Aleene’s Tacky Glue® for housebody assembly
(available at www.realgoodtoys.com).
Make sure everything is straight and at as glue
dries... That’s the shape that will be permanent.
Q: Can I wallpaper before I assemble the doll house?
A: Yes you can (it’s your house!) Many experienced builders
are advocates of papering before construction - I am not.
My biggest objection to papering rst is that you are always
too skimpy with glue so none will squeeze out and get on the
paper. I try to use the amount of glue that lls the joint, so
some will squeeze out in every joint and be wiped up. But
wiping glue off of wallpaper leaves a streak, so the tempta-
tion is to go skimpy, and the joints aren’t as strong.
Second, I can always tell a house that was pre-papered
because the corners show a void instead of being continuous
(see the slideshows about how to crowd the papers together
in the corner... you can’t do that with pre-papered walls).
Third, I have had to replace paper too often that has gotten
damaged by glue or tape during construction... that wastes
time and paper ($) and can make it so you are left deciding
whether to replace a damaged paper or letting it slide because
you don’t have any more of that pattern and you’ll have to
order it and that takes too much time (running out but then
needing another piece is a distressing moment).
Finally, I don’t nd pre-papering to be faster. By the time I
have done all of the extra planning that getting the papers in
the right place requires, I have used up any potential advan-
tage. I have great big blacksmith’s hands, and papering in a
nished house is easy for me.
All that having been said, I do pre-cut the papers used in the
attic before attaching the Roofs.
Glue the shingles on with glue that doesn’t have any water
in it! If the glue says ”water clean-up”, it will curl the wooden
shingles. Look carefully at the glue you intend to use to be
sure it is solvent-based, or use hot-melt glue (use the high
temp version and watch out for the burns). I use a “Sub-Floor
Adhesive” glue which comes in a caulking-gun tube at the
hardware or building supply store. It says “Caution: Flamma-
ble” on the front, and that’s how I am sure it is solvent based.
Check ingredients and warnings!
If you Wallpaper,use Grandma Stover’s
www.realgoodtoys.com
or pre-mixed Roman’s “Border” paste.
Brush paste on the wallpaper, then the wall, and nally
smooth the wallpaper into position.
Taking things apart: Heat softens glue. If you have to take
things apart, warm the part in the oven at 170ofor up to a half
hour to let the heat get into the joint where the glue is. Don’t let
it get hotter than you can touch or the paint may scorch. Don’t
heat window panes. www.realgoodtoys.help has more info.
When glue is drying, skip ahead to up-coming assembly
steps and prepare the parts that will be used.
Before you begin, read the “Finish the Inside” section at
the end of these instructions.
Overview of the Build:
Details of each step will be expanded along the way, but lots
of folks like to see how it all ts together before they start
Slideshows, demos, useful links, details, and photos are all at:
www.realgoodtoys.help
Wiring? www.realgoodtoys.help
for wiring information specic to this house.
*avoid painting grooves, edges, and surfaces that will be glued (like the outside of the roofs)
Painting (B) page 7
Instructions for Kit #B 1925
J
A: Getting Started:
Do these things before the house assembly
Stain the Shingles: Our pro uses Real Good Toys’ Shingle Dye
(available at www.realgoodtoys.com or through your Real Good
Toys miniature dealer) when dying the shingles for this house.
Batch dye or stain the shingles several days ahead of time so they
will be dry when the time comes to use them (instructions are
with the shingle dye).
Square the corners of the window, door, and stair holes with a utility knife - each
cutout has a rounded corner left over from the tool that made it.
Make two cuts
in each corner from the outside (one from each direction), then cut from each
direction on the inside to cut away the rounding in the corner so the window,
door, or stairs will t.
A Double-Cut Coarse le (item
#5408-10 at reagoodtoys.com)
is easier for many people to
use when squaring the corners.
Make several strokes from each
direction in each corner and test
the Window or Door to see how
it ts.
Demos and slideshows are at: www.realgoodtoys.help
Can I do it differently? Yes you can - but:
The information on these pages is offered as “best practices” advice, and it is what we do when we build this house.
But if you are customizing or have something else in mind, go ahead!... just test-ahead to make sure your planning
includes everything!
Masking tape is a great universal puller for dollhouse assembly, here’s how to get the best out of it:
a. Use a sticky yellow tape, not the easy-to-remove painter’s tape. Look for “high tack” on the label.
b. Use enough tape so you can start a distance from the joint and rub down several inches on the end, then...
c.
Stretch
the tape as you pull it across the joint.
Rub the tape down so it will remain tight while the glue dries.
d. For more pull, put on two thicknesses at the same time, or even three.
Wood always reacts to uneven moisture from paint or from having one surface exposed to the open air and the other
facing a table top. It is part of the dollhouse builder’s art to straighten reactive wood as you are building, and masking
tape is your rst and best tool. Many layers of tape will tighten or atten even the most misbehaving panel, and it’s
normal to stretch bands of tape all the way around the house to hold the joints tight as the glue dries.
Don’t be shy when using masking tape!
Stretch
3-way tape on the corners
Pre-assembly page 8
Instructions for kit #B 1925
A Railing Assembly demo is available online at www.realgoodtoys.help
□1. Rail Assembly
A. 1. Paint (the rst coat - see page 11) and sand the Rails before assembly.
Wipe any paint out of the grooves, and do not paint the Rail ends at all (wipe
the ends to eliminate paint that sneaks around the corner).
Paint the Ballusters.
B. Assemble the Railing:
1. Set one Rail on the assembly diagram, lined up on each end;
tape it in place so it won’t move. Put a dab of glue on a Balluster
end, and push it into the groove at a balluster locator on the dia-
gram. Straighten and adjust the Balluster to exactly line up with the
diagram, then put in the next Balluster.
Repeat until all the Ballusters are in place. Do a nal inspection
and adjustment. Let the glue stiffen for a few minutes.
3. Squeeze the Rails together so the Ballusters are fully in the grooves.
4. Hold the Railing set on the drawing; make the Rail ends exactly line
up. Adjust the Ballusters - - straight and square. Tape together Dividers
to form a square inside corner, and lay the Railing in the corner as the
glue dries - keep the ends square!
C. Paint (second-coat) the Railing.
2. Support the Ballusters with a piece of stripwood; dab a little glue onto
each Balluster end. Hold the second Rail over the Balluster’s ends at an
angle.
Push down and scoop the Ballusters’ ends into the groove.
2. Sand (320 grit) the Rails and Ballusters. Sand the
Rail’s grooves with a folded piece of sandpaper.
Balluster Paint (one coat) and Sand
the Rails and Ballusters
Diagram
Rail
Tape
Support
stripwood
C. Put a nish on the oors now to protect them from the mess and
wear-and-tear of construction. Do not use penetrating stain on these
oors. Use a surface-coating nish like acrylic urethane or a “one-
coat” stain + nish like “PolyShades” (polyurethane mixed with stain).
Wipe off the rst coat completely and, when dry, take off the shine with
very ne abrasive (a used scotch-brite pad is ideal), then put on a full
thickness second coat. see “checklist” at www.realgoodtoys.help/B1925.html
Remove the last page from the instructions -
it has a Railing Assembly layout diagram.
□2 Foundation. Glue and tape the Foundation F&B
(303/16”) and Mid Foundations (187/8”) together.
Tape the Base Floor to the Foundation to hold it square as
the glue dries. If you haven’t put nish on the Base Floor
yet, tape it up-side-down so the tape won’t damage the
ooring (see “Put nish on the oors now”, page 8).
Pre-Assembly page 9Instructions for kit #B 1925
□4. Porch Postbases:
A. Sort the Postbases into these 5 categories:
Front/Back Foundation
□4B Center Postbase (make two sets):
(1) Lay a Postbase Front at; glue and tape two Post-
base Sides to it, lined up on the edges.
(2) Glue and tape a Postbase Back to the assembly.
(3) Line up the edges and ends, with extra
attention to the edges in the cutout.
Postbase Sides
Lined up
Postbase Front
3B (1)
Center Postbase
3B (2)
Postbase Back
3B (3) up-side-down
Line up the parts in
the cutout
a
a
Postbase
Front
Postbase
Back
Postbase
SideEnd
22
13/4
47/8
27/8
Postbase
Side
13/4
Postbase
BackEnd
2
47/8
1/8Thick
1/4Thick
47/8
47/8
Mid Foundation
13/4
303/16
187/8
±91/2
□3. Stairs:
Glue and tape together the Stairs.
Top Stair Block Bottom Stair Block
Bevel
Glue
±91/2
Porch Posts page 10
Instructions for kit #B 1925
□3C End Postbases:
(1) Lay two Postbase Fronts at, glue and tape one Post-
base Side to each, lined up on opposite edges to make
one left set and one right set.
(2) Glue and tape a Postbase SideEnd to each assembly.
Postbase Side
3C (1)
Left and Right Sets
are mirrors of each other
Postbase Front
3C (2)
Left set
Postbase SideEnd
□4. Glue the Porch Posts to Post Caps, centered.
Pro tip: I usually paint the Porch Post and Post Caps the
same color, so I paint them (one coat) rst, sand them,
glue them together, and paint them again (second-coat).
Texture Paint: Real Good Toys’ “Stucco Grit” mixed with
paint is tough and good looking on Foundations, Postbases,
and the Front Step Block. Paint (one coat) the base color and
sand now, and apply the paint + grit during nal assembly.
□5. Glue the Porch Posts to PostBase Caps, centered.
Look from every angle to make sure the Posts are straight.
Step 4:
Porch Post
Post Cap
Step 5
PostBase Cap
a
Front
3C (3) Left Set viewed from the bottom
Right set is the mirror
Side
BackEnd
SideEnd
(3) Glue and tape the Postbase BackEnd to
the back edges of the Postbase Sides 3C (3).
(4) Line up the edges and ends with extra
attention to the edges in the cutout.
Let the glue dry, then paint the Postbases.
Note... gluing errors can be un-done without
damage: see “taking things apart” page 6.
Review the Post options on page 19 before
committing to step 5 for all your Porch Posts
J
J
Paint the parts the rst coat. The rst coat mostly soaks
into the wood, lling and reinforcing the grain so the sanding
step clips off the bers and leaves the surface smooth. Resist
sanding before painting - it will leave the surface fuzzy and
make a smooth nish harder to achieve. The quality of your
nal nish is dependent on the quality of the sanding after the
rst coat. Do not go back to re-paint just because the paint has
soaked in. Just a bit of paint left on the surface tells you you
have put on enough to saturate the grain, which is the right
amount. More paint than that will only make sanding harder.
Glue doesn’t stick well to paint.
Avoid painting edges,
grooves, and areas that will be glued.
Do not stack painted parts - even when they
feel dry they will stick and damage each other.
Keep them spread out or separate them with
waxed paper.
A word about primer: Primer is designed to help paint stick
to an impervious surface or to join layers of dissimilar paints.
In this application, the rst coat of paint soaks right into the
wood and lls the grain - you could do that with primer, but its
job of being an interface between different materials doesn’t
apply here. In this application, primer just adds steps and
expense. I don’t use it under exterior colors, but I do one-coat
and sand the interior walls and ceilings before assembly, and
primer (or any light colored paint) is a good choice for that.
Paint the walls on both faces. Paint the Upper Floor on the
bottom face (the ceiling).
Paint the Trim on one face and both edges.
Paint the second coat. The Second coat for the outside of
the Walls should be done after assembly of the housebody and
before attaching the Roof. The second coat goes on smooth
and creamy with enough paint on the brush so it is quiet while
you are brushing the paint out, but not enough to leave puddles
or drips.
Sand everything. Sand until the paint is smooth and “soft”
feeling, transparent, and some of the wood is showing through.
Sand the Clapboard one-clapboard-surface-at-a-time. Fold
the sandpaper and sand back and forth until the surface of that
board is smooth and transparent; then move on to the next
board. Fold the sandpaper as needed to keep it fresh.
J
J
Cleaning an edge with the
back of a utility knife blade
Cleaning a groove with a Cabinet Scraper
Clean the edges and grooves before assembly. A little paint always
builds-out the corner of an edge or groove and will make assembly
harder and the glue joint less strong. Test the Floors in their grooves
to see that they t well.
Painting: www.RealGoodToys.help has painting and sanding videos
Cleaning a groove with a knife
Painting page 11
Instructions for kit #B 1925
Instructions for kit #B 1925 page 12
Step 6A: front edges are up
The Base Floor sticks out
1/8” in front
Stair hole is to the Front
Step 6B: front edges are up
The Mid Floor sticks out
1/8” in front
Base Floor
Tape
Step 6C: Groove Fill
□6. Complete all of step 6 without stopping.
A. Spread glue in the grooves of both Sides. Tape the Base Floor to
the Sides, lined up in back (down) the oor sticks out 1/8” in front
(up). Make sure the Floor is all the way to the top of the Sides’
grooves.
B. Set the Mid Floor into the grooves lined up in back (the oor sticks
out 1/8” in front), and with the stairhole closer to the front (up). Hold
the Sides tight onto the Mid Floor with a piece of tape above where
the Front will attach (on the sloped part) so the tape won’t be
in the way.
C. Glue and tape the Groove-Fill into the exposed groove
within the stairhole.
The Base Floor is pushed to
the top of the groove
Note: if the Groove-Fill is too tight to slip into
the groove, turn the house on its side and use
a hammer and block (Front Step) to tap it in.
□ 6 D. Spread glue in the grooves of the Front and on the front edges (up) of the Sides.
(1) Set the Front on the housebody lined up side-to-side at the base corners.
Tape the Front to the housebody along the base.
Step 6D: Line up the Front side-to-side; tape along the bottom.
Housebody
Line up and tape along both sides
Tape
Instructions for kit #B 1925 page 13
Step 6D: Line up the Front side-to-side; tape along the bottom.
□ 6 D. (2) Flex the housebody side-to-side as necessary to make it line up
with the edges of the Front (hold a block on the edges to confirm a good fit).
Tape the Front to the Sides.
(3) Stand the housebody upright. Tape across the top of the Front around the back
edge of the floor and back thru the window and door openings.
□ 6 E. At the back of the housebody, Tape the Base Floor up to hold it tight
to the top of the groove. Inspect the Base Floor to confirm it is at the top of the
groove all the way around.
Tape all the way around the house-
body to hold the parts tight
Base Floor is at the
top of the groove
□ 6 F. Tape all the way around the housebody at the Mid Floor to pull the
joints tight. On this model I stretched 3 bands all the way around, stretching the
tape each time I went around a corner.
Tight
Let the glue dry
Clean up the
glue squeezings
Chimney Caps help see
when the side is lined up
Tape all the way around the back
Housebody
Instructions for kit #B 1925 Prepare the Roofs page 14
□7 Draw Shingle Guidelines spaced 1” apart,
starting from the top of each roof. Look at the
drawings to identify the outside of the Roofs (a
dotted line shows a beveled edge that faces down).
Porch Roof
(bevel faces up)
Front Roof
Rear Roof
Dormer Roofs
(bevels face down)
□8 Turn the Roofs over and draw painting
guidelines spaced from the edges as shown.
Paint to the lines (leave the lines visible).
Note: these are guidelines for the eave paint
(outside of the walls). For ceiling paint, draw a
second guideline 1/4” inside the rst (see below).
Pro Tip: Paint the interior ceilings with one coat,
and sand them now. Leave about 1/4” unpainted
for gluing the Roof to the Walls. Sand until the
paint gets transparent and the wood begins to
show thru (this allows Dividers to be glued in).
Paint the second coat after assembly is done.
21/16”
21/16”
Stand the Dormer Roofs on their front
edges and use a Divider to extend the
marks for shingle lines.
a
a
11/2”
21/8”
21/16”
1/2” unpainted
1/4” unpainted
2”
3/4”
□10A. Glue, tape, and weight the Housebody to the Foundation,
lined up at the back corners, and along both sides.
Instructions for Kit #B 1925 Assembly, cont. page 15
Lined up at the corners
Wiring? Now is the easiest time to lay a “main loop”. Leave a 2”
ap under the Baseoor and lay tapewire up the Side (using the
E-Slots) across the underside of the Attic Ceiling, down thru the E-
slots on the other side, and leave another ap underneath. These
aps will stick to the inside of the Foundation and will be connect-
ed to the Power Jack (Kit #6888, the ‘Best1’ wiring set).
See www.realgoodtoys.help
□9. Glue and tape the Attic Ceiling to the Sides, lined
up on top.
Attic Ceiling
Lined up on top
Lined up at the corners
Lined up along the Sides
When removing tape from ooring:
roll the tape off sideways,
don’t yank it off
Weights
□10B. Glue, tape, and weight the Porch Floor to the Foundation,
lined up at the front corners and along the sides.
Lined up
Let the glue dry
Tape
□12. Without glue, set the Front Step between the Postbases.
Set the Tread in place up-side-down (to “mask” the place on the
foundation where it will be glued); Texture paint the Foundation
above the Steps - avoid the edge of the Base Floor - Porch Edge
Nosing will attach there after everything else is done (keeping
the texture paint away from an edge is possible because the rst-
coat is the same color, so the texture paint only has to approach
the edge).
Now there is texture paint on the Foundation where it will be
visible, and there is no texture paint where the Step or Postbases
will glue.
Clean off the bottom of the Tread.
Do not glue the Step to the Foundation yet.
Instructions for Kit #B 1925 Porch Assembly page 16
Everything that you attach to the house assembly from now
on should be fully painted (except for texture paint... that
will be applied during the Porch assembly).
Temporary use of the Steps to mask
the Foundation for painting.
Assemble the Porch: These instructions are customized for stucco/texture paint. The Foun-
dation, the Postbases, and the Steps are painted with one coat only of the paint color with
no texture additive, and they are sanded. The Rails, the Post sets, the Arches, and the Porch
Beam are painted with two coats.
Stucco/texture paint is mixed and ready.
Without glue, set up the Porch parts. You may wish to lift the Rails with some shingles.
Foundation behind the Front Steps
□11. Glue and Tape the Front Trim
(3/32 x 7/16 x 9) to the Front at both edges.
Front Trim
Front Steps
PostBase
Railings
Temporary use
of Shingles
Temporarily set the Postbases
in approximate position.
Clean residual Stucco from the Tread
Handy Square
Porch Beam
Corner Postbase
□13. On the Left end, glue the 417/32” Railing in place about
1/8” from the edge of the oor (and lifted with pairs of shingles if
desired). Put glue on both ends of the Railing.
Put the Postbase in place so it touches the Railing and gets a dot
of glue from each rail.
Texture paint the back and right side of the Postbase but do not
texture paint where the glue dots are... the grit in the texture paint
will interfere with the rail’s glue joint. (You are putting texture
paint in places that will be difcult to paint cleanly after assembly,
and you are not texture painting the left or front edges so you can
put the Handy Square and Porch Beam against the Postbase to
straighten it... you will paint those surfaces after the glue dries).
Glue the Postbase to the Foundation, Porch Floor, and Railing.
Straighten the Postbase with Handy Squares and the Porch Beam.
Check that the Railing is straight.
Repeat for the right Side Rail and Postbase.
Let the glue dry.
Instructions for Kit #B 1925 Porch Assembly page 17
Note: For extra strength in your glue joints on fully painted
surfaces, mark where you will be gluing and scrape a spot
for the glue to grab inside the joint.
Mark Scrape
Housebody
Step 13:
417/32” Railing
Front Trim
Postbase
Glue
Glue dots
Touch
Stucco
Instructions for kit #B 1925 Porch Assembly page 18
Porch Beam
Lift
□14. Repeat the glue-dot, paint, and glue process
for the Front Railings and Center Postbases.
Straighten the Postbases with Handy Squares and the
Porch Beam. Make sure the Postbases are tight on
the Railings, tight on the Porch, straight, and square.
Straighten the Railings.
Let the glue dry.
Finish painting the Postbases and Foundation.
Glue dots
417/32” Railing (side)
91/16” Railing (front)
Steps
End Postbase Center Postbase
Looking down on the porch
The Porch Beam helps
get the Postbases straight
Handy Square
Lined up
Instructions for kit #B 1925 Porch Assembly page 19
□15A. Glue the Porch Post assemblies to the Post-
bases, centered and straight.
Glue the Steps, Treads, and Porch Edge Nosing in place.
Finish painting the Foundation.
□15B. Glue the Porch Beam to the Postcaps.
Temporarily tape two Arches between the Center
Posts (if used). The Arches are the guide for spac-
ing the Center Posts.
Center the Postcaps under the Porch Beam.
Let the glue dry.
Steps and Treads
Postcap
Post
Postbase Cap
Porch Beam
Arches are
touching
Porch Edge Nosing
Post Base
Postbase Cap
Post Post
Post Cap
Porch Beam
Porch Beam Cap Porch Triangle
The Porch can be built with two Posts or four,
and with any conguration of Arches you wish.
Look at the photos, test different arrangements,
and decide which look you prefer.
The Porch Beam and
Post lines up on the end
Side View
Instructions for kit #B 1925 Porch Assembly page 20
□16. Glue and tape the Porch Beam Cap to the Porch Beam, centered.
Side Trim
Lined up at the bottom
of the Base Floor
Use the top of the wall
as a cutting guide
□18. Hold 19” Side Stripwood against the Side, lined up
at the back edge and lined up with the bottom of the Base
Floor. Use the top of the Attic Endwall as a cutting guide
- cut the Stripwood with a ne-tooth saw (like the X-Acto
razor saw).
Hold 137/32” Side Stripwood against the Side lined up with
the front edge. Use the top edges of the Front and Side as
a guide: cut the Stripwood to t.
Repeat for the other side. Glue and tape the Side Trim to
the Sides.
Porch Beam Cap
□17. A. Glue and tape Porch Triangles to the Porch Beam and
Cap, and to the Front, lined up with the house side on each end.
B. Tape a Rafter End to the top of the other two Porch Triangles,
sticking out at the back. Glue these two Porch Triangles to the
Porch Beam and Cap, and to the Front, lined up and centered
behind the Posts.
17. C. Tape from in front of the Porch Beam to the back surface of
the Front, or all the way to the back of the Floor to pull the Porch
Beam and Cap, the Triangles, and the housebody tight.
Porch Triangle
Porch Triangle
Rafter End
Temporary use of the Rafter
End to hold the Triangle lined
up with the top of the Front
Let the glue dry - take off the tape.

Other manuals for Classic Bungalow

1

Other Real Good Toys Toy manuals

Real Good Toys Beachside Bungalow User manual

Real Good Toys

Real Good Toys Beachside Bungalow User manual

Real Good Toys 67100 User manual

Real Good Toys

Real Good Toys 67100 User manual

Real Good Toys Special Edition Princess Anne User manual

Real Good Toys

Real Good Toys Special Edition Princess Anne User manual

Real Good Toys New England Lighthouse User manual

Real Good Toys

Real Good Toys New England Lighthouse User manual

Real Good Toys Victoria's Farmhouse User manual

Real Good Toys

Real Good Toys Victoria's Farmhouse User manual

Real Good Toys Junior Conservatory User manual

Real Good Toys

Real Good Toys Junior Conservatory User manual

Real Good Toys Special Edition Vermont Farmhouse, Jr. User manual

Real Good Toys

Real Good Toys Special Edition Vermont Farmhouse, Jr. User manual

Real Good Toys Ruff'n Rustic All American Barn User manual

Real Good Toys

Real Good Toys Ruff'n Rustic All American Barn User manual

Real Good Toys QuickBuild User manual

Real Good Toys

Real Good Toys QuickBuild User manual

Real Good Toys Keeper's House User manual

Real Good Toys

Real Good Toys Keeper's House User manual

Real Good Toys Best1 User manual

Real Good Toys

Real Good Toys Best1 User manual

Real Good Toys J-550 User manual

Real Good Toys

Real Good Toys J-550 User manual

Real Good Toys General Store User manual

Real Good Toys

Real Good Toys General Store User manual

Real Good Toys Special Edition Alison, Jr. User manual

Real Good Toys

Real Good Toys Special Edition Alison, Jr. User manual

Real Good Toys My Dreamhouse User manual

Real Good Toys

Real Good Toys My Dreamhouse User manual

Real Good Toys the New Haven DH 77K User manual

Real Good Toys

Real Good Toys the New Haven DH 77K User manual

Real Good Toys Classic Bungalow User manual

Real Good Toys

Real Good Toys Classic Bungalow User manual

Real Good Toys Kit #71K User manual

Real Good Toys

Real Good Toys Kit #71K User manual

Real Good Toys QuickBuild Firehouse User manual

Real Good Toys

Real Good Toys QuickBuild Firehouse User manual

Real Good Toys Victorian Painted Lady User manual

Real Good Toys

Real Good Toys Victorian Painted Lady User manual

Real Good Toys Bigger Best1 User manual

Real Good Toys

Real Good Toys Bigger Best1 User manual

Real Good Toys CAPE DOLLHOUSE KIT 1287 User manual

Real Good Toys

Real Good Toys CAPE DOLLHOUSE KIT 1287 User manual

Real Good Toys Colonial Addition User manual

Real Good Toys

Real Good Toys Colonial Addition User manual

Popular Toy manuals by other brands

RC 58631 user manual

RC

RC 58631 user manual

REVELL Pz.Kpfw. 35(t) Assembly manual

REVELL

REVELL Pz.Kpfw. 35(t) Assembly manual

LEGO FRIENDS 41085 Building instructions

LEGO

LEGO FRIENDS 41085 Building instructions

MTHTrains UNION PACIFIC BIG BOY operating instructions

MTHTrains

MTHTrains UNION PACIFIC BIG BOY operating instructions

Eduard Ju 88C-6b Night Fighter interior quick start guide

Eduard

Eduard Ju 88C-6b Night Fighter interior quick start guide

Mattel HOT WHEELS FORMULA CIRCUIT instructions

Mattel

Mattel HOT WHEELS FORMULA CIRCUIT instructions

LGB 24211 instruction manual

LGB

LGB 24211 instruction manual

Viessmann 5271 Operation manual

Viessmann

Viessmann 5271 Operation manual

LGB 70308 manual

LGB

LGB 70308 manual

Phoenix Model Ryan STA instruction manual

Phoenix Model

Phoenix Model Ryan STA instruction manual

Eduard Me 410B quick start guide

Eduard

Eduard Me 410B quick start guide

Mattel GHOSTBUSTERS instructions

Mattel

Mattel GHOSTBUSTERS instructions

PIKO H0 SmartMeasure Car instruction manual

PIKO

PIKO H0 SmartMeasure Car instruction manual

POLA G 331945 Instruction

POLA G

POLA G 331945 Instruction

LGB Lehmann 21750 manual

LGB Lehmann

LGB Lehmann 21750 manual

Parkside PP 18 A1 Operation and safety notes, Notes for Parents

Parkside

Parkside PP 18 A1 Operation and safety notes, Notes for Parents

myToys 15029469 Assembly instructions

myToys

myToys 15029469 Assembly instructions

Fisher-Price DFT28 manual

Fisher-Price

Fisher-Price DFT28 manual

manuals.online logo
manuals.online logoBrands
  • About & Mission
  • Contact us
  • Privacy Policy
  • Terms and Conditions

Copyright 2025 Manuals.Online. All Rights Reserved.