Rebel POWER URZ1227-2 User manual

POWER
Outdoor power socket
with remote control
USER
MANUALPL
ENDE RO
model: URZ1227-2
PL

SICHERHEITSANLEITUNGEN
Vor dem ersten Gebrauch des Produktes lesen Sie bitte diese
Bedienungsanleitung sorg ältig und bewahren diese au ür späteres
Nachschlagen.
• Schützen Sie dieses Produkt vor Feuchtigkeit. Vermeiden Sie die
Verwendung / Auewahrung in extremen Temperaturen und hoher
Feuchtigkeit. Setzen Sie es nicht direktem Sonnenlicht und
Wärmequellen aus.
• Das Gerät ist nur zur Benutzung im Innenbereich geeignet
• Halten Sie das Gerät außerhalb der Reichweite von Kindern.
• Bei längerer Nichtbenutzung, trennen Sie das Gerät vom Stromnetz.
• Benutzen Sie nur autorisiertes Zubehör.
• Versuchen Sie nicht, das Gerät selbst zu reparieren. Im Schadens all,
wenden Sie sich an einen autorisierten Kundendienst ür
Überprü ung / Reparatur.
• Immer vor der Reinigung Gerät ausschalten und vom Stromnetz
trennen.
• Reinigen Sie das Gerät mit einem weichen leicht be euchteten Tuch.
Benutzen Sie keine Scheuermittel oder andere Chemikalien um das
Gerät zu reinigen.
• Die Reichweite des Gerätes kann verringert werden, wenn es in der
Nähe anderer elektronischer Geräte au gestellt wird.
• Schließen Sie nicht an die Steckdose Geräte mit einer Stromstärke
höher als 4,35 A (etwa 1000 W) an.
• Damit das Gerät richtig unktioniert, muss es ausreichend belü tet
werden.
2 3
DE DE

PRODUKTBESCHREIBUNG
1. Steckdose
2. Zweipolige geerdete Steckdose
3. Steckdose-Betriebsanzeige
4. Fernbedienung
5. Fernbedienung-Betriebsanzeige
6. Taste AUS [OFF] / EIN [ON]
7. Batterie ach-Deckel
1
3
2
4
5
6
7
ERSTER LAUF
1. Legen Sie den Akku in die Fernbedienung ein und achten Sie dabei
au die richtige Polarität.
2. Den Systemcode zwischen der Fernbedienung und den
Steckdosen-Schaltern synchronisieren
3. Ein EIN/AUS Tastenpaar an der Fernbedienung einem
Steckdosenschalter zuordnen
S NCHRONISIERUNG DES S STEMCODE
Bevor Sie das Gerät zum ersten Mal benutzen, muss der Systemcode
synchronisiert werden, damit alle Steckdosenschalter au das Funksignal der
Fernbedienung reagieren können. Darüber hinaus muss jedem
Steckdosenschalter eine Frequenz eines Tastenpaars au der
Fernbedienung zugeordnet sein, um eine individuelle Bedienung zu
ermöglichen. Stellen Sie die DIP Schalter mit einem geeigneten Gegenstand,
z.B. einem kleinen Schraubendreher, ein, indem Sie diese nach unten oder
oben drücken. Die Fernbedienung unterstützt bis zu vier Steckdosen.
EINSTELLEN DES S STEMCODE AN DER
FERNBEDIENUNG
1. Batterie ach-Deckel ent ernen.
2. Systemcode mit den DIP Schalter 1 bis 5 einstellen.
3. Batterie ach schließen.
4 5
DE DE

EINSTELLEN DES S STEMCODE AM
STECKDOSENSCHALTER
1. Schraube an der Abdeckung mit Hil e eines PH0 Schraubenziehers
ent ernen.
2. Abdeckung etwas über das Schraubenloch heben und
herausschieben.
3. Denselben Systemcode wie an der Fernbedienung mit den DIP
Schalter 1 bis 5 einstellen
ZUORDNEN EINES STECKDOSENSCHALTERS ZU
EINER KONTROLLTASTE
1. Zuordnen einer Kontrolltaste an der Fernbedienung mit den DIP
Schalter A bis D
2. Abdeckung einschieben und schließen
3. Schraube ins Loch ein ügen und estschrauben.
BETRIEB
1. Stecken Sie diese Steckdose in eine Steckdose.
2. Schließen Sie ein externes Gerät an diese Buchse an.
3. Drücken Sie die EIN-Taste au der Fernbedienung, um die
entsprechende Buchse richtig einzuschalten.
4. Drücken Sie die AUS-Taste au der Fernbedienung, um die
entsprechende Buchse auszuschalten.
Beispiel*
1. Einstellen des Systemcode „123” an der Fernbedienung
2. Einstellen des Systemcode „123” an allen Steckdosenschaltern. Um
dem Schalter "A" einen Code zuzuweisen, setzen Sie den Buchstaben
"A" in die obere Position.
Einstellen einer zusätzlichen Kontrolltaste. In der Abbildung ist das
Tastenpaar „A” mit dem DIP Schalter A eingestellt.
REINIGUNG UND WARTUNG
Achtung! Stromschlagge ahr..
1. Trennen Sie das Gerät vor der Reinigung vom Stromnetz.
2. Stellen Sie sicher, dass keine Flüssigkeit in das Gerät elangt.
6 7
DE DE

TECHNISCHE DATEN
• Schutzklasse: IP44
• Maximale Leistung: 1000 W
• Reichweite der Fernbedienung: bis zu 25 m
• Frequenz der Fernbedienung: 433,92 MHz
• Batterie: 1x A23 12 V DC
• Stromversorgung: 220-240 V AC | 50-60 Hz
• Im set: Fernbedienung mit Batterien, 1 Schalter
Flüssigkeit im Inneren des Geräts kann zu einem Kurzschluss ühren.
3. Verwenden Sie keine Scheuermittel oder chemische Mittel, um dieses
Gerät zu reinigen.
4. Reinigen Sie das Gerät mit einem weichen, leicht euchten Tuch.
5. Stellen Sie sicher, dass das Gerät vor dem nächsten Gebrauch
vollständig trocken ist.
ERFAHREN SIE MEHR
Für weitere in ormationen zu diesem gerät finden sie unter:
www.rebelelectro.com.
Lesen sie die bedienungsanleitung sorg ältig durch, bevor sie das gerät
verwenden.
Besuchen sie www.rebelelectro.com website ür weitere produkte und
zubehör.
Deutsch
Korrekte Entsorgung dieses Produkts (Elektromüll)
(Anzuwenden in den Ländern der Europäischen Union und anderen
europäischen Ländern mit einem separaten Sammelsystem) Die
Kennzeichnung au dem Produkt bzw. au der dazugehörigen Literatur
gibt an, dass es nach seiner Lebensdauer nicht zusammen mit dam
normalen Haushaltsmüll entsorgt werden dar . Entsorgen Sie dieses Gerät
bitte getrennt von anderen Ab ällen, um der Umwelt bzw. dermenschilchen
Gesundheit nicht durch unkontrollierte Müllbeseitigung zu schaden.
Recyceln Sie das Gerät, um die nachhaltige Wiederverwertung von
stoichen Ressourcen zu ördern. Private Nutzer sollten den Händler,
bei dem das Produkt gekau t wurde, oder die zuständigen Behörden
kontaktieren, um in Er ahrung zu bringen, wie sie das Gerät au
umwelt reundliche Weise recyceln können. Gewerbliche Nutzer sollten
sich an Ihren Lie eranten wenden und die Bedingungen des
Verkau svertrags konsultieren. Dieses Produkt dar nicht zusammen mit
anderem Gewerbemüll entsorgt werden.
Hergestellt in China ür LECHPOL ELECTRONICS Sp. z o.o. Sp.k.,
ul. Garwolińska 1, 08-400 Miętne.
Hiermit erklär die Firma LECHPOL ELECTRONICS Sp. z o.o. Sp.k. dass sich
das Gerät Steckdose mit Fernbedienung URZ1227-2 im Einklang mit den
Bestimmungen der Richtlinie 2014/53/UE befindet.
Komplette Kon ormitätserklärung zum herunterladen au www.lechpol.eu.
8 9
DE DE

SAFET INSTRUCTIONS
Please read this operation instruction care ully be ore use, and keep it or
uture re erence.
1. Protect this product rom moisture. Avoid using/storing it in extreme
temperatures and high humidity. Do not expose it to direct sunlight
and other sources o heat.
2. The device is intended or indoor use only.
3. Keep the device out o the reach o children.
4. Disconnect rom power outlet i the device is not going to be used
or a long time.
5. Use only authorized accessories.
6. Do not attempt to repair this device yoursel . In case o damage,
contact authorized service point or check-up or repair.
7. Always disconnect the product rom the power outlet be ore cleaning.
8. Clean the device with a so t, dry cloth. Do not use any chemical
agents to clean this device.
9. Devices range may be decreased, i placed near other electronic devices.
10.Do not plug to the socket appliances with current higher than 4,35 A
(about 1000 W).
11. To work correctly, the device needs proper ventilation.
PRODUCT DESCRIPTION
1. Socket
2. Two-pin earthed socket
3. Socket unction indicator light
4. Remote control
5. Remote control unction indicator light
6. ON/OFF buttons
7. Battery compartment cover
4
5
6
7
10 11
EN EN
1
3
2

FIRST USE
1. Insert the battery into the remote control paying attention to the
correct polarity.
2. Synchronise the system code between the remote control and the
socket switches
3. Assign an ON/OFF key pair on the remote control to a socket switch.
S NCHRONIZING THE S STEM CODE
Be ore using the device or the first time the system code must be
synchronized to enable all socket switches to react to the radio signal o
the remote control. Moreover, each socket switch must be assigned a
requency o a key pair on the remote control to enable it to be operated
individually. Adjust the DIP switches using a suitable object, or instance a
small screwdriver, by pushing them down or up. The remote control
supports up to our sockets.
SETTING A S STEM CODE ON THE REMOTE
CONTROL
1. Remove the cover o the battery compartment.
2. Set any system code using DIP switches 1 to 5.
3. Close the battery compartment.
SETTING A S STEM CODE ON THE SOCKET
SWITCH
1. Undo the screw o the cover using a PH0 screwdriver.
2. Slightly raise the cover above the screw hole and push out.
3. Set the same system code as or the remote control using DIP switches
1 to 5.
ASSIGNING A SOCKET SWITCH TO A CONTROL
KE
1. Set a control key on the remote control using DIP switches A to D:
2. Push the cover in and close.
3. Insert the screw through the screw hole into the thread and tighten
12 13
EN EN

OPERATION
1. Plug this socket into a wall power mains socket.
2. Connect an external device into this socket.
3. Press the ON button on the remote control to turn on the
corresponding socket accordingly.
4. Press the OFF button on the remote control to turn o the
corresponding socket.
Example*
1. Set the system code „123” on the remote control.
2. Set the system code „123” on all the socket switches. To assign a
code to switch "A", set the switch with the letter "A" in the upper
position.
Set a control key as well. In the figure the key pair „A” is set with DIP
switch A.
LEARN MORE
For more in ormation on this device visit: www.rebelelectro.com.
Read owner’s manual care ully be ore using your device.
Visit www.rebelelectro.com website or more products and accessories.
CLEANING AND MAINTENANCE
Caution! Risk o electric shock.
1. Prior to cleaning, disconnect the device rom power mains socket.
2. Make sure that no liquid gets into the device. The liquid inside the
device may lead to a short circuit.
3. Do not use any abrasives or chemical agents to clean this device.
4. Clean the device with a so t, slightly damp cloth.
5. Make sure the device is completely dry be ore next use.
6. Check battery level regularly..
SPECIFICATION
• Protection class: IP44
• Maximum power: 1000 W
• Remote control range: up to 25 m
• Remote control requency: 433,92 MHz
• Power supply: 220-240 V AC | 50-60 Hz
• Battery: 1x A23 12 V DC
• In set: Remote control with batteries, 1 switch
14 15
EN EN

English
Correct Disposal of This Product
(Waste Electrical & Electronic Equipment)
(Applicable in the European Union and other European countries with
separate collection systems) This marking shown on the product or
its literature, indicates that it should not be disposed with other household
wastes at the end o its working li e. To prevent possible harm to the
environment or human health rom uncontrolled waste disposal, please
separate this rom other types o wastes and recycle it responsibly
to promote the sustainable reuse o material resources. Household users
should contact either the retailer where they purchased this product,
or their local government oce, or details o where and how they
can take this item or environmentally sa e recycling. Business users
should contact their supplier and check the terms and conditions o
the purchase contract. This product should not be mixed with other
commercial wastes or disposal.
Made in China or LECHPOL ELECTRONICS Sp. z o.o. Sp.k., ul. Garwolińska 1,
08-400 Miętne.
Lechpol Electronics Sp. z o.o. Sp.k. hereby declares that Power socket
with remote control URZ1227-2 is consistent with directive 2014/53/UE.
Full text o the EU Declaration o Con ormity is available at ollowing
Internet address: www.lechpol.eu.
KWESTIE BEZPIECZEŃSTWA
Przed użyciem należy dokładnie zapoznać się z treścią instrukcji obsługi
oraz zachować ją w celu późniejszego wykorzystania.
• Produkt należy chronić przed wilgocią. Nie należy używać ani
przechowywać urządzenia w zbyt wysokich temperaturach i
wysokiej wilgotności. Produkt należy chronić przed bezpośrednim
nasłonecznieniem oraz źródłami ciepła.
• Urządzenie jest przeznaczone tylko do użytku wewnętrznego.
• Urządzenie należy przechowywać w miejscu niedostępnym dla dzieci.
• Jeśli urządzenie nie jest używane przez dłuższy czas, należy
odłączyć je od źródła zasilania.
• Nie należy używać nieoryginalnych akcesoriów.
• Zabrania się własnoręcznej naprawy sprzętu. W wypadku
uszkodzenia, należy skontaktować się z autoryzowanym punktem
serwisowym w celu sprawdzenia/naprawy.
• Należy ZAWSZE odłączyć urządzenie od źródła zasilania przed
czyszczeniem.
• Obudowę urządzenia należy czyścić za pomocą miękkiej, suchej
ściereczki. Nie należy używać środków chemicznych lub
detergentów do czyszczenia tego urządzenia.
• Zakres działania urządzenia może ulec zmniejszeniu, jeśli w pobliżu
znajdują się inne urządzenia elektroniczne.
• Do gniazdka nie należy podłączać urządzeń o prądzie wyższym niż
4,35 A (około 1000 W).
• Do poprawnego działania należy zapewnić odpowiedni przepływ
powietrza.
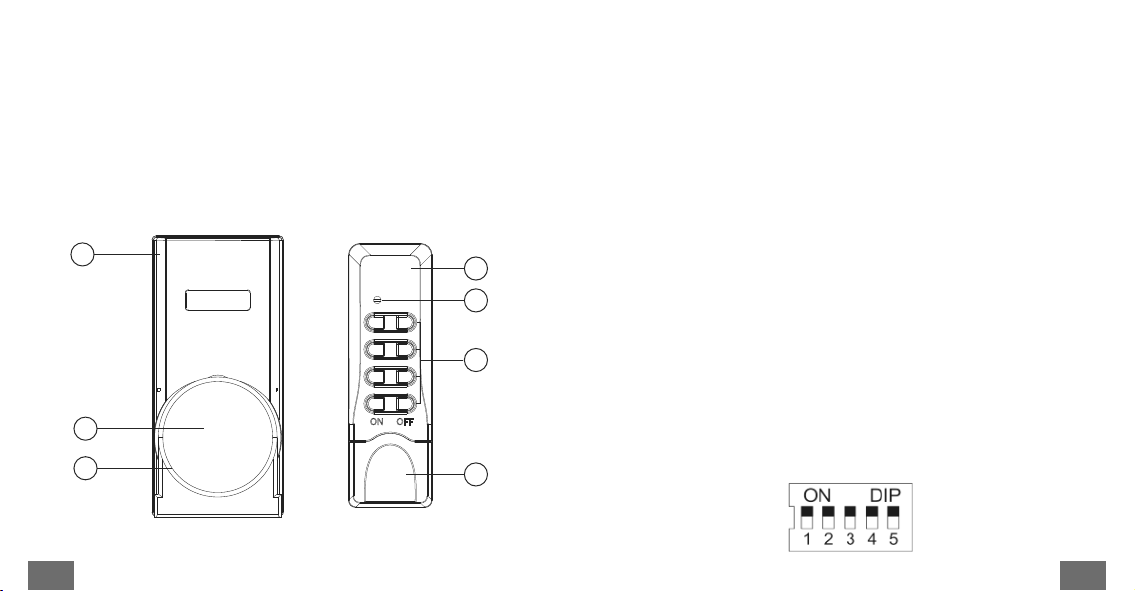
• Przed użyciem należy sprawdzić poprawność instalacji baterii w pilocie.
• Jeżeli bateria została rozładowana, należy wymienić ją na nową.
16 17
EN EN
16 17
PL PL

OPIS PRODUKTU
1. Przełącznik,
2. 2-pinowe uziemione gniazdo
3. Wskaźnik unkcji
4. Pilot zdalnego sterowania
5. Wskaźnik unkcji
6. Przyciski wyłączania i włączania
7. Pokrywa komory baterii
4
5
6
7
1
3
2
PIERWSZE URUCHOMIENIE
1. Należy włożyć baterię do pilota, zwracając uwagę na prawidłową
polaryzację.
2. Zsynchronizować kod systemu pomiędyz pilotem, a gniazdem
przełącznika.
3. Przypisać parę przycisków ON/OFF na pilocie do gniazda
przełącznika
S NCHRONIZACJA KODU S STEMU
Przed pierwszym użyciem urządzenia należy zsynchronizować kod
systemu, aby umożliwić wszystkim przełącznikom poprawne reagowanie
na sygnał radiowy z pilota zdalnego sterowania. Ponadto każdy
przełącznik musi być przypisany do częstotliwości pary przycisków na
pilocie, aby mógł być sterowany indywidualnie. Należy ustawić
przełączniki DIP za pomocą odpowiedniego narzędzia, np. za pomocą
małego śrubokręta, przesuwając je w górę lub w dół. Pilot obsługuje do
czterech gniazdek.
USTAWIENIE KODU S STEMU NA PILOCIE
Należy zdjąć pokrywę pojemnika na baterie.
1. Ustawić dowolny kod systemu DIP przełącznikami od 1 do 5.
2. Zamknąć pojemnik na baterie.
18 19
PL PL

USTAWIENIE KODU S STEMU NA PRZEŁĄCZNIKU
1. Należy odkręcić śrubę z pokrywy używając śrubokręta krzyżowego
PH0.
2. Lekko podnieść pokrywę powyżej otworu na śrubę i przesunąć.
3. Ustawić ten sam kod systemu co na pilocie za pomocą przełączników
DIP.
PRZ PISANIE PRZEŁĄCZNIKA DO PRZ CISKU
KONTROLNEGO
1. Należy ustawić przycisk kontrolny na pilocie używając przełączników
DIP A do D (przycisk E jest nieaktywny).
2. Zamknąć pokrywę.
3. Włożyć śrubę do otworu w gwint i dokręcić.
OBSŁUGA
1. Należy podłączyć gniazdo do gniazda zasilania sieciowego ściennego.
2. Podłączyć urządzenie zewnętrzne do tego gniazda.
3. Nacisnąć przycisk ON (włączenia) na pilocie zdalnego sterowania, aby
włączyć odpowiednie gniazdo.
4. Nacisnąć przycisk OFF (wyłączenia) na pilocie zdalnego sterowania,
aby wyłączyć odpowiednie gniazdo.
Przykład*
1. Ustaw kod systemu „123” na pilocie.
2. Ustaw kod systemu „123” na przełącznikach. Aby przypisać kod do
przełącznika „A” należy ustawić przełącznik z literą „A” w górnej
pozycji.
Na rysunku para kluczy „A” jest ustawiona z przełącznikiem DIP A.
CZ SZCZENIE I KONSERWACJA
Uwaga! Ryzyko porażenia prądem.
1. Przed rozpoczęciem czyszczenia należy odłączyć urządzenie od sieci.
2. Należy upewnić się, że płyn nie przenika do urządzenia. Ciecz w
20 21
PL PL

WIĘCEJ
Więcej in ormacji na temat tego urządzenia dostępne są na stronie:
www.rebelelectro.com.
Przed użyciem należy dokładnie zapoznać się z treścią instrukcji obsługi.
Odwiedź stronę www.rebelelectro.com, aby poznać więcej produktów i
akcesoriów.
SPEC FIKACJA
• Stopień ochrony: IP44
• Moc maksymalna: 1000 W
• Zasięg pilota: do 25 m
• Częstotliwość pilota: 433,92 MHz
• Bateria pilota: 1x A23 12 V DC
• Zasilanie: 220-240 V AC | 50-60 Hz
• Zawartość opakowania: pilot zdalnego sterowania z baterią, 1
przełącznik
urządzeniu może doprowadzić do zwarcia.
3. Nigdy nie należy używać agresywnych i ściernych środków
czyszczących.
4. Urządzenie należy czyścić miękką wilgotną szmatką z łagodnym
środkiem czyszczącym.
5. Należy upewnić się, że urządzenie jest całkowicie suche przed
ponownym użyciem.
Poland
Prawidłowe usuwanie produktu
(zużyty sprzęt elektryczny i elektroniczny)
Oznaczenie umieszczone na produkcie lub w odnoszących się do niego
tekstach wskazuje, że po upływie okresu użytkowania nie należy usuwać
z innymi odpadami pochodzącymi z gospodarstw domowych. Aby
uniknąć szkodliwego wpływu na środowisko naturalne i zdrowie ludzi
wskutek niekontrolowanego usuwania odpadów, prosimy o oddzielenie
produktu od innego typu odpadów oraz odpowiedzialny recykling w celu
promowania ponownego użycia zasobów materialnych jako stałej
praktyki.Wcelu uzyskania in ormacji na temat miejsca i sposobu
bezpiecznego dla środowiska recyklingu tego produktu użytkownicy w
gospodarstwach domowych powinni skontaktować się z punktem
sprzedaży detalicznej,w którym dokonali zakupu produktu, lub z organem
władz lokalnych. Użytkownicy w firmach powinni skontaktować się ze
swoim dostawcą i sprawdzić warunki umowy zakupu. Produktu nie należy
usuwać razem z innymi odpadami komercyjnymi.
Wyprodukowano w CHRL dla LECHPOL ELECTRONICS Sp. z o.o. Sp.k.,
ul. Garwolińska 1, 08-400 Miętne.
Lechpol Electronics Sp. z o.o. Sp.k. niniejszym oświadcza, że Gniazdo
sieciowe sterowane pilotem URZ1227-2 jest zgodne z dyrektywą
2014/53/UE. Pełny tekst deklaracji zgodności UE jest dostępny pod
następującym adresem internetowym: www.lechpol.eu.
22 23
PL PL

INSTRUCȚIUNI PRIVIND SIGURANȚA
Vă rugăm citiți cu atenție aceste instrucțiuni înainte de utilizare și păstrați-
le pentru consultări ulterioare.
• Protejați acest produs de umezeală. Evitați utilizarea/depozitarea
acestuia la temperaturi extreme și umiditate mare. Nu expuneți
produsul la lumina directă a soarelui și la alte surse de căldură.
• Dispozitivul este destinat doar utilizării în interior.
• Țineți dispozitivul departe de copii.
• Deconectați de la sursa de alimentare dacă dispozitivul nu va fi
utilizat o perioadă mai lungă de timp.
• Utilizați doar accesorii autorizate.
• Nu încercați să reparați produsul singur. În caz de deteriorare,
contactați un service autorizat pentru verificare și reparație.
• Deconectați întotdeauna produsul de la sursa de alimentare înainte
de curățare.
• Curățați dispozitivul cu un material textil moale și uscat. Nu olosiți
agenți chimici pentru a curăța acest dispozitiv.
• Distanța dispozitivelor poate fi redusă dacă se află în apropiere
dispozitive electronice.
• Nu conectați la priză aparate cu curent mai mare de 4,35 A
(aproximativ 1000 W).
• Pentru a uncționa corect, dispozitivul are nevoie de o ventilație
adecvată.
DESCRIEREA PRODUSULUI
1. Priză
2. Priză cu împământare cu 2 pini
3. Indicator uncționare
4. Telecomandă
5. Indicator uncționare telecomandă
6. Tastă oprire/pornire
7. Compartiment baterii
4
5
6
7
24 25
RO RO
1
3
2

PRIMA UTILIZARE
1. Introduceți bateria în telecomandă cu atenție la polaritatea corectă.
2. Sincronizați codul de sistem între telecomandă și priză.
3. Atribuiți o pereche de taste ON/OFF de pe telecomandă la priză
SINCRONIZAREA TELECOMENZII CU PRIZA
Înainte de utilizarea dispozitivului pentru prima dată, codul sistemului
trebuie sincronizat pentru a permite ca toate comutatoarele să
reacționeze la semnalul telecomenzii. Mai mult de atât, fiecărui comutator
trebuie să i se atribuie o recvență corespunzatoare unei perechi de taste
de pe telecomandă pentru a permite uncționarea individuală. Reglați
comutatoarele DIP olosind un obiect potrivit, de exemplu o șurubelniță
mică, împingând în sus sau jos. Telecomanda suportă până la patru prize.
SETAREA CODULUI LA TELECOMANDĂ
1. Îndepărtați capacul compartimentului pentru baterii.
2. Setați orice cod olosit butoanele DIP de la 1 la 5.
3. Închideți compartimentul pentru baterii.
SETAREA CODULUI LA PRIZĂ
1. Deșurubați șurubul de pe capac utilizând o șurubelniță PH0.
2. Trageți capacul în a ară și scoateți șurubul.
3. Setați același cod ca cel de pe telecomandă utilizând butoanele DIP de
la 1 la 5.
ASIGNAREA PRIZEI LA O TASTĂ DE CONTROL
1. Setați o tastă de control pe telecomandă utilizând butoanele DIP de la
A la D
2. Împineți și închideți capacul.
3. Introduceți șurubul în filet și strângeși-l.
26 27
RO RO

FUNCȚIONARE
1. Conectați dispozitivul la o priză de perete.
2. Conectați un dispozitiv extern la această mu ă.
3. Apăsați butonul de alimentare de pe telecomandă pentru a porni priza
corespunzătoare.
4. Apăsați butonul de alimentare de pe telecomandă pentru a opri priza
de alimentare corespunzătoare.
Examplu*
1. Setați codul „123” pe telecomandă.
2. Setați codul „123” pe toate prizele. Pentru a atribui un cod pentru
comutarea „A”, setați comutatorul cu litera „A” în poziția superioară.
Setați o tastă de control. În imagine tasta „A” este setată cu
comutatorul DIP A.
CURĂȚARE ȘI MENTENANȚĂ
Atenție! Pericol de șocuri electrice..
1. Înainte de curățare, deconectați dispozitivul de la priză.
SPECIFICAȚII
• Clasa de protecție: IP44
• Putere maximă: 1000 W
• Distanță maximă telecomandă: până la 25 m
• Frecvență telecomandă: 433,92 MHz
• Alimenatre: 220-240 V AC | 50-60 Hz
• Baterie: 1x A23 12 V DC
• Setul include: Telecomandă cu baterii, 1 comutator
2. Asigurați-vă că nu intră niciun lichid în dispozitiv. Lichidul din interiorul
dispozitivului poate duce la scurtcircuit.
3. Nu utilizați abrazivi sau agenți chimici pentru a curăța dispozitivul.
4. Curățați dispozitivul cu un material textil moale, ușor umed.
5. Asigurați-vă că dispozitivul este complet uscat înainte de următoarea
utilizare.
6. Verificați nivelul bateriilor în mod constant.
28 29
RO RO
28
RO
AFLĂ MAI MULTE
Pentru mai multe in ormații despre acest dispozitiv vizitati:
www.rebelelectro.com.
Citiți manualul de utilizare cu atenție înainte de a utiliza dispozitivul.
Vizitati site-ul web www.rebelelectro.com pentru mai multe produse si
accesorii.

Romania
Reciclarea corecta a acestui produs
(reziduuri provenind din aparatura electrica si electronica)
Marcajale de peacest produs saumentionate in instructiunilesale de olosire
indica aptul ca produsul nu trebuie aruncat impreuna cu alte reziduuri din
gospod arie atunci cand nu mai este in stare de unctionare. Pentru a preveni
posibile e ecte daunatoare asupra mediului inconjurator sau a san ata tii
oamenilor datorate evacuarii necontrolate a reziduurilor, vă rugăm să separați
acest produs de alte tipuri de reziduuri si să-l reciclati in mod responsabil
pentru a promova re olosirea resurselor materiale. Utilizatorii casnici sunt rugati
să ia legatura fie cu distribuitorul de la care au achizitionat acest produs, fie cu
autoritatile locale, pentru a primi in ormatii cu privire la locul si modul in care
pot depozita acest produs in vederea reciclarii sale ecologice. Utilizatorii
institutionali sunt rugati să ia legatura cu urnizorul și să verifice condițiile
stipulate in contractul de vanzare. Acest produs nu trebuie amestecat cu alte
reziduuri de natura comerciala.
Distribuit de Lechpol Electronic SRL, Republicii nr. 5, Resita, CS, ROMANIA.
Compania Lechpol Electronics declară prin prezenta că Priză cu
telecomandă URZ1227-2 este în con ormitate cu Directiva 2014/53/UE.
Textul integral al Declarației de Con ormitate UE este disponibil la
următoarea adresă: www.lechpol.eu.
30 31
RO RO

www.rebelelectro.com
Table of contents
Languages:
Other Rebel Accessories manuals
Popular Accessories manuals by other brands

Manitowoc
Manitowoc CA200 user manual

Leuze electronic
Leuze electronic HTU418B Series manual

Waterpik
Waterpik Waterflosser WF-02 manual

Sensorex
Sensorex CS300 product manual

Dare
Dare RadiSense Series product manual

Gared Sports
Gared Sports Ultra Champ I Installation, operation and maintenance instructions