manuals.online logo
Brands
  1. Home
  2. •
  3. Brands
  4. •
  5. Regent Lighting Solutions
  6. •
  7. Outdoor Light
  8. •
  9. Regent Lighting Solutions Bilux Inground User manual

Regent Lighting Solutions Bilux Inground User manual

1
2
www.regentlight.co.za
INSTALLATION INSTRUCTIONS
ALL CONNECTIONS TO BE CARRIED OUT BY A QUALIFIED ELECTRICIAN
1
2
PLEASE READ CAREFULLY BEFORE STARTING INSTALLATION.
DO NOT CONNECT THE LUMINAIRE LIVE
Bilux Inground
Ø90mm
Hole diameter
145mm
Hole depth
Ensure there is a drain under the
substrate when installing the tting into
paving or cement
Drainage detail spec by Civil
Engineer.
2. Create a cavity for tting in the
ground/paving at the required position.
NB: GRAVEL FOR DRAINAGE: Lay at least
50mm of 13mm or 19mm Chip Stones
beneath the well of the cavity and
check drainage efciency.
DRAIN
GROUND
PAVING/
CEMENT
13/19mm Chip
Stones
3 - 13 MAIN REEF SERVICE ROAD, CORNER
SPRINGBOK AND MAIN REEF ROAD, INDUSTRIA,
JOHANNESBURG. SOUTH AFRICA.
TEL : +27 11 474 0171
www.regentlight.co.za
RE GENT L I GHT ING A D IVIS ION
OF WA HL IND USTR IES.
September 2021
98
53
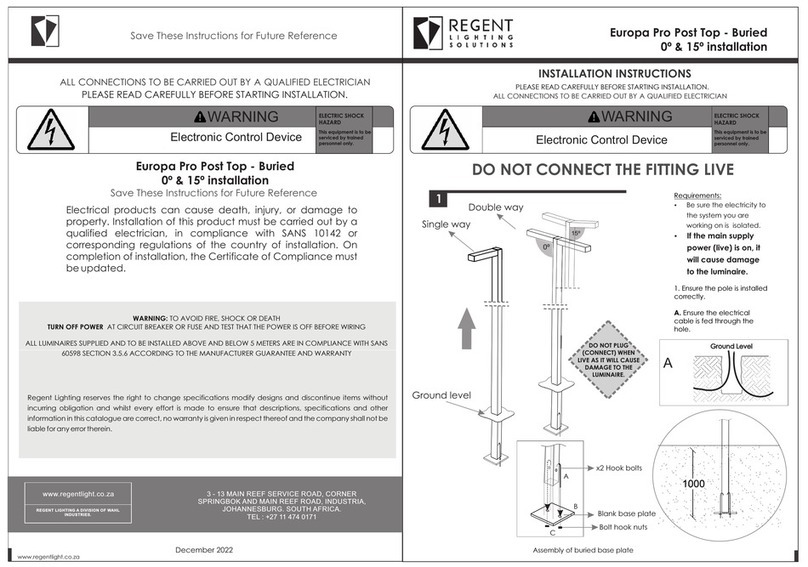
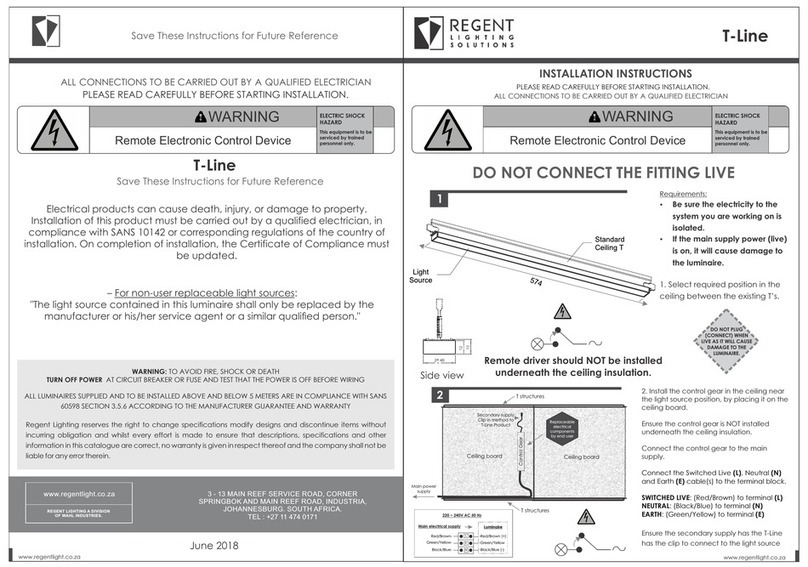
ŸBe sure the electricity to the system
you are working on is isolated.
ŸIf the main supply power (live) is on,
it will cause damage to the
luminaire.
ŸAmbient temperature: Ta 36ºC
ŸIP rating according to IEC 60598-1:
-Gear compartment: IP65
ŸMounting: In-ground installation
-Optical compartment: IP65
ŸControl gear weight: 220V - 240 V
AC 50 Hertz
1
2
1. Selected the required position for the luminaire.
Create cavity in for plastic sleeve.
DO NOT PLUG
(CONNECT) WHEN
LIVE AS IT WILL CAUSE
DAMAGE TO THE
LUMINAIRE.
Bilux Inground
Remote Electronic Control Device
WARNING
ELECTRIC SHOCK
HAZARD
This equipment is to be
serviced by trained
personnel only.
50
Bilux Inground
Save These Instructions for Future Reference
Regent Lighting reserves the right to change specifications modify designs and discontinue items
without incurring obligation and whilst every effort is made to ensure that descriptions, specifications
and other information in this catalogue are correct, no warranty is given in respect thereof and the
company shall not be liable for any error therein.
TURN OFF POWER AT CIRCUIT BREAKER OR FUSE AND TEST THAT THE POWER IS OFF BEFORE WIRING
WARNING: TO AVOID FIRE, SHOCK OR DEATH
ALL LUMINAIRES SUPPLIED AND TO BE INSTALLED ABOVE AND BELOW 5 METERS ARE IN COMPLIANCE WITH
SANS 60598 SECTION 3.5.6 ACCORDING TO THE MANUFACTURER GUARANTEE AND WARRANTY
Electrical products can cause death, injury, or damage to property.
Installation of this product must be carried out by a qualified electrician,
in compliance with SANS 10142 or corresponding regulations of the
country of installation. On completion of installation, the Certificate of
Compliance must be updated.
For non user replaceable light source: The light source contained in this luminaire
shall only be replacedby the manufacturer or his/her service
agent or a similar qualied person
ALL CONNECTIONS TO BE CARRIED OUT BY A QUALIFIED ELECTRICIAN
PLEASE READ CAREFULLY BEFORE STARTING INSTALLATION.
WARNING
Remote Electronic Control Device
ELECTRIC SHOCK
HAZARD
This equipment is to be
serviced by trained
personnel only.
www.regentlight.co.za
4
7
8
8
This product should be installed by a competent person i.e. Qualified electrician.
This product requires a constant stable electrical supply 220V - 240V VAC 50Hz - alternating current.
The product must be regularly maintained, including the replacement of lamps/LED timeously.
This product could be HAZARDOUS if not used correctly, it could cause electric shock, serious bodily harm or death.
This product is not a toy, please keep away from children.
This product may contain small parts that can be swallowed.
Use only the correct light bulbs/LED as stipulated on the carton for the product.
Any modifications of this product after supply will result in the guarantee being void.
Spare parts may become unavailable over time.Items can vary slightly from the picture on the carton
Coastal humidity can affect the longevity of the light fitting over time.
Be sure to follow the steps in the order given.
Read instructions carefully.
Important Safety Instructions
4
5
6
3
3. Before installing the
tting, ensure the tting is
level with the ground, to
ensure the tting does
not collect water.
4. Insert the plastic sleeve into
cavity.
Feed the electrical cable
through the
When installing in cement or
paving, ensure there is a drain
pipe under the cavity, under
the gravel.
DO NOT PLUG
(CONNECT) WHEN
LIVE AS IT WILL CAUSE
DAMAGE TO THE
LUMINAIRE.
EARTH – (Green/Yellow) to
terminal marked E.
SWITCHED LIVE – (Red or Brown)
to terminal marked L
5. Connect the Switched Live
(S/L), Neutral (N) and Earth (E)
cable(s) to the terminal block.
NEUTRAL – (Black or Blue) to
terminal marked N
ŸThe amount of ttings on
one circuit can be innite,
this depends on the circuit
design by the engineer on
site.
ŸRecommended cable
thickness is 1.5mm on the
50m circuit.
ŸThe ttings can be looped
6. To install multiple ttings:
230 VAC Supply
Friction t the luminaire into
plastic sleeve.
7. Insert the Bilux Inground
Luminaire body into plastic
sleeve.
Ensure inground luminaire is
ush to nished oor level.
DO NOT PLUG
(CONNECT) WHEN
LIVE AS IT WILL CAUSE
DAMAGE TO THE
LUMINAIRE.
8. Rell the cavity and ensure
the tting is level with the
nished oor level, to eliminate
water collection on the tting.
Switch on power supply.
Square Round
Water collecting area
Finished
oor
level
(FFL)
(FFL)
Incorrect installation Correct installation
Finished
oor
level
(FFL)
(FFL)
3
4
58
7
6
DO NOT PLUG
(CONNECT) WHEN
LIVE AS IT WILL CAUSE
DAMAGE TO THE
LUMINAIRE.
Replaceable
electrical
components
by end user
Replaceable
electrical
components
by end user
REMOTE
CONNECTION
ELECTRICAL CONNECTION
Replaceable
electrical
components
by end user
Luminaire
-Red/Brown (+)
-Green/Yellow
-Black/Blue (-)
E
N
L
Main electrical supply
Red/Brown-
Green/Yellow-
Black/Blue-
220 ~ 240V AC 50 Hz
7
Finished
oor
level
(FFL)
(FFL)

Other Regent Lighting Solutions Outdoor Light manuals

Regent Lighting Solutions Lumina Mini User manual

Regent Lighting Solutions

Regent Lighting Solutions Lumina Mini User manual

Regent Lighting Solutions Plato User manual

Regent Lighting Solutions

Regent Lighting Solutions Plato User manual

Regent Lighting Solutions Europa Pro User manual

Regent Lighting Solutions

Regent Lighting Solutions Europa Pro User manual

Regent Lighting Solutions Europa Pro Post Top User manual

Regent Lighting Solutions

Regent Lighting Solutions Europa Pro Post Top User manual

Regent Lighting Solutions Columbia User manual

Regent Lighting Solutions

Regent Lighting Solutions Columbia User manual

Regent Lighting Solutions Kazo User manual

Regent Lighting Solutions

Regent Lighting Solutions Kazo User manual

Regent Lighting Solutions Echo User manual

Regent Lighting Solutions

Regent Lighting Solutions Echo User manual

Regent Lighting Solutions Bedford Bollard - Buried User manual

Regent Lighting Solutions

Regent Lighting Solutions Bedford Bollard - Buried User manual

Regent Lighting Solutions Halo User manual

Regent Lighting Solutions

Regent Lighting Solutions Halo User manual

Regent Lighting Solutions Penza User manual

Regent Lighting Solutions

Regent Lighting Solutions Penza User manual

Regent Lighting Solutions IRIS Series User manual

Regent Lighting Solutions

Regent Lighting Solutions IRIS Series User manual

Regent Lighting Solutions Bedford Bollard - Plinth Mounted User manual

Regent Lighting Solutions

Regent Lighting Solutions Bedford Bollard - Plinth Mounted User manual

Regent Lighting Solutions Challenger Mini User manual

Regent Lighting Solutions

Regent Lighting Solutions Challenger Mini User manual

Regent Lighting Solutions T -Line User manual

Regent Lighting Solutions

Regent Lighting Solutions T -Line User manual

Popular Outdoor Light manuals by other brands

BEGA UniLink 84 919 Instructions for use

BEGA

BEGA UniLink 84 919 Instructions for use

Philips Ledino 16801/93/16 Specifications

Philips

Philips Ledino 16801/93/16 Specifications

John Lewis 706 03249 user guide

John Lewis

John Lewis 706 03249 user guide

Endon EL-40085 instruction manual

Endon

Endon EL-40085 instruction manual

VIBIA Jordi Volardell Wind Assembly instructions

VIBIA

VIBIA Jordi Volardell Wind Assembly instructions

TEKA ILLUMINATION MBP quick guide

TEKA ILLUMINATION

TEKA ILLUMINATION MBP quick guide

LED's light Hangi 300780 Installation and operating manual

LED's light

LED's light Hangi 300780 Installation and operating manual

Prilux Niza instruction manual

Prilux

Prilux Niza instruction manual

AccuLux SL 5 operating instructions

AccuLux

AccuLux SL 5 operating instructions

Utilitech DC209H-28 user manual

Utilitech

Utilitech DC209H-28 user manual

Nichia 144 Series Assembly instructions

Nichia

Nichia 144 Series Assembly instructions

8 seasons design Micro Series instructions

8 seasons design

8 seasons design Micro Series instructions

Italkero lightfire dolce vita User manual and assembly instructions

Italkero

Italkero lightfire dolce vita User manual and assembly instructions

Hinkley 51000 BZ installation instructions

Hinkley

Hinkley 51000 BZ installation instructions

7hSevenOn Home 09310 manual

7hSevenOn Home

7hSevenOn Home 09310 manual

Thorn VOLUPTO VO 18L105-740 SF RS CL2 W5 T60 ANT installation instructions

Thorn

Thorn VOLUPTO VO 18L105-740 SF RS CL2 W5 T60 ANT installation instructions

marset FUNICULI Assembly instructions

marset

marset FUNICULI Assembly instructions

JOOBY Avenue Series user manual

JOOBY

JOOBY Avenue Series user manual

manuals.online logo
manuals.online logoBrands
  • About & Mission
  • Contact us
  • Privacy Policy
  • Terms and Conditions

Copyright 2025 Manuals.Online. All Rights Reserved.