manuals.online logo
Brands
  1. Home
  2. •
  3. Brands
  4. •
  5. Rehan
  6. •
  7. Magnifier
  8. •
  9. Rehan LOOKY User manual

Rehan LOOKY User manual

Other manuals for LOOKY

1

Other Rehan Magnifier manuals

Rehan Looky4 User manual

Rehan

Rehan Looky4 User manual

Rehan Looky + User manual

Rehan

Rehan Looky + User manual

Rehan i-See Speech User manual

Rehan

Rehan i-See Speech User manual

Rehan i-See HD User manual

Rehan

Rehan i-See HD User manual

Rehan LOOKY User manual

Rehan

Rehan LOOKY User manual

Rehan ACUITY SPEECH User manual

Rehan

Rehan ACUITY SPEECH User manual

Rehan i-See Touch User manual

Rehan

Rehan i-See Touch User manual

Rehan Looky Book User manual

Rehan

Rehan Looky Book User manual

Rehan i-See HD User manual

Rehan

Rehan i-See HD User manual

Rehan Looky 6 HD User manual

Rehan

Rehan Looky 6 HD User manual

Rehan i-See User manual

Rehan

Rehan i-See User manual

Rehan Looky 4+ HD User manual

Rehan

Rehan Looky 4+ HD User manual

Rehan Looky 10 User manual

Rehan

Rehan Looky 10 User manual

Rehan ACUITY BASIC User manual

Rehan

Rehan ACUITY BASIC User manual

Rehan ACUITY BASIC User manual

Rehan

Rehan ACUITY BASIC User manual

Popular Magnifier manuals by other brands

Aimpoint Duty RDS user manual

Aimpoint

Aimpoint Duty RDS user manual

Carson DeskBrite Plus CP-70 Instructions for use

Carson

Carson DeskBrite Plus CP-70 Instructions for use

HIMS SenseView DUO user manual

HIMS

HIMS SenseView DUO user manual

nedis MAGL12WWT manual

nedis

nedis MAGL12WWT manual

Ryobi RML18-0 manual

Ryobi

Ryobi RML18-0 manual

ENHANCED VISION Merlin user manual

ENHANCED VISION

ENHANCED VISION Merlin user manual

Baum VisioBook Guide book

Baum

Baum VisioBook Guide book

HIMS GoVision PRO user manual

HIMS

HIMS GoVision PRO user manual

OPTRON i-Stick user guide

OPTRON

OPTRON i-Stick user guide

LS & S 251107 user guide

LS & S

LS & S 251107 user guide

Eschenbach Visolux Digital XL FHD operating instructions

Eschenbach

Eschenbach Visolux Digital XL FHD operating instructions

VisionAid HandyReader HD v2 user manual

VisionAid

VisionAid HandyReader HD v2 user manual

Ash Technologies Andromeda user manual

Ash Technologies

Ash Technologies Andromeda user manual

Niigata seiki LS4-150A instruction manual

Niigata seiki

Niigata seiki LS4-150A instruction manual

Carson SV-50 quick start guide

Carson

Carson SV-50 quick start guide

Hongdee DigiMax-HD user manual

Hongdee

Hongdee DigiMax-HD user manual

Optelec Compact 7 HD user manual

Optelec

Optelec Compact 7 HD user manual

Carson Lighted MagniGrip MG-88 quick start guide

Carson

Carson Lighted MagniGrip MG-88 quick start guide

manuals.online logo
manuals.online logoBrands
  • About & Mission
  • Contact us
  • Privacy Policy
  • Terms and Conditions

Copyright 2025 Manuals.Online. All Rights Reserved.

Manufactured By:
Rehan Electronics Ltd.
IDA ind. Est., Courtown Road, Gorey
Co. We ford, Ireland
User manual
Bedienungsanleitung
Gebruiksaanwijzing
Manuel d’útilisation
Manual del usuario
Manual do utilizador
Manuale dúso
Bruksanvisning
Brugsanvisning
Looky logo is a trademark of Rehan Electronics
First Edition (July 2006) V2.0
Copyright 2006 Rehan Electronics
Ingen dele af denne publikation må gengives,
overføres i nogen form eller på nogen måde,
elektronisk eller mekanisk, inklusive
fotokopiering og optagelse, eller gemmes i et
system, hvor de kan hentes frem igen, uden
skriftlig forhåndsgodkendelse fra Rehan
Electronics.
Bemærkning
Rehan Electronics udsteder ikke garantier af
nogen slags i forbindelse med denne
vejledning. Rehan Electronics hæfter ikke for
fejl heri eller for direkte skader eller
følgeskader, der er opstået som en
konsekvens af handlinger baseret på
oplysninger i denne vejledning.
I tilfælde af problemer
Fjern oplader stikket fra Looky hvis det er
isat.
Fjern batterierne fra batterirummet (6).
Vent i 3 minutter og isæt batterierne.
Tænd Looky igen.
Hvis problemet gentager sig skal de kontakte
Deres forhandler.
Sikkerheds forhold
Beskyt Looky og batterierne for fugt, regn,
vand, sand og ekstreme temperaturer.
Overdæk ikke Looky under opladning af
batterierne.
Rengør Looky med et rent tørt stykke stof.
Anvend ikke rensemidler, kemi eller
produkter der indeholder alkohol eller
amnoniak eller andre kemiprodukter da de
kan beskadige Looky.
The package contains
Im lieferumfang sind enthalten
Le package contient
Inhoud van het pakket
Contenido del paquete
O conjunto contêm
Il pacchetto contiene
Förpackningen innehåller
Pakken indeholder
1
2
3
4 5 6
(Advarsel! Det anbefales ikke at oplade
batterier i en ekstern batteri oplader. Der
er ingen garanti for at batterierne vil blive
fuldt opladet).
Det er muligt at isætte almindelige AA
batterier i Looky, men driftstiden bliver da
markant kortere.
Hvis adapteren er tilsluttet og der er isat
almindelige AA batterier ved en fejl vil et
dobbelt biplyd kunne høres og LED(5) lampen
vil blinke. Dette indikere at batterier ikke vil
blive opladet. Fjern adapteren først og
derefter batterierne, udskift batterier med
de genopladelige.
(Advarsel! Kun udskift de medfølgende
batterier med nogle af samme t pe)
Kontakt Deres forhandler for at bestille nye
eller ekstra.
Opladning af Batterier til Look
Når batterierne er ved at være opbrugte giver
Looky et advarselsbip. En høj tone høres, der
langsomt falder.
For at oplade batterierne tilsluttes den
medfølgende oplader (4). To korte bip kan
høres.
(Advarsel! Look må IKKE ben ttes med
andre opladere end den medfølgende.
En grøn LED (5) lyser konstant når Looky
oplader. En blinkende grøn LED (5) indikerer
at batterierne er fuldt opladet.
At oplade Looky tager ca 4 timer. En fuldt
opladet Looky kan benyttes i ca. 1,5 time.
(Vær opmærksom på! De kan ben tte Look
mens den oplader, men selve opladningen
vil i givet fald tage lidt længere tid en de
anførte 4 timer).
English........................................... 1
Deutsch.......................................... 7
Français......................................... 13
Nederlands...................................... 19
Español.......................................... 25
Português....................................... 31
Italiano.......................................... 37
Svenska.......................................... 43
Dansk............................................ 49
Congratulated with the purchase of the
Looky.
Using for the first time
It is necessary to charge the batteries before
using the Looky. Place the batteries supplied
into the battery compartment (6) with the
correct orientation. Connect the adapter
supplied into the adapter connection (4) and
plug into the mains socket. Charging takes
appro imately 4 hours.
Switching on the Look
Press either the yellow button (1) or the blue
button (2) for about 3 seconds until a two
tone beep is audible to switch on the Looky.
During operation a short beep (3) is audible
when either button is pressed.
Freeze function (1)
Press the yellow button (1) to activate the
freeze picture function. To unfreeze, press
the yellow button (1) again.
Det er muligt at ændre billede funktionen ved
at trykke på den blå knap (2), dette kan også
gøres i foto / fryse funktionen.
Billede funktion (2)
Der er 3 billed funktioner. Disse kan blive
valgt ved at trykke på den blå knap (2).
Funktionerne er:
-Foto funktion (farve)
-Positiv funktion (sort-hvid)
-Negativ funktion (hvid-sort)
Skriv under Look
Det anbefales at foto funktion
anvendes når Looky bruges til
at skrive under.
Sådan slukkes Look
Hold enten den gule knap (1) eller blå knap
(2) nede for cirka 3 sekunder indtil en dobbelt
bip lyd høres.
Hvis ikke De bruger Looky slukker den
automatisk efter 3 minutter. En dobbelt bip
lyd høres når looky slukkes.
Tillyke med købet af denne Looky.
Første gang De bruger LOOKY
Det er nødvendigt at oplade batterierne fuldt
før De benytter Looky første gang. Placer de
medfølgende batterier korrekt i
batteriholderen (6). Tilslut den medfølgende
adapter (4) og isæt stikket i stikkontakten.
Opladningen tager ca 4 timer.
Sådan tændes Look
Hold enten den gule knap (1) eller den blå
knap (2) nede i ca 3 sekunder indtil en
dobbelt bip lyd høres, hvorefter Looky
tændes.
Hvis De under brug af Looky trykker på en af
knapperne,vil en kort bip (3) lyd høres.
Foto funktion (1)
Tryk på den gule knap (1) for at aktivere foto
/ fryse funktionen. For at fortsætte tryk på
den gule knap (1) igen og Looky viser igen
aktuelt kamera billede.
It is possible to change the picture mode
using the blue button (2) while the freeze
picture function is activated.
Picture Mode (2)
There are 3 picture modes available. These
can be selected by pressing the blue(2)
button. The modes are:
-Photo mode (colour)
-Positive mode (black-white)
-Negative mode (white-black)
Writing mode
It is recommended that
Photo mode is selected
when using the Looky as
a writing aid.
Switching off the Look
Press either the yellow button (1) or the blue
button (2) for about 3 seconds until a two
tone beep is audible to switch off the Looky.
If the Looky detects no movement within 3
minutes then it automatically powers off.
A two tone beep is audible when this
happens.
Charging the Batteries of the Look
When the batteries are empty the Looky
emits a warning beep. A high tone is audible
and this then fades away.
To charge the batteries connect the adapter
supplied into the adapter connection (4).
Two short beeps are audible.
(Attention! Do not use an other adapter
other than the one supplied and specified
for use with the Look )
A green LED (5) burning continuously
indicates the Looky is charging.
A green LED (5) flashing indicates the
batteries are charged.
Charging of the Looky takes appro imately 4
hours. After charging the batteries, you can
use the Looky for up to 1,5 hours continuesly.
Copyright 2006 Rehan Electronics.
Ingen del av denna publikation får
reproduceras eller överföras i någon form
eller på något sätt, varken elektroniskt eller
mekaniskt genom t.e . fotokopiering eller
inspelning, eller med hjälp av något slags
informationslagring eller återvinningssystem
utan skriftligt tillstånd från Rehan
Electronics.
Anmärkning
Rehan Electronics Iämnar ingen garanti av
något slag gällande denna startanvisning.
Rehan Electronics kan ej hållas ansvariga för
fel i startanvisningen för konsekventiella eller
oförutsedda skador som uppstått som resultat
av handling enligt information i denna
startanvisning.
Vad som kan göras vid problem
När Ni marker att något är fel med Looky, gör
då följande:
Om Ni har batteriladdaren ansluten, koppla
då bort denna och ta ur batterierna. Vänta ca
3 minuter och sätt sedan i batterierna igen.
Sätt på Looky igen.
Om problemet fortfarande kvarstår, kontakta
då någon på adressen nedan.
Säkerhetsförskrifter
Skydda Looky ifrån fukt, regn, sand och
e tremt höga temperaturer.
Ni kan torka av Looky med en ren och torr
trasa. Använd inte rengörningsprodukter som
innehåller alkohol, denaturerad sprit,
ammoniak eller slipmedel då detta kan skada
Looky.
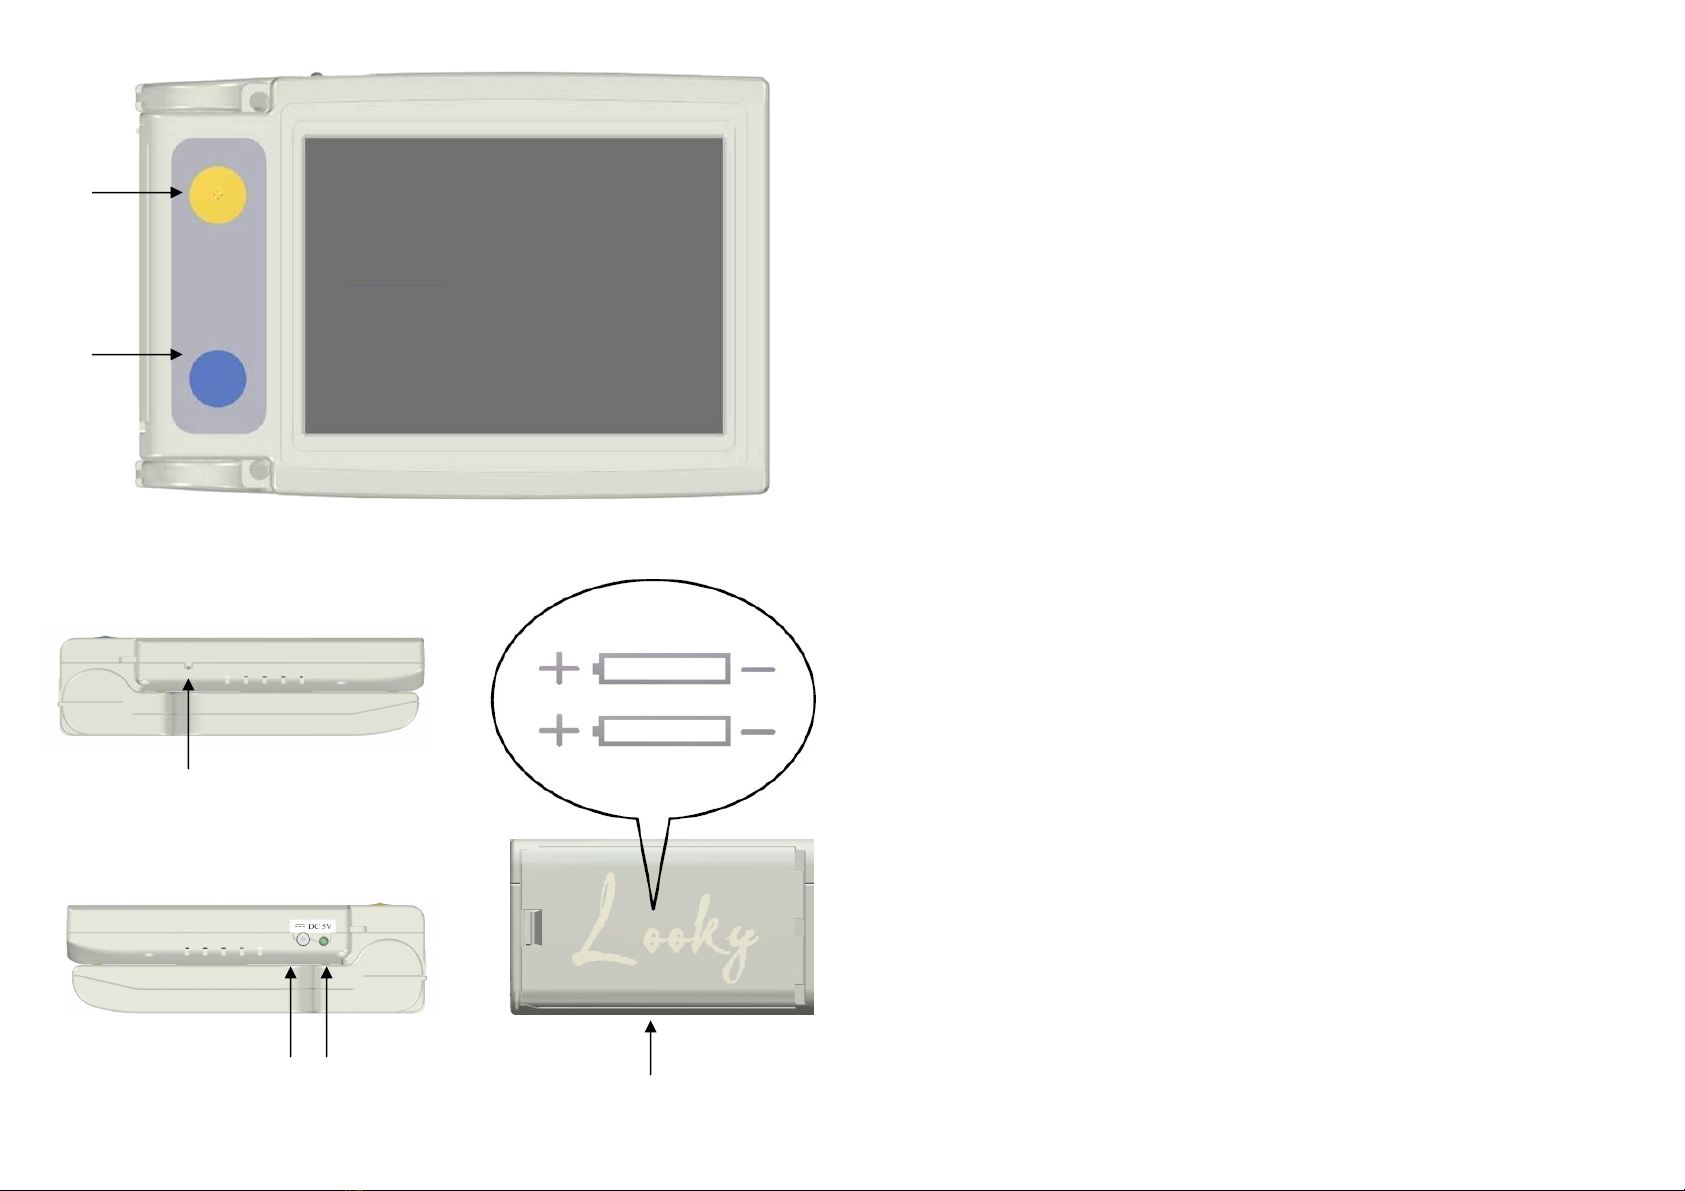
(Attention! You can use the Look while it
is charging, but it will take longer to
complete the charging process).
(Attention! It is not recommended to
charge the batteries in an external
batter charger. There is no guarantee
that the batteries will be full charged).
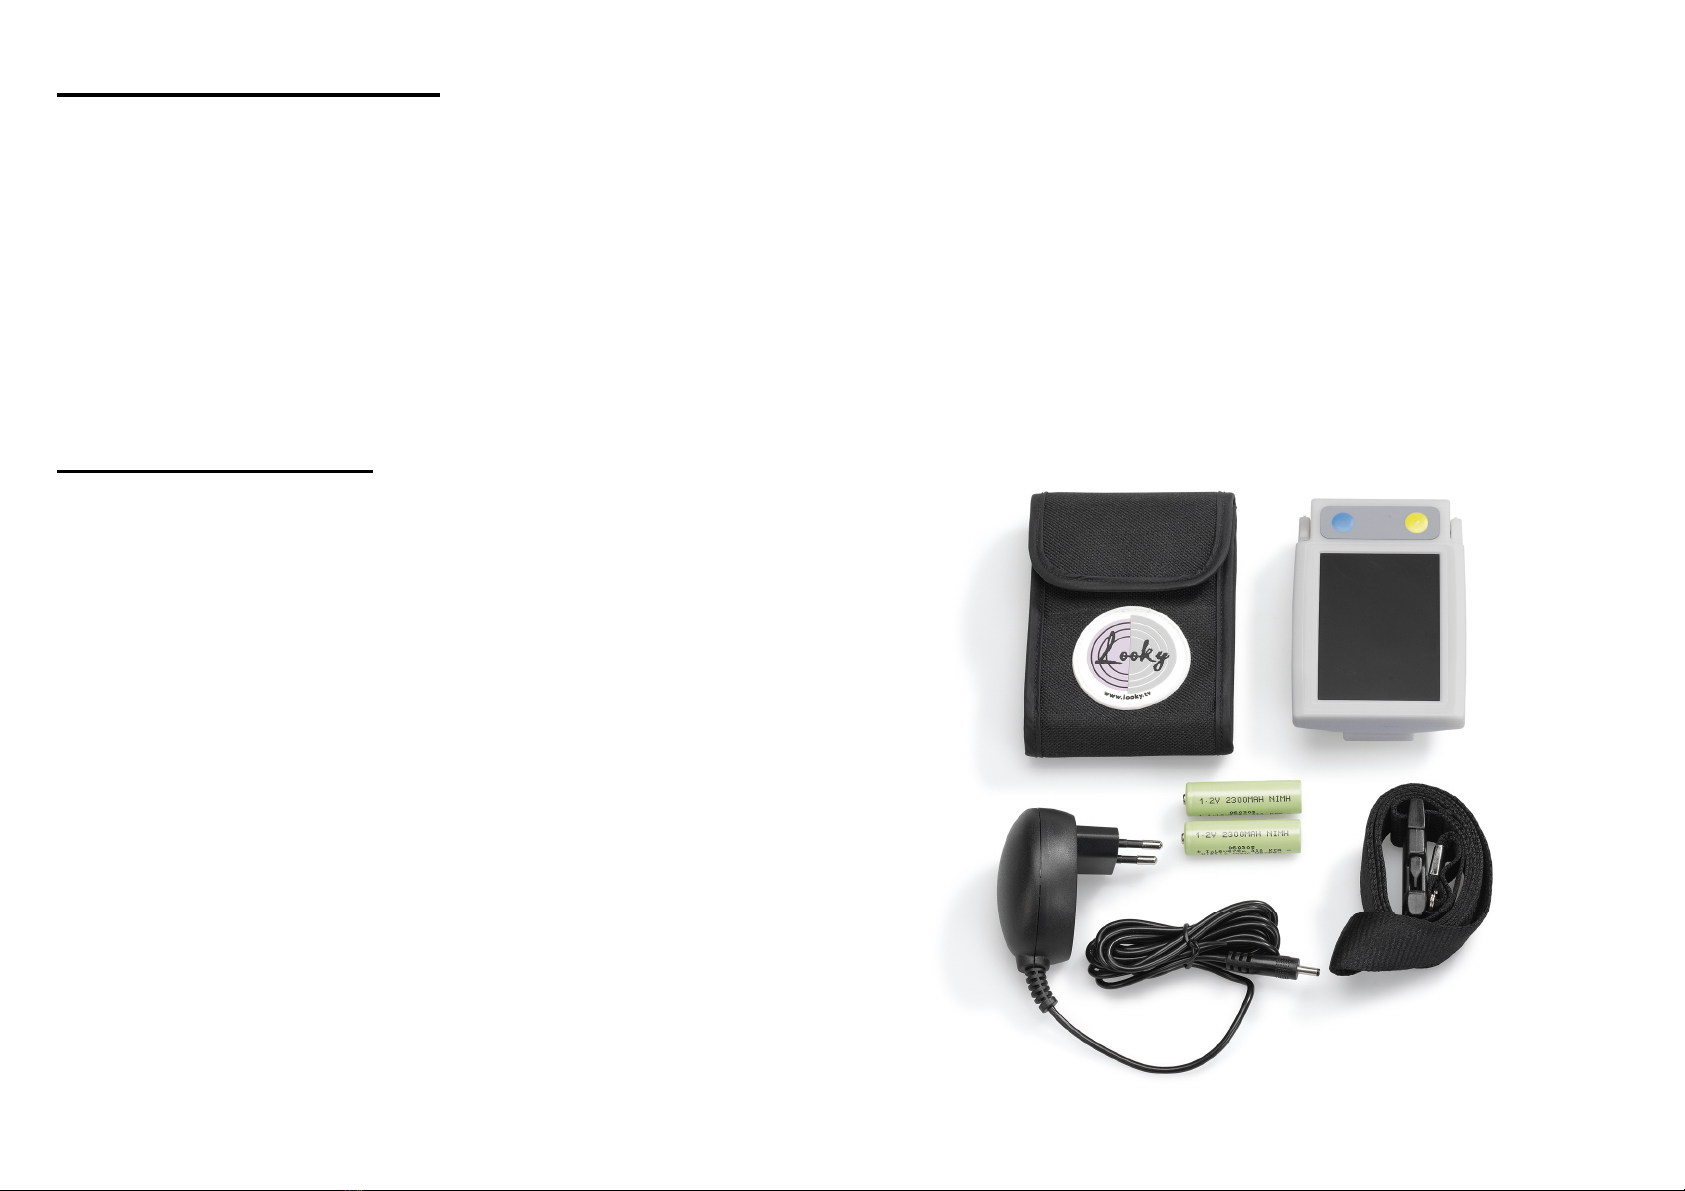
It is possible to use Alkaline batteries
(type AA) in the Looky but the duration of use
is significantly shorter.
If the adapter is connected to the Looky
containing Alkaline batteries in error, a
continuous two tone beep is emitted and the
LED (5) flashes on and off. This indicates that
the batteries will not be charged. Remove the
adapter first and then the alkaline batteries
and replace with rechargeable ones.
(Attention! Onl replace with same t pe as
originall supplied)
What to do if problems occur
Disconnect the adapter if attached.
Remove the batteries from the battery
compartment (6).
Wait for 3 minutes and replace the batteries.
Switch back on the Looky.
If problems persist, please contact your
nearest dealer.
Safet Precautions
Protect the device and the batteries from
e cessive moisture, rain, sand or e treme
temperatures.
Do not cover the device when charging the
batteries.
Clean the device with a clean, dry cloth. Do
not use cleaning products that contain
alcohol, methylated spirits, ammonia or that
are abrasive as these can damage the device.
Vi rekommenderar inte att Ni tar ur
batterierna för att ladda dem i en e tern
batteriladdare då vi har märkt att de inte blir
fulladdade.
Det går bra att använda alkaliska batterier i
Looky. Tänk då bara på att användningstiden
blir betydligt kortare.
Om Ni av misstag skulle börja ladda Looky när
det sitter alkaliska batterier i, så kommer Ni
att höra två ihållande ljudsignaler som
varning att batterierna inte kommer att
laddas. Den gröna LED (5) lampan blinker
också ihållande tills batteriladdaren dras ur.
Öppna batteriluckan (6) och sätt i två
batterier av typen AA/LR6 med “+” och “-“
på samma sätt som visas i botten av
batterifacket (6).