Rhima RR211 PRO User manual

Operator’s Manual
RR211, RR270, RR300, RR390 PRO
Rack Conveyor Washers
Australia Tel: 1300 347 944 | New Zealand Tel: 0800 902 054 | Singapore Tel: +65 9107 8943

INSTRUCTION MANUAL FOR DISHWASHERS
●The appliance must be connected to water and electrical supplies by qualified
tradespersons only and according to local regulations.
●The appliance must be used by adults only. Do not let children play with, or operate
this machine.
●Only persons trained to use this dishwasher are permitted to operate it.
●This appliance has been designed to wash food preparation and eating utensils. It has
NOT been designed to wash objects soiled with petrol, paint, remnants of steel or iron,
corrosive chemical products such as acids, alkalis, or solvents or any item that cannot be
immersed in water.
●Do not open the appliance door(s) while the appliance is operating. The appliance has
a safety device which stops operation if a door is accidentally opened.
●After using the appliance, isolate the electric and water supply.
●Do not attempt to repair the appliance. Repairs made by unqualified persons may cause
further damage and will void warranty.
●Repairs and servicing of this appliance must be carried out by Rhima personnel only.
GENERAL INSTRUCTIONS
It is important to keep this instruction manual near the appliance for
future consultation.
If the appliance is sold or transferred to another user, make sure this
manual remains with the appliance so that the new owner is informed
about the warnings and operation of the appliance. These instructions
are given for safety reasons and they must be read carefully before
installing or using the appliance.
IMPORTANT CUSTOMER INFORMATION
●To request a service, detergents or rinse additive contact your local Rhima Service centre
below:
Australia: 1300 347 944
New Zealand: 0800 902 054
Singapore: +65 9107 8943
2

ELECTRICAL INSTALLATION
The Australian installation shall be in accordance with The Plumbing Code of Australia (PCA).
This appliance should be connected to a hot water supply (Max 65°C ) for in accordance
with Australian Standard AS/NZS 3500.1. for optimum performance.
The water supply pressure should be a minimum 200 kPa at all times and flow rate should
be at least 15 litres per minute. A static pressure higher than 600 kPa (73.5 psi) requires a
pressure reducing valve upstream of the supply line. If water pressure is below 200 kPa,
the use of a rinse booster pump is recommended.
This appliance is designed to drain to a tundish. Waste connection to a spigot is not
recommended and may cause draining issues.
The drainpipe should withstand 70°C (158°F) in continuous duty conditions.
The grey water drain hose must have a fixed watertight seal above the tundish in
accordance with the Australian Standard AS/NZS 3500.2.
A DIAGRAM SHOWING THE CORRECT METHOD OF WASTE INSTALLATION IN ACCORDANCE
WITH THE AUSTRALIAN STANDARD AS/NZS 3500.2 IS BELOW
PLUMBING INSTALLATION
This appliance must be connected to an earthed 3-phase electrical switched outlet of an
appropriate rating.
VENTILATION
Use extractor fans to guarantee a minimum ventilation of 500 m³/h. Increase the
ventilation rate to 1500 m³/h if the machine is equipped with drying system. It is suggested
to position the extractor fans close to the machine entry and exit and in correspondence
to the heat recovery fans.
3

MACHINE DESCRIPTION
Description of the machine, its accessories and its guards
Machine description
Refer to annexes for the technical data of the machines.
Example:
MACHINE IN RIGHT EXECUTION
A- SPLASH GUARD
B- AUTOMATIC SHOWER WITH DRAWER STRAINER
C- PRE-WASH
D- FIRST WASH
E- PRE-RINSE AND RINSE MODULE
F- CONTROL PANEL
G- DRYER
H- EMERGENCY BUTTON
L- HEAT RECOVERY/STEAM CONDENSER/HEAT
M- DRAWER STRAINER
16 - CIRCUIT-BREAKER SWITCH
pic. 4
HG
E
F
D
L
CBA
M
16
noisnemiDeludoM
Width Height Depth
A mm003DRAUGHSALPS-
1520 mm
900 mm
B - AUTOMATIC SHOWER WITH DRAWER STRAINER 450 mm
C mm009romm006HSAW-ERP-
Dmm009HSAW-
E- PRE-RINSE AND RINSE MODULE 600 mm
Fmm0381mm058LE
NAPLORTNOC-
Gmm0702)mm007(mm006REYRD-
L- HEAT RECOVERY/STEAM CONDENSER 450 mm or 1300 mm 1860 mm
L- HEAT RECOVERY WITH HEAT PUMP (BIG) 1000 mm 2070 mm
L- HEAT RECOVERY WITH HEAT PUMP (SMALL) 700 mm
This machine is built with high quality materials in particular AISI 304 stainless steel (AISI 316 for boilers and tanks) and in
high thickness to ensure a longer lifetime.
The machine is built in different sections:
Pre-wash module (the presence depends on the model chosen): a preliminary rough washing is carried out with low
temperature thermostatically controlled to melt the alimentary residuals and avoid the proteins denaturation.
On machines with pre-wash, the initial tanks filling occurs in several phases:
- Phase 1: wash tanks only
- Phase 2: filling interruption. Water heating using the heating elements until a proper pre-wash temperature is reached
(factory-set)
- Phase 3: resume and filling conclusion
- Phase 4: resume and heating conclusion.
lling
RECOVERY WITH HEAT PUMP
4

Wash module(s): a proper washing of the crockery is performed with temperature thermostatically controlled.
Rinse module: a pre-rinse is performed that removes most of the detergent, then a final rinse is performed with high
temperature thermostatically controlled.
Autotimer: the Autotimer function (activated by default) allows stopping the machine if it is in start-mode but not operating
at the moment.
It can happen in these cases:
1. The machine is working in vain (it is in operation but it is not used).
2. The machine is in operation but a baskets accumulation exiting the machine causes the limit switch SQ1 to trip (F1).
3. The machine is in operation with the drawer Mopen.
In these cases, the timer set by default at 300 seconds trips. When the time is over the energetic saving mode turns on.
By inserting a basket, clearing the exit or closing the drawer the machine restarts automatically to operate.
Available options
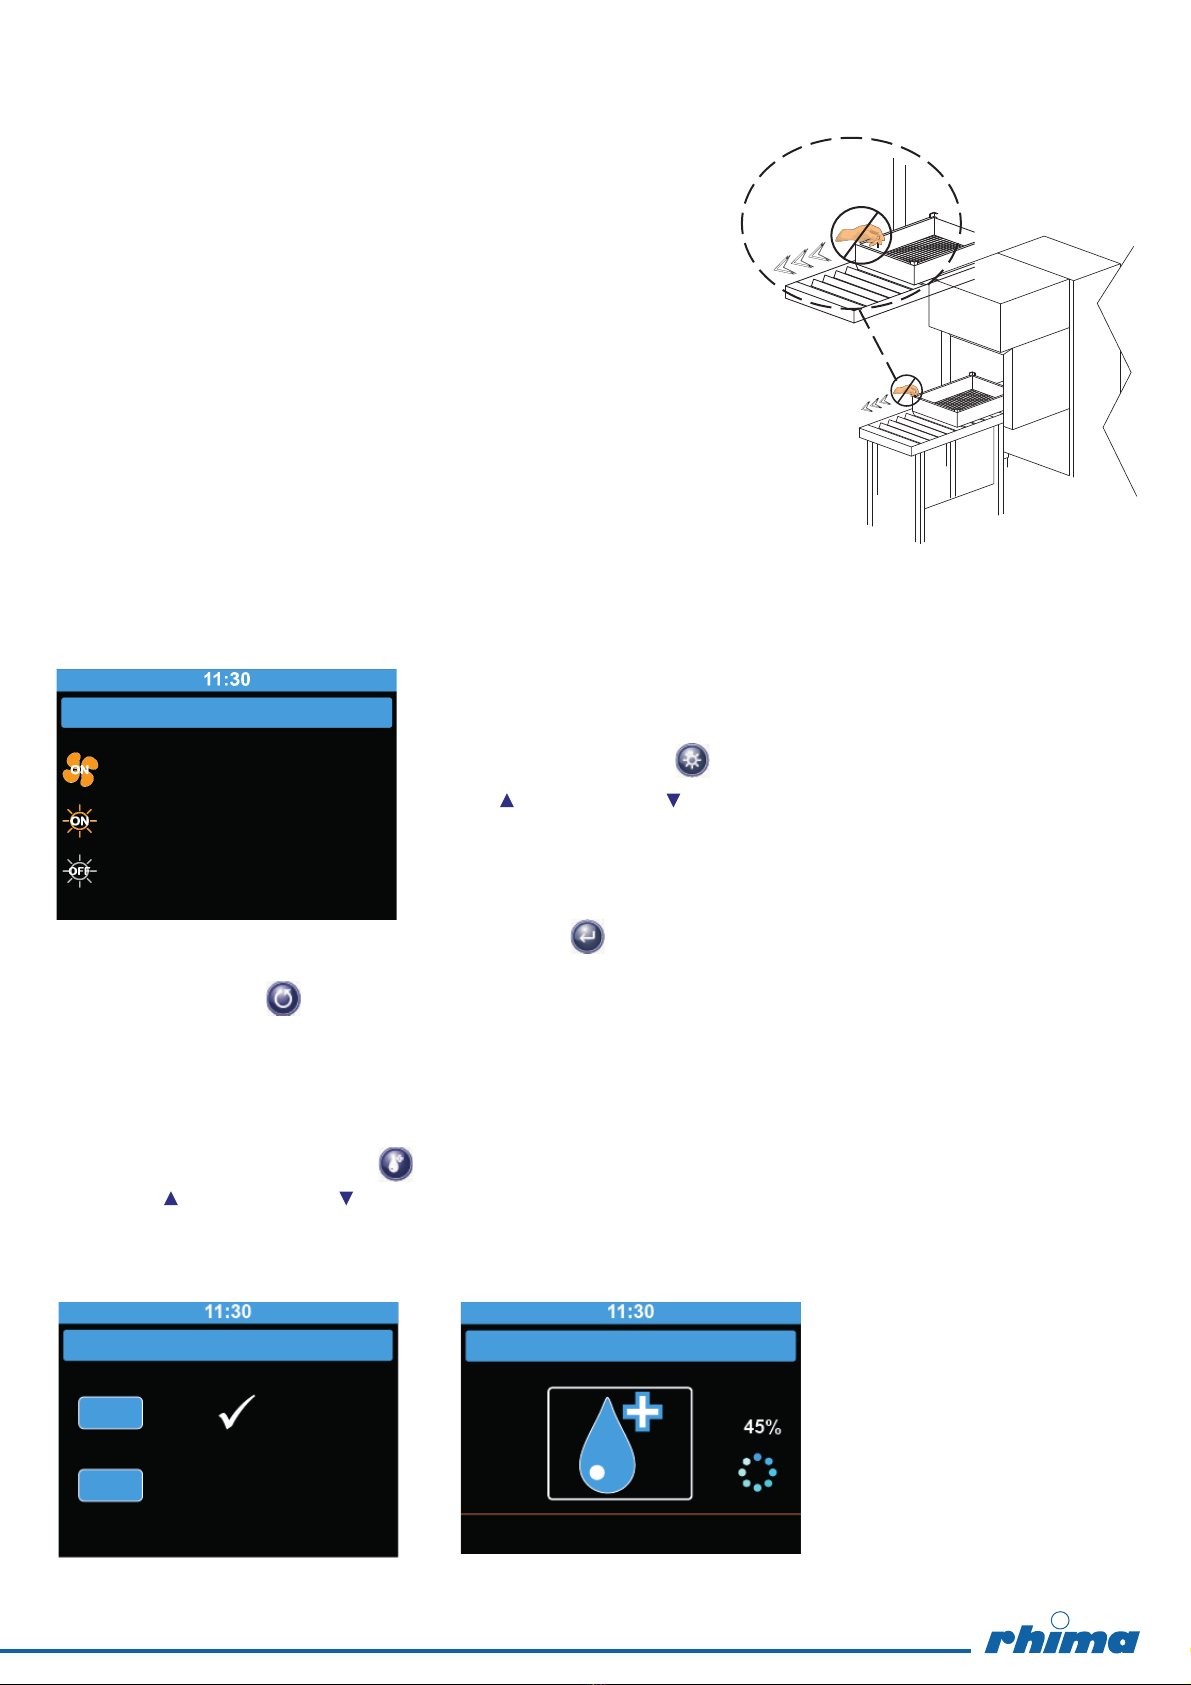
Automatic shower with drawer strainer B:
Module with low temperature water thermostatically not controlled, with drawer strainer M.
The filter collects the food residuals and it can easily be removed and cleaned during the operation thanks to the drawer,
without opening the doors and getting in touch with the washing solution.
If the drawer is extracted during the washing, the machine stops the conveyor, the rinse and the module pump to allow the
filter cleaning.
The wash pumps keep working.
The machine restart the operation as the drawer is repositioned.
Make sure that during the operation the filter is clean and correctly positioned.
Dryer G:
It conveys hot and dry air that creates the ideal conditions for the rinse aid action.
Depending on his/her needs the operator can turn on or o the dryer module heating part using the dedicated key, during
the work.
Heat recovery L:
The goal is the recovery of the steam heat exiting the machine that otherwise would be dispersed, and use it to pre-heat
the water entering the boiler.
The machine must have a cold water supply for the rinse.
Heat recovery with heat pump L:
The goal is the recovery of the steam heat exiting the machine that otherwise would be dispersed, and use it to pre-heat
the water entering the boiler.
It exploits a heat pump to further increase the water temperature entering the boiler.
The machine must have a cold water supply for the rinse.
WARNING: If this optional is present the Autotimer must be set to a minimum value of 300 seconds
WARNING: Heat Recovery system and Steam Condenser - installation (optional)
It is strictly forbidden to connect the machine’s vent directly with the outdoor!
Cold weather conditions might seriously damage the Thermal Recovery system or the Steam
Condenser.
Pressure Increase Pump:
It allows a proper machine operation when the feeding water pressure of the machine is lower than 200 kPa.
Self-cleaning:
The system allows carrying out an automatic internal machine cleaning and rinsing cycle, when it has finished operating.
Specific sanitizing product can be used.
The self-cleaning can be carried out only if:
• The machine is in stand-by
• The doors are closed
• The tanks are empty.
The display shows the Self-cleaning screen.
During the cycle all the other functions are disabled. If there is no electrical supply the cycle will be restarted automatically
to ensure a proper execution of the cycle.
Self- Cleaning pressure increase pump:
It allows a proper Self-cleaning operation when the feeding water pressure of the machine is lower than 200 kPa.
Inlet water temperature probe:
The option allows to show the inlet water temperature on display.
5

1: Display TFT back lit.
2: START key green backlit (not backlit: stand-by mode)
3: STOP key red backlit
4: ON / OFF key.
5 and 6: Scrolling keys ( / , - / +).
7: TEMPERATURES key
8: INFO key.
9: CONFIRMATION key
10: DRYER ON/OFF key (optional).
11: Disabled
12: SELF-CLEANING key (optional).
13: MENU key
14: RETURN key
15: SPEED selector switch (from 1 to 5).
16: CIRCUIT-BREAKER SWITCH: position 0= machine not powered - position I= machine powered.
Backlit keys only if it is possible to activate the corresponding function:
7: TEMPERATURES key. It allows the working temperature adjustment of the single modules.
8: INFO key. It provides additional information about the current status of the machine. In case of alarm it allows to have
more details.
9: CONFIRMATION key.
10: DRYER ON/OFF key. It allows to enable or to disable the DRYER heatings. See paragraph for
CONTROL PANEL AND RELATED SYMBOLS
Available options
more information.
6

MACHINE IN STAND-BY MODE
4: ON / OFF key with ON function. To turn the machine ON.
8: INFO key. Provides additional information about the current status of the machine.
12: SELF-CLEANING key. Backlit key only when it is possible to activate SELF-CLEANING option. If pressed the
function is activated. See paragraph for more information.
13: MENU key. Provides to access to menus and related work parameters.
MACHINE READY OR IN OPERATION
1: Notice area.
1A: Status of the machine.
1B: Measured temperatures for single modules.
2: START key back lit. When the machine is ready, it allows the start. The washing is activated by pressing this key.
3: STOP key back lit in red. When the machine is running, allows to stop and putting in ready mode. The conveyor is stopped
by pressing this key.
4: ON / OFF key with OFF function. Allows putting the machine in STAND-BY mode.
5 and 6: Scrolling keys ( / , - / +). When in the menu either scrolls the items or modifies all adjustable parameter (increase
and/or decrease)
Backlit keys only if it is possible to activate the corresponding function:
7: TEMPERATURES key. Temperature quick adjustment. It allows the working temperature adjustment of the single modules.
8: INFO key. It provides additional information about the current status of the machine. In case of alarm it allows to have
more details.
9: CONFIRMATION key.
10: DRYER ON/OFF key. It allows to enable or to disable the DRYER heatings. See paragraph for
STAND-BY
11:30
11:30
MACCHINA PRONTA
78°C
50°C
68°C
68°C
Risciacquo
Lavaggio 1
Prelavaggio
Doccione cesti/h
Available options
more information.
Available options
7

FUNCTIONING OF THE MACHINE
Machine start-up
• Check that the over flow pipes are correctly inserted.
• Check if the surface filters are in their seats. Check that the washing and rinsing arms are properly inserted, as well as
the curtains
Note: the long and narrow curtains are to be put at the entry and exit; the wide and short ones go inside the machine.
• Close the doors.
• Open the water valve(s).
• Position on I the circuit-breaker switch 16 (see chap. )
• Turn on the machine using the control panel.
• Wait for the filling and pre-heating operations to be completed. During the pre-heating the machine suspends the tanks
filling. In this phase the display always shows the message FILLING.
Once filling of all the tanks is finished, the complete heating of the machine starts. In this phase the display shows the
message HEATING and, by pressing the key TEMPERATURE 7 (for about 10 seconds), it shows the reached temperatures.
To ensure a proper washing, the start is not possible until the set temperatures are reached.
The several phases are represented on the display with specific icons.
• When the heating is finished, it is possible to proceed with the washing.
The working temperatures can be seen on the display.
Washing
To set the desired working speed, use the SPEED selector switch 15 turning it to the right or to the left to set a suitable speed
for the type of work to be carried out. Confirm the selection by pressing key 9 CONFIRMATION .
There are five possible settings:
Speed 1: intensive wash.
Speed from 2 to 3: dedicated to the washing of the average dirt.
Speed from 4 to 5: dedicated to trays and dusting.
• If the machine is not equipped with an automatic chemicals dispenser, manually introduce the detergent in the wash tank.
Carefully follow the instructions of the product manufacturer considering the water hardness (see chap. DETERGENTS).
• Press START 2 button to start the conveyor movement.
• Carry out the cleaning off.
Place the baskets on the conveyor (see paragraph - pic. 6 - 7).
Push the basket inside the splash guard Auntil the hooking with the towing system.
The washing sequence is the following:
Automatic shower (B- if there is the optional module) equipped with filter that can be periodically cleaned by extracting
the drawer M.
Low temperature pre-wash (C- if there is).
Thermostatically controlled temperature wash D.
Pre-rinse E.
Final rinse Ecarried out with clean water coming from the hydric network and thermostatically controlled and eventually
rinse aid.
Drying (G- if there is the optional module).
Baskets exit zone equipped with roller conveyor and limit switch.
• Push the STOP 3 button to stop the operation.
N.B.: It is recommended to change the tank’s water by new filling, when very dirty or, at least, twice a day.
WARNING: In case a dangerous situation occurs, push the emergency button H. The towing system
and the absorptions turn off. Before restarting the appliance, check if the emergency is over. The
emergency button rearmament does not start the machine but it position the appliance in stand-by.
The emergency button does not have to be used as usual machine switch off system.
CONTROL PANEL AND RELATED SYMBOLS
Dishes and cutlery loading
8

It is forbidden to remove the basket from the machine before it has come
out of the tunnel and to insert hands or arms inside the machine when it
is in movement (see pic. 5).
Note: Always turn the machine off before inserting your hands or arms
inside the tunnel.
Note: Each model has the AUTOTIMER installed. If the machine does not
wash objects for more than 5 minutes (the timing can be changed by the
installer), the machine stops any optional installed (dryer, heat recovery,
steam condenser, etc.) to cut down consumption.
Note: The machine is equipped with automatic economizers to cut
consumption down, if the machine does not work continuously. If the
objects to be washed are placed discontinuously, the wash pumps not
involved are turned off.
5.3 End washing operations
Press STOP 3 key.
Press ON / OFF 4 key.
Drain the tanks. Turn off the machine positioning on 0 the circuit-breaker switch 16.
Shut the water supply valve(s).
Start the cleaning of the machine (see chap. MAINTENANCE).
5.4 Select DRYER (option)
When the machine is in Ready or in Running mode, if present the optional DRYER.
It allows enabling or disabling the DRYER's heating elements.
Press key 10 DRYER ON/OFF .
Use keys 5 (increase) and 6 (decrease) to select one of the following parameters:
ONLY FAN ON: enables only the fan(s) (heating elements disabled)
TOTAL POWER: enables the dryer(s) (fan(s) and heating elements enabled)
DRYER OFF: dryer completely disabled.
Confirm the selection by pressing key 9 CONFIRMATION .
The lower banner shows the icon of the selected mode.
Press key 14 RETURN to exit without saving the settings.
5.5 Select SELF-CLEANING (option)
When the machine is in Stand-by mode and if present the optional SELF-CLEANING. It allows enabling SELF-CLEANING
function.
Drain the tanks.
Press the key 12 SELF-CLEANING .
Use keys 5 (increase) and 6 (decrease) to select one of the following two parameters:
NO: the machine turns to Stand-by mode
YES: the function SELF-CLEANING is enabled. When the function is enabled, an automatic cycle of internal wash and rinse
starts. At the end the machine turns to Stand-by mode again.
pic. 5
SELF CLEANINGPROCEED WITH SELF CLEANING?
YES
NO
DRYER
ONLY FAN ON
TOTAL POWER
DRYER OFF
9

Dishes and cutlery loading
Before loading the dishes it is necessary to carry out a proper cleaning off of the food residuals.
It is not necessary to rinse the dishes with water before the loading.
Follow these tips:
• Crockery and cutlery must not lie inside one another, covering each other.
• Place the dishes so that all the surfaces can be reached by the water; otherwise the dishes cannot be washed properly.
• Make sure that the dishes are placed in a stable position and that the empty containers (cups, glasses, bowls, etc.) do
not turn upside down.
• Place all the empty containers like cups, glasses, etc., upside down.
• Place in tilted position the dishes with deep hollows, so that the water can drain.
• Make sure that the smaller dishes do not fall from the baskets.
• Check that the dishes are not too tall or protruding.
• Do not wash trays horizontally.
Some food, like carrots, tomatoes, ketchup, may contain natural colorant substances that may alter the dishes and plastic
parts if they are in large quantity.
The eventual color alteration does not mean that the plastic is not thermo-resistant.
Dishes to not wash in a dishwasher
Dishes not suitable to be washed in a dishwasher:
• Wooden crockery and cutlery or with wooden parts; wood wraps and loses its characteristics if it is exposed to high
temperatures. In addition the glues used are not suitable for dishwashers; a consequence may be the handles detachment.
• Hand-made objects, valued vases or decorated glasses.
• Plastic dishes not thermo-resistant.
• Copper, brass, pewter or aluminum objects can discolor or become opaque.
• The decorations on glass can lose sparkle after a certain number of washes.
• Fragile glass or crystal objects can become opaque if washed many times.
It is suggested to purchase only crockery and cutlery suitable for washing in dishwashers.
Glasses can become opaque after many washes.
If after the washing the dishes are not clean or they have washing residuals (glasses, cups, bowls, etc., with liquid
on the inside) it is mandatory to repeat the procedure.
WARNING: Do not wash items contaminated by petrol, paint, pieces of steel or iron, ash, sand, wax,
lubricating grease. These substances damage the machine. Do not wash fragile items or made of
material that do not stand the washing process.
10

YES
pic. 7
NO
pic. 6
WARNINGS:
• Do not slam the doors when opening and closing.
• Do not put material or objects on the machine.
• The water used for the washing and the rinsing is not potable because of the presence of chemical additives. In
case of contact with skin or eyes wash them immediately with plenty of water and check the safety instructions of
the detergent manufacturer. If necessary, contact a doctor.
• Some important rules must be followed for the use of this appliance:
1) Never touch the appliance with wet hands or feet
2) Never use the appliance when barefooted
3) Do not install the appliance in places exposed to water splashes.
• This machine must be disconnected from the main electrical supply after use at the end of the day and for
any service/maintenance operation. Switch off the circuit-breaker switch 16 located on the control panel.
Shut the water supply valve(s).
• In case an obstacle stops the conveyor, first turn off the circuit-breaker switch 16 (position 0= machine not powered)
and then remove the cause of the block.
WARNING: INTERNAL CLEANING OF THE MACHINE SHALL BE CARRIED OUT AT LEAST 10 MINUTES AFTER
IT HAS BEEN TURNED OFF.
WARNING: DO NOT INSERT HANDS AND/OR TOUCH THE PARTS LOCATED AT THE BOTTOM OF THE WASH
TANK AND/OR AT THE END OF THE WASH CYCLE.
WARNING: DO NOT TOUCH THE CONVEYOR WHILE IT IS WORKING.
11

DETERGENTS
Using detergent
The detergent must be of good quality, of NON-FOAMING type, specific for the mechanical washing of dishes.
The use of liquid detergents is recommended.
The dosing has to be done following the recommendations of the detergent manufacturer and in accordance with the water
and dishes characteristics.
The detergent has to be inserted only in the wash tank 1. For manual dosing remember that the wash tank contains about
85 litres of water.
Note: It is forbidden to use detergents with chlorine-based reagents.
Using rinse aid
It is possible to use the rinse aid to get quicker drying and polishing.
The dosing has to be done following the recommendations of the rinse aid manufacturer and in accordance with the water
characteristics.
Note: too much chemicals produces foam that reduces the effectiveness and lifetime of the washing pump.
Too much chemicals might leave residuals on the dishes.
Using sanitizing
It is forbidden to use sanitizing products with chlorine-based reagents.
Detergents and sanitizing products used to clean the machine must be properly prewashed.
It is forbidden to use generic detergents to clean the machine.
AIRBORNE NOISE EMISSIONS
The equivalent inlet maximum sound pressure level is the point Cwith L eq = 75,7 dB(A).
The equivalent outlet maximum sound pressure level is the point Cwith L eq = 69,8 dB(A).
OBSERVANCE OF THE RULES OF HYGIENE AND H.A.C.C.P.
In order to meet the correct H.A.C.C.P. procedures remember to prepare a sheet with tables where the shift operator enters
the date and time the washing starts, the time the washing ends, the tanks and boilers temperatures and any other note/
alarms that have tripped and what he/she has done to ensure sanitary safety.
This is the reason why the machine is equipped with:
• Temperature gauges that indicate the boiler and tank temperature.
• Malfunctioning gauges.
• Possibility to consult the washing parameters.
Inlet
Back
Front
A
B
C
A
B
C
Outlet
0,2 m
0,2 m
12

MAINTENANCE
WARNING: The machine is not protected against pressure water jets, therefore avoid the use of this type of cleaning
system on the cabinet.
It is also suggested to contact cleaning product dealers for detailed information about methods and products for
a periodical sanitizing of the machine.
Do not use bleach or chlorine-based detergents to clean the machine.
Routine maintenance
The perfect operation of the machine depends on a careful cleaning that is necessary at least once a day with the
following procedure:
• Turn off the machine as explained in the paragraph End washing operations.
• If the machine is equipped with Heat Recovery with heat pump, clean the extractable filter (see pic. 10).
• With empty tank, extract the filters of the tanks and the pumps (see pic. 8 - 9). Be careful that the washing residuals in
the filters do not fall in the tanks. Clean the filters with a rigid brush underneath a powerful water jet.
• Extract the wash (see photo 1) and the rinse arms and carefully clean the nozzles
underneath running water.
• Carefully clean the tanks avoiding the use of chlorine-based detergents.
• Clean the shutters (long on the outside, short on the inside).
• If the machine is equipped with automatic shower with drawer strainer, extract the
drawer and clean it (see photo 2).
• Reassemble all the parts and replace the arms in their seats.
• It is suggested to leave the doors of the machine open at the end of the day.
Do not use a metal scouring pad and/or corrosive products to clean the dishwasher.
Do not use pressure cleaning systems.
photo 1
pic. 9
pic. 8
photo 2
pic. 10
1
3

Extraordinary Maintenance – by qualified Service Personnel only
Once or twice per year, the machine should be checked by qualified Service Personnel:
• To remove scaling from the heating elements.
• To check the status and the tightness of all gaskets.
• To check the perfect state and/or wear of the components. If a component is damaged or oxidized replace it immediately,
with genuine spare parts only.
• To check the eff
ciency of the dispensers.
• To tighten firmly all electrical connections at least once per year.
• To clean the intake filter of the solenoid valve.
• To check the state of the safety devices of the doors/boilers, limit switches.
• To check the calibration of the clutch.
Pay attention to do not wet the motor or any electric part. Perform maintenance with the circuit-breaker switch 16
turned OFF (in 0 position).
Every 3-4 years of machine use, double-check the tightening and the eff
ciency of all electrical contacts, with special
attention to the contacts of starters and relays. Increase controls frequency if the machine is operating in heavy
or intensive conditions.
Extraordinary Maintenance - Heat Recovery with heat pump option
Every two months the Heat Recovery should be checked by qualified Service Personnel to:
• Clean the finned exchangers inside the Heat Recovery.
• Check the heat pump's flow is properly charged.
Extraordinary Maintenance - Heat Recovery or Steam Condenser option
Every three months the Heat Recovery/Steam Condenser should be checked by qualified Service Personnel to:
• Clean the finned exchanger inside the Heat Recovery/Steam Condenser.
Extraordinary Maintenance - Pressure Increase Pump and/or Self-Cleaning pressure increase pump
option
After long periods of inactivity of the dishwasher, check that the supplementary pressure increase pump freely rotate. Please
contact the Technical Service.
Packing
The packing consists of the following:
• a wooden crate;
• extensible belt in nylon (LDPE);
• polystyrene foam (PS).
Please dispose of the materials listed above, in compliance with the legislation in force.
Disposal
The equipment is marked with the symbol (see pic. 11).
The symbol indicates that the product should not be discarded as unsorted waste but must be sent to
separate collection facilities for recovery and recycling in compliance with the legislation in force.
An eff
cient waste disposal procedure contributes to avoiding any potential environmental or health hazards
as well as promoting the recycling and re-utilization of materials from which our appliances are constructed.
If the user does not comply with the regulations he/she shall be subject to the penalties foreseen by each
member state.
Disconnect electricity and water before disposal.
All metal parts are recyclable as they are made of stainless steel.
Recyclable plastic parts are marked with the plastic material symbol.
pic. 11
ENVIRONMENTAL ASPECTS
14

ECOLOGICAL ASPECTS
Recommendations for optimum use of energy, water and additives
If possible, use the machine at full load: This will avoid wasting detergent, rinse aid, water and energy.
Detergents and rinse aids: Use detergents and rinse aids having the highest biodegradability so that the environment
is better respected. Have the correct dosage according to the water hardness checked at least once a year. An
excess of product pollutes rivers and seas, whereas an insuff
cient amount compromises dish washing and/or hygiene.
Tank and boiler temperatures: The temperatures of the tank and boiler are set by the manufacturer so as to get the best
washing results with the majority of detergents on the market. These can be reset by the installer according to the detergent
used.
Cleaning off: Carefully clean off the kitchenware using water at ambient temperature with moderation so as to make removal
of animal fats easier. To remove encrusted matter, soaking in hot water is recommended.
Notes: Wash the objects as soon as possible in order to prevent the deposits from drying and jeopardizing the effectiveness
of the washing. To get an eff
cient wash, it is advisable to regularly clean and maintain the dishwasher.
MAINTENANCE).
Non-compliance with the above points and all the information described in this manual could determine a waste of
energy, water and detergent, with consequent increase in operating costs and/or decrease in performance.
Signals
The signal messages are displayed and signalized with a beep.
When DETERGENT LOW LEVEL appears on the display it means that the detergent is over.
When RINSE AID LOW LEVEL appears on the display it means that the rinse aid is over.
When SANITIZER LOW LEVEL
appears on the display it means that the sanitizing product is over (only on machines
equipped with the SELF-CLEANING optional).
SIGNALS AND ALARMS
During the operation, the machine signals other situations in addition to alarms that need the operator attention.
In any case the relative information automatically appears on the display and remains visible until the operator execute the
necessary actions.
To display the alarm/signal screen during the machine operation, press the 8 INFO key.
Press the 14 RETURN
g
key to go back to the main screen.
Signal screen example
10:23 DETERGENT LOW LEVEL
Alarm screen example
10:23 ALARM Z8
GENERAL
ALARM
(see chap.
15

Alarms
The alarms are displayed on a dedicated screen that overlap the current display at the time the alarm occurs.
Each alarm screen gives precise information about the meaning of the alarm and which are the operation the operator can run.
Alarm screen example:
It is possible to have more information about the current alarm by pressing the 8 INFO key.
If the alarm does not block the machine it is possible to continue the operation by pressing 14 RETURN key.
The machine will continue to signal the alarm until the resolution of the problem by:
- The symbol is shown in the state of the machine.
- The 8 INFO key. In this case by pressing the 8 INFO key the current alarm is displayed.
If the alarm block the machine the operator will be able to carry out only two actions:
- Press the 8 INFO key to have more information
- Press the 4 ON/OFF
y
to position the machine in stand-by.
Alarm screen example
10:23 ALARM Z8
GENERAL
ALARM
Alarm code
Short alarm description and
module or component involved
10:23 ALARM Z8
Emergency button pressed.
Make sure that the emergency is solved.
To resume working, release the emergency button.
WARNING: the emergency button should not be
used as ordinary means to turn the appliance
ON/OFF.
Alarm code
Information for the operator and
actions to implement
When DOOR OPEN appears on the display it means that you are trying an operation that cannot be done with the door
opened or that you opened the door and interrupted a cycle in progress.
When DRAWER OPEN appears on the display it means that you are trying an operation that cannot be done with the drawer
opened or that you opened the drawer and interrupted a cycle in progress.
When PLEASE DRAIN THE TANKS appears on the display it means that you are trying an operation that cannot be done
with the tanks full.
When ENSURE THAT OUTLET IS CLEAR appears on the display it means that it is necessary to remove the objects from
the exiting shelf to continue the operation.
When PERIODIC MAINTENANCE SUGGESTED appears on the display it means that it is suggested to contact a technician
for the periodical check of the machine.
When ENERGY SAVING MODE appears on the display it means that the machine is in energetic saving mode.
).
When HEAT PUMP MAINTENANCE appears on the display it means that you must call a technician for the Heat Recovery
with heat pump maintenance (see paragraph
Extraordinary Maintenance - Heat Recovery with heat pump option - only
if the machine is equipped with the optional).
Available options
(see par.
16

Alarms description
Alphanumeric abbreviation Alarm description
ALARM B2 BOILER 1 PROBE FAILURE
ALARM B3 BOILER 1 HEATING FAILURE
ALARM B5 BOILER 1 OVERTEMPERATURE
ALARM B10 RINSE LOW TEMPERATURE
ALARM C1 PRE-RINSE FILLING FAILURE
ALARM C6 PRE-RINSE DRAINING FAILURE
ALARM C7 PRE-RINSE PUMP THERMAL PROT.
ALARM E1 WASH TANKS FILLING FAILURE
ALARM E2 WASH1 PROBE FAILURE
ALARM E3 WASH1 HEATING FAILURE
ALARM E4 WASH1 LOW TEMPERATURE
ALARM E5 WASH1 OVERTEMPERATURE
ALARM E6 WASH DRAINING FAILURE
ALARM E7 WASH1 PUMP THERMAL PROTECTION
ALARM F2 WASH2 PROBE FAILURE
ALARM F3 WASH2 HEATING FAILURE
ALARM F4 WASH2 LOW TEMPERATURE
ALARM F5 WASH2 OVERTEMPERATURE
ALARM F7 WASH2 PUMP THERMAL PROTECTION
ALARM M1 PREWASH FILLING FAILURE
ALARM M2 PREWASH PROBE FAILURE
ALARM M3 PREWASH COOLING FAILURE
ALARM M5 PREWASH OVERTEMPERATURE
ALARM M6 PRE-WASH DRAINING FAILURE
ALARM M7 PREWASH PUMP THERMAL PROT.
ALARM N2 SHOWER PROBE FAILURE
ALARM N7 SHOWER PUMP THERMAL PROT.
ALARM U1 RINSE PUMP THERMAL PROTECTION
ALARM U3 .TORPLAMREHT
ROTOMROTCARTXE
ALARM U4 BLOWER MOTOR THERMAL PROT.
ALARM U7 SELF-CLEAN. PUMP THERMAL PROT.
ALARM U9 HEAT PUMP THERMAL PROT.
ALARM U10 OPTIONAL MOTORS THERMAL PROT.
ALARM W1 INVERTER THERMAL PROTECTION
ALARM X2 INLET WATER PROBE FAILURE
ALARM Z8 GENERAL ALARM
ALARM Z14 BREAK TANK FILLING FAILURE
ALARM Z15 BREAK TANK DRAINING FAILURE
ALARM Z16 SELF-CLEAN. WATER SUPPLY FAIL.
ALARM Z17 RINSE WATER SUPPLY FAILURE
17

ALARM B2 BOILER 1 PROBE FAILURE
Rated temperature cannot be reached.
It's recommended to suspend the washing.
Please contact the Rhima Service Department.
ALARM B3 BOILER 1 HEATING FAILURE
Please turn OFF the appliance, by pressing the ON/OFF 4 button, and turn it ON again, after a few seconds.
Should the alarm persists, please contact the Rhima Service Department.
ALARM B5 BOILER 1 OVERTEMPERATURE
It is recommended to turn OFF the appliance and contact the Rhima Service Department.
ALARM B10 RINSE LOW TEMPERATURE
Please make sure that rinse arms and nozzles are in the right position.
Should the alarm persists, please contact the Rhima Service Department.
ALARM C1 PRE-RINSE FILLING FAILURE
Please check that water inlet connection is working.
Please turn OFF the appliance, by pressing the ON/OFF 4 button, and turn it ON again, after a few seconds.
Should the alarm persists, please contact the Rhima Service Department.
ALARM C6 PRE-RINSE DRAINING FAILURE
Please check that the drain of the tank is not clogged.
Please turn OFF the appliance, by pressing the ON/OFF 4 button, and turn it ON again, after a few seconds.
Should the alarm persist, please contact the Rhima Service Department.
ALARM C7 PRE-RINSE PUMP THERMAL PROT.
Rinse results may be affected.
Please contact the Rhima Service Department.
ALARM E1 WASH TANKS FILLING FAILURE
Please check that water inlet connection is working.
Please turn OFF the appliance, by pressing the ON/OFF 4 button, and turn it ON again, after a few seconds.
Should the alarm persists, please contact the Rhima Service Department.
ALARM E2 WASH1 PROBE FAILURE
Rated temperature cannot be reached.
Washing results may be affected.
Please contact the Rhima Service Department.
ALARM E3 WASH1 HEATING FAILURE
Please turn OFF the appliance, by pressing the ON/OFF 4 button, and turn it ON again, after a few seconds.
Should the alarm persists, please contact the Rhima Service Department.
ALARM E4 WASH1 LOW TEMPERATURE
The washing results may be affected.
Please check if the curtains are properly placed and that dishes are well-positioned in the racks.
It is recommended to suspend washing until the right temperature is reached.
Should the alarm persists, please contact the Rhima Service Department.
ALARM E5 WASH1 OVERTEMPERATURE
It is recommended to turn OFF the appliance and contact the Rhima Service Department.
ALARM E6 WASH DRAINING FAILURE
Please check that the drain of the tanks is not clogged.
Please turn OFF the appliance, by pressing the ON/OFF 4 button, and turn it ON again, after a few seconds.
Should the alarm persist, please contact the Rhima Service Department.
ALARM E7 WASH1 PUMP THERMAL PROTECTION
It's recommended to suspend the washing.
Please contact the Rhima Service Department.
ALARM F2 WASH2 PROBE FAILURE
Washing results may be affected.
Please contact the Rhima Service Department.
18

ALARM F3 WASH2 HEATING FAILURE
Please turn OFF the appliance, by pressing the ON/OFF 4 button, and turn it ON again, after a few seconds.
Should the alarm persists, please contact the Rhima Service Department.
ALARM F4 WASH2 LOW TEMPERATURE
The washing results may be affected.
Please check if the curtains are properly placed and that dishes are well-positioned in the racks.
It is recommended to suspend washing until the right temperature is reached.
Should the alarm persists, please contact the Rhima Service Department.
ALARM F5 WASH2 OVERTEMPERATURE
It is recommended to turn OFF the appliance and contact the Rhima Service Department.
ALARM F7 WASH2 PUMP THERMAL PROTECTION
Washing results may be affected.
Please contact the Rhima Service Department.
ALARM M1 PREWASH FILLING FAILURE
Please check that water inlet connection is working.
Please turn OFF the appliance, by pressing the ON/OFF 4 button, and turn it ON again, after a few seconds.
Should the alarm persists, please contact the Rhima Service Department.
ALARM M2 PREWASH PROBE FAILURE
Washing results may be affected.
Please contact the Rhima Service Department.
ALARM M3 PREWASH COOLING FAILURE
Please check that the cold water inlet connection is working.
Please turn OFF the appliance, by pressing the ON/OFF 4
g
button, and turn it ON again, after a few seconds.
Should the alarm persists, please contact the Rhima Service Department.
ALARM M5 PREWASH OVERTEMPERATURE
Washing results may be affected.
Please check that the cold water inlet connection is working.
Should the alarm persists, please contact the Rhima Service Department.
ALARM M6 PRE-WASH DRAINING FAILURE
Please check that the drain of the tanks is not clogged.
Please turn OFF the appliance, by pressing the ON/OFF 4 button, and turn it ON again, after a few seconds.
Should the alarm persist, please contact the Rhima Service Department.
ALARM M7 PREWASH PUMP THERMAL PROT.
Washing results may be affected.
Please contact the Rhima Service Department.
ALARM N2 SHOWER PROBE FAILURE
Please contact the Rhima Service Department.
ALARM N7 SHOWER PUMP THERMAL PROT.
Washing results may be affected.
Please contact the Rhima Service Department.
ALARM U1 RINSE PUMP THERMAL PROTECTION
Please contact the Rhima Service Department.
ALARM U3 EXTRACTOR MOTOR THERMAL PROT.
It's recommended to suspend the washing.
Please contact the Rhima Service Department.
ALARM U4 BLOWER MOTOR THERMAL PROT.
Please contact the Rhima Service Department.
ALARM U7 SELF-CLEAN. PUMP THERMAL PROT.
Please contact the Rhima Service Department.
19

ALARM U9 HEAT PUMP THERMAL PROT.
Please contact the Rhima Service Department.
ALARM U10 OPTIONAL MOTORS THERMAL PROT.
Please contact the Rhima Service Department.
ALARM W1 INVERTER THERMAL PROTECTION
Please contact the Rhima Service Department.
ALARM X2 INLET WATER PROBE FAILURE
Please contact the Rhima Service Department.
ALARM Z8 GENERAL ALARM
Emergency button pressed.
Make sure that the emergency is solved.
To resume working, release the emergency button.
WARNING: the emergency button should not be used as ordinary mean to turn the appliance ON/OFF.
ALARM Z14 BREAK TANK FILLING FAILURE
Check if the water supply is working.
Please turn OFF the appliance, by pressing the ON/OFF 4 button, and turn it ON again, after a few seconds.
Should the alarm persists, please contact the Rhima Service Department.
ALARM Z15 BREAK TANK DRAINING FAILURE
Please make sure that rinse nozzles are not clogged.
Please turn OFF the appliance, by pressing the ON/OFF 4 button, and turn it ON again, after a few seconds.
Should the alarm persists, please contact the Rhima Service Department.
ALARM Z16 SELF-CLEAN. WATER SUPPLY FAIL.
Please check if the water supply is working and make sure that self-cleaning arms are in the proper position.
Please turn OFF the appliance, by pressing the ON/OFF 4 button, and turn it ON again, after a few seconds.
Should the alarm persists, please contact the Rhima Service Department.
ALARM Z17 RINSE WATER SUPPLY FAILURE
Please check if the water supply is working and make sure that rinse arms and nozzles are in the proper position.
Please turn OFF the appliance, by pressing the ON/OFF 4 button, and turn it ON again, after a few seconds.
Should the alarm persists,
Please contact the Rhima Service Department.
20
This manual suits for next models
3
Table of contents
Other Rhima Washer manuals

Rhima
Rhima DEKO 190iX User manual

Rhima
Rhima RM 50 User manual

Rhima
Rhima RT490 User manual

Rhima
Rhima RC108 User manual

Rhima
Rhima RH 50 User manual

Rhima
Rhima RG 10 HR User manual

Rhima
Rhima HIGH SPARKLE 40 User manual

Rhima
Rhima RR210 EVO User manual

Rhima
Rhima RC231 User manual

Rhima
Rhima DEKO 260iX User manual