Ricoh FAX 1190L Safety guide

Read this manual carefully before you use this machine and keep it handy for future reference. For safe and correct
use, be sure to read the Important Information in “User’s Guide” before using the machine.
Software User’s Guide
FAX 1190L

i
Table of Contents
1Using the machine as a printer
Using the printer driver ............................................................................................1-1
How to print your document.....................................................................................1-1
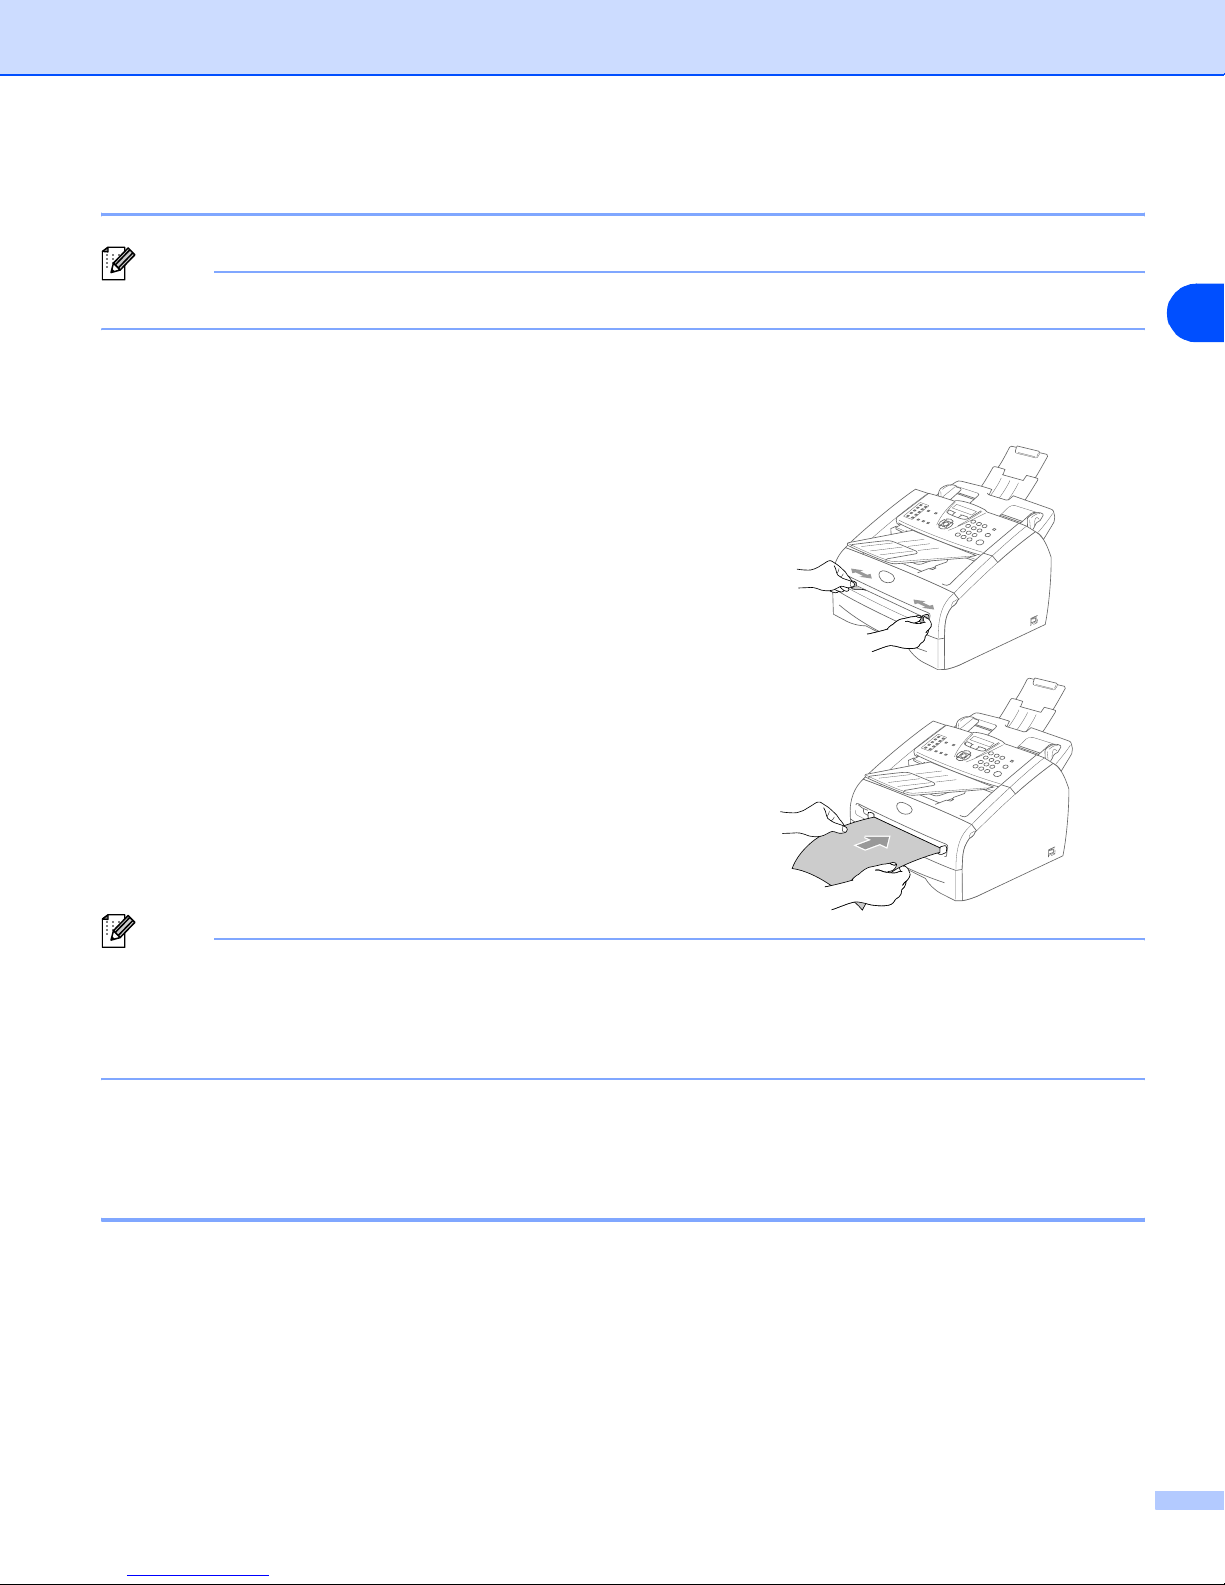
Printing from the manual feed slot......................................................................1-2
Manual Duplex Printing ......................................................................................1-2
Simultaneous printing and faxing ............................................................................1-3
Printer driver settings...............................................................................................1-3
How to access the printer driver settings.................................................................1-4
Features in the printer driver ...................................................................................1-4
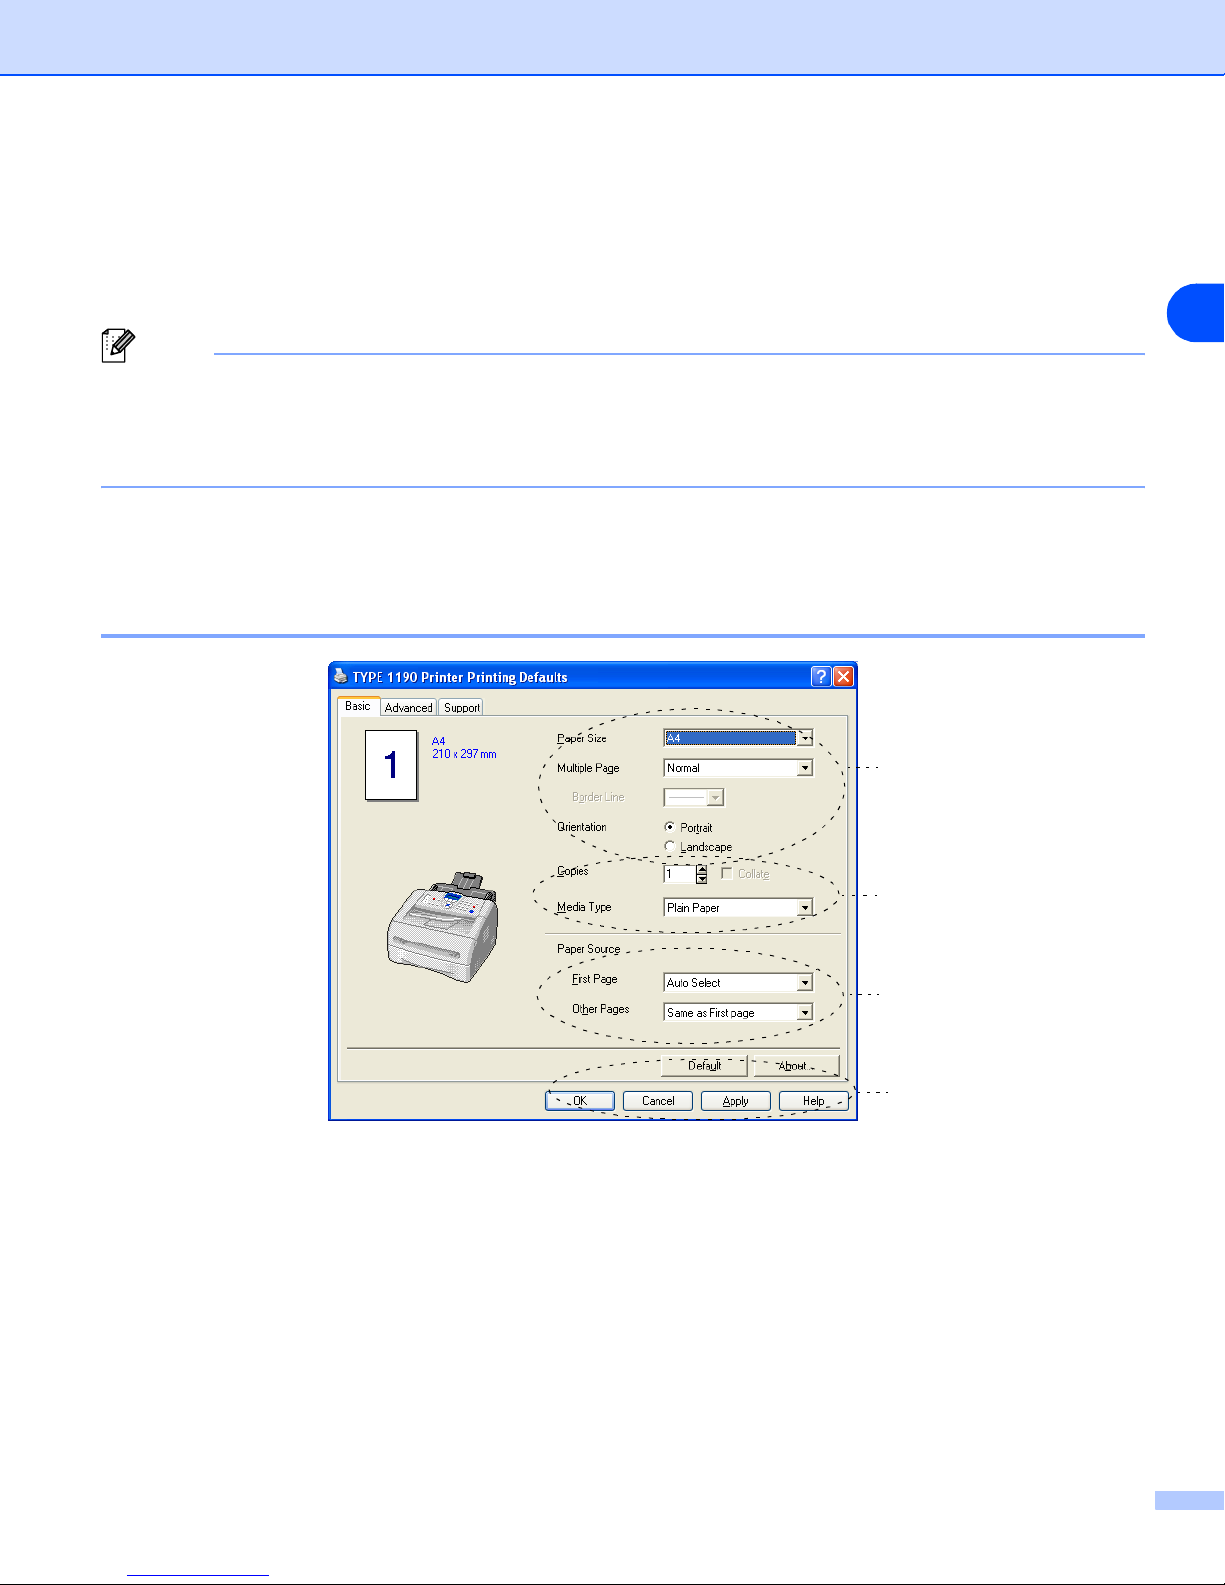
Basic tab.............................................................................................................1-4
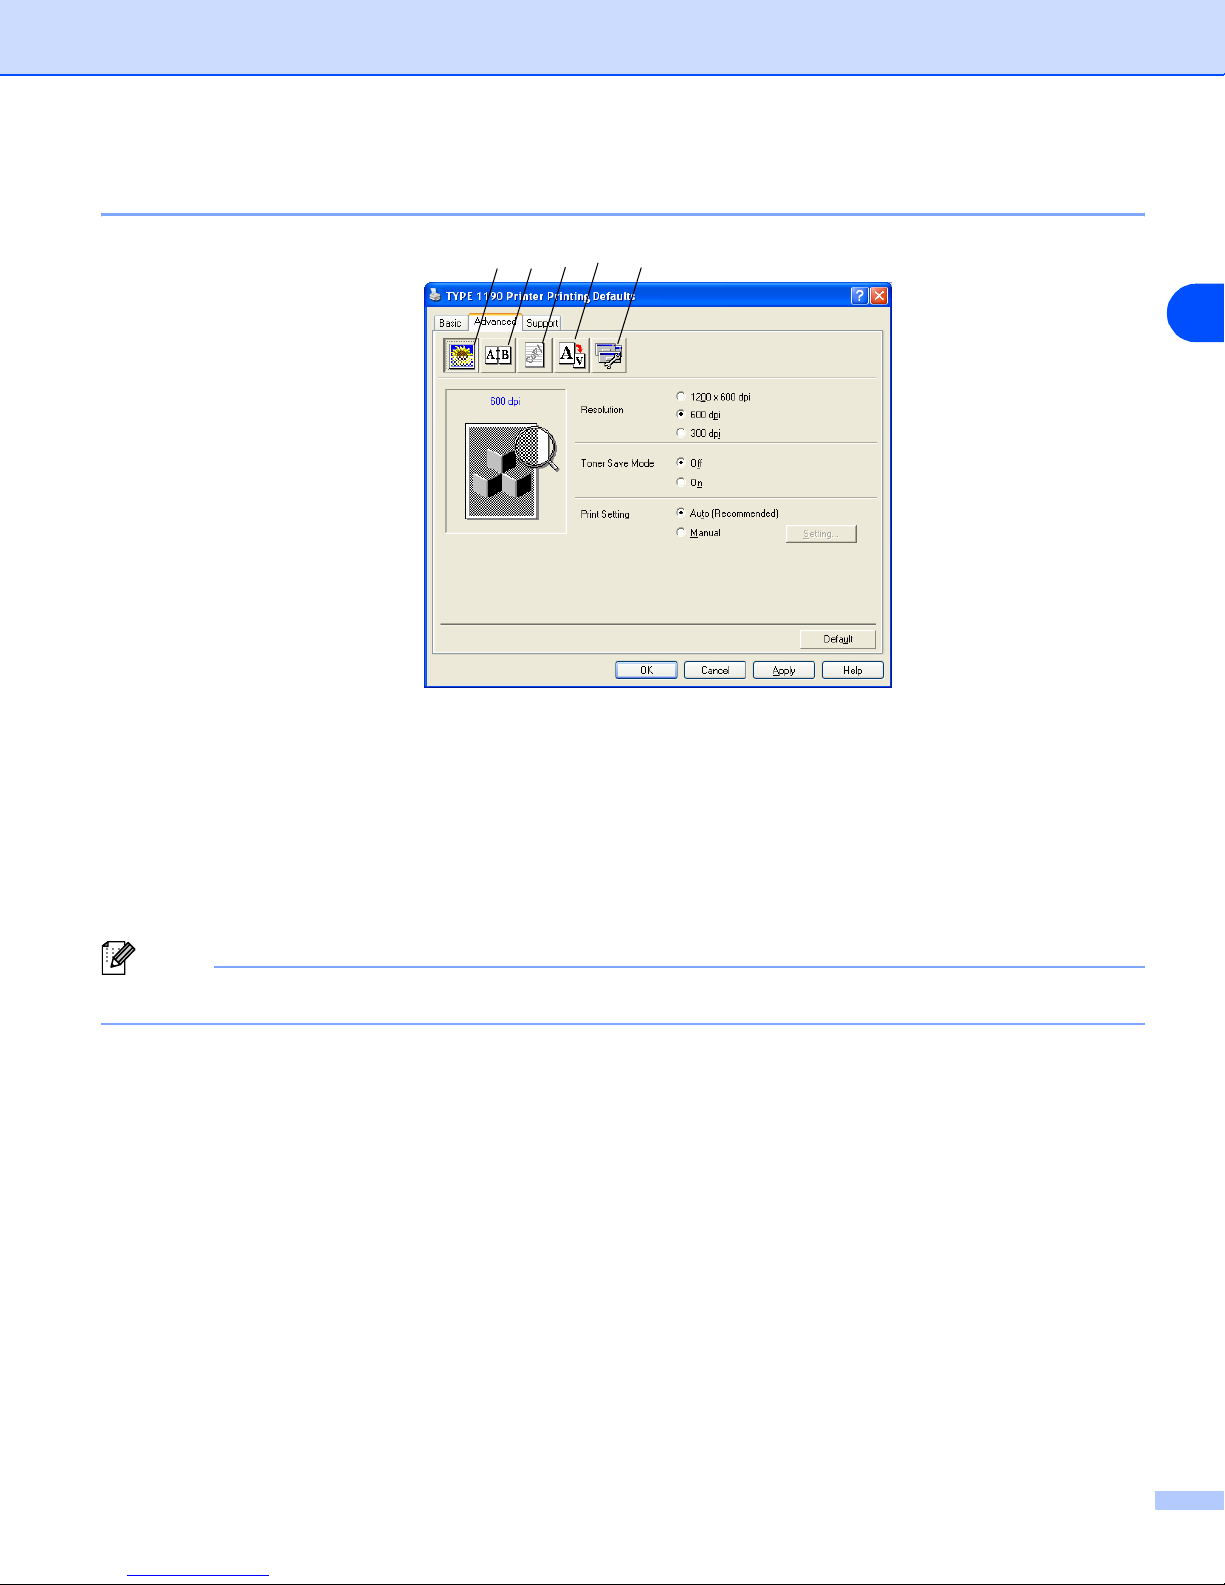
Advanced tab .....................................................................................................1-7
Print Quality........................................................................................................1-8
Duplex ................................................................................................................1-9
Watermark........................................................................................................1-10
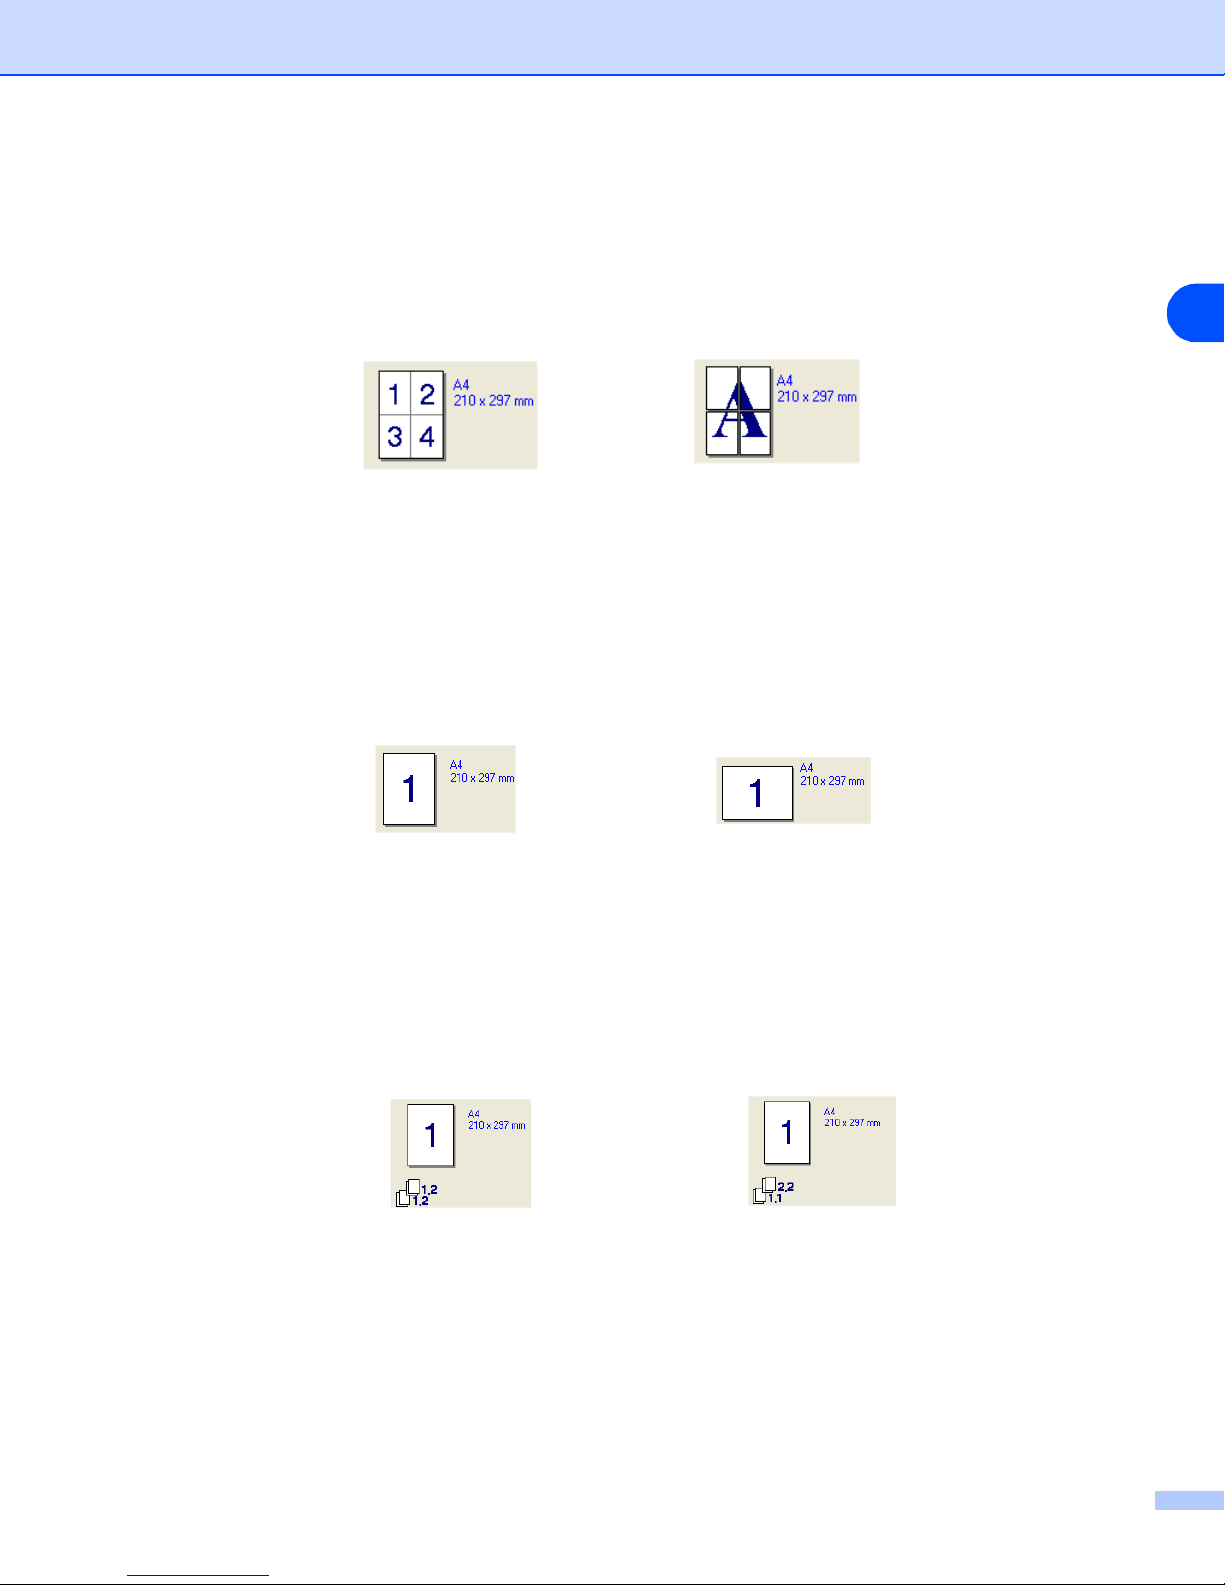
Page Setting.....................................................................................................1-11
Device Options .................................................................................................1-11
Support tab.......................................................................................................1-14
Status Monitor .......................................................................................................1-15
How to turn on the status monitor ....................................................................1-15
Monitoring and viewing the machine’s status...................................................1-15
2Using PC-FAX software
PC-FAX sending......................................................................................................2-1
Setting up user information ................................................................................2-1
Sending setup ....................................................................................................2-2
User interface .....................................................................................................2-3
Address Book .....................................................................................................2-4
Setting up a Cover Page ....................................................................................2-5
Entering Cover Page Information .......................................................................2-5
Speed-Dial setup.....................................................................................................2-6
Address Book .....................................................................................................2-6
Setting up a Member in the Address Book.........................................................2-7
Setting up a Group for Broadcasting..................................................................2-7
Editing Member information ...............................................................................2-7
Deleting a Member or Group..............................................................................2-8
Exporting the Address Book...............................................................................2-8
Importing to the Address Book ...........................................................................2-9
Sending a file as a PC-FAX using the Facsimile style user interface...............2-10
Sending a file as a PC-FAX using the Simple style user interface...................2-11
3Using Remote Setup
Remote Setup..........................................................................................................3-1

1
1
1 - 1
Using the printer driver
A Printer Driver is software that translates data from the format used by a computer into the format required
by a particular printer, using a printer command language or page description language.
Windows®Printing
The dedicated printer driver for Microsoft®Windows®2000/XP/Vista/7 are available for your device. The
driver supports our unique compression mode to enhance printing speed in Windows®applications, and
allows you to set various printer settings, including economy printing mode and custom paper size.
How to print your document
When the machine receives data from your computer, it begins printing by picking up paper from the paper
tray. The paper tray can feed many types of paper and envelopes. (See the User’s Guide for information
about the Paper Tray and Recommended paper.)
1From your application, select the Print command.
If any other printer drivers are installed on your computer, select TYPE 1190 Printer as your printer
driver from the Print or Print Settings menu in your software application, and then click OK to begin
printing.
2Your computer sends the data to the machine.
The LCD shows Receiving Data.
3When the machine finishes printing all the data, the LCD shows the date and time.
Note
You can select the paper size and orientation in your application software.
If your application software does not support your custom paper size, select the next larger paper size.
Then adjust the print area by changing the right and left margins in your application software.
Using the machine as a printer

Using the machine as a printer
1 - 2
1
Printing from the manual feed slot
Note
The machine automatically turns on the Manual Feed mode when you put paper in the manual feed slot.
1Set the Paper Size, Media Type, Paper Source, and other settings in the printer driver.
Set the Paper Source to Manual.
2Slide the paper guides to fit the paper size.
3Using both hands put paper in the manual feed slot until the
front edge of the paper touches the paper feed roller. Hold the
paper in this position until the printer automatically feeds it in for
a short distance, and then let go of it.
4Send the print data to the machine.
Note
■Put the paper into the manual feed slot with the side to be printed face up.
■Make sure that the paper is straight and in the proper position on the manual feed slot. If it is not, the paper
may not be fed properly, resulting in a skewed printout or a paper jam.
■Do not put more than one piece of paper in the manual feed slot at any one time, as it may cause a jam.
5After the printed page comes out of the machine, put in the next sheet of paper as in Step 3 above.
Repeat for each page that you want to print.
Manual Duplex Printing
The machine prints all the even-numbered pages on one side of the paper first.
Then, the Windows®driver instructs you (with a pop-up message) to reinsert the paper. Before reinserting
the paper, straighten it well, or you may get a paper jam. Very thin or very thick paper is not recommended.
✔
✔

Using the machine as a printer
1 - 3
1
Simultaneous printing and faxing
Your machine can print from your computer while sending or receiving a fax in memory. Fax sending will not
be stopped during PC printing.
However, when the machine is copying or receiving a fax on paper, it pauses the PC printing operation, and
then continues printing when copying or fax receiving has finished.
Printer driver settings
You can change the following printer settings when you print from your computer:
■Paper Size
■Multiple Page
■Orientation
■Copies
■Media Type
■Paper Source
■Resolution
■Toner Save Mode
■Manual Duplex
■Watermark
■Scaling
■Print Date & Time
■Quick Print Setup
■Status Monitor

Using the machine as a printer
1 - 4
1
How to access the printer driver settings
1Select Print from the File menu in your application software.
2Select TYPE 1190 Printer and click Properties or Preferences. The Printer dialog box will appear.
Note
■The way you access the printer driver settings depends on your operating system and software
applications.
■The screens shown in this chapter are from Windows®XP. The screens on your computer may vary
depending on your Windows®operating system.
Features in the printer driver
Basic tab
1Select the Paper Size, Multiple Page, Border Line (if any) and Orientation.
2Select number of Copies and Media Type.
3Select the Paper Source (First Page and Other Pages).
4Click the OK button to apply your selected settings.
To return to the default settings, click the Default button, then click the OK button.
2
4
3
1

Using the machine as a printer
1 - 5
1
Paper Size
From the drop-down box select the Paper Size you are using.
Multiple Page
The Multiple Page selection can reduce the image size of a page allowing multiple pages to be printed on
one sheet of paper or enlarging the image size for printing one page on multiple sheets of paper.
Border Line
When printing multiple pages on one sheet with the Multiple Page feature you can select to have a solid
border, dash border or no border around each page on the sheet.
Orientation
Orientation selects the position of how your document will be printed (Portrait or Landscape).
Copies
The copies selection sets the number of copies that will be printed.
Collate
With the Collate check box selected, one complete copy of your document will be printed and then repeated
for the number of copies you selected. If the Collate check box is not selected, then each page will be printed
for all the copies selected before the next page of the document is printed.
Ex. 4 in 1 Ex. 1 in 2 ×2 pages
Landscape
Portrait
Collate box checked Collate box not checked

Using the machine as a printer
1 - 6
1
Media Type
You can use the following types of media in your machine. For the best print quality, select the type of media
that you wish to use.
Note
■When using ordinary plain paper (70 to 95 g/m2), select Plain Paper. When using heavier weight paper,
envelopes or rough paper select Thick Paper or Thicker Paper. For bond paper, select Bond Paper; for
OHP transparencies, select Transparencies.
■
When you use envelopes, select
Envelopes
. If the toner is not fixed to the envelope correctly when
Envelopes
has been selected, select
Env. Thick
. If the envelope is crumpled when
Envelopes
has been
selected, select
Env. Thin
.
Paper Source
You can choose Auto Select, Tray 1 or Manual and specify separate trays for printing the first page and for
printing from the second page onwards.
Plain Paper Thin Paper Thick Paper Thicker Paper Bond Paper
Transparencies Envelopes Env. Thick Env. Thin Recycled Paper

Using the machine as a printer
1 - 7
1
Advanced tab
Change the tab settings by selecting one of the following icons:
1 Print Quality
2 Duplex
3 Watermark
4 Page Setting
5 Device Options
Note
To return to the default settings, click the Default button.
1 2 3 4 5

Using the machine as a printer
1 - 8
1
Print Quality
Resolution
You can change the resolution as follows:
■1200 x 600 dpi
■600 dpi
■300 dpi
Toner Save Mode
You can save running costs by turning on the Toner Save Mode, which reduces the print density.
Print Setting
You can manually change the Print setting.
■Auto
Selecting the Auto (Recommended) button will allow automatic printing with the most suitable print
settings for your print job.
■Manual
You can change the settings manually by selecting the Manual button and clicking the Setting... button.

Using the machine as a printer
1 - 9
1
Duplex
The printer driver supports manual duplex printing.
Manual Duplex
Check Manual Duplex. In this mode, the machine prints all
the even numbered pages first. Then the printer driver stops
and shows the instructions required to re-install the paper.
When you click OK the odd numbered pages are printed.
Duplex Type
There are six types of duplex directions available for each
orientation.
Flip on Left Edge
Flip on Right Edge
Flip on Top Edge
Flip on Bottom Edge
Flip on Top Edge (No Reverse)
Flip on Bottom Edge (No Reverse)
Binding Offset
Check the Binding Offset option, you can specify the offset value of the binding side in inches or millimeters
(0 - 8 inches) [0 - 203.2 mm].

Using the machine as a printer
1 - 10
1
Watermark
You can place a logo or text into your document as a
Watermark. You can select one of the preset Watermarks, or
you can use a bitmap file or text file that you have created.
Check Use Watermark, and then select the watermark you
want to use.
Transparent
Check Transparent with the Watermark to print the
watermark image in the background of your document. If this
feature is not checked then the Watermark will be printed on
top of your document.
In Outline Text
Check In Outline Text if you only want to print an outline of
the watermark.
Print Watermark
The Print Watermark feature offers the following print choices:
■On all pages
■On first page only
■From second page
■Custom
Watermark Setting
You can change the Watermark’s size and position on the
page by selecting the Watermark, and clicking the Edit
button. If you want to add a new Watermark, click the New
button, and then select Text or Bitmap in the Watermark
Style.
■Title
You can select the CONFIDENTIAL, COPY or DRAFT as
the standard title or enter a title you like in the field.
■Watermark Text
Enter your Watermark text into the Text Box, and then
select the Font, Size, Darkness and Style.
■Watermark Bitmap
Enter the file name and location of your bitmap image in
the File box, or Browse for the file location. You can also
set the scaling size of the image.
■Position
Use this setting if you want to control the position of the watermark on the page.

Using the machine as a printer
1 - 11
1
Page Setting
Scaling
You can change the print size of your document with the
Scaling feature.
■Check Off if you want to print the document as it appears
on your screen.
■Check Fit to Paper Size if your document has an unusual
size, or if you have only the standard size paper.
■Check Free if you want to change the size.
You can also use the Mirror Print or Reverse Print feature
for your page setting.
Device Options
You can set the following Printer Function modes in this tab:
■Quick Print Setup
■Status Monitor
■Page Protection
■Print Date & Time
■Density adjustment
Note
The Printer Function list may differ depending on the model.
Quick Print Setup
The Quick Print Setup feature allows you to quickly select
driver settings. To view settings, simply click your mouse
button on the task tray icon. This feature can be set to On
or Off from the Device Options.

Using the machine as a printer
1 - 12
1
Status Monitor
This reports the machine status (any error that may happen with the machine) when printing. The default
setting for the Status Monitor is off. If you would like to turn the Status Monitor on, go to the Advanced tab,
select Device options and then select Status monitor.
Page Protection
Page Protection refers to a setting that reserves additional memory for the creation of full page images.
Selections are AUTO, OFF and Printer Default.
The page protection feature allows the machine to create the full page image to be printed in memory before
physically moving the paper through the machine. When the image is very complicated and the machine has
to wait to process the image before printing, use this function.

Using the machine as a printer
1 - 13
1
Print Date & Time
When enabled the Print Date & Time feature, it will print the
date and time on your document from your computer’s system
clock.
Click the Setting button to change the Date, Time, Position
and Font. To include a background with the Date and Time,
select Opaque. When Opaque is selected, you can set the
Darkness of the Date and Time background by changing the
percentage.
Note
The Date and Time in the selection box shows the format that will be printed. The actual Date and Time
printed on your document is automatically retrieved from the settings of your computer.
Density adjustment
Increase or decrease the print density.

Using the machine as a printer
1 - 14
1
Support tab
The Support Tab provides driver version and setting
information.
Print Settings
You can print a list of current printer settings.
Check Setting
The Check Setting selection displays a list of your current
driver settings.

Using the machine as a printer
1 - 15
1
Status Monitor
The Status Monitor utility is a configurable software tool that allows you to monitor the status of one or more
devices, allowing you to get immediate notification of errors such as paper empty or paper jam.
How to turn on the status monitor
1Click TYPE 1190 located in the Start/All
Programs/TYPE 1190/Status Monitor on your
computer. The Status Monitor window will appear.
2Right-click on the status monitor window and select
Load Status Monitor on Startup in the menu.
3Right-click on the status monitor window and select
Location, and then select the way to display the status
monitor on your computer—in the taskbar, in the
tasktray, in the tasktray (on Error) or on the desktop.
Monitoring and viewing the machine’s status
The Status Monitor icon will change colour depending on the machine’s status.
Green icon means a normal stand-by condition.
Yellow icon means a warning.
Red icon means a printing error has occured.
Note
■You can check the device status at anytime by double-clicking the icon in the tasktray or selecting the
Status Monitor located in the Start/All Programs/TYPE 1190/Status Monitor on your computer.
■For more information about using the Status Monitor software, right click the Status Monitor icon and
choose Help.

2
2
2 - 1
PC-FAX sending
PC-FAX feature allows you to use your PC to send any application or document file as a standard fax. You
can create a file in any application on your PC, and then send it as a PC-FAX. You can even attach a cover
page note. All you have to do is set up the receiving parties as Members or Groups in your PC-FAX Address
Book or simply enter the destination address or fax number into the User interface. You can use the Address
Book Search feature to quickly find members to send your fax to.
Note
■The maximum amount of faxes that can be sent as “broadcast” using PC-FAX is 50 fax numbers.
■If you are using Windows®XP or Windows®2000 Professional, you need to log on with administrator
rights.
■Please check our Web site for the latest updates available for TYPE 1190.
Setting up user information
1From the Start menu, select Programs, TYPE 1190,
and then select PC-FAX Setup.
The PC-FAX TYPE 1190 dialog box will appear:
2You must enter this information to create the Fax Header
and Cover Page.
3Click OK to save the User Information.
Note
You can access the User Information from the FAX Sending
dialog box by clicking .
(See Sending a file as a PC-FAX using the Facsimile style
user interface on page 2-10.)
Using PC-FAX software

Using PC-FAX software
2 - 2
2
Sending setup
From the PC-FAX TYPE 1190 dialog box, click the Sending
tab.
The user has the choice of two user interfaces: Simple style
or Facsimile style. To change the user interface select the
interface setting you want: Simple style or Facsimile style.
(See User interface on page 2-3.)
Outside line access
If you need to enter a number to access an outside line, enter
it here. This is sometimes required by a local PABX (PBX)
telephone system (for example, if you must dial 9, to get an
outside line in your office).
Include header
To add header information to the top of the fax pages you
send, check the Include header box.

Using PC-FAX software
2 - 3
2
User interface
In the Sending tab, select the user interface you wish to use.
You can choose the Simple Style or the Facsimile Style.
Simple style
Facsimile style
Other manuals for FAX 1190L
3
Table of contents
Other Ricoh Fax Machine manuals

Ricoh
Ricoh fax180 User manual

Ricoh
Ricoh FAX2900L User manual

Ricoh
Ricoh 2400L User manual

Ricoh
Ricoh Stella-C1 Service manual

Ricoh
Ricoh Fax 2210L User manual

Ricoh
Ricoh FAX 2900Li User manual

Ricoh
Ricoh FAX2500L User manual

Ricoh
Ricoh 3245 User manual

Ricoh
Ricoh 4410L User manual

Ricoh
Ricoh FAX7000L Quick start guide

Ricoh
Ricoh FAX 1190L User manual

Ricoh
Ricoh MV310 User manual

Ricoh
Ricoh FAX07 Quick start guide

Ricoh
Ricoh FAX 1190L User manual

Ricoh
Ricoh HL-F1 Quick start guide

Ricoh
Ricoh fax4700l User manual

Ricoh
Ricoh FAX4000L User manual

Ricoh
Ricoh 1195L User manual

Ricoh
Ricoh 3232 User manual

Ricoh
Ricoh 3900L User manual