manuals.online logo
Brands
  1. Home
  2. •
  3. Brands
  4. •
  5. Rightline Gear
  6. •
  7. Automobile Accessories
  8. •
  9. Rightline Gear PackRight Edge Car Top Carrier User manual

Rightline Gear PackRight Edge Car Top Carrier User manual

1-Place the Edge Car Top Carrier on the top of your ve-
hicle with its closed end facing forward.
2-Load your gear inside the carrier, evenly distributing
the weight. Place items with sharp or pointed edges in the
middle and pack softer items around them to protect the
carrier material (Fig 1).
IMPORTANT: PACK THE CARRIER FULL SO THAT
ITS SIDES ARE PULLED TIGHT. THIS STEP PRE-
VENTS EXCESS MATERIAL FROM FLAPPING
IN THE WIND WHICH CAN DAMAGE THE CAR-
RIER AND CAUSE THE STRAPS TO LOOSEN.
3-Close the zipper and fold the protective ap down (Fig
2). Secure all of the Velcro closures.
The Edge Carrier comes with (4) straps (Fig 3). Attach-
ing (2) straps front to back between the cross bars or (2)
straps side to side between the side rails will sufciently
secure the carrier. Using all (4) straps will provide the
most secure method of attachment (Fig 4). Make sure the
roof rack is anchored to your vehicle and don’t exceed its
weight limit.
1-Unthread the short strap piece from the buckle and se-
cure it to your rack by threading its end through its loop and
pulling tight (Fig 5). Go to the opposite side of the vehicle
and secure the long piece to the rack by the same method.
2-Run both strap pieces through the d-rings on each side
of the carrier (Fig 6). Bring them together on top of the
carrier.
3-Thread the short strap piece back through the center
buckle (Fig 7).
Through The Vehicle
Pack The Carrier
Attach The Carrier - WITH a Roof Rack
Attach The Carrier - WITHOUT a Roof Rack
PackRight Edge Car Top Carriers Set Up Guide
4-Repeat steps 1-3 for each of the straps that will be used.
The correct attachment of this product is critical and
beyond the control of Rightline Gear. The safe use
and long life of this product depends entirely on
your good judgment and following these directions.
Fig 1
Fig 3
Fig 5 Fig 6
Fig 4
1-Leave (1) strap as originally provided and separate the
(2) pieces of the second strap by unthreading the short
strap piece from the center buckle.
Fig 7
Fig 8
Each strap has (2) strap pieces connected through a center
buckle.
Fig 9
Fig 2
2-Connect the loop end of each strap piece to a loop end
of the rst strap (Fig 8).
3-Run this double long strap through the vehicle, through
the d-rings and over the top of the carrier (Fig 9).
4-Thread the short strap piece back through the center
buckle (Fig 7) and tighten.
5-Repeat steps 1-4 to create a second double long strap.
Buckle
Buckle
Loop Ends
Double Long Strap Tri-glides
Connect (2) straps together to form (1) double long strap.
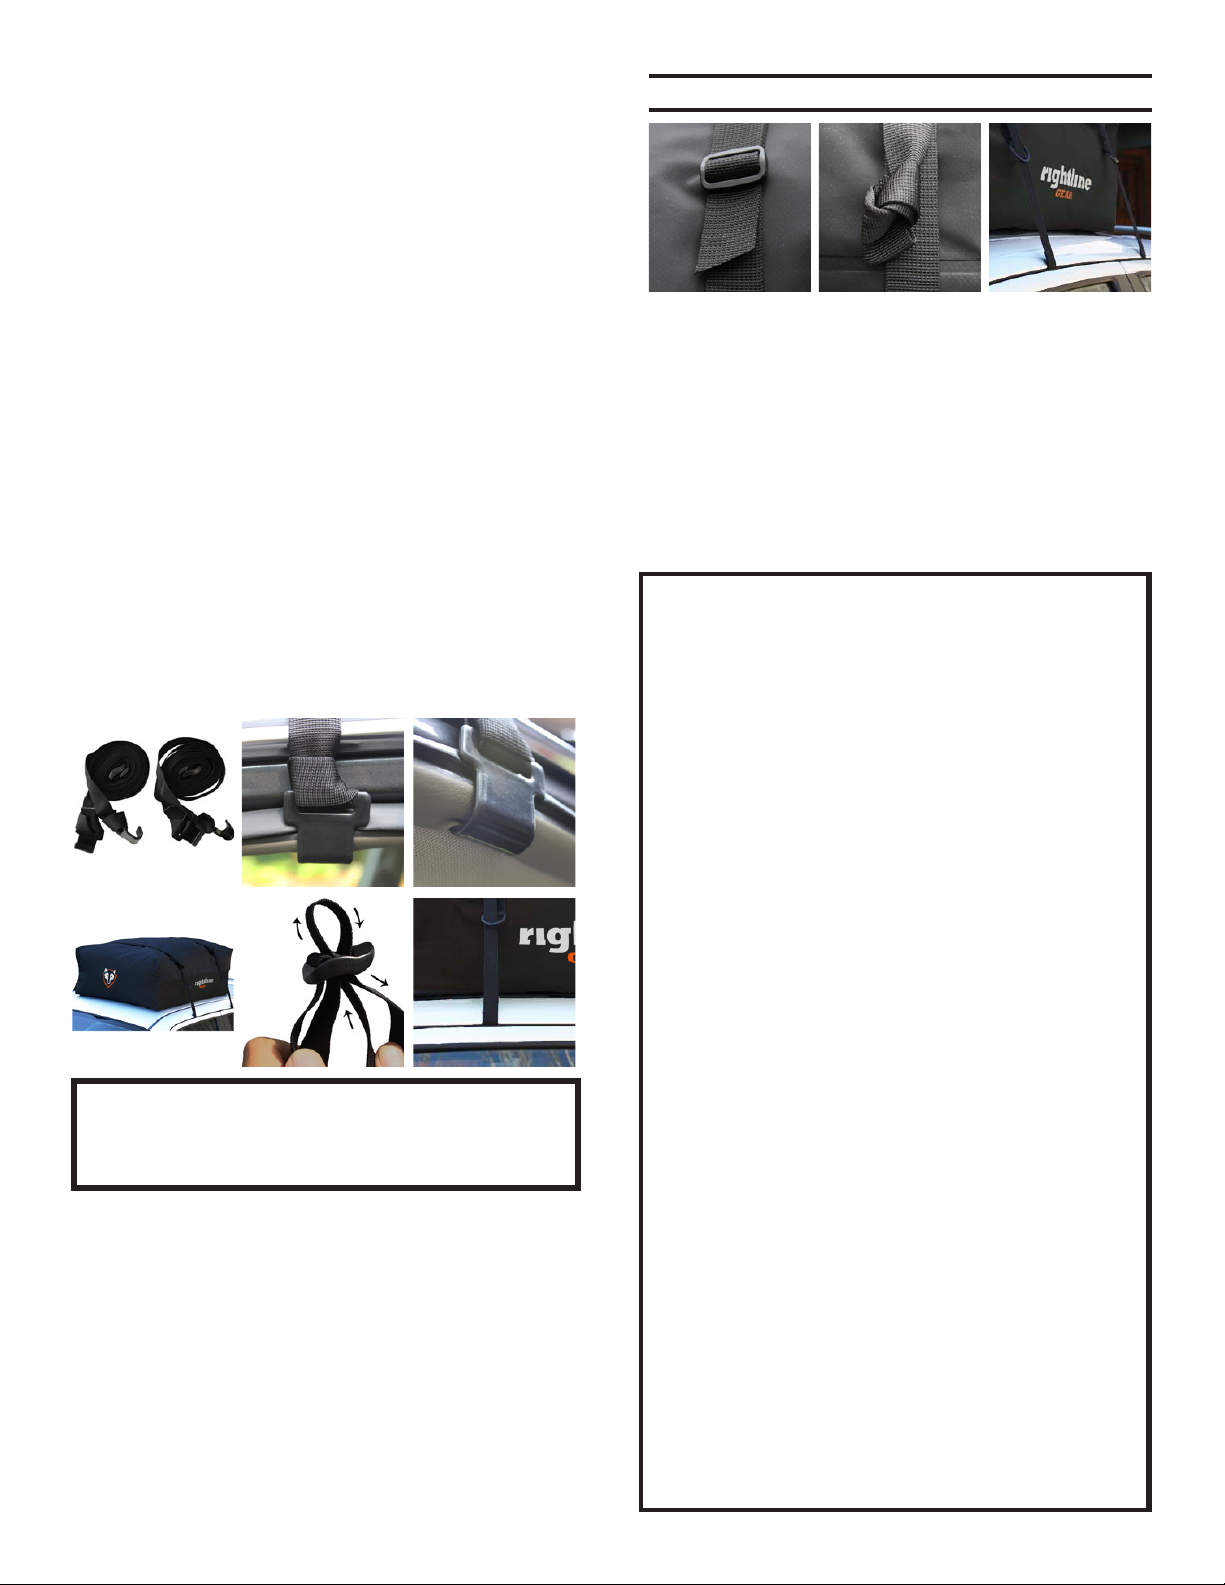
PackRight Car Clips (sold separately) are added to the
straps of an Edge Car Top Carrier (Fig 10). The clips al-
low the carrier to attach to a sturdy ledge on the vehicle’s
door frame. On most vehicles, the best ledge can be found
under the weather molding (Fig 11 & Fig 12), however,
any metal ledge, rain gutter, or the outside of the weather
molding itself can be used.
1-Unthread the short strap piece from the buckle and run
both strap pieces through the d-rings on each side of the
carrier. Bring them together on the top of the carrier (Fig
13).
1-Secure the extra length of each strap in the plastic tri-
glide so that it doesn’t ap in the wind (Fig 16).
IMPORTANT: DO NOT ATTACH STRAPS TO THE D-
RINGS AS THEY WILL CAUSE THEM DAMAGE. The
strap tension over the top of the carrier secures the load.
2-Thread the short strap piece back through the center
buckle (Fig 14).
3-Attach the clips to the open door frames and tighten
the strap at the buckle.
Final Adjustments For All Straps
LIMITED WARRANTY
Rightline Gear warrants that for one (1) year, from the
date of purchase that all PackRight and CampRight
products will be free of material defect and Rightline
Gear will repair or replace any defective or damaged
product free of charge if it is returned in original con-
dition by the consumer to Rightline Gear or the place
of purchase. Claims of defective material and/or
workmanship must be made in a timely manner. Safe
and maintenance-free use of this product depends
upon the consumer’s or user’s proper installation of the
product and good judgment in its use. Rightline Gear
is not responsible for the consumer’s or user’s use or
misuse of this product. Damage to Purchaser’s vehicle
or any other vehicle caused by Purchaser’s improper
use of this product may cause serious injury or death.
The Purchaser acknowledges that Rightline Gear has
no control over the attachment of its products to ve-
hicles or the attachment of items to the Rightline Gear
products. Accordingly, Rightline Gear cannot assume
responsibility for any damage to any property arising
out of the improper attachment or use of its products.
RIGHTLINE GEAR SPECIFICALLY DISCLAIMS ANY AND
ALL OTHER WARRANTIES WHETHER EXPRESS OR IM-
PLIED, INCLUDING BUT NOT LIMITED TO WARRANTY
OF MERCHANTABILITY AND WARRANTY OF FITNESS
FOR A PARTICULAR PURPOSE. RIGHTLINE GEAR FUR-
THER DISCLAIMS ANY WARRANTY OR OTHER PROM-
ISE THAT GIVES RISE TO ANY SORT OF CONSE-
QUENTIAL, EXTRAORDINARY, PUNITIVE, EXEMPLARY,
SUBSEQUENT, OR NONECONOMIC DAMAGES OR
ATTORNEY FEES. THE CONSUMER OR USER’S SOLE
REMEDY AGAINST RIGHTLINE GEAR FOR ANY DEFECT
IN THIS PRODUCT IS LIMITED TO FULL RETURN OF THE
PURCHASE PRICE.
RIGHTLINE GEAR SPECIFICALLY ENCOURAGES
COMPLIANCE WITH ALL MOTOR VEHICLE LAWS,
AND EXPRESSLY DISCLAIMS ANY AND ALL LIABIL-
ITY FOR FAILURE TO COMPLY WITH SAME.
www.rightlinegear.com
3-Position the straps at least 20” apart on each side of
the carrier (Fig 18).
2-Always check straps before driving and tie off any ex-
cess length (Fig 17). If the straps are too long, cut off the
extra length and melt the cut end to prevent fraying.
Fig 16 Fig 17
Fig 10
Car Clips
Fig 11
Fig 14 Fig 15
Fig 18
5-Shut the doors of the vehicle over the clips/straps, se-
curing them in place (Fig 15).
Each strap has (2) strap pieces connected through a center
buckle.
Fig 13
Fig 12
4-Repeat steps 1-3 for a second strap.

Other Rightline Gear Automobile Accessories manuals

Rightline Gear 100B90 User manual

Rightline Gear

Rightline Gear 100B90 User manual

Rightline Gear Car Top Golf Travel Bag User manual

Rightline Gear

Rightline Gear Car Top Golf Travel Bag User manual

Rightline Gear 100605 Manual

Rightline Gear

Rightline Gear 100605 Manual

Rightline Gear 100K40 User manual

Rightline Gear

Rightline Gear 100K40 User manual

Rightline Gear 100R20 User manual

Rightline Gear

Rightline Gear 100R20 User manual

Rightline Gear packright Sport Jr. User manual

Rightline Gear

Rightline Gear packright Sport Jr. User manual

Rightline Gear 100R30 User manual

Rightline Gear

Rightline Gear 100R30 User manual

Rightline Gear 110930 User manual

Rightline Gear

Rightline Gear 110930 User manual

Rightline Gear 100A30 User manual

Rightline Gear

Rightline Gear 100A30 User manual

Rightline Gear 4x4 Duffle Bag User manual

Rightline Gear

Rightline Gear 4x4 Duffle Bag User manual

Rightline Gear 100605 User manual

Rightline Gear

Rightline Gear 100605 User manual

Rightline Gear Car Top Duffle Bag User manual

Rightline Gear

Rightline Gear Car Top Duffle Bag User manual

Rightline Gear 110M90 User manual

Rightline Gear

Rightline Gear 110M90 User manual

Rightline Gear Ace 2 User manual

Rightline Gear

Rightline Gear Ace 2 User manual

Rightline Gear Trunk Storage Bag User manual

Rightline Gear

Rightline Gear Trunk Storage Bag User manual

Rightline Gear 100S10 User manual

Rightline Gear

Rightline Gear 100S10 User manual

Rightline Gear 100S30 User manual

Rightline Gear

Rightline Gear 100S30 User manual

Rightline Gear Roll Bar Storage Bag User manual

Rightline Gear

Rightline Gear Roll Bar Storage Bag User manual

Rightline Gear 100A21 User manual

Rightline Gear

Rightline Gear 100A21 User manual

Rightline Gear packright User manual

Rightline Gear

Rightline Gear packright User manual

Rightline Gear 100J72 User manual

Rightline Gear

Rightline Gear 100J72 User manual

Rightline Gear campright User manual

Rightline Gear

Rightline Gear campright User manual

Rightline Gear 100S30 User manual

Rightline Gear

Rightline Gear 100S30 User manual

Rightline Gear 100A20 User manual

Rightline Gear

Rightline Gear 100A20 User manual

Popular Automobile Accessories manuals by other brands

Schartec CR4 quick start guide

Schartec

Schartec CR4 quick start guide

Metra Electronics 99-7013 installation instructions

Metra Electronics

Metra Electronics 99-7013 installation instructions

Parrot 3400 LS-GPS Setup information

Parrot

Parrot 3400 LS-GPS Setup information

Laser 4769 instructions

Laser

Laser 4769 instructions

Speedsignal B-339VW01 installation guide

Speedsignal

Speedsignal B-339VW01 installation guide

Emerald FC-CH21 manual

Emerald

Emerald FC-CH21 manual

LAS 11805 manual

LAS

LAS 11805 manual

Rock Hard 4x4 RH-90340 installation manual

Rock Hard 4x4

Rock Hard 4x4 RH-90340 installation manual

EUFAB CROW BASIC operating instructions

EUFAB

EUFAB CROW BASIC operating instructions

WALMEC 40129 AL Mounting instructions

WALMEC

WALMEC 40129 AL Mounting instructions

MORryde JP54-035 installation instructions

MORryde

MORryde JP54-035 installation instructions

Camcar 40025 AL Mounting instructions

Camcar

Camcar 40025 AL Mounting instructions

ELBE CARG-201-N user manual

ELBE

ELBE CARG-201-N user manual

InCarTec 29-UC-050-BMW quick start guide

InCarTec

InCarTec 29-UC-050-BMW quick start guide

Manta MA425 user manual

Manta

Manta MA425 user manual

Prorack K807 Fitting Instructions for Basic Carrier

Prorack

Prorack K807 Fitting Instructions for Basic Carrier

Progress FASTWAY e2 92-00-0600 owner's manual

Progress

Progress FASTWAY e2 92-00-0600 owner's manual

Vixen Horns VXO8330B/4124XB installation guide

Vixen Horns

Vixen Horns VXO8330B/4124XB installation guide

manuals.online logo
manuals.online logoBrands
  • About & Mission
  • Contact us
  • Privacy Policy
  • Terms and Conditions

Copyright 2025 Manuals.Online. All Rights Reserved.