riverhawk IM-125 User manual

Repairs – Rentals
Field Service
215ClintonRoad
NewHartford,NY13413
Tel:+13157684855
Fax:+13157684941
Email:[email protected]
RevisionW
Page1of38
INSTRUCTIONMANUALIM‐125
ForGasTurbineandSteamTurbine
TensionedStudsandNuts
ApplicableBoltingConnections
Fr.7FAGasTurbineto7FH2Generator
Fr.7FAGasTurbinetoLoadCoupling
Fr.7FBGasTurbineto7FH2Generator
Fr.7FBGasTurbinetoLoadCoupling
LoadCouplingorSteamTurbineto7FH2Gen
ApplicableGEOrderingSheetPartNumbers
358A7202P001
358A7202P002
358A7202P012
358A7202P018
358A7202P020
358A7202P031
358A7202P032
361A5218P001
377A9477P001
377A9477P002
377A9477P003
377A9477P004
377A9477P005
377A9477P006
382A6121P003
382A6121P004
382A6121P006
GEPower&Water
GENERALELECTRICCOMPANY
MLI: ____ OF ____
DATE
CUSTOMER'SINFORMATIONBOX
CONTENTSAREINDEPENDENTOFRIVERHAWKDOCUMENTCONTROL
ISSUED:
THISDOCUMENTSHALLBEREVISEDINITSENTIRETY.ALLSHEETSOFTHISDOCUMENTARE
THESAMEREVISIONLEVELASINDICATEDINTHISVENDORSUPPLIEDDRAWINGAPPLIQUE.
REV
373A4000
GEDRAWINGNUMBER
VENDORSUPPLIED
THISDOCUMENTISFILEDUNDERTHEGEDRAWINGNUMBER.
GENOTTOREVISE.GEREVISIONLEVELISSHOWNONTHISAPPLIQUE.
GESIGNATURES
CHECKED:
TheRiverhawk Company reserves the righttoupdatethisdocumentwithout dissemination ornotice.
ThelatestrevisionmaybeobtainedbycontactingRiverhawkCompanyorthruwww.riverhawk.com.

InstructionManualIM‐125
CUSTOMER'SINFORMATIONBOX
CONTENTSAREINDEPENDENTOFRIVERHAWKDOCUMENTCONTROL
215ClintonRoad
NewHartford,NY13413
Tel:+13157684855
Fax:+13157684941
Email:[email protected]
REV
373A4000
GEDRAWINGNUMBER
RevisionW
Page2of38
TableofContents
Section Description PageNumber
1.0 CautionsandSafetyWarnings 3
2.0 ScopeandGEPartNumberCross‐Reference 4
3.0 QuickChecklist 6
4.0 GeneralPreparations 9
5.0 HardwareSetPreparations 11
6.0 StudandNutAssembly 14
7.0 HydraulicTensionerEquipmentAssembly 17
8.0 AssemblyofTensioneronStud 20
9.0 StudTensioning 23
10.0 ThreadLocking 25
11.0 StudandNutRemoval 26
12.0 StorageInstructions 30
13.0 FrequentlyAskedQuestions 31
14.0 RevisionHistory 33
AppendixA1 ECDeclarationofConformity 35
AppendixA2 UKCADeclarationofConformity 36
AppendixB1 18‐BoltTensioningPattern(GT‐LC)RecordSheet 37
AppendixB2 16‐BoltTensioningPattern(LC‐GEN)RecordSheet 38

InstructionManualIM‐125
CUSTOMER'SINFORMATIONBOX
CONTENTSAREINDEPENDENTOFRIVERHAWKDOCUMENTCONTROL
215ClintonRoad
NewHartford,NY13413
Tel:+13157684855
Fax:+13157684941
Email:[email protected]
REV
373A4000
GEDRAWINGNUMBER
RevisionW
Page3of38
1.0CautionsandSafetyWarnings
WARNING
Impropertooluseandthefailuretofollowthecorrectproceduresaretheprimaryroot
causesoftoolfailuresandpersonalinjuries.Alackoftrainingorexperiencecanleadto
incorrecthardwareinstallationorincorrecttooluse.Onlytrainedoperatorswithcareful,
deliberateactionsshouldusehydraulictensioners.ContactRiverhawkCompanywithany
trainingneeds.
WARNING
Riskofhighpressurehydraulicfluidinjection.Riverhawktoolsoperateunderhighpressure.
Thoroughlyinspectallhosesandconnectionsfordamagepriortousingthisequipment.
CAUTION
Personalinjuryandequipmentdamagecanoccuriftheproperhealthandsafetycodesand
proceduresarenotfollowed.Contactthesite’shealthandsafetyofficetodetermineall
applicablesafetyrulesandregulations.
WARNING
Theproperpersonalprotectiveequipmentmustbewornatalltimes.Riverhawkrecommends
ataminimum,safetyglasses,longsleeveshirt,hardhat,heavyworkgloves,andsteeltoe
shoes.
CAUTION
Itisespeciallyimportanttochecktheconditionoftheconicalthreadusedtotensionthestud.
Threaddamagefrompreviousabusecanleadtofailureofthestudortensioningequipment
CAUTION
RiverhawkrecommendsthatthetensionershouldbereturnedtoRiverhawkforperiodic
inspections.Replacementofobsoletetensionersisrecommended.Functionalupgradesarealso
recommended.TheRiverhawkServiceReturnsCoordinatorshouldbenotified3‐6monthsprior
toaplannedoutagetoscheduleaninspectionservice.
WARNING
Adamagedburstdiscmustbereplacedwithawithaburstdiscofthesamedesignand
pressurerating.Donotsubstituteadamagedburstdiscwithadifferentdisctype,adifferent
pressurerating,oraforeignobject.
WARNING
Toavoidfailure,ensuresafety,andproperoperation,thetensionerassemblymustbeinstalled
onastudintheflangebeforebleedingandpressurizingthetensioner.Donotusethetensioner
atanypressureunlessthetoolisinstalledonastudinaflange.

InstructionManualIM‐125
CUSTOMER'SINFORMATIONBOX
CONTENTSAREINDEPENDENTOFRIVERHAWKDOCUMENTCONTROL
215ClintonRoad
NewHartford,NY13413
Tel:+13157684855
Fax:+13157684941
Email:[email protected]
REV
373A4000
GEDRAWINGNUMBER
RevisionW
Page4of38
CAUTION
Donotoverextendthetensioner.Overextensioncancausethepistontoloseitssealandleak
oil.
CAUTION
Personalinjuryandequipmentdamagecanoccurifthepullerscrewisnotsecurelyengaged
withthetaperedthreadsofthestud.Properengagementisachievedwhenthepullerscrewis
tightinthestudandthetensionerassemblyisfreetoturn.
WARNING
Thesafetycagemustbeinplaceatalltimes.Whenthetensionerispressurizedhandsmustbe
keptoutofdesignatedareastoavoidanypotentialforpersonalinjury.
CAUTION
Beforethreadingthepullerscrewintothestud,carefullycheckthecleanlinessofboththe
stud'sandthepullerscrew'sconicalthreads.Applyalightcoatofcleanturbineoiloraspray
lubricanttothepullerscrew.Thisprocedurewilleaseassemblyandassurepositivematingof
thethreadsbeforetightening.Donotuse“NeverSeize”ontheconicalthreads.
CAUTION
Donottightenthenutwhilethetooliscominguptopressure;waituntilpressureisachieved
beforeattemptingtotightenthenutwiththespannerring.Ifthetoolisnotproperlyinstalled,
thetoolcouldjumpoffthestudwhilecominguptopressure.
CAUTION
Donotexceedthemaximumpressuremarkedonthetensioner.Excessivepressurecandamage
thestudandpullerscrew.
WARNING
FIREHAZARD:DONOTheatwhenpullerassemblyisinplace.Personalinjuryorequipment
damagemayoccur.UseofanOxy‐Acetylenetorchisnotrecommended
2.0Scope
Thisdocumentdescribestheproceduretobeusedtoinstallthestudandnutsetssuppliedby
theRiverhawkCompanyintheflangesattheTurbine/Coupling,Coupling/Generator,andSteam
Turbine/Generatorconnections.
ThevariousframeconfigurationscoveredinthismanualarelistedinSections2.1through2.6
withdifferencesasrelatedtoconnectivehardwaredefined.Listedalsoarethepertinent

InstructionManualIM‐125
CUSTOMER'SINFORMATIONBOX
CONTENTSAREINDEPENDENTOFRIVERHAWKDOCUMENTCONTROL
215ClintonRoad
NewHartford,NY13413
Tel:+13157684855
Fax:+13157684941
Email:[email protected]
REV
373A4000
GEDRAWINGNUMBER
RevisionW
Page5of38
hardwaredrawings(HF‐xxxx).Thesedrawingsaswellastoolingdrawings(HT‐xxxx)formpartof
thismanual.
2.1Frame7FAGasTurbineto7FH2Generator
GEPARTNUMBER RIVERHAWKP/N GEVENDOCP/N
GE358A7202P001
GE358A7202P002
GE358A7202P012
HF‐0771
HF‐0771
HF‐0771
GE359B2514
GE359B2514
GE359B2514
ThehydraulictoolusedforinstallationandremovalisRiverhawkHT‐0342.
ThesehardwaredrawingsdepictthecompletestudandnutpackagefortheGasTurbineto
LoadCoupling(2‐1/4”size,Qty18)aswellastheLoadCouplingtoGenerator(2‐3/4”size,Qty
16).
2.2Frame7FAGasTurbinetoLoadCoupling
GEPARTNUMBER RIVERHAWKP/N GEVENDOCP/N
GE358A7202P031
GE358A7202P032
GE361A5218P001
HF‐2447
HF‐2447
HF‐2447
GE359B2539
GE359B2539
GE359B2539
ThehydraulictoolusedforinstallationandremovalisRiverhawkHT‐0342.
ThesehardwaredrawingsdepictthecompletestudandnutpackagefortheGasTurbineto
LoadCoupling(2‐1/4”size,Qty18).
2.3Frame7FBGasTurbineto7FH2Generator
GEPARTNUMBER RIVERHAWKP/N GEVENDOCP/N
GE377A9477P001
GE377A9477P002
HF‐0771
HF‐0771
GE359B2514
GE359B2514
ThehydraulictoolusedforinstallationandremovalisRiverhawkHT‐0342.
ThesehardwaredrawingsdepictthecompletestudandnutpackagefortheGasTurbineto
LoadCoupling(2‐1/4”size,Qty18)aswellastheLoadCouplingtoGenerator(2‐3/4”size,Qty
16).

InstructionManualIM‐125
CUSTOMER'SINFORMATIONBOX
CONTENTSAREINDEPENDENTOFRIVERHAWKDOCUMENTCONTROL
215ClintonRoad
NewHartford,NY13413
Tel:+13157684855
Fax:+13157684941
Email:[email protected]
REV
373A4000
GEDRAWINGNUMBER
RevisionW
Page6of38
2.4Frame7FBGasTurbinetoLoadCoupling
GEPARTNUMBER RIVERHAWKP/N GEVENDOCP/N
GE377A9477P006 HF‐2447 GE359B239
ThehydraulictoolusedforinstallationandremovalisRiverhawkHT‐0342.
ThesehardwaredrawingsdepictthecompletestudandnutpackagefortheGasTurbineto
Load.
2.5LoadCouplingorSteamTurbineto7FH2Generator
GEPARTNUMBER RIVERHAWKP/N GEVENDOCP/N
GE358A7202P018
GE382A6121P003
GE382A6132P004
GE377A9477P003
GE377A9477P005
HF‐0803
HF‐0803
HF‐0803
HF‐0803
HF‐0803
GE359B2520
GE359B2520
GE359B2520
GE359B2520
GE359B2520
ThehydraulictoolusedforinstallationandremovalisRiverhawkHT‐0342.
ThesehardwaredrawingsdepictthecompletestudandnutpackagefortheLoadCouplingor
SteamTurbinetoGenerator(2‐3/4”size,Qty16).
2.6HydraulicTooling
GEPARTNUMBER RIVERHAWKP/N GEVENDOCP/N
GE358A7202P020
GE382A6121P006
GE377A9477P004
HT‐0342
HT‐0342
HT‐0342
GE359B2500
GE359B2500
GE359B2500
3.0QuickChecklist
ThefollowingchecklistisintendedasasummaryofthestepsneededtousetheRiverhawk‐
suppliedequipment.Newpersonnelorthoseexperiencedpersonnelwhohavenotusedthe
Riverhawkequipmentrecentlyareencouragedtoreadtheentiremanual.
EQUIPMENTINSPECTION
□Checkoillevelinhydraulicpump.

InstructionManualIM‐125
CUSTOMER'SINFORMATIONBOX
CONTENTSAREINDEPENDENTOFRIVERHAWKDOCUMENTCONTROL
215ClintonRoad
NewHartford,NY13413
Tel:+13157684855
Fax:+13157684941
Email:[email protected]
REV
373A4000
GEDRAWINGNUMBER
RevisionW
Page7of38
□Checkairpressureat80psi[5.5bar]minimum.(Forair‐drivenpumps)
□Checkhydraulichosefordamage.
□Testpump.
□nspecttensionerforanydamage.
NUTANDSTUDPREPARATION
□Inspectstudsandnutsforanydamage.
□Cleanthestudsandnuts.
□Measurestudlengths.(VERYIMPORTANT)
□Installstudsandnutsintotheflange.
□Setstick‐outdimensiononthecouplingsideoftheflange.
□Handtightennutsonturbine/generatorsideofflange.
□Verifystick‐outmeasurement(VERYIMPORTANT)
TENSIONING(BoltInstallation)
□Checktensionerdrawingforcorrectpartsandpartnumbers.
□Applyalightcoatofcleanturbineoilorspraylubricanttothepullerscrew.DONOTUSE
“NEVERSEIZE”ONTHECONICALTHREADS.
□Slidespannerringoverthepullerscrew.
□Installthetensioneronthestudinflangeandslidespannerringontonut.
□Insert1/2”hexAllenwrenchintothebacksideofthestud.

InstructionManualIM‐125
CUSTOMER'SINFORMATIONBOX
CONTENTSAREINDEPENDENTOFRIVERHAWKDOCUMENTCONTROL
215ClintonRoad
NewHartford,NY13413
Tel:+13157684855
Fax:+13157684941
Email:[email protected]
REV
373A4000
GEDRAWINGNUMBER
RevisionW
Page8of38
□Tightenthepullerscrew.Thenbackoffpullerscrew1/2aturn.
□Retightenthepullerscrewandleavetight.DONOTBACKOFFPULLERSCREW.
□Bleedthetensioner.DoNOTbleedtensioneroffofastud!Damagetothetoolwill
result!
□Tensionto50%.Consultmanualforcorrectpressure.
□Usethepinwrenchinspannerringtotightennut.
□Releasepressure,movetonextstudinpattern.
□Repeatabovestepsatfinalpressure.
□Measurefinalstudlengthandrecordonstretchdatasheets.Calculatestretch.
□Torquethenuts'setscrews.
DETENSIONING(StudRemoval)
□Loosennuts'setscrews
□
Inspectandcleanstuds'conicalthreads.DonotcontinueuntilALLdebrisisremoved
fromthethreads!SeeinstructionmanualIM‐220.Donottrytousethetensionerto
removeadamagedstud!
□Applyalightcoatofcleanturbineoilorspraylubricanttothepullerscrew.DONOTUSE
“NEVERSEIZE”ONTHECONICALTHREADS.
□Slidespannerringoverthepullerscrew.
□Installthetensioneronthestud.
□Installspannerringintonut.
□Tightenthepullerscrew.Thenbackoffpullerscrew1/2aturn.

InstructionManualIM‐125
CUSTOMER'SINFORMATIONBOX
CONTENTSAREINDEPENDENTOFRIVERHAWKDOCUMENTCONTROL
215ClintonRoad
NewHartford,NY13413
Tel:+13157684855
Fax:+13157684941
Email:[email protected]
REV
373A4000
GEDRAWINGNUMBER
RevisionW
Page9of38
□Retightenthepullerscrewandleavetight.DONOTBACKOFFPULLERSCREW.
□Bleedthetensioner.DoNOTbleedtensioneroffofastud!Damagetothetoolwill
result!
□Applyfinalpressure.
□Loosennutwiththespannerringandpinwrench.
□Movetonextstudinpattern
4.0GeneralPreparations
Readandunderstandallinstructionsbeforeinstallingandtensioningstuds.
OperatorsshouldbetrainedorhavepreviousexperienceusingRiverhawktensioning
equipment.Trainingwillminimizethechanceofimproperuseoftheequipment.
Thehydraulictoolingincludingthehydraulichosesshouldbeinspectedpriortouse.Inspection
guidelinesarelistedinthefollowingsub‐sections.
Thisequipmentproducesveryhighhydraulicpressuresandveryhighforces.Operatorsmust
exercisecautionandweartheappropriatepersonalprotectiveequipmentwhenhandlingand
operatingthehydraulictooling.
High‐pressureoilfromthehydraulicpumppressurizesthetensionerwhichgeneratesavery
largeforcethatactuallystretchesthestud.Asthestudisstretchedthenutliftsofftheflange.
Thenutisthenturnedbyhandusingthesuppliedspannerring.Oncethenutistightagainstthe
flange,thepressureinthetensionerisreleased.Thehardwareisnowclampingtheflange
together.
4.1MachinePreparation
Theflangetobetensionedmustbefullyclosedpriortopositioningofstudsintheflanges.
Turningtheturbineandgeneratorshaftsisnotrequired,butmaybeuseful.Also,itwillbe
advantageoustoremoveasmanyobstructionsaspossiblefromtheflangearea,suchasspeed
probes,shippingplates,andconduit.

InstructionManualIM‐125
CUSTOMER'SINFORMATIONBOX
CONTENTSAREINDEPENDENTOFRIVERHAWKDOCUMENTCONTROL
215ClintonRoad
NewHartford,NY13413
Tel:+13157684855
Fax:+13157684941
Email:[email protected]
REV
373A4000
GEDRAWINGNUMBER
RevisionW
Page10of38
4.2Hardware–Balance
Hardwareissuppliedasweightbalancedsets.StudsandNutsareinterchangeablewithinsets.
Donotintermixsets.
Savetheweightcertificationsuppliedwitheachset.Itwillbeneededforthepurchaseof
replacementhardware.
4.3Tensioner–CareandHandling
Whennotinuse,thetensionershallbemaintainedinacleanenvironmentandallcapsand
plugsforhydraulicopeningsandfittingsmustbeinplace.
UseISO32gradeoil.
Wheninuse,thetensionershallbeprotectedfromsandandgrit.
Seesection12forlongtermstoragerequirements.
4.4HandTools
Severalhandwrenchesandmicrometerswillberequiredtoperforminstallationand
measurementofthestuds:
5/8”wrench AsetofAllenWrenches 9”to10”micrometer
1”wrench 3’–4’BreakerBar 10”to11”micrometer
4.5SpecialTools
HydraulicTensionerKit: HT‐0342HydraulicTensioner
(referenceGEVENDOC359B2500)
ObsoleteHydraulicTensionerKits: HT‐0835HydraulicTensioner
(OBSOLETE,replacedbyHT‐0342)
HydraulicPumpKit: AP‐0532Air‐OperatedHydraulicPump
(recommended)
(referenceGEVENDOC359B2502)

InstructionManualIM‐125
CUSTOMER'SINFORMATIONBOX
CONTENTSAREINDEPENDENTOFRIVERHAWKDOCUMENTCONTROL
215ClintonRoad
NewHartford,NY13413
Tel:+13157684855
Fax:+13157684941
Email:info@riverhawk.com
REV
373A4000
GEDRAWINGNUMBER
RevisionW
Page11of38
MP‐0130ManualHand‐OperatedHydraulicPump
(referenceGEVENDOC359B2506)
CAUTION
RiverhawkrecommendsthatthetensionersbereturnedtoRiverhawkforperiodic
inspections.Replacementofobsoletetensionersisrecommended.Functionalupgradesare
alsorecommended.TheRiverhawkServiceReturnsCoordinatorshouldbenotified3‐6
monthspriortoaplannedoutagetoscheduleaninspectionservice.
5.0HardwareSetPreparations
5.1NutPreparation
Picture1.RiverhawkLocknut
Ifthereisanyvisibledamageonanut,donotusethenutandcontacttheRiverhawkCompany
forareplacementnut.Pleasebepreparedtosupplytheturbinenumber,weightcertification,
anddigitalphotographsforevaluation.
5.1.1NutCleaning‐NewInstallations
Fornewinstallations,thenutsshouldcomesealedfromthefactoryandwillneednocleaning.
Set Screw
1 of 2
Spanner
Ring Holes

InstructionManualIM‐125
CUSTOMER'SINFORMATIONBOX
CONTENTSAREINDEPENDENTOFRIVERHAWKDOCUMENTCONTROL
215ClintonRoad
NewHartford,NY13413
Tel:+13157684855
Fax:+13157684941
Email:[email protected]
REV
373A4000
GEDRAWINGNUMBER
RevisionW
Page12of38
5.1.2NutCleaning‐OldInstallations
Previouslyinstallednutsrequirecleaningasfollows:Wirebrushusingapetroleum‐based
solventtoremoveanyforeignmaterialontheexternalsurfacesandthreads.
5.1.3NutCleaning‐VeryOldInstallations
Ifpreviousinstallationsemployedathread‐lockingcompound,whichwillbevisibleasagrayish‐
greenresidue,removeasmuchofthiscompoundaspossible.Finishthecleaningprocessby
rinsinginavolatilesolventsuchasacetoneandallowtodry.
RiverhawkCompanystronglyrecommendsreplacingthisstyleofnutwiththecurrentnutwith
are‐useablemechanicallockingfeature.
5.2StudPreparation
Checkthestudforanyvisibledamage.Ifthereisanyvisibledamage,donotusethestudand
contacttheRiverhawkCompanyforareplacementstud.Pleasebepreparedtosupplythe
turbinenumber,weightcertification,anddigitalphotographsforevaluation.
CAUTION
Itisespeciallyimportanttochecktheconditionoftheconicalthreadusedtotensionthe
stud.Threaddamagefrompreviousabusecanleadtofailureofthestudortensioning
equipment.
Theconicalthreadsofeachstudmustbecleanofgritanddirtbeforeinstallationorremoval.
Thisensurestheproperseatingofthepullerscrew.
5.2.1StudCleaning‐NewInstallations
Fornewinstallations,thestudsshouldcomesealedfromthefactoryandwillneednocleaning.
5.2.2StudCleaning‐OldInstallations
Previouslyinstalledstudsmayrequirecleaning.Cleanconicalthreadsshouldhaveabrightand
shinyappearance.
Ifcleaningisrequired,followthesesteps:
1. Blowoutthethreadswithcompressedairtoremoveloosedebrisanddryconical
threads.Donotapplyasolventorothercleaningsolutiontothethreadsasthismay
chemicallyattackthestud.

InstructionManualIM‐125
CUSTOMER'SINFORMATIONBOX
CONTENTSAREINDEPENDENTOFRIVERHAWKDOCUMENTCONTROL
215ClintonRoad
NewHartford,NY13413
Tel:+13157684855
Fax:+13157684941
Email:[email protected]
REV
373A4000
GEDRAWINGNUMBER
RevisionW
Page13of38
2. UseStudCleaningKit,GT‐4253orasimilar1"diameterBrasspowerbrush.
Picture2.BrassPowerBrush
3. Insertthebrushintoanelectricdrillandsetdrilltoruninacounterclockwisedirection
athighspeed.
4. Workthedrillinacircularmotionwhilemovingthebrushinandouttocleanallofthe
threads.Trynottoholdthebrushinoneplacetoolong,soasnottoremovethestud's
protectivecoating.
5. Blowoutthethreadswithcompressedairtoremovelooseneddebris.
6. Visuallyinspectthreadsforcleanliness.Threadsshouldbebrightandshiny.
7. Repeatifanydirtcanbeseeninthethreads.
8. Inspectthreadsforanydamagethatmayhavebeencausedbypreviousinstallation.
9. Donotapplythreadlubricantssuchas“NeverSeize”tothestud’sthreads.
10. Finishthecleaningprocessbyrinsinginavolatilesolventsuchasacetoneandallowto
dry.
5.2.3StudCleaning‐VeryOldInstallations
Ifpreviousinstallationemployedathreadlockingcompound,whichwillbevisibleasagrayish‐
greenresidue,removeasmuchofthiscompoundaspossiblefromthestud’sthreads.
Finishthecleaningprocessbyrinsinginavolatilesolventsuchasacetoneandallowtodry.
5.3StudLengthMeasurement
Measureandrecordtheinitiallengthsofthestuds.Thefollowingsuggestionswillimproveyour
results.
Plantostartandfinishanyflangeinthesameday.
InstructionManualIM‐125
CUSTOMER'SINFORMATIONBOX
CONTENTSAREINDEPENDENTOFRIVERHAWKDOCUMENTCONTROL
215ClintonRoad
NewHartford,NY13413
Tel:+13157684855
Fax:+13157684941
Email:[email protected]
REV
373A4000
GEDRAWINGNUMBER
RevisionW
Page14of38
Studsandflangemustbeatthesametemperature.
Numbereachstudwithamarkerforlaterstretchmeasurementtracking.
Markthelocationofmeasurementonstudendwithapermanentmarker.
Measureeachstudtonearest0.001inch(.01mm).
Recordeachmeasurementonthesuppliedrecordsheets.
Donotallowthemeasuringinstrumentstositinthesun.
Thesamepersonshouldmakeallmeasurements.
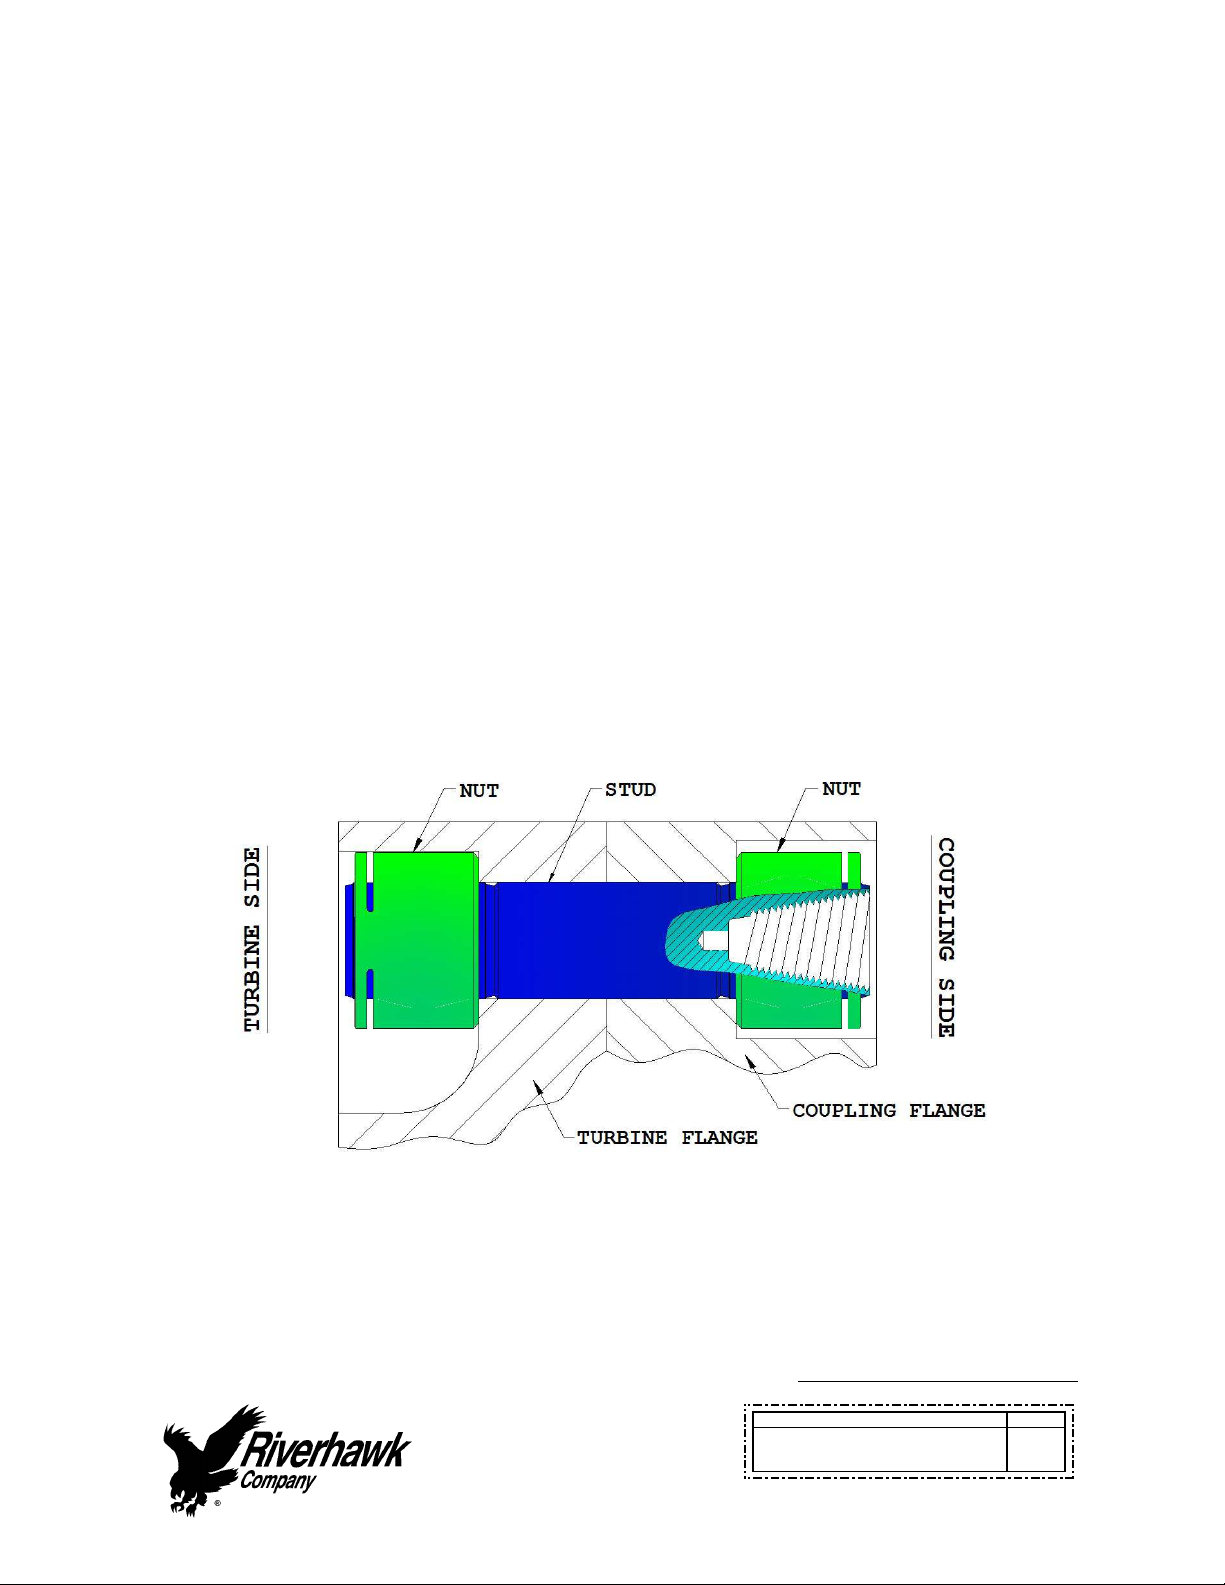
6.0StudandNutAssembly
RefertoHardwareSetPartNumberdrawinglistedinSection2.0ofthismanual.
Assemblethenuttotheconicalthreadend(TensioningEnd)ofthestud.
SlidetheassemblyintotheflangefromthecouplingsideasshowninFigures1&2(onthenext
page)theninstalltheothernutonthebackside.
ThenutsarethesameontheTurbineend(2.25”).ThenutsaredifferentontheGeneratorend
(2.75”);theshorternutgoesonthe“backside”orthesideclosesttotheGenerator.
Figure1–CutawayViewofTurbineFlange
andCouplingFlangeBoltedJoint

InstructionManualIM‐125
CUSTOMER'SINFORMATIONBOX
CONTENTSAREINDEPENDENTOFRIVERHAWKDOCUMENTCONTROL
215ClintonRoad
NewHartford,NY13413
Tel:+13157684855
Fax:+13157684941
Email:[email protected]
REV
373A4000
GEDRAWINGNUMBER
RevisionW
Page15of38
Figure2–CutawayViewofGeneratorFlange
andCouplingFlangeBoltedJoint
Adjustthestud/nutassemblysothatthestudsticksoutfromthefaceofthenuttheamount
shownonthehardwaresetdrawing.Ifyoudon’thaveahardwaresetdrawing,itcanbe
foundintheGEVendocssystemorcontactRiverhawkCompany.(Seesection2)
SETTINGTHESTICK‐OUTLENGTHISCRITICALFORTHEHYDRAULICTENSIONERTOWORK
CORRECTLY.
THESTICK‐OUTLENGTHISALWAYSSETFROMTHECOUPLINGSIDEOFTHEFLANGE.
Thestick‐outlengthcanbecheckedthreedifferentways.
Stick‐OutGageDropGage

InstructionManualIM‐125
CUSTOMER'SINFORMATIONBOX
CONTENTSAREINDEPENDENTOFRIVERHAWKDOCUMENTCONTROL
215ClintonRoad
NewHartford,NY13413
Tel:+13157684855
Fax:+13157684941
Email:[email protected]
REV
373A4000
GEDRAWINGNUMBER
RevisionW
Page16of38
DigitalCalipers
SamplePicturesofaStick‐OutMeasurement
Handtightentheassemblytoasnugfit.SeePhotos1&2foraviewoftheassemblyofstuds
andnutsintheflangepriortotensioning.
CouplingSideTurbine/GeneratorSide
Photo1 Photo2

InstructionManualIM‐125
CUSTOMER'SINFORMATIONBOX
CONTENTSAREINDEPENDENTOFRIVERHAWKDOCUMENTCONTROL
215ClintonRoad
NewHartford,NY13413
Tel:+13157684855
Fax:+13157684941
Email:[email protected]
REV
373A4000
GEDRAWINGNUMBER
RevisionW
Page17of38
7.0HydraulicTensionerEquipmentAssembly
7.1HydraulicEquipmentInspection
7.1.1HydraulicTensionerInspection
CAUTION
RiverhawkrecommendsthatthetensionerbereturnedtoRiverhawkforperiodicinspections.
Replacementofobsoletetensionersisrecommended.Functionalupgradesarealso
recommended.TheRiverhawkServiceReturnsCoordinatorshouldbenotified3‐6months
priortoaplannedoutagetoscheduleaninspectionservice.
Donotbleedtheairfromthehydrauliclinesandtensioneratthistime.Seesection8for
bleedinginstructionsonwhentobleedtheairfromthehydrauliclines.
WARNING
Toavoidfailure,ensuresafety,andproperoperation,thetensionerassemblymustbe
installedonastudintheflangebeforebleedingandpressurizingthetensioner.Donotuse
thetensioneratanypressureunlessthetoolisinstalledonastudinaflange.
CheckpullerscrewusagelifewithRiverhawkservicebulletinSB‐08001.
Cleanpullerscrewandcheckforanydebrisanddents.
Pullerscrewshouldbefreetorotateandmovebackandforth.
Seambetweencylindersclosedtightly.
Inspectthetensionerguardforanysignsofdamageincludingcrackedwelds.Anyguards
modifiedinthefieldshouldbereplaced.Bentguardsshouldbereplaced.Also,besurethe
rubberpadisinplaceontheendoftheguard,ifmissing,replace.
Inspecttheoutsideofthetensionerfordiscolorationpatternsthatmayindicatesubmersion
andinternaldamage.
Performaninventoryofthelooseequipmentsuppliedwiththetensioner.Aninventorylistis
providedonthetensioner’stechnicaldrawing(forexampleRiverhawkHT‐xxxx).Replacement
partsareavailablefromRiverhawk.

InstructionManualIM‐125
CUSTOMER'SINFORMATIONBOX
CONTENTSAREINDEPENDENTOFRIVERHAWKDOCUMENTCONTROL
215ClintonRoad
NewHartford,NY13413
Tel:+13157684855
Fax:+13157684941
Email:[email protected]
REV
373A4000
GEDRAWINGNUMBER
RevisionW
Page18of38
NOTE:PriortoSerialNumberS/N721theHT‐0342wassuppliedwithtwoadapterfeet.The
feetweremarked“TURBINE”and“GENERATOR”.Mounttheappropriatefootbefore
attemptinguseofthetensioner.
7.1.1.1HydraulicTensioner’sBurstDiscReplacement
Thehydraulictensioner’sburstdiscisakeyelementintheoverallsafeuseofthehydraulic
tensioner.
Eachtensionerisshippedfromourfactorywithoneburstdiscalreadyinstalledinthetensioner
andwithanothersparediscforfieldreplacement.Extraburstdiscsareavailablefrom
Riverhawkforreplacementpurposes.
Toreplaceadamagedburstdisc:
1. Removethehydraulicport’sdispersionnut,compressionring,anddamagedburstdisc.
2. Discardthedamagedburstdisc.
3. Cleanthedispersionnut,compressionring,newburstdisc,andthehydraulicportwitha
solventtoensureadirt‐freeinstallation.
4. Reassemblenewburstdisc,compressionring,anddispersionnutintothesame
hydraulicport.
Warning
Adamagedburstdiscmustbereplacedwithawithaburstdiscofthesamedesignand
pressurerating.Donotsubstituteadamagedburstdiscwithadifferentdisctype,adifferent
pressurerating,oraforeignobject.
7.1.2HydraulicPumpKitInspection
RefertotheHydraulicPumpKitInstructionManual,IM‐293(GEVENDOC373A4058).Thelatest
revisionmaybeobtainedbycontactingRiverhawkCompanyorthruwww.riverhawk.com.
InstructionManualIM‐125
CUSTOMER'SINFORMATIONBOX
CONTENTSAREINDEPENDENTOFRIVERHAWKDOCUMENTCONTROL
215ClintonRoad
NewHartford,NY13413
Tel:+13157684855
Fax:+13157684941
Email:[email protected]
REV
373A4000
GEDRAWINGNUMBER
RevisionW
Page19of38
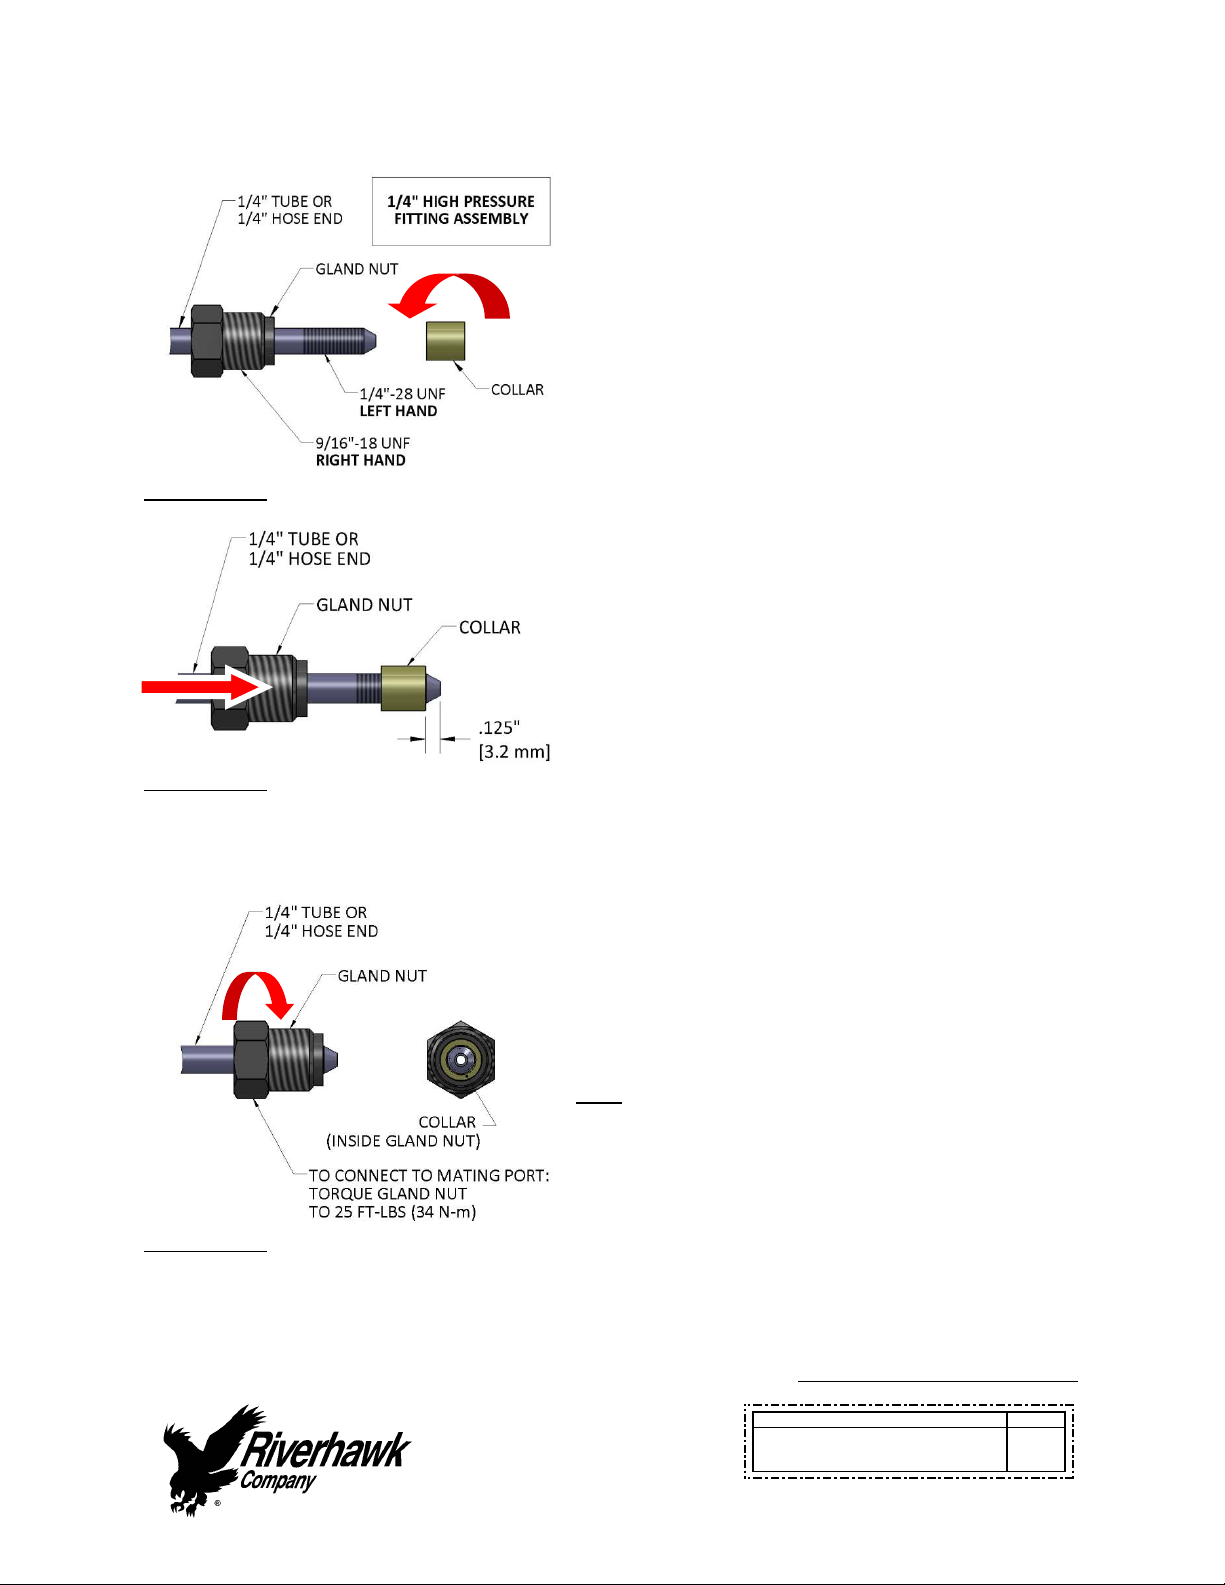
7.2HydraulicFittings
Illustration1
Riverhawktensionersusea1/4”HighPressure
porttoconnectitshydraulichoses.Thehose
connectorismadefromathreepieceassembly:a
glandnut,acollar,anda1/4”tubeor1/4”hose
end.(SeeIllustration1)
Toassemblythefitting,slidetheglandnutover
the1/4”tubeor1/4”hoseend.Turnthecollar
counter‐clockwise(lefthandthread)ontothe
tubeorhoseendasshowninIllustration1.
Illustration2
Thecollarshouldbeplaced.125”(3.2mm)from
thetipofthecone.(SeeIllustration2)Itmaybe
necessarytoadjustthiscollarwithasetofvise‐
grippliers.Becarefultonotstripthethreadsoff
thetubeorhoseend.
Illustration3
Slidetheglandnutdownoverthecollar.(See
Illustration3)Insertthe1/4”tubeor1/4”hose
endintotensionerorhydraulicpump.Whilefirmly
holdingthetubeorhoseendtostopitfrom
rotating,turntheglandnutclockwise(righthand
thread)andtorquetheglandnutto25FT‐LBS(34
N‐m).
Tips:
Makesureallpartsarecleanandfreefrom
debris.
Protecttheconeontheendofthe1/4”tube
or1/4”hoseendfromscratchesasthisisthe
sealingsurface.
Replaceredplasticcapswhenfinishedto
protectthethreadsandcone.

InstructionManualIM‐125
CUSTOMER'SINFORMATIONBOX
CONTENTSAREINDEPENDENTOFRIVERHAWKDOCUMENTCONTROL
215ClintonRoad
NewHartford,NY13413
Tel:+13157684855
Fax:+13157684941
Email:[email protected]
REV
373A4000
GEDRAWINGNUMBER
RevisionW
Page20of38
8.0AssemblyofTensioneronaStud
8.1HandlingoftheTensioner
Restthetensionerontopofthecouplingshaft.Usingastrapjustlongenoughtogoaroundthe
couplingshaft,attacheachendtothehandlesofthetensioner.Onewaytodothisistoattach
thestrapbyloopingthestrapthroughitselfaroundthehandleofthetensionerononeside
thenaroundthecouplingshaftandfinallyattachedtothehandleontheothersidewithaD‐
shackle.Thiswillhelpholdthetensionerinplaceshoulditfalloffoftheshaft.Thestrapalso
helpstheoperatorsmovethetensioneraroundtheshaftwhiletensioning.
Ifpossible,usea‘Come‐along’orchainfallfromtheceilingofthecouplingroomandattachit
tothetensionerusingashortstrapwrappedthroughthehandlesandaroundthetopofthe
tensioner.Thiswillallowtheoperatorstoeasilymovethetensioneraroundthecouplingshaft
bysupportingtheweightofthetool.
8.2KitAssembly
Assemblethehydraulicpumpwithitshosetothetensionerandbleedouttheairperfollowing
instructionsinsection8.3.
Note:Beforethreadingthepullerscrewintothestud,carefullycheckthecleanlinessofboth
thestud'sandthepullerscrew'sconicalthreads.Applyalightcoatofcleanturbineoilora
spraylubricanttothepullerscrew.Donotuse“NeverSeize”ontheconicalthreads.This
procedurewilleaseassemblyandassurepositivematingofthethreadsbeforetightening.
RefertoTensionerAssemblydrawingandphotoforviewsofthetensionertoflangemounting.
Alltensioningwillbeperformedonthecouplingsideoftheflangeconnections.
Table of contents
Other riverhawk Industrial Equipment manuals

riverhawk
riverhawk IM-269 User manual

riverhawk
riverhawk IM-150 User manual

riverhawk
riverhawk IM-139 User manual

riverhawk
riverhawk IM-257 User manual

riverhawk
riverhawk IM-116 User manual

riverhawk
riverhawk IM-255 User manual

riverhawk
riverhawk IM-164 User manual

riverhawk
riverhawk IM-477 User manual

riverhawk
riverhawk IM-278 User manual

riverhawk
riverhawk IM-186 User manual


