RKS MX25 User manual

MX25
USER MANUAL
www.rksmotor.eu

PREFACE
Industralzaton has brought us envronmental polluton. Needless to say t s everyone’s duty to lve a low-carbon
lfe. Rdng an e-bke s consdered one of the healthest forms of daly exercse.
Thank you for purchasng electrc bkes of RKS. You bought not only a good qualty e-bke, but also professonal
after-sale servce.
Dear Customers;
Ths manual helps you to use your e-bke correctly, provdng the bref knowledge about your e-bke and daly
mantenance.
RKS has contrbuted a lot to mprovng rdng experence, provdng a fun transport opton. So let us get started.
MX25

TABLE OF CONTENTS
Attentons
1. Introducton
Battery hargng A. C
Motor tartng B. S
C. Unpackng/ nstallng the attery I B
2. Components
3. Preface
4. Components Adjustment
A. Installaton of the Rear Wheel
B. Assembly of the Handlebar
C. Adjustment of the Hydraulc Brake
D. Assembly of the Seat Tube
E. The Assembly of the Reflector and the Rng Bell
F. Assembly of the Front Fender
G. Pedal
H. Adjustment of the Shft System
J. Adjustment of the Brakes and the Brake Handles
K. Adjustment of the Brakes and the Brake Handles
L. RIMMantenance of the
5. Safety
6. Daly Usage
7. Laws and Regulatons
8. The Dfference Between the Electrc-Powered Bkes and the E-Bke
9. Battery Pack
..................................................................................................................................................................1
.............................................................................................................................................2
.................................................................................................................................................3
.....................................................................................................................4
........................................................................................................................................................5
................................................................................................................................................................6
.........................................................................................................................8
.............................................................................................................................8
..................................................................................................................9
.............................................................................................................................9
.........................................................................................10
......................................................................................................................10
............................................................................................................................................................11
.....................................................................................................................11
.........................................................................................12
........................................................................................12
................................................................................................................................13
................................................................................................................................................................14
.......................................................................................................................................................15
.......................................................................................................................................17
...............................................................18
......................................................................................................................................................19
MX25

MATTERS NEEDING ATTENTION TO USERS
Charger
UI
Lghtnng
Attentons
Mantenance
Repar
After Sale Servce
Regular Mantenance
Specficaton of Tres
Spare components for the E-Bke
Regular accessory
Warnngs
Torque
Specficatons
Supplement
19................................................................................................................................................................
......................................................................................................................................................................... 20
.............................................................................................................................................................. 20
............................................................................................................................................................. 20
21........................................................................................................................................................
21..................................................................................................................................................................
21................................................................................................................................................
.......................................................................................................................................... 22
23...........................................................................................................................................
24.......................................................................................................................
24..............................................................................................................................................
23.............................................................................................................................................................
25.................................................................................................................................................................
26......................................................................................................................................................
27.........................................................................................................................................................
MX25
01
ATTENTIONS
The product has been found compliant with the requirements of the standard: EN 15194.
Electric Powered Bike/E-Bike
Electrical components comply with international safety certification.
Electrical components comply with the relevant safety and performance testing.
Ths manual s about RKS E-Bke (Electrc Powered Bke). At the general part of the manual, you may find some
useful nformaton on the use of the e-bke. Please read the manual carefully before usng.
MotorBattery Pack(s)LED MeterCharger
MX25

02
INTRODUCTION
It s safe to wear a helmet when rdng.
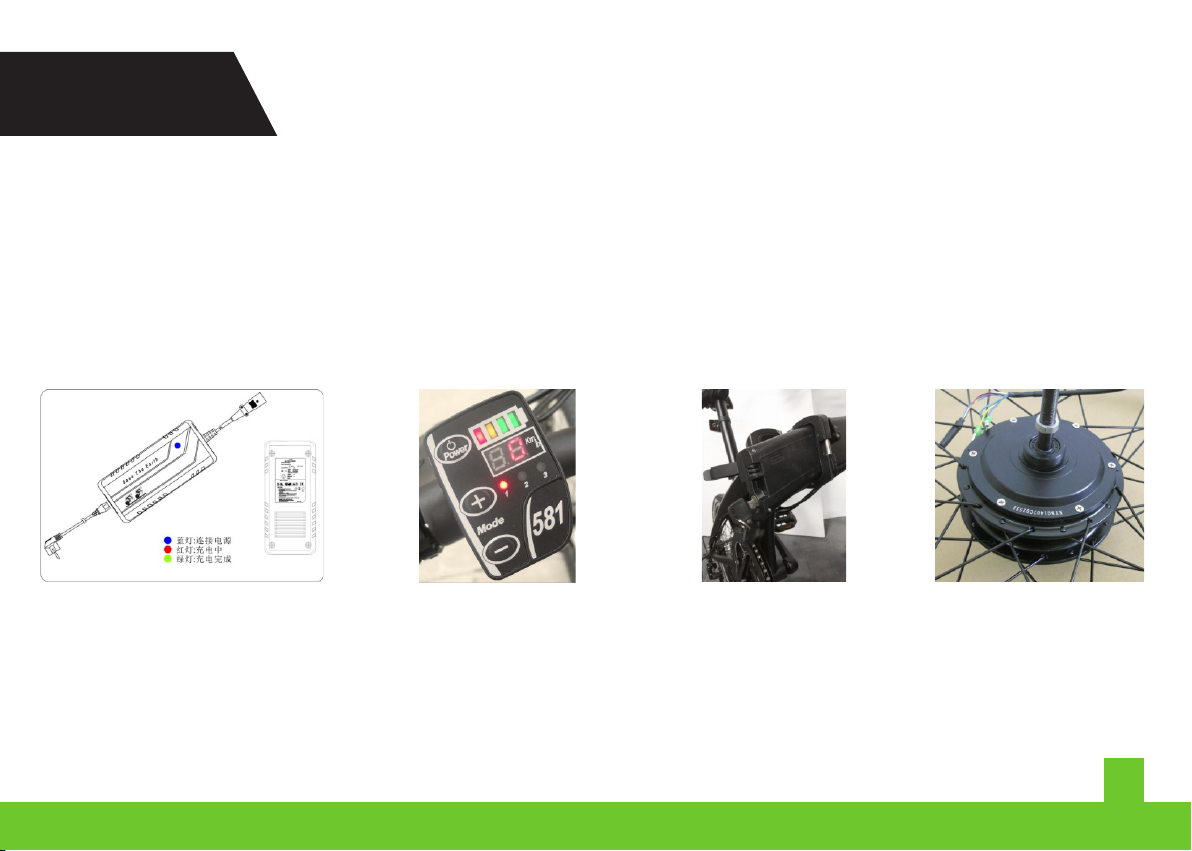
A. Battery Chargng
For more detals, see the manual of meter.LED
Press the power button for more than 2 sec.
B. Motor Startng
2. Black: Chargng Port
1. Red: Power Swtch
3. Whte: USB
MX25
03
INTRODUCTION
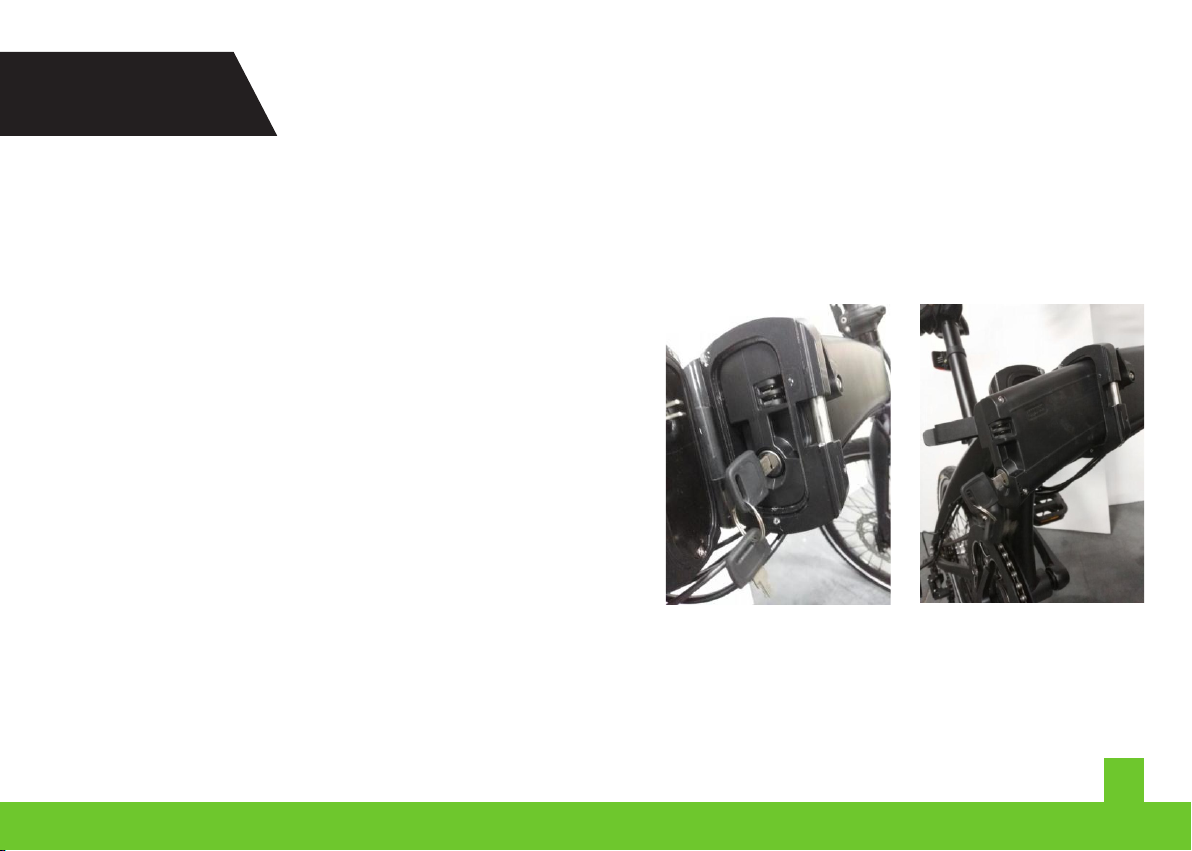
C.Takng Out/Installng the Battery
ê If the meter fals, please refer to User's LCD meter manual.
ê WARNING! PLEASE POWER OFF WHEN PARKING IN ORDER TO PREVENT ACCIDENTS.
ê THE REAR TYPE MOVES THE MOMENT THE SYSTEM STARTS. IN ORDER TO PREVENT AN
UNCONTROLLED START (EXPECIALLY IN THE RAINY OR SNOWY DAYS), WE SUGGEST TO WEAR A
HELMET.
1. Turn the key clockwse, unlockng the battery pack
ê Keep the battery away from mosture, and keep good ventlaton. Do not cover anythng on battery whle chargng,
because t wll generate a sgnficant amount of heat. We suggest that you have one person to montor durng the
chargng.
ê When the red ndcator lght of the charger s flckerng, t ndcates the battery s not chargng. Please unplug
mmedately and contact the dstrbutor.
2. Remove the battery
ê WARNING! You are suggested to rde safely and quetly
ê WARNING! PLEASE KEEP THE SAFETY OF THE BATTERY PACK.
1.Unpack/install the battery pack
MX25
04
INTRODUCTION
ê WARNING! When the rder must lock nsurance deducton.
1. Forward fastenng wrench
2. Press down nsurance deducton
MX25

05
COMPONENTS
1. Rear Tre/Tubes
2. Rear Wheel
3. Spoke
4. Rear Dsc Brake
5. Freewheel
6. Deralleur
7. Chan
8. Rear Reflector
9. Seat Clamps
10. Seat Tubes
11. Saddles
12. Chanwheel & Crank
13. Stand
14. Motor
15. Battery Packs
16. Frame
17. Handle
18. Shfter
19. Stem Clamps
20. Headset
21. Stem
22. Front Forks
23. Front Brake
24. Left Lever Brake
25. Rght Brake Lever
26. Bell
27. LED Meter
28. Handle
29. Charger
30. Spoke
31. Front Hub
32. Speed Sensor
MX25
1
2
3
4
5
6
7
8
9
10
11
12
13
14
15
16
17
18
19
21
22
23
24
25
26
27
28
30
31
32

06
PREFACE
ê Use
Precauton:
Please get to know e-bkes ahead before purchasng our products.
Dear Customers;
ê Cleanness
ê Tdy
ê Repar and mantenance
Ths manual contans the basc gude, mantenance and repar. Ths manual s very mportant to your rde. Ignore at
your own perl.
Because the complexty of the modern technology, we have tred our best to get close to the final technologcal
nformaton.
Ths manual also apples to other bkes we provde. For more nformaton, please refer to the manual or contact
RKS's authorzed dstrbutors.
Please obey the local laws or regulatons when rdng.
The e-bke we provde should have been assembled and adjusted completely. If not, please contact authorzed
dstrbutors and make sure you have your rghts safeguarded.
ê Please wear lght-color clothes or clothes wth reflectng components
As some basc knowledge that helps to protect you from some potental rsks has been ntroduced above, we
suggest you to read the ntroducton carefully.
ê Please wear sutable helmet.
Please read the manual first. For your safety, f you have any problems, please contact RKS MOTOR EUROPE as soon
aspossble.
MX25

07
PREFACE
ê Please wear ant-slp shoes.
ê Please wear tght clothes to avod potental dangers when rdng.
Even you are an experenced rder, please read the manual toget famlar wth our products and check the status of the
product before rdng.
PRECAUTION: There s potental rsk for a new rder of the electrc-powered bke. A good rdng habt s very
necessary for not only your own safety but for other's safety. When you are rdng at the speed of 33 km/h, your e-bke
s consdered an ntellgent e-bke s consdered an ntellgent e-bke. When you are rdng at the speed of 25 km/h, t s
consdered as a smple e-bke.
MX25
08
COMPONENT ADJUSTMENT
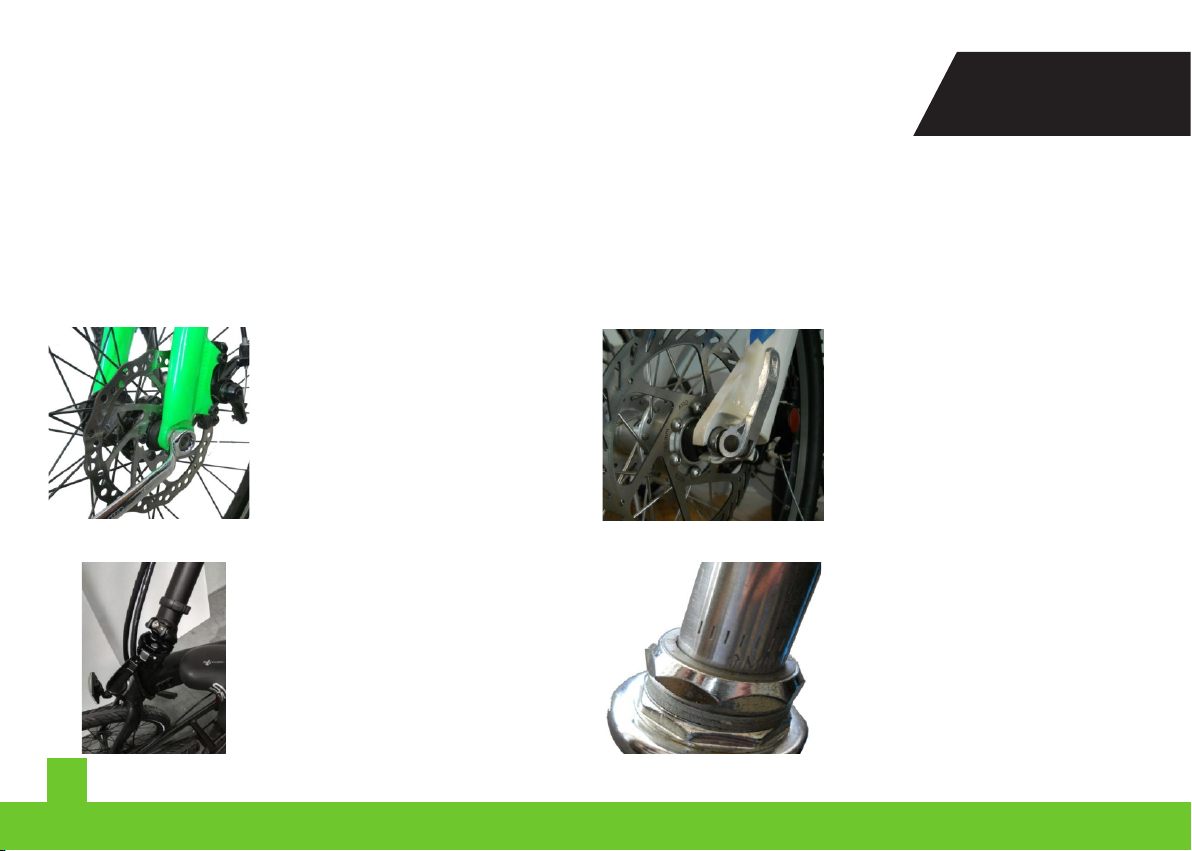
A. Installaton of the Rear Wheel
ATTENTION: Please make sure the both ends have occluded tghtly and evenly. Wheel groups are at the central
poston.
The hub of the front wheel s grouped nto two types: the nut-type and the quck-release type. A 15# open/box
spanner s necessary for the net-type whle the quck-release type can buckle or release tself wth the buckle.
The Assembly of the Handlebar and Stem
1.Nut-type front wheel groups
2.15# open/box spanner
3.Torque: 160-250KGf.cm
(16N.m-25N.m)/
4.Make sure wheel groups are at
the central poston
1. Quck-release front wheel
group
2. Make sure the bub occludes
the front fork, and make sure
there s no devaton
Stem s grouped nto two types: The tooth-
type and the non-tooth-type
1.The tooth-type stem
2.Turn the M6 hexagon tool clockwse.
3.Torque: 100-120KGg.cm
9.8N.m-12N.m)。
4.Make sure the stem shares the
same drecton wth your rdng.
ATTENTION
SAFETY LINE SHOULD BE
FOLDED, OR THERE MAY
EXIST POTENTIAL RISKS
MX25

09
COMPONENT ADJUSTMENT
1.Non-tooth stem.
2.M5hexagon and M4hexagon tool.
3.Torque:M6 100-120KGg.cm.
(9.8N.m-12N.m)
4.Insert the stem nto the front fork
stem, and then tghten the screw
wth the M5 clockwse.
5.Make sure the stem shares the
same drecton wth your rdng.
1. Tighten the two screws with the M4
hexagon screwdriver.
2. Torque: M5 60-80KGf.cm 6-8N.m.
B.1. Assembly of the Handlebar
1.Use M4 and M5 hexagon
screwdrver to assemble the
handlebar. Please make sure
you can grp comfortably.
2.Please make sure the handlebar s
n parallel wth the horzontal plane.
3.Please make sure there a 30-40
degree wth the horzontal plane.
C.Adjustment of the Hydraulc Brake
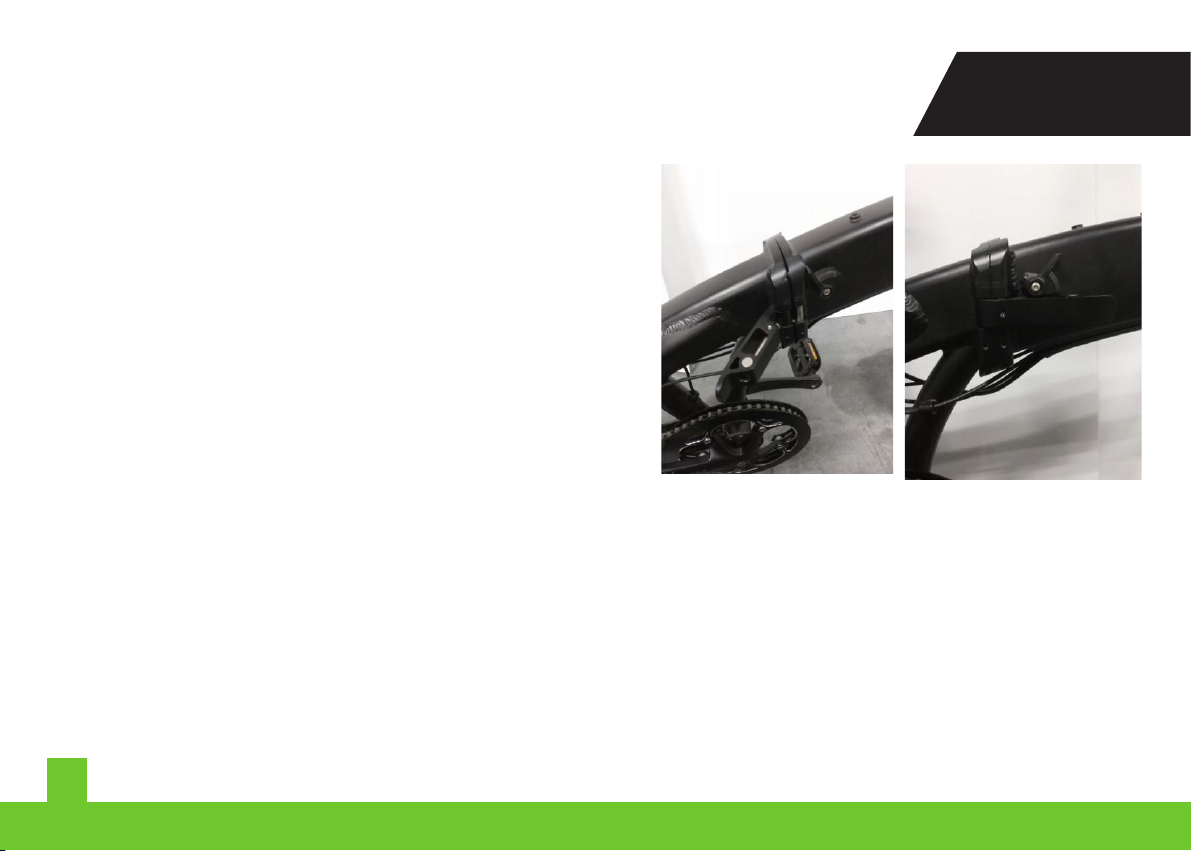
D.Assembly of the Seat Tube
1.Insert the seat tube nto the frame.
(Refer to the pc.)
2.Adjust the saddle to make sure you st on
the saddle comfortably.
3.Make sure the seat tube s n lne wth the
tube of the frame.
1. Do not expose the safety lne.
2. Buckle thequck-release handle.
(Locked at the poston of "CLOSE")
3.The seat postcan be fully nserted
E. The assembly of the reflector and
the rng bell
1. Tool: Cross screwdrver.
2. Install the reflector.
3. Usually, the rear reflector s red.
MX25

1.Tool: cross screwdrver.
2.Have the reflector assembled on the
frame. Adjust the degree to have the
reflector n parallel wth the horzon.
3.Usually the front reflector s whte.
1.Tool: a cross screwdrver
2.It affilates your rdng f you nstall
the rng bell on the left sde.
F. Assembly of the front fender
1.Tool: a screwdrver.
2.Screw the front fender n the hole of the
front fork, and then adjust.
1.Tool: a M5 hexagon screwdrver.
2.Lock the lftng eye as the pc, and
then adjust to make t have a
safety dstance wth the tre.
G.Pedal
1. R:Rght; L:Left
2. R: Rght part of the pedal,
L: Left part of the pedal
1.Tool: 15# open spanner.
2.Twst the pedal clockwse.
3.Torque:350KGf.cm-450KGf.cm
(34N.m-44N.m)
10
COMPONENT ADJUSTMENT MX25
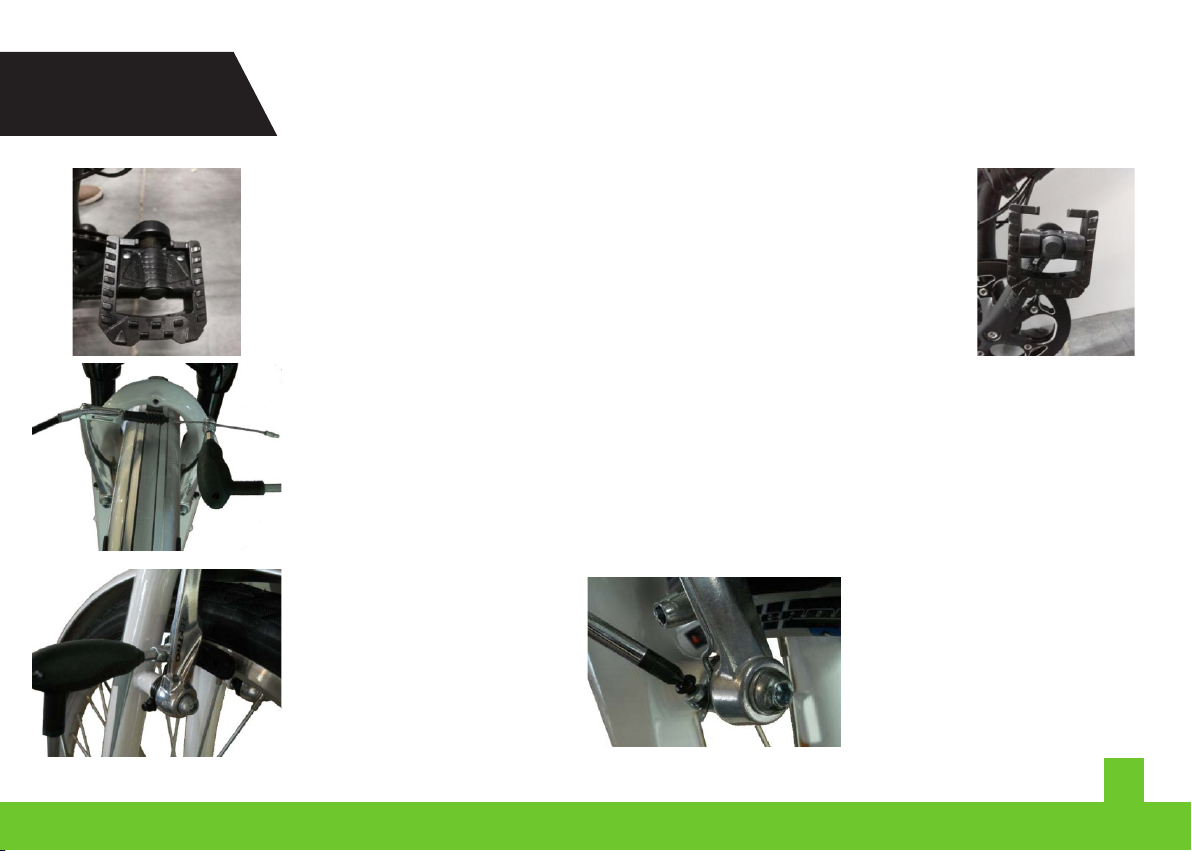
1.Push the pedal from the outsde to the
nsde, Then push down.
2.Then push down.
H. Adjustment of the Shft System
Please refer to User's Shft System Manual
J.Adjustment of the Brakes and the Brake Handles
There are two types of brakes: the v brakes and the dsc brake.
1.Tool: M5 hexagonal screwdrver
2.Please make sure a 3mm dstance between the wheel and the brake pads, and then adjust
(see the pcture below)
3.Please keep the brake n the mddle, and make sure the two brake pads work properly.
4.Level up the brakes (n ts standard condton)
1. Adjust the brake pads, to keep t
n lne wth the curve of the wheel.
2. Please make sure the brake pads
can have fully touch wth the
surface of the steel wheel.
1.Nuts for adjustment. Ths s for
the brakes to work properly.
2.If only one sde of the brakes
works, please adjust the nut.
11
COMPONENT ADJUSTMENT
MX25

1.The adjustment of the dsc brake; tool: a M5 hexagonal screwdrver.
2.Fx the lne onto the dsc brake.
3.Please make sure a more than 1mm gap between the brake dsc and the brake pad.
4.If there s any frcton, please adjust the nuts.
5.Bolts for adjustment nclude the bolts on the brake handle.
6.If you squeeze the brake, they are n standard condton when they are n lne wth the bar.
1.Cut theextra part of the brake lne.
2.Enclose the end of the brake lne
for both of the dsc brake and the V brake.
1.Thread the brake lne through the
brake handle, and take t out from
the hole of the bolt.
2.The end of the brake lne should
be folded nto the hole of the bolts.
1.For effect pcture, see the
pcture.
2.Ths s the bolt for fine
adjustment
3.Adjustment s only for V brakes
and dsc brakes.
1.Enclose the end of the brake
lne to prevent the lne from
spreadng apart whch would
hurt people.
12
COMPONENT ADJUSTMENT MX25

It s suggested to adjust the spokes for every 3 months to prevent dstort of the rm that wll harm the brake.
L. Mantenance of the Rm
K. Assembly of the Motor
Please refer to md motor user's manual.
There s a safe lne whch s less than 3mm on the rm. If the rm has been worn close to the depth of the safe
lne after rdng, please replace the rm. Ths would prevent unnecessary accdent.
13
COMPONENT ADJUSTMENT
MX25

ATTENTION: INDICATE DEFECTS OR POSSIBLE DAMAGES
Please pay attenton to the nformaton as follows:
Every screw must be tghtened. Please refer to chapter 22 for more detals. If you don't have the professonal
tools for the torque, please contact your dstrbutor. If screws are not tghtened, there exts the potental of an
fallng-apart or a breakdown that mght lead to an accdent. As a result, please check your components regularly.
WARNING!: MODERN E-BIEKS ARE RELATIVELY COMPLEX. IT IS NECESSARY FOR RIDERS TO HAVE
CERTAIN KNOWLEDGE, EXPERIENCE AND TOOLS FOR THE MODIFICATION OF AN E-BIKE. SO PLEASE
DO NOT TRY TO MODIFY YOUR E-BIKE. FOR ALL THE MAINTENANCE AND REPAIR, PLEASE REFER TO
AUTHORIZED DISTRIBUTORS.
INFORMATION: INDICATES THAT USEFUL INFORMATION IS PROVIDED FOR YOU TO REFER TO.
Please read all the warnngs and cautons ahead. Please stck to the nstructon of the manual. If you lend your e-
bke to your frends, please ask hm/her to read the manual first.
WARNING!: INDICATE POTENTIAL RISKS TO YOUR LIFE OR HEALTH IF YOU VIOLATE THE OPERATING
RULES OR NEGLECT NECESSARY MAINTENANCE.
14
SAFETY MX25

If you cannot find a soluton n the manual, please contact authorzed dstrbutors or RKS.
ê Assemble the front and rear brakes(there are two types of brakes: the front and the back one)
ê Check the condition of the battery
ê Check the pressure of the tres
Please follow all the nstructons, manual or nformaton provded onlne.
WARNING! PLESE MAKE THE LID OF THE CHARGING HOLE IS ON BEFORE RIDING.
Necessary adjustment for the first use:
ê Assemble the handlebar and set tube
In order to st comfortably and have a better brakng effect, please adjust the degree and the poston of the
paddle. (Please refer to RKS e-bkes user's manual or authorzed dstrbutors).
ê Assembly of the wheels
WARNING! NOT BE ACCUSTOMED TO THE MODERN BRAKING SYSTEM. PLEASE HAVE A TRY TO GET
FAMILIAR WITH THE E-BIKE.
WARNING! PLEASE KEEP IN MEMORY THAT E-BIKES WILL HAVE A LONGER BRAKING DISTANCE ON
THE SLIPPING GROUD.
WARNING! PUT ON THE REAR AND FRPNT BRAKES BEFORE RIDING!IF NOT THERE IS POTENTIAL OF
FALLING OFF.
15
DAILY USAGE
MX25

Please check the condton of the tres, fork and the brakes. If there s any defect, please contact RKS's authorzed
dstrbutors.
Move the e-bke for several meters. There should not be frctonal nose between the brake pads and the dsc brake
rotaton.
Check the pressure of the tres before rdng. Tres should have a maxmum or a mnmum pressure. However, f you
are not clear about thenumber, please apply 3-4Bar whch s a normal pressure number.
ê Check the tres and the wheels
WARNING! PLEASE MAKE SURE THE BIKE IS COMPLETE.
Check functons as follows before every rdng:
ê Check the condition of the battery pack
ê Check the front and the back brakes
ê Check the wear and tear of the tires,
ê Check the tightness of the front fork and frame
ê Check the sealng of the tubes of the hydraulc brake
ê Check the tghtness of the nuts and bolts
WARNING! MAKE SURE THE LIP OF THE CHARGING HOLE IS COVERED
ê Check the lamp, rng bell, and the horn
ê Check the position, safety and the tightness of the saddle. Please slope the saddle upward or downward
slightly.
16
DAILY USAGE MX25
Table of contents
Other RKS Bicycle manuals


