Roban SH?60 Seahawk Compactor Assembly instructions

SH‐60Seahawk
Compactor
Manual
CCPMSCALERCHELICOPTER

Copyright@2014 - Roban Limited – All rights reserved
Compactor700Manual–UH‐60
Release2.0‐April2014
RobanLimited
DryriverIndustrialZone,VentureCrossRd.
Jiaolian,WanjiangCityDistrictofDongguan,
523046DongguanCounty(GD)‐PRC

SPECIFICATIONS
Bodylength: 1680mm
Lengthincl.rotors: 1850mm
Width: 655mm
Height: 465mm
Mainrotordiameter: 1560mm
Mainbladelength: 700mm
Tailrotordiameter: 280mm
Tailbladelength: 105mm
Mainshaftdiameter: 12mm
Tailshaftdiameter: 5mm
Spindlediameter: 8mm
Batterycompartment: 2x60x60x180mm
Motor:* 1x750MX450KVbrushlessoutrunner,12Scapable
Speedcontroller:* 1x120Abrushless,12Scapable
Servo:* 3xmetalgearcyclic,1x9gmetalgeartailservo
Battery:* 44.4V5000mAh35C+
Flighttime: 5minutes
Takeoffweight: 9000g
FlightStabilization:* 3axisflybarlessgyro
RadioControl:* min.6channelwithpitchandthrottlecurves
*)Optionallyavailableequipment
TheCompactorisahighperformanceradiocontrolledscalehelicopter.
Ourgoalwastocreateasimple,highperformancehelicopter,withaminimumofmechanicalcomponentsandsimple
maintenance.
Pleasereadthisusermanualcarefully,itcontainsinstructionsforthecorrectassemblyofthemodel.
Pleaserefertothewebsitewww.robanmodel.comforupdatesandotherimportantinformation.
Thankyouforyourpurchase,andhaveagreattimewithyourCompactor!
RobanLimited

Copyright@2014 - Roban Limited – All rights reserved
IMPORTANTNOTES
*Thisradiocontrolledhelicopterisnotatoy.
*Thisradiocontrolledhelicoptercanbeverydangerous.
*Thisradiocontrolledhelicopterisatechnicallycomplexdevicewhichhastobebuiltandhandledverycarefully.
*Thisradiocontrolledhelicoptermustbebuiltfollowingtheseinstructions.Thismanualprovidesthenecessaryinformation
Inordertocorrectlyassemblethemodel.Itisnecessarytocarefullyfollowalltheinstructions.
*Inexperiencedpilotsmustbemonitoredbyexpertpilots,duringassembly,adjustmentandflight.
*Alloperatorsmustwearsafetyglassesandtakeappropriatesafetyprecautions.
*Aradiocontrolledhelicoptermustonlybeusedinopenspaceswithoutobstacles,andfarenoughfrompeopletominimizethe
possibilityofaccidentsorofinjurytopropertyorpersons.
*Aradiocontrolledhelicoptercanbehaveinanunexpectedmanner,andlosingcontrolofthemodelmustatalltimes
considered.
*Lackofcarewithassemblyormaintenancecanresultinanunreliableanddangerousmodel.
*NeitherRobanLimitednoritsagentshaveanycontrolovertheassembly,maintenanceanduseofthisproduct.Therefore,no
responsibilitycanbetracedbacktothemanufacturer.YouherebyagreetoreleaseRobanLimitedfromanyresponsibilityor
liabilityarisingfromtheuseofthisproduct.
SAFETYGUIDELINES
*Flyonlyinareasdedicatedtotheuseofmodelhelicopters.
*Followallcontrolproceduresfortheradiofrequencysystem.
*Itisnecessarythatyouknowyourradiosystemwell.Checkallfunctionsofthetransmitterbeforeeveryflight.
*Thebladesofthemodelrotateataveryhighspeed;beawareofthedangertheyposeandthedamagetheymaycause.
*Neverflyinthevicinityofotherpeople.
NOTESFORASSEMBLY
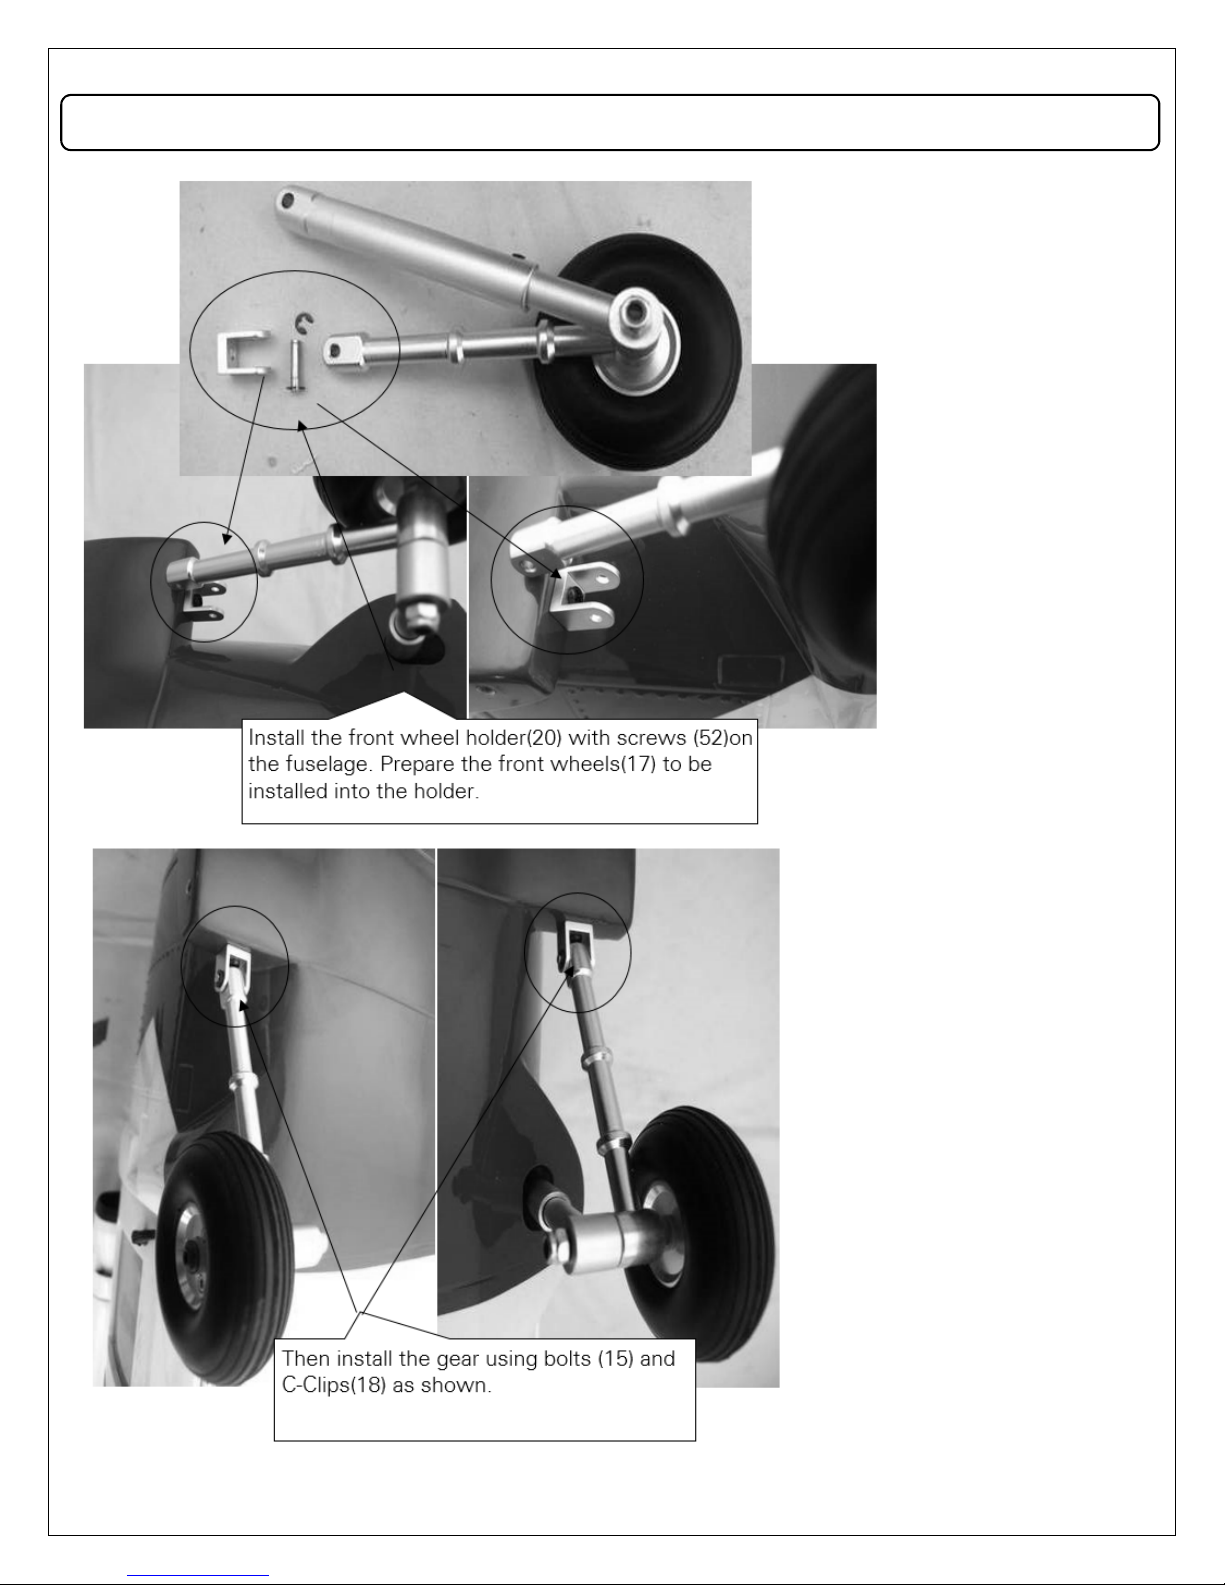
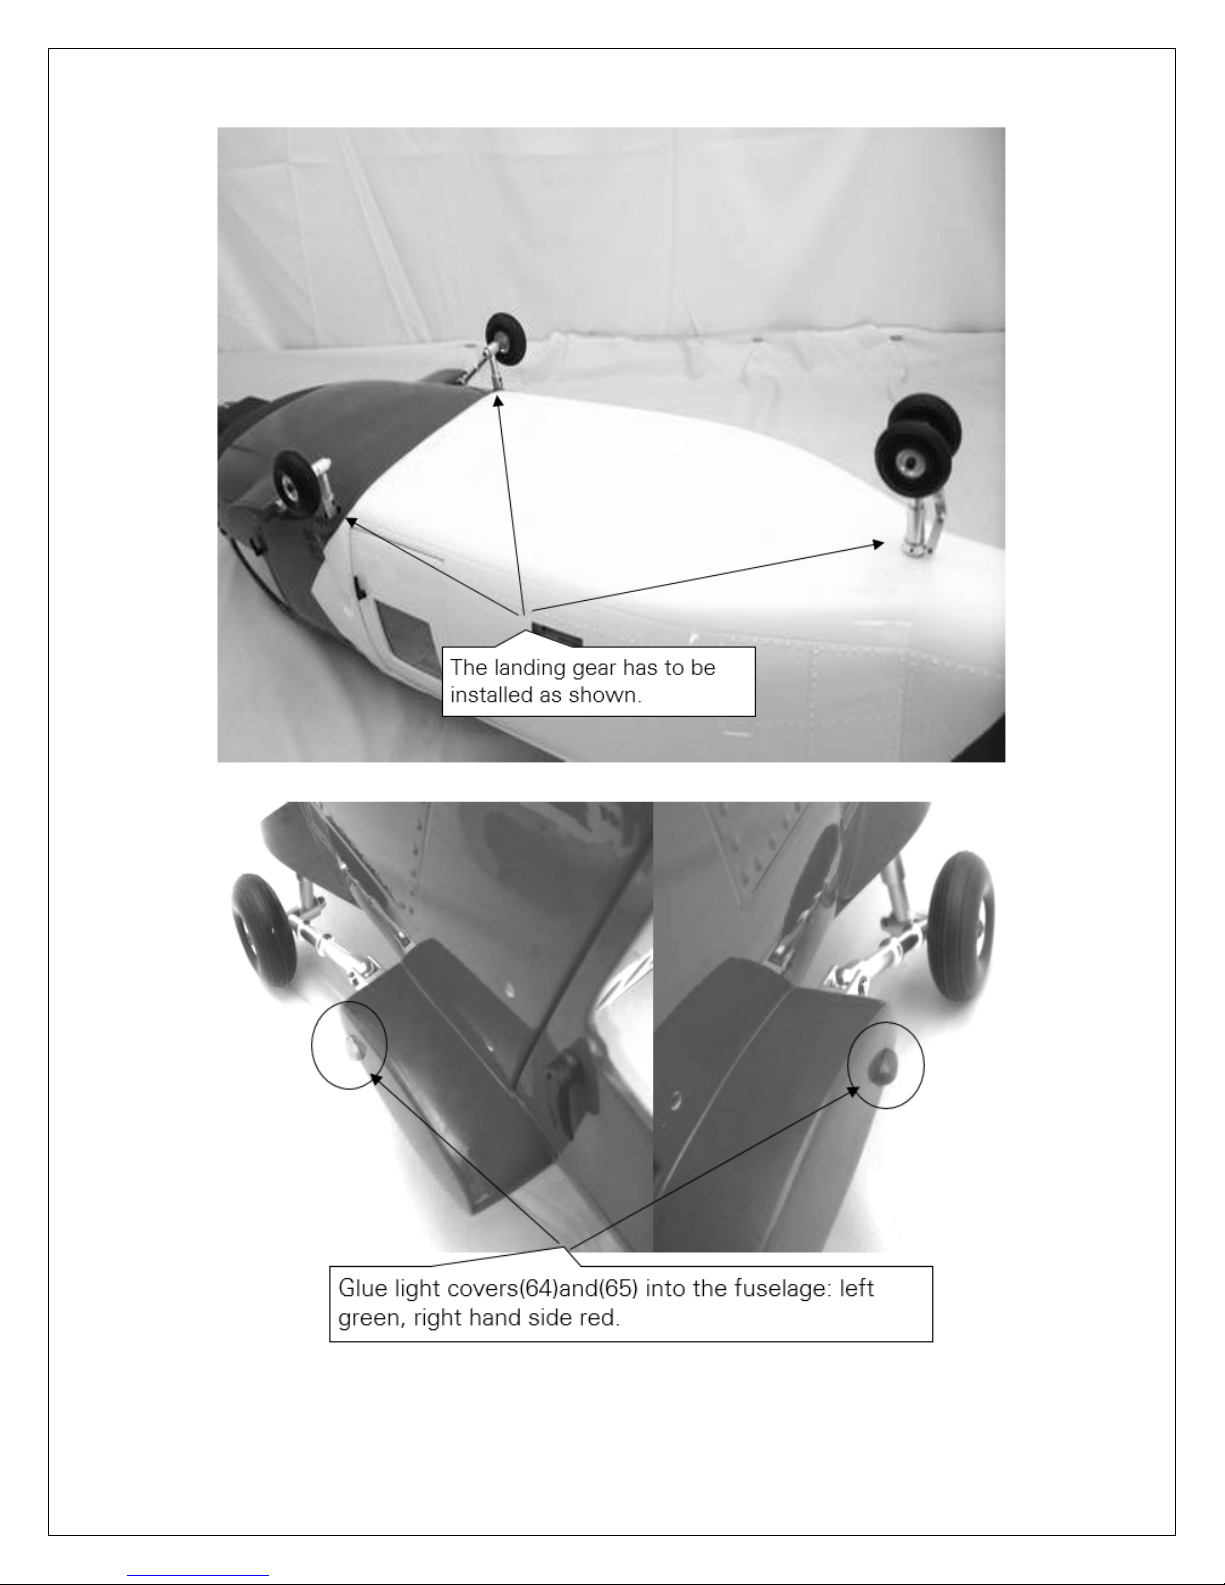
Pleaserefertothismanualforassemblyinstructionsforthismodel.
Followtheorderofassemblyindicated.Theinstructionsaredividedintochapters,whicharestructuredinawaythateachstep
isbasedontheworkdoneinthepreviousstep.Changingtheorderofassemblymayresultinadditionalorunnecessarysteps.
Usethreadlockersandretainingcompoundsasindicated.Ingeneral,eachboltorscrewthatengageswithametalpartrequires
threadlock.
Factorypre‐assembledcomponentshavebeenassembledwithalltherequiredthreadlockandlubricants,andhavepassed
qualitycontrol.Itisnotnecessarytodisassembleandre‐assemblethem,butyetitremainstheresponsibilityoftheownerto
checkallpartsinquestion.
Wedonotrecommendtheuseofthincyanoacrylateglueforsurfacemountofpaintedparts.Thefumesofthecuringglueleave
whitestainsontheclearcoat,whicharehardtoremove.

Copyright@2014 - Roban Limited – All rights reserved
1–Tailgearbox
2–Tailtube
3 – Shorttorquetube
4–Balllinks
5–Tailboomholder
6–Mechanicmainframe
7 – Motorpulley
8–Shorttailservorod
9–Tailrotorassy
10–Mainrotorassy
11 –TailservoHolder
12–Torquetubebearings
13–Tailservoframe
14–Tailpushrodguides 15 –Landinggearbolts
16–Centergear
17–Frontgear
18–C‐Clips
19 –Tailgear 20–Gearsupports
21–Mainrotorblades
22–Longtorquetube
23–Tailtube
24–Longtailservorod
25–Tailboomsupports
26–EVAboomdistancer
27 –Tailrotorblades
28–ScalePart
29–Scalecockpit
30–Weaponholder
31 –Rockets
32–Fueltanks
33–Exhaustinnerpipe
34‐Exhaust
35 –Tailwing
36–Tailwing
37–Plasticbolts
38–Windshield
39 –ScrewA3x1616pcs
40–ScrewA2x88pcs
CONTENTS:

Copyright@2014 - Roban Limited – All rights reserved
41–ScrewM3x144pcs
42–ScrewA1.7x64pcs
43 –Washer3x8 8pcs
44–Washer4x107pcs
45–Lbrackets
46–ScrewM4x104pcs
47 –ScrewM3x106pcs
48–SelflocknutM4pcs
49–Balllinks3pcs
50–NutM2
51 –Woodenwashers8pcs
52–ScrewA3x106pcs
53–ScrewM4x253pcs
54–Scaleacc.A1pc
55 –Scaleacc.B2pcs
56–Scaleacc.C1pc
57–Scaleacc.D2pcs
58–Scaleacc. E2pcs
59 –Scaleacc.F1pc
60–Scaleacc.G2pcs
61–Scaleacc.H1pc
62–Scaleacc.I2pcs
63 –ScaleJacc.B1pc
64–LEDlightA
65–LEDlightB
66–LEDlightC
67 –Prolongingwire4pcs 68–LEDlightcap
69–LEDlightcontroller
70–DecalSet
Remarks: UH‐60Blackhawkdoesnotcontainparts16and35.
SH‐60Seahawkdoesnotcontainparts16and36.
HH‐60Coastguarddoesnotcontainparts17,36,30to34,54,55,56,and58to62.

ADDITIONALCOMPONENTSREQUIRED
*ElectricMotor:
10S‐12S–400‐600Kv,
pinionshaftdiameter6mm
*Speedcontroller:
minimum120Atobesafe
*Batteries:10‐12S4000‐5000mAh
*1flybarless3axiscontrolunit,suitableforscaleflying
*Radiopowersystem
*3cyclicservos
*1tailrotorservo
*6channelradiocontrolsystemon2.4GHz
TOOLS,LUBRICANTS,ADHESIVES
*Genericpliers
*Hexagonaldriver,size1.5,2,2.5,3,4mm
*4mmT‐Wrench
*5.5mmSocketwrench(forM3nuts)
*8mmHexforkwrench(forM5nuts)
*Mediumthreadlocker(eg.Loctite243)
*Strongretainingcompound(eg.Loctite648)
*Spraylubricant(eg.Try‐FlowOil)
*Syntheticgrease(eg.Tri‐FlowSyntheticGrease)
*Cyanoacrylateadhesive
*PitchGauge(forset‐up)
*Solderingequipment(formotorwiring)
Insidethemainboxthereare:
Insidethemainbox:
Box1:MainFrame/TailFrame/Rotorhead
Box2:Boom,Blades,Tailblades,Rods
Box3:ScaleCockpit
Bag1:Tailfinrod
Bag2:Positionlightcontroller
Bag3:Scalefittings,screws
Bag4:Tailboomaccessories
Bag5:Fuselagescalefittings
Bag6:Mechanicalfittings,screws
Bag7:TailWings
Bag8:Beltdrivepulley
Bag9:Batterytray
Bag10:EVAtaildistancer
Bag11:Footrests
Bag12:Frontwindow(insidecockpit)
MasterPack4:Frontscalefuse(Bag6inside)
MasterPack5:Tailboom(allotherbags)
MasterPack6:Aluminumlandinggear

AssemblyScaleFuselage
Priortoinstallingthemechanicsintothefuselage,pleasepreparethefuselageaccordingtothefollowingsteps.

Copyright@2014 - Roban Limited – All rights reserved
Ifnotexplicitlystatedotherwise,thismanualreferstousingadhesiveswhenusingthewords“install”or“fix”.Forareasnotvisible
totheeye,anykindofgeneralplasticadhesivecanbeused.Forvisibleareas,werecommendtheuseofepoxy2Kglueoftherapid
curingkind.Astherapidcuringkindproducesalotofheatuponcuring,onlythinfilmsofgluearesuitableforthiskindofglue.If
largeramountsofgluehavetobeused,werecommendtheuseof30minutecuringglue.Asmuchascyanoacrylateglueis
convenientforrapidgluingofparts,itdoeshavetwogreatdisadvantages.Itisverybrittleaftercureandthereforenotverysuitable
forflexiblesurfacesanduponcuringitproducesgaseouscompoundsthatDOleavewhitestainsonpaintedsurfacesasmuchasa
thumbwithawayfromtheactualareathegluewasapplied.Thesestainsarehardtoremove.

Copyright@2014 - Roban Limited – All rights reserved

Copyright@2014 - Roban Limited – All rights reserved

Copyright@2014 - Roban Limited – All rights reserved

AssemblyMechanics
Themechanicsarealmostentirelypreassembledandsplitupintofoursections:rotorhead,mainframe,tailframeandtailtube.
Priortotheinstallationintothescalefuselage,themechanicshavetobeentirelyassembled,electroniccomponentsinstalled,
adjustedandtested.Afterinstallationintothefuselagemostofthehelicoptermechanicbecomeinaccessible.
Step1–Rotorhead
Slidetherotorheadontothemainshaft.Usescrew(70‐
00006)andnylonnut(70‐00007)tosecuretherotorhead
ontothemainshaft.Usetwoscrews(70‐00008)to
additionallyclampuptherotorhubontotheshaftasshown.
MakesurethedistancebetweentheballlinkandtheLlever
isequallyat24mm.Finallysnapontheballlinks(70‐00025)
ontheswashplate’supperdiscuni‐links(70‐00030).
Step2–Tailboom
Firstofallinstallthecenterbearings(70‐00100)withthe
holders(02‐02006)intothetailboom(70‐00095).Distribute
thebearingsevenlyinthetailboom.Itisrecommendedto
applyabitoflubrificantontothetubesinnersurface,
elsewisethebearingislikelytogetstuckbeforethecorrect
positionisreached.Theninstallthecentersupportring
(600UH1‐007),theservorodguides(70‐00040)andtheservo
twotailservoholders(70‐00098).Installthetailtorquetube
(70‐00096)intothetailtube.
Theninsertthetailboomintothetailboomholders(70‐
00093,70‐00094).LockthetubeinplacewithscrewM3x8
(70‐00086)viatheclampupandadditionallywithscrew
M3x6(70‐00053)asshown.Installthecarbonsupportbeams
(70‐00104‐70‐00106)onthemainframeandthetailboom
tailboomclamp(600UH1‐007).

Copyright@2014 - Roban Limited – All rights reserved
Step3–TailServoInstallation
Firstofall,mounttheholderframe(70‐00097)ontothe
boomholders(70‐00098)usingscrewM3x8.Thenmountthe
tailservoofyourchoiceintothetailframeusingscrews
M3x10,washersandnylonnutsasshown.Installtheservo
hornandthesupplieduniball.Thenslidethetailrotorcontrol
rod(70‐00103)intothefourguides.Installtheballlink(70‐)
onbothendsofthetailrotorcontrolrod.Distributethe
guidesevenlyalongthetailboom.Theninstallthetailrotor
frameontothetailboom.Lockitwiththethreescrewsas
shown,butdonotusethreadlockyet,asithasgottobe
uninstalledagain.Snaptheservocontrolrodontotheball
link.
Step4–CyclicServoInstallation
Installthethreecyclicservosontotheservotrayasshown.
Dependingonyourservos,youmayhavetousewashersto
adjusttheservototheproperinstallationheight.Itisstrongly
recommendedtousemetalservohornsandonlymetal
gearedservos.Themultibladerotorheadcanfeedback
forcesthatmayleadtofailureofplasticcomponents.
Aftertheservosareinstalled,youwillhavetoadjustthe
linkagerodslength’saccordingtotheschematicsbelow.The
distancesareuniballcentertouniballcenter:
1=81mm2=112mm3=81mm

Step5–Adjustswashplatelinkages
ThelinkagesfromtheL‐Leverstotheswashplatehavetobe
setatcorrectlength.Distancesareuniballcentertouniball
center:1=35mm
Step6–MotorandBeltinstallation
Inordertoinstallthemotor,youmustfirstdisassembleone
ofthesideframesinordertohaveaccesstothemounting
screwsandaccesstothebeltdrive.Henceonesideframes
fastenersarenottightenedupondelivery.Beforeinstalling
thepinionpulleyonthemotor,youhavetoaddaflattothe
motorshaftinordertosecurethepulleywiththesetscrews
(70‐).
Mountthemotorasshownusingwashersandscrewsonto
themotormount(70‐00066).Makesuretohavethemotor
wireoutletfacingintotherightdirectionforconnectingthem
totheESC.Theninsertthebeltpulleyintothebeltandslideit
ontothemotorshaft.Beforeyoutightenthesetscrews,
makesurethatthepinionisinstalledleveledwiththebelt
pulley,thedistance(Fig.1)isat24.5mm.
Usebothtensioningscrewstotensionthebeltdrive.Thebelt
mustn’tbetensionedtootighttoavoidunnecessarywear.
Afterinstallationofthemotor,reassemblethesideframes.
1

Step7–ElectricalWiringandSetup
Themechanicshavetobefullyelectricallysetupandadjusted
priortoinstallationintothefuselage.Astheuseofa12S
(44.4V)setupisnecessary,westronglyrecommendtorunthe
controlequipmentonaseparate2SLipobatteryandBECfor
securityreasons.
Inscaleconfigurationsmainbatterypowerwiresmaybe
longerthanoncomparable3Dhelicopterequipment.AsHV
ESCsdonotnecessarilyhavethemainbatterygroundwire
connectedtotheservosignalgroundwire,itmaybe
necessarytocreateanadditionalconnectionbetweenthe
BEC2Sbatteriesgroundwireandthe12Smainbattery
groundwire.Certainconfigurationswithoutthisground
interconnectionhaveledtoalossofsignalattheESCfrom
thereceiverduetoEMCeffects.
Theswashplateisaregular120degCCPMtype,pleasetake
yourtimetoadjustallservotravels,centerpositions–the
entire3axisgyro–servo–radiosetuppriortothe
installationintothefuselage.
A450KVmotorsuchastheAlign750MXrunatapp.80%
throttle(hover)showssatisfyingresults.Asspaceislimited,
pleasemakesureyoucheckthedimensionsifyouintendto
useotherbrandmotors.
Inregardstothegyrosetup,werecommendtostartwith
standardvaluesofthe3axisgyro.Makesureyouinstallthe
gyroinawaythatprovideseasyaccessforconnectingyour
programmingequipment.Asthescalefuselageadds
additionalinertiatoeachaxis,gyrosarenormallytobesetat
alowergyrogain.Allinall,arigidgyroresponsedoesruinthe
scalelookinflight.
Beforeoperatingthemodelcheckthefollowingpoints:
‐Thedirectionofservorotation(includingthethrottle
function)andtravels.
‐Thedirectionofeffectofthegyro,andthetransmittermixer
functionsyouhaveprogrammed.
‐Collectivepitchtravel(lineartravel‐2/‐3°to+9/+10°)
ATTENTION!
WhenusingtheapitchgaugetoadjustcorrectCPtravels,
makesurethatthegaugelinesupwiththeflatsurfaceofthe
rotorblade.Manypitchgaugesdonotshowthecorrectangle
whensnappedontounsymmetricrotorblades!
Themainrotorbladesarenotsymmetrical.Donottrytofly
inverted.
‐Itispermissibletoreduceservotravels,butnotbelow60%
(inthiscaseadjustthemechanicallinkage);travelsshouldbe
primarilysymmetrical.
‐Applycollectivepitchmin./collectivepitchmax.andfullroll
andpitch‐axiscommandssimultaneouslyin
alldirections;rotatetherotorheadatthesametime,and
checkthatattheextremesoftravelnopartoftherotor
headisobstructed.
‐Theauto‐rotationswitchmustbeassigned,andwithineasy
reach!
‐Whenauto‐rotationisselected:throttlepositiontooff,all
directionsofcontrolandtravelsasinnormal
flight,tailrotorto0°=fixedvalue.
‐Thefirstfewbatteriesshouldbeflownwiththemodelclose
totheground,i.e.nomorethanabout1m
altitude,untilyouareconfidentthattherearenodefectsor
errors,andthateverythingisworkingfaultlessly:
‐Useyourearscritically(!),listeningforunusualsoundsand
vibration,andseekouttheproblemifyouareinanydoubtat
all!
‐Don’tlistentoanyonestandingclosebyiftheytrytohurry
youintoflyingthemodel.
‐Avoidhoveringoutsidegroundeffect(hoveraltitudewitha
model:approx.1m,orhalftherotordiscdiameter):
‐Hoveringrequiresveryhighpower,andyouarecompletely
dependentonthemotor:incontrasttomostfull‐size
helicopters,modelhelicoptershaveonlyone(!)powerplant.

Step8–Installationofmechanics
MountthefourL‐brackets(60UH1‐003)ontobothsidesof
themainframeasshown.Makesuretheyareproperly
alignedbeforeyoufastenthescrews.
Unmounttheentiretailrotorframefromthetailboxagain.
Dismantlethemainrotorbladesifyouinstalledthemduring
thesetup.
Installthemechanicsbyslidingthemintothefuselageas
shown.
Theaftgearboxmustappearinthetailboomhatch.
Mounttheshorttailtubeandthetailrotorasshowninside
thetail.
18

SliptheEVAtaildampenerunitontothetailboom.Inorder
toinstallit,slotitwithaknife.
Installthetailservopushrodsinsidethetailfuselageas
shown.
Nowinstallthemechanicswith41and42screwsintothe
fuselage.
Installtheafttopcoverasshown.

Step9–ScaleFittings

Copyright@2014 - Roban Limited – All rights reserved
This manual suits for next models
1
Table of contents
Other Roban Toy manuals

Roban
Roban Apache AH-64D User manual

Roban
Roban B-25J Mitchell User manual

Roban
Roban Bell 407 User manual

Roban
Roban Bell AH-1W Compactor User manual

Roban
Roban AS350 b3 User manual

Roban
Roban A-10 Thunderbolt II User manual

Roban
Roban 600 scale fuselage User manual

Roban
Roban MD500D User manual

Roban
Roban Bell 429 Compactor User manual

Roban
Roban Airwolf Compactor User manual