manuals.online logo
Brands
  1. Home
  2. •
  3. Brands
  4. •
  5. ROBOTIQ
  6. •
  7. Robotics
  8. •
  9. ROBOTIQ Wrist Camera User manual

ROBOTIQ Wrist Camera User manual

1.WHAT IS SUPPLIED?
Standard upon delivery of a Wrist Camera kit
for Universal Robots:
(RWC-CAM-001)
(RWC-TOOL-062)
(ACC-CALIB-BOARD)
(ACC-TEACH-BACK)
(ACC-USB-4-HUB)
(ACC-USB-DONGLE)
(ACC-USB-16G)
Wrist Camera
Tool plate
Calibration board
Color background
4-port USB hub splitter
USB license dongle
16 Gb USB stick
Necessary hardware
6.SOFTWARE INSTALLATION
5.WIRING
4.MOUNTING
Visit support.robotiq.com
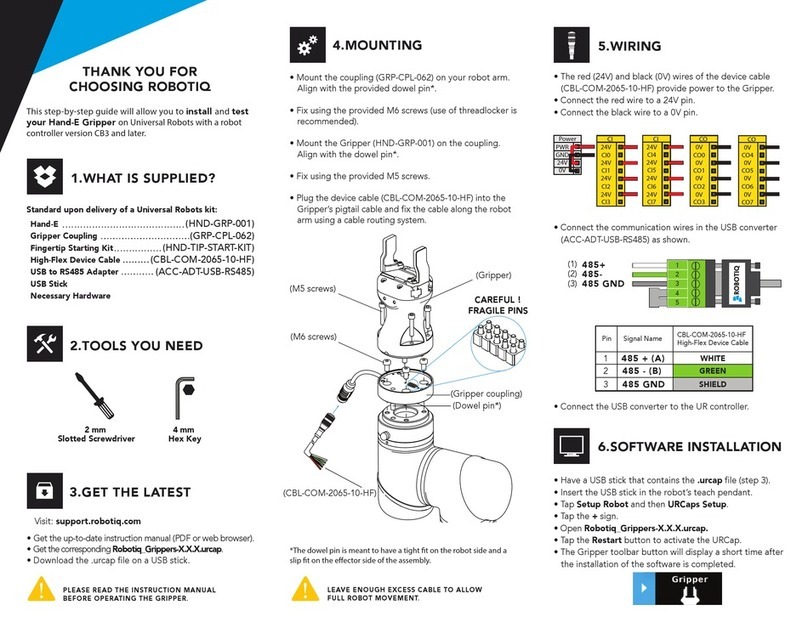
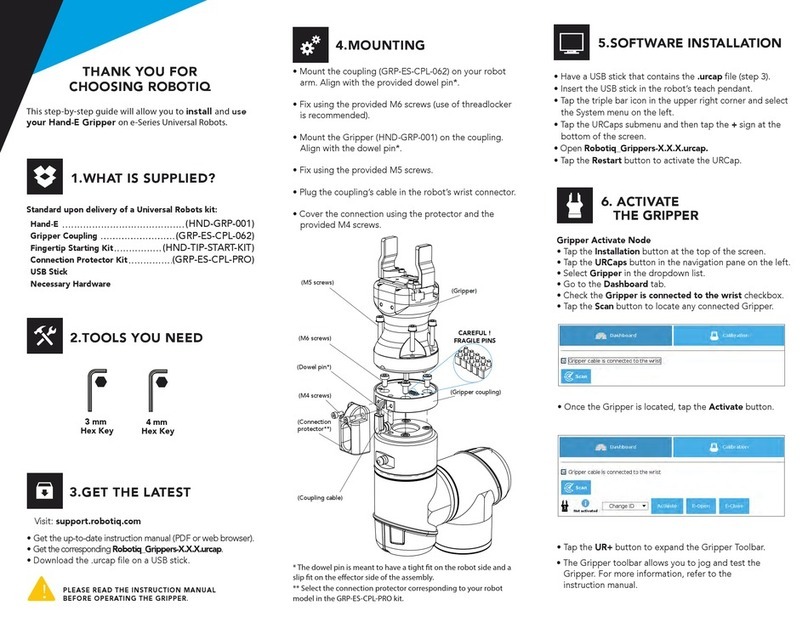
This step-by-step guide will allow you to install and
test your Wrist Camera on a UR3, UR5 or UR10
Universal Robots with an e-Series controller.
3.GET THE LATEST
• Download and uncompress the content of the
corresponding UCC-X.X.X version directly on the
provided 16 Gb USB stick (ACC-USB-16G).
• Get the latest instruction manual.
• Have the 16 Gb USB stick (ACC-USB-16G) at hand that
contains the UCC-X.X.X uncompressed content (see step 3).
• With the controller on, insert the 16 Gb USB stick in the
4-port USB hub.
• On the teach pendant, tap the triple bar icon in the
upper right corner of the teach pendant and select the
System menu in the left pane.
• Tap the URCaps submenu and then tap the +sign at
the bottom of the screen.
• Open Robotiq_Wrist_Camera-X.X.X.urcap from
the USB stick. Tap the Restart button.
• When PolyScope reopens, tap the Installation button.
• Select the URCaps menu in the left pane and tap the
Camera button.
• Go to the Dashboard to verify the system status and
tap the Install button.
• Wait for the vision server to be installed and for the
vision system to start.
• Connect the red wire of the device cable to a 24V pin of
the robot controller.
• Connect the black wire of the device cable to a 0V pin
of the robot controller.
• Connect the 4 ports USB hub (ACC-USB-4-HUB) to the
robot controller.
• Connect the Wrist Camera’s USB cable in the USB hub.
• Connect the USB license dongle (ACC-USB-DONGLE)
in the USB hub.
• Place the Wrist Camera (RWC-CAM-001) on the robot
arm. Align the dowel pin.
THANK YOU FOR
CHOOSING ROBOTIQ
!
!
DO NOT REMOVE THE 16 GB USB STICK
AND THE USB LICENSE DONGLE, EVEN AFTER
THE INSTALLATION HAS BEEN COMPLETED.
Option 1 :
(Screws provided)
Option 2 :
(Screws not provided)
LEAVE ENOUGH EXCESS CABLE
TO ALLOW FULL ROBOT
MOVEMENT.
Option 1 :
• Fix the camera on the
robot arm using the
provided M6 X 12mm
(RWC-UR) screws and
lock washers.
• Mount the gripper
directly on the Wrist
Camera using the
provided M5 X 35mm
(CPL-C3-B) screws and
lock washers.
Option 2 :
• Place the tool plate
(RWC-TOOL-062) on
the camera. Align the
dowel pin.
• Fix the end effector on
the robot arm, through
the tool plate and the
camera, using M6
screws. The use of a
dowel pin for alignment
is recommended.
2 mm
Slotted Screwdriver
2.TOOLS YOU’ll NEED
4 mm
Hex Key
Power
PWR
GND
24V
0V
24V
CI0
24V
CI1
CI3
24V
CI2
24V
CI
24V
CI4
24V
CI5
CI7
24V
CI6
24V
CI
0V
CO0
0V
CO1
CO3
0V
CO2
0V
CO
0V
CO4
0V
CO5
CO7
0V
CO6
0V
CO
[email protected]
T: 1.418.380.2788 option 3
October 2018
V1.0
WRIST CAMERA
QUICK START GUIDE
support.robotiq.com
New product has a 1 year warranty from the above date.
Refer to your product instruction manual for details.
7. TEST WRIST CAMERA
8. SNAPSHOT POSITION
• Tap the Installation button and select the URCaps
menu in the left pane.
• Select Camera and
go to the Dashboard to verify that the
system is running.
• Go to the Camera tab.
•The output image from the camera will display.
9. TEACH OBJECT
• Tap the Program button.
• Select the URCaps menu in the left pane.
• Tap the Cam Locate button.
• Select the Cam Locate node in the program tree and
tap the Teach object button in the Command tab
to launch the object teaching wizard.
• You will need to select the previously taught
snapshot position.
Visit support.robotiq.com to get the latest
instruction manual and further information
on how to program with the Wrist Camera.
Where automation Pros share
their know-how and get answers.
dof.robotiq.com
• Tap the
Installation
button.
• Select the
Features
menu in the left pane.
• Define a new point and rename it if applicable.
• Set the point at any position in the robot’s workspace.
• Tap the URCaps menu in the left pane and select
Camera.
• Go to the
Snapshot
tab.
• Select the new point in the dropdown menu and tap
Define
to launch the Snapshot position wizard.
For installation on
e-Series
Universal Robots
For help with troubleshooting,
visit support.robotiq.com.

Other manuals for Wrist Camera

2

Other ROBOTIQ Robotics manuals

ROBOTIQ 2F-85 User manual

ROBOTIQ

ROBOTIQ 2F-85 User manual

ROBOTIQ PALLETIZING SOLUTION User manual

ROBOTIQ

ROBOTIQ PALLETIZING SOLUTION User manual

ROBOTIQ HAND-E User manual

ROBOTIQ

ROBOTIQ HAND-E User manual

ROBOTIQ HAND-E User manual

ROBOTIQ

ROBOTIQ HAND-E User manual

ROBOTIQ HAND-E User manual

ROBOTIQ

ROBOTIQ HAND-E User manual

ROBOTIQ AirPick User manual

ROBOTIQ

ROBOTIQ AirPick User manual

ROBOTIQ HAND-E Series User manual

ROBOTIQ

ROBOTIQ HAND-E Series User manual

ROBOTIQ Wrist Camera User manual

ROBOTIQ

ROBOTIQ Wrist Camera User manual

ROBOTIQ EPick Operation and maintenance manual

ROBOTIQ

ROBOTIQ EPick Operation and maintenance manual

ROBOTIQ HAND-E User manual

ROBOTIQ

ROBOTIQ HAND-E User manual

ROBOTIQ ETF-CB-UR-KIT User manual

ROBOTIQ

ROBOTIQ ETF-CB-UR-KIT User manual

ROBOTIQ CNC Machine Tending Kit User manual

ROBOTIQ

ROBOTIQ CNC Machine Tending Kit User manual

ROBOTIQ AirPick Vacuum Gripper User manual

ROBOTIQ

ROBOTIQ AirPick Vacuum Gripper User manual

ROBOTIQ AirPick User manual

ROBOTIQ

ROBOTIQ AirPick User manual

ROBOTIQ AirPick Vacuum Gripper User manual

ROBOTIQ

ROBOTIQ AirPick Vacuum Gripper User manual

ROBOTIQ CB Series User manual

ROBOTIQ

ROBOTIQ CB Series User manual

ROBOTIQ HAND-E Operation and maintenance manual

ROBOTIQ

ROBOTIQ HAND-E Operation and maintenance manual

ROBOTIQ 56854B User manual

ROBOTIQ

ROBOTIQ 56854B User manual

ROBOTIQ AirPick User manual

ROBOTIQ

ROBOTIQ AirPick User manual

ROBOTIQ 2F-85 User manual

ROBOTIQ

ROBOTIQ 2F-85 User manual

ROBOTIQ HAND-E User manual

ROBOTIQ

ROBOTIQ HAND-E User manual

ROBOTIQ POWERPICK20 Operation and maintenance manual

ROBOTIQ

ROBOTIQ POWERPICK20 Operation and maintenance manual

ROBOTIQ EPick User manual

ROBOTIQ

ROBOTIQ EPick User manual

ROBOTIQ PE20 User manual

ROBOTIQ

ROBOTIQ PE20 User manual

Popular Robotics manuals by other brands

ROBORISEN EDU Series Manual book

ROBORISEN

ROBORISEN EDU Series Manual book

Dobot CR 10 Hardware user's guide

Dobot

Dobot CR 10 Hardware user's guide

YahBoom 6000200062 USE PRECAUTIONS

YahBoom

YahBoom 6000200062 USE PRECAUTIONS

Pioneer Module Mobile manual

Pioneer

Pioneer Module Mobile manual

Pai Technology Botzee mini instruction manual

Pai Technology

Pai Technology Botzee mini instruction manual

ROSCAMAT 200 Operator's manual

ROSCAMAT

ROSCAMAT 200 Operator's manual

4M SMART ROBOT manual

4M

4M SMART ROBOT manual

MISUMI RS1 user manual

MISUMI

MISUMI RS1 user manual

Nepes NM500 user manual

Nepes

Nepes NM500 user manual

EFORT ECR5 user manual

EFORT

EFORT ECR5 user manual

SIASUN GCR20-1100 user manual

SIASUN

SIASUN GCR20-1100 user manual

YASKAWA YRC1000micro Startup guide

YASKAWA

YASKAWA YRC1000micro Startup guide

Blaupunkt XSMART user manual

Blaupunkt

Blaupunkt XSMART user manual

Kuka KR C2 operating instructions

Kuka

Kuka KR C2 operating instructions

MIR MiR1000 operating guide

MIR

MIR MiR1000 operating guide

XPROHELI Silk quick start guide

XPROHELI

XPROHELI Silk quick start guide

dji RoboMaster LI01 user guide

dji

dji RoboMaster LI01 user guide

ECOVACS Winbot 7 series instruction manual

ECOVACS

ECOVACS Winbot 7 series instruction manual

manuals.online logo
manuals.online logoBrands
  • About & Mission
  • Contact us
  • Privacy Policy
  • Terms and Conditions

Copyright 2025 Manuals.Online. All Rights Reserved.