ROHO Hybrid Elite User manual

ROHO®Hybrid Elite®Cushion
Operation Manual
shape fitting technology®
Supplier: This manual must be given to the user of this product.
Operator (Individual or Caregiver): Before using this product, read the instructions and save for future reference.

Manufactured by ROHO, Inc.
100 N. Florida Ave., Belleville, IL 62221-5429 U.S.A.
ROHO.com
© 2009, 2015 ROHO, Inc.
The following are trademarks and registered trademarks of ROHO, Inc.: ROHO®, DRY FLOATATION®,
shape fitting technology®, and Hybrid Elite®.
Products in this manual may be covered by one or more U.S. and foreign patents. For further
details, please refer to ROHO.com.
ROHO, Inc. has a policy of continual product improvement and reserves the right to amend
specifications presented in this document. A current version of this document is available at
ROHO.com.
Intended Use 2
Warnings and Cautions 2-3
Parts Detail 3
Product Specifications 3-4
Cushion Adjustment 5
Cover Removal and Replacement 6
Cushion Insert Removal and Replacement 6
Cleaning and Disinfecting 7-8
Troubleshooting, Disposal and Limited Warranty 8
Español 9
Français 17
Deutsch 25
Italiano 33
Nederlands 41
Dansk 49
Svenska 57
Norsk 65
Suomi 73
Português 81
Table of Contents

2
ROHO Hybrid Elite Cushion Operation Manual
Intended Use
The ROHO®Hybrid Elite®Cushion (Hybrid Elite Cushion) is an adjustable, air-filled, wheelchair
support surface combining a ROHO DRY FLOATATION®cellular design cushion insert with
a contoured foam base and is intended to conform to an individual’s seated shape in the
pelvic loading area to provide skin/soft tissue protection, positioning, and an environment to
facilitate wound healing. There is a weight limit of 500 lbs. (225 kg), and the cushion must
be properly sized to the individual. The Hybrid Elite Cushion must be used with the supplied
cover. Cushion models include:
• ROHO® Hybrid Elite®Single Compartment Cushion (Hybrid Elite Single Compartment
Cushion)
• ROHO® Hybrid Elite® Dual Compartment Cushion (Hybrid Elite Dual Compartment Cushion)
ROHO, Inc. recommends evaluation by a clinician who is experienced in seating, positioning
and mobility: 1) to determine whether the cushion is appropriate for the individual; and 2) to
determine whether a solid seat platform is recommended if using the cushion on a sling-seat
wheelchair.
ROHO medical products are intended to be part of an overall care regimen. ROHO, Inc.
recommends that a clinician make product recommendations based upon an evaluation of the
individual’s medical and therapeutic needs and overall condition.
Warnings
• Skin/soft tissue breakdown can occur due to a number of factors, which vary by
individual. Check skin frequently, at least once a day. Redness, bruising, or darker
areas (when compared to normal skin) may indicate the beginning of soft tissue
breakdown and may need to be addressed. If there is any discoloration to skin/soft
tissue, STOP USE immediately. If the discoloration does not disappear within 30 minutes
after disuse, immediately consult a healthcare professional.
• The cushion and the cover MUST be compatible sizes and MUST be used as directed in
this manual. IF THEY ARE NOT: 1) The benefits provided by the cushion may be reduced
or eliminated, increasing the risk to skin or to other soft tissue, and 2) the individual
may become unstable and vulnerable to falling.
• DO NOT use your cushion on top of, or in conjunction with, any other products or
materials, except as indicated in this manual. Doing so may cause the individual to
become unstable and vulnerable to falling.
• DO NOT use the components of this product separately.
• DO NOT use this cushion as a water flotation device (e.g. a Life Preserver). It will NOT
support you in water.
• If you are unable to perform any tasks described in this manual, seek assistance.
Cautions
• DO NOT use a pump, cover, or a repair kit other than those provided by ROHO, Inc. Doing so
may void your product’s warranty.
• DO NOT modify the cushion or any components. Doing so may result in damage to the
product and will void the warranty.
• DO NOT allow your cushion to come into contact with oil-based lotions or lanolin. They may
degrade the material.

3
ROHO Hybrid Elite Cushion Operation Manual
Cautions, Continued
• Prolonged exposure to ozone may degrade materials used in the cushion, affect the
performance of the cushion, and void the product warranty.
• Changes in altitude may require adjustment to your cushion.
• Keep the cushion away from sharp objects.
• DO NOT expose the product to high heat, open flames, or hot ashes.
• If the cushion has been in temperatures lower than 32º F (0º C) and exhibits unusual
stiffness, allow the cushion to warm to room temperature.
• DO NOT use the inflation valve as a handle for carrying or pulling the cushion. Carry the
cushion by the cushion base or by the carrying handle on the cover.
Parts Detail
Operation
Manual
Repair Kit
Hand Pump
Product Registration Card
Cushion Insert
Contoured Foam Base
Cover
Inflation Tube(s)
Inflation Valve(s)
Package Contents:
Product Specifications
Materials: Cushion Insert: neoprene rubber; made without latex; Inflation Valve: nickel-plated
brass; Contoured Foam Base: polyethylene closed cell foam; Standard Cover: two-way stretch,
spacer fabric sides, with a zipper located in the back of the cover; and a non-skid bottom with
hook and loop fasteners to help secure the cushion in the chair; Heavy Duty Cover: two-way
stretch, fluid-resistant top and sides, with a zipper located in the front of the cover; and a
non-skid bottom with hook and loop fasteners to help secure the cushion in the chair. Refer to
cover care label for material content.
Zipper
Valve Openings
Carrying
Handle

4
ROHO Hybrid Elite Cushion Operation Manual
Sizing Table
Cushion Foam Base
Single Valve Dual Valve Width (in.) Depth* (in.) Width (cm) Depth* (cm)
1RHY1414C 2RHY1414C 13¾ 14¾ 35.0 37.5
1RHY1415C 2RHY1415C 13¾ 15¾ 35.0 40.0
1RHY1416C 2RHY1416C 13¾ 16¾ 35.0 43.0
1RHY1515C 2RHY1515C 14¾ 15¾ 37.5 40.0
1RHY1516C 2RHY1516C 14¾ 16¾ 37.5 43.0
1RHY1517C 2RHY1517C 14¾ 17¾ 37.5 45.0
1RHY1615C 2RHY1615C 15¾ 15¾ 40.0 40.0
1RHY1616C 2RHY1616C 15¾ 16¾ 40.0 43.0
1RHY1617C 2RHY1617C 15¾ 17¾ 40.0 45.0
1RHY1618C 2RHY1618C 15¾ 18¾ 40.0 48.0
1RHY1620C 2RHY1620C 15¾ 20¾ 40.0 53.0
1RHY1716C 2RHY1716C 16¾ 16¾ 43.0 43.0
1RHY1717C 2RHY1717C 16¾ 17¾ 43.0 45.0
1RHY1718C 2RHY1718C 16¾ 18¾ 43.0 48.0
1RHY1816C 2RHY1816C 17¾ 16¾ 45.0 43.0
1RHY1817C 2RHY1817C 17¾ 17¾ 45.0 45.0
1RHY1818C 2RHY1818C 17¾ 18¾ 45.0 48.0
1RHY1820C 2RHY1820C 17¾ 20¾ 45.0 53.0
1RHY2017C 2RHY2017C 19¾ 17¾ 50.0 45.0
1RHY2018C 2RHY2018C 19¾ 20¾ 50.0 48.0
1RHY2020C 2RHY2020C 19¾ 20¾ 50.0 53.0
1RHY2218C 2RHY2218C 21¾ 18¾ 55.5 48.0
1RHY2220C 2RHY2220C 21¾ 20¾ 55.5 53.0
1RHY2418C 2RHY2418C 23¾ 18¾ 60.5 48.0
1RHY2420C 2RHY2420C 23¾ 20¾ 60.5 53.0
Weight: 3¼ lbs. / 1.4 kg (based on 1RHY1817C)
Height: 4 in. / 10.0 cm
*Depths shown include ¾in. (1.5 cm) of foam base
that fits between wheelchair back posts.
Note: All measurements are approximate. Width and
depth measurements are taken from the top of the
foam base and are rounded to the nearest ¼in. or .5
cm. Cushion item numbers and cover tags indicate the
wheelchair size the cushion is designed to fit.
W
D

5
ROHO Hybrid Elite Cushion Operation Manual
1. Place the cushion in the wheelchair with the air cells
facing up and the non-skid surface of the cover facing
down.
2. Slide the rubber nozzle of the
hand pump over the inflation
valve. Pinch the nozzle, open the
inflation valve, and inflate the
air cells.
3. When the air cells begin to arch
slightly, pinch the rubber nozzle
of the hand pump and close
the inflation valve completely.
Remove the hand pump.
4. The individual should sit in the chair in their usual
position. Confirm that the boniest prominences are
supported by the air cells.
5. Slide your hand between the air cells and the
individual. Lift the leg slightly and feel for the lowest
bony prominence, and then lower the leg to a sitting
position.
6. Open the valve to remove air, keeping your hand
beneath the individual’s lowest bony prominence.
Release air until you are barely able to move your
fingertips. Close the valve.
Cushion Adjustment
Important Safety Information
• Check inflation frequently, at least once a day!
• DO NOT use an under-inflated cushion or an over-inflated cushion because the
product benefits will be reduced or eliminated, resulting in an increased risk to
skin and other soft tissue. If the cushion does not appear to be holding air, or if
you are not able to inflate or deflate the cushion, see TroubleshooTing. Immediately
contact your clinical caregiver, distributor, or ROHO, Inc. if the problem persists.
• When possible, use the hook or loop fasteners to further secure the cushion to
the seating surface.
• The cover is not shown. The cushion must be used with the provided cover.
Open
Close
The seated
figure shows
product
orientation.
Note: For two-valve cushions, repeat all steps for both valves.
½" - 1" (1.5 cm - 2.5 cm)
recommended distance
between the individual and
the seating surface
=

6
ROHO Hybrid Elite Cushion Operation Manual
Cover Removal and Replacement
Cover Removal:
1. Unzip the cover.
2. Remove the cover from the cushion.
Cover Replacement:
1. Unzip the cover.
2. Insert the cushion into the cover, front edge first. The air cells should face up and the
non-skid surface of the cover should face down.
3. Reach inside the cover and push the inflation valve(s) through the valve opening(s) in
the cover.
4. Zip the cover.
5. If the hook fastener strips were removed prior to washing, replace the strips.
Cushion Insert Removal and Replacement
Cushion Insert Removal:
1. Unzip the cover.
2. Slide the inflation tube out through the hole in the foam base corner. For a two-valve
cushion, repeat for the other side.
3. Remove the air insert from the contoured foam base.
Cushion Insert Replacement:
1. Line up the hook and loop fastener strips and refer to the directional labels to
correctly place the air insert onto the foam base. Press to attach securely.
2. Insert the inflation tube through the hole in the foam base corner. For a two-valve
cushion, repeat for the other side.
3. Press the inflation tube(s) into the groove(s) in the foam base. The inflation valve(s)
should face the front of the cushion.
Inspect the cover for damage and replace if necessary.
Inspect the foam portion of the product for damage and replace if necessary.

7
ROHO Hybrid Elite Cushion Operation Manual
Cleaning and Disinfecting
Cleaning and disinfecting are separate processes. Cleaning must precede
disinfection. Before use by a different individual: clean, disinfect, and check
product for proper functioning.
Cover Care: Before cleaning and disinfecting, remove the cover from the cushion.
Remove the hook fastener pieces from bottom of the cover.
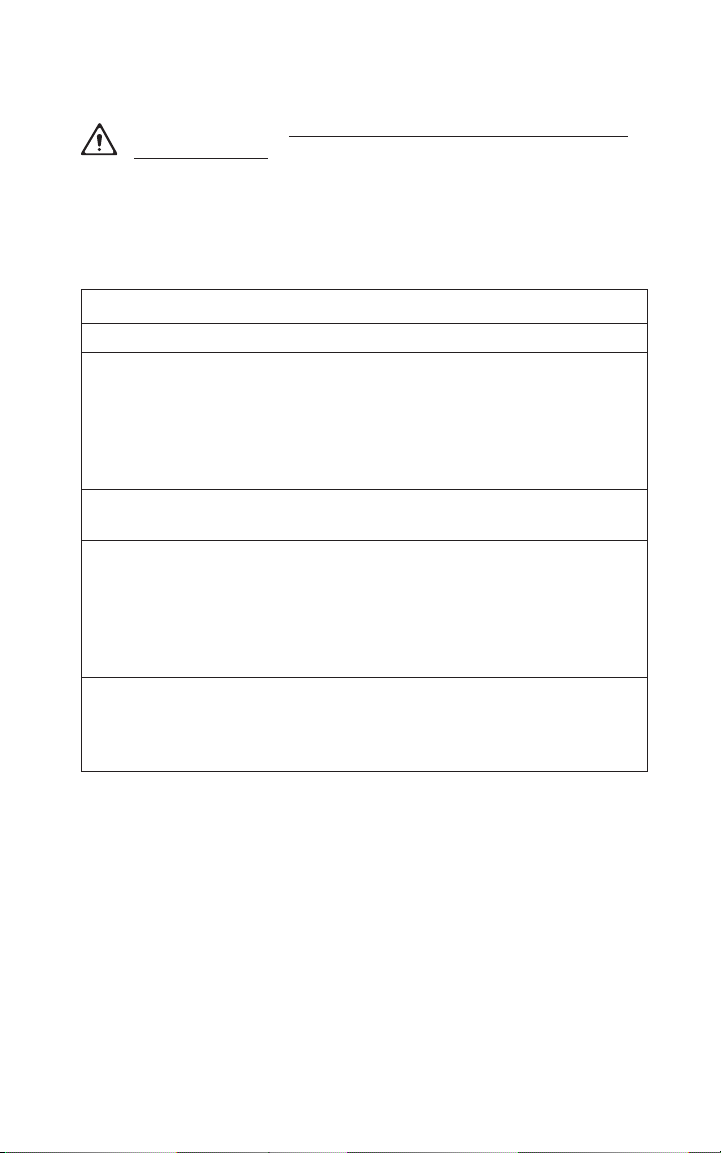
To Clean the Cover: Machine wash in cold water (30°C) with mild
detergent, gentle cycle, or wipe clean with neutral detergent and
cold water. Tumble dry low.
To Disinfect the Cover: Hand wash in cold water (30°C) using 1
part household liquid bleach per 9 parts water. Keep the product
wet with the bleach solution for 10 minutes, and then rinse
thoroughly. Or machine wash in hot water (60°C). Tumble dry low.
Follow the safety guidelines on the bleach container.
Cushion Care Cautions: Valve(s) must be closed. • DO NOT allow water or
cleaning solution to enter the cushion overlay. • DO NOT machine wash or machine
dry the cushion insert or the contoured foam base. • Use of the following may cause
damage to the cushion: abrasives (steel wool, scouring pads); caustic, automatic
dishwasher detergents; cleaning products that contain petroleum or organic solvents,
including acetone, toluene, Methyl Ethyl Ketone (MEK), naphtha, dry cleaning fluid,
adhesive remover; oil-based lotions, lanolin, or phenolic-based disinfectants; ozone
gas; ultraviolet light cleaning methods.
To Clean the Cushion Insert: Carefully remove the cushion insert from the contoured
foam base. Close the inflation valve(s). Hand wash, using mild liquid hand soap, hand
dishwashing liquid, laundry detergent, or a multipurpose detergent (Follow product
label instructions.) Gently scrub all cushion surfaces, using a soft plastic bristle brush,
a sponge or a cloth. Rinse with clean water. Air dry. DO NOT expose to direct sunlight.
To Disinfect the Cushion Insert: Repeat cleaning instructions, using 1 part household
liquid bleach per 9 parts water. Keep the product wet with the bleach solution for 10
minutes. Rinse thoroughly with clean water. Air dry.
Follow the safety guidelines on the bleach container.
To Clean the Contoured Foam Base: Remove the cover. Wipe gently with a cloth
dampened with water and a household detergent. Rinse cloth and re-wipe.
Allow foam to air dry thoroughly before putting the cover on.
This symbol means, “Wipe with a damp cloth.”
Disinfectants are not effective on porous surfaces such as foam. If the foam
portion of the product becomes soiled or contaminated, DO NOT use with
multiple individuals. Replace soiled or contaminated foam components.
Note: Most germicidal disinfectants are safe if used following the disinfectant
manufacturer’s dilution directions.
30C
30C
1:9
+

8
ROHO Hybrid Elite Cushion Operation Manual
Note About Sterilization: High temperatures accelerate aging and will damage
the product assembly. ROHO products are not packaged in a sterile condition,
nor are they intended or required to be sterilized prior to use. If institution
protocol demands sterilization: First, follow the cleaning and disinfecting
instructions; then, open the inflation valve and use the lowest possible
sterilizing temperature, but not to exceed 60°C (158°F), for the shortest time
possible. DO NOT autoclave.
Cleaning and Disinfecting, Continued
Disposal
The components of the products in this manual are associated with no known
environmental hazards when properly used and when disposed of in accordance with all
local/regional regulations. Incineration must be performed by a qualified, licensed waste
management facility.
Limited Warranty
Limited Warranty Term: 24 months from the date the product was originally purchased.
The warranty does not apply to punctures, tears or burns, nor does it apply to the removable
cover. See also the ROHO Limited Warranty supplement provided with your product, or
contact Customer Care.
Troubleshooting
For additional assistance, contact your clinical caregiver, distributor, or ROHO, Inc.
Not Holding Air - Inspect for inflation valve and hose damage. Confirm that the
inflation valve(s) are completely closed (turn clockwise). Look for holes in the cushion.
If very small holes or no holes are visible, follow the instructions in the Repair Kit
provided with your product. For inflation valve or hose damage, or for large holes or
leaks in the cushion, see the ROHO Limited Warranty supplement, or contact Customer
Care.
Not Able To Inflate or Deflate Cushion - Confirm that the inflation valve(s) are open.
Inspect the inflation valve(s) and hose(s) for damage.
Uncomfortable / Unstable - Confirm that:
- the air cells are not over-inflated (See Cushion Adjustment.)
- the air cells and the top of the cover are facing up.
- the cushion is centered beneath the individual.
- the cushion is properly sized to the individual and the wheelchair.
Allow the individual at least one hour to adjust to the cushion.
The Cushion Slides on the Wheelchair - Make sure the non-skid bottom of the
cushion cover is facing down. Use directional labels on the cushion and on the cover
to orient the cushion. Use hook and loop fasteners to further secure the cushion to the
wheelchair.

Item #: T20192
Rev Date: 28/10/19
Print Date: Qty:
Mailing/Shipping Address:
1501 South 74th Street, Belleville, IL 62223-5900 USA
Administrative Offices:
100 N. Florida Avenue, Belleville, IL 62221-5429 USA
U.S.: 800-851-3449 • Fax 888-551-3449
Outside the U.S.: 618-277-9150 • Fax 618-277-6518
ROHO.com
Table of contents
Other ROHO Wheelchair manuals

ROHO
ROHO DRY FLOATATION User manual

ROHO
ROHO AGILITY User manual

ROHO
ROHO AGILITY AG-LATSA-M-FL User manual

ROHO
ROHO JetStream Pro User manual

ROHO
ROHO MOSAIC CUSHION User manual

ROHO
ROHO MID PROFILE User manual

ROHO
ROHO AirLITE User manual

ROHO
ROHO Cushion Guide

ROHO
ROHO AirLITE User manual

ROHO
ROHO AGILITY User manual